Network Address Translation (NAT) for Firepower Threat Defense

The following topics explain Network Address Translation (NAT) and how to configure it on Firepower Threat Defense devices.

Why Use NAT?

Each computer and device within an IP network is assigned a unique IP address that identifies the host. Because of a shortage of public IPv4 addresses, most of these IP addresses are private, not routable anywhere outside of the private company network. RFC 1918 defines the private IP addresses you can use internally that should not be advertised:

  • 10.0.0.0 through 10.255.255.255

  • 172.16.0.0 through 172.31.255.255

  • 192.168.0.0 through 192.168.255.255

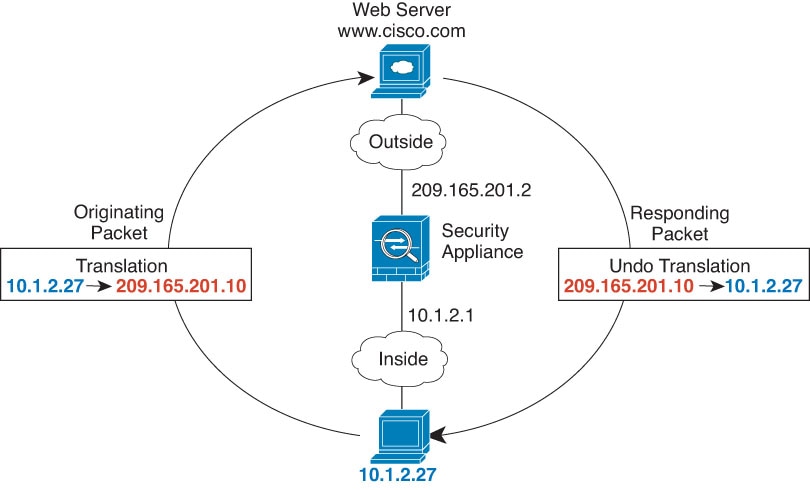
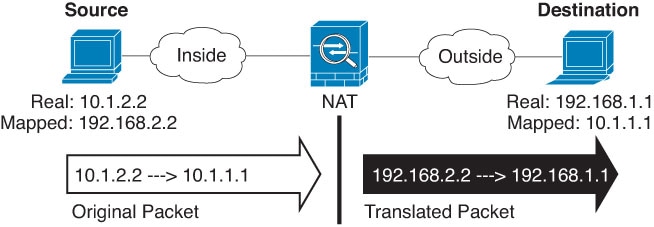
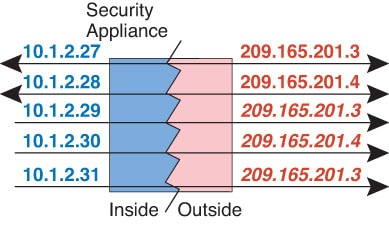
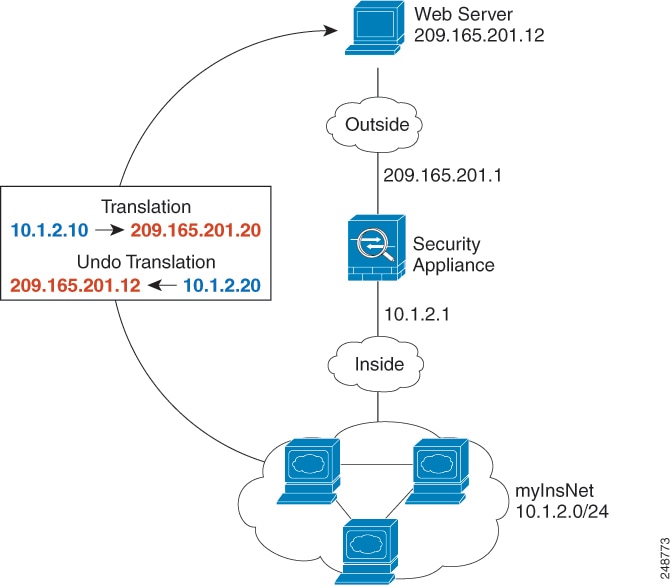
One of the main functions of NAT is to enable private IP networks to connect to the Internet. NAT replaces a private IP address with a public IP address, translating the private addresses in the internal private network into legal, routable addresses that can be used on the public Internet. In this way, NAT conserves public addresses because it can be configured to advertise at a minimum only one public address for the entire network to the outside world.

Other functions of NAT include:

  • Security—Keeping internal IP addresses hidden discourages direct attacks.

  • IP routing solutions—Overlapping IP addresses are not a problem when you use NAT.

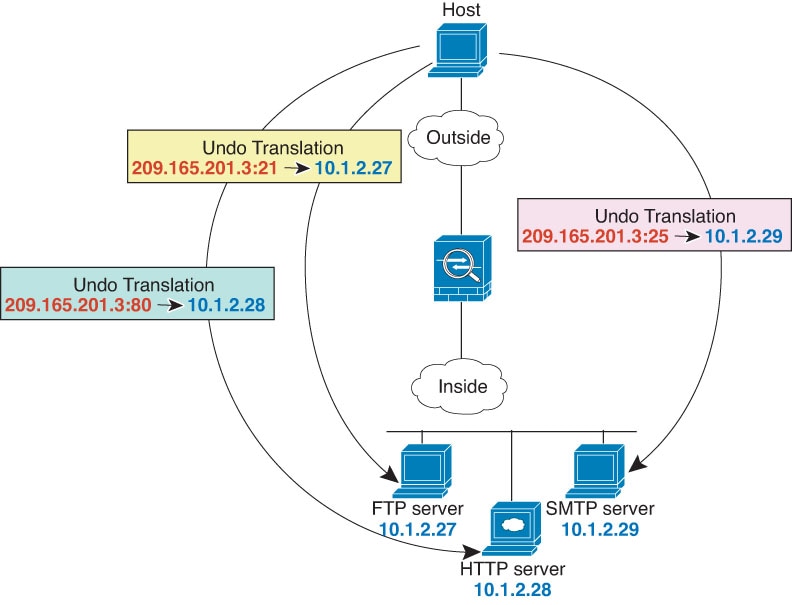
  • Flexibility—You can change internal IP addressing schemes without affecting the public addresses available externally; for example, for a server accessible to the Internet, you can maintain a fixed IP address for Internet use, but internally, you can change the server address.

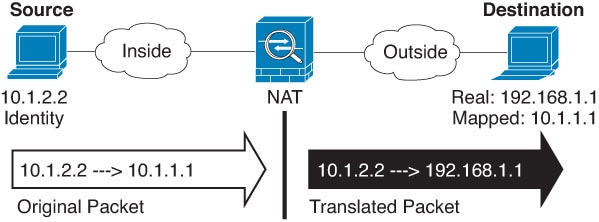
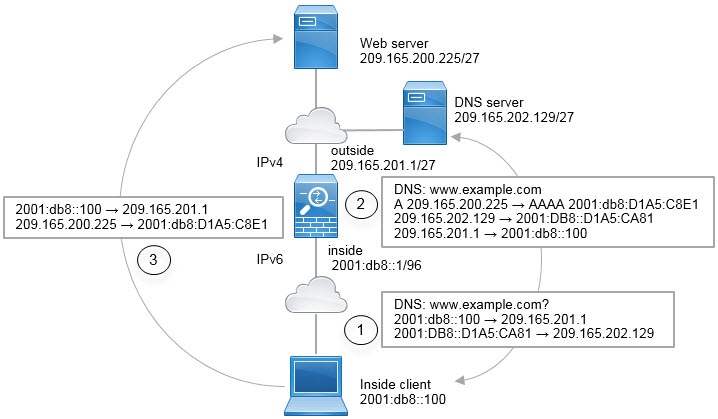
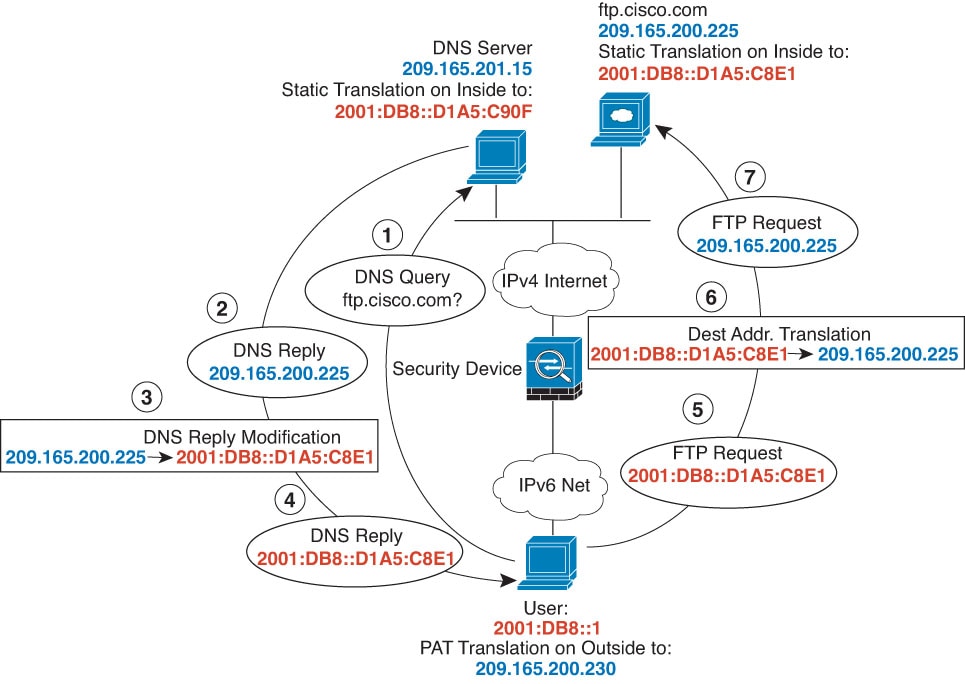
  • Translating between IPv4 and IPv6 (Routed mode only) —If you want to connect an IPv6 network to an IPv4 network, NAT lets you translate between the two types of addresses.


Note


NAT is not required. If you do not configure NAT for a given set of traffic, that traffic will not be translated, but will have all of the security policies applied as normal.


NAT Basics

The following topics explain some of the basics of NAT.

NAT Terminology

This document uses the following terminology:

  • Real address/host/network/interface—The real address is the address that is defined on the host, before it is translated. In a typical NAT scenario where you want to translate the inside network when it accesses the outside, the inside network would be the “real” network. Note that you can translate any network connected to the device, not just an inside network. Therefore if you configure NAT to translate outside addresses, “real” can refer to the outside network when it accesses the inside network.

  • Mapped address/host/network/interface—The mapped address is the address that the real address is translated to. In a typical NAT scenario where you want to translate the inside network when it accesses the outside, the outside network would be the “mapped” network.


    Note


    During address translation, IP addresses configured for the device interfaces are not translated.


  • Bidirectional initiation—Static NAT allows connections to be initiated bidirectionally, meaning both to the host and from the host.

  • Source and destination NAT—For any given packet, both the source and destination IP addresses are compared to the NAT rules, and one or both can be translated/untranslated. For static NAT, the rule is bidirectional, so be aware that “source” and “destination” are used in commands and descriptions throughout this guide even though a given connection might originate at the “destination” address.

NAT Types

You can implement NAT using the following methods:

  • Dynamic NAT—A group of real IP addresses are mapped to a (usually smaller) group of mapped IP addresses, on a first come, first served basis. Only the real host can initiate traffic. See Dynamic NAT.

  • Dynamic Port Address Translation (PAT)—A group of real IP addresses are mapped to a single IP address using a unique source port of that IP address. See Dynamic PAT.

  • Static NAT—A consistent mapping between a real and mapped IP address. Allows bidirectional traffic initiation. See Static NAT.

  • Identity NAT—A real address is statically translated to itself, essentially bypassing NAT. You might want to configure NAT this way when you want to translate a large group of addresses, but then want to exempt a smaller subset of addresses. See Identity NAT.

NAT in Routed and Transparent Mode

You can configure NAT in both routed and transparent firewall mode. You cannot configure NAT for interfaces operating in inline, inline tap, or passive modes. The following sections describe typical usage for each firewall mode.

NAT in Routed Mode

The following figure shows a typical NAT example in routed mode, with a private network on the inside.

Figure 1. NAT Example: Routed Mode
  1. When the inside host at 10.1.2.27 sends a packet to a web server, the real source address of the packet, 10.1.2.27, is translated to a mapped address, 209.165.201.10.

  2. When the server responds, it sends the response to the mapped address, 209.165.201.10, and the FTD device receives the packet because the FTD device performs proxy ARP to claim the packet.

  3. The FTD device then changes the translation of the mapped address, 209.165.201.10, back to the real address, 10.1.2.27, before sending it to the host.

NAT in Transparent Mode or Within a Bridge Group

Using NAT in transparent mode eliminates the need for the upstream or downstream routers to perform NAT for their networks. It can perform a similar function within a bridge group in routed mode.

NAT in transparent mode, or in routed mode between members of the same bridge group, has the following requirements and limitations:

  • You cannot configure interface PAT when the mapped address is a bridge group member interface, because there is no IP address attached to the interface.

  • ARP inspection is not supported. Moreover, if for some reason a host on one side of the FTD sends an ARP request to a host on the other side of the FTD, and the initiating host real address is mapped to a different address on the same subnet, then the real address remains visible in the ARP request.

  • Translating between IPv4 and IPv6 networks is not supported. Translating between two IPv6 networks, or between two IPv4 networks is supported.

The following figure shows a typical NAT scenario in transparent mode, with the same network on the inside and outside interfaces. The transparent firewall in this scenario is performing the NAT service so that the upstream router does not have to perform NAT.

Figure 2. NAT Example: Transparent Mode

NAT in Threat Defense transparent mode.
  1. When the inside host at 10.1.1.75 sends a packet to a web server, the real source address of the packet, 10.1.1.75, is changed to a mapped address, 209.165.201.15.

  2. When the server responds, it sends the response to the mapped address, 209.165.201.15, and the FTD receives the packet because the upstream router includes this mapped network in a static route directed to the FTD management IP address.

  3. The FTD then undoes the translation of the mapped address, 209.165.201.15, back to the real address, 10.1.1.1.75. Because the real address is directly-connected, the FTD sends it directly to the host.

  4. For host 192.168.1.2, the same process occurs, except for returning traffic, the FTD looks up the route in its routing table and sends the packet to the downstream router at 10.1.1.3 based on the FTD static route for 192.168.1.0/24.

Auto NAT and Manual NAT

You can implement address translation in two ways: auto NAT and manual NAT.

We recommend using auto NAT unless you need the extra features that manual NAT provides. It is easier to configure auto NAT, and it might be more reliable for applications such as Voice over IP (VoIP). (For VoIP, you might see a failure in the translation of indirect addresses that do not belong to either of the objects used in the rule.)

Auto NAT

All NAT rules that are configured as a parameter of a network object are considered to be auto NAT rules. This is a quick and easy way to configure NAT for a network object. You cannot create these rules for a group object, however.

Although these rules are configured as part of the object itself, you cannot see the NAT configuration in the object definition through the object manager.

When a packet enters an interface, both the source and destination IP addresses are checked against the auto NAT rules. The source and destination address in the packet can be translated by separate rules if separate matches are made. These rules are not tied to each other; different combinations of rules can be used depending on the traffic.

Because the rules are never paired, you cannot specify that sourceA/destinationA should have a different translation than sourceA/destinationB. Use manual NAT for that kind of functionality, where you can identify the source and destination address in a single rule.

Manual NAT

Manual NAT lets you identify both the source and destination address in a single rule. Specifying both the source and destination addresses lets you specify that sourceA/destinationA can have a different translation than sourceA/destinationB.


Note


For static NAT, the rule is bidirectional, so be aware that “source” and “destination” are used in commands and descriptions throughout this guide even though a given connection might originate at the “destination” address. For example, if you configure static NAT with port address translation, and specify the source address as a Telnet server, and you want all traffic going to that Telnet server to have the port translated from 2323 to 23, then you must specify the source ports to be translated (real: 23, mapped: 2323). You specify the source ports because you specified the Telnet server address as the source address.


The destination address is optional. If you specify the destination address, you can either map it to itself (identity NAT), or you can map it to a different address. The destination mapping is always a static mapping.

Comparing Auto NAT and Manual NAT

The main differences between these two NAT types are:

  • How you define the real address.

    • Auto NAT—The NAT rule becomes a parameter for a network object. The network object IP address serves as the original (real) address.

    • Manual NAT—You identify a network object or network object group for both the real and mapped addresses. In this case, NAT is not a parameter of the network object; the network object or group is a parameter of the NAT configuration. The ability to use a network object group for the real address means that manual NAT is more scalable.

  • How source and destination NAT is implemented.

    • Auto NAT— Each rule can apply to either the source or destination of a packet. So two rules might be used, one for the source IP address, and one for the destination IP address. These two rules cannot be tied together to enforce a specific translation for a source/destination combination.

    • Manual NAT—A single rule translates both the source and destination. A packet matches one rule only, and further rules are not checked. Even if you do not configure the optional destination address, a matching packet still matches one manual NAT rule only. The source and destination are tied together, so you can enforce different translations depending on the source/destination combination. For example, sourceA/destinationA can have a different translation than sourceA/destinationB.

  • Order of NAT Rules.

    • Auto NAT—Automatically ordered in the NAT table.

    • Manual NAT—Manually ordered in the NAT table (before or after auto NAT rules).

NAT Rule Order

Auto NAT and manual NAT rules are stored in a single table that is divided into three sections. Section 1 rules are applied first, then section 2, and finally section 3, until a match is found. For example, if a match is found in section 1, sections 2 and 3 are not evaluated. The following table shows the order of rules within each section.

Table 1. NAT Rule Table

Table Section

Rule Type

Order of Rules within the Section

Section 1

Manual NAT

Applied on a first match basis, in the order they appear in the configuration. Because the first match is applied, you must ensure that specific rules come before more general rules, or the specific rules might not be applied as desired. By default, manual NAT rules are added to section 1.

By "specific rules first," we mean:

  • Static rules should come before dynamic rules.

  • Rules that include destination translation should come before rules with source translation only.

If you cannot eliminate overlapping rules, where more than one rule might apply based on the source or destination address, be especially careful to follow these recommendations.

Section 2

Auto NAT

If a match in section 1 is not found, section 2 rules are applied in the following order:

  1. Static rules.

  2. Dynamic rules.

Within each rule type, the following ordering guidelines are used:

  1. Quantity of real IP addresses—From smallest to largest. For example, an object with one address will be assessed before an object with 10 addresses.

  2. For quantities that are the same, then the IP address number is used, from lowest to highest. For example, 10.1.1.0 is assessed before 11.1.1.0.

  3. If the same IP address is used, then the name of the network object is used, in alphabetical order. For example, abracadabra is assessed before catwoman.

Section 3

Manual NAT

If a match is still not found, section 3 rules are applied on a first match basis, in the order they appear in the configuration. This section should contain your most general rules. You must also ensure that any specific rules in this section come before general rules that would otherwise apply.

For section 2 rules, for example, you have the following IP addresses defined within network objects:

  • 192.168.1.0/24 (static)

  • 192.168.1.0/24 (dynamic)

  • 10.1.1.0/24 (static)

  • 192.168.1.1/32 (static)

  • 172.16.1.0/24 (dynamic) (object def)

  • 172.16.1.0/24 (dynamic) (object abc)

The resultant ordering would be:

  • 192.168.1.1/32 (static)

  • 10.1.1.0/24 (static)

  • 192.168.1.0/24 (static)

  • 172.16.1.0/24 (dynamic) (object abc)

  • 172.16.1.0/24 (dynamic) (object def)

  • 192.168.1.0/24 (dynamic)

NAT Interfaces

Except for bridge group member interfaces, you can configure a NAT rule to apply to any interface (in other words, all interfaces), or you can identify specific real and mapped interfaces. You can also specify any interface for the real address, and a specific interface for the mapped address, or vice versa.

For example, you might want to specify any interface for the real address and specify the outside interface for the mapped address if you use the same private addresses on multiple interfaces, and you want to translate them all to the same global pool when accessing the outside.

Figure 3. Specifying Any Interface

However, the concept of “any” interface does not apply to bridge group member interfaces. When you specify “any” interface, all bridge group member interfaces are excluded. Thus, to apply NAT to bridge group members, you must specify the member interface. This could result in many similar rules where only one interface is different. You cannot configure NAT for the Bridge Virtual Interface (BVI) itself, you can configure NAT for member interfaces only.


Note


You cannot configure NAT for interfaces operating in inline, inline tap, or passive modes. When specifying interfaces, you do so indirectly by selecting the interface object that contains the interface.


Configuring Routing for NAT

The Firepower Threat Defense device needs to be the destination for any packets sent to the translated (mapped) address.

When sending packets, the device uses the destination interface if you specify one, or a routing table lookup if you do not, to determine the egress interface. For identity NAT, you have the option to use a route lookup even if you specify a destination interface.

The type of routing configuration needed depends on the type of mapped address, as explained in the following topics.

Addresses on the Same Network as the Mapped Interface

If you use addresses on the same network as the destination (mapped) interface, the FTD device uses proxy ARP to answer any ARP requests for the mapped addresses, thus intercepting traffic destined for a mapped address. This solution simplifies routing because the FTD device does not have to be the gateway for any additional networks. This solution is ideal if the outside network contains an adequate number of free addresses, a consideration if you are using a 1:1 translation like dynamic NAT or static NAT. Dynamic PAT greatly extends the number of translations you can use with a small number of addresses, so even if the available addresses on the outside network is small, this method can be used. For PAT, you can even use the IP address of the mapped interface.


Note


If you configure the mapped interface to be any interface, and you specify a mapped address on the same network as one of the mapped interfaces, then if an ARP request for that mapped address comes in on a different interface, then you need to manually configure an ARP entry for that network on the ingress interface, specifying its MAC address. Typically, if you specify any interface for the mapped interface, then you use a unique network for the mapped addresses, so this situation would not occur. Configure the ARP table in the ingress interface's Advanced settings.


Addresses on a Unique Network

If you need more addresses than are available on the destination (mapped) interface network, you can identify addresses on a different subnet. The upstream router needs a static route for the mapped addresses that points to the FTD device.

Alternatively for routed mode, you can configure a static route on the FTD device for the mapped addresses using any IP address on the destination network as the gateway, and then redistribute the route using your routing protocol. For example, if you use NAT for the inside network (10.1.1.0/24) and use the mapped IP address 209.165.201.5, then you can configure a static route for 209.165.201.5 255.255.255.255 (host address) to the 10.1.1.99 gateway that can be redistributed.

For transparent mode, if the real host is directly-connected, configure the static route on the upstream router to point to the FTD device: specify the bridge group IP address. For remote hosts in transparent mode, in the static route on the upstream router, you can alternatively specify the downstream router IP address.

The Same Address as the Real Address (Identity NAT)

The default behavior for identity NAT has proxy ARP enabled, matching other static NAT rules. You can disable proxy ARP if desired. You can also disable proxy ARP for regular static NAT if desired, in which case you need to be sure to have proper routes on the upstream router.

Normally for identity NAT, proxy ARP is not required, and in some cases can cause connectivity issues. For example, if you configure a broad identity NAT rule for “any” IP address, then leaving proxy ARP enabled can cause problems for hosts on the network directly connected to the mapped interface. In this case, when a host on the mapped network wants to communicate with another host on the same network, then the address in the ARP request matches the NAT rule (which matches “any” address). The FTD device will then proxy ARP for the address, even though the packet is not actually destined for the FTD device. (Note that this problem occurs even if you have a manual NAT rule; although the NAT rule must match both the source and destination addresses, the proxy ARP decision is made only on the “source” address). If the FTD device ARP response is received before the actual host ARP response, then traffic will be mistakenly sent to the FTD device.

Guidelines for NAT

The following topics provide detailed guidelines for implementing NAT.

Firewall Mode Guidelines for NAT

NAT is supported in routed and transparent firewall mode.

However, configuring NAT on bridge group member interfaces (interfaces that are part of a Bridge Group Virtual Interface, or BVI) has the following restrictions:

  • When configuring NAT for the members of a bridge group, you specify the member interface. You cannot configure NAT for the bridge group interface (BVI) itself.

  • When doing NAT between bridge group member interfaces, you must specify the real and mapped addresses. You cannot specify “any” as the interface.

  • You cannot configure interface PAT when the mapped address is a bridge group member interface, because there is no IP address attached to the interface.

  • You cannot translate between IPv4 and IPv6 networks (NAT64/46) when the source and destination interfaces are members of the same bridge group. Static NAT/PAT 44/66, dynamic NAT44/66, and dynamic PAT44 are the only allowed methods; dynamic PAT66 is not supported. However, you can do NAT64/46 between members of different bridge groups, or between a bridge group member (source) and standard routed interface (destination).


Note


You cannot configure NAT for interfaces operating in inline, inline tap, or passive modes.


IPv6 NAT Guidelines

NAT supports IPv6 with the following guidelines and restrictions.

  • For standard routed mode interfaces, you can also translate between IPv4 and IPv6.

  • You cannot translate between IPv4 and IPv6 for interfaces that are members of the same bridge group. You can translate between two IPv6 or two IPv4 networks only. This restriction does not apply when the interfaces are members of different bridge groups, or between a bridge group member and a standard routed interface.

  • You cannot use dynamic PAT for IPv6 (NAT66) when translating between interfaces in the same bridge group. This restriction does not apply when the interfaces are members of different bridge groups, or between a bridge group member and a standard routed interface.

  • For static NAT, you can specify an IPv6 subnet up to /64. Larger subnets are not supported.

  • When using FTP with NAT46, when an IPv4 FTP client connects to an IPv6 FTP server, the client must use either the extended passive mode (EPSV) or extended port mode (EPRT); PASV and PORT commands are not supported with IPv6.

IPv6 NAT Best Practices

You can use NAT to translate between IPv6 networks, and also to translate between IPv4 and IPv6 networks (routed mode only). We recommend the following best practices:

  • NAT66 (IPv6-to-IPv6)—We recommend using static NAT. Although you can use dynamic NAT or PAT, IPv6 addresses are in such large supply, you do not have to use dynamic NAT. If you do not want to allow returning traffic, you can make the static NAT rule unidirectional (manual NAT only).

  • NAT46 (IPv4-to-IPv6)—We recommend using static NAT. Because the IPv6 address space is so much larger than the IPv4 address space, you can easily accommodate a static translation. If you do not want to allow returning traffic, you can make the static NAT rule unidirectional (manual NAT only). When translating to an IPv6 subnet (/96 or lower), the resulting mapped address is by default an IPv4-embedded IPv6 address, where the 32-bits of the IPv4 address is embedded after the IPv6 prefix. For example, if the IPv6 prefix is a /96 prefix, then the IPv4 address is appended in the last 32-bits of the address. For example, if you map 192.168.1.0/24 to 201b::0/96, then 192.168.1.4 will be mapped to 201b::0.192.168.1.4 (shown with mixed notation). If the prefix is smaller, such as /64, then the IPv4 address is appended after the prefix, and a suffix of 0s is appended after the IPv4 address. You can also optionally translate the addresses net-to-net, where the first IPv4 address maps to the first IPv6 address, the second to the second, and so on.

  • NAT64 (IPv6-to-IPv4)—You may not have enough IPv4 addresses to accommodate the number of IPv6 addresses. We recommend using a dynamic PAT pool to provide a large number of IPv4 translations.

NAT Support for Inspected Protocols

Some application layer protocols that open secondary connections, or that embedded IP addresses in packets, are inspected to provide the following services:

  • Pinhole creation—Some application protocols open secondary TCP or UDP connections either on standard or negotiated ports. Inspection opens pinholes for these secondary ports so that you do not need to create access control rules to allow them.

  • NAT rewrite— Protocols such as FTP embed IP addresses and ports for the secondary connections in packet data as part of the protocol. If there is NAT translation involved for either of the endpoints, the inspection engines rewrite the packet data to reflect the NAT translation of the embedded addresses and ports. The secondary connections would not work without NAT rewrite.

  • Protocol enforcement—Some inspections enforce some degree of conformance to the RFCs for the inspected protocol.

The following table lists the inspected protocols that apply NAT rewrite and their NAT limitations. Keep these limitations in mind when writing NAT rules that include these protocols. Inspected protocols not listed here do not apply NAT rewrite. These inspections include GTP, HTTP, IMAP, POP, SMTP, SSH, and SSL.


Note


NAT rewrite is supported on the listed ports only. For some of these protocols, you can extend inspection to other ports using Network Analysis Policies, but NAT rewrite is not extended to those ports. This includes DCERPC, DNS, FTP, and Sun RPC inspection. If you use these protocols on non-standard ports, do not use NAT on the connections.


Table 2. NAT Supported Application Inspection

Application

Inspected Protocol, Port

NAT Limitations

Pinholes Created

DCERPC

TCP/135

No NAT64.

Yes

DNS over UDP

UDP/53

No NAT support is available for name resolution through WINS.

No

ESMTP

TCP/25

No NAT64.

No

FTP

TCP/21

(Clustering) No static PAT.

Yes

H.323 H.225 (Call signaling)

H.323 RAS

TCP/1720

UDP/1718

For RAS,
 UDP/1718-1719

(Clustering) No static PAT.

No extended PAT.

No NAT64.

Yes

ICMP

ICMP Error

ICMP

(ICMP traffic directed to a device interface is never inspected.)

No limitations.

No

IP Options

RSVP

No NAT64.

No

NetBIOS Name Server over IP

UDP/137, 138 (Source ports)

No extended PAT.

No NAT64.

No

RSH

TCP/514

No PAT.

No NAT64.

(Clustering) No static PAT.

Yes

RTSP

TCP/554

(No handling for HTTP cloaking.)

No extended PAT.

No NAT64.

(Clustering) No static PAT.

Yes

SIP

TCP/5060


UDP/5060

No extended PAT.

No NAT64 or NAT46.

(Clustering) No static PAT.

Yes

Skinny (SCCP)

TCP/2000

No extended PAT.

No NAT64, NAT46, or NAT66.

(Clustering) No static PAT.

Yes

SQL*Net

(versions 1, 2)

TCP/1521

No extended PAT.

No NAT64.

(Clustering) No static PAT.

Yes

Sun RPC

TCP/111

UDP/111

No extended PAT.

No NAT64.

Yes

TFTP

UDP/69

No NAT64.

(Clustering) No static PAT.

Payload IP addresses are not translated.

Yes

XDMCP

UDP/177

No extended PAT.

No NAT64.

(Clustering) No static PAT.

Yes

Additional Guidelines for NAT

  • For interfaces that are members of a bridge group, you write NAT rules for the member interfaces. You cannot write NAT rules for the Bridge Virtual Interface (BVI) itself.

  • (Auto NAT only.) You can only define a single NAT rule for a given object; if you want to configure multiple NAT rules for an object, you need to create multiple objects with different names that specify the same IP address.

  • If a VPN is defined on an interface, inbound ESP traffic on the interface is not subject to the NAT rules. The system allows the ESP traffic for established VPN tunnels only, dropping traffic not associated with an existing tunnel. This restriction applies to ESP and UDP ports 500 and 4500.

  • If you define a site-to-site VPN on a device that is behind a device that is applying dynamic PAT, so that UDP ports 500 and 4500 are not the ones actually used, you must initiate the connection from the device that is behind the PAT device. The responder cannot initiate the security association (SA) because it does not know the correct port numbers.

  • If you change the NAT configuration, and you do not want to wait for existing translations to time out before the new NAT configuration is used, you can clear the translation table using the clear xlate command in the device CLI. However, clearing the translation table disconnects all current connections that use translations.

    If you create a new NAT rule that should apply to an existing connection (such as a VPN tunnel), you need to use clear conn to end the connection. Then, the attempt to re-establish the connection should hit the NAT rule and the connection should be NAT'ed correctly.


    Note


    If you remove a dynamic NAT or PAT rule, and then add a new rule with mapped addresses that overlap the addresses in the removed rule, then the new rule will not be used until all connections associated with the removed rule time out or are cleared using the clear xlate or clear conn commands. This safeguard ensures that the same address is not assigned to multiple hosts.


  • You cannot use an object group with both IPv4 and IPv6 addresses; the object group must include only one type of address.

  • (Manual NAT only.) When using any as the source address in a NAT rule, the definition of “any” traffic (IPv4 vs. IPv6) depends on the rule. Before the FTD device performs NAT on a packet, the packet must be IPv6-to-IPv6 or IPv4-to-IPv4; with this prerequisite, the FTD device can determine the value of any in a NAT rule. For example, if you configure a rule from “any” to an IPv6 server, and that server was mapped from an IPv4 address, then any means “any IPv6 traffic.” If you configure a rule from “any” to “any,” and you map the source to the interface IPv4 address, then any means “any IPv4 traffic” because the mapped interface address implies that the destination is also IPv4.

  • You can use the same mapped object or group in multiple NAT rules.

  • The mapped IP address pool cannot include:

    • The mapped interface IP address. If you specify “any” interface for the rule, then all interface IP addresses are disallowed. For interface PAT (routed mode only), specify the interface name instead of the interface address.

    • The failover interface IP address.

    • (Transparent mode.) The management IP address.

    • (Dynamic NAT.) The standby interface IP address when VPN is enabled.

  • Avoid using overlapping addresses in static and dynamic NAT policies. For example, with overlapping addresses, a PPTP connection can fail to get established if the secondary connection for PPTP hits the static instead of dynamic xlate.

  • You cannot use overlapping addresses in the source address of a NAT rule and a remote access VPN address pool.

  • If you specify a destination interface in a rule, then that interface is used as the egress interface rather than looking up the route in the routing table. However, for identity NAT, you have the option to use a route lookup instead.

  • If you use PAT on Sun RPC traffic, which is used to connect to NFS servers, be aware that the NFS server might reject connections if the PAT'ed port is above 1024. The default configuration of NFS servers is to reject connections from ports higher than 1024. The error is typically "Permission Denied." Mapping ports above 1024 might happen if you use the "flat range" option to use the higher port numbers if a port in the lower range is not available, especially if you do not select the option to include the lower range in the flat range. You can avoid this problem by changing the NFS server configuration to allow all port numbers.

  • NAT applies to through traffic only. Traffic generated by the system is not subject to NAT.

  • Do not name a network object or group pat-pool, using any combination of upper- or lower-case letters.

  • The unidirectional option is mainly useful for testing purposes and might not work with all protocols. For example, SIP requires protocol inspection to translate SIP headers using NAT, but this will not occur if you make the translation unidirectional.

  • You cannot use NAT on the internal payload of Protocol Independent Multicast (PIM) registers.

  • (Manual NAT) When writing NAT rules for a dual ISP interface setup (primary and backup interfaces using service level agreements in the routing configuration), do not specify destination criteria in the rule. Ensure the rule for the primary interface comes before the rule for the backup interface. This allows the device to choose the correct NAT destination interface based on the current routing state when the primary ISP is unavailable. If you specify destination objects, the NAT rule will always select the primary interface for the otherwise duplicate rules.

  • If you get the ASP drop reason nat-no-xlate-to-pat-pool for traffic that should not match the NAT rules defined for the interface, configure identity NAT rules for the affected traffic so the traffic can pass untranslated.

  • If you configure NAT for GRE tunnel endpoints, you must disable keepalives on the endpoints or the tunnel cannot be established. The endpoints send keepalives to the original addresses.

Configure NAT for Threat Defense

Network address translation can be very complex. We recommend that you keep your rules as simple as possible to avoid translation problems and difficult troubleshooting situations. Careful planning before you implement NAT is critical. The following procedure provides the basic approach.

The NAT policy is a shared policy. You assign the policy to devices that should have similar NAT rules.

Whether a given rule in the policy applies to an assigned device is determined by the interface objects (security zones or interface groups) used in the rule. If the interface objects include one or more interface for the device, the rule is deployed to the device. Thus, you can configure rules that apply to subsets of devices within a single shared policy by carefully designing your interface objects. Rules that apply to “any” interface object are deployed to all devices.

You can configure multiple NAT policies if groups of your devices require significantly different rules.

Procedure


Step 1

Select Devices > NAT.

  • Click New Policy > Threat Defense NAT to create a new policy. Give the policy a name, optionally assign devices to it, and click Save.

    You can change device assignments later by editing the policy and clicking Policy Assignments.

  • Click Edit (edit icon) to edit an existing Threat Defense NAT policy. Note that the page also shows Firepower NAT policies, which are not used by Firepower Threat Defense devices.

Step 2

Decide what kinds of rules you need.

You can create dynamic NAT, dynamic PAT, static NAT, and identity NAT rules. For an overview, see NAT Types.

Step 3

Decide which rules should be implemented as manual or auto NAT.

For a comparison of these two implementation options, see Auto NAT and Manual NAT.

Step 4

Decide which rules should be custom per device.

Because you can assign a NAT policy to multiple devices, you can configure a single rule on many devices. However, you might have rules that should be interpreted differently by each device, or some rules that should apply to a subset of devices only.

Use interface objects to control on which devices a rule is configured. Then, use object overrides on network objects to customize the addresses used per device.

For detailed information, see Customizing NAT Rules for Multiple Devices.

Step 5

Create the rules as explained in the following sections.

Step 6

Manage the NAT policy and rules.

You can do the following to manage the policy and its rules.

  • To edit the policy name or description, click in those fields, type in your changes, and click outside the fields.

  • To view only those rules that apply to a specific device, click Filter by Device and select the desired device. A rule applies to a device if it uses an interface object that includes an interface on the device.

  • To change the devices to which the policy is assigned, click the Policy Assignments link and modify the selected devices list as desired.

  • To change whether a rule is enabled or disabled, right click the rule and select the desired option from the State command. You can temporarily disable a rule without deleting it using these controls.

  • To edit a rule, click Edit (edit icon) for the rule.

  • To delete a rule, click Delete (delete icon) for the rule.

Step 7

Click Save.

You can now click Deploy and deploy the policy to assigned devices. The changes are not active until you deploy them.


Customizing NAT Rules for Multiple Devices

Because the NAT policy is shared, you can assign a given policy to more than one device. However, you can configure at most one auto NAT rule for a given object. Thus, if you want to configure different translations for an object based on the specific device doing the translation, you need to carefully configure the interface objects (security zones or interface groups) and define network object overrides for the translated address.

The interface objects determine on which devices a rule gets configured. The network object overrides determine what IP addresses are used by a given device for that object.

Consider the following scenario:

  • FTD-A and FTD-B have inside networks 192.168.1.0/24 attached to the interface named “inside.”

  • On FTD-A, you want to translate all 192.168.1.0/24 addresses to a NAT pool in the 10.100.10.10 - 10.100.10.200 range when going to the “outside” interface.

  • On FTD-B, you want to translate all 192.168.1.0/24 addresses to a NAT pool in the 10.200.10.10 - 10.200.10.200 range when going to the “outside” interface.

To accomplish the above, you would do the following. Although this example rule is for dynamic auto NAT, you can generalize the technique for any type of NAT rule.

Procedure


Step 1

Create the security zones for the inside and outside interfaces.

  1. Choose Objects > Object Management.

  2. Select Interface Objects from the table of contents and click Add > Security Zone. (You can use interface groups instead of zones.)

  3. Configure the inside zone properties.

    • Name—Enter a name, for example, inside-zone.

    • Type—Select Routed for routed-mode devices, Switched for transparent mode.

    • Selected Interfaces—Add the FTD-A/inside and FTD-B/inside interfaces to the selected list.

  4. Click Save.

  5. Click Add > Security Zone and define the outside zone properties.

    • Name—Enter a name, for example, outside-zone.

    • Interface Type—Select Routed for routed-mode devices, Switched for transparent mode.

    • Selected Interfaces—Add the FTD-A/outside and FTD-B/outside interfaces to the selected list.

  6. Click Save.

Step 2

Create the network object for the original inside network on the Object Management page.

  1. Select Network from the table of contents and click Add Network > Add Object.

  2. Configure the inside network properties.

    • Name—Enter a name, for example, inside-network.

    • Network—Enter the network address, for example, 192.168.1.0/24.

  3. Click Save.

Step 3

Create the network object for the translated NAT pool and define overrides.

  1. Click Add Network > Add Object.

  2. Configure the NAT pool properties for FTD-A.

    • Name—Enter a name, for example, NAT-pool.

    • Network—Enter the range of addresses to include in the pool for FTD-A, for example, 10.100.10.10-10.100.10.200.

  3. Select Allow Overrides.

  4. Click the Overrides heading to open the list of object overrides.

  5. Click Add to open the Add Object Override dialog box.

  6. Select FTD-B and Add it to the Selected Devices list.

  7. Click Override and change Network to 10.200.10.10-10.200.10.200

  8. Click Add to add the override to the device.

    By defining an override for FTD-B, whenever the system configures this object on FTD-B, it will use the override value instead of the value defined in the original object.

  9. Click Save.

Step 4

Configure the NAT rule.

  1. Select Devices > NAT and create or edit an Firepower Threat Defense NAT policy.

  2. Click Add Rule.

  3. Configure the following properties:

    • NAT Rule = Auto NAT Rule.

    • Type = Dynamic.

  4. On Interface Objects, configure the following:

    • Source Interface Objects = inside-zone.

    • Destination Interface Objects = outside-zone.

    Note


    The interface objects control on which devices the rule is configured. Because in this example the zones contain interfaces for FTD-A and FTD-B only, even if the NAT policy were assigned to additional devices, the rule would be deployed to those 2 devices only.

  5. On Translation, configure the following:

    • Original Source = inside-network object.

    • Translated Source > Address= NAT-pool object.

  6. Click Save.

    You now have a single rule that will be interpreted differently for FTD-A and FTD-B, providing unique translations for the inside networks protected by each firewall.


Dynamic NAT

The following topics explain dynamic NAT and how to configure it.

About Dynamic NAT

Dynamic NAT translates a group of real addresses to a pool of mapped addresses that are routable on the destination network. The mapped pool typically includes fewer addresses than the real group. When a host you want to translate accesses the destination network, NAT assigns the host an IP address from the mapped pool. The translation is created only when the real host initiates the connection. The translation is in place only for the duration of the connection, and a given user does not keep the same IP address after the translation times out. Users on the destination network, therefore, cannot initiate a reliable connection to a host that uses dynamic NAT, even if the connection is allowed by an access rule.


Note


For the duration of the translation, a remote host can initiate a connection to the translated host if an access rule allows it. Because the address is unpredictable, a connection to the host is unlikely. Nevertheless, in this case you can rely on the security of the access rule.


The following figure shows a typical dynamic NAT scenario. Only real hosts can create a NAT session, and responding traffic is allowed back.

Figure 4. Dynamic NAT

The following figure shows a remote host attempting to initiate a connection to a mapped address. This address is not currently in the translation table; therefore, the packet is dropped.

Figure 5. Remote Host Attempts to Initiate a Connection to a Mapped Address

Dynamic NAT Disadvantages and Advantages

Dynamic NAT has these disadvantages:

  • If the mapped pool has fewer addresses than the real group, you could run out of addresses if the amount of traffic is more than expected.

    Use PAT or a PAT fall-back method if this event occurs often because PAT provides over 64,000 translations using ports of a single address.

  • You have to use a large number of routable addresses in the mapped pool, and routable addresses may not be available in large quantities.

The advantage of dynamic NAT is that some protocols cannot use PAT. PAT does not work with the following:

  • IP protocols that do not have a port to overload, such as GRE version 0.

  • Some multimedia applications that have a data stream on one port, the control path on another port, and are not open standard.

Configure Dynamic Auto NAT

Use dynamic auto NAT rules to translate addresses to different IP addresses that are routable on the destination network.

Before you begin

Select Objects > Object Management and create the network objects or groups needed in the rule. Alternatively, you can create the objects while defining the NAT rule. The objects must meet the following requirements:

  • Original Source—This must be a network object (not a group), and it can be a host, range, or subnet.

  • Translated Source—This can be a network object or group, but it cannot include a subnet. The group cannot contain both IPv4 and IPv6 addresses; it must contain one type only. If a group contains both ranges and host IP addresses, then the ranges are used for dynamic NAT, and then the host IP addresses are used as a PAT fallback.

Procedure

Step 1

Select Devices > NAT and create or edit an Firepower Threat Defense NAT policy.

Step 2

Do one of the following:

  • Click the Add Rule button to create a new rule.
  • Click Edit (edit icon) to edit an existing rule.

The right click menu also has options to cut, copy, paste, insert, and delete rules.

Step 3

Configure the basic rule options:

  • NAT Rule—Select Auto NAT Rule.
  • Type—Select Dynamic.

Step 4

On Interface Objects, configure the following options:

  • Source Interface Objects, Destination Interface Objects(Required for bridge group member interfaces.) The interface objects (security zones or interface groups) that identify the interfaces where this NAT rule applies. Source is the object containing the real interface, the one through which the traffic enters the device. Destination is the object containing the mapped interface, the one through which traffic exits the device. By default, the rule applies to all interfaces (Any) except for bridge group member interfaces.

Step 5

On Translation, configure the following options:

  • Original Source—The network object that contains the addresses you are translating.
  • Translated Source—The network object or group that contains the mapped addresses.

Step 6

(Optional.) On Advanced, select the desired options:

  • Translate DNS replies that match this ruleWhether to translate the IP address in DNS replies. For DNS replies traversing from a mapped interface to a real interface, the Address (the IPv4 A or IPv6 AAAA) record is rewritten from the mapped value to the real value. Conversely, for DNS replies traversing from a real interface to a mapped interface, the record is rewritten from the real value to the mapped value. This option is used in specific circumstances, and is sometimes needed for NAT64/46 translation, where the rewrite also converts between A and AAAA records. For more information, see Rewriting DNS Queries and Responses Using NAT.
  • Fallthrough to Interface PAT (Destination Interface)Whether to use the IP address of the destination interface as a backup method when the other mapped addresses are already allocated (interface PAT fallback). This option is available only if you select a destination interface that is not a member of a bridge group. To use the IPv6 address of the interface, also check the IPv6 option.
  • IPv6Whether to use the IPv6 address of the destination interface for interface PAT.

Step 7

Click Save to add the rule.

Step 8

Click Save on the NAT page to save your changes.


Configure Dynamic Manual NAT

Use dynamic manual NAT rules when auto NAT does not meet your needs. For example, if you want to do different translations based on the destination. Dynamic NAT translates addresses to different IP addresses that are routable on the destination network.

Before you begin

Select Objects > Object Management and create the network objects or groups needed in the rule. Groups cannot contain both IPv4 and IPv6 addresses; they must contain one type only. Alternatively, you can create the objects while defining the NAT rule. The objects must also meet the following requirements:

  • Original Source—This can be a network object or group, and it can contain a host, range, or subnet. If you want to translate all original source traffic, you can skip this step and specify Any in the rule.

  • Translated Source—This can be a network object or group, but it cannot include a subnet. If a group contains both ranges and host IP addresses, then the ranges are used for dynamic NAT, and then the host IP addresses are used as a PAT fallback.

You can also create network objects for the Original Destination and Translated Destination if you are configuring a static translation for those addresses in the rule.

For dynamic NAT, you can also perform port translation on the destination. In the Object Manager, ensure that there are port objects you can use for the Original Destination Port and Translated Destination Port. If you specify the source port, it will be ignored.

Procedure

Step 1

Select Devices > NAT and create or edit an Firepower Threat Defense NAT policy.

Step 2

Do one of the following:

  • Click the Add Rule button to create a new rule.
  • Click Edit (edit icon) to edit an existing rule.

The right click menu also has options to cut, copy, paste, insert, and delete rules.

Step 3

Configure the basic rule options:

  • NAT Rule—Select Manual NAT Rule.
  • Type—Select Dynamic. This setting only applies to the source address. If you define a translation for the destination address, the translation is always static.
  • EnableWhether you want the rule to be active. You can later activate or deactivate the rule using the right-click menu on the rules page.
  • InsertWhere you want to add the rule. You can insert it in a category (before or after auto NAT rules), or above or below the rule number you specify.

Step 4

On Interface Objects, configure the following options:

  • Source Interface Objects, Destination Interface Objects(Required for bridge group member interfaces.) The interface objects (security zones or interface groups) that identify the interfaces where this NAT rule applies. Source is the object containing the real interface, the one through which the traffic enters the device. Destination is the object containing the mapped interface, the one through which traffic exits the device. By default, the rule applies to all interfaces (Any) except for bridge group member interfaces.

Step 5

(On the Translation page.) Identify the original packet addresses, either IPv4 or IPv6; namely, the packet addresses as they appear in the original packet.

See the following figure for an example of the original packet vs. the translated packet.

  • Original Source—The network object or group that contains the addresses you are translating.

  • Original Destination—(Optional.) The network object that contains the addresses of the destinations. If you leave this blank, the source address translation applies regardless of destination. If you do specify the destination address, you can configure a static translation for that address or just use identity NAT for it.

    You can select Source Interface IP to base the original destination on the source interface (which cannot be Any). If you select this option, you must also select a translated destination object. To implement a static interface NAT with port translation for the destination addresses, select this option and also select the appropriate port objects for the destination ports.

Step 6

Identify the translated packet addresses, either IPv4 or IPv6; namely, the packet addresses as they appear on the destination interface network. You can translate between IPv4 and IPv6 if desired.

  • Translated Source—The network object or group that contains the mapped addresses.
  • Translated Destination—(Optional.) The network object or group that contains the destination addresses used in the translated packet. If you selected an object for Original Destination, you can set up identity NAT (that is, no translation) by selecting the same object.

Step 7

(Optional.) Identify the destination service ports for service translation: Original Destination Port, Translated Destination Port.

Dynamic NAT does not support port translation, so leave the Original Source Port and Translated Source Port fields empty. However, because the destination translation is always static, you can perform port translation for the destination port.

NAT only supports TCP or UDP. When translating a port, be sure the protocols in the real and mapped service objects are identical (both TCP or both UDP). For identity NAT, you can use the same service object for both the real and mapped ports.

Step 8

(Optional.) On Advanced, select the desired options:

  • (For source translation only.) Translate DNS replies that match this ruleWhether to translate the IP address in DNS replies. For DNS replies traversing from a mapped interface to a real interface, the Address (the IPv4 A or IPv6 AAAA) record is rewritten from the mapped value to the real value. Conversely, for DNS replies traversing from a real interface to a mapped interface, the record is rewritten from the real value to the mapped value. This option is used in specific circumstances, and is sometimes needed for NAT64/46 translation, where the rewrite also converts between A and AAAA records. For more information, see Rewriting DNS Queries and Responses Using NAT.
  • Fallthrough to Interface PAT (Destination Interface)Whether to use the IP address of the destination interface as a backup method when the other mapped addresses are already allocated (interface PAT fallback). This option is available only if you select a destination interface that is not a member of a bridge group. To use the IPv6 address of the interface, also check the IPv6 option.
  • IPv6Whether to use the IPv6 address of the destination interface for interface PAT.

Step 9

Click Save to add the rule.

Step 10

Click Save on the NAT page to save your changes.


Dynamic PAT

The following topics describe dynamic PAT.

About Dynamic PAT

Dynamic PAT translates multiple real addresses to a single mapped IP address by translating the real address and source port to the mapped address and a unique port.

Each connection requires a separate translation session because the source port differs for each connection. For example, 10.1.1.1:1025 requires a separate translation from 10.1.1.1:1026.

The following figure shows a typical dynamic PAT scenario. Only real hosts can create a NAT session, and responding traffic is allowed back. The mapped address is the same for each translation, but the port is dynamically assigned.

Figure 6. Dynamic PAT

For the duration of the translation, a remote host on the destination network can initiate a connection to the translated host if an access rule allows it. Because the port address (both real and mapped) is unpredictable, a connection to the host is unlikely. Nevertheless, in this case you can rely on the security of the access rule.

After the connection expires, the port translation also expires.


Note


We recommend that you use different PAT pools for each interface. If you use the same pool for multiple interfaces, especially if you use it for "any" interface, the pool can be quickly exhausted, with no ports available for new translations.


Dynamic PAT Disadvantages and Advantages

Dynamic PAT lets you use a single mapped address, thus conserving routable addresses. You can even use the FTD device interface IP address as the PAT address.

You cannot use dynamic PAT for IPv6 (NAT66) when translating between interfaces in the same bridge group. This restriction does not apply when the interfaces are members of different bridge groups, or between a bridge group member and a standard routed interface.

Dynamic PAT does not work with some multimedia applications that have a data stream that is different from the control path. For more information, see NAT Support for Inspected Protocols.

Dynamic PAT might also create a large number of connections appearing to come from a single IP address, and servers might interpret the traffic as a DoS attack. You can configure a PAT pool of addresses and use a round-robin assignment of PAT addresses to mitigate this situation.

PAT Pool Object Guidelines

When creating network objects for a PAT pool, follow these guidelines.

For a PAT pool
  • If available, the real source port number is used for the mapped port. However, if the real port is not available, by default the mapped ports are chosen from the same range of ports as the real port number: 0 to 511, 512 to 1023, and 1024 to 65535. Therefore, ports below 1024 have only a small PAT pool that can be used. If you have a lot of traffic that uses the lower port ranges, you can specify a flat range of ports to be used instead of the three unequal-sized tiers: either 1024 to 65535, or 1 to 65535.

  • If you use the same PAT pool object in two separate rules, then be sure to specify the same options for each rule. For example, if one rule specifies extended PAT, then the other rule must also specify extended PAT.

  • If a host has an existing connection, then subsequent connections from that host use the same PAT IP address. If no ports are available, this can prevent the connection. Use the round robin option to avoid this problem.

  • For best performance, limit the number of IP addresses within a PAT pool to 10,000.

For extended PAT for a PAT pool
  • Many application inspections do not support extended PAT.

  • If you enable extended PAT for a dynamic PAT rule, then you cannot also use an address in the PAT pool as the PAT address in a separate static NAT with port translation rule. For example, if the PAT pool includes 10.1.1.1, then you cannot create a static NAT-with-port-translation rule using 10.1.1.1 as the PAT address.

  • If you use a PAT pool and specify an interface for fallback, you cannot specify extended PAT.

  • For VoIP deployments that use ICE or TURN, do not use extended PAT. ICE and TURN rely on the PAT binding to be the same for all destinations.

  • Extended PAT increases memory usage on the device.

For round robin for a PAT pool
  • If a host has an existing connection, then subsequent connections from that host will use the same PAT IP address if ports are available. However, this “stickiness” does not survive a failover. If the device fails over, then subsequent connections from a host might not use the initial IP address.

  • IP address “stickiness” is also impacted if you mix PAT pool/round robin rules with interface PAT rules on the same interface. For any given interface, choose either a PAT pool or interface PAT; do not create competing PAT rules.

  • Round robin, especially when combined with extended PAT, can consume a large amount of memory. Because NAT pools are created for every mapped protocol/IP address/port range, round robin results in a large number of concurrent NAT pools, which use memory. Extended PAT results in an even larger number of concurrent NAT pools.

Configure Dynamic Auto PAT

Use dynamic auto PAT rules to translate addresses to unique IP address/port combinations, rather than to multiple IP addresses only. You can translate to a single address (either the destination interface's address or another address), or use a PAT pool of addresses to provide a larger number of possible translations.

Before you begin

Select Objects > Object Management and create the network objects or groups needed in the rule. Alternatively, you can create the objects while defining the NAT rule. The objects must meet the following requirements:

  • Original Source—This must be a network object (not a group), and it can be a host, range, or subnet.

  • Translated Source—You have the following options to specify the PAT address:

    • Destination Interface—To use the destination interface address, you do not need a network object.

    • Single PAT address—Create a network object containing a single host.

    • PAT pool—Create a network object that includes a range, or create a network object group that contains hosts, ranges, or both. You cannot include subnets. The group cannot contain both IPv4 and IPv6 addresses; it must contain one type only.

Procedure

Step 1

Select Devices > NAT and create or edit an Firepower Threat Defense NAT policy.

Step 2

Do one of the following:

  • Click the Add Rule button to create a new rule.
  • Click Edit (edit icon) to edit an existing rule.

The right click menu also has options to cut, copy, paste, insert, and delete rules.

Step 3

Configure the basic rule options:

  • NAT Rule—Select Auto NAT Rule.
  • Type—Select Dynamic.

Step 4

On Interface Objects, configure the following options:

  • Source Interface Objects, Destination Interface Objects(Required for bridge group member interfaces.) The interface objects (security zones or interface groups) that identify the interfaces where this NAT rule applies. Source is the object containing the real interface, the one through which the traffic enters the device. Destination is the object containing the mapped interface, the one through which traffic exits the device. By default, the rule applies to all interfaces (Any) except for bridge group member interfaces.

Step 5

On Translation, configure the following options:

  • Original Source—The network object that contains the addresses you are translating.
  • Translated Source—One of the following:
    • (Interface PAT.) To use the address of the destination interface, select Destination Interface IP. You must also select a specific destination interface object. To use the IPv6 address of the interface, you must also select the IPv6 option on Advanced. Skip the step for configuring a PAT pool.

    • To use a single address other than the destination interface address, select the host network object you created for this purpose. Skip the step for configuring a PAT pool.

    • To use a PAT pool, leave Translated Source empty.

Step 6

If you are using a PAT pool, select the PAT Pool page and do the following:

  1. Select Enable PAT pool.

  2. Select the network object group that contains the addresses for the pool in the PAT > Address field.

    You can alternatively select Destination Interface IP, which is another way to implement interface PAT.

  3. (Optional) Select the following options as needed:

    • Use Round Robin AllocationTo assign addresses/ports in a round-robin fashion. By default without round robin, all ports for a PAT address will be allocated before the next PAT address is used. The round-robin method assigns one address/port from each PAT address in the pool before returning to use the first address again, and then the second address, and so on.

    • Extended PAT TableTo use extended PAT. Extended PAT uses 65535 ports per service, as opposed to per IP address, by including the destination address and port in the translation information. Normally, the destination port and address are not considered when creating PAT translations, so you are limited to 65535 ports per PAT address. For example, with extended PAT, you can create a translation of 10.1.1.1:1027 when going to 192.168.1.7:23 as well as a translation of 10.1.1.1:1027 when going to 192.168.1.7:80. You cannot use this option with interface PAT or interface PAT fallback.

    • Flat Port Range, Include Reserved PortsTo use the 1024 to 65535 port range as a single flat range when allocating TCP/UDP ports. When choosing the mapped port number for a translation, PAT uses the real source port number if it is available. However, without this option, if the real port is not available, by default the mapped ports are chosen from the same range of ports as the real port number: 1 to 511, 512 to 1023, and 1024 to 65535. To avoid running out of ports at the low ranges, configure this setting. To use the entire range of 1 to 65535, also check the Include Reserved Ports option.

Step 7

(Optional.) On Advanced, select the desired options:

  • Fallthrough to Interface PAT (Destination Interface)Whether to use the IP address of the destination interface as a backup method when the other mapped addresses are already allocated (interface PAT fallback). This option is available only if you select a destination interface that is not a member of a bridge group. To use the IPv6 address of the interface, also check the IPv6 option. You cannot select this option if you already configured interface PAT as the translated address or PAT pool.
  • IPv6Whether to use the IPv6 address of the destination interface for interface PAT.

Step 8

Click Save to add the rule.

Step 9

Click Save on the NAT page to save your changes.


Configure Dynamic Manual PAT

Use dynamic manual PAT rules when auto PAT does not meet your needs. For example, if you want to do different translations based on the destination. Dynamic PAT translates addresses to unique IP address/port combinations, rather than to multiple IP addresses only. You can translate to a single address (either the destination interface's address or another address), or use a PAT pool of addresses to provide a larger number of possible translations.

Before you begin

Select Objects > Object Management and create the network objects or groups needed in the rule. Groups cannot contain both IPv4 and IPv6 addresses; they must contain one type only. Alternatively, you can create the objects while defining the NAT rule. The objects must also meet the following requirements:

  • Original Source—This can be a network object or group, and it can contain a host, range, or subnet. If you want to translate all original source traffic, you can skip this step and specify Any in the rule.

  • Translated Source—You have the following options to specify the PAT address:

    • Destination Interface—To use the destination interface address, you do not need a network object.

    • Single PAT address—Create a network object containing a single host.

    • PAT pool—Create a network object that includes a range, or create a network object group that contains hosts, ranges, or both. You cannot include subnets.

You can also create network objects for the Original Destination and Translated Destination if you are configuring a static translation for those addresses in the rule.

For dynamic NAT, you can also perform port translation on the destination. In the Object Manager, ensure that there are port objects you can use for the Original Destination Port and Translated Destination Port. If you specify the source port, it will be ignored.

Procedure

Step 1

Select Devices > NAT and create or edit an Firepower Threat Defense NAT policy.

Step 2

Do one of the following:

  • Click the Add Rule button to create a new rule.
  • Click Edit (edit icon) to edit an existing rule.

The right click menu also has options to cut, copy, paste, insert, and delete rules.

Step 3

Configure the basic rule options:

  • NAT Rule—Select Manual NAT Rule.
  • Type—Select Dynamic. This setting only applies to the source address. If you define a translation for the destination address, the translation is always static.
  • EnableWhether you want the rule to be active. You can later activate or deactivate the rule using the right-click menu on the rules page.
  • InsertWhere you want to add the rule. You can insert it in a category (before or after auto NAT rules), or above or below the rule number you specify.

Step 4

On Interface Objects, configure the following options:

  • Source Interface Objects, Destination Interface Objects(Required for bridge group member interfaces.) The interface objects (security zones or interface groups) that identify the interfaces where this NAT rule applies. Source is the object containing the real interface, the one through which the traffic enters the device. Destination is the object containing the mapped interface, the one through which traffic exits the device. By default, the rule applies to all interfaces (Any) except for bridge group member interfaces.

Step 5

(On the Translation page.) Identify the original packet addresses, either IPv4 or IPv6; namely, the packet addresses as they appear in the original packet.

See the following figure for an example of the original packet vs. the translated packet.

  • Original Source—The network object or group that contains the addresses you are translating.

  • Original Destination—(Optional.) The network object that contains the addresses of the destinations. If you leave this blank, the source address translation applies regardless of destination. If you do specify the destination address, you can configure a static translation for that address or just use identity NAT for it.

    You can select Source Interface IP to base the original destination on the source interface (which cannot be Any). If you select this option, you must also select a translated destination object. To implement a static interface NAT with port translation for the destination addresses, select this option and also select the appropriate port objects for the destination ports.

Step 6

Identify the translated packet addresses, either IPv4 or IPv6; namely, the packet addresses as they appear on the destination interface network. You can translate between IPv4 and IPv6 if desired.

  • Translated Source—One of the following:
    • (Interface PAT.) To use the address of the destination interface, select Destination Interface IP. You must also select a specific destination interface object. To use the IPv6 address of the interface, you must also select the IPv6 option on Advanced. Skip the step for configuring a PAT pool.

    • To use a single address other than the destination interface address, select the host network object you created for this purpose. Skip the step for configuring a PAT pool.

    • To use a PAT pool, leave Translated Source empty.

  • Translated Destination—(Optional.) The network object or group that contains the destination addresses used in the translated packet. If you selected an object for Original Destination, you can set up identity NAT (that is, no translation) by selecting the same object.

Step 7

(Optional.) Identify the destination service ports for service translation: Original Destination Port, Translated Destination Port.

Dynamic NAT does not support port translation, so leave the Original Source Port and Translated Source Port fields empty. However, because the destination translation is always static, you can perform port translation for the destination port.

NAT only supports TCP or UDP. When translating a port, be sure the protocols in the real and mapped service objects are identical (both TCP or both UDP). For identity NAT, you can use the same service object for both the real and mapped ports.

Step 8

If you are using a PAT pool, select the PAT Pool page and do the following:

  1. Select Enable PAT pool.

  2. Select the network object group that contains the addresses for the pool in the PAT > Address field.

    You can alternatively select Destination Interface IP, which is another way to implement interface PAT.

  3. (Optional) Select the following options as needed:

    • Use Round Robin AllocationTo assign addresses/ports in a round-robin fashion. By default without round robin, all ports for a PAT address will be allocated before the next PAT address is used. The round-robin method assigns one address/port from each PAT address in the pool before returning to use the first address again, and then the second address, and so on.

    • Extended PAT TableTo use extended PAT. Extended PAT uses 65535 ports per service, as opposed to per IP address, by including the destination address and port in the translation information. Normally, the destination port and address are not considered when creating PAT translations, so you are limited to 65535 ports per PAT address. For example, with extended PAT, you can create a translation of 10.1.1.1:1027 when going to 192.168.1.7:23 as well as a translation of 10.1.1.1:1027 when going to 192.168.1.7:80. You cannot use this option with interface PAT or interface PAT fallback.

    • Flat Port Range, Include Reserved PortsTo use the 1024 to 65535 port range as a single flat range when allocating TCP/UDP ports. When choosing the mapped port number for a translation, PAT uses the real source port number if it is available. However, without this option, if the real port is not available, by default the mapped ports are chosen from the same range of ports as the real port number: 1 to 511, 512 to 1023, and 1024 to 65535. To avoid running out of ports at the low ranges, configure this setting. To use the entire range of 1 to 65535, also check the Include Reserved Ports option.

Step 9

(Optional.) On Advanced, select the desired options:

  • Fallthrough to Interface PAT (Destination Interface)Whether to use the IP address of the destination interface as a backup method when the other mapped addresses are already allocated (interface PAT fallback). This option is available only if you select a destination interface that is not a member of a bridge group. To use the IPv6 address of the interface, also check the IPv6 option.
  • IPv6Whether to use the IPv6 address of the destination interface for interface PAT.

Step 10

Click Save to add the rule.

Step 11

Click Save on the NAT page to save your changes.


Static NAT

The following topics explain static NAT and how to implement it.

About Static NAT

Static NAT creates a fixed translation of a real address to a mapped address. Because the mapped address is the same for each consecutive connection, static NAT allows bidirectional connection initiation, both to and from the host (if an access rule exists that allows it). With dynamic NAT and PAT, on the other hand, each host uses a different address or port for each subsequent translation, so bidirectional initiation is not supported.

The following figure shows a typical static NAT scenario. The translation is always active so both real and remote hosts can initiate connections.

Figure 7. Static NAT

Note


You can disable bidirectionality if desired.


Static NAT with Port Translation

Static NAT with port translation lets you specify a real and mapped protocol and port.

When you specify the port with static NAT, you can choose to map the port and/or the IP address to the same value or to a different value.

The following figure shows a typical static NAT with port translation scenario showing both a port that is mapped to itself and a port that is mapped to a different value; the IP address is mapped to a different value in both cases. The translation is always active so both translated and remote hosts can initiate connections.

Figure 8. Typical Static NAT with Port Translation Scenario

Static NAT-with-port-translation rules limit access to the destination IP address for the specified port only. If you try to access the destination IP address on a different port not covered by a NAT rule, then the connection is blocked. In addition, for manual NAT, traffic that does not match the source IP address of the NAT rule will be dropped if it matches the destination IP address, regardless of the destination port. Therefore, you must add additional rules for all other traffic allowed to the destination IP address. For example, you can configure a static NAT rule for the IP address, without port specification, and place it after the port translation rule.


Note


For applications that require application inspection for secondary channels (for example, FTP and VoIP), NAT automatically translates the secondary ports.


Following are some other uses of static NAT with port translation.

Static NAT with Identity Port Translation

You can simplify external access to internal resources. For example, if you have three separate servers that provide services on different ports (such as FTP, HTTP, and SMTP), you can give external users a single IP address to access those services. You can then configure static NAT with identity port translation to map the single external IP address to the correct IP addresses of the real servers based on the port they are trying to access. You do not need to change the port, because the servers are using the standard ones (21, 80, and 25 respectively).

Static NAT with Port Translation for Non-Standard Ports

You can also use static NAT with port translation to translate a well-known port to a non-standard port or vice versa. For example, if inside web servers use port 8080, you can allow outside users to connect to port 80, and then undo translation to the original port 8080. Similarly, to provide extra security, you can tell web users to connect to non-standard port 6785, and then undo translation to port 80.

Static Interface NAT with Port Translation

You can configure static NAT to map a real address to an interface address/port combination. For example, if you want to redirect Telnet access for the device's outside interface to an inside host, then you can map the inside host IP address/port 23 to the outside interface address/port 23.

One-to-Many Static NAT

Typically, you configure static NAT with a one-to-one mapping. However, in some cases, you might want to configure a single real address to several mapped addresses (one-to-many). When you configure one-to-many static NAT, when the real host initiates traffic, it always uses the first mapped address. However, for traffic initiated to the host, you can initiate traffic to any of the mapped addresses, and they will be untranslated to the single real address.

The following figure shows a typical one-to-many static NAT scenario. Because initiation by the real host always uses the first mapped address, the translation of real host IP/first mapped IP is technically the only bidirectional translation.

Figure 9. One-to-Many Static NAT

For example, you have a load balancer at 10.1.2.27. Depending on the URL requested, it redirects traffic to the correct web server.

Figure 10. One-to-Many Static NAT Example
Other Mapping Scenarios (Not Recommended)

NAT has the flexibility to allow any kind of static mapping scenario: one-to-one, one-to-many, but also few-to-many, many-to-few, and many-to-one mappings. We recommend using only one-to-one or one-to-many mappings. These other mapping options might result in unintended consequences.

Functionally, few-to-many is the same as one-to-many; but because the configuration is more complicated and the actual mappings may not be obvious at a glance, we recommend creating a one-to-many configuration for each real address that requires it. For example, for a few-to-many scenario, the few real addresses are mapped to the many mapped addresses in order (A to 1, B to 2, C to 3). When all real addresses are mapped, the next mapped address is mapped to the first real address, and so on until all mapped addresses are mapped (A to 4, B to 5, C to 6). This results in multiple mapped addresses for each real address. Just like a one-to-many configuration, only the first mappings are bidirectional; subsequent mappings allow traffic to be initiated to the real host, but all traffic from the real host uses only the first mapped address for the source.

The following figure shows a typical few-to-many static NAT scenario.

Figure 11. Few-to-Many Static NAT

For a many-to-few or many-to-one configuration, where you have more real addresses than mapped addresses, you run out of mapped addresses before you run out of real addresses. Only the mappings between the lowest real IP addresses and the mapped pool result in bidirectional initiation. The remaining higher real addresses can initiate traffic, but traffic cannot be initiated to them (returning traffic for a connection is directed to the correct real address because of the unique 5-tuple (source IP, destination IP, source port, destination port, protocol) for the connection).


Note


Many-to-few or many-to-one NAT is not PAT. If two real hosts use the same source port number and go to the same outside server and the same TCP destination port, and both hosts are translated to the same IP address, then both connections will be reset because of an address conflict (the 5-tuple is not unique).


The following figure shows a typical many-to-few static NAT scenario.

Figure 12. Many-to-Few Static NAT

Instead of using a static rule this way, we suggest that you create a one-to-one rule for the traffic that needs bidirectional initiation, and then create a dynamic rule for the rest of your addresses.

Configure Static Auto NAT

Use static auto NAT rules to translate addresses to different IP addresses that are routable on the destination network. You can also do port translation with the static NAT rule.

Before you begin

Select Objects > Object Management and create the network objects or groups needed in the rule. Alternatively, you can create the objects while defining the NAT rule. The objects must meet the following requirements:

  • Original Source—This must be a network object (not a group), and it can be a host, range, or subnet.

  • Translated Source—You have the following options to specify the translated address:

    • Destination Interface—To use the destination interface address, you do not need a network object. This configures static interface NAT with port translation: the source address/port is translated to the interface's address and the same port number.

    • Address—Create a network object or group containing hosts, ranges, or subnets. A group cannot contain both IPv4 and IPv6 addresses; it must contain one type only. Typically, you configure the same number of mapped addresses as real addresses for a one-to-one mapping. You can, however, have a mismatched number of addresses.

Procedure

Step 1

Select Devices > NAT and create or edit an Firepower Threat Defense NAT policy.

Step 2

Do one of the following:

  • Click the Add Rule button to create a new rule.
  • Click Edit (edit icon) to edit an existing rule.

The right click menu also has options to cut, copy, paste, insert, and delete rules.

Step 3

Configure the basic rule options:

  • NAT Rule—Select Auto NAT Rule.
  • Type—Select Static.

Step 4

On Interface Objects, configure the following options:

  • Source Interface Objects, Destination Interface Objects(Required for bridge group member interfaces.) The interface objects (security zones or interface groups) that identify the interfaces where this NAT rule applies. Source is the object containing the real interface, the one through which the traffic enters the device. Destination is the object containing the mapped interface, the one through which traffic exits the device. By default, the rule applies to all interfaces (Any) except for bridge group member interfaces.

Step 5

On Translation, configure the following options:

  • Original Source—The network object that contains the addresses you are translating.
  • Translated Source—One of the following:
    • To use a set group of addresses, select Address and the network object or group that contains the mapped addresses. Typically, you configure the same number of mapped addresses as real addresses for a one-to-one mapping. You can, however, have a mismatched number of addresses.

    • (Static interface NAT with port translation.) To use the address of the destination interface, select Destination Interface IP. You must also select a specific destination interface object. To use the IPv6 address of the interface, you must also select the IPv6 option on Advanced. This configures static interface NAT with port translation: the source address/port is translated to the interface's address and the same port number.

  • (Optional.) Original Port, Translated Port—If you need to translate a TCP or UDP port, select the protocol in Original Port, and type the original and translated port numbers. For example, you can translate TCP/80 to 8080 if necessary.

Step 6

(Optional.) On Advanced, select the desired options:

  • Translate DNS replies that match this ruleWhether to translate the IP address in DNS replies. For DNS replies traversing from a mapped interface to a real interface, the Address (the IPv4 A or IPv6 AAAA) record is rewritten from the mapped value to the real value. Conversely, for DNS replies traversing from a real interface to a mapped interface, the record is rewritten from the real value to the mapped value. This option is used in specific circumstances, and is sometimes needed for NAT64/46 translation, where the rewrite also converts between A and AAAA records. For more information, see Rewriting DNS Queries and Responses Using NAT. This option is not available if you are doing port translation.
  • IPv6Whether to use the IPv6 address of the destination interface for interface PAT.
  • Net to Net MappingFor NAT 46, select this option to translate the first IPv4 address to the first IPv6 address, the second to the second, and so on. Without this option, the IPv4-embedded method is used. For a one-to-one translation, you must use this option.
  • Do not proxy ARP on Destination InterfaceDisables proxy ARP for incoming packets to the mapped IP addresses. If you use addresses on the same network as the mapped interface, the system uses proxy ARP to answer any ARP requests for the mapped addresses, thus intercepting traffic destined for a mapped address. This solution simplifies routing because the device does not have to be the gateway for any additional networks. You can disable proxy ARP if desired, in which case you need to be sure to have proper routes on the upstream router. Normally for identity NAT, proxy ARP is not required, and in some cases can cause connectivity issues.

Step 7

Click Save to add the rule.

Step 8

Click Save on the NAT page to save your changes.


Configure Static Manual NAT

Use static manual NAT rules when auto NAT does not meet your needs. For example, if you want to do different translations based on the destination. Static NAT translates addresses to different IP addresses that are routable on the destination network. You can also do port translation with the static NAT rule.

Before you begin

Select Objects > Object Management and create the network objects or groups needed in the rule. Groups cannot contain both IPv4 and IPv6 addresses; they must contain one type only. Alternatively, you can create the objects while defining the NAT rule. The objects must also meet the following requirements:

  • Original Source—This can be a network object or group, and it can contain a host, range, or subnet. If you want to translate all original source traffic, you can skip this step and specify Any in the rule.

  • Translated Source—You have the following options to specify the translated address:

    • Destination Interface—To use the destination interface address, you do not need a network object. This configures static interface NAT with port translation: the source address/port is translated to the interface's address and the same port number.

    • Address—Create a network object or group containing hosts, range, or subnets. Typically, you configure the same number of mapped addresses as real addresses for a one-to-one mapping. You can, however, have a mismatched number of addresses.

You can also create network objects for the Original Destination and Translated Destination if you are configuring a static translation for those addresses in the rule. If you want to configure destination static interface NAT with port translation only, you can skip adding an object for the destination mapped addresses and specify the interface in the rule.

You can also perform port translation on the source, destination, or both. In the Object Manager, ensure that there are port objects you can use for the original and translated ports.

Procedure

Step 1

Select Devices > NAT and create or edit an Firepower Threat Defense NAT policy.

Step 2

Do one of the following:

  • Click the Add Rule button to create a new rule.
  • Click Edit (edit icon) to edit an existing rule.

The right click menu also has options to cut, copy, paste, insert, and delete rules.

Step 3

Configure the basic rule options:

  • NAT Rule—Select Manual NAT Rule.
  • Type—Select Static. This setting only applies to the source address. If you define a translation for the destination address, the translation is always static.
  • EnableWhether you want the rule to be active. You can later activate or deactivate the rule using the right-click menu on the rules page.
  • InsertWhere you want to add the rule. You can insert it in a category (before or after auto NAT rules), or above or below the rule number you specify.

Step 4

On Interface Objects, configure the following options:

  • Source Interface Objects, Destination Interface Objects(Required for bridge group member interfaces.) The interface objects (security zones or interface groups) that identify the interfaces where this NAT rule applies. Source is the object containing the real interface, the one through which the traffic enters the device. Destination is the object containing the mapped interface, the one through which traffic exits the device. By default, the rule applies to all interfaces (Any) except for bridge group member interfaces.

Step 5

(On the Translation page.) Identify the original packet addresses, either IPv4 or IPv6; namely, the packet addresses as they appear in the original packet.

See the following figure for an example of the original packet vs. the translated packet.

  • Original Source—The network object or group that contains the addresses you are translating.

  • Original Destination—(Optional.) The network object that contains the addresses of the destinations. If you leave this blank, the source address translation applies regardless of destination. If you do specify the destination address, you can configure a static translation for that address or just use identity NAT for it.

    You can select Source Interface IP to base the original destination on the source interface (which cannot be Any). If you select this option, you must also select a translated destination object. To implement a static interface NAT with port translation for the destination addresses, select this option and also select the appropriate port objects for the destination ports.

Step 6

Identify the translated packet addresses, either IPv4 or IPv6; namely, the packet addresses as they appear on the destination interface network. You can translate between IPv4 and IPv6 if desired.

  • Translated Source—One of the following:
    • To use a set group of addresses, select Address and the network object or group that contains the mapped addresses. Typically, you configure the same number of mapped addresses as real addresses for a one-to-one mapping. You can, however, have a mismatched number of addresses.

    • (Static interface NAT with port translation.) To use the address of the destination interface, select Destination Interface IP. You must also select a specific destination interface object. To use the IPv6 address of the interface, you must also select the IPv6 option on Advanced. This configures static interface NAT with port translation: the source address/port is translated to the interface's address and the same port number.

  • Translated Destination—(Optional.) The network object or group that contains the destination addresses used in the translated packet. If you selected an object for Original Destination, you can set up identity NAT (that is, no translation) by selecting the same object.

Step 7

(Optional.) Identify the source or destination service ports for service translation.

If you are configuring static NAT with port translation, you can translate ports for the source, destination, or both. For example, you can translate between TCP/80 and TCP/8080.

NAT only supports TCP or UDP. When translating a port, be sure the protocols in the real and mapped service objects are identical (both TCP or both UDP). For identity NAT, you can use the same service object for both the real and mapped ports.

  • Original Source Port, Translated Source Port—Defines a port translation for the source address.
  • Original Destination Port, Translated Destination Port—Defines a port translation for the destination address.

Step 8

(Optional.) On Advanced, select the desired options:

  • Translate DNS replies that match this ruleWhether to translate the IP address in DNS replies. For DNS replies traversing from a mapped interface to a real interface, the Address (the IPv4 A or IPv6 AAAA) record is rewritten from the mapped value to the real value. Conversely, for DNS replies traversing from a real interface to a mapped interface, the record is rewritten from the real value to the mapped value. This option is used in specific circumstances, and is sometimes needed for NAT64/46 translation, where the rewrite also converts between A and AAAA records. For more information, see Rewriting DNS Queries and Responses Using NAT. This option is not available if you are doing port translation.
  • IPv6Whether to use the IPv6 address of the destination interface for interface PAT.
  • Net to Net MappingFor NAT 46, select this option to translate the first IPv4 address to the first IPv6 address, the second to the second, and so on. Without this option, the IPv4-embedded method is used. For a one-to-one translation, you must use this option.
  • Do not proxy ARP on Destination InterfaceDisables proxy ARP for incoming packets to the mapped IP addresses. If you use addresses on the same network as the mapped interface, the system uses proxy ARP to answer any ARP requests for the mapped addresses, thus intercepting traffic destined for a mapped address. This solution simplifies routing because the device does not have to be the gateway for any additional networks. You can disable proxy ARP if desired, in which case you need to be sure to have proper routes on the upstream router. Normally for identity NAT, proxy ARP is not required, and in some cases can cause connectivity issues.
  • UnidirectionalSelect this option to prevent the destination addresses from initiating traffic to the source addresses. The unidirectional option is mainly useful for testing purposes and might not work with all protocols. For example, SIP requires protocol inspection to translate SIP headers using NAT, but this will not occur if you make the translation unidirectional.

Step 9

Click Save to add the rule.

Step 10

Click Save on the NAT page to save your changes.


Identity NAT

You might have a NAT configuration in which you need to translate an IP address to itself. For example, if you create a broad rule that applies NAT to every network, but want to exclude one network from NAT, you can create a static NAT rule to translate an address to itself.

The following figure shows a typical identity NAT scenario.

Figure 13. Identity NAT

The following topics explain how to configure identity NAT.

Configure Identity Auto NAT

Use static identity auto NAT rules to prevent the translation of an address. That is, to translate the address to itself.

Before you begin

Select Objects > Object Management and create the network objects or groups needed in the rule. Alternatively, you can create the objects while defining the NAT rule. The objects must meet the following requirements:

  • Original Source—This must be a network object (not a group), and it can be a host, range, or subnet.

  • Translated Source—A network object or group with the exact same contents as the original source object. You can use the same object.

Procedure

Step 1

Select Devices > NAT and create or edit an Firepower Threat Defense NAT policy.

Step 2

Do one of the following:

  • Click the Add Rule button to create a new rule.
  • Click Edit (edit icon) to edit an existing rule.

The right click menu also has options to cut, copy, paste, insert, and delete rules.

Step 3

Configure the basic rule options:

  • NAT Rule—Select Auto NAT Rule.
  • Type—Select Static.

Step 4

On Interface Objects, configure the following options:

  • Source Interface Objects, Destination Interface Objects(Required for bridge group member interfaces.) The interface objects (security zones or interface groups) that identify the interfaces where this NAT rule applies. Source is the object containing the real interface, the one through which the traffic enters the device. Destination is the object containing the mapped interface, the one through which traffic exits the device. By default, the rule applies to all interfaces (Any) except for bridge group member interfaces.

Step 5

On Translation, configure the following options:

  • Original Source—The network object that contains the addresses you are translating.
  • Translated Source—The same object as the original source. Optionally, you can select a different object that has the exact same contents.

Do not configure the Original Port and Translated Port options for identity NAT.

Step 6

(Optional.) On Advanced, select the desired options:

  • Translate DNS replies that match this rule—Do not configure this option for identity NAT.
  • IPv6—Do not configure this option for identity NAT.
  • Net to Net Mapping—Do not configure this option for identity NAT.
  • Do not proxy ARP on Destination InterfaceDisables proxy ARP for incoming packets to the mapped IP addresses. If you use addresses on the same network as the mapped interface, the system uses proxy ARP to answer any ARP requests for the mapped addresses, thus intercepting traffic destined for a mapped address. This solution simplifies routing because the device does not have to be the gateway for any additional networks. You can disable proxy ARP if desired, in which case you need to be sure to have proper routes on the upstream router. Normally for identity NAT, proxy ARP is not required, and in some cases can cause connectivity issues.
  • Perform Route Lookup for Destination Interface If you select source and destination interfaces when selecting the same object for original and translated source address, you can select this option to have the system determine the destination interface based on the routing table rather than using the destination interface configured in the NAT rule.

Step 7

Click Save to add the rule.

Step 8

Click Save on the NAT page to save your changes.


Configure Identity Manual NAT

Use static identity manual NAT rules when auto NAT does not meet your needs. For example, if you want to do different translations based on the destination. Use static identity NAT rules to prevent the translation of an address. That is, to translate the address to itself.

Before you begin

Select Objects > Object Management and create the network objects or groups needed in the rule. Groups cannot contain both IPv4 and IPv6 addresses; they must contain one type only. Alternatively, you can create the objects while defining the NAT rule. The objects must also meet the following requirements:

  • Original Source—This can be a network object or group, and it can contain a host, range, or subnet. If you want to translate all original source traffic, you can skip this step and specify Any in the rule.

  • Translated Source—The same object as the original source. Optionally, you can select a different object that has the exact same contents.

You can also create network objects for the Original Destination and Translated Destination if you are configuring a static translation for those addresses in the rule. If you want to configure destination static interface NAT with port translation only, you can skip adding an object for the destination mapped addresses and specify the interface in the rule.

You can also perform port translation on the source, destination, or both. In the Object Manager, ensure that there are port objects you can use for the original and translated ports. You can use the same object for identity NAT.

Procedure

Step 1

Select Devices > NAT and create or edit an Firepower Threat Defense NAT policy.

Step 2

Do one of the following:

  • Click the Add Rule button to create a new rule.
  • Click Edit (edit icon) to edit an existing rule.

The right click menu also has options to cut, copy, paste, insert, and delete rules.

Step 3

Configure the basic rule options:

  • NAT Rule—Select Manual NAT Rule.
  • Type—Select Static. This setting only applies to the source address. If you define a translation for the destination address, the translation is always static.
  • EnableWhether you want the rule to be active. You can later activate or deactivate the rule using the right-click menu on the rules page.
  • InsertWhere you want to add the rule. You can insert it in a category (before or after auto NAT rules), or above or below the rule number you specify.

Step 4

On Interface Objects, configure the following options:

  • Source Interface Objects, Destination Interface Objects(Required for bridge group member interfaces.) The interface objects (security zones or interface groups) that identify the interfaces where this NAT rule applies. Source is the object containing the real interface, the one through which the traffic enters the device. Destination is the object containing the mapped interface, the one through which traffic exits the device. By default, the rule applies to all interfaces (Any) except for bridge group member interfaces.

Step 5

Identify the original packet addresses, either IPv4 or IPv6; namely, the packet addresses as they appear in the original packet.

See the following figure for an example of the original packet vs. the translated packet where you perform identity NAT on the inside host but translate the outside host.

  • Original Source—The network object or group that contains the addresses you are translating.

  • Original Destination—(Optional.) The network object that contains the addresses of the destinations. If you leave this blank, the source address translation applies regardless of destination. If you do specify the destination address, you can configure a static translation for that address or just use identity NAT for it.

    You can select Interface Object to base the original destination on the source interface (which cannot be Any). If you select this option, you must also select a translated destination object. To implement a static interface NAT with port translation for the destination addresses, select this option and also select the appropriate port objects for the destination ports.

Step 6

Identify the translated packet addresses, either IPv4 or IPv6; namely, the packet addresses as they appear on the destination interface network. You can translate between IPv4 and IPv6 if desired.

  • Translated Source—The same object as the original source. Optionally, you can select a different object that has the exact same contents.
  • Translated Destination—(Optional.) The network object or group that contains the destination addresses used in the translated packet. If you selected an object for Original Destination, you can set up identity NAT (that is, no translation) by selecting the same object.

Step 7

(Optional.) Identify the source or destination service ports for service translation.

If you are configuring static NAT with port translation, you can translate ports for the source, destination, or both. For example, you can translate between TCP/80 and TCP/8080.

NAT only supports TCP or UDP. When translating a port, be sure the protocols in the real and mapped service objects are identical (both TCP or both UDP). For identity NAT, you can use the same service object for both the real and mapped ports.

  • Original Source Port, Translated Source Port—Defines a port translation for the source address.
  • Original Destination Port, Translated Destination Port—Defines a port translation for the destination address.

Step 8

(Optional.) On Advanced, select the desired options:

  • Translate DNS replies that match this rule—Do not configure this option for identity NAT.
  • IPv6Whether to use the IPv6 address of the destination interface for interface PAT.
  • Do not proxy ARP on Destination InterfaceDisables proxy ARP for incoming packets to the mapped IP addresses. If you use addresses on the same network as the mapped interface, the system uses proxy ARP to answer any ARP requests for the mapped addresses, thus intercepting traffic destined for a mapped address. This solution simplifies routing because the device does not have to be the gateway for any additional networks. You can disable proxy ARP if desired, in which case you need to be sure to have proper routes on the upstream router. Normally for identity NAT, proxy ARP is not required, and in some cases can cause connectivity issues.
  • Perform Route Lookup for Destination Interface If you select source and destination interfaces when selecting the same object for original and translated source address, you can select this option to have the system determine the destination interface based on the routing table rather than using the destination interface configured in the NAT rule.
  • UnidirectionalSelect this option to prevent the destination addresses from initiating traffic to the source addresses. The unidirectional option is mainly useful for testing purposes and might not work with all protocols. For example, SIP requires protocol inspection to translate SIP headers using NAT, but this will not occur if you make the translation unidirectional.

Step 9

Click Save to add the rule.

Step 10

Click Save on the NAT page to save your changes.


NAT Rule Properties for Firepower Threat Defense

Use Network Address Translation (NAT) rules to translate IP addresses to other IP addresses. You would typically use NAT rules to convert private addresses to publically routable addresses. The translation can be from one address to another, or you can use Port Address Translation (PAT) to translate many addresses to one or a few addresses, using port numbers to distinguish among the source addresses.

NAT rules include the following basic properties. The properties are the same for auto NAT and manual NAT rules except where indicated.

NAT Type

Whether you want to configure a Manual NAT Rule or an Auto NAT Rule. Auto NAT translates the source address only, and you cannot make different translations based on the destination address. Because auto NAT is more simple to configure, use it unless you need the added features of manual NAT. For more information on the differences, see Auto NAT and Manual NAT.

Type

Whether the translation rule is Dynamic or Static. Dynamic translation automatically chooses the mapped address from a pool of addresses, or an address/port combination when implementing PAT. Use static translation if you want to precisely define the mapped address/port.

Enable (Manual NAT only.)

Whether you want the rule to be active. You can later activate or deactivate the rule using the right-click menu on the rules page. You cannot disable auto NAT rules.

Insert (Manual NAT only.)

Where you want to add the rule. You can insert it in a category (before or after auto NAT rules), or above or below the rule number you specify.

Description (Optional. Manual NAT only.)

A description of the purpose of the rule.

The following topics describe the tabs for the NAT rules properties.

Interface Objects NAT Properties

Interface objects (security zones or interface groups) define the interfaces to which a NAT rule applies. In routed mode, you can use the default "any" for both source and destination to apply to all interfaces of all assigned devices. However, you typically want to select specific source and destination interfaces.


Note


The concept of “any” interface does not apply to bridge group member interfaces. When you specify “any” interface, all bridge group member interfaces are excluded. Thus, to apply NAT to bridge group members, you must specify the member interface. You cannot configure NAT for the Bridge Virtual Interface (BVI) itself, you can configure NAT for member interfaces only.


If you select interface objects, a NAT rule will be configured on an assigned device only if the device has interfaces included in all selected objects. For example, if you select both source and destination security zones, both zones must contain one or more interface for a given device.

Source Interface Objects, Destination Interface Objects

(Required for bridge group member interfaces.) The interface objects (security zones or interface groups) that identify the interfaces where this NAT rule applies. Source is the object containing the real interface, the one through which the traffic enters the device. Destination is the object containing the mapped interface, the one through which traffic exits the device. By default, the rule applies to all interfaces (Any) except for bridge group member interfaces.

Translation Properties for Auto NAT

Use the options on Translation to define the source addresses and the mapped translated addresses. The following properties apply to auto NAT only.

Original Source (Always required.)

The network object that contains the addresses you are translating. This must be a network object (not a group), and it can be a host, range, or subnet.

You cannot create auto NAT rules for the system-defined any-ipv4 or any-ipv6 objects.

Translated Source (Usually required.)

The mapped addresses, the ones to which you are translating. What you select here depends on the type of translation rule you are defining.

  • Dynamic NAT—The network object or group that contains the mapped addresses. This can be a network object or group, but it cannot include a subnet. The group cannot contain both IPv4 and IPv6 addresses; it must contain one type only. If a group contains both ranges and host IP addresses, then the ranges are used for dynamic NAT, and then the host IP addresses are used as a PAT fallback.

  • Dynamic PAT—One of the following:

    • (Interface PAT.) To use the address of the destination interface, select Destination Interface IP. You must also select a specific destination interface object. To use the IPv6 address of the interface, you must also select the IPv6 option on Advanced. Do not configure a PAT pool.

    • To use a single address other than the destination interface address, select the host network object you created for this purpose. Do not configure a PAT pool.

    • To use a PAT pool, leave Translated Source empty. Select the PAT pool object on PAT Pool.

  • Static NAT—One of the following:

    • To use a set group of addresses, select Address and the network object or group that contains the mapped addresses. The object or group can contain hosts, ranges, or subnets. Typically, you configure the same number of mapped addresses as real addresses for a one-to-one mapping. You can, however, have a mismatched number of addresses.

    • (Static interface NAT with port translation.) To use the address of the destination interface, select Destination Interface IP. You must also select a specific destination interface object. To use the IPv6 address of the interface, you must also select the IPv6 option on the Advanced tab. This configures static interface NAT with port translation: the source address/port is translated to the interface's address and the same port number.

  • Identity NAT—The same object as the original source. Optionally, you can select a different object that has the exact same contents.

Original Port, Translated Port (Static NAT only.)

If you need to translate a TCP or UDP port, select the protocol in Original Port, and type the original and translated port numbers. For example, you can translate TCP/80 to 8080 if necessary. Do not configure these options for identity NAT.

Translation Properties for Manual NAT

Use the options on Translation to define the source addresses and the mapped translated addresses. The following properties apply to manual NAT only. All are optional except as indicated.

Original Source (Always required.)

The network object or group that contains the addresses you are translating. This can be a network object or group, and it can contain a host, range, or subnet. If you want to translate all original source traffic, you can specify Any in the rule.

Translated Source (Usually required.)

The mapped addresses, the ones to which you are translating. What you select here depends on the type of translation rule you are defining.

  • Dynamic NAT—The network object or group that contains the mapped addresses. This can be a network object or group, but it cannot include a subnet. The group cannot contain both IPv4 and IPv6 addresses; it must contain one type only. If a group contains both ranges and host IP addresses, then the ranges are used for dynamic NAT, and then the host IP addresses are used as a PAT fallback.

  • Dynamic PAT—One of the following:

    • (Interface PAT.) To use the address of the destination interface, select Destination Interface IP. You must also select a specific destination interface object. To use the IPv6 address of the interface, you must also select the IPv6 option on Advanced. Do not configure a PAT pool.

    • To use a single address other than the destination interface address, select the host network object you created for this purpose. Do not configure a PAT pool.

    • To use a PAT pool, leave Translated Source empty. Select the PAT pool object on PAT Pool.

  • Static NAT—One of the following:

    • To use a set group of addresses, select Address and the network object or group that contains the mapped addresses. The object or group can contain hosts, ranges, or subnets. Typically, you configure the same number of mapped addresses as real addresses for a one-to-one mapping. You can, however, have a mismatched number of addresses.

    • (Static interface NAT with port translation.) To use the address of the destination interface, select Destination Interface IP. You must also select a specific destination interface object. To use the IPv6 address of the interface, you must also select the IPv6 option on the Advanced tab. This configures static interface NAT with port translation: the source address/port is translated to the interface's address and the same port number.

  • Identity NAT—The same object as the original source. Optionally, you can select a different object that has the exact same contents.

Original Destination

The network object that contains the addresses of the destinations. If you leave this blank, the source address translation applies regardless of destination. If you do specify the destination address, you can configure a static translation for that address or just use identity NAT for it.

You can select Source Interface IP to base the original destination on the source interface (which cannot be Any). If you select this option, you must also select a translated destination object. To implement a static interface NAT with port translation for the destination addresses, select this option and also select the appropriate port objects for the destination ports.

Translated Destination

The network object or group that contains the destination addresses used in the translated packet. If you selected an object for Original Destination, you can set up identity NAT (that is, no translation) by selecting the same object.

Original Source Port, Translated Source Port, Original Destination Port, Translated Destination Port

The port objects that define the source and destination services for the original and translated packets. You can translate the ports, or select the same object to make the rule sensitive to the service without translating the ports. Keep the following rules in mind when configuring services:

  • (Dynamic NAT or PAT.) You cannot do translation on the Original Source Port and Translated Source Port. You can do translation on the destination port only.

  • NAT only supports TCP or UDP. When translating a port, be sure the protocols in the real and mapped service objects are identical (both TCP or both UDP). For identity NAT, you can use the same service object for both the real and mapped ports.

PAT Pool NAT Properties

When you configure dynamic NAT, you can define a pool of addresses to use for Port Address Translation using the properties on the PAT Pool tab.

Enable PAT Pool

Select this option to configure a pool of addresses for PAT.

PAT

The addresses to use for the PAT pool, one of the following:

  • Address—The object that defines the PAT pool addresses, either a network object that includes a range, or a network object group that contains hosts, ranges, or both. You cannot include subnets. The group cannot contain both IPv4 and IPv6 addresses; it must contain one type only.

  • Destination Interface IP—Indicates that you want to use the destination interface as the PAT address. For this option, you must select a specific Destination Interface Object; you cannot use Any as the destination interface. This is another way to implement interface PAT.

Round Robin

To assign addresses/ports in a round-robin fashion. By default without round robin, all ports for a PAT address will be allocated before the next PAT address is used. The round-robin method assigns one address/port from each PAT address in the pool before returning to use the first address again, and then the second address, and so on.

Extended PAT Table

To use extended PAT. Extended PAT uses 65535 ports per service, as opposed to per IP address, by including the destination address and port in the translation information. Normally, the destination port and address are not considered when creating PAT translations, so you are limited to 65535 ports per PAT address. For example, with extended PAT, you can create a translation of 10.1.1.1:1027 when going to 192.168.1.7:23 as well as a translation of 10.1.1.1:1027 when going to 192.168.1.7:80. You cannot use this option with interface PAT or interface PAT fallback.

Flat Port Range; Include Reserved Ports

To use the 1024 to 65535 port range as a single flat range when allocating TCP/UDP ports. When choosing the mapped port number for a translation, PAT uses the real source port number if it is available. However, without this option, if the real port is not available, by default the mapped ports are chosen from the same range of ports as the real port number: 1 to 511, 512 to 1023, and 1024 to 65535. To avoid running out of ports at the low ranges, configure this setting. To use the entire range of 1 to 65535, also check the Include Reserved Ports option.

Advanced NAT Properties

When you configure NAT, you can configure properties that provide specialized services in the Advanced options. All of these properties are optional: configure them only if you need the service.

Translate DNS replies that match this rule

Whether to translate the IP address in DNS replies. For DNS replies traversing from a mapped interface to a real interface, the Address (the IPv4 A or IPv6 AAAA) record is rewritten from the mapped value to the real value. Conversely, for DNS replies traversing from a real interface to a mapped interface, the record is rewritten from the real value to the mapped value. This option is used in specific circumstances, and is sometimes needed for NAT64/46 translation, where the rewrite also converts between A and AAAA records. For more information, see Rewriting DNS Queries and Responses Using NAT. This option is not available if you are doing port translation in a static NAT rule.

Fallthrough to Interface PAT (Destination Interface) (Dynamic NAT only.)

Whether to use the IP address of the destination interface as a backup method when the other mapped addresses are already allocated (interface PAT fallback). This option is available only if you select a destination interface that is not a member of a bridge group. To use the IPv6 address of the interface, also check the IPv6 option. You cannot select this option if you already configured interface PAT as the translated address. You also cannot select the option if you configure a PAT pool.

IPv6

Whether to use the IPv6 address of the destination interface for interface PAT.

Net to Net Mapping (Static NAT only.)

For NAT 46, select this option to translate the first IPv4 address to the first IPv6 address, the second to the second, and so on. Without this option, the IPv4-embedded method is used. For a one-to-one translation, you must use this option.

Do not proxy ARP on Destination Interface (Static NAT only.)

Disables proxy ARP for incoming packets to the mapped IP addresses. If you use addresses on the same network as the mapped interface, the system uses proxy ARP to answer any ARP requests for the mapped addresses, thus intercepting traffic destined for a mapped address. This solution simplifies routing because the device does not have to be the gateway for any additional networks. You can disable proxy ARP if desired, in which case you need to be sure to have proper routes on the upstream router. Normally for identity NAT, proxy ARP is not required, and in some cases can cause connectivity issues.

Perform Route Lookup for Destination Interface (Static Identity NAT only. Routed mode only.)

If you select source and destination interfaces when selecting the same object for original and translated source address, you can select this option to have the system determine the destination interface based on the routing table rather than using the destination interface configured in the NAT rule.

Unidirectional (Manual NAT only, static NAT only.)

Select this option to prevent the destination addresses from initiating traffic to the source addresses. The unidirectional option is mainly useful for testing purposes and might not work with all protocols. For example, SIP requires protocol inspection to translate SIP headers using NAT, but this will not occur if you make the translation unidirectional.

Translating IPv6 Networks

In cases where you need to pass traffic between IPv6-only and IPv4-only networks, you need to use NAT to convert between the address types. Even with two IPv6 networks, you might want to hide internal addresses from the outside network.

You can use the following translation types with IPv6 networks:

  • NAT64, NAT46—Translates IPv6 packets into IPv4 and vice versa. You need to define two policies, one for the IPv6 to IPv4 translation, and one for the IPv4 to IPv6 translation. Although you can accomplish this with a single manual NAT rule, if the DNS server is on the external network, you probably need to rewrite the DNS response. Because you cannot enable DNS rewrite on a manual NAT rule when you specify a destination, creating two auto NAT rules is the better solution.


    Note


    NAT46 supports static mappings only.


  • NAT66—Translates IPv6 packets to a different IPv6 address. We recommend using static NAT. Although you can use dynamic NAT or PAT, IPv6 addresses are in such large supply, you do not have to use dynamic NAT.


Note


NAT64 and NAT 46 are possible on standard routed interfaces only. NAT66 is possible on both routed and bridge group member interfaces.


NAT64/46: Translating IPv6 Addresses to IPv4

When traffic goes from an IPv6 network to an IPv4-only network, you need to convert the IPv6 address to IPv4, and return traffic from IPv4 to IPv6. You need to define two address pools, an IPv4 address pool to bind IPv6 addresses in the IPv4 network, and an IPv6 address pool to bind IPv4 addresses in the IPv6 network.

  • The IPv4 address pool for the NAT64 rule is normally small and typically might not have enough addresses to map one-to-one with the IPv6 client addresses. Dynamic PAT might more easily meet the possible large number of IPv6 client addresses compared to dynamic or static NAT.

  • The IPv6 address pool for the NAT46 rule can be equal to or larger than the number of IPv4 addresses to be mapped. This allows each IPv4 address to be mapped to a different IPv6 address. NAT46 supports static mappings only, so you cannot use dynamic PAT.

You need to define two policies, one for the source IPv6 network, and one for the destination IPv4 network. Although you can accomplish this with a single manual NAT rule, if the DNS server is on the external network, you probably need to rewrite the DNS response. Because you cannot enable DNS rewrite on a manual NAT rule when you specify a destination, creating two auto NAT rules is the better solution.

NAT64/46 Example: Inside IPv6 Network with Outside IPv4 Internet

Following is a straight-forward example where you have an inside IPv6-only network, and you want to convert to IPv4 for traffic sent to the Internet. This example assumes you do not need DNS translation, so you can perform both the NAT64 and NAT46 translations in a single manual NAT rule.


Basic NAT64 network diagram.

In this example, you translate the inside IPv6 network to IPv4 using dynamic interface PAT with the IP address of the outside interface. Outside IPv4 traffic is statically translated to addresses on the 2001:db8::/96 network, allowing transmission on the inside network.

Procedure

Step 1

Create the network object that defines the inside IPv6 network.

  1. Choose Objects > Object Management.

  2. Select Network from the table of contents and click Add Network > Add Object.

  3. Define the inside IPv6 network.

    Name the network object (for example, inside_v6) and enter the network address, 2001:db8::/96.


    NAT64 inside_v6 network object.

  4. Click Save.

Step 2

Create the manual NAT rule to translate the IPv6 network to IPv4 and back again.

  1. Select Devices > NAT and create or edit an Firepower Threat Defense NAT policy.

  2. Click Add Rule.

  3. Configure the following properties:

    • NAT Rule = Manual NAT Rule.

    • Type = Dynamic.

  4. On Interface Objects, configure the following:

    • Source Interface Objects = inside.

    • Destination Interface Objects = outside.

  5. On Translation, configure the following:

    • Original Source = inside_v6 network object.

    • Translated Source = Destination Interface IP.

    • Original Destination = inside_v6 network object.

    • Translated Destination = any-ipv4 network object.


    NAT64 dynamic PAT rule.

  6. Click OK.

    With this rule, any traffic from the 2001:db8::/96 subnet on the inside interface going to the outside interface gets a NAT64 PAT translation using the IPv4 address of the outside interface. Conversely, any IPv4 address on the outside network coming to the inside interface is translated to an address on the 2001:db8::/96 network using the embedded IPv4 address method.

  7. Click Save on the NAT rules page.


NAT64/46 Example: Inside IPv6 Network with Outside IPv4 Internet and DNS Translation

Following is a typical example where you have an inside IPv6-only network, but there are some IPv4-only services on the outside Internet that internal users need.


NAT64 network diagram.

In this example, you translate the inside IPv6 network to IPv4 using dynamic interface PAT with the IP address of the outside interface. Outside IPv4 traffic is statically translated to addresses on the 2001:db8::/96 network, allowing transmission on the inside network. You enable DNS rewrite on the NAT46 rule, so that replies from the external DNS server can be converted from A (IPv4) to AAAA (IPv6) records, and the addresses converted from IPv4 to IPv6.

Following is a typical sequence for a web request where a client at 2001:DB8::100 on the internal IPv6 network tries to open www.example.com.

  1. The client’s computer sends a DNS request to the DNS server at 2001:DB8::D1A5:CA81. The NAT rules make the following translations to the source and destination in the DNS request:

    • 2001:DB8::100 to a unique port on 209.165.201.1 (The NAT64 interface PAT rule.)

    • 2001:DB8::D1A5:CA81 to 209.165.202.129 (The NAT46 rule. D1A5:CA81 is the IPv6 equivalent of 209.165.202.129.)

  2. The DNS server responds with an A record indicating that www.example.com is at 209.165.200.225. The NAT46 rule, with DNS rewrite enabled, converts the A record to the IPv6-equivalent AAAA record, and translates 209.165.200.225 to 2001:db8:D1A5:C8E1in the AAAA record. In addition, the source and destination addresses in the DNS response are untranslated:

    • 209.165.202.129 to 2001:DB8::D1A5:CA81

    • 209.165.201.1 to 2001:db8::100

  3. The IPv6 client now has the IP address of the web server, and makes an HTTP request to www.example.com at 2001:db8:D1A5:C8E1. (D1A5:C8E1 is the IPv6 equivalent of 209.165.200.225.) The source and destination of the HTTP request are translated:

    • 2001:DB8::100 to a unique port on 209.156.101.54 (The NAT64 interface PAT rule.)

    • 2001:db8:D1A5:C8E1 to 209.165.200.225 (The NAT46 rule.)

The following procedure explains how to configure this example.

Before you begin

Ensure that you have interface objects (security zones or interface groups) that contain the interfaces for the device. In this example, we will assume the interface objects are security zones named inside and outside. To configure interface objects, select Objects > Object Management, then select Interface.

Procedure

Step 1

Create the network objects that define the inside IPv6 and outside IPv4 networks.

  1. Choose Objects > Object Management.

  2. Select Network from the table of contents and click Add Network > Add Object.

  3. Define the inside IPv6 network.

    Name the network object (for example, inside_v6) and enter the network address, 2001:db8::/96.


    NAT64 inside_v6 network object.

  4. Click Save.

  5. Click Add Network > Add Object and define the outside IPv4 network.

    Name the network object (for example, outside_v4_any) and enter the network address 0.0.0.0/0.


    NAT64 outside_v4_any network object.

  6. Click Save.

Step 2

Configure the NAT64 dynamic PAT rule for the inside IPv6 network.

Step 3

Configure the static NAT46 rule for the outside IPv4 network.

  1. Click Add Rule.

  2. Configure the following properties:

    • NAT Rule = Auto NAT Rule.

    • Type = Static.

  3. On Interface Objects, configure the following:

    • Source Interface Objects = outside.

    • Destination Interface Objects = inside.

  4. On Translation, configure the following:

    • Original Source = outside_v4_any network object.

    • Translated Source > Address = inside_v6 network object.

  5. On Advanced, select Translate DNS replies that match this rule.


    NAT46 rule.

  6. Click OK.

    With this rule, any IPv4 address on the outside network coming to the inside interface is translated to an address on the 2001:db8::/96 network using the embedded IPv4 address method. In addition, DNS responses are converted from A (IPv4) to AAAA (IPv6) records, and the addresses converted from IPv4 to IPv6.


NAT66: Translating IPv6 Addresses to Different IPv6 Addresses

When going from an IPv6 network to another IPv6 network, you can translate the addresses to different IPv6 addresses on the outside network. We recommend using static NAT. Although you can use dynamic NAT or PAT, IPv6 addresses are in such large supply, you do not have to use dynamic NAT.

Because you are not translating between different address types, you need a single rule for NAT66 translations. You can easily model these rules using auto NAT. However, if you do not want to allow returning traffic, you can make the static NAT rule unidirectional using manual NAT only.

NAT66 Example, Static Translation between Networks

You can configure a static translation between IPv6 address pools using auto NAT. The following example explains how to convert inside addresses on the 2001:db8:122:2091::/96 network to outside addresses on the 2001:db8:122:2999::/96 network.


NAT66 static translation network diagram.

Before you begin

Ensure that you have interface objects (security zones or interface groups) that contain the interfaces for the device. In this example, we will assume the interface objects are security zones named inside and outside. To configure interface objects, select Objects > Object Management, then select Interface.

Procedure

Step 1

Create the network objects that define the inside IPv6 and outside IPv6 NAT networks.

  1. Choose Objects > Object Management.

  2. Select Network from the table of contents and click Add Network > Add Object.

  3. Define the inside IPv6 network.

    Name the network object (for example, inside_v6) and enter the network address, 2001:db8:122:2091::/96.


    NAT66 inside_v6 network object.

  4. Click Save.

  5. Click Add Network > Add Object and define the outside IPv6 NAT network.

    Name the network object (for example, outside_nat_v6) and enter the network address 2001:db8:122:2999::/96.


    NAT66 outside_nat_v6 network object.

  6. Click Save.

Step 2

Configure the static NAT rule for the inside IPv6 network.

  1. Select Devices > NAT and create or edit an Firepower Threat Defense NAT policy.

  2. Click Add Rule.

  3. Configure the following properties:

    • NAT Rule = Auto NAT Rule.

    • Type = Static.

  4. On Interface Objects, configure the following:

    • Source Interface Objects = inside.

    • Destination Interface Objects = outside.

  5. On Translation, configure the following:

    • Original Source = inside_v6 network object.

    • Translated Source > Address = outside_nat_v6 network object.


    NAT66 static translation rule.

  6. Click OK.

    With this rule, any traffic from the 2001:db8:122:2091::/96 subnet on the inside interface going to the outside interface gets a static NAT66 translation to an address on the 2001:db8:122:2999::/96 network.


NAT66 Example, Simple IPv6 Interface PAT

A simple approach for implementing NAT66 is to dynamically assign internal addresses to different ports on the outside interface IPv6 address.

When you configure an interface PAT rule for NAT66, all the global addresses that are configured on that interface are used for PAT mapping. Link-local or site-local addresses for the interface are not used for PAT.


NAT66 interface PAT network diagram.

Before you begin

Ensure that you have interface objects (security zones or interface groups) that contain the interfaces for the device. In this example, we will assume the interface objects are security zones named inside and outside. To configure interface objects, select Objects > Object Management, then select Interface.

Procedure

Step 1

Create the network object that defines the inside IPv6 network.

  1. Choose Objects > Object Management.

  2. Select Network from the table of contents and click Add Network > Add Object.

  3. Define the inside IPv6 network.

    Name the network object (for example, inside_v6) and enter the network address, 2001:db8:122:2091::/96.


    NAT66 inside_v6 network object.

  4. Click Save.

Step 2

Configure the dynamic PAT rule for the inside IPv6 network.

  1. Select Devices > NAT and create or edit an Firepower Threat Defense NAT policy.

  2. Click Add Rule.

  3. Configure the following properties:

    • NAT Rule = Auto NAT Rule.

    • Type = Dynamic.

  4. On Interface Objects, configure the following:

    • Source Interface Objects = inside.

    • Destination Interface Objects = outside.

  5. On Translation, configure the following:

    • Original Source = inside_v6 network object.

    • Translated Source = Destination Interface IP.

  6. On tAdvanced, select IPv6, which indicates that the IPv6 address of the destination interface should be used.


    NAT66 interface PAT rule.

  7. Click OK.

    With this rule, any traffic from the 2001:db8:122:2091::/96 subnet on the inside interface going to the outside interface gets a NAT66 PAT translation to one of the IPv6 global addresses configured for the outside interface.


Monitoring NAT

To monitor and troubleshoot NAT connections, log into the device CLI and use the following commands.

  • show nat displays the NAT rules and per-rule hit counts. There are additional keywords to show other aspects of NAT.

  • show xlate displays the actual NAT translations that are currently active.

  • clear xlate lets you remove an active NAT translation. You might need to remove active translations if you alter NAT rules, because existing connections continue to use the old translation slot until the connection ends. Clearing a translation allows the system to build a new translation for a client on the client's next connection attempt based on your new rules.

Examples for NAT

The following topics provide examples for configuring NAT on Threat Defense devices.

Providing Access to an Inside Web Server (Static Auto NAT)

The following example performs static NAT for an inside web server. The real address is on a private network, so a public address is required. Static NAT is necessary so hosts can initiate traffic to the web server at a fixed address.

Figure 14. Static NAT for an Inside Web Server

Before you begin

Ensure that you have interface objects (security zones or interface groups) that contain the interfaces for the device that protects the web server. In this example, we will assume the interface objects are security zones named inside and outside. To configure interface objects, select Objects > Object Management, then select Interface.

Procedure


Step 1

Create the network objects that define the server’s private and public host addresses.

  1. Choose Objects > Object Management.

  2. Select Network from the table of contents and click Add Network > Add Object.

  3. Define the web server’s private address.

    Name the network object (for example, WebServerPrivate) and enter the real host IP address, 10.1.2.27.


    Network object defining private address.
  4. Click Save.

  5. Click Add Network > Add Object and define the public address.

    Name the network object (for example, WebServerPublic) and enter the host address 209.165.201.10.


    Network object defining public address.
  6. Click Save.

Step 2

Configure static NAT for the object.

  1. Select Devices > NAT and create or edit an Firepower Threat Defense NAT policy.

  2. Click Add Rule.

  3. Configure the following properties:

    • NAT Rule = Auto NAT Rule.

    • Type = Static.

  4. On Interface Objects, configure the following:

    • Source Interface Objects = inside.

    • Destination Interface Objects = outside.

  5. On Translation, configure the following:

    • Original Source = WebServerPrivate network object.

    • Translated Source > Address= WebServerPublic network object.


    Web server NAT rule.

  6. Click Save.

Step 3

Click Save on the NAT rule page.


Dynamic Auto NAT for Inside Hosts and Static NAT for an Outside Web Server

The following example configures dynamic NAT for inside users on a private network when they access the outside. Also, when inside users connect to an outside web server, that web server address is translated to an address that appears to be on the inside network.

Figure 15. Dynamic NAT for Inside, Static NAT for Outside Web Server

Before you begin

Ensure that you have interface objects (security zones or interface groups) that contain the interfaces for the device that protects the web server. In this example, we will assume the interface objects are security zones named inside and outside. To configure interface objects, select Objects > Object Management, then select Interface.

Procedure


Step 1

Create a network object for the dynamic NAT pool to which you want to translate the inside addresses.

  1. Choose Objects > Object Management.

  2. Select Network from the table of contents and click Add Network > Add Object.

  3. Define the dynamic NAT pool.

    Name the network object (for example, myNATpool) and enter the network range 209.165.201.20-209.165.201.30.


    myNATpool network object.

  4. Click Save.

Step 2

Create a network object for the inside network.

  1. Click Add Network > Add Object.

  2. Name the network object (for example, MyInsNet) and enter the network address 10.1.2.0/24.


    Network object defining inside network address.
  3. Click Save.

Step 3

Create a network object for the outside web server.

  1. Click Add Network > Add Object.

  2. Name the network object (for example, MyWebServer) and enter the host address 209.165.201.12.


    Network object defining the outside web server address.
  3. Click Save.

Step 4

Create a network object for the translated web server address.

  1. Click Add Network > Add Object.

  2. Name the network object (for example, TransWebServer) and enter the host address 10.1.2.20.


    Network object defining the translated web server address.
  3. Click Save.

Step 5

Configure dynamic NAT for the inside network using the dynamic NAT pool object.

  1. Select Devices > NAT and create or edit an Firepower Threat Defense NAT policy.

  2. Click Add Rule.

  3. Configure the following properties:

    • NAT Rule = Auto NAT Rule.

    • Type = Dynamic.

  4. On Interface Objects, configure the following:

    • Source Interface Objects = inside.

    • Destination Interface Objects = outside.

  5. On Translation, configure the following:

    • Original Source = myInsNet network object.

    • Translated Source > Address= myNATpool network group.


    MyInsNet NAT rule.

  6. Click Save.

Step 6

Configure static NAT for the web server.

  1. Click Add Rule.

  2. Configure the following properties:

    • NAT Rule = Auto NAT Rule.

    • Type = Static.

  3. On Interface Objects, configure the following:

    • Source Interface Objects = outside.

    • Destination Interface Objects = inside.

  4. On Translation, configure the following:

    • Original Source = myWebServer network object.

    • Translated Source > Address= TransWebServer network object.


    MyWebServer NAT rule.

  5. Click Save.

Step 7

Click Save on the NAT rule page.


Inside Load Balancer with Multiple Mapped Addresses (Static Auto NAT, One-to-Many)

The following example shows an inside load balancer that is translated to multiple IP addresses. When an outside host accesses one of the mapped IP addresses, it is untranslated to the single load balancer address. Depending on the URL requested, it redirects traffic to the correct web server.

Figure 16. Static NAT with One-to-Many for an Inside Load Balancer

Before you begin

Ensure that you have interface objects (security zones or interface groups) that contain the interfaces for the device that protects the web server. In this example, we will assume the interface objects are security zones named inside and outside. To configure interface objects, select Objects > Object Management, then select Interface.

Procedure


Step 1

Create a network object for the addresses to which you want to map the load balancer.

  1. Choose Objects > Object Management.

  2. Select Network from the table of contents and click Add Network > Add Object.

  3. Define the addresses.

    Name the network object (for example, myPublicIPs) and enter the network range 209.165.201.3-209.165.201.5.


    myPublicIPs network object.

  4. Click Save.

Step 2

Create a network object for the load balancer.

  1. Click Add Network > Add Object.

  2. Name the network object (for example, myLBHost), enter the host address 10.1.2.27.


    Network object defining load balancer address.
  3. Click Save.

Step 3

Configure static NAT for the load balancer.

  1. Select Devices > NAT and create or edit an Firepower Threat Defense NAT policy.

  2. Click Add Rule.

  3. Configure the following properties:

    • NAT Rule = Auto NAT Rule.

    • Type = Static.

  4. On Interface Objects, configure the following:

    • Source Interface Objects = inside.

    • Destination Interface Objects = outside.

  5. On Translation, configure the following:

    • Original Source = myLBHost network object.

    • Translated Source > Address= myPublicIPs network group.


    Load balancer NAT rule.

  6. Click Save.

Step 4

Click Save on the NAT rule page.


Single Address for FTP, HTTP, and SMTP (Static Auto NAT-with-Port-Translation)

The following static NAT-with-port-translation example provides a single address for remote users to access FTP, HTTP, and SMTP. These servers are actually different devices on the real network, but for each server, you can specify static NAT-with-port-translation rules that use the same mapped IP address, but different ports.

Figure 17. Static NAT-with-Port-Translation

Before you begin

Ensure that you have interface objects (security zones or interface groups) that contain the interfaces for the device that protects the servers. In this example, we will assume the interface objects are security zones named inside and outside. To configure interface objects, select Objects > Object Management, then select Interface.

Procedure


Step 1

Create a network object for the FTP server.

  1. Choose Objects > Object Management.

  2. Select Network from the table of contents and click Add Network > Add Object.

  3. Name the network object (for example, FTPserver), and enter the real IP address for the FTP server, 10.1.2.27.


    Network object defining FTP server address..
  4. Click Save.

Step 2

Create a network object for the HTTP server.

  1. Click Add Network > Add Object.

  2. Name the network object (for example, HTTPserver), enter the host address 10.1.2.28.


    Network object defining HTTP server address.
  3. Click Save.

Step 3

Create a network object for the SMTP server.

  1. Click Add Network > Add Object.

  2. Name the network object (for example, SMTPserver), enter the host address 10.1.2.29.


    Network object defining SMTP server address.
  3. Click Save.

Step 4

Create a network object for the public IP address used for the three servers.

  1. Click Add Network > Add Object.

  2. Name the network object (for example, ServerPublicIP) and enter the host address 209.165.201.3.


    Network object defining server public address.
  3. Click Save.

Step 5

Configure static NAT with port translation for the FTP server, mapping the FTP port to itself.

  1. Select Devices > NAT and create or edit an Firepower Threat Defense NAT policy.

  2. Click Add Rule.

  3. Configure the following properties:

    • NAT Rule = Auto NAT Rule.

    • Type = Static.

  4. On Interface Objects, configure the following:

    • Source Interface Objects = inside.

    • Destination Interface Objects = outside.

  5. On Translation, configure the following:

    • Original Source = FTPserver network object.

    • Translated Source > Address= ServerPublicIP network object.

    • Original Port > TCP = 21.

    • Translated Port = 21.


    FTP server NAT rule.

  6. Click Save.

Step 6

Configure static NAT with port translation for the HTTP server, mapping the HTTP port to itself.

  1. Click Add Rule.

  2. Configure the following properties:

    • NAT Rule = Auto NAT Rule.

    • Type = Static.

  3. On Interface Objects, configure the following:

    • Source Interface Objects = inside.

    • Destination Interface Objects = outside.

  4. On Translation, configure the following:

    • Original Source = HTTPserver network object.

    • Translated Source > Address= ServerPublicIP network object.

    • Original Port > TCP = 80.

    • Translated Port = 80.


    HTTP server NAT rule.

  5. Click Save.

Step 7

Configure static NAT with port translation for the SMTP server, mapping the SMTP port to itself.

  1. Click Add Rule.

  2. Configure the following properties:

    • NAT Rule = Auto NAT Rule.

    • Type = Static.

  3. On Interface Objects, configure the following:

    • Source Interface Objects = inside.

    • Destination Interface Objects = outside.

  4. On Translation, configure the following:

    • Original Source = SMTPserver network object.

    • Translated Source > Address= ServerPublicIP network object.

    • Original Port > TCP = 25.

    • Translated Port = 25.


    SMTP Server NAT rule.

  5. Click Save.

Step 8

Click Save on the NAT rule page.


Different Translation Depending on the Destination (Dynamic Manual PAT)

The following figure shows a host on the 10.1.2.0/24 network accessing two different servers. When the host accesses the server at 209.165.201.11, the real address is translated to 209.165.202.129:port. When the host accesses the server at 209.165.200.225, the real address is translated to 209.165.202.130:port.

Figure 18. Manual NAT with Different Destination Addresses

Before you begin

Ensure that you have interface objects (security zones or interface groups) that contain the interfaces for the device that protects the servers. In this example, we will assume the interface objects are security zones named inside and dmz. To configure interface objects, select Objects > Object Management, then select Interface.

Procedure


Step 1

Create a network object for the inside network.

  1. Choose Objects > Object Management.

  2. Select Network from the table of contents and click Add Network > Add Object.

  3. Name the network object (for example, myInsideNetwork), and enter the real network address, 10.1.2.0/24.


    Network object defining inside network address..
  4. Click Save.

Step 2

Create a network object for the DMZ network 1.

  1. Click Add Network > Add Object.

  2. Name the network object (for example, DMZnetwork1) and enter the network address 209.165.201.0/27 (subnet mask of 255.255.255.224).


    Network object defining the DMZ network 1 address.
  3. Click Save.

Step 3

Create a network object for the PAT address for DMZ network 1.

  1. Click Add Network > Add Object.

  2. Name the network object (for example, PATaddress1) and enter the host address 209.165.202.129.


    Network object defining the PAT address for DMZ network 1 address.
  3. Click Save.

Step 4

Create a network object for the DMZ network 2.

  1. Click Add Network > Add Object.

  2. Name the network object (for example, DMZnetwork2) and enter the network address 209.165.200.224/27 (subnet mask of 255.255.255.224).


    Network object defining the DMZ network 2 address.
  3. Click Save.

Step 5

Create a network object for the PAT address for DMZ network 2.

  1. Click Add Network > Add Object.

  2. Name the network object (for example, PATaddress2) and enter the host address 209.165.202.130.


    Network object defining the PAT address for DMZ network 2.
  3. Click Save.

Step 6

Configure dynamic manual PAT for DMZ network 1.

  1. Select Devices > NAT and create or edit an Firepower Threat Defense NAT policy.

  2. Click Add Rule.

  3. Configure the following properties:

    • NAT Rule = Manual NAT Rule.

    • Type = Dynamic.

  4. On Interface Objects, configure the following:

    • Source Interface Objects = inside.

    • Destination Interface Objects = dmz.

  5. On Translation, configure the following:

    • Original Source = myInsideNetwork network object.

    • Translated Source > Address= PATaddress1 network object.

    • Original Destination > Address = DMZnetwork1 network object.

    • Translated Destination = DMZnetwork1 network object.

      Note


      Because you do not want to translate the destination address, you need to configure identity NAT for it by specifying the same address for the original and translated destination addresses. Leave all of the port fields blank.


    DMZnetwork1 NAT rule.

  6. Click Save.

Step 7

Configure dynamic manual PAT for DMZ network 2.

  1. Click Add Rule.

  2. Configure the following properties:

    • NAT Rule = Manual NAT Rule.

    • Type = Dynamic.

  3. On Interface Objects, configure the following:

    • Source Interface Objects = inside.

    • Destination Interface Objects = dmz.

  4. On Translation, configure the following:

    • Original Source = myInsideNetwork network object.

    • Translated Source > Address= PATaddress2 network object.

    • Original Destination > Address = DMZnetwork2 network object.

    • Translated Destination = DMZnetwork2 network object.


    DMZnetwork2 NAT rule.

  5. Click Save.

Step 8

Click Save on the NAT rule page.


Different Translation Depending on the Destination Address and Port (Dynamic Manual PAT)

The following figure shows the use of source and destination ports. The host on the 10.1.2.0/24 network accesses a single host for both web services and Telnet services. When the host accesses the server for Telnet services, the real address is translated to 209.165.202.129:port. When the host accesses the same server for web services, the real address is translated to 209.165.202.130:port.

Figure 19. Manual NAT with Different Destination Ports

Before you begin

Ensure that you have interface objects (security zones or interface groups) that contain the interfaces for the device that protects the servers. In this example, we will assume the interface objects are security zones named inside and dmz. To configure interface objects, select Objects > Object Management, then select Interface.

Procedure


Step 1

Create a network object for the inside network.

  1. Choose Objects > Object Management.

  2. Select Network from the table of contents and click Add Network > Add Object.

  3. Name the network object (for example, myInsideNetwork) and enter the real network address, 10.1.2.0/24.


    Network object defining inside network address..
  4. Click Save.

Step 2

Create a network object for the Telnet/Web server.

  1. Click Add Network > Add Object.

  2. Name the network object (for example, TelnetWebServer) and enter the host address 209.165.201.11.


    Network object defining the Telnet/Web server address.
  3. Click Save.

Step 3

Create a network object for the PAT address when using Telnet.

  1. Click Add Network > Add Object.

  2. Name the network object (for example, PATaddress1) and enter the host address 209.165.202.129.


    Network object defining the PAT address for DMZ network 1 address.
  3. Click Save.

Step 4

Create a network object for the PAT address when using HTTP.

  1. Click Add Network > Add Object.

  2. Name the network object (for example, PATaddress2) and enter the host address 209.165.202.130.


    Network object defining the PAT address for DMZ network 2.
  3. Click Save.

Step 5

Configure dynamic manual PAT for Telnet access.

  1. Select Devices > NAT and create or edit an Firepower Threat Defense NAT policy.

  2. Click Add Rule.

  3. Configure the following properties:

    • NAT Rule = Manual NAT Rule.

    • Type = Dynamic.

  4. On Interface Objects, configure the following:

    • Source Interface Objects = inside.

    • Destination Interface Objects = dmz.

  5. On Translation, configure the following:

    • Original Source = myInsideNetwork network object.

    • Translated Source > Address= PATaddress1 network object.

    • Original Destination > Address = TelnetWebServer network object.

    • Translated Destination = TelnetWebServer network object.

    • Original Destination Port = TELNET port object (system-defined).

    • Translated Destination Port = TELNET port object (system-defined).

      Note


      Because you do not want to translate the destination address or port, you need to configure identity NAT for them by specifying the same address for the original and translated destination addresses, and the same port for the original and translated port.


    Telnet server NAT rule.

  6. Click Save.

Step 6

Configure dynamic manual PAT for web access.

  1. Click Add Rule.

  2. Configure the following properties:

    • NAT Rule = Manual NAT Rule.

    • Type = Dynamic.

  3. On Interface Objects, configure the following:

    • Source Interface Objects = inside.

    • Destination Interface Objects = dmz.

  4. On Translation, configure the following:

    • Original Source = myInsideNetwork network object.

    • Translated Source > Address= PATaddress2 network object.

    • Original Destination > Address = TelnetWebServer network object.

    • Translated Destination = TelnetWebServer network object.

    • Original Destination Port = HTTP port object (system-defined).

    • Translated Destination Port = HTTP port object (system-defined).


    Web server NAT rule.

  5. Click Save.

Step 7

Click Save on the NAT rule page.


NAT and Site-to-Site VPN

The following figure shows a site-to-site tunnel connecting the Boulder and San Jose offices. For traffic that you want to go to the Internet (for example from 10.1.1.6 in Boulder to www.example.com), you need a public IP address provided by NAT to access the Internet. The below example uses interface PAT rules. However, for traffic that you want to go over the VPN tunnel (for example from 10.1.1.6 in Boulder to 10.2.2.78 in San Jose), you do not want to perform NAT; you need to exempt that traffic by creating an identity NAT rule. Identity NAT simply translates an address to the same address.

Figure 20. Interface PAT and Identity NAT for Site-to-Site VPN

The following example explains the configuration for Firewall1 (Boulder).

Before you begin

Ensure that you have interface objects (security zones or interface groups) that contain the interfaces for the devices in the VPN. In this example, we will assume the interface objects are security zones named inside-boulder and outside-boulder for the Firewall1 (Boulder) interfaces. To configure interface objects, select Objects > Object Management, then select Interfaces.

Procedure


Step 1

Create the objects to define the various networks.

  1. Choose Objects > Object Management.

  2. Select Network from the table of contents and click Add Network > Add Object.

  3. Identify the Boulder inside network.

    Name the network object (for example, boulder-network) and enter the network address, 10.1.1.0/24.


    boulder-network object.

  4. Click Save.

  5. Click Add Network > Add Object and define the inside San Jose network.

    Name the network object (for example, sanjose-network) and enter the network address 10.2.2.0/24.


    sanjose-network object.

  6. Click Save.

Step 2

Configure manual identity NAT for the Boulder network when going over the VPN to San Jose on Firewall1 (Boulder).

  1. Select Devices > NAT and create or edit an Firepower Threat Defense NAT policy.

  2. Click Add Rule.

  3. Configure the following properties:

    • NAT Rule = Manual NAT Rule.

    • Type = Static.

  4. On Interface Objects, configure the following:

    • Source Interface Objects = inside-boulder.

    • Destination Interface Objects = outside-boulder.

  5. On Translation, configure the following:

    • Original Source = boulder-network object.

    • Translated Source > Address = boulder-network object.

    • Original Destination > Address = sanjose-network object.

    • Translated Destination = sanjose-network object.

      Note


      Because you do not want to translate the destination address, you need to configure identity NAT for it by specifying the same address for the original and translated destination addresses. Leave all of the port fields blank. This rule configures identity NAT for both source and destination.

  6. On Advanced, select Do not proxy ARP on Destination interface.


    Identity NAT rule for boulder-network to sanjose-network traffic.

  7. Click Save.

Step 3

Configure manual dynamic interface PAT when going to the Internet for the inside Boulder network on Firewall1 (Boulder).

  1. Click Add Rule.

  2. Configure the following properties:

    • NAT Rule = Manual NAT Rule.

    • Type = Dynamic.

    • Insert Rule = any position after the first rule. Because this rule will apply to any destination address, the rule that uses sanjose-network as the destination must come before this rule, or the sanjose-network rule will never be matched. The default is to place new manual NAT rules at the end of the "NAT Rules Before Auto NAT" section.

  3. On Interface Objects, configure the following:

    • Source Interface Objects = inside-boulder.

    • Destination Interface Objects = outside-boulder.

  4. On Translation, configure the following:

    • Original Source = boulder-network object.

    • Translated Source = Destination Interface IP. This option configures interface PAT using the interface contained in the destination interface object.

    • Original Destination > Address = any (leave blank).

    • Translated Destination = any (leave blank).


    Interface PAT rule for boulder-network to Internet traffic.

  5. Click Save.

Step 4

If you are also managing Firewall2 (San Jose), you can configure similar rules for that device.

  • The manual identity NAT rule would be for sanjose-network when the destination is boulder-network. Create new interface objects for the Firewall2 inside and outside networks.

  • The manual dynamic interface PAT rule would be for sanjose-network when the destination is "any."


Rewriting DNS Queries and Responses Using NAT

You might need to configure the FTD device to modify DNS replies by replacing the address in the reply with an address that matches the NAT configuration. You can configure DNS modification when you configure each translation rule. DNS modification is also known as DNS doctoring.

This feature rewrites the address in DNS queries and replies that match a NAT rule (for example, the A record for IPv4, the AAAA record for IPv6, or the PTR record for reverse DNS queries). For DNS replies traversing from a mapped interface to any other interface, the record is rewritten from the mapped value to the real value. Inversely, for DNS replies traversing from any interface to a mapped interface, the record is rewritten from the real value to the mapped value. This feature works with NAT44,NAT 66, NAT46, and NAT64.

Following are the main circumstances when you would need to configure DNS rewrite on a NAT rule.

  • The rule is NAT64 or NAT46, and the DNS server is on the outside network. You need DNS rewrite to convert between DNS A records (for IPv4) and AAAA records (for IPv6).

  • The DNS server is on the outside, clients are on the inside, and some of the fully-qualified domain names that the clients use resolve to other inside hosts.

  • The DNS server is on the inside and responds with private IP addresses, clients are on the outside, and the clients access fully-qualified domain names that point to servers that are hosted on the inside.

DNS Rewrite Limitations

Following are some limitations with DNS rewrite:

  • DNS rewrite is not applicable for PAT because multiple PAT rules are applicable for each A or AAAA record, and the PAT rule to use is ambiguous.

  • If you configure a manual NAT rule, you cannot configure DNS modification if you specify the destination address as well as the source address. These kinds of rules can potentially have a different translation for a single address when going to A vs. B. Therefore, the can not accurately match the IP address inside the DNS reply to the correct twice NAT rule; the DNS reply does not contain information about which source/destination address combination was in the packet that prompted the DNS request.

  • You must enable DNS application inspection with DNS NAT rewrite enabled for NAT rules to rewrite DNS queries and responses. By default, DNS inspection with DNS NAT rewrite enabled is globally applied, so you probably do not need to change the inspection configuration.

  • DNS rewrite is actually done on the xlate entry, not the NAT rule. Thus, if there is no xlate for a dynamic rule, rewrite cannot be done correctly. The same problem does not occur for static NAT.

  • DNS rewrite does not rewrite DNS Dynamic Update messages (opcode 5).

The following topics provide examples of DNS rewrite in NAT rules.

DNS64 Reply Modification

The following figure shows an FTP server and DNS server on the outside IPv4 network. The system has a static translation for the outside server. In this case, when an inside IPv6 user requests the address for ftp.cisco.com from the DNS server, the DNS server responds with the real address, 209.165.200.225.

Because you want inside users to use the mapped address for ftp.cisco.com (2001:DB8::D1A5:C8E1, where D1A5:C8E1 is the IPv6 equivalent of 209.165.200.225) you need to configure DNS reply modification for the static translation. This example also includes a static NAT translation for the DNS server, and a PAT rule for the inside IPv6 hosts.

Before you begin

Ensure that you have interface objects (security zones or interface groups) that contain the interfaces for the device. In this example, we will assume the interface objects are security zones named inside and outside. To configure interface objects, select Objects > Object Management, then select Interface.

Procedure

Step 1

Create the network objects for the FTP server, DNS server, inside network, and PAT pool.

  1. Choose Objects > Object Management.

  2. Select Network from the table of contents and click Add Network > Add Object.

  3. Define the real FTP server address.

    Name the network object (for example, ftp_server) and enter the host address, 209.165.200.225.


    ftp_server network object.

  4. Click Save.

  5. Click Add Network > Add Object and define the FTP server's translated IPv6 address.

    Name the network object (for example, ftp_server_v6) and enter the host address, 2001:DB8::D1A5:C8E1.


    ftp_server_v6 network object.

  6. Click Save.

  7. Click Add Network > Add Object and define the DNS server's real address.

    Name the network object (for example, dns_server) and enter the host address, 209.165.201.15.


    dns_server network object.

  8. Click Save.

  9. Click Add Network > Add Object and define the DNS server's translated IPv6 address.

    Name the network object (for example, dns_server_v6) and enter the host address, 2001:DB8::D1A5:C90F (where D1A5:C90F is the IPv6 equivalent of 209.165.201.15).


    dns_server_v6 network object.

  10. Click Save.

  11. Click Add Network > Add Object and define the inside IPv6 network.

    Name the network object (for example, inside_v6) and enter the network address, 2001:DB8::/96.


    inside_v6 network object.

  12. Click Save.

  13. Click Add Network > Add Object and define the IPv4 PAT pool for the inside IPv6 network.

    Name the network object (for example, ipv4_pool) and enter the range 209.165.200.230-209.165.200.235.


    ipv4_pool network object.

  14. Click Save.

Step 2

Configure the static NAT rule with DNS modification for the FTP server.

  1. Select Devices > NAT and create or edit an Firepower Threat Defense NAT policy.

  2. Click Add Rule.

  3. Configure the following properties:

    • NAT Rule = Auto NAT Rule.

    • Type = Static.

  4. On Interface Objects, configure the following:

    • Source Interface Objects = outside.

    • Destination Interface Objects = inside.

  5. On Translation, configure the following:

    • Original Source = ftp_server network object.

    • Translated Source > Address = ftp_server_v6 network object.


    FTP server static NAT rule with DNS rewrite.

  6. On Advanced, select the following options:

    • Translate DNS replies that match this rule.

    • Net to Net Mapping, because this is a one-to-one NAT46 translation.

  7. Click OK.

Step 3

Configure the static NAT rule for the DNS server.

  1. Click Add Rule.

  2. Configure the following properties:

    • NAT Rule = Auto NAT Rule.

    • Type = Static.

  3. On Interface Objects, configure the following:

    • Source Interface Objects = outside.

    • Destination Interface Objects = inside.

  4. On Translation, configure the following:

    • Original Source = dns_server network object.

    • Translated Source > Address = dns_server_v6 network object.

  5. On Advanced, select Net to Net Mapping, because this is a one-to-one NAT46 translation.


    DNS server static NAT rule.

  6. Click OK.

Step 4

Configure the dynamic NAT with a PAT pool rule for the inside IPv6 network.

  1. Click Add Rule.

  2. Configure the following properties:

    • NAT Rule = Auto NAT Rule.

    • Type = Dynamic.

  3. On Interface Objects, configure the following:

    • Source Interface Objects = inside.

    • Destination Interface Objects = outside.

  4. On Translation, configure the following:

    • Original Source = inside_v6 network object.

    • Translated Source > Address = leave this field empty.


    Dynamic PAT pool rule for the inside network.

  5. On PAT Pool, configure the following:

    • Enable PAT Pool = select this option.

    • Translated Source > Address = ipv4_pool network object.


    Dynamic PAT pool rule, PAT pool page.

  6. Click OK.


DNS Reply Modification, DNS Server on Outside

The following figure shows a DNS server that is accessible from the outside interface. A server, ftp.cisco.com, is on the inside interface. You configure NAT to statically translate the ftp.cisco.com real address (10.1.3.14) to a mapped address (209.165.201.10) that is visible on the outside network.

In this case, you want to enable DNS reply modification on this static rule so that inside users who have access to ftp.cisco.com using the real address receive the real address from the DNS server, and not the mapped address.

When an inside host sends a DNS request for the address of ftp.cisco.com, the DNS server replies with the mapped address (209.165.201.10). The system refers to the static rule for the inside server and translates the address inside the DNS reply to 10.1.3.14. If you do not enable DNS reply modification, then the inside host attempts to send traffic to 209.165.201.10 instead of accessing ftp.cisco.com directly.

Before you begin

Ensure that you have interface objects (security zones or interface groups) that contain the interfaces for the device. In this example, we will assume the interface objects are security zones named inside and outside. To configure interface objects, select Objects > Object Management, then select Interface.

Procedure

Step 1

Create the network objects for the FTP server.

  1. Choose Objects > Object Management.

  2. Select Network from the table of contents and click Add Network > Add Object.

  3. Define the real FTP server address.

    Name the network object (for example, ftp_server) and enter the host address, 10.1.3.14.


    ftp_server network object.

  4. Click Save.

  5. Click Add Network > Add Object and define the FTP server's translated address.

    Name the network object (for example, ftp_server_outside) and enter the host address, 209.165.201.10.


    ftp_server_outside network object.

  6. Click Save.

Step 2

Configure the static NAT rule with DNS modification for the FTP server.

  1. Select Devices > NAT and create or edit an Firepower Threat Defense NAT policy.

  2. Click Add Rule.

  3. Configure the following properties:

    • NAT Rule = Auto NAT Rule.

    • Type = Static.

  4. On Interface Objects, configure the following:

    • Source Interface Objects = inside.

    • Destination Interface Objects = outside.

  5. On Translation, configure the following:

    • Original Source = ftp_server network object.

    • Translated Source > Address = ftp_server_outside network object.

  6. On Advanced, select Translate DNS replies that match this rule.


    Auto NAT rule for the FTP server.

  7. Click OK.


DNS Reply Modification, DNS Server on Host Network

The following figure shows an FTP server and DNS server on the outside. The system has a static translation for the outside server. In this case, when an inside user requests the address for ftp.cisco.com from the DNS server, the DNS server responds with the real address, 209.165.20.10. Because you want inside users to use the mapped address for ftp.cisco.com (10.1.2.56) you need to configure DNS reply modification for the static translation.

Before you begin

Ensure that you have interface objects (security zones or interface groups) that contain the interfaces for the device. In this example, we will assume the interface objects are security zones named inside and outside. To configure interface objects, select Objects > Object Management, then select Interface.

Procedure

Step 1

Create the network objects for the FTP server.

  1. Choose Objects > Object Management.

  2. Select Network from the table of contents and click Add Network > Add Object.

  3. Define the real FTP server address.

    Name the network object (for example, ftp_server) and enter the host address, 209.165.201.10.


    ftp_server network object.

  4. Click Save.

  5. Click Add Network > Add Object and define the FTP server's translated address.

    Name the network object (for example, ftp_server_translated) and enter the host address, 10.1.2.56.


    ftp_server_translated object.

  6. Click Save.

Step 2

Configure the static NAT rule with DNS modification for the FTP server.

  1. Select Devices > NAT and create or edit an Firepower Threat Defense NAT policy.

  2. Click Add Rule.

  3. Configure the following properties:

    • NAT Rule = Auto NAT Rule.

    • Type = Static.

  4. On Interface Objects, configure the following:

    • Source Interface Objects = outside.

    • Destination Interface Objects = inside.

  5. On Translation, configure the following:

    • Original Source = ftp_server network object.

    • Translated Source > Address = ftp_server_translated network object.

  6. On Advanced, select Translate DNS replies that match this rule.


    FTP server static auto NAT rule.

  7. Click OK.


History for FTD NAT

Feature

Version

Details

Network Address Translation (NAT) for Firepower Threat Defense.

6.0.1

The NAT policy for Firepower Threat Defense was added.

New/modified screens: Threat Defense was added as a type of NAT policy to the Devices > NAT page.

Supported platforms: Firepower Threat Defense

Support for network range objects in NAT for Firepower Threat Defense.

6.1.0

You can now use network range objects in Firepower Threat Defense NAT rules where appropriate.