ASA Deployment with ASDM

Is This Chapter for You?

This chapter describes how to deploy a standalone ASA logical device, including how to configure smart licensing. This chapter does not cover the following deployments, for which you should refer to the ASA configuration guide:

  • Clustering

  • Failover

  • CLI configuration

This chapter also walks you through configuring a basic security policy; if you have more advanced requirements, refer to the configuration guide.

Privacy Collection Statement—The Firepower 4100 does not require or actively collect personally-identifiable information. However, you can use personally-identifiable information in the configuration, for example for usernames. In this case, an administrator might be able to see this information when working with the configuration or when using SNMP.

End-to-End Procedure

See the following tasks to deploy and configure the ASA on your chassis.

Cisco Commerce Workspace

Chassis Manager: Register the Chassis with the Licensing Server: Obtain feature licenses.

Smart Software Manager

Chassis Manager: Register the Chassis with the Licensing Server: Generate a license token for the chassis.

Chassis Manager

Chassis Manager: Register the Chassis with the Licensing Server: Register the chassis with the Smart Licensing server.

Chassis Manager

Chassis Manager: Add an ASA Logical Device.

ASDM

Log Into the ASDM.

ASDM

Configure License Entitlements on the ASA.

ASDM

Configure the ASA.

Chassis Manager: Register the Chassis with the Licensing Server

The ASA uses Smart Licensing. You can use regular Smart Licensing, which requires internet access; or for offline management, you can configure Permanent License Reservation or a Smart Software Manager On-Prem (formerly known as a Satellite server). For more information about these offline licensing methods, see Cisco ASA Series Feature Licenses; this guide applies to regular Smart Licensing.

For a more detailed overview on Cisco Licensing, go to cisco.com/go/licensingguide

For the ASA on the Firepower 4100, Smart Software Licensing configuration is split between FXOS on the chassis and the ASA.

  • Firepower 4100—Configure all Smart Software Licensing infrastructure in FXOS, including parameters for communicating with the License Authority. The Firepower 4100 itself does not require any licenses to operate.

  • ASA—Configure all license entitlements in the ASA.

When you register the chassis, the Smart Software Manager issues an ID certificate for communication between the firewall and the Smart Software Manager. It also assigns the firewall to the appropriate virtual account. Until you register with the Smart Software Manager, you will not be able to make configuration changes to features requiring special licenses, but operation is otherwise unaffected. Licensed features include:

  • Essentials

  • Security Contexts

  • Carrier—Diameter, GTP/GPRS, M3UA, SCTP

  • Strong Encryption (3DES/AES)—If your Smart Account is not authorized for strong encryption, but Cisco has determined that you are allowed to use strong encryption, you can manually add a stong encryption license to your account.

  • Cisco Secure ClientSecure Client Advantage, Secure Client Premier, or Secure Client VPN Only.

When you request the registration token for the ASA from the Smart Software Manager, check the Allow export-controlled functionality on the products registered with this token check box so that the full Strong Encryption license is applied (your account must be qualified for its use). The Strong Encryption license is automatically enabled for qualified customers when you apply the registration token on the chassis, so no additional action is required. If your Smart Account is not authorized for strong encryption, but Cisco has determined that you are allowed to use strong encryption, you can manually add a strong encryption license to your account.

Strong encryption is required for ASDM access.

Before you begin

  • Have a master account on the Smart Software Manager.

    If you do not yet have an account, click the link to set up a new account. The Smart Software Manager lets you create a master account for your organization.

  • Your Smart Software Manager account must qualify for the Strong Encryption (3DES/AES) license to use some features (enabled using the export-compliance flag).

  • If you have not already done so, Configure NTP.

  • If you did not configure DNS during the initial setup, add a DNS server on the Platform Settings > DNS page.

Procedure


Step 1

Make sure your Smart Licensing account contains the available licenses you need, including at a minimum the Essentials license.

When you bought your device from Cisco or a reseller, your licenses should have been linked to your Smart Software Manager account. However, if you need to add licenses yourself, use the Find Products and Solutions search field on the Cisco Commerce Workspace. Search for the following license PIDs:

Figure 1. License Search
  • Essentials license—L-FPR4100-ASA=. The Essentials license is free, but you still need to add it to your Smart Software Licensing account.

  • 10 context license—L-FPR4K-ASASC-10=. Context licenses are additive; buy multiple licenses to meet your needs.

  • 230 context license—L-FPR4K-ASASC-230=. Context licenses are additive; buy multiple licenses to meet your needs.

  • 250 context license—L-FPR4K-ASASC-250=. Context licenses are additive; buy multiple licenses to meet your needs.

  • Carrier (Diameter, GTP/GPRS, M3UA, SCTP)—L-FPR4K-ASA-CAR=

  • Strong Encryption (3DES/AES) license—L-FPR4K-ENC-K9=. Only required if your account is not authorized for strong encryption.

Step 2

In the Cisco Smart Software Manager, request and copy a registration token for the virtual account to which you want to add this device.

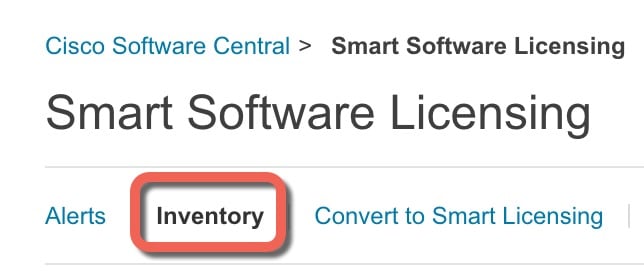
  1. Click Inventory.

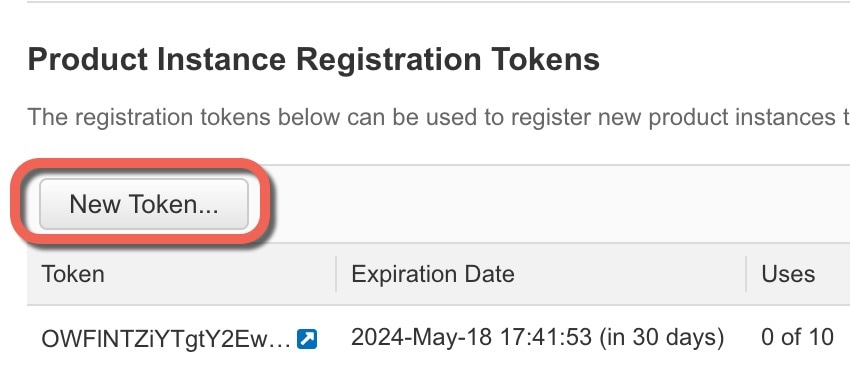
  2. On the General tab, click New Token.

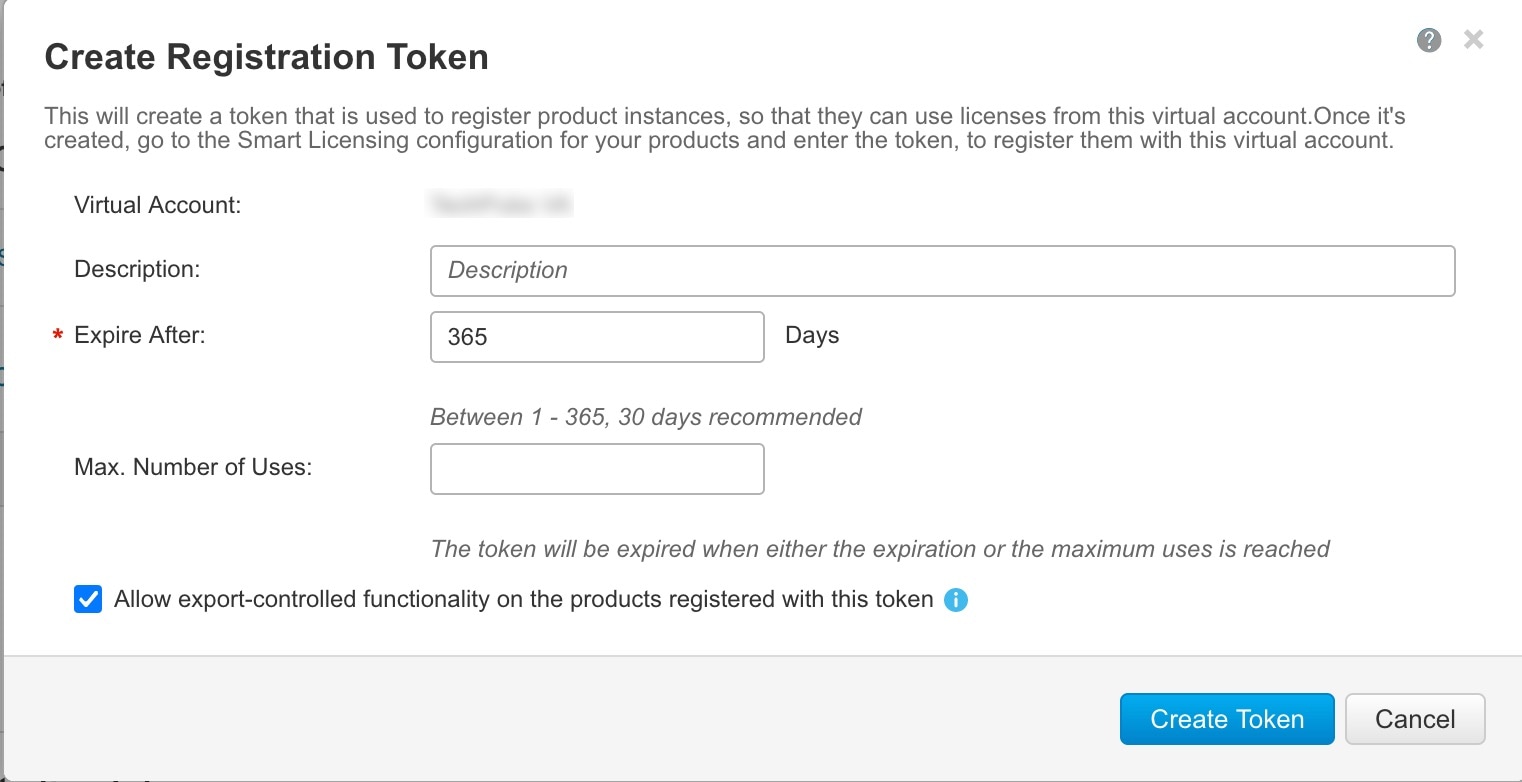
  3. On the Create Registration Token dialog box enter the following settings, and then click Create Token:

    • Description

    • Expire After—Cisco recommends 30 days.

    • Allow export-controlled functionaility on the products registered with this token—Enables the export-compliance flag.

    The token is added to your inventory.

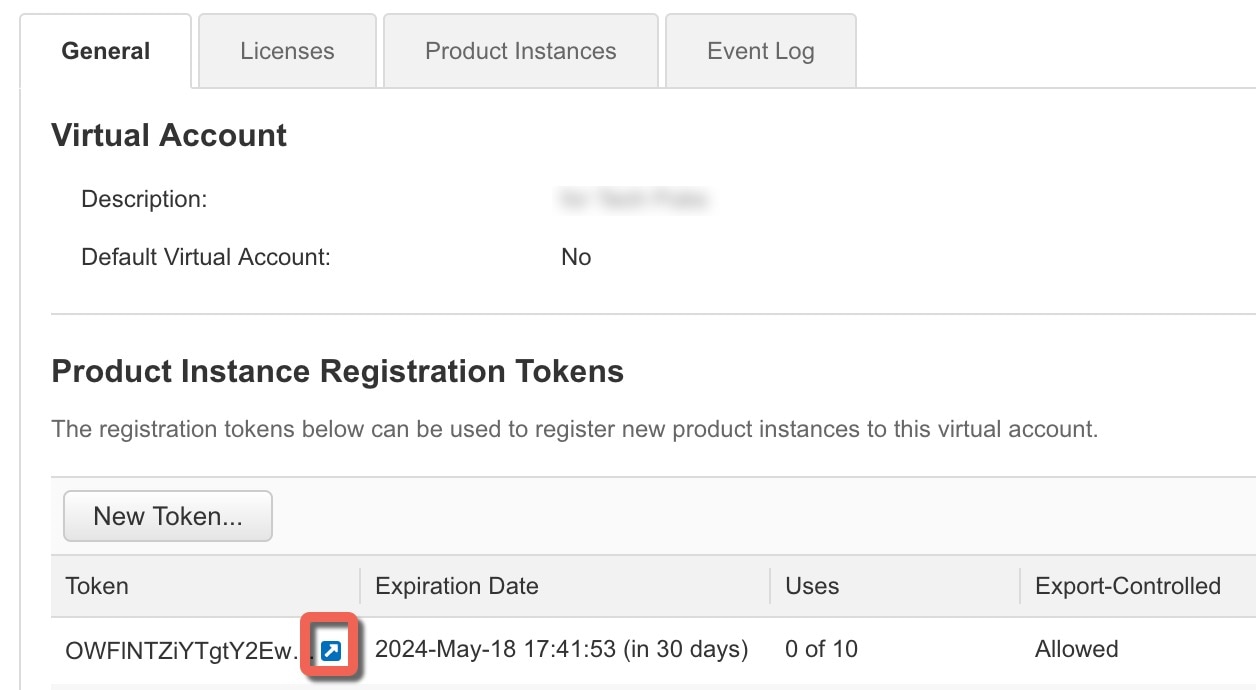
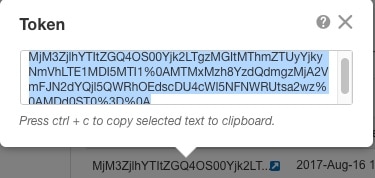
  4. Click the arrow icon to the right of the token to open the Token dialog box so you can copy the token ID to your clipboard. Keep this token ready for later in the procedure when you need to register the ASA.

    Figure 2. View Token
    Figure 3. Copy Token

Step 3

In the chassis manager, choose System > Licensing > Smart License.

Step 4

Enter the registration token in the Enter Product Instance Registration Token field.

Step 5

Click Register.

The Firepower 4100 registers with the License Authority. Successful registration can take several minutes. Refresh this page to see the status.

Figure 4. Registration in Progress
Figure 5. Registration Successful

Chassis Manager: Add an ASA Logical Device

You can deploy an ASA from the Firepower 4100 as a native instance.

To add a failover pair or cluster, see the ASA general operations configuration guide.

This procedure lets you configure the logical device characteristics, including the bootstrap configuration used by the application.

Before you begin

  • Configure a Management interface to use with the ASA; see Configure Interfaces. The Management interface is required. Note that this Management interface is not the same as the chassis management port that is used only for chassis management (and that appears at the top of the Interfaces tab as MGMT).

  • Gather the following information:

    • Interface IDs for this device

    • Management interface IP address and network mask

    • Gateway IP address

    • New admin password/enable password

Procedure


Step 1

In the chassis manager, choose Logical Devices.

Step 2

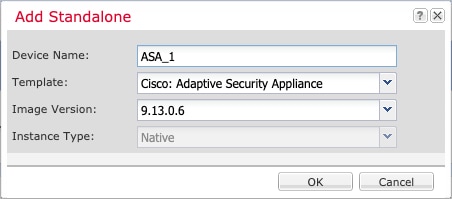
Click Add > Standalone, and set the following parameters:

  1. Provide a Device Name.

    This name is used by the chassis supervisor to configure management settings and to assign interfaces; it is not the device name used in the application configuration.

    Note


    You cannot change this name after you add the logical device.

  2. For the Template, choose Cisco: Adaptive Security Appliance.

  3. Choose the Image Version.

  4. Click OK.

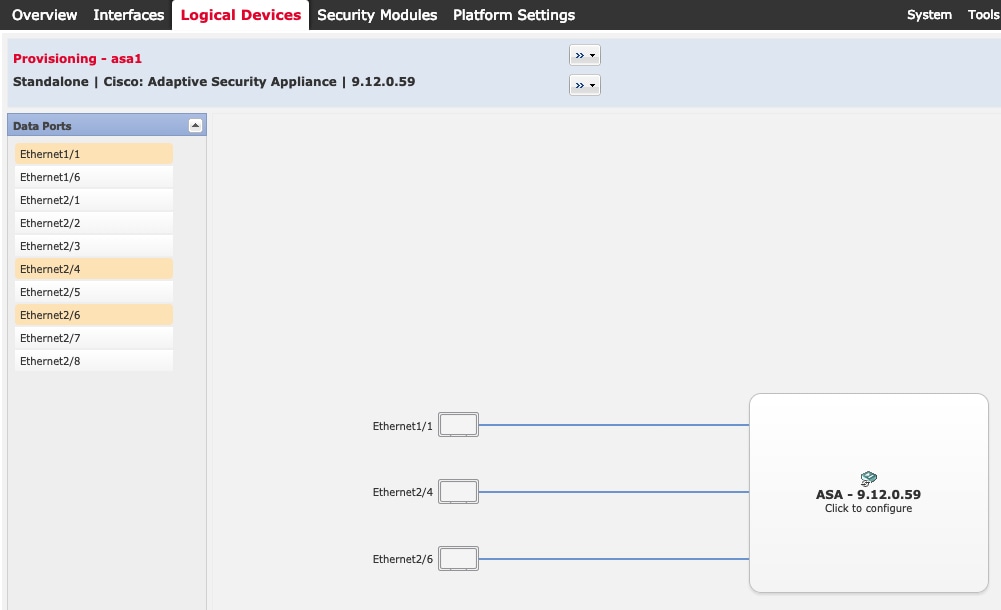
    You see the Provisioning - device name window.

Step 3

Expand the Data Ports area, and click each interface that you want to assign to the device.

You can only assign Data interfaces that you previously enabled on the Interfaces page. You will later enable and configure these interfaces in ASDM, including setting the IP addresses.

Step 4

Click the device icon in the center of the screen.

A dialog box appears where you can configure initial bootstrap settings. These settings are meant for initial deployment only, or for disaster recovery. For normal operation, you can later change most values in the application CLI configuration.

Step 5

On the General Information page, complete the following:

  1. Choose the Management Interface.

    This interface is used to manage the logical device. This interface is separate from the chassis management port.

  2. Choose the management interface Address Type: IPv4 only, IPv6 only, or IPv4 and IPv6.

  3. Configure the Management IP address.

    Set a unique IP address for this interface.

  4. Enter a Network Mask or Prefix Length.

  5. Enter a Network Gateway address.

Step 6

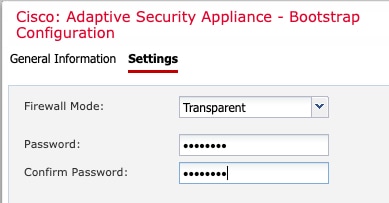
Click Settings.

  1. Choose the Firewall Mode: Routed or Transparent.

    In routed mode, the ASA is considered to be a router hop in the network. Each interface that you want to route between is on a different subnet. A transparent firewall, on the other hand, is a Layer 2 firewall that acts like a “bump in the wire,” or a “stealth firewall,” and is not seen as a router hop to connected devices.

    The firewall mode is only set at initial deployment. If you re-apply the bootstrap settings, this setting is not used.

  2. Enter and confirm a Password for the admin user and for the enable password.

    The preconfigured ASA admin user/password and enable password are useful for password recovery; if you have FXOS access, then you can reset the admin user password/enable password if you forget it.

Step 7

Click OK to close the configuration dialog box.

Step 8

Click Save.

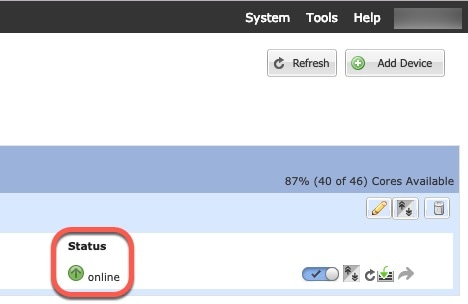
The chassis deploys the logical device by downloading the specified software version and pushing the bootstrap configuration and management interface settings to the application instance. Check the Logical Devices page for the status of the new logical device. When the logical device shows its Status as online, you can start configuring the security policy in the application.


Log Into the ASDM

Launch the ASDM so you can configure the ASA.

Before you begin

  • See the ASDM release notes on Cisco.com for the requirements to run ASDM.

  • Make sure the ASA logical device Status is online on the chassis manager Logical Devices page.

Procedure


Step 1

Enter the following URL in your browser.

  • https://management_ip —Management interface IP address that you entered in the bootstrap configuration.

Note


Be sure to specify https://, and not http:// or just the IP address (which defaults to HTTP); the ASA does not automatically forward an HTTP request to HTTPS.

The Cisco ASDM web page appears. You may see browser security warnings because the ASA does not have a certificate installed; you can safely ignore these warnings and visit the web page.

Step 2

Click one of these available options: Install ASDM Launcher or Run ASDM.

Step 3

Follow the onscreen instructions to launch ASDM according to the option you chose.

The Cisco ASDM-IDM Launcher appears.

Step 4

Leave the username empty, enter the enable password that you set when you deployed the ASA, and click OK.

The main ASDM window appears.


Configure License Entitlements on the ASA

Assign licenses to the ASA. You must at a minimum assign the Standard license.

Before you begin

Procedure


Step 1

In ASDM, choose Configuration > Device Management > Licensing > Smart Licensing.

Step 2

Set the following parameters:

  1. Check Enable Smart license configuration.

  2. From the Feature Tier drop-down list, choose Essentials.

    Only the Essentials tier is available.

  3. (Optional) For the Context license, enter the number of contexts.

    You can use 10 contexts without a license. The maximum number of contexts is 250. For example, to use the maximum, enter 240 for the number of contexts; this value is added to the default of 10.

  4. (Optional) Check Carrier.

Step 3

Click Apply.

If you do not have the appropriate licenses in your account, you cannot apply your license changes.

Step 4

Click the Save icon in the toolbar.

Step 5

Quit ASDM and relaunch it.

When you change licenses, you need to relaunch ASDM to show updated screens.


Configure the ASA

Using ASDM, you can use wizards to configure basic and advanced features. You can also manually configure features not included in wizards.

Procedure


Step 1

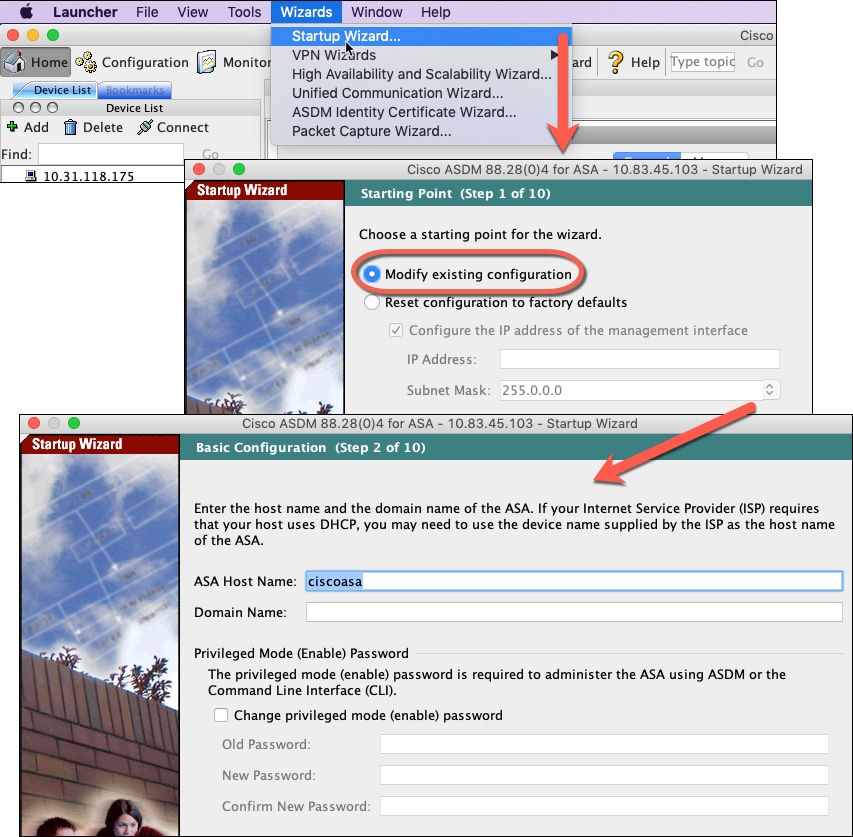
Choose Wizards > Startup Wizard, and click the Modify existing configuration radio button.

Step 2

The Startup Wizard walks you through configuring:

  • The enable password

  • Interfaces, including setting the inside and outside interface IP addresses and enabling interfaces.

  • Static routes

  • The DHCP server

  • And more...

Step 3

(Optional) From the Wizards menu, run other wizards.

Step 4

To continue configuring your ASA, see the documents available for your software version at Navigating the Cisco ASA Series Documentation.


Access the ASA CLI

You can use the ASA CLI to troubleshoot or configure the ASA instead of using ASDM. You can access the CLI by connecting from the FXOS CLI. You can later configure SSH access to the ASA on any interface. See the ASA general operations configuration guide for more information.

Procedure


Step 1

From the FXOS CLI, connect to the module CLI using a console connection or a Telnet connection.

connect module 1 { console | telnet}

The benefits of using a Telnet connection is that you can have multiple sessions to the module at the same time, and the connection speed is faster.

Example:


Firepower# connect module 1 console
Telnet escape character is '~'.
Trying 127.5.1.1...
Connected to 127.5.1.1.
Escape character is '~'.

CISCO Serial Over LAN:
Close Network Connection to Exit

Firepower-module1> 

Step 2

Connect to the ASA console.

connect asa

Example:


Firepower-module1> connect asa
Connecting to asa(asa1) console... hit Ctrl + A + D  to return to bootCLI
[...]
asa>

Step 3

Exit the application console to the FXOS module CLI by entering Ctrl-a, d.

Step 4

Return to the supervisor level of the FXOS CLI.

Exit the console:

  1. Enter ~

    You exit to the Telnet application.

  2. To exit the Telnet application, enter:

    telnet>quit

Exit the Telnet session:

  1. Enter Ctrl-], .


Example

The following example shows how to connect to an ASA and then exit back to the supervisor level of the FXOS CLI.


Firepower# connect module 1 console
Telnet escape character is '~'.
Trying 127.5.1.1...
Connected to 127.5.1.1.
Escape character is '~'.

CISCO Serial Over LAN:
Close Network Connection to Exit

Firepower-module1>connect asa
asa> ~
telnet> quit
Connection closed.
Firepower#

History for the ASA

Feature

Version

Details

ASA for the Firepower 4115, 4125, and 4145

9.12(1)

We introduced the Firepower 4115, 4125, and 4145.

Note


Requires FXOS 2.6.1.

Support for ASA and threat defense on separate modules of the same Firepower 9300

9.12(1)

You can now deploy the ASA and the threat defense logical devices on the same Firepower 9300.

Note


Requires FXOS 2.6.1.

Support for transparent mode deployment for an ASA logical device

9.10(1)

You can now specify transparent or routed mode when you deploy the ASA.

Note


Requires FXOS 2.4.1.

New/modified chassis manager screens:

Logical Devices > Add Device > Settings > Firewall Mode drop-down list

Smart Agent Upgrade to v1.6

9.6(2)

The smart agent was upgraded from Version 1.1 to Version 1.6. This upgrade supports permanent license reservation and also supports setting the Strong Encryption (3DES/AES) license entitlement according to the permission set in your license account.

New Carrier license

9.5(2)

The new Carrier license replaces the existing GTP/GPRS license, and also includes support for SCTP and Diameter inspection. For the ASA on the Firepower 9300, the feature mobile-sp command will automatically migrate to the feature carrier command.

We modified the following screen: Configuration > Device Management > Licensing > Smart License