Workflows

The following topics describe how to use workflows:

Overview: Workflows

A workflow is a tailored series of data pages on the FMC web interface that analysts can use to evaluate events generated by the system.

The following types of workflows are available on the FMC:

Predefined Workflows

Preset workflows delivered with the system. You cannot edit or delete a predefined workflow. You can, however, copy a predefined workflow and use it as the basis for a custom workflow.

Saved Custom Workflows

Custom workflows based on saved custom tables delivered with the FMC. You can edit, delete, and copy these workflows.

Custom Workflows

Workflows that you create and customize for your specific needs, or that the system generates automatically when you create custom tables. You can edit, delete, and copy these workflows.

The data displayed in a workflow often depends on such factors as how you license and deploy your managed devices, and whether you configure features that provide the data.

Predefined Workflows

The predefined workflows described in the following sections are delivered with the system. You cannot edit or delete a predefined workflow, but you can copy a predefined workflow and use it as the basis for a custom workflow.

Predefined Intrusion Event Workflows

The following table describes the predefined intrusion event workflows included with the system.

Table 1. Predefined Intrusion Event Workflows

Workflow Name

Description

Destination Port

Because destination ports are usually tied to an application, this workflow can help you detect applications that are experiencing an uncommonly high volume of alerts. The Destination Port column can also help you identify applications that should not be present on your network.

Event-Specific

This workflow provides two useful features. Events that occur frequently may indicate:

  • false positives

  • a worm

  • a badly misconfigured network

Events that occur infrequently are most likely evidence of a targeted attack and warrant special attention.

Events by Priority and Classification

This workflow lists events and their type in order of event priority, along with a count showing how many times each event has occurred.

Events to Destinations

This workflow provides a high-level view of which host IP addresses are being attacked and the nature of the attack; where available, you can also see information about the countries involved in attacks.

IP-Specific

This workflow shows which host IP addresses are generating the most alerts. Hosts with the greatest number of events are either public-facing and receiving worm-type traffic (indicating a good place to look for tuning) or require further investigation to determine the cause of the alerts. Hosts with the lowest counts also warrant investigation as they could be the subject of a targeted attack. Low counts may also indicate that a host may not belong on the network.

Impact and Priority

This workflow lets you find high-impact recurring events quickly. The reported impact level is shown with the number of times the event has occurred. Using this information, you can identify the high-impact events that recur most often, which might be an indicator of a widespread attack on your network.

Impact and Source

This workflow can help you identify the source of an attack in progress. The reported impact level is shown with the associated source IP address for the event. If, for example, events with a level 1 impact are coming from the same source IP address repeatedly, they may indicate an attacker who has identified vulnerable systems and is targeting them.

Impact to Destination

You can use this workflow to identify events repeatedly occurring on vulnerable computers, so you can address the vulnerabilities on those systems and stop any attacks in progress.

Source Port

This workflow indicates which servers are generating the most alerts. You can use this information to identify areas that require tuning, and to decide which servers require attention.

Source and Destination

This workflow identifies host IP addresses sharing high levels of alerts. Pairs at the top of the list could be false positives, and may identify areas that require tuning. You can check pairs at the bottom of the list for targeted attacks, for users accessing resources they should not be accessing, or for hosts that do not belong on the network.

Predefined Malware Workflows

The following table describes the predefined malware workflows included on the FMC. All predefined malware workflows use the table view of malware events.

Table 2. Predefined Malware Workflows

Workflow Name

Description

Malware Summary

This workflow provides a list of the malware detected in network traffic or by AMP for Endpoints Connectors, grouped by individual threat.

Malware Event Summary

This workflow provides a quick breakdown of the different malware event types and subtypes.

Hosts Receiving Malware

This workflow provides a list of host IP addresses that have received malware, grouped by the malware files’ associated dispositions.

Hosts Sending Malware

This workflow provides a list of host IP addresses that have sent malware, grouped by the malware files’ associated dispositions.

Applications Introducing Malware

This workflow provides a list of host IP addresses that have received files, grouped by the associated malware dispositions for those files.

Predefined File Workflows

The following table describes the predefined file event workflows included on the FMC. All the predefined file event workflows use the table view of file events.

Table 3. Predefined File Workflows

Workflow Name

Description

File Summary

This workflow provides a quick breakdown of the different file event categories and types, along with any associated malware dispositions.

Hosts Receiving Files

This workflow provides a list of host IP addresses that have received files, grouped by the associated malware dispositions for those files.

Hosts Sending Files

This workflow provides a list of host IP addresses that have sent files, grouped by the associated malware dispositions for those files.

Predefined Captured File Workflows

The following table describes the predefined captured file workflows included on the FMC. All predefined captured file workflows use the table view of captured files.

Table 4. Predefined Captured File Workflows

Workflow Name

Description

Captured File Summary

This workflow provides a breakdown of captured files based on type, category, and threat score.

Dynamic Analysis Status

This workflow provides a count of captured files based on whether they have been submitted for dynamic analysis.

Predefined Connection Data Workflows

The following table describes the predefined connection data workflows included on the FMC. All the predefined connection data workflows use the table view of connection data.

Table 5. Predefined Connection Data Workflows

Workflow Name

Description

Connection Events

This workflow provides a summary view of basic connection and detected application information, which you can then use to drill down to the table view of events.

Connections by Application

This workflow contains a graph of the 10 most active applications on the monitored network segment, based on the number of detected connections.

Connections by Initiator

This workflow contains a graph of the 10 most active host IP addresses on the monitored network segment, based on the number of connections where the host initiated the connection transaction.

Connections by Port

This workflow contains a graph of the 10 most active ports on the monitored network segment, based on the number of detected connections.

Connections by Responder

This workflow contains a graph of the 10 most active host IP addresses on the monitored network segment, based on the number of connections where the host IP was the responder in the connection transaction.

Connections over Time

This workflow contains a graph of the total number of connections on the monitored network segment over time.

Traffic by Application

This workflow contains a graph of the 10 most active applications on the monitored network segment, based on the number of kilobytes transmitted.

Application counts reflect each detector that matched against an application connection. The same application session may be represented more than once in the list depending on whether an application protocol, web application, client detector, or internal detector matched the traffic, as well as whether the traffic originated from a mobile device or was part of an encrypted session. If the application was seen in a client flow and no specific client detector exists, a generic client may be reported.

For example, you may see the same session of YouTube traffic reported as YouTube (because it matched a YouTube web application detector) and as YouTube client (because an internal YouTube detector matched against characteristics typically seen in a client session).

Use the information in the connection events and network map for your network to determine more context for specific application connections.

Traffic by Initiator

This workflow contains a graph of the 10 most active host IP addresses on the monitored network segment, based on the total number of kilobytes transmitted from each address.

Traffic by Port

This workflow contains a graph of the 10 most active ports on the monitored network segment, based on the number of kilobytes transmitted.

Traffic by Responder

This workflow contains a graph of the 10 most active host IP addresses on the monitored network segment, based on the total number of kilobytes received by each address.

Traffic over Time

This workflow contains a graph of the total kilobytes transmitted on the monitored network segment over time.

Unique Initiators by Responder

This workflow contains a graph of the 10 most active responding host IP addresses on the monitored network segment, based on the number of unique initiators that contacted each address.

Unique Responders by Initiator

This workflow contains a graph of the 10 most active initiating host IP addresses on the monitored network segment, based on the number of unique responders that the addresses contacted.

Predefined Security Intelligence Workflows

The following table describes the predefined Security Intelligence workflows included on the FMC. All the predefined Security Intelligence workflows use the table view of Security Intelligence events.

Table 6. Predefined Security Intelligence Workflows

Workflow Name

Description

Security Intelligence Events

This workflow provides a summary view of basic Security Intelligence and detected application information, which you can then use to drill down to the table view of events.

Security Intelligence Summary

This workflow is identical to the Security Intelligence Events workflow, but begins with the Security Intelligence Summary page, which lists security intelligence events by category and count only.

Security Intelligence with DNS Details

This workflow is identical to the Security Intelligence Events workflow, but begins with the Security Intelligence with DNS Details page, which lists Security Intelligence events by category and DNS-related characteristics.

Predefined Host Workflows

The following table describes the predefined workflows that you can use with host data.

Table 7. Predefined Host Workflows

Workflow Name

Description

Hosts

This workflow contains a table view of hosts followed by the host view. Workflow views based on the Hosts table allow you to easily view data on all IP addresses associated with a host.

Operating System Summary

You can use this workflow to analyze the operating systems in use on your network.

Predefined Indications of Compromise Workflows

The following table describes the predefined workflows that you can use with IOC (Indications of Compromise) data.

Table 8. Predefined Indications of Compromise Workflows

Workflow Name

Description

Host Indications of Compromise

This workflow begins with a summary view of IOC data grouped by count and category, and provides a detail view that further subdivides the summary data by event type.

Access this workflow via the Analysis > Hosts menu.

Indications of Compromise by Host

You can use this workflow to gauge which hosts on your network are most likely to be compromised (based on IOC data).

Access this workflow via the Analysis > Hosts menu.

User Indications of Compromise

This workflow begins with a summary view of IOC data grouped by count and category, and provides a detail view that further subdivides the summary data by event type.

Access this workflow via the Analysis > Users menu.

Indications of Compromise by User

Use this workflow to gauge which users on your network are most likely to be involved in potential compromises (based on IOC data.)

Access this workflow via the Analysis > Users menu.

Predefined Applications Workflows

The following table describes the predefined workflows that you can use with application data.

Table 9. Predefined Applications Workflows

Workflow Name

Description

Application Business Relevance

You can use this workflow to analyze running applications of each estimated business relevance level on your network, so you can monitor appropriate use of your network resources.

Application Category

You can use this workflow to analyze running applications of each category (such as email, search engine, or social networking) on your network, so you can monitor appropriate use of your network resources.

Application Risk

You can use this workflow to analyze running applications of each estimated security risk level on your network, so you can estimate the potential risk of users’ activity and take appropriate action.

Application Summary

You can use this workflow to obtain detailed information about the applications and associated hosts on your network, so you can closely examine host application activity.

Applications

You can use this workflow to analyze running applications on your network, so you can gain an overview of how the network is being used.

Predefined Application Details Workflows

The following table describes the predefined workflows that you can use with application detail and client data.

Table 10. Predefined Application Details Workflows

Workflow Name

Description

Application Details

You can use this workflow to analyze the client applications on your network in more detail. The workflow then provides a table view of client applications, followed by the host view.

Clients

This workflow contains a table view of client applications, followed by the host view.

Predefined Servers Workflows

The following table describes the predefined workflows that you can use with server data.

Table 11. Predefined Servers Workflows

Workflow Name

Description

Network Applications by Count

You can use this workflow to analyze the most frequently used applications on your network.

Network Applications by Hit

You can use this workflow to analyze the most active applications on your network.

Server Details

You can use this workflow to analyze the vendors and versions of detected server application protocols in detail.

Servers

This workflow contains a table view of applications followed by the host view.

Predefined Host Attributes Workflows

The following table describes the predefined workflow that you can use with host attribute data.

Table 12. Predefined Host Attributes Workflows

Workflow Name

Description

Attributes

You can use this workflow to monitor IP addresses of hosts on your network and the hosts’ status.

The Predefined Discovery Events Workflow

The following table describes the predefined workflow that you can use to view discovery and identity data.

Table 13. Predefined Discovery Event Workflows

Workflow Name

Description

Discovery Events

This workflow provides a detailed list, in table view form, of discovery events, followed by the host view.

Predefined User Workflows

The following table describes the predefined workflow that you can use to view user discovery and user identity data.

Table 14. Predefined User Workflows

Workflow Name

Description

Active Sessions

This workflow provides a list of active sessions collected by user identity sources.

Users

This workflow provides a list of user information collected by user identity sources.

Predefined Vulnerabilities Workflows

The following table describes the predefined vulnerabilities workflow included on the FMC.

Table 15. Predefined Vulnerabilities Workflows

Workflow Name

Description

Vulnerabilities

You can use this workflow to review vulnerabilities in the database, including a table view of only those active vulnerabilities that apply to the detected hosts on your network. The workflow provides a vulnerability detail view, which contains a detailed description for every vulnerability that meets your constraints.

Predefined Third-Party Vulnerabilities Workflows

The following table describes the predefined third-party vulnerabilities workflows included on the FMC.

Table 16. Predefined Third-Party Vulnerabilities Workflows

Workflow Name

Description

Vulnerabilities by IP Address

You can use this workflow to quickly see how many third-party vulnerabilities you have detected per host IP address on your monitored network.

Vulnerabilities by Source

You can use this workflow to quickly see how many third-party vulnerabilities you have detected per third-party vulnerability source, such as the QualysGuard Scanner.

Predefined Correlation and Allow List Workflows

There is a predefined workflow for each type of correlation data, allow list events, allow list violations, and remediation status events.

Table 17. Predefined Correlation Workflows

Workflow Name

Description

Correlation Events

This workflow contains a table view of correlation events.

Allow List Events

This workflow contains a table view of allow list events.

Host Violation Count

This workflow provides a series of pages that list all the host IP addresses that violate at least one allow list.

Allow List Violations

This workflow includes a table view of allow list violations that lists all violations with the most recently detected violation at the top of the list. Each row in the table contains a single detected violation.

Status

This workflow contains a table view of remediation status, which includes the name of the policy that was violated and the name and status of the remediation that was applied.

Predefined System Workflows

The system is delivered with some additional workflows, including system events such as audit events and health events, as well as workflows that list results from rule update imports and active scans.

Table 18. Additional Predefined Workflows

Workflow Name

Description

Audit Log

This workflow contains a table view of the audit log that lists audit events.

Health Events

This workflow displays events triggered by the health monitoring policy.

Rule Update Import Log

This workflow contains a table view listing information about both successful and failed rule update imports.

Scan Results

This workflow contains a table view listing each completed scan.

Custom Table Workflows

You can use the custom tables feature to create tables that use the data from two or more types of events. This is useful because you can, for example, create tables and workflows that correlate intrusion event data with discovery data to allow simple searches for events that affect critical systems.

When you create a custom table, the system automatically creates a workflow that you can use to view the events associated with the table. The features in the workflow differ depending on which type of table you use. For example, custom table workflows based on the intrusion event table always end with the packet view. However, custom table workflows based on discovery events end with the host view.

Unlike workflows based on the predefined event tables, workflows based on custom tables do not have links to other types of workflows.

Using Workflows

Procedure


Step 1

Choose the appropriate menu path and option as described in Workflow Selection.

Step 2

Navigate within the current workflow:

  • To view all of the columns available in your chosen event data type, use table view pages; see Using Table View Pages.

  • To view a subset of the columns available in your chosen event data type, use drill-down pages; see Using Drill-Down Pages.

  • To display the corresponding row in the next page of the workflow, click Down-Arrow (down-arrow icon).

  • To move among the pages of a multipage workflow, use the tools at the bottom of each page; see Workflow Page Traversal Tools.

  • To view the same constraints applied within a workflow for a different type of event, click Jump to and choose the event view from the drop-down list.

Step 3

Modify the display of the current workflow:

  • Check the check boxes by one or more rows on a page to indicate which row(s) you want to affect, then click one of the buttons at the bottom of the page (for example, View) to perform that action for all selected rows.

  • Check the check box at the top of the row to select all the rows on the page, then click one of the buttons at the bottom of the page (for example, View) to perform that action for all rows on the page.

  • Constrain the columns in the display by clicking Close (close icon) in the column heading that you want to hide. In the pop-up window that appears, click Apply

    Tip


    To hide or show other columns, check or clear the appropriate check boxes before you click Apply. To add a disabled column back to the view, click the expand arrow to expand the search constraints, then click the column name under Disabled Columns.

  • Constrain the data view by selected values for selected fields. For information, see Event View Constraints and Compound Event View Constraints.

  • Change the time constraints on the event view. The date range located in the upper right corner of the page sets a time range for events to include in the workflow; for information, see Event Time Constraints.

    Note


    Events that were generated outside the appliance's configured time window (whether global or event-specific) may appear in an event view if you constrain the event view by time. This may occur even if you configured a sliding time window for the appliance.

  • To sort data by columns, click the name of a column. To reverse the sort order, click the column name again. The direction indicates which column the data is sorted by, and whether the sort is Ascending or Descending.

  • Click a workflow page link to display that page using any active constraints. Workflow page links appear in the upper left corner of predefined workflow table views and drill-down pages, above events and below the workflow name.

Step 4

View additional data within the current workflow:

  • To view the file's trajectory map in a new window, click network file trajectory in file name and SHA-256 hash value columns. The icon is different depending on the file status; see File Trajectory Icons.

  • To display a pop-up window of the host profile associated with an IP address, click host profile in any IP address column. The icon is different depending on the file status; see Host Profile Icons.

  • To view the Dynamic Analysis Summary report for the highest threat score associated with a file, click threat score in any threat score column. The icon is different depending on the file’s highest threat score; see Threat Score Icons.

  • To view user profile information, click User or, for users associated with an indication of compromise, Red User in any user identity column. The user icon is dimmed if that user cannot be in the database (that is, is an AMP for Endpoints Connector user).

  • To view vulnerability details for third-party vulnerabilities, click Vulnerability in any third-party vulnerability ID column.

  • When viewing aggregated data points, hover your pointer over the flag to view the country name.

  • When viewing individual data points, click flag to view further geolocation details described in Geolocation.

Step 5

Navigate to a different workflow:

To view the same event type using a different workflow, click (switch workflow) next to the workflow title, then choose the workflow you want to use. Note that you cannot use a different workflow for scan results.


Workflow Access by User Role

Access to a workflow is determined by the user's role. See the table below for more information.

User Role

Accessible Workflows

Administrator

Can access any workflow, and are the only users who can access the audit log, scan results, and the rule update import log.

Maintenance User

Can access health events.

Security Analyst and Security Analyst (Read Only)

Can access intrusion, malware, file, connection, discovery, vulnerability, correlation, and health workflows.

Workflow Selection

The system provides predefined workflows for the types of data listed in the following table.

Table 19. Features Using Workflows

Feature

Menu Path

Option

Connection events

Analysis > Connections

Events

Security Intelligence events

Analysis > Connections

Security Intelligence Events

Correlation events

Analysis > Correlation

Correlation Events

Allow List Events

Allow List Violations

Status

Malware events

Analysis > Files

Malware Events

File events

Analysis > Files

File Events

Captured files

Analysis > Files

Captured Files

Host events

Analysis > Hosts

Network Map

Hosts

Indications of Compromise

Applications

Application Details

Servers

Host Attributes

Discovery Events

Intrusion events

Analysis > Intrusions

Events

Reviewed Events

User events

Analysis > Users

Active Sessions

User Activity

Users

Indications of Compromise

Vulnerability events

Analysis > Hosts

Vulnerabilities

Third-Party Vulnerabilities

Scan Results

Policies > Actions > Scanners

Health events

System > Health > Events

Audit events

System > Monitoring

Audit

Rule Update Import Log

System > Updates

Rule Updates

When you view any of the kinds of data described in the above table, events appear on the first page of the default workflow for that data. You can specify a different default workflow by configuring your event view settings. Note that workflow access depends on your user role.

In a multidomain deployment, you can view data for the current domain and for any descendant domains. You cannot view data from higher level or sibling domains.

Workflow Pages

Although the data in each type of workflow is different, all workflows share a common set of features. Workflows can include several types of pages. The actions you can perform on a workflow page depend on the type of page.

Drill-down and table view pages in workflows allow you to quickly narrow your view of the data so you can zero in on events that are significant to your analysis. Table view pages and drill-down pages both support many features you can use to constrain the set of events you want to view or to navigate the workflow. When viewing data on drill-down pages or in the table view in a workflow, you can sort the data in ascending or descending order based on any available column. If the database contains more events than can be displayed on a single workflow page, you can click the links at the bottom of the page to display more events. When you click one of these links, the time window automatically pauses so that you do not see the same events twice; you can unpause the time window when you are ready.

In a multidomain deployment, you can view data for the current domain and for any descendant domains. You cannot view data from higher level or sibling domains.

Table Views

Table views include a column for each of the fields in the database on which your workflow is based if the page is enabled by default.

For best performance, display only the columns you need. The more columns are displayed, the more resources are required to display the data.

Note that when you disable a column on a table view, the system adds the Count column to the event view if disabling the column could create two or more identical rows, if no more than 6 columns are displayed (excluding the Count column).

When you click on a value in a table view page, you constrain by that value.

When you create a custom workflow, you add a table view to it by clicking Add Table View.

Drill-Down Pages

Generally, drill-down pages are intermediate pages that you use to narrow your investigation to a few events before moving to a table view page. Drill-down pages contain a subset of columns that are available in the database.

For example, a drill-down page for discovery events might include only the IP Address, MAC Address, and Time columns. A drill-down page for intrusion events, on the other hand, might include the Priority, Impact Flag, Inline Result, and Message columns.

Drill-down pages allow you to narrow the scope of events you are viewing and to move forward in the workflow. If you click on a value in a drill-down page, for example, you constrain by that value and move to the next page in the workflow, focusing more closely on events that match your selected values. Clicking a value in a drill-down page does not disable the column where the value is, even if the page you advance to is a table view. Note that drill-down pages for predefined workflows always have a Count column. When you create a custom workflow, you add a drill-down page to it by clicking Add Page.

Graphs

Workflows based on connection data can include graph pages, also called connection graphs.

For example, a connection graph might display a line graph that shows the number of connections detected by the system over time. Generally, connection graphs are, like drill-down pages, intermediate pages that you use to narrow your investigation.

Final Pages

The final page of a workflow depends on the type of event on which the workflow is based:

  • The host view is the final page for workflows based on applications, application details, discovery events, hosts, indications of compromise (IOC), servers, allow list violations, host attributes, or third-party vulnerabilities. Viewing host profiles from this page allows you to easily view data on all IP addresses associated with hosts that have multiple addresses.

  • The user detail view is the final page for workflows based on users, user activity, and user indications of compromise.

  • The vulnerability detail view is the final page for workflows based on Cisco vulnerabilities.

  • The packet view is the final page for workflows based on intrusion events.

Workflows based on other kinds of events (for example, audit log events or malware events) do not have final pages.

On the final page of a workflow, you can expand detail sections to view specific information about each object in the set you focused on over the course of the workflow. Although the web interface does not list the constraints on the final page of a workflow, previously set constraints are retained and applied to the set of data.

Workflow Page Navigation Tools

Workflow pages provide visual cues to facilitate navigating among them and choosing what information to display during event analysis.

Workflow Page Traversal Tools

If a workflow contains multiple pages of data, the bottom of each page displays the number of pages in the workflow, as well as the tools listed in the table below which you may use to navigate among the pages:

Table 20. Workflow Page Traversal Tools

Page Traversal Tool

Action

page number

(To view a different page, enter the number you wish to view, then press Enter.)

view a different page

>

view the next page

<

view the previous page

> |

jump to the last page

|<

jump to the first page

File Trajectory Icons

When a workflow page provides the opportunity to view the trajectory map for a file in a new window, a network trajectory icon appears. This icon differs depending upon the file status.

Table 21. File Trajectory Icons

File Trajectory Icon

File Status

Clean

Clean

Malware

Malware

Custom detection

Custom detection

Unknown

Unknown

Unavailable

Unavailable

Host Profile Icons

When a workflow page provides the opportunity to view the host profile associated with an IP address in a pop-up window, a host profile icon appears. If the host profile icon is dimmed, you cannot view the host profile because that host cannot be in the network map (for example, 0.0.0.0). This icon appears different depending on the status of the host.

Table 22. Host Profile Icons

Host Profile Icon

Host Status

Host is not tagged as potentially compromised.

Host is tagged as potentially compromised by triggered indications of compromise (IOC) rules.

Added to Block List (Appears only if you are performing traffic filtering based on Security Intelligence data.)

Added to Block List, set to monitor (Appears only if you are performing traffic filtering based on Security Intelligence data.)

Threat Score Icons

When a workflow page provides the opportunity to view a Dynamic Analysis Summary report for the highest threat score associate with a file, a threat score icon appears. The icon differs depending on the file’s highest threat score.

Table 23. Threat Score Icons

Threat Score Icon

Threat Score Level

Low

Low

Medium

Medium

High

High

Very High

Very high

User Icons

When a workflow page provides the opportunity to view the user identity associated with a username in a pop-up window, a user icon appears.

Table 24. User Icons

User Icon

User Status

User

User is not associated with any indications of compromise.

Red User

User is associated with one or more indications of compromise.

The Workflow Toolbar

Each page in a workflow includes a toolbar that offers quick access to related features. The following table describes each of the links on the toolbar.

Table 25. Workflow Toolbar Links

Feature

Description

Bookmark This Page

Bookmarks the current page so you can return to it later. Bookmarking captures the constraints in effect on the page you are viewing so you can return to the same data (assuming the data still exists) at a later time.

Report Designer

Opens the report designer with the currently constrained workflow as the selection criteria.

Dashboard

Opens a dashboard relevant to your current workflow. For example, Connection Events workflows link to the Connection Summary dashboard.

View Bookmarks

Displays a list of saved bookmarks from which you can select.

Search

Displays a Search page where you can perform advanced searches on data in the workflow. You can also click the down arrow icon to select and use a saved search.

Using Drill-Down Pages

Procedure


Step 1

Access a workflow by choosing the appropriate menu path and option as described in Features Using Workflows.

Step 2

In any workflow, you have the following options:

  • To drill down to the next workflow page constraining on a specific value, click a value within a row. Note that this works only on drill-down pages. Clicking a value within a row in a table view only constrains the table view and does not drill down to the next page.

  • To drill down to the next workflow page constraining on some events, check the check boxes next to the events you want to view on the next workflow page, then click View.

  • To drill down to the next workflow page keeping the current constraints, click View All.

Tip


Table views always include “Table View” in the page name.


Using Table View Pages

Table view pages provide some features not available on drill-down, host view, packet view, or vulnerability detail pages. Use these features as described below:

Procedure


Step 1

Access a workflow by choosing the appropriate menu path and option as described in Workflow Selection.

Step 2

Choose a table view from the workflow path displayed beneath the workflow name.

Step 3

If event data is stored remotely, you may see an option to choose whether to display local or remote data.

See Work in Firepower Management Center with Connection Events Stored on a Secure Network Analytics Appliance.

Step 4

Use the features listed below to arrange and navigate within the table view as needed:

  • To display the list of disabled columns, click the Search Constraints Expand Arrow (expand arrow icon).

  • To hide the list of disabled columns, click the Search Constraints Collapse Arrow (collapse arrow icon).

  • To add a disabled column back to the event view, click the Search Constraints Expand Arrow (expand arrow icon) to expand the search constraints, then click the column name under Disabled Columns.

  • To show or hide (disable) a column, click Clear (clear icon) next to any column name. In the pop-up window that appears, check or clear the appropriate check boxes to indicate which columns you want to display, then click Apply.


Work in Firepower Management Center with Connection Events Stored on a Secure Network Analytics Appliance

If your devices are sending connection events to a Secure Network Analytics appliance using Security Analytics and Logging (On Premises), you can view and work with these remotely stored events in the FMC's event viewer and context explorer, and include them when generating reports. You can also cross-launch from an event in FMC to view related data on your Secure Network Analytics appliance.

By default, the system automatically selects the appropriate data source based on the time range you specify. If you want to override the data source, use this procedure.


Important


When you change the data source, your selection persists across all of the relevant analytics features that rely on the event data source, including reports, until you change it, even after you sign out. Your selection does not apply to other FMC users.


The selected data source is used for low-priority connection events only. All other event types (intrusion, file, and malware events; connection events associated with those events; and Security Intelligence events) are displayed regardless of data source.

Before you begin

You have used the wizard to send connection events to Security Analytics and Logging (On Premises).

Procedure


Step 1

In the FMC web interface, navigate to a page that displays connection event data, such as Analysis > Connections > Events.

Step 2

Click the data source displayed here and select an option:

Location of the data source selector on the page

Caution


If you select Local, the system displays only the data available on the FMC, even if local data is not available for the entire time range selected. You will not be notified that this situation is occurring.

Step 3

(Optional) To view related data directly in your Secure Network Analytics appliance, right-click (in the unified event viewer, click) a value such as an IP address or domain and choose a cross-launch option.


Geolocation

You can view and filter traffic based on country and continent by leveraging a geolocation database (GeoDB). Note that for mobile devices and other hosts detected moving from country to country, the system may report a continent instead of a specific country.

The system comes with an initial GeoDB that maps IP addresses to countries/continents, so that information should always be available. The system can also download contextual data. This can include:

  • Region (state, province, or other country subregion), city, and postal code.

  • Latitude/longitude, time zone, and clickable maps.

  • Autonomous System Number (ASN) and additional information about the ASN.

  • Internet service provider (ISP), connection type, and proxy type.

  • Home/business, organization, and domain name information.

To view this information, click the small country flag icons and ISO country codes wherever they appear: in events, asset profiles, the Context Explorer, dashboard, and other analysis tools. You cannot view geolocation details for aggregate geolocation information, such as on the Connection Summary dashboard.

We issue periodic updates to the GeoDB. You must regularly update the GeoDB to have accurate geolocation information; see Update the Geolocation Database (GeoDB).


Note


In May 2022 we split the GeoDB into two packages: a country code package that maps IP addresses to countries/continents, and an IP package that contains contextual data. The new country code package has the same file name as the old all-in-one package. This allows FMCs running Version 7.1 and earlier to continue to obtain GeoDB updates. However, because this package now contains only country code mappings, the contextual data is no longer updated and will grow stale. To obtain fresh data, upgrade or reimage to Version 7.2+ and update the GeoDB. Note that this split does not affect geolocation rules or traffic handling in any way—those rules rely only on the data in the country code package.


Connection Event Graphs

In addition to workflows that use tabular drill-down pages and a final table view of events, the system can present certain connection data graphically, using data aggregated over five-minute intervals. Note that you can graph only the information used to aggregate data: source and destination IP addresses (and those hosts’ associated users), destination port, transport protocol, and application protocol.


Tip


You cannot graph Security Intelligence events separately from their associated connection events. For a graphical overview of Security Intelligence filtering activity, use dashboards and the Context Explorer.


There are three different types of connection graphs:

  • Pie charts display data from one dataset grouped into discrete categories.

  • Bar graphs display data from one or more datasets grouped into discrete categories.

  • Line graphs plot data from one or more datasets over time, using either a standard or a velocity (rate of change) view.


Note


The system displays traffic profiles as line graphs, which you can manipulate in the same way as you would any other connection graph, with some restrictions. To view traffic profiles, you must have Administrator access.


Like workflow tables, you can drill down and constrain workflow graphs to focus your analysis.

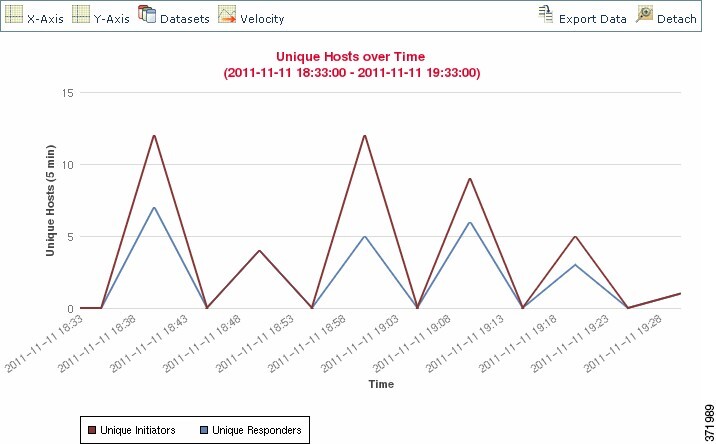
Both bar graphs and line graphs can display multiple datasets; that is, they can display several values on the y-axis for each x-axis data point. For example, you could display the total number of unique initiators and responders. Pie charts can only display one dataset.

You can display different data and datasets on a connection graph by changing either the x-axis, the y-axis, or both. On a pie chart, changing the x-axis changes the independent variable and changing the y-axis changes the dependent variable.

Using Connection Event Graphs

On the FMC, you can view connection event graphs and manipulate them depending on the information you are looking for.

The page you see when you access connection graphs differs depending on the workflow you use. You can use a predefined workflow, which terminates in a table view of connection events. You can also create a custom workflow that displays only the information that matches your specific needs.

In a multidomain deployment, you can view data for the current domain and for any descendant domains. You cannot view data from higher level or sibling domains.

Procedure

Step 1

Choose Analysis > Connections > Events.

Note


If a connection event table appears instead of a graph, or to view a different graph, click (switch workflow) by the workflow title and choose a predefined workflow that includes graphs, or a custom workflow. Note that all predefined connection event workflows—including connection graphs—terminate in a table view of connections.

Step 2

You have the following options:

  • Time Range — To adjust the time range, which is useful if the graph is blank, see Changing the Time Window.

  • Field Names — To learn more about the data you can graph, see Connection and Security Intelligence Event Fields.

  • Host Profile — To view the host profile for an IP address, on a graph displaying connection data by initiator or responder, click either a bar on a bar graph or a wedge on a pie chart and choose View Host Profile.

  • User Profile — To view user profile information, on a graph displaying connection data by initiator user, click either a bar on a bar graph or a wedge on a pie chart and choose View User Profile.

  • Other Information — To learn more information about the graphed data, position your cursor over a point on a line graph, a bar in a bar graph, or a wedge in a pie chart.

  • Constrain — To constrain a connection graph by any x-axis (independent variable) criterion without advancing the workflow to the next page, click a point on a line graph, a bar on a bar graph, or a wedge on a pie chart, and choose a View by... option.

  • Data Selection — To change the data displayed on the graph, click X-Axis or Y-Axis and choose the new data to graph. Note that changing the x-axis to or from Time also changes the graph type; changing the y-axis affects the displayed datasets.

  • Datasets — To change the graph’s dataset, click Datasets and choose a new dataset.

  • Detach — To detach a connection graph so you can perform further analysis without affecting the default time range, click Detach.

    Tip


    Click New Window in a detached graph to create a copy. You can then perform different analyses on each of the detached graphs. Note that traffic profiles are detached graphs.

  • Drill Down — To drill down to the next page in the workflow, click a point on a line graph, a bar on a bar graph, or a wedge on a pie chart, then choose Drill-down. Clicking a point on a line graph changes the time range on the next page to a 10-minute span, centered on the point you clicked. Clicking a bar on a bar graph or a wedge on a pie chart constrains the next page based on the criterion represented by the bar or wedge.

  • Export — To export the connection data for a graph as a CSV (comma-separated values) file, Export Data. Then, click Download CSV File and save the file.

  • Graph Type: Line — To switch between a standard and velocity (rate of change) line graph, click Velocity, then choose Standard or Velocity.

  • Graph Type: Bar and Pie — To switch between a bar graph and pie chart, click Switch to Bar or Switch to Pie. Because you cannot display multiple datasets on a pie char, if you switch to a pie chart from a bar graph that has multiple datasets, the pie chart shows only one dataset, which is selected automatically. When choosing which dataset to display, the FMC favors total statistics over initiator and responder statistics, and favors initiator statistics over responder statistics.

  • Navigate Between Pages — To navigate between pages in the current workflow, keeping the current constraints, click the appropriate page link at the top left of the workflow page.

  • Navigate Between Event Views — To navigate to other event views to view associated events, click Jump to and choose the event view from the drop-down list.

  • Recenter — To recenter a line graph around a point in time without changing the length of the time range, click that point, then choose Recenter.

  • Zoom -— To recenter a line graph around a point in time while zooming in or out, click that point, choose Zoom, then choose a new time span.

Note


Unless you are working with a detached graph, constraining, recentering, and zooming changes the default time range for the FMC.


Example
Example: Constraining a Connection Graph

Consider a graph of connections over time. If you constrain a point on the graph by port, a bar graph appears, showing the 10 most active ports based on the number of detected connection events, but constrained by the ten-minute time span that is centered on the point you clicked.

If you further constrain the graph by clicking on one of the bars and choosing View by Initiator IP, a new bar graph appears, constrained by not only the same ten-minute time span as before, but also by the port represented by the bar you clicked.

Example: Changing X-Axis and Y-Axis on a Pie Chart

Consider a pie chart that graphs kilobytes per port. In this case, the x-axis is Responder Port and the y-axis is KBytes. This pie chart represents the total kilobytes of data transmitted over a monitored network during a certain interval. The wedges of the pie represent the percent of the data that was detected on each port.

  • If you change the x-axis of the chart to Application Protocol, the pie chart still represents the total kilobytes of data transmitted, but the wedges of the pie represent the percentage of the data transmitted for each detected application protocol.

  • If you change the y-axis of the chart to Packets, the pie chart represents the total number of packets transmitted over the monitored network during a certain interval, and the wedges of the pie represent the percentage of the total number of packets that was detected on each port.

Connection Graph Data Options

You can display different data on a connection graph by changing either the x-axis, the y-axis, or both. On a pie chart, changing the x-axis changes the independent variable and changing the y-axis changes the dependent variable.

Table 26. X-Axis Options

X-Axis Option

Graph Type

Graphs This Data

Application Protocol

bar or pie

by the 10 most active application protocols

Device

bar or pie

by the 10 most active managed devices

Initiator IP

bar or pie

by the 10 most active initiator host IP addresses

Initiator User

bar or pie

by the 10 most active initiator users

Responder IP

bar or pie

by the 10 most active responder host IP addresses

Responder Port

bar or pie

by the 10 most active responder ports

Source Device

bar or pie

by the 10 most active NetFlow data exporters, plus a source device named Firepower for all connections detected by Firepower System managed devices.

Time

line

over time

Changing the y-axis to and from Time also changes the graph type and may change the datasets.

Table 27. Y-Axis Options

Y-Axis Option

Graphs This Data Using The X-Axis Criterion

Bytes

bytes transmitted

Connections

number of connections

KBytes

kilobytes transmitted

KBytes Per Second

kilobytes per second

Packets

number of packets transmitted

Unique Hosts

number of unique hosts detected

Unique Application Protocols

number of unique application protocols

Unique Users

number of unique users

Connection Graphs with Multiple Datasets

Both bar graphs and line graphs can display multiple datasets; that is, they can display several values on the y-axis for each x-axis data point. For example, you could display the total number of unique initiators and responders.


Note


You cannot display multiple datasets on a pie chart. If you switch to a pie chart from a bar graph that has multiple datasets, the pie chart shows only one dataset, which is selected automatically. When selecting which dataset to display, the FMC favors total statistics over initiator and responder statistics, and favors initiator statistics over responder statistics.


On line graphs, multiple datasets appear as multiple lines, each with a different color. For example, the following graphic displays the total number of unique initiators and the total number of unique responders detected on a monitored network over a one hour interval.

Screenshot of a line graph with multiple datasets

On bar graphs, multiple datasets appear as a set of colored bars for each x-axis data point. For example, the following bar graph displays the total packets transmitted on a monitored network, packets transmitted by initiators, and packets transmitted by responders.

Screenshot of a bar graph with multiple datasets

Connection Graph Dataset Options

The following table describes the datasets you can display on the x-axis of a connection graph.

Table 28. Dataset Options

If the y-axis displays...

You can select as datasets...

Connections

the default only, which is the number of connections detected on the monitored network (Connections). This is the only option for traffic profile graphs.

KBytes

combinations of:

  • the total kilobytes transmitted on the monitored network (Total KBytes)

  • the number of kilobytes transmitted from host IP addresses on the monitored network (Initiator KBytes)

  • the number of kilobytes received by host IP addresses on the monitored network (Responder KBytes)

KBytes Per Second

the default only, which is the total kilobytes per second transmitted on the monitored network (Total KBytes Per Second)

Packets

combinations of:

  • the total packets transmitted on the monitored network (Total Packets)

  • the number of packets transmitted from host IP addresses on the monitored network (Initiator Packets)

  • the number of packets received by host IP addresses on the monitored network (Responder Packets)

Unique Hosts

combinations of:

  • the number of unique session initiators on the monitored network (Unique Initiators)

  • the number of unique session responders on the monitored network (Unique Responders)

Unique Application Protocols

the default only, which is the number of unique application protocols on the monitored network (Unique Application Protocols)

Unique Users

the default only, which is the number of unique users logged into session initiators on the monitored network (Unique Initiator Users)

Event Time Constraints

Each event has a time stamp that indicates when the event occurred. You can constrain the information that appears in some workflows by setting the time window, sometimes called the time range.

Workflows based on events that can be constrained by time include a time range line at the top of the page.

By default, workflows use an expanding time window set to the past hour. For example, if you log in at 11:30 AM, you will see events that occurred between 10:30 AM and 11:30 AM. As time moves forward, the time window expands. At 12:30 PM, you will see events that occurred between 10:30 AM and 12:30 PM.

You can change this behavior by setting your own default time window in the event view settings. This governs three properties:

  • time window type (static, expanding, or sliding)

  • time window length

  • the number of time windows (either multiple time windows or a single global time window)

Regardless of the default time window setting, you can manually change the time window during your event analysis by clicking the time range at the top of the page, which displays the Date/Time pop-up window. Depending on the number of time windows you configured and the type of appliance you are using, you can also use the Date/Time window to change the default time window for the type of event you are viewing.

Finally, you can pause the time window while looking at a sliding or expanding workflow. See Pause the Time Window to Temporarily Freeze the Data Set.

Per-Session Time Window Customization for Events

Regardless of the default time window, you can manually change the time window during your event analysis.


Note


Manual time window settings are valid for only the current session. When you log out and then log back in, time windows are reset to the default.


Depending on the number of time windows you configured, changing the time window for one workflow may affect other workflows on the appliance. For example, if you have a single, global time window, changing the time window for one workflow changes it for all other workflows on the appliance. On the other hand, if you are using multiple time windows, changing the audit log or health event workflow time windows has no effect on any other time window, while changing the time window for other kinds of events affects all events that can be constrained by time (with the exception of audit events and health events).

Note that because not all workflows can be constrained by time, time window settings have no effect on workflows based on hosts, host attributes, applications, application details, vulnerabilities, users, or allow list violations.

Use the Time Window tab on the Date/Time window to manually configure a time window. Depending on the number of time windows you configured in your default time window settings, the tab’s title is one of the following:

  • Events Time Window, if you configured multiple time windows and are setting the time window for a workflow other than the audit log or health events workflow

  • Health Monitoring Time Window, if you configured multiple time windows and are setting the time window for the health events workflow

  • Audit Log Time Window, if you configured multiple time windows and are setting the time window for the audit log

  • Global Time Window, if you configured a single time window

The first decision you must make when configuring a time window is the type of time window you want to use:

  • A static time window displays all the events generated from a specific start time to a specific end time.

  • An expanding time window displays all the events generated from a specific start time to the present; as time moves forward, the time window expands and new events are added to the event view.

  • A sliding time window displays all the events generated from a specific start time (for example, one week ago) to the present; when you refresh the page, the time window “slides” so that you see only the events in the time range you configured (in this example, for the last week). To temporarily prevent the data set from updating while you are examining it, see Pause the Time Window to Temporarily Freeze the Data Set.

Depending on what type you select, the Date/Time window changes to give you different configuration options.


Note


The system uses a 24-hour clock based on the time you specified in your time zone preferences.


Time Window Settings

The following table explains the various settings you can configure on the Time Window tab.

Table 29. Time Window Settings

Setting

Time Window Type

Description

time window type drop-down list

n/a

Select the type of time window you want to use: static, expanding, or sliding.

Note that events that were generated outside the appliance's configured time window (whether global or event-specific) may appear in an event view if you constrain the event view by time. This may occur even if you configured a sliding time window for the appliance.

Start Time calendar

static and expanding

Specify a start date and time for your time window. The maximum time range for all time windows is from midnight on January 1, 1970 (UTC) to 3:14:07 AM on January 19, 2038 (UTC).

Instead of using the calendar, you can use the Presets options, described below.

End Time calendar

static

Specify an end date and time for your time window. The maximum time range for all time windows is from midnight on January 1, 1970 (UTC) to 3:14:07 AM on January 19, 2038 (UTC).

Note that if you are using an expanding time window, the End Time calendar is grayed out and specifies that the end time is “Now.”

Instead of using the calendar, you can use the Presets options, described below.

Show the Last field and drop-down list

sliding

Configure the length of the sliding time window.

Presets: Last

all

Click one of the time ranges in the list to change the time window, based on the local time of the appliance. For example, clicking 1 week changes the time window to reflect the last week. Clicking a preset changes the calendars to reflect the preset you choose.

Presets: Current

static and expanding

Click one of the time ranges in the list to change the time window, based on the local time and date of the appliance. Clicking a preset changes the calendars to reflect the preset you choose.

Note that:

  • the current day begins at midnight

  • the current week begins at midnight Sunday

  • the current month begins at midnight on the first of the month

Presets: Synchronize with

all (not available if you are using a global time window)

Click one of:

  • Events Time Window to synchronize the current time window with the events time window

  • Health Monitoring Time Window to synchronize the current time window with the health monitoring time window

  • Audit Log Time Window to synchronize the current time window with the audit log time window

Changing the Time Window
Procedure

Step 1

On a workflow constrained by time, click Time Range (time range icon) to go to the Date/Time window.

Step 2

On Events Time Window, set the time window as described in Time Window Settings.

Tip


Click Reset to change the time window back to the default settings.

Step 3

Click Apply.


Pause the Time Window to Temporarily Freeze the Data Set

If you are using a sliding or expanding time window, you can pause the time window to examine a snapshot of the data provided by the workflow. This is useful because when an unpaused workflow updates, it may remove events that you want to examine or add events that you are not interested in.

The time window automatically pauses when you click a link at the bottom of the page to display another page of events; you can unpause the time window when you are ready.

When you are finished with your analysis, you can unpause the time window. Unpausing the time window updates it according to your preferences, and also updates the event view to reflect the unpaused time window.

Pausing an event time window has no effect on dashboards, nor does pausing a dashboard have any effect on pausing an event time window.

Procedure

On a workflow constrained by time, choose the desired time range control:

  • To pause the time window, click time range control Pause (pause icon).

  • To unpause the time window, click time range control Play (play icon).


The Default Time Window for Events

During your event analysis, you can use the Preferences tab on the Date/Time window to change the default time window for the type of event you are viewing without having to use the event view settings.

Keep in mind that changing the default time window in this way changes the default time window for only the type of event you are viewing. For example, if you configured multiple time windows, changing the default time window on the Preferences tab changes the settings for either the events, health monitoring, or audit log window, in other words, whichever time window is indicated by the first tab. If you configured a single time window, changing the default time window on the Preferences tab changes the default time window for all types of events.

Default Time Window Options for Event Types

The following table explains the various settings you can configure on the Preferences tab.

Table 30. Time Window Preferences

Preference

Description

Refresh Interval

Sets the refresh interval for event views, in minutes. Entering zero disables the refresh option.

Number of Time Windows

Specify how many time windows you want to use:

  • Select Multiple to configure separate default time windows for the audit log, for health events, and for workflows based on events that can be constrained by time.

  • Select Single to use a global time window that applies to all events.

Default Time Window: Show the Last - Sliding

This setting allows you to configure a sliding default time window of the length you specify.

The appliance displays all the events generated from a specific start time (for example, 1 hour ago) to the present. As you change event views, the time window “slides” so that you always see events from the last hour.

Default Time Window: Show the Last - Static/Expanding

This setting allows you to configure either a static or expanding default time window of the length you specify.

For static time windows (enable the Use End Time check box), the appliance displays all the events generated from a specific start time (for example, 1 hour ago), to the time when you first viewed the events. As you change event views, the time window stays fixed so that you see only the events that occurred during the static time window.

For expanding time windows (disable the Use End Time check box), the appliance displays all the events generated from a specific start time (for example, 1 hour ago), to the present. As you change event views, the time window expands to the present time.

Default Time Window: Current Day - Static/Expanding

This setting allows you to configure either a static or expanding default time window for the current day. The current day begins at midnight, based on the time zone setting for your current session.

For static time windows (enable the Use End Time check box), the appliance displays all the events generated from midnight to the time when you first viewed the events. As you change event views, the time window stays fixed so that you see only the events that occurred during the static time window.

For expanding time windows (disable the Use End Time check box), the appliance displays all the events generated from midnight to the present. As you change event views, the time window expands to the present time. Note that if your analysis continues for over 24 hours before you log out, this time window can be more than 24 hours.

Default Time Window: Current Week - Static/Expanding

This setting allows you to configure either a static or expanding default time window for the current week. The current week begins at midnight on the previous Sunday, based on the time zone setting for your current session.

For static time windows (enable the Use End Time check box), the appliance displays all the events generated from midnight to the time when you first viewed the events. As you change event views, the time window stays fixed so that you see only the events that occurred during the static time window.

For expanding time windows (disable the Use End Time check box), the appliance displays all the events generated from midnight Sunday to the present. As you change event views, the time window expands to the present time. Note that if your analysis continues for over 1 week before you log out, this time window can be more than 1 week.

Changing the Default Time Window for Your Event Type
Procedure

Step 1

On a workflow constrained by time, click Time Range (time range icon) to go to the Date/Time window.

Step 2

Click Preferences and change your preferences, as described in Default Time Window Options for Event Types.

Step 3

Click Save Preferences.

Step 4

You have two options:

  • To apply your new default time window settings to the event view you are using, click Apply to close the Date/Time window and refresh the event view.

  • To continue with your analysis without applying the default time window settings, close the Date/Time window without clicking Apply.


Event View Constraints

The information that you see on a workflow page is determined by the constraints that you impose. For example, when you initially open an event workflow, the information is constrained to events that were generated in the previous hour.

To advance to the next page in the workflow and constrain the data you are viewing by specific values, select the rows with those values on the page and click View. To advance to the next page in the workflow retaining the current constraints and carrying forward all events, select View All.


Note


If you select a row with multiple non-count values and click View, you create a compound constraint.


There is a third method for constraining data in a workflow. To constrain the page to the rows with values that you selected and also add the selected value to the list of constraints at the top of the page, click a value within a row on the page. For example, if you are viewing a list of logged connections and want to constrain the list to only those you allowed using access control, click Allow in the Action column. As another example, if you are viewing intrusion events and want to constrain the list to only events where the destination port is 80, click 80 (http)/tcp in the Destination Port/ICMP Code column.


Tip


The procedure for constraining connection events based on Monitor rule criteria is slightly different and you may need to take some extra steps. Additionally, you cannot constrain connection events by associated file or intrusion information.


You can also use searches to constrain the information in a workflow. Use this feature when you want to constrain against multiple values in a single column. For example, if you want to view the events related to two IP addresses, click Edit Search, then modify the appropriate IP address field on the Search page to include both addresses, and then click Search.

The search criteria you enter on the search page are listed as the constraints at the top of the page, with the resulting events constrained accordingly. On the FMC, the current constraints are also applied when navigating to other workflows, unless they are compound constraints.

When searching, you must pay careful attention to whether your search constraints apply to the table you are searching. For example, client data is not available in connection summaries. If you search for connection events based on the detected client in the connection and then view the results in a connection summary event view, the FMC displays connection data as if you had not constrained it at all. Invalid constraints are labeled as not applicable (N/A) and are marked with a strikethrough.

Constraining Events

Procedure

Step 1

Access a workflow by choosing the appropriate menu path and option as described in Workflow Selection.

Step 2

In any workflow, you have the following options:

  • To constrain the view to events that match a single value, click the desired value within a row on the page.

  • To constrain the view to events that match multiple values, check the check boxes for events with those values, and click View.

    Note


    A compound constraint is added if the row contains multiple non-count values.

  • To remove a constraint, click the Search Constraints Expand Arrow (expand arrow icon) and click the name of the constraint in the expanded Search Constraints list.

  • To edit constraints using the Search page, click Edit Search.

  • To save constraints as a saved search, click Save Search and give the query a name.

    Note


    You cannot save queries containing compound constraints.

  • To use the same constraints with another event view, click Jump to and choose the event view.

    Note


    You do not retain compound constraints when you switch to another workflow.

  • To toggle the display of constraints click the Search Constraints Expand Arrow (expand arrow icon) or the Search Constraints Collapse Arrow (collapse arrow icon). This is useful when the list of constraints is large and takes up most of the screen.


Compound Event View Constraints

Compound constraints are based on all non-count values for a specific event. When you select a row with multiple non-count values, you set a compound constraint that retrieves only events matching all the non-count values in that row on that page. For example, if you select a row that has a source IP address of 10.10.31.17 and a destination IP address of 10.10.31.15 and a row that has a source IP address of 172.10.10.17 and a destination IP address of 172.10.10.15, you retrieve all of the following:

  • Events that have a source IP address of 10.10.31.17 AND a destination IP address of 10.10.31.15

    OR

  • Events that have a source IP address of 172.10.31.17 AND a destination IP address of 172.10.31.15

When you combine compound constraints with simple constraints, the simple constraints are distributed across each set of compound constraints. If, for example, you added a simple constraint for a protocol value of tcp to the compound constraints listed above, you retrieve all of the following:

  • Events that have a source IP address of 10.10.31.17 AND a destination IP address of 10.10.31.15 AND a protocol of tcp

    OR

  • Events that have a source IP address of 172.10.31.17 AND a destination IP address of 172.10.31.15 AND a protocol of tcp

You cannot perform a search or save a search on a compound constraint. You also cannot retain compound constraints when you use the event view links or click (switch workflow) to switch to another workflow. If you bookmark an event view with compound constraints applied, the constraints are not saved with the bookmark.

Using Compound Event View Constraints

Procedure

Step 1

Access a workflow by choosing the appropriate menu path and option as described in Workflow Selection.

Step 2

To manage compound constraints, you have the following options:

  • To create a compound constraint, choose one or more rows with multiple non-count values and click View.

  • To clear compound constraints, click the Search Constraints Expand Arrow (expand arrow icon) and click Compound Constraints.


Inter-Workflow Navigation

You can navigate to other workflows using the links in the Jump to... drop-down list on a workflow page. Select the drop-down list to view and select additional workflows.

When you select a new workflow, properties shared by the rows you select and the constraints you set are used in the new workflow, if they are applicable. If configured constraints or event properties do not map to fields in the new workflow, they are dropped. In addition, compound constraints are not retained when you switch from one workflow to another. In addition, constraints from the captured files workflow only transfer to file and malware event workflows.


Note


When you view event counts over a time range, the total number of events may not reflect the number of events for which more detailed data is available. This occurs because the system sometimes prunes older event details to manage disk space usage. To minimize the occurrence of event detail pruning, you can fine-tune event logging to log only those events most important to your deployment.


Note that unless you have either paused the time window or have configured a static time window, the time window changes when you change workflows.

This feature enhances your ability to investigate suspicious activity. For example, if you are viewing connection data and notice that an internal host is transmitting an abnormally large amount of data to an external site, you can select the responder IP address and the port as constraints and then jump to the Applications workflow. The applications workflow will use the responder IP address and port as IP Address and Port constraints and display additional information about the application, such as what kind of application it is. You can also click Hosts at the top of the page to view the host profile for the remote host.

After finding more information about the application, you can select Correlation Events to return to the connection data workflow, remove the Responder IP from the constraints, add the Initiator IP to constraints, and select Application Details to see what client the user on the initiating host used when transferring data to the remote host. Note that the Port constraint is not transferred to the Application Details page. While keeping the local host as a constraint, you can also use other navigation buttons to find additional information:

  • To discover if any policies have been violated by the local host, keep the IP address as a constraint and select Correlation Events from the Jump to drop-down list.

  • To find out if an intrusion rule triggered against the host, indicating a compromise, select Intrusion Events from the Jump to drop-down list.

  • To view the host profile for the local host and determine if the host is susceptible to any vulnerabilities that may have been exploited, select Hosts from the Jump to drop-down list.

Working with the Unified Event Viewer

Unified Events provide you a single-screen view of multiple types (connection, intrusion, file, malware, and some security-related connection events) of firewall events. The Unified Events table is highly customizable. You can create and apply custom filters to fine-tune the information displayed on the event viewer. The Live View option in the unified events table lets you see the firewall events in real time and monitor the activity on your network.

Use the unified event viewer to:

  • Look for relationships between events of different types

  • See the effects of policy changes in real time

Procedure


Step 1

Select Analysis > Unified Events.

Step 2

Select a time range (fixed or sliding) to view the firewall events from a specific period. By default, unified event viewer table displays events from the previous hour. You can filter the table to get more granular context of the security event, customize the table columns, or enable live view and see the event updates in real time.


Bookmarks

Create a bookmark if you want to return quickly to a specific location and time in an event analysis. Bookmarks retain information about:

  • the workflow you are using

  • the part of the workflow you are viewing

  • the page number within the workflow

  • any search constraints

  • any disabled columns

  • the time range you are using

The bookmarks you create are available to all user accounts with bookmark access. This means that if you uncover a set of events that require more in-depth analysis, you can easily create a bookmark and turn over the investigation to another user with the appropriate privileges.


Note


If the events that appear in a bookmark are deleted (either directly by a user or by automatic database cleanup), the bookmark no longer displays the original set of events.


Creating Bookmarks

In a multidomain deployment, you can only view bookmarks created in the current domain.

Procedure


Step 1

During an event analysis, with the events of interest displayed, click Bookmark This Page.

Step 2

In the Bookmark Name field, enter a name.

Step 3

Click Save Bookmark.


Viewing Bookmarks

In a multidomain deployment, you can only view bookmarks created in the current domain.

Procedure


From any event view, you have two options:

  • Hover your pointer over View Bookmarks, and click on the desired bookmark in the drop-down menu.

  • Click on click View Bookmarks and on the View Bookmarks page, click on the desired bookmark name or View (View button) next to it.

    Note


    If the events that originally appeared in a bookmark are deleted (either directly by a user or by automatic database cleanup), the bookmark no longer displays the original set of events.


History for Workflows

Table 31.

Feature

Minimum FMC

Minimum FTD

Details

Deprecated: intrusion incidents and event clipboard.

7.1

Any

Intrusion incidents and event clipboard are deprecated.

Deprecated screens:

  • Analysis > Intrusions > Clipboard

  • Analysis > Intrusions > Incidents

Unified event viewer.

7.0

Any

View and work in a single table with multiple event types: connection (including security intelligence), intrusion, file, and malware.

New/modified screens: Analysis > Unified Events

Work with events stored remotely.

7.0

Any

You can use the FMC to work with connection events stored on a Secure Network Analytics appliance. The system automatically uses the most appropriate data source, or you can explicitly choose the source. This option appears only if you have completed the Security Analytics and Logging (On Premises) wizard.

New/modified screens: pages that display connection events, for example, the event viewer, dashboard, context explorer, and reports.

Improved loading speed of workflow tables in certain cases.

6.6

Any

Tables on workflow pages now show a Count column for rows that are identical only when no more than six columns are displayed. This minimizes the amount of calculation required and thus improves table loading speed.

New/modified screens: event viewer.