Virtual Routers

This chapter describes underlying concepts about virtual routers and on how virtual routing behaves within the Secure Firewall Threat Defense.

About Virtual Routers and Virtual Routing and Forwarding (VRF)

You can create multiple virtual routers to maintain separate routing tables for groups of interfaces. Because each virtual router has its own routing table, you can provide clean separation in the traffic flowing through the device.

Thus, you can provide support to two or more distinct customers over a common set of networking equipment. You can also use virtual routers to provide more separation for elements of your own network, for example, by isolating a development network from your general purpose corporate network.

Virtual routers implement the “light” version of Virtual Routing and Forwarding, or VRF-Lite, which does not support Multiprotocol Extensions for BGP (MBGP).

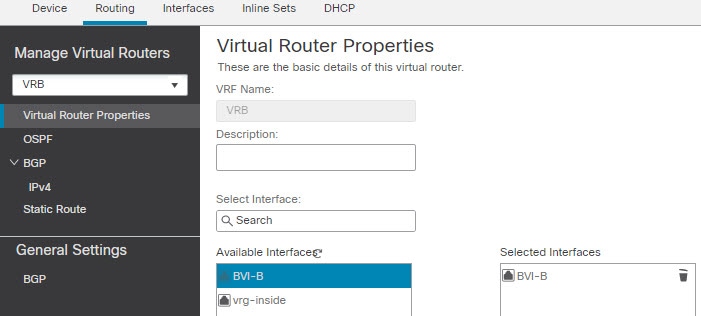
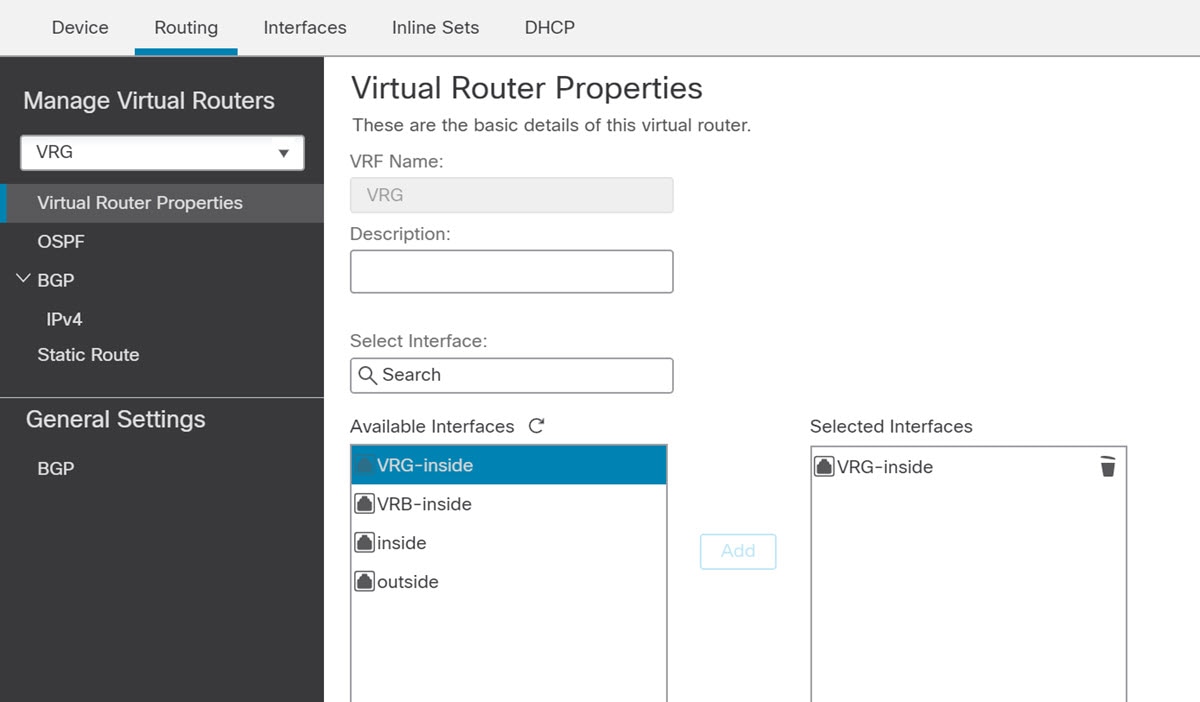
When you create a virtual router, you assign interfaces to the router. You can assign a given interface to one, and only one, virtual router. You would then define static routes, and configure routing protocols such as OSPF or BGP, for each virtual router. You would also configure separate routing processes over your entire network, so that routing tables on all participating devices are using the same per-virtual-router routing process and tables. Using virtual routers, you create logically-separated networks over the same physical network to ensure the privacy of the traffic that runs through each virtual router.

Because the routing tables are separate, you can use the same, or overlapping, address spaces across the virtual routers. For example, you could use the 192.168.1.0/24 address space for two separate virtual routers, supported by two separate physical interfaces.

Note that there are separate management and data routing tables per virtual router. For example, if you assign a management-only interface to a virtual router, then the routing table for that interface is separate from the data interfaces assigned to the virtual router.

Applications of Virtual Routers

You can use virtual routers to isolate network on shared resources and/or to isolate networks with common security policy. Thus, virtual routers help you to achieve:

  • Traffic separation for customers through dedicated routing tables for each customer or for different departments.

  • Common security policy management for different departments or networks.

  • Shared internet access for different departments or network.

Global and User-Defined Virtual Routers

Global Virtual Routers

For a device with virtual routing capability, system creates a global virtual router by default. The system assigns all interfaces in your network to the global virtual router. A routed interface can belong to either a user-defined virtual router or a global virtual router. When you upgrade threat defense to a version which has virtual router capability, all its existing routing configuration becomes part of the global virtual router.

User-Defined Virtual Routers

A user-defined virtual router is the one defined by you. You can create more than one virtual router on a device. However, anytime, an interface can be assigned to only one user-defined virtual router. While some of the device features are supported on user-defined virtual routers, few of the features are supported only on the global virtual routers. User-defined virtual routers support route-based site-to-site VPN (static VTI) .

Supported Features and Monitoring Policies

You can configure the following features on the global virtual router only:

  • OSPFv3

  • RIP

  • EIGRP

  • IS-IS

  • Multicast Routing

  • Policy Based Routing (PBR)

ISIS and PBR are supported through Flex Config in management center (see Predefined FlexConfig Objects). Configure only global virtual router interfaces for these features.

DHCP server auto-configuration uses WINS/DNS server that is learned from an interface. This interface can only be a global virtual router interface.

You can configure the following features separately for each user-defined virtual router:

  • Static routes and their SLA monitors

  • OSPFv2

  • BGPv4/v6

  • Integrated Routing and Bridging (IRB)

  • SNMP

Following features are used by the system when querying or communicating with the remote system (from-the-box traffic). These features use interfaces in the global virtual router only. That means, if you configure an interface for the feature, it must belong to the global virtual router. As a rule, anytime, if the system must look up a route to reach an external server for its own management purposes, it does the route lookup in the global virtual router.

  • DNS server when used to resolve fully qualified names used in access control rules, or for resolving names for the ping command. If you specify any as the interface for a DNS server, the system considers interfaces in the global virtual router only.

  • AAA server or identity realm when used with VPN. You can configure VPN on interfaces in the global virtual router only. Thus, the external AAA servers that are used for VPN, such as Active Directory, must be reachable through an interface in the global virtual router.

  • Syslog server.

Configuring Policies to be Virtual-Router-Aware

When you create a virtual router, the routing table for that virtual router is automatically separated from the global virtual router or any other virtual router. However, security policies are not automatically virtual-router-aware.

For example, if you write an access control rule that applies to “any” source or destination security zone, then the rule will apply to all interfaces across all virtual routers. This might in fact be exactly what you want. For example, all of your customers might want to block access to the same list of objectionable URL categories.

But, if you need to apply a policy to one of the virtual routers but not others, you need to create security zones that contain interfaces from that single virtual router only. Then, use the virtual-router-constrained security zones in the source and destination criteria of the security policy.

By using security zones whose memberships are constrained to the interfaces assigned to a single virtual router, you can write virtual-router-aware rules in the following policies:

  • Access control policy.

  • Intrusion and file policies.

  • SSL decryption policy.

  • Identity policy and user-to-IP address mappings. If you use overlapping address spaces in virtual routers, ensure that you create separate realms for each virtual router and apply them correctly in the identity policy rules.

If you use overlapping address spaces in your virtual routers, you should use security zones to ensure that the right policies get applied. For example, if you use the 192.168.1.0/24 address space in two separate virtual routers, an access control rule that simply specifies the 192.168.1.0/24 network will apply to traffic in both virtual routers. If that is not the desired outcome, you can limit the application of the rule by also specifying the source/destination security zones for just one of the virtual routers.

Interconnecting Virtual Routers

Static and Dynamic Route Leaking

You can configure the device to route traffic between virtual routers. This process of route leaking can be done manually by setting up static routes or dynamically through BGP settings.

Static Route Leaking

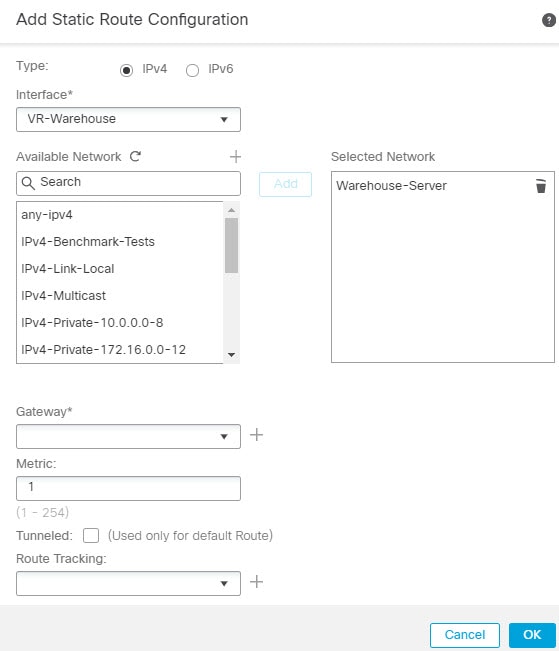
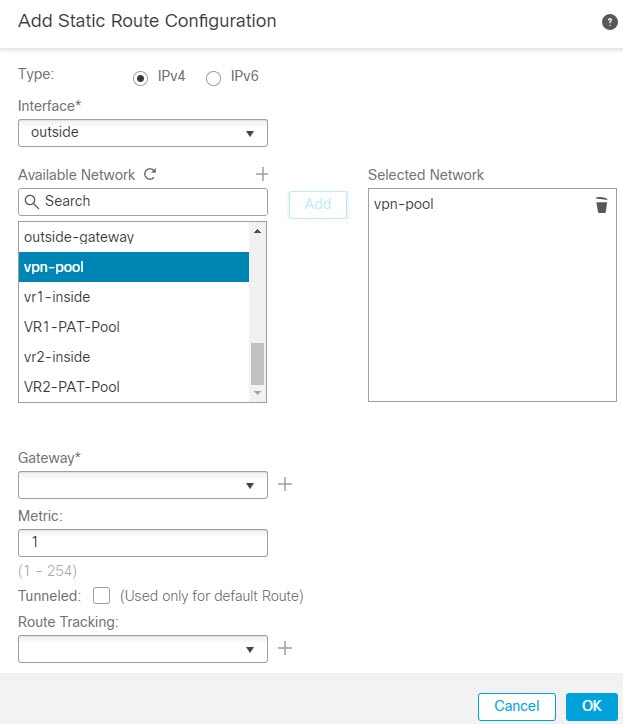
You can configure static routes to route traffic between virtual routers.

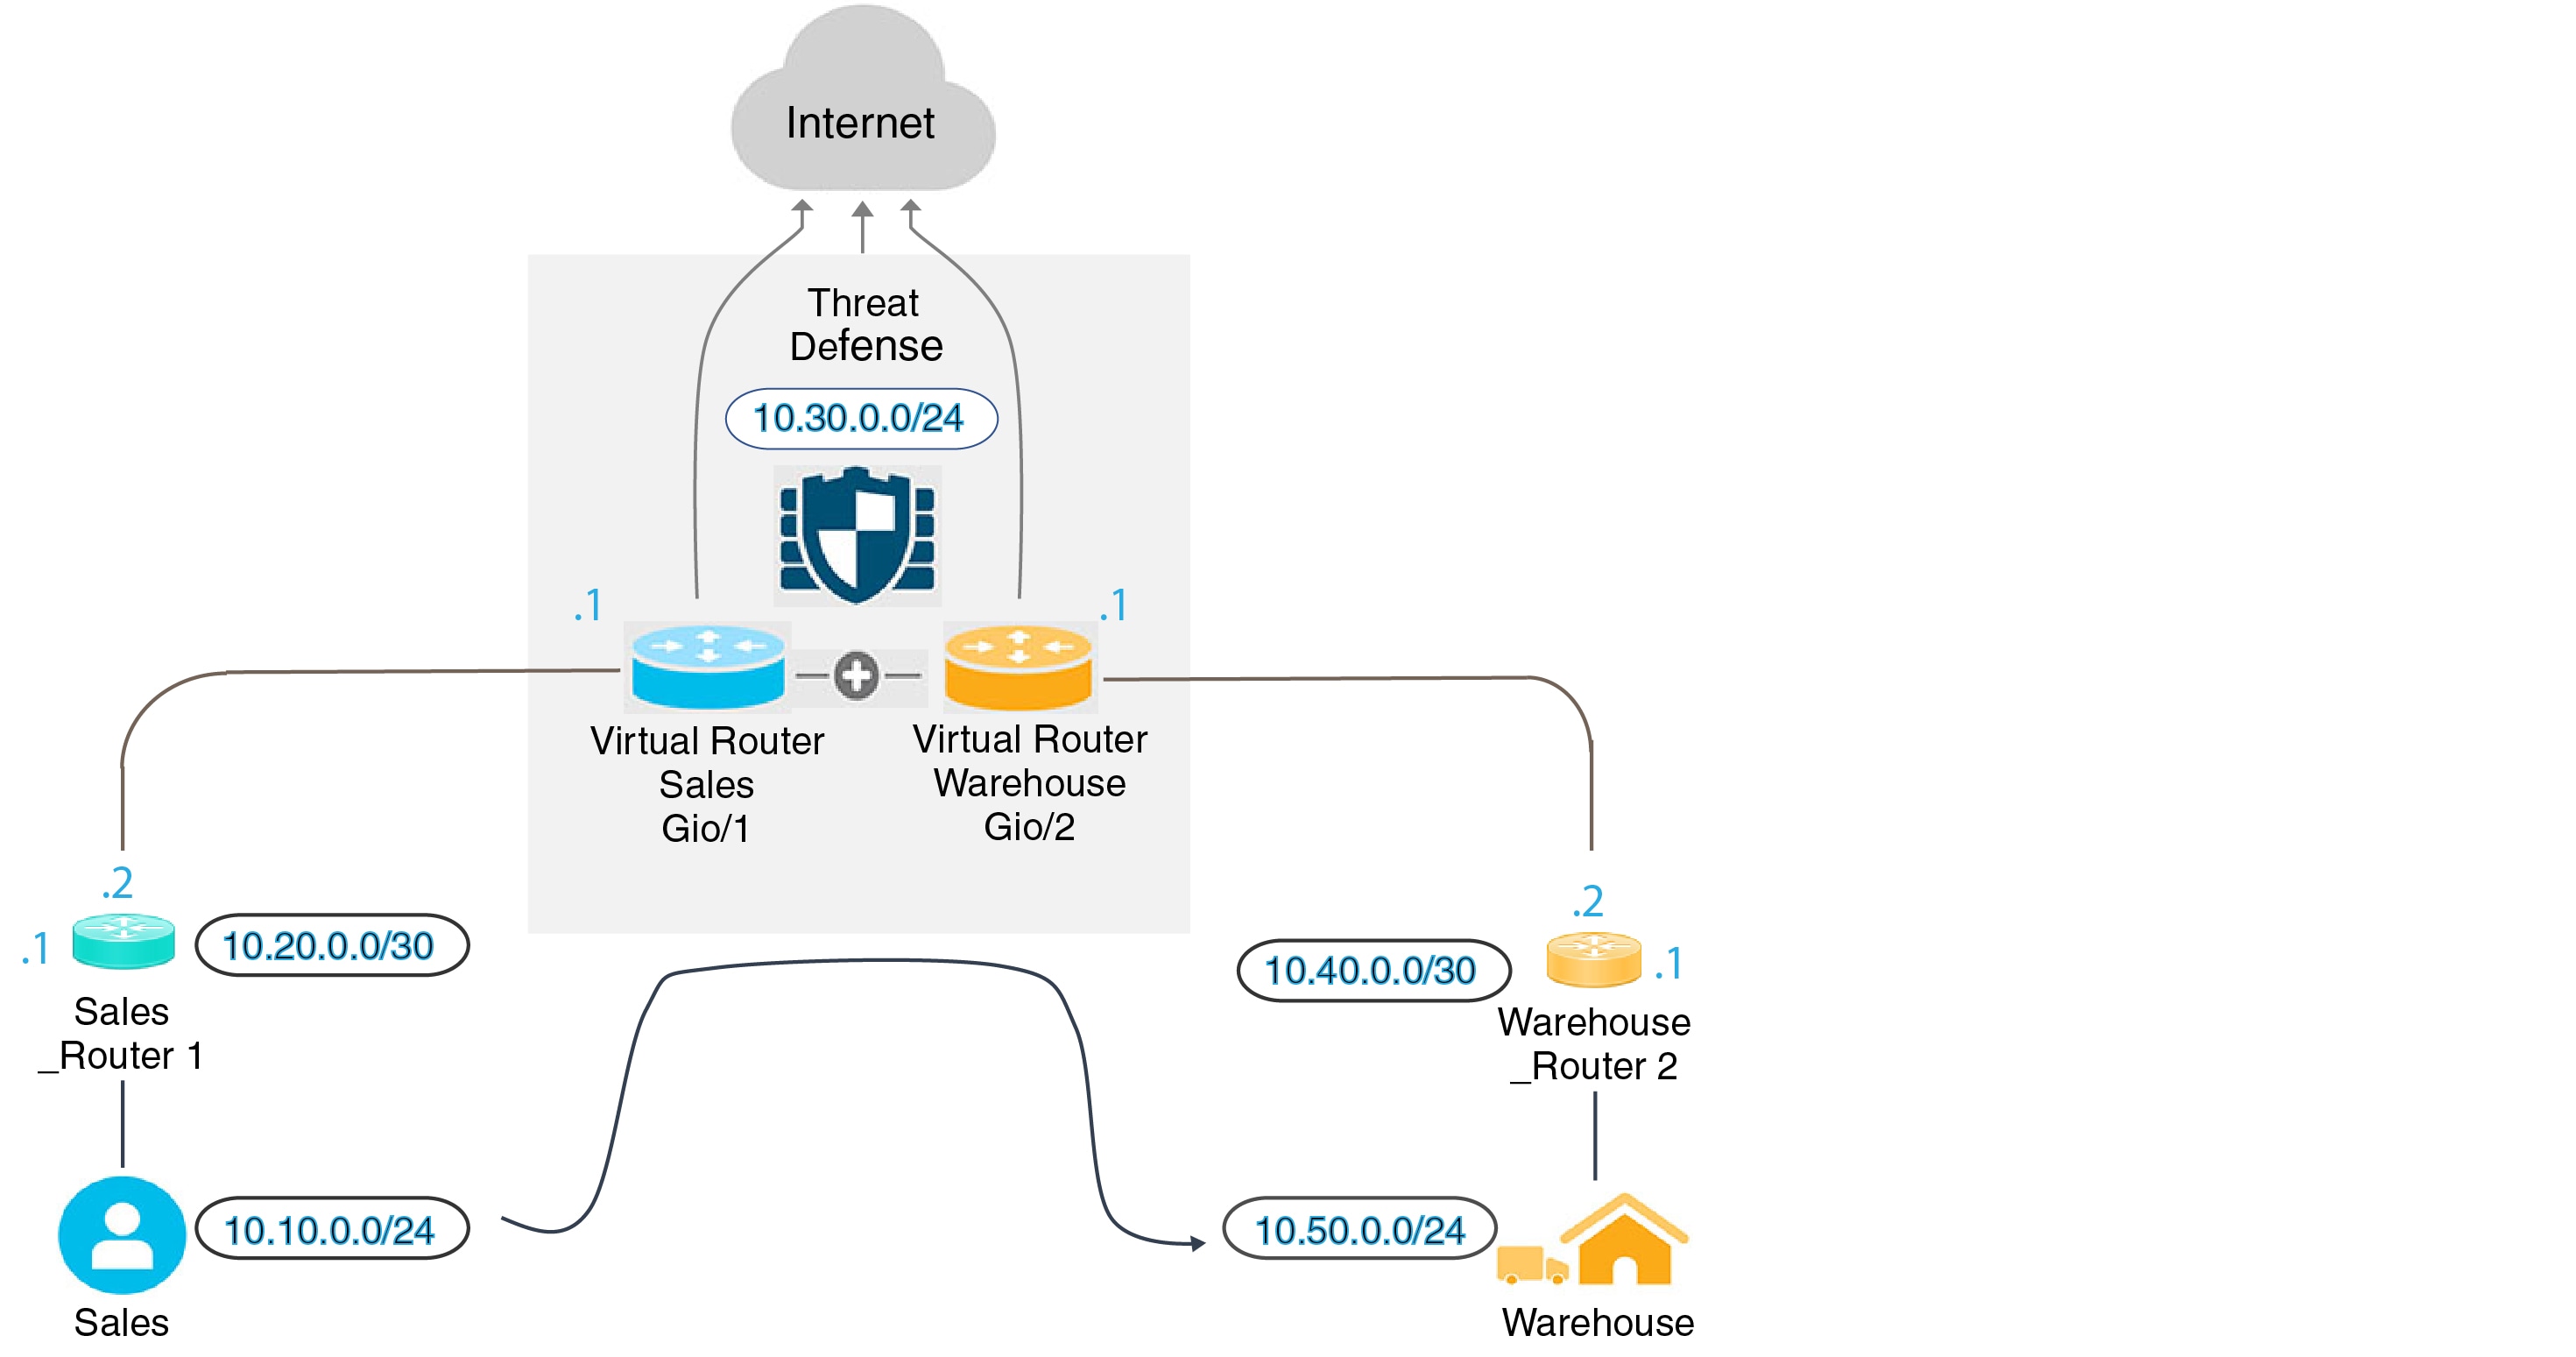
For example, if you have the outside interface in the global virtual router, you can set up static default routes in each of the other virtual routers to send traffic to the outside interface. Then, any traffic that cannot be routed within a given virtual router gets sent to the global router for subsequent routing.

Static routes between virtual routers are known as route leaks, because you are leaking traffic to a different virtual router. When you are leaking routes, say, VR1 routes to VR2, you can initiate connections from VR2 to VR1 only. For traffic to flow from VR1 to VR2, you must configure the reverse route. When you create a static route to an interface in another virtual router, you do not need to specify a gateway address. Simply select the destination interface.

For inter-virtual-router routes, the system does destination interface look-up in the source virtual router. Then, it looks up the MAC address of the next hop in the destination virtual router. Thus, the destination virtual router must have either a dynamic (learned) or static route for the selected interface for the destination address.

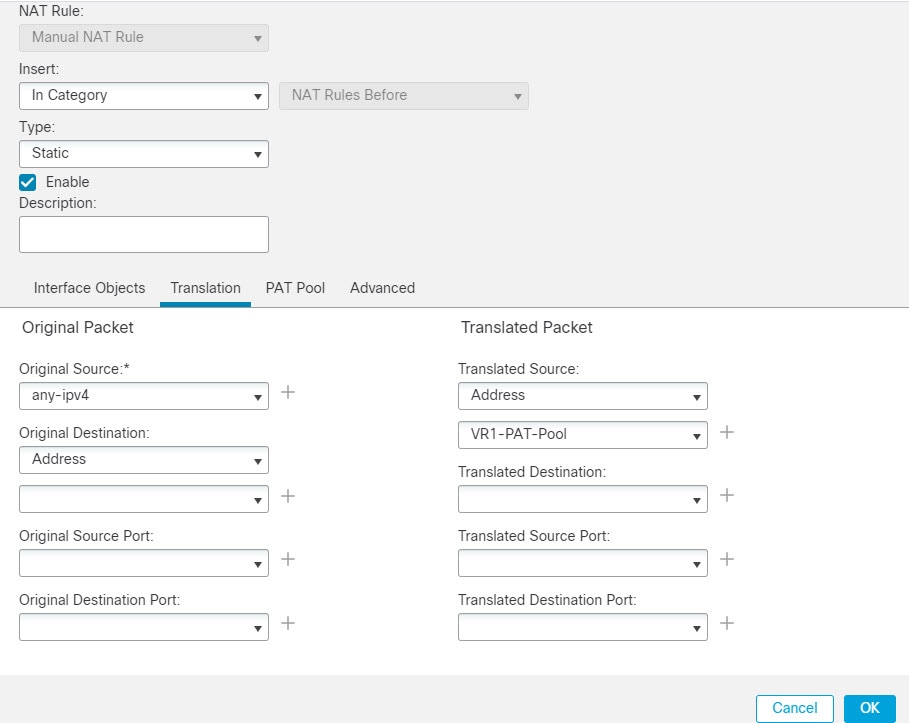
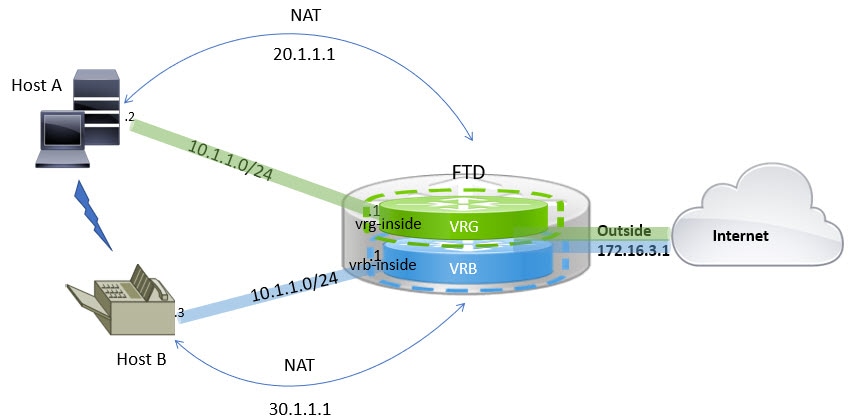
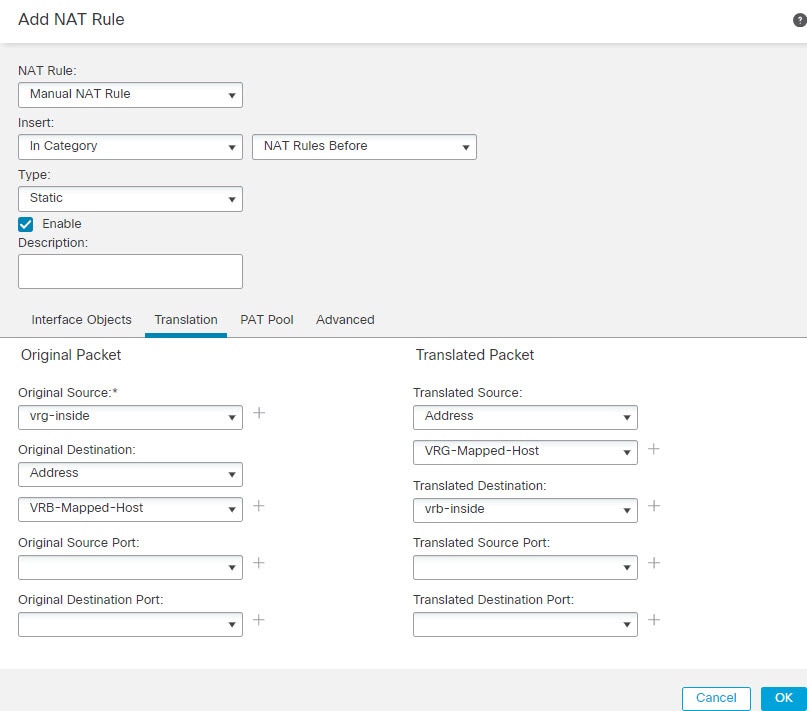
Configuring NAT rules that use source and destination interfaces in different virtual routers can also allow traffic to route between virtual routers. If you do not select the option for NAT to do a route lookup, the rule will simply send traffic out the destination interface with a NATed address whenever destination translation happens. However, the destination virtual router should have a route for the translated destination IP address so that next-hop lookup can succeed.

Though NAT rule leaks traffic from one virtual router to another, to ensure correct routing, we recommend that you configure a static route leak between these virtual routers for the translated traffic. Without the route leak, sometimes the rule may not match the traffic you expect it to match, and the translation may not be applied.

Virtual routing does not support a cascading or chain of route leaks. For example, assume that your threat defense has VR1, VR2, and VR3 virtual routers; VR3 is directly connected to a network - 10.1.1.0/24. Now, assume you configure a route leak in VR1 for network 10.1.1.0/24 through interface in VR2 and in VR2 define a route leak for 10.1.1.0/24 through VR3. This chain of route leaks will not allow traffic to hop from VR1 to VR2 and then exit from VR3. In case of route leaks, the route lookups first determine egress interface from input Virtual Router’s routing table and then looks at the output of Virtual Router’s routing table for next hop lookup. From both the lookups, egress interface should match. In our example, the egress interfaces will not be the same and hence the traffic does not pass through.

Use static inter VRF route with caution when the destination network is not a direct-connected subnet of the upstream (outgoing) VR. For example, assume two VRs - VR1 and VR2. While VR1 handles the outgoing traffic which gets the default route from its external peer through BGP or any dynamic routing protocol, and VR2 handles the incoming traffic which is configured with static inter VRF default route with VR1 as the next-hop. When VR1 loses the default route from its peer, VR2 will not able to detect that its upstream (outgoing) VR lost the default route and the traffic is still sent toward VR1 which will eventually get dropped without notifications. In this scenario, we recommend that you configure VR2 with dynamic route leak through BGP.

Dynamic Route Leaking Using BGP

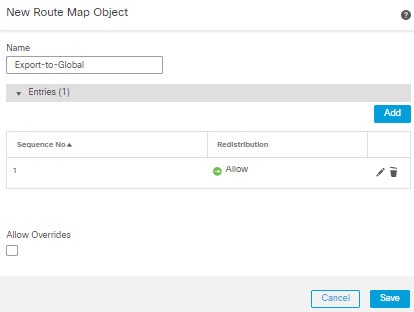
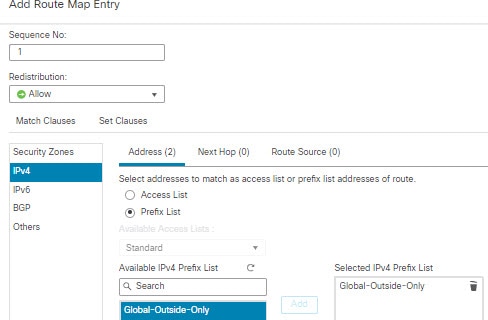
You can implement an inter-virtual-router route leak by exporting routes from a source virtual router (say VR1) to the source BGP table using route target extended community and then importing the same route target extended community from the source BGP table into the destination BGP table, which in turn is used by the destination virtual router (say, VR2). You can use the route maps for filtering the routes. The routes of global virtual router can also be leaked to user-defined virtual routers and vice versa. The BGP inter-virtual-router route leaking supports both ipv4 and ipv6 prefixes.

For details on configuring BGP route leaking, see Configure BGP Route Import/Export Settings.

BGP Route Leaking Guidelines

  • Ensure that all the routes required for recursion are imported and present in the routing table of the ingress virtual router.

  • ECMP is supported per virtual router. Hence, do not configure an ECMP across different virtual routers. The overlapping prefixes imported from different virtual routers cannot form an ECMP. That is, when you attempt to import routes with overlapping addresses from two different virtual routers to other virtual routers (a global virtual router or an user-defined virtual router), only one route (as per BGP best path algorithm, the first route that was advertised) is imported to the respective virtual routing table. For example, if a network 10.10.0.0/24, connected to VR1 is advertised through BGP to a global virtual router first, and later another network with the same address 10.10.0.0/24, connected to VR2 is also advertised through BGP to global virtual router, only the VR1 network route is imported to the global virtual routing table.

  • OSPFv3 is not supported on user-defined virtual routers. Hence, do not configure BGPv6 to leak OSPFv3 user-defined virtual routers to global virtual router. However, you can configure BGPv6 to leak OSPFv3 global virtual router routes to user-defined virtual router through redistribution.

  • It is recommended to keep VTI interface, protected internal interfaces (loopback interface if supported for VTI) to be part of same virtual router to prevent the need for route leak.

Overlapping IP Addresses

Virtual router creates multiple instances of routing tables that are independent, thereby, the same or overlapping IP addresses can be used without conflicts. Threat Defense allows the same network to be part of two or more virtual routers. This involves multiple policies to be applied at the interface or at the virtual router level.

Other than few exceptions, the routing functions and most of the NGFW and IPS capability does not get impacted by the overlapping IP addresses. The following section describes the features that have limitations with overlapping IP addresses and the suggestions or recommendations to overcome them.

Limitations with Overlapping IP Addresses

When using an overlapping IP address in multiple virtual routers, to ensure proper application of the policy, you have to modify policies or rules for some of the features. Such features require you to use more specific interface either by splitting existing security zone or using new interface group as the need be.

Following features need modification for its proper functioning with an overlapping IP address:

  • Network Map—Modify the network discovery policy to exclude some overlapping IP segments to ensure that there is no overlapping IP address being mapped.

  • Identity Policy—The identity feed source cannot differentiate among virtual routers; to overcome this limitation, map overlapping address spaces or virtual routers in different realms.

For the following features, you need to apply rules on specific interfaces to ensure that different policies are applied on overlapping IP segments:

  • Access Policy

  • Prefilter Policy

  • QoS/Rate Limit

  • SSL Policy

Unsupported Features with Overlapping IP Addresses

  • ISE SGT-based Rule in AC Policy—The static security group tag (SGT) to IP address mappings downloaded from Cisco Identity Services Engine (ISE) are not virtual-router-aware. Set up separate ISE systems per virtual router if you need to create different SGT mappings per virtual router. This is not necessary if you intend to map the same IP addresses to the same SGT number in each virtual router.

  • Overlapping DHCP server pools are not supported across virtual routers.

  • Events and Analytics—Many of the management center analytics are dependent on network map and identity mappings which cannot differentiate if the same IP address belongs to two different end hosts. Hence, these analytics are not accurate when there are overlapping IP segments existing in same device but different virtual routers.

Configuring SNMP on User-Defined Virtual Routers

In addition to supporting SNMP on the management interface and Global virtual router data interfaces, Secure Firewall Threat Defense now allows you to configure SNMP host on user-defined virtual routers.

Configuring an SNMP host on user-defined virtual routers includes the following process:

  1. Configure device interfaces.

  2. Configure virtual router on an interface.

  3. Configure SNMP hosts on a virtual router interface.


    Note


    SNMP is not virtual router-aware. Hence, while configuring SNMP server on the user-defined virtual router, ensure that the network address is not an overlapping IP address.


  4. Deploy configurations to Secure Firewall Threat Defense. On successful deployment, the‑SNMP polling and traps are sent to the Network Management Station through the virtual router interface.

Maximum Number of Virtual Routers By Device Model

The maximum number of virtual routers you can create depends on the device model. The following table provides the maximum limits. You can double-check on your system by entering the show vrf counters command, which shows the maximum number of user-defined virtual routers for that platform not including the global virtual router. The numbers in the table below include user and global routers. For the Firepower 4100/9300, these numbers apply to native mode.

For platforms that support multi-instance capability, such as the Firepower 4100/9300, determine the maximum number of virtual routers per container instance by dividing the maximum virtual routers by the number of cores on the device, and then multiplying by the number of cores assigned to the instance, rounding down to the nearest whole number. For example, if the platform supports a maximum of 100 virtual routers, and it has 70 cores, then each core would support a maximum of 1.43 virtual routers (rounded). Thus, an instance assigned 6 cores would support 8.58 virtual routers, which rounds down to 8, and an instance assigned 10 cores would support 14.3 virtual routers (rounding down, 14).

Device Model

Maximum Virtual Routers

Firepower 1010

5

Firepower 1120

5

Firepower 1140

10

Firepower 1150

10

Firepower 2110

10

Firepower 2120

20

Firepower 2130

30

Firepower 2140

40

Secure Firewall 3110

15

Secure Firewall 3120

25

Secure Firewall 3130

50

Secure Firewall 3140

100

Firepower 4110

60

Firepower 4112

60

Firepower 4115

80

Firepower 4120

80

Firepower 4125

100

Firepower 4140

100

Firepower 4145

100

Firepower 4150

100

Firepower 9300 appliance, all models

100

Threat Defense Virtual, all platforms

30

ISA 3000

10

Requirements and Prerequisites for Virtual Routers

Model Support

Threat Defense

Supported Domains

Any

User Roles

Admin

Network Admin

Security Approver

Guidelines and Limitations for Virtual Routers

Firewall Mode Guidelines

Virtual routers are supported on routed firewall mode only.

Interface Guidelines

  • You can assign an interface to only one virtual router.

  • A virtual router can have any number of interfaces that are assigned to it.

  • You can assign only routed interfaces with logical names and VTIs to a user-defined virtual router.

  • If you want to change a virtual router interface to a non-routed mode, remove the interface from the virtual router, and then change its mode.

  • You can assign an interface to a virtual router, either from a global virtual router or from another user-defined virtual router.

  • The following interfaces cannot be assigned to an user-defined virtual router:

    • Diagnostic interfaces.

    • Members of EtherChannel.

    • Members of Redundant interfaces.

    • Members of BVI.

  • VTI is a route-based VPN. So, when the tunnel is established, the traffic that uses VTI for encryption must be controlled through routing. Static routing, as well as dynamic routing with BGP is supported.

  • You cannot use interfaces that belong to user-defined virtual routers in policy-based site-to-site or remote access VPNs.

  • If a route using the interface that is being moved or its virtual router is deleted, exist in source or destination virtual router table, remove the routes before the interface movement or virtual router deletion.

  • As separate routing tables are maintained for each virtual router, when an interface is moved from one virtual router to another virtual router, be it global or user-defined, the system removes the IP address configured on the interface temporarily. All existing connections on the interface are terminated. Thus, moving interfaces between virtual routers have drastic effect on the network traffic. Hence take precautionary measures before you move interfaces.

Global Virtual Router Guidelines

  • The interfaces which are named and not part of other virtual routers, are part of the global virtual router.

  • You cannot remove routed interfaces from global virtual router.

  • You cannot modify global virtual router.

  • Generally, after configuring interfaces, if you un-register and register back to same or another management center, interface configuration is imported back from device. With virtual router support, there is a restriction—the IP address for only global virtual router interfaces is retained.

Clustering Guidelines

  • When the control unit link fails due to failure of its interfaces, the unit removes all leaked routes of its interfaces from the global routing table and propagates the inactive connected and static routes to other units of the cluster. This results in removal of those leaked routes from the routing table in other units. These removal takes place prior to another unit becoming a new control unit, which takes approximately 500 ms. When another unit becomes the new control unit, these routes are learned and added back to the routing tables through BGP convergence. Thus, till the convergence time, approximately one minute, the leaked routes are not available for the routing events to take place.

  • When a control role change occurs in a cluster, the leaked routes learnt through BGP is updated with the best ECMP path. However, the non-best ECMP path is removed from the cluster routing table only after the BGP reconvergence timer elapses, that is 210 seconds. Thus, till the BGP reconvergence timer elapse, the old, non-best ECMP path persist as preferred route for routing events.

Additional Guidelines

  • While configuring BGP for virtual routers, you can redistribute the routes belonging to different protocols within the same virtual routers. For example, OSPF VR2 routes cannot be imported into BGP VR1. You can only redistribute OSPF VR2 into BGP VR2, and then configure a route leak between BGP VR2 and BGP VR1.

  • You cannot use IPv6 ACL for filtering the routes in the route map. Only prefix list is supported.

  • Security Intelligence Policy—The Security Intelligence policy is not virtual-router-aware. If you add an IP address, URL, or DNS name to the block list, it is blocked for all virtual routers. This limitation is applicable on the interface having security zones.

  • NAT Rules—Do not mix interfaces in NAT rules. In virtual routing, if the specified source and destination interface objects (interface groups or security zones) have interfaces that belong to different virtual routers, the NAT rule diverts traffic from one virtual router through another virtual router. The NAT does the route lookup in the virtual router table for the inbound interface only. If necessary, define static routes in the source virtual router for the destination interface. If you leave the interface as any, the rule applies to all interfaces regardless of virtual router membership.

  • DHCP Relay—Interconnecting virtual routers for DHCP relay is not supported. For example, if DHCP relay client is enabled on VR1 interface and DHCP relay server is enabled on VR2 interface, the DHCP requests will not be forwarded outside of VR2 interface.

  • Recreating a deleted virtual router—When you recreate a virtual router that was deleted less than 10 seconds earlier, an error message appears stating that deletion of the virtual router is in progress. If you want to recreate a deleted virtual router successively, use a different name for the new virtual router.

Modifications to the Management Center Web Interface - Routing Page

Devices earlier to the threat defense 6.6 and few device models are not supported with virtual routing capability. The management center web interface displays the same Routing page of the management center 6.5 or earlier version for such non supported devices. To know the supported devices and platform for virtual routing, see Supported Device Models.

You can configure virtual routers in the routing page of a supported device:

  1. Navigate to Devices > Device Management and edit the virtual-router-aware device.

  2. Click Routing to enter the virtual routers page.

For devices using virtual routing, the left pane of the Routing page displays the following:

  • Manage Virtual Routers—allows you to create and manage virtual routers.

  • List of virtual routing protocols—lists routing protocols that you can configure for the virtual routers.

  • General Settings—allows you to configure BGP general settings that are applicable for all the virtual routers. Select the Enable BGP check box in order to define other BGP settings. To configure other BGP settings for a virtual router, navigate to BGP in the virtual routing protocols .

Manage Virtual Routers

When you click Manage Virtual Routers on the Virtual Routers pane, the Manage Virtual Routers page appears. This page displays the existing virtual routers on the device and the associated interfaces. In this page, you can Add Virtual Router (add virtual router icon) to the device. You can also Edit (edit icon) and Delete (delete icon) user-defined virtual routers. You cannot edit or remove a global virtual router. You can only View (View button) the details of a global virtual router.

Create a Virtual Router

Procedure


Step 1

Choose Devices > Device Management, and edit the threat defense device.

Step 2

Click Routing.

Step 3

Click Manage Virtual Routers.

Step 4

Click Add Virtual Router (add virtual router icon).

Step 5

In the Add Virtual Router box, enter a name and description for the virtual router.

Note


If you are creating a virtual router that was deleted less than 10 seconds earlier, an error message appears stating that deletion of the virtual router is in progress. If you want to create a deleted virtual router successively, use a different name for the new virtual router.

Step 6

Click Ok.

The Routing page appears, displaying the newly created virtual router page.


What to do next

Configure a Virtual Router

You can assign interfaces to a user-defined virtual router and configure the routing policies for the device. Though you cannot manually add or remove interfaces for a global virtual router, you can configure the routing policies for the device interfaces.

Before you begin

  • To configure routing policies for a user-defined virtual router, add a router. See Create a Virtual Router.

  • All routing configuration settings of a non-virtual routing capable device are also available for a global virtual router. For information on the settings, see Routing Settings.

  • Only limited routing protocols are supported for a user-defined virtual router.

Procedure


Step 1

From the Devices > Device Management page, edit the virtual-router supported device. Navigate to Routing. For information on the modifications to the routing page, see Modifications to the Management Center Web Interface - Routing Page.

Step 2

From the drop-down list, select the desired virtual router.

Step 3

In the Virtual Router Properties page, you can modify the description.

Step 4

To add interfaces, select the interface under the Available Interfaces box, and then click Add.

Remember the following:

  • Only interfaces with a logical name are listed under the Available Interfaces box. You can edit the interface and provide a logical name in Interfaces. Remember to save the changes for the settings to take effect.

  • Only interfaces of global virtual routers are available for assigning; the Available Interfaces box lists only interfaces that are not assigned to any other user-defined virtual routers. You can assign physical interfaces, subinterfaces, redundant interfaces, bridge groups, VTIs, and EtherChannels to a virtual router, but not their member interfaces. Because the member interfaces cannot be named, they cannot be used in virtual routing.

    You can assign the diagnostic interface to the global virtual router only.

Step 5

To save the settings, click Save.

Step 6

To configure the routing policy for the virtual router, click the respective names to open the corresponding settings page:

  • OSPF—Only OSPFv2 is supported on the user-defined virtual router. All other settings for OSPFv2 are as applicable as for a non-virtual-router-aware interface, except that Interface allows you to select only the interfaces of the virtual router that you are configuring. You can define the OSPFv3 and OSPFv2 routing policies for a global virtual router. For information on the OSPF settings, see OSPF.

  • RIP—You can configure RIP routing policies only for a global virtual router. For information on RIP settings, see RIP.

  • BGP—This page displays the BGP general settings that you have configured in Settings:

    • You cannot modify any of those general settings on this page, except for the router ID settings. You can override the router ID settings that were defined in the Settings page by editing them on this page.

    • To configure other BGP IPv4 or IPv6 settings, you must enable the BGP option in BGP page under General Settings.

    • BGP configuration for both IPv4 and IPv6 address family are supported for global router and the user-defined virtual router.

    For information on configuring BGP settings, see BGP.

  • Static Route—Use this setting to define where to send traffic for a specific destination network. You can also use this setting to create an inter-virtual-router static route. You can create a leak of connected or static route by using the interfaces of user-defined or global virtual routers. FMC prefixes to an interface to indicate that it is belonging to another virtual router and can be used for a route leak. For the route leak to be successful, do not specify next hop gateway.

    The Static Route table displays the virtual router whose interface is used for a route leak in the Leaked from Virtual Router column. If it is not a route leak, the column displays N/A.

    Irrespective of which virtual router the static route belongs, a Null0 interface is listed along with the interfaces of the same virtual router to which the static route belongs.

    For information on static route settings, see Static and Default Routes.

  • Multicast—You can configure multicast routing policies only for a global virtual router. For information on multicast settings, see Multicast.

Step 7

To save the settings, click Save.


What to do next

Modify a Virtual Router

You can modify the description and other routing policies of a virtual router.

Procedure


Step 1

Choose Devices > Device Management, and edit the threat defense device.

Step 2

Click Routing.

Step 3

Click Manage Virtual Routers.

All virtual routers along with the assigned interfaces are displayed in the Virtual Routers page.

Step 4

To modify a virtual router, click Edit (edit icon) against the desired virtual router.

Note

 
You cannot modify the general settings of the global virtual router. Hence, edit is not available for the global router; instead a View (View button) is provided to view the settings.

Step 5

To save the changes, click Save.


What to do next

Remove Virtual Routers

Before you begin

  • You cannot delete the Global virtual router. Hence, the delete option is not available for the Global virtual router.

  • You can remove multiple virtual routers at a time.

  • All the routing policies of the deleted virtual router are also deleted.

  • All the interfaces of the deleted virtual router move to the global virtual router.

  • If there are any restrictions on the movement of interfaces, such as overlapping IPs, route conflicts, and so on, you can remove the router only after resolving the conflicts.

Procedure


Step 1

Choose Devices > Device Management, and edit the threat defense device.

Step 2

Click Routing.

Step 3

Click Manage Virtual Routers.

All virtual routers along with the mapped interfaces are displayed in the Virtual Routers page.

Step 4

To remove a virtual router, click Delete (delete icon) against the desired virtual router.

Step 5

To remove multiple routers, holding the CTRL key, click the virtual routers that you want to delete. Right-click, and then click Delete.

Step 6

To save the changes, click Save.


Monitoring Virtual Routers

To monitor and troubleshoot virtual routers, log into the device CLI and use the following commands:

  • show vrf: Displays the details of the virtual routers and their associated interfaces.

  • show route vrf <vrf_name>: Displays the routing details of a virtual router.

  • show run router bgp all: Displays the BGP routing details of all virtual router.

  • show run router bgp vrf <vrf_name>: Displays the BGP routing details of a virtual router.

Configuration Examples for Virtual Routers

How to Route to a Distant Server through Virtual Routers

In virtual routing, you can create multiple virtual routers to maintain separate routing tables for groups of interfaces, thereby achieve network separation. In some scenarios, you may need to access a server that is reachable only through a separate virtual router. This example provides the procedure that interconnects virtual routers to reach to a host that is multiple hops away.

Consider an example, where a member of the sales department of a garment company wants to look up at the stock maintained by the warehousing department of its factory unit. In a virtual routing environment, you need to leak route between virtual routers where destination (warehousing department) is multiple hops away from sales department. This route leaking is done by adding multihop route leak, where, you configure a static route in Sales virtual router(source) to an interface in Warehouse virtual router (destination). As the destination network is multi-hop away, you also need to configure the Warehouse virtual router with the route to the destination network, namely 10.50.0.0/24.

Figure 1. Interconnecting Two Virtual Routers - An Example

Before you begin

This example assumes that you have already configured Sales_Router1 to route traffic from 10.20.0.1/30 interface to 10.50.0.5/24.

Procedure


Step 1

Configure the inside interface (Gi0/1) of the device to be assigned to Sales virtual router:

  1. Choose Devices > Device Management > Interfaces.

  2. Edit the Gi0/1 interface:

    • Name—For this example, VR-Sales.

    • Select the Enabled checkbox.

    • In IPV4, for IP Type, choose Use Static IP.

    • IP Address—Enter 10.30.0.1/24.

  3. Click Ok.

  4. Click Save.

Step 2

Configure the inside interface (Gi0/2) of the device to be assigned to Warehouse virtual router:

  1. Choose Devices > Device Management > Interfaces.

  2. Edit the Gi0/2 interface:

    • Name—For this example, VR-Warehouse.

    • Select the Enabled checkbox.

    • In IPV4, for IP Type, choose Use Static IP.

    • IP Address—Leave it blank. The system does not allow you to configure interfaces with same IP address (10.30.0.1/24), as you are yet to create user-defined virtual routers.

  3. Click Ok.

  4. Click Save.

Step 3

Create Sales and Warehouse virtual routers and assign their interfaces:

  1. Choose Devices > Device Management, and edit the threat defense device.

  2. Choose Routing > Manage Virtual Routers.

  3. Click Add Virtual Router and create Sales.

  4. Click Add Virtual Router and create Warehouse.

  5. Select Sales from virtual router drop-down, in Virtual Router Properties, add VR-Sales as Selected Interface and save.

  6. Select Warehouse from virtual router drop-down, in Virtual Router Properties, add VR-Warehouse as Selected Interface and save.

Step 4

Revisit the VR-Warehouse interface configuration:

  1. Choose Devices > Device Management > Interfaces.

  2. Click Edit against VR-Warehouse interface. Specify the IP Address as 10.30.0.1/24. The system now allows you to configure with same IP address of VR-Sales, because the interfaces are seperately assigned to two different virtual routers.

  3. Click Ok.

  4. Click Save.

Step 5

Create network objects for the warehouse server—10.50.0.0/24, and for the warehouse gateway— 10.40.0.2/30:

  1. Choose Object > Object Management.

  2. Choose Add Network > Add Object:

    • Name—For this example, Warehouse-Server.

    • Network—Click Network and enter 10.50.0.0/24.

  3. Click Save.

  4. Choose Add Network > Add Object:

    • Name—For this example, Warehouse-Gateway.

    • Network—Click Host and enter 10.40.0.2.

  5. Click Save.

Step 6

Define the route leak in Sales that points to the VR-Warehouse interface:

  1. Choose Devices > Device Management, and edit the threat defense device.

  2. Choose Routing.

  3. Choose Sales virtual router from the drop-down, and then click Static Route.

  4. Click Add Route. In Add Static Route Configuration, specify the following:

    • Interface—Select VR-Warehouse.

    • Network—Select the Warehouse-Server object.

    • Gateway—Leave it blank. When leaking a route into another virtual router, do not select the gateway.

  5. Click Ok.

  6. Click Save.

Step 7

In the Warehouse virtual router, define the route that points to the Warehouse Router 2 gateway:

  1. Choose Warehouse virtual router from the drop-down, and then click Static Route.

  2. Click Add Route. In Add Static Route Configuration, specify the following:

    • Interface—Select VR-Warehouse.

    • Network—Select the Warehouse-Server object.

    • Gateway—Select the Warehouse-Gateway object.

  3. Click Ok.

  4. Click Save.

Step 8

Configure access control rule that allows access to the warehouse server. For creating the access control rule, you need to create security zones. Use Object > Object Management > Interface. Choose Add > Security Zone and create security zones for VR-Sales and VR-Warehouse; for Warehouse-Server network object, create a Warehouse-Server interface group (Choose Add > Interface Group).

Step 9

Choose Policies > Access Control and configure an access control rule to allow traffic from the source interfaces in the Sales virtual router to the destination interfaces in the Warehouse virtual router for the destination Warehouse-Server network object.

For example, if the interfaces in Sales are in the Sales-Zone security zone, and those in Warehouse are in the Warehouse-Zone security zone, the access control rule would look similar to the following:


How to Provide Internet Access with Overlapping Address Spaces

When using virtual routers, you can have the same network address for interfaces that reside in separate routers. However, because the IP addresses routed in these separate virtual routers are the same, apply NAT/PAT rules for each interface with separate NAT/PAT pools to ensure that return traffic goes to the correct destination. This example provides the procedure to configure the virtual routers and NAT/PAT rules to manage the overlapping address spaces.

For example, interfaces vr1-inside and vr2-inside on threat defense is defined to use the IP address 192.168.1.1/24, managing endpoints on their segment in the 192.168.1.0/24 network. To allow Internet access from two virtual routers that use the same address space, you need to apply NAT rules separately to the interfaces within each virtual router, ideally using separate NAT or PAT pools. You could use PAT to translate the source addresses in VR1 to 10.100.10.1, and for those in VR2, to 10.100.10.2. The following illustration shows this setup, where the Internet-facing outside interface is part of the global router. You must define the NAT/PAT rules with the source interface (vr1-inside and vr2-inside) explicitly selected—using “any” as the source interface makes it impossible for the system to identify the correct source because the same IP address could exist on two different interfaces.

Network diagram for overlapping address space

Note


Even if you have some interfaces within virtual routers that does not use overlapping address spaces, define the NAT rule with the source interface to make troubleshooting easier, and to ensure a cleaner separation between traffic from the virtual routers that is Internet-bound.


Procedure


Step 1

Configure the inside interface of the device for VR1:

  1. Choose Devices > Device Management > Interfaces.

  2. Edit the interfaces that you want to assign to VR1:

    • Name—For this example, vr1-inside.

    • Select the Enabled checkbox.

    • In IPV4, for IP Type, choose Use Static IP.

    • IP Address—Enter 192.168.1.1/24.

  3. Click Ok.

  4. Click Save.

Step 2

Configure the inside interface of the device for VR2:

  1. Choose Devices > Device Management > Interfaces.

  2. Edit the interfaces that you want to assign to VR2:

    • Name—For this example, vr2-inside.

    • Select the Enabled checkbox.

    • In IPV4, for IP Type, choose Use Static IP.

    • IP Address—Leave it blank. The system does not allow you to configure interfaces with same IP address, as you are yet to create user-defined virtual routers.

  3. Click Ok.

  4. Click Save.

Step 3

Configure VR1 and the static default route leak to the outside interface:

  1. Choose Devices > Device Management, and edit the threat defense device.

  2. Choose Routing > Manage Virtual Routers. Click Add Virtual Router and create VR1.

  3. For VR1, in Virtual Router Properties, assign vr1-inside and save.

  4. Click Static Route.

  5. Click Add Route. In Add Static Route Configuration, specify the following:

    • Interface—Select the outside interface of the global router.

    • Network—Select the any-ipv4 object. This network is the default route for any traffic that cannot be routed within VR1.

    • Gateway—Leave it blank. When leaking a route into another virtual router, do not provide a Gateway.

  6. Click Ok.

  7. Click Save.

Step 4

Configure VR2 and the static default route leak to the outside interface:

  1. Choose Devices > Device Management, and edit the threat defense device.

  2. Choose Routing > Manage Virtual Routers. Click Add Virtual Router and create VR2.

  3. For VR2, in Virtual Router Properties, assign vr2-inside and save.

  4. Click Static Route.

  5. Click Add Route. In Add Static Route Configuration, specify the following:

    • Interface—Select the outside interface of the global router.

    • Network—Select the any-ipv4 object. This network is the default route for any traffic that cannot be routed within VR2.

    • Gateway—Leave it blank. When leaking a route into another virtual router, do not select the Gateway.

  6. Click Ok.

  7. Click Save.

Step 5

Configure IPv4 static default route, namely 172.16.1.2 on the outside interface of the global router:

  1. Choose Devices > Device Management, and edit the threat defense device.

  2. Choose Routing and edit global router properties.

  3. Click Static Route.

  4. Click Add Route. In Add Static Route Configuration, specify the following:

    • Interface—Select the outside interface of the global router.

    • Network—Select the any-ipv4 object. This will be the default route for any IPv4 traffic.

    • Gateway—If already created, select the host name from the drop-down. If the object is not yet created, click Add and define the host object for the IP address of the gateway at the other end of the network link on the outside interface, in this example, 172.16.1.2. After you create the object, select it in the Gateway field.

  5. Click Ok.

  6. Click Save.

Step 6

Revisit the vr2-inside interface configuration:

  1. Choose Devices > Device Management > Interfaces.

  2. Click Edit against vr2-inside interface. Specify the IP Address as 192.168.1.1/24. The system now allows you to configure with same IP address of vr1-inside, because the interfaces are separately assigned to two different virtual routers.

  3. Click Ok.

  4. Click Save.

Step 7

Create the NAT rule to PAT inside to outside traffic of VR1 to 10.100.10.1.

  1. Choose Devices > NAT.

  2. Click New Policy > Threat Defense NAT.

  3. Enter InsideOutsideNATRule as the NAT policy name, and select the threat defense device. Click Save.

  4. In InsideOutsideNATRule page, click Add Rule and define the following:

    • NAT Rule—Select Manual NAT Rule.

    • Type—Select Dynamic.

    • Insert—Above, if any dynamic NAT rule exists.

    • Click Enabled.

    • In Interface Objects, select vr1-interface object and click Add to Source (If the object is not available, create one in Object > Object Management > Interface), and select outside as Add to Destination.

    • In Translation, for Original Source, select any-ipv4. For Translated Source, click Add and define host object VR1-PAT-Pool with 10.100.10.1. Select VR1-PAT-Pool as shown in the figure below:

  5. Click Ok.

  6. Click Save.

Step 8

Add NAT rule to PAT inside to outside traffic of VR2 to 10.100.10.2.

  1. Choose Devices > NAT.

  2. Edit InsideOutsideNATRule to define the VR2 NAT rule:

    • NAT Rule—Select Manual NAT Rule.

    • Type—Select Dynamic.

    • Insert—Above, if any dynamic NAT rule exists.

    • Click Enabled.

    • In Interface Objects, select vr2-interface object and click Add to Source (If the object is not available, create one in Object > Object Management > Interface), and select outside as Add to Destination.

    • In Translation, for Original Source, select any-ipv4. For Translated Source, click Add and define host object VR2-PAT-Pool with 10.100.10.2. Select VR2-PAT-Pool as shown in the figure below:

  3. Click Ok.

  4. Click Save.

Step 9

To configure the access control policy that allows traffic from the vr1-inside and vr2-inside interfaces to the outside interface, you need to create security zones. Use Object > Object Management > Interface. Choose Add > Security Zone and create security zones for vr1-inside, vr2-inside, and outside interfaces.

Step 10

Choose Policies > Access Control and configure an access control rule to allow traffic from vr1-inside-zone and vr2- inside-zone to outside-zone.

Assuming that you create zones named after the interfaces, a basic rule that allows all traffic to flow to the Internet will look like the following. You can apply other parameters to this access control policy:


How to Allow RA VPN Access to Internal Networks in Virtual Routing

On virtual routing-enabled devices, RA VPN is supported only on global virtual router interfaces. This example provides the procedure that allows your AnyConnect Client user to connect to user-defined virtual router networks.

In the following example, the RA VPN (AnyConnect Client) user connects to the outside interface of threat defense at 172.16.3.1, and is given an IP address within the pool of 192.168.80.0/24. The user can access the inside network of only the global virtual router. To allow traffic flow through the network of the user-defined virtual router VR1, namely 192.168.1.0/24, leak the route by configuring the static routes on global and VR1.

Virtual routers and RA VPN network diagram.

Before you begin

This example assumes that you have already configured the RA VPN, defined the virtual routers, and configured and assigned the interfaces to the appropriate virtual routers.

Procedure


Step 1

Configure route leak from Global virtual router to the user-defined VR1:

  1. Choose Devices > Device Management, and edit the threat defense device.

  2. Click Routing. By default, the Global routing properties page appears.

  3. Click Static Route.

  4. Click Add Route. In Add Static Route Configuration, specify the following:

    • Interface—Select the VR1 inside interface.

    • Network—Select the VR1 virtual router network object. You can create one using the Add Object option.

    • Gateway—Leave it blank. When leaking a route into another virtual router, does not select the gateway.

    The route leak allows AnyConnect Client assigned IP addresses in the VPN pool to access the 192.168.1.0/24 network in the VR1 virtual router.

  5. Click Ok.

Step 2

Configure the route leak from VR1 to the Global virtual router:

  1. Choose Devices > Device Management, and edit the threat defense device.

  2. Click Routing and from the drop-down, select VR1.

  3. Click Static Route.

  4. Click Add Route. In Add Static Route Configuration, specify the following:

    • Interface—Select the outside interface of the global router.

    • Network—Select the global virtual router network object.

    • Gateway—Leave it blank. When leaking a route into another virtual router, does not select the gateway.

    The configured static route allows endpoints on the 192.168.1.0/24 network (VR1) to initiate connections to AnyConnect Client assigned IP addresses in the VPN pool.

  5. Click Ok.


What to do next

If RA VPN address pool and the IP addresses in the user-defined virtual router overlap, you must also use static NAT rules on the IP addresses to enable proper routing. Alternatively, you can change your RA VPN address pool so that there is no overlap.

How to Secure Traffic from Networks in Multiple Virtual Routers over a Site-to-Site VPN

On virtual routing-enabled devices, Site-to-Site VPN is supported only on global virtual router interfaces. You cannot configure it on an interface that belongs to a user-defined virtual router. This example provides the procedure that allows you to secure the connections from or to networks hosted within user-defined virtual routers over the site-to-site VPN. You also need to update the site-to-site VPN connection to include the user-defined virtual routing networks.

Let us consider a scenario, where, a site-to-site VPN is configured between a branch office network to a company headquaters network; the threat defense in the branch office having virtual routers. In this case, the site-to-site VPN is defined on the outside interface of the branch office at 172.16.3.1. This VPN includes the inside network 192.168.2.0/24 without extra configuration, because the inside interface is also part of the global virtual router. But, to provide site-to-site VPN services to the 192.168.1.0/24 network, which is part of the VR1 virtual router, you must leak the route by configuring the static routes on global and VR1, and add the VR1 network to the site-to-site VPN configuration.

Virtual routers and S2S network diagram

Before you begin

This example assumes that you have already configured the site-to-site VPN between the 192.168.2.0/24 local network and the 172.16.20.0/24 external network, defined the virtual routers, and configured and assigned the interfaces to the appropriate virtual routers.

Procedure


Step 1

Configure route leak from the Global virtual router to the user-defined VR1:

  1. Choose Devices > Device Management, and edit the threat defense device.

  2. Click Routing. By default, the Global routing properties page appears.

  3. Click Static Route.

  4. Click Add Route. In Add Static Route Configuration, specify the following:

    • Interface—Select the VR1 inside interface.

    • Network—Select the VR1 virtual router network object. You can create one using the Add Object option.

    • Gateway—Leave it blank. When leaking a route into another virtual router, do not select the gateway.

    The route leak allows endpoints protected by the external (remote) end of the site-to-site VPN to access the 192.168.1.0/24 network in the VR1 virtual router.

  5. Click Ok.

Step 2

Configure the route leak from VR1 to the Global virtual router:

  1. Choose Devices > Device Management, and edit the threat defense device.

  2. Click Routing and from the drop-down, select VR1.

  3. Click Static Route.

  4. Click Add Route. In Add Static Route Configuration, specify the following:

    • Interface—Select the outside interface of the global router.

    • Network—Select the global virtual router network object.

    • Gateway—Leave it blank. When leaking a route into another virtual router, do not select the gateway.

    This static route allows endpoints on the 192.168.1.0/24 network (VR1) to initiate connections that will traverse the site-to-site VPN tunnel. For this example, the remote endpoint that is protecting the 172.16.20.0/24 network.

  5. Click Ok.

Step 3

Add the 192.168.1.0/24 network to the site-to-site VPN connection profile:

  1. Choose Devices > VPN > Site To Site, and edit the VPN Topology.

  2. In Endpoints, edit Node A endpoint.

  3. In Edit Endpoint, in the Protected Networks field, click Add New Network Object.

  4. Add the VR1 network object with 192.168.1.0 network:

  5. Click Ok and save the configuration.


How to Route Traffic between Two Overlapping Network Host in Virtual Routing

You can configure hosts on the virtual routers that have same network address. If the hosts want to communicate, you can configure twice NAT. This example provides the procedure to configure the NAT rules to manage the overlapping network host.

In the following example, two hosts Host A and Host B belong to different virtual routers: VRG (interface vrg-inside), VRB (interface vrb-inside) respectively with the same subnet 10.1.1.0/24. For both the hosts to communicate, create a NAT policy where, VRG-Host interface object would use a mapped NAT address - 20.1.1.1, and VRB-Host interface object would use a mapped NAT address - 30.1.1.1. Thus, Host A uses 30.1.1.1 to communicate to Host B; Host B uses 20.1.1.1 to reach Host A.

Before you begin

This example assumes that you have already configured:

  • vrg-inside and vrb-inside interfaces are associated with virtual routers: VRG and VRB respectively and vrg-inside and vrb-inside interfaces configured with same subnet address (say, 10.1.1.0/24).

  • Interfaces zones VRG-Inf, VRB-Inf created with vrg-inside and vrb-inside interfaces respectively.

  • Host A in VRG with vrg-inside as default gateway; Host B in VRB with vrb-inside as default gateway.

Procedure


Step 1

Create the NAT rule to handle traffic from Host A to Host B. Choose Devices > NAT.

Step 2

Click New Policy > Threat Defense NAT.

Step 3

Enter a NAT policy name, and select the threat defense device. Click Save.

Step 4

In the NAT page, click Add Rule and define the following:

  • NAT Rule—Select Manual NAT Rule.

  • Type—Select Static.

  • Insert—Select Above, if any NAT rule exists.

  • Click Enabled.

  • In Interface Objects, select VRG-Inf object and click Add to Source (If the object isn’t available, create one in Object > Object Management > Interface), and select VRB-Inf object and click Add to Destination.

  • In Translation, select the following:

    • Original Source, select vrg-inside.

    • Original Destination, click Add and define object VRB-Mapped-Host with 30.1.1.1. Select VRB-Mapped-Host.

    • Translated Source, click Add and define object, VRG-Mapped-Host with 20.1.1.1. Select VRG-Mapped-Host.

    • Translated Destination, select vrb-inside as shown in the following figure:

When you run the show nat detail command on the threat defense device, you will see an output similar to this:
firepower(config-service-object-group)# show nat detail
Manual NAT Policies (Section 1)
1 (2001) to (3001) source static vrg-inside VRG-MAPPED-HOST destination static VRB-MAPPED-HOST vrb-inside
translate_hits = 0, untranslate_hits = 0
Source - Origin: 10.1.1.1/24, Translated: 20.1.1.1/24
Destination - Origin: 30.1.1.1/24, Translated: 10.1.1.1/24

Step 5

Click Ok.

Step 6

Click Save.

The NAT rule looks like this:

When you deploy the configuration, a warning message appears:


How to Manage Overlapping Segments in Routed Firewall Mode with BVI Interfaces

You can deploy single threat defense between multiple overlapping networks transparently and/or deploy the firewall between the hosts of same network. To achieve this deployment, configure BVI per virtual router. The procedure to configure the BVIs in virtual router is explained here.

BVI is a virtual interface within a router that acts like a normal routed interface. It does not support bridging, but represents the comparable bridge group to routed interfaces within the router. All the packets coming in or going out of these bridged interfaces, pass through the BVI interface. The interface number of the BVI is the number of the bridge group that the virtual interface represents.

In the following example, BVI-G is configured in VRG and Bridge Group 1 is the routed interface for interfaces G0/1 and G0/2. Similarly, BVI-B is configured in VRB and Bridge Group 2 is the routed interface for interfaces G0/3 and G0/4. Consider that both BVIs have the same IP subnet address, say 10.10.10.5/24. Because of virtual routers, the network is isolated on the shared resources.

Procedure


Step 1

Choose Devices > Device Management. Edit the required device.

Step 2

In Interfaces, choose Add Interfaces > Bridge Group Interface.

  1. Enter the following details for BVI-G:

    • Name—For this example, BVI-G.

    • Bridge Group ID—For this example, 1.

    • Available Interface—Select the interfaces.

    • In IPV4, for IP Type, choose Use Static IP.

    • IP Address—Enter 10.10.10.5/24.

  2. Click Ok.

  3. Click Save.

  1. Enter the following details for BVI-B:

    • Name—For this example, BVI-B.

    • Bridge Group ID—For this example, 2.

    • Available Interface—Select the sub interfaces.

    • In IPV4, for IP Type, choose Use Static IP.

    • IP Address—Leave this field empty as the system does not allow two interfaces to have overlapping IP address. You can revisit the Bridge Group and provide the same IP address after aligning it under a virtual router.

  2. Click Ok.

  3. Click Save.

Step 3

Create virtual router, say VRG, and select BVI-G as its network:

  1. Choose Devices > Device Management.

  2. Edit the device, and choose Routing > Manage Virtual Routers.

  3. Click Add Virtual Router. Enter a name for the virtual router and click Ok.

  4. In Virtual Routing Properties, select BVI-G and click Add.

  5. Click Save.

Step 4

Create virtual router, say VRB, and select BVI-B as its network:

  1. Choose Devices > Device Management.

  2. Edit the device, and choose Routing > Manage Virtual Routers.

  3. Click Add Virtual Router. Enter a name for the virtual router and click Ok.

  4. In Virtual Routing Properties, select BVI-B and click Add.

  5. Click Save.

Step 5

Revisit the BVI-B configuration:

  1. Choose Devices > Device Management > Interfaces.

  2. Click Edit against BVI-B interface. Specify the IP Address as 10.10.10.5/24. The system now allows you to configure with same IP address of BVI-G, because the interfaces are seperately assigned to two different virtual routers.

  3. Click Ok.

  4. Click Save.

If you want to enable inter-BVI communication, use an external router as default gateway. In overlapping BVI scenarios, as in this example, use twice NAT external router as gateway to establish inter-BVI traffic. When configuring NAT for the members of a bridge group, you specify the member interface. You cannot configure NAT for the bridge group interface (BVI) itself. When doing NAT between bridge group member interfaces, you must specify the real and mapped addresses. You cannot specify “any” as the interface.


How to Configure User Authentication with Overlapping Networks

In virtual routing, you can configure multiple virtual routers with overlapping IP and overlapping users. In the example, VRG, and VRB are the virtual routers with overlapping IP - 192.168.1.1/24. The users on two different domains are also on overlapping network IP 192.168.1.20. For VRG and VRB users to access the shared server 172.16.10.X, leak routes to the global virtual router. Use source NAT to handle the overlapping IP. For controlling the access from VRG and VRB users, you must set user authentication in management center. Management Center uses realms, Active Directories, Identity source, and Identity rules and policies for authenticating user identity. Because threat defense does not have direct role in authenticating users, user access is managed only through the access control policy. For controlling traffic from the overlapping users, use Identity policy and rules to create access control policy.

Before you begin

This example assumes that you have:

  • Two AD servers for the VRG and VRB users.

  • ISE with the two AD servers added.

Procedure


Step 1

Configure the inside interface of the device for VRG:

  1. Choose Devices > Device Management > Interfaces.

  2. Edit the interfaces that you want to assign to VRG:

    • Name—For this example, VRG-inside.

    • Select the Enabled checkbox.

    • In IPV4, for IP Type, choose Use Static IP.

    • IP Address—Enter 192.168.1.1/24.

  3. Click Ok.

  4. Click Save.

Step 2

Configure the inside interface of the device for VRB:

  1. Choose Devices > Device Management > Interfaces.

  2. Edit the interfaces that you want to assign to VRB:

    • Name—For this example, VRB-inside.

    • Select the Enabled checkbox.

    • In IPV4, for IP Type, choose Use Static IP.

    • IP Address—Leave it blank. The system doesn’t allow you to configure interfaces with same IP address, as you’re yet to create user-defined virtual routers.

  3. Click Ok.

  4. Click Save.

Step 3

Configure VRG and the static default route leak to the inside interface of the Global router for the VRG users to access the common server 172.16.10.1:

  1. Choose Devices > Device Management, and edit the threat defense device.

  2. Choose Routing > Manage Virtual Routers. Click Add Virtual Router and create VRG.

  3. For VRG, in Virtual Router Properties, assign VRG-inside and save.

  4. Click Static Route.

  5. Click Add Route. In Add Static Route Configuration, specify the following:

    • Interface—Select the inside interface of the global router.

    • Network—Select the any-ipv4 object.

    • Gateway—Leave it blank. When leaking a route into another virtual router, do not select a gateway.

  6. Click Ok.

  7. Click Save.

Step 4

Configure VRB and the static default route leak to the inside interface of the Global router for the VRB users to access the shared server 172.16.10.x:

  1. Choose Devices > Device Management, and edit the threat defense device.

  2. Choose Routing > Manage Virtual Routers. Click Add Virtual Router and create VRB.

  3. For VRB, in Virtual Router Properties, assign VRB-inside and save.

  4. Click Static Route.

  5. Click Add Route. In Add Static Route Configuration, specify the following:

    • Interface—Select the inside interface of the global router.

    • Network—Select the any-ipv4 object.

    • Gateway—Leave it blank. When leaking a route into another virtual router, do not select a gateway.

  6. Click Ok.

  7. Click Save.

Step 5

Revisit the VRB-inside interface configuration:

  1. Choose Devices > Device Management > Interfaces.

  2. Click Edit against VRB-inside interface. Specify the IP Address as 192.168.1.1/24. The system now allows you to configure with the same IP address as that of VRG-inside, because the interfaces are seperately assigned to two different virtual routers.

  3. Click Ok.

  4. Click Save.

Step 6

Add NAT rules for the source objects VRG and VRB. Click Devices > NAT.

Step 7

Click New Policy > Threat Defense NAT.

Step 8

Enter a NAT policy name, and select the threat defense device. Click Save.

Step 9

In the NAT page, click Add Rule and define the following source NAT for VRG:

  • NAT Rule—Select Manual NAT Rule.

  • Type—Select Static.

  • Insert—Select Above, if any NAT rule exists.

  • Click Enabled.

  • In Interface Objects, select VRG-Inside object and click Add to Source (If the object is not available, create one in Object > Object Management > Interface), and select Global-Inside object and click Add to Destination.

  • In Translation, select the following:

    • Original Source, select VRG-Users.

    • Translated Source, click Add and define object, VRG-NAT with 10.1.1.1. Select VRG-NAT as shown in the following figure:

Step 10

Click Ok.

Step 11

In the NAT page, click Add Rule and define the following source NAT for VRB:

  • NAT Rule—Select Manual NAT Rule.

  • Type—Select Static.

  • Insert—Select Above, if any NAT rule exists.

  • Click Enabled.

  • In Interface Objects, select VRB-Inside object and click Add to Source (If the object is not available, create one in Object > Object Management > Interface), and select Global-Inside object and click Add to Destination.

  • In Translation, select the following:

    • Original Source, select VRB-Users.

    • Translated Source, click Add and define object, VRB-NAT with 20.1.1.1. Select VRB-NAT as shown in the following figure:

Step 12

Click Save.

The NAT rule looks like this:

Step 13

Add the two unique AD servers in management center one for each VRG and VRB users—choose System > Integration > Realms.

Step 14

Click New Realm and complete the fields. For detailed information on the fields, see Realm Fields.

Step 15

For controlling the access from VRG and VRB users, define 2 Active Directories, see Realm Directory and Synchronize fieldssee Create an LDAP Realm or an Active Directory Realm and Realm Directory

Step 16

Add ISE in management center—choose System > Integration > Identity Sources.

Step 17

Click Identity Services Engine and complete the fields. For detailed information on the fields, see How to Configure ISE/ISE-PIC for User Control Using a Realm.

Step 18

Create Identity policy, rules, and then define access control policy for controlling access of overlapping users from VRG and VRB.


How to Interconnect Virtual Routers using BGP

You can now configure BGP settings on a device to leak the routes among virtual routers (Global and user-defined virtual routers). The route target of the source virtual router is exported to the BGP table, which, in turn is imported to the destination virtual router. The route map is used to share the Global virtual routes with the user-defined virtual routers and vice versa. Note that all import or export of the routes to the BGP table is configured at the user-defined virtual router, including the Global virtual routes.

Consider the firewall device of a factory is configured with the following virtual routers and interfaces:

  • Global virtual router is configured with Inside (10.10.1.4/24) and Outside (10.10.0.5/24)

  • VR-S (Sales) virtual router is configured with Inside1 (10.10.10.7/24) and Outside1 (10.10.11.7/24)

  • VR-W (Warehouse) virtual router is configured with Inside2 (10.10.12.7/24) and Outside2 (10.10.13.7/24)

Assume that you want the routes of warehouse (VR-W) to be leaked with sales (VR-S) and Global, and the outside interface routes of VR-S to VR-W. Similarly, you want the outside interface routes of the Global router to be leaked to sales (VR-S). This example demonstrates the BGP configuration procedure to achieve interconnecting the routers:

Figure 2. Interconnect Virtual Routers using BGP Settings
BGP route leak for VRF

Before you begin

Procedure


Step 1

Configure VR-W to export its routes tagging them with a route target to VR-S:

  1. Choose Devices > Device Management, edit device, and then click the Routing tab.

  2. From the virtual router drop-down, select VR-W.

  3. Click BGP > IPv4 > Route Import/Export.

  4. To leak the VR-W routes to VR-S, tag the routes with a route target, so that the VR-W routes are exported to its BGP table with the route target marked on them. In the Route Targets Export field, enter a value, say, 200:200. Click Add:

  5. From the virtual router drop-down, select VR-S.

  6. Click BGP > IPv4 > Route Import/Export.

  7. To receive the leaked routes from VR-W, configure the Import Route Target to import the VR-W routes that are marked with the route target from the (peer or redistributed) BGP table. In the Route Targets Import field, enter the same route target value that you had configured for VR-W, 200:200. Click Add.

Note


If you want to conditionalize routes to be leaked from VR-W, you can specify the match criteria in the route map object, and choose it in the User Virtual Router Export Route Map. Similarly, if you want to conditionalize the routes to be imported to VR-S from the BGP table, you can use the User Virtual Router Import Route Map. This procedure is explained in Step 3.

Step 2

Configure VR-W to export its routes to the Global virtual router:

  1. You need to create a route map that would allow the VR-W routes to be exported to the Global routing table. Choose Objects > Object Management > Route Map.

  2. Click Add Route Map, give a name, say Export-to-Global, and then click Add.

  3. Specify a Sequence Number, say 1, and then choose Allow from the Redistribution drop-down list:

  4. Click Save.

    In this example, all the VR-W routes are leaked to the Global routing table. Hence, no match criteria is configured for the route map.

  5. Navigate to the Routing tab of the device, and select VR-W. Click BGP > IPv4 > Route Import/Export.

  6. From the Global Virtual Router Export Route Map drop-down list, choose Export-to-Global:

Step 3

To leak only the Outside1 routes of VR-S to VR-W:

  1. From the virtual router drop-down, select VR-S.

  2. Click BGP > IPv4 > Route Import/Export.

  3. To leak the VR-S routes to VR-W, tag the routes with a route target, so that the VR-S routes are exported to its BGP table with the route target marked on them. In the Route Targets Export field, enter a value, say, 100:100. Click Add.

  4. From the virtual router drop-down, select VR-W, and choose BGP > IPv4 > Route Import/Export.

  5. To receive the leaked routes from VR-S, configure the Import Route Target to import the VR-S routes that are marked with the route target from the (peer or redistributed) BGP table. In the Route Targets Import field, enter the VR-S route target value, 100:100. Click Add.

  6. Now, you need to conditionalize that only the Outside1 routes of VR-S to be leaked to VR-W. Choose Objects > Object Management > Prefix List > IPv4 Prefix List.

  7. Click Add IPv4 Prefix List, give a name, say VRS-Outside1-Only, and then click Add.

  8. Specify a Sequence Number, say 1, and then choose Allow from the Redistribution drop-down list.

  9. Enter the IP Address (first two octets) of the VR-S Outside1 interface.

  10. Click Save.

  11. Create a route map with the match clause with the prefix list. Click Route Map. Click Add Route Map, give a name, say Import-from-VRS, and then click Add.

  12. Specify a Sequence Number, say 1, and then choose Allow from the Redistribution drop-down list.

  13. In the Match Clause tab, click IPv4. Under Address tab, click Prefix List.

  14. Under Available IPv4 Prefix List, select VRS-Outside1-Only, and then click Add.

  15. Click Save.

  16. Navigate to the Routing tab of the device, and select VR-W. Click BGP > IPv4 > Route Import/Export.

  17. From the Global Virtual Router Import Route Map drop-down list, choose Import-from-VRS:

Step 4

Configure VR-S to import the Outside routes of Global virtual router:

Note


To leak routes to or from a Global virtual router, you must configure the source or destination user defined virtual router respectively. Thus, in this example, VR-S is the destination router that imports the routes from Outside interface of the Global virtual router.

  1. Choose Objects > Object Management > Prefix List > IPv4 Prefix List.

  2. Click Add IPv4 Prefix List, give a name, say Global-Outside-Only, and then click Add.

  3. Specify a Sequence Number, say 1, and then choose Allow from the Redistribution drop-down list.

  4. Enter the IP Address (first two octets) of the Global Outside interface:

  5. Click Save.

  6. Click Route Map. Click Add Route Map, give a name, say Import-from-Global, and then click Add.

  7. Specify a Sequence Number, say 1, and then choose Allow from the Redistribution drop-down list.

  8. In the Match Clause tab, click IPv4. Under Address tab, click Prefix List.

  9. Under Available IPv4 Prefix List, select Global-Outside-Only, and then click Add:

  10. Click Save.

  11. Navigate to the Routing tab of the device, and select VR-S. Click BGP > IPv4 > Route Import/Export.

  12. From the Global Virtual Router Import Route Map drop-down list, choose Import-from-Global:

Step 5

Save and Deploy.


History for Virtual Routers

Feature

Minimum Management Center

Minimum Threat Defense

Details

Virtual router support for the ISA 3000.

7.0

7.0

You can configure up to 10 virtual routers on the ISA 3000.

SNMP support on user-defined virtual routers

7.0

7.0

You can now configure SNMP on user-defined virtual routers.

Bulk removal of virtual routers.

6.7

6.6

You can remove multiple virtual routers from threat defense at a time.

New/modified screens: Devices > Device Management > Routing > Manage Virtual Routers

Virtual routers and VRF-Lite for threat defense.

6.6

6.6

You can now create multiple virtual routers to maintain separate routing tables for groups of interfaces. Because each virtual router has its own routing table, you can provide clean separation in the traffic flowing through the device. Virtual routers implement the “light” version of Virtual Routing and Forwarding, or VRF-Lite, which does not support Multiprotocol Extensions for BGP (MBGP). The maximum number of virtual routers you can create ranges from five to 100, and depends on the device model..

New/modified screens: Devices > Device Management > edit device > Routing tab

New/modified CLI commands: .

  • show vrf

  • Added the [ vrf name | all] keyword set to these CLI commands, and changed the output to indicate virtual router information where applicable: clear ospf , clear route , ping , show asp table routing , show bgp , show ipv6 route , show ospf , show route , show snort counters

Platform restrictions: Not supported on the Firepower 1010 and ISA 3000.