- Preface
- GettingStarted
- Creating the Spaces Services
- Adding Devices
- Configurations
- Working with Faults
- Working with the Signage Menu
- Working with the Signage Content
- RoomSetup
- EmergencyDisplay
- Working with Information Signage
- Working with Smart+Connected Green Advisor
- Working with Tools
- Managing Locations
- Managing the Quick Response Codes
- Managing Workspace Features
- Working with Reports
- Usage Scenarios
- Troubleshooting
Working with Tools
This chapter describes the Tools in the Cisco Smart+Connected Spaces application.
The Management Tab
The Management tab allows you perform the following tasks:
- Refreshing Data Collection
- Refreshing Energy Savings
- Removing the IP Phone Cache
- Removing the Location Property Cache
- Removing the Time Zone Cache
Refreshing Data Collection
The Refresh Data Collection option enables you to collect data from the newly added data points. You can use this option when you want the data collection module to start using the updated metadata that has been created in the database, without restarting the application.
Refreshing Energy Savings
The Refresh Energy Savings option allows you to utilize the updated values in the energy savings settings, without restarting the application.
Removing the IP Phone Cache
The Remove IP Phone Cache option allows the Smart+Connected Spaces solution to consider the following changes without restarting the application:
Removing the Location Property Cache
Any changes that you make to the location properties in the SDP such as changing the room setup, room size, or enabling/disabling the Cisco TelePresence service are reflected in the application only after you use the Remove Location Property Cache option.
Removing the Time Zone Cache
The Remove Time Zone Cache option must be used to update the conference room time zone if the property is changed in the SDP.
The Templates Tab
Templates help you create a base format or a layout that can be set up by end users and used to add content as required. The rich text editor that is bundled along with the Smart+Connected Spaces solution allows both visual editing as well as source-level (HTML) editing of the template content.
The Templates tab allows you to add and delete templates for the News Content, Green Advisor, and Emergency Notification.
We recommend that the end user must have relevant knowledge of the HTML/Cascading Style Sheets (CSS) for creating the templates.
Adding Templates
You can create template content for the News Content, Green Advisor, and Emergency Notification.
To create a template, perform the following steps:
Step 1![]() In the home page of the Smart+Connected Spaces portal for managing meeting spaces and digital signage, choose Tools > Templates.
In the home page of the Smart+Connected Spaces portal for managing meeting spaces and digital signage, choose Tools > Templates.
Step 2![]() In the Templates page, click Add.
In the Templates page, click Add.
Step 3![]() In the rich text editor, enter the Template Name.
In the rich text editor, enter the Template Name.
Step 4![]() From the Category drop-down list, choose the appropriate category based on the type of template that you want to create. The available options are News Content, Green Advisor, and Emergency Notification.
From the Category drop-down list, choose the appropriate category based on the type of template that you want to create. The available options are News Content, Green Advisor, and Emergency Notification.
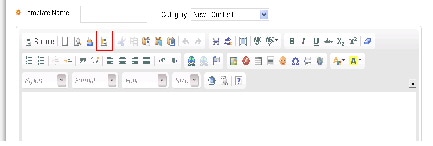
In the rich text editor, click the templates  icon to choose a set of predefined templates. This icon appears in the first row and is the 5th icon from the left (see Figure 12-1). You can choose to either create the template on your own, or use a predefined template. You can edit the predefined templates to create a new template.
Figure 12-1 displays the icons in the rich text editor.
Figure 12-1 Templates Icon in the Rich Text Editor
The Content Template pop-up window that appears has a set of predefined templates for News Content, Alert Message, and Notification Message. You can choose the template that you wish to display on the signage. When you choose any of these templates, predefined template content is displayed in the rich text editor.
Step 5![]() (Optional) In the Content Template pop-up window, check the Replace actual contents check box to replace the actual contents. This allows you to edit the selected template.
(Optional) In the Content Template pop-up window, check the Replace actual contents check box to replace the actual contents. This allows you to edit the selected template.
You can use this option when you want to replace existing content with the pre-defined template content.

Note![]() You can control the template layout, formatting, using the Source option available in the rich text editor. This allows you to view or edit the underlying HTML source.
You can control the template layout, formatting, using the Source option available in the rich text editor. This allows you to view or edit the underlying HTML source.
Step 7![]() (Optional) Click Clear to clear the entry.
(Optional) Click Clear to clear the entry.
Step 8![]() (Optional) Click Cancel to cancel the task.
(Optional) Click Cancel to cancel the task.
Note![]() For all emergency notifications, if you want to utilize the option of using the floor plans uploaded via the EISignage to automatically be used by the template, then you must not edit the floor plan area of the EN template.
For all emergency notifications, if you want to utilize the option of using the floor plans uploaded via the EISignage to automatically be used by the template, then you must not edit the floor plan area of the EN template.
Viewing Templates
To view templates, perform the following steps in the home page of the Smart+Connected Spaces portal for managing meeting spaces and digital signage, choose Tools > Templates. The Templates page appears.
Table 12-1 displays the components of the Templates page.
Editing a Template
To edit a template, perform the following steps:
Step 1![]() In the home page of the Smart+Connected Spaces portal for managing meeting spaces and digital signage, choose Tools > Templates.
In the home page of the Smart+Connected Spaces portal for managing meeting spaces and digital signage, choose Tools > Templates.
In the Template List area table, check the check box next to the template that you want to edit.
The rich text editor displays the template details.
Step 2![]() (Optional) Edit the template name in the Template Name field.
(Optional) Edit the template name in the Template Name field.
Step 3![]() (Optional) From the Category drop-down list, choose the category based on the type of template. The available options are News Content, Green Advisor, and Emergency Notification.
(Optional) From the Category drop-down list, choose the category based on the type of template. The available options are News Content, Green Advisor, and Emergency Notification.
Step 4![]() Edit the template contents and click Save.
Edit the template contents and click Save.
Step 5![]() (Optional) Click Clear to clear the entry.
(Optional) Click Clear to clear the entry.
Step 6![]() (Optional) Click Cancel to cancel the task.
(Optional) Click Cancel to cancel the task.
Deleting Templates
To delete the template content, perform the following steps:
Step 1![]() In the home page of the Smart+Connected Spaces portal for managing meeting spaces and digital signage, choose Smart+Connected Tools > Templates.
In the home page of the Smart+Connected Spaces portal for managing meeting spaces and digital signage, choose Smart+Connected Tools > Templates.
Step 2![]() In the Templates List area table, check the check box next to the template that you want to delete.
In the Templates List area table, check the check box next to the template that you want to delete.
A confirmation message asking you to confirm the deletion appears.
Step 4![]() Click Yes to confirm the deletion. Alternatively, you can click No to cancel the deletion.
Click Yes to confirm the deletion. Alternatively, you can click No to cancel the deletion.
 Feedback