Managing Devices
Overview
Each hub site or branch site may have one or more associated devices. The IWAN app provides methods for managing the devices individually, including the Custom Configuration feature, which enables executing batch CLI commands on devices in the network.
Custom Configuration of Devices
Custom Configuration is a mechanism for executing CLI configuration commands on devices within the IWAN network. The feature works similarly to executing a batch file of commands, but operates remotely from the IWAN app. Enter a set of commands (and optionally save them for later use), and select the devices on which to execute the configuration commands. The IWAN app sends the commands to each selected device and then indicates whether execution was successful or not.
Rollback Mechanism in Case of Command Failure
If the command execution is not successful, the feature provides a mechanism for rollback—executing a set of commands to reverse any failed configuration operations.
Custom Configuration provides a “parameter” feature that prompts you at run-time to enter parameter values specific to each device on which the commands are being executed. When you execute the configuration, the system prompts you to enter values one-by-one for each selected target device. Parameters appear as a dollar sign ($) followed by a parameter name.
Example: $interface.
A maximum of 10 parameters may be used.
Custom Configuration Default Templates
The IWAN App includes default configuration templates that provide CLI-level support for various network features. Each template consists of a set of CLI commands to perform a pre-defined function. The templates may include “per-device parameters”—when you execute the configuration, the system prompts you to enter values for the parameters, one-by-one for each selected target device.
The following table summarizes the configuration templates included by default.
|
|
|
|---|---|
Enables LiveAction network monitoring. Configures a NetFlow monitor compatible with LiveAction and configures the monitor to export to the LiveAction Server. |
|
The following input is required when executing the template: |
|
Configures Direct Internet Access (DIA). Configures NAT, zone-based policy firewall (ZFW) and Policy-Based Routing (PBR) for Direct Internet Access from a branch. The template also configures tracking of the Internet Gateway IP and failover to Tunnel Overlay if the Internet Gateway is not reachable. Note DIA configuration templates are applicable only for Cisco ISR 4000 series routers. |
|
The following input is required when executing the template:
|
|
Enables guest internet access on an IWAN branch router. Creates a guest VLAN interface on the router with NAT and zone-based policy firewall (ZFW). The guest VLAN is assigned to a separate VRF called IWAN-GUEST. |
|
The following input is required when executing the template:
|
Enabling Custom Configuration
Use the following procedure to enable execution of CLI configuration commands using the Custom Configuration feature.
Step 1![]() On the site list page, display the Custom Config Status column by clicking the gear icon above the table and selecting Custom Config Status. The column is displayed and the Custom Config button appears above the table.
On the site list page, display the Custom Config Status column by clicking the gear icon above the table and selecting Custom Config Status. The column is displayed and the Custom Config button appears above the table.
Creating and Executing a Custom Configuration
Use the following procedure to open the Custom Configuration window to create a Custom Configuration CLI batch file, or to execute an existing Custom Configuration, called a template.
Step 1![]() On the site list page, click the Custom Config button above the table. If the button is not displayed, see Enabling Custom Configuration. The Custom Config page appears.
On the site list page, click the Custom Config button above the table. If the button is not displayed, see Enabling Custom Configuration. The Custom Config page appears.
Step 2![]() Select an existing custom configuration or click the plus-sign icon (
Select an existing custom configuration or click the plus-sign icon ( ) to create a new one.
Step 3![]() In the Actual pane, enter the CLI commands to execute, similarly to a batch CLI command file. The commands will be executed in configuration mode on the device.
In the Actual pane, enter the CLI commands to execute, similarly to a batch CLI command file. The commands will be executed in configuration mode on the device.

Note![]() The IWAN app does not perform any validation of the entered commands.
The IWAN app does not perform any validation of the entered commands.
Step 4![]() (Optional) The full set of commands will be executed on all selected devices. To individually enter parameters specific to each device on which the configuration commands are being executed, use a "parameter" value in the CLI command: a dollar sign ($) followed by a parameter name.
(Optional) The full set of commands will be executed on all selected devices. To individually enter parameters specific to each device on which the configuration commands are being executed, use a "parameter" value in the CLI command: a dollar sign ($) followed by a parameter name.
Example: $interface.
When you execute the custom configuration, you will be prompted to enter values for this "parameter" one-by-one for each selected target device. A maximum of 10 parameters may be used.
Step 5![]() In the Rollback pane, enter the commands to execute in case one or more of the configuration commands in the Actual pane fail to execute correctly. For information about handling failed executions of custom configuration commands, see Handling Failed Custom Configuration Executions.
In the Rollback pane, enter the commands to execute in case one or more of the configuration commands in the Actual pane fail to execute correctly. For information about handling failed executions of custom configuration commands, see Handling Failed Custom Configuration Executions.
Step 6![]() In the Devices pane, select the devices on which to execute the CLI configuration commands.
In the Devices pane, select the devices on which to execute the CLI configuration commands.
Step 7![]() Click Save to save the configuration without executing. Click Deploy to execute the configuration on the specified devices. The site list page opens automatically, enabling you to view the Success or Failure status of execution of the configuration commands.
Click Save to save the configuration without executing. Click Deploy to execute the configuration on the specified devices. The site list page opens automatically, enabling you to view the Success or Failure status of execution of the configuration commands.
Viewing Status of Custom Configuration Execution
On the site list page, the Custom Config Status column shows the Success or Failure status of execution of the configuration commands per site.
If execution fails for any device within a site, the Custom Config Status column for the site displays Failure. If a failure occurs, click the Failure link in the Custom Config Status column to display the status of each device within the site. For information about handling failed executions of custom configurations, see Handling Failed Custom Configuration Executions.
Handling Failed Custom Configuration Executions
Use the following procedure to handle failed Custom Configuration CLI command execution.
Step 1![]() On the site list page, the Custom Config Status column shows the Success or Failure status of execution of the configuration commands per site. If execution fails for any device within a site, the Custom Config Status column for the site displays Failure. If a failure occurs, click the Failure link in the Custom Config Status column to open a Site Details pop-up.
On the site list page, the Custom Config Status column shows the Success or Failure status of execution of the configuration commands per site. If execution fails for any device within a site, the Custom Config Status column for the site displays Failure. If a failure occurs, click the Failure link in the Custom Config Status column to open a Site Details pop-up.
Step 2![]() The Site Details pop-up displays the status of each device within the site. For each site with Failure status, the Rollback option is displayed by default. Do one of the following to resolve the failure status for each device:
The Site Details pop-up displays the status of each device within the site. For each site with Failure status, the Rollback option is displayed by default. Do one of the following to resolve the failure status for each device:
- To execute the rollback command(s), click Deploy.
- To change the rollback commands, edit the rollback commands displayed in the window and click Deploy. This does not affect the saved version of the custom configuration.
- To change the custom configuration commands and attempt to execute them again, click Actual to display the commands that failed to execute, edit the commands, and click Deploy to execute the edited commands. This does not affect the saved version of the custom configuration.
- To skip any further command execution and remove the Failure status for the device, click Ignore/Reset.
Limitations of Custom Configuration
The Custom Configuration feature has the following limitations:
- Only IWAN provisioned devices are supported.
- Maximum number of characters for a saved Custom Configuration template name: 20
- The commands stored in a single Custom Configuration template ("Actual" commands and "Rollback" commands) must not exceed 9000 characters.
- Maximum number of per-device specified "parameters" (syntax: $<parameter-name>): 10
- Maximum number of devices on which to execute a Custom Configuration at once: 20
- Pushing a new set of configuration commands to a device does not automatically synchronize the new configuration back to the database. Consequently, any configuration that conflicts with the configuration that is pushed by the prescriptive IWAN app will be overwritten upon execution of the day N operation from the app.
- After creating a custom configuration, it is not possible to edit the configuration. If changes are necessary, copy the text from the existing configuration, create a new configuration, and paste in the text.
Replacement of a Hub Device
It is possible to replace a provisioned device (Day N) on a hub site. The object is to ensure that the new router operates exactly like the router that has been replaced. This is often called “RMA.” This procedure does not apply to devices at branch sites.

Note![]() This procedure applies to a hub device. For information about replacing a branch device, contact the Cisco Technical Assistance Center (TAC). Replacing the device incorrectly can cause problems.
This procedure applies to a hub device. For information about replacing a branch device, contact the Cisco Technical Assistance Center (TAC). Replacing the device incorrectly can cause problems.
Step 1![]() Using a console connection to the existing router (the one being replaced), make a copy of the running configuration (running-config) stored on the router. Save this copied running-config for a later step.
Using a console connection to the existing router (the one being replaced), make a copy of the running configuration (running-config) stored on the router. Save this copied running-config for a later step.
Step 2![]() Disconnect the router to be replaced.
Disconnect the router to be replaced.
Step 3![]() Connect the new router exactly as the previous router was installed.
Connect the new router exactly as the previous router was installed.
Step 4![]() Using a console connection to the newly installed router, paste in the running configuration that was copied (in an earlier step) from the old router.
Using a console connection to the newly installed router, paste in the running configuration that was copied (in an earlier step) from the old router.
Step 5![]() (If SSH, and not Telnet, is used to discover the device) Enable SSH access to the new router, creating RSA keys and terminal VTY lines.
(If SSH, and not Telnet, is used to discover the device) Enable SSH access to the new router, creating RSA keys and terminal VTY lines.
Use the following steps on the new device, in config mode:
Step 6![]() From the IWAN app home page, click Configure Hub Site & Settings.
From the IWAN app home page, click Configure Hub Site & Settings.
Step 7![]() Click the IWAN Aggreagation Site tab. The hub topology is displayed.
Click the IWAN Aggreagation Site tab. The hub topology is displayed.
Step 8![]() Click the device (router) to be replaced. The Device Operations dialog box appears.
Click the device (router) to be replaced. The Device Operations dialog box appears.
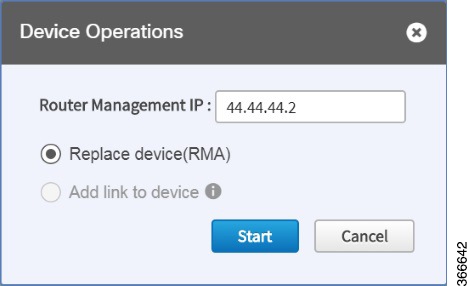
Step 9![]() In the Device Operations dialog box, select Replace Device (RMA) and click the Start button.
In the Device Operations dialog box, select Replace Device (RMA) and click the Start button.
A dialog box appears, displaying a checklist of actions required before replacing the device. The system then performs an inventory collection, deletes the old trustpoints, and creates new trustpoints.
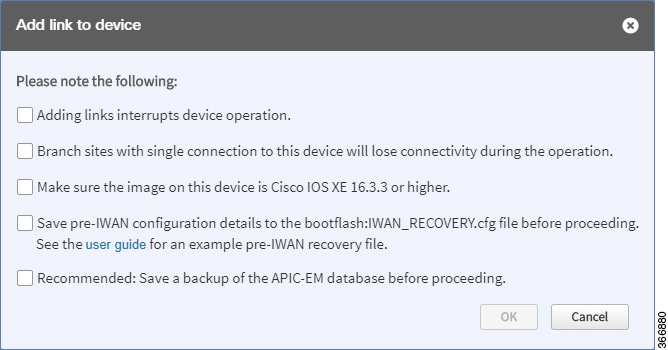
Step 10![]() If the process cannot be completed, a message appears, describing the problem.
If the process cannot be completed, a message appears, describing the problem.
- If there is a connectivity issue, repair the connectivity issue and click the Retry button.
- If the procedure fails despite efforts to troubleshoot, click the Delete Device button.
Step 11![]() (Optional) If the old router had spokes configured and connected to the router, verify that the DMVPN tunnels are operational.
(Optional) If the old router had spokes configured and connected to the router, verify that the DMVPN tunnels are operational.
PKI Certificate Renewal Alarms
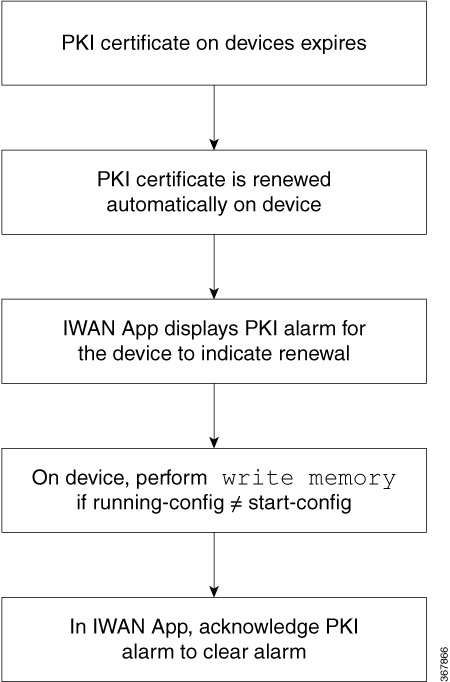
The IWAN App displays an alarm to indicate that a PKI certificate renewal has occurred for a specific device on a hub or branch site. The alarm alerts you to perform a write memory on the device if the startup-config does not match the running-config, to ensure that the certificate renewal will not be lost when the device reloads.

Note![]() The IWAN App does not show PKI renewal alarms older than 90 days.
The IWAN App does not show PKI renewal alarms older than 90 days.
Viewing PKI Renewal Alarms on the Home Page
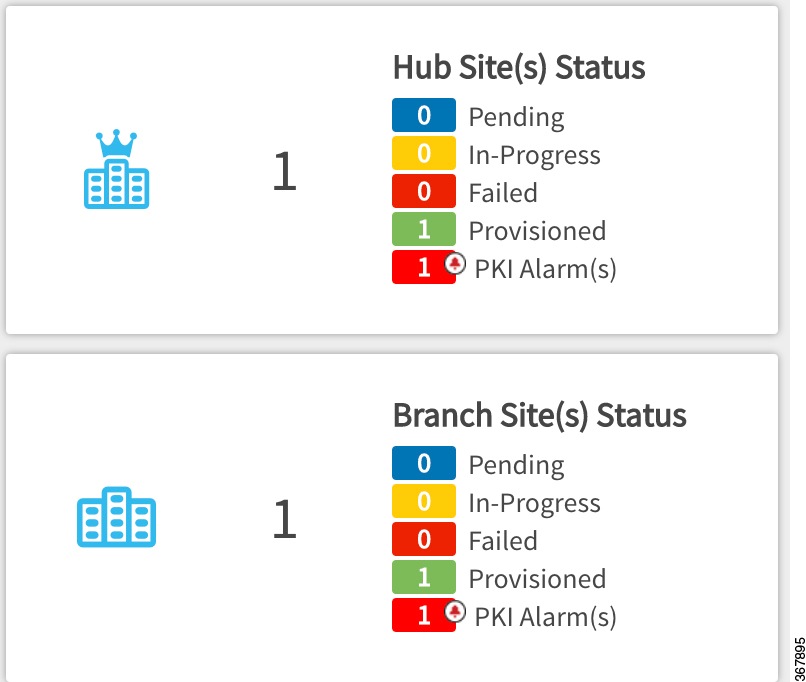
On the IWAN App home page, view the Hub Site(s) Status and Branch Site(s) Status frames. PKI certificate renewal alarms appear if relevant.
Viewing and Acknowledging PKI Renewal Alarms
Step 1![]() From the IWAN app home page, click Manage Branch Sites. The Sites page opens.
From the IWAN app home page, click Manage Branch Sites. The Sites page opens.
In the sites list, any site with a device that has an alarm will show a red alarm icon.

Step 3![]() (Optional) Add the Alarms column to the table to enable sorting according to alarm status (Yes or No).
(Optional) Add the Alarms column to the table to enable sorting according to alarm status (Yes or No).
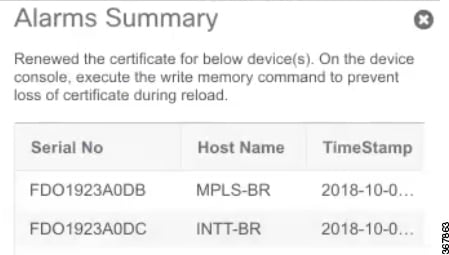
Step 4![]() Click the alarm icon to display information about the device(s) and alarm(s), including:
Click the alarm icon to display information about the device(s) and alarm(s), including:
- Device serial number and hostname
- Timestamp of the alarm
- Summary of alarm and action to take
- Acknowledge button to remove the notification
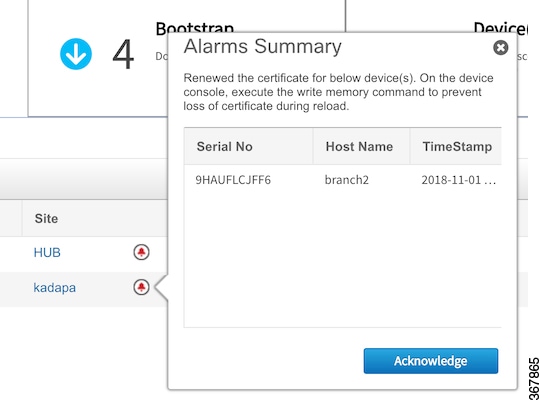
Step 5![]() Click Acknowledge to clear the alarms.
Click Acknowledge to clear the alarms.
 Feedback