Configuring VSAN Trunking

This chapter describes how to configure VSAN trunking.

This chapter includes the following sections:

Configuring VSAN Trunking

Information About VSAN Trunking

VSAN trunking enable interconnected ports to transmit and receive frames in more than one VSAN. Trunking is supported on E ports and F ports.

The VSAN trunking feature includes the following restrictions:

  • Trunking configurations are applicable only to E ports. If trunk mode is enabled in an E port and that port becomes operational as a trunking E port, it is referred to as a TE port.

  • The trunk-allowed VSANs configured for TE ports are used by the trunking protocol to determine the allowed-active VSANs in which frames can be received or transmitted.

  • If a trunking-enabled E port is connected to a third-party switch, the trunking protocol ensures seamless operation as an E port.

VSAN Trunking Mismatches

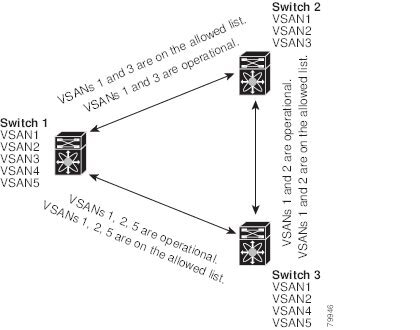
If you misconfigure VSAN configurations across E ports, issues can occur such as the merging of traffic in two VSANs (causing both VSANs to mismatch). The VSAN trunking protocol validates the VSAN interfaces at both ends of an ISL to avoid merging VSANs (see the following figure).

Figure 1. VSAN Mismatch

In this example, the trunking protocol detects potential VSAN merging and isolates the ports involved.

The trunking protocol cannot detect merging of VSANs when a third-party switch is placed in between two Cisco SAN switches (see the following figure).

Figure 2. Third-Party Switch VSAN Mismatch

VSAN 2 and VSAN 3 are effectively merged with overlapping entries in the name server and the zone applications. helps detect such topologies.

VSAN Trunking Protocol

The trunking protocol is important for E-port and TE-port operations. It supports the following capabilities:

  • Dynamic negotiation of operational trunk mode.

  • Selection of a common set of trunk-allowed VSANs.

  • Detection of a VSAN mismatch across an ISL.

By default, the VSAN trunking protocol is enabled. If the trunking protocol is disabled on a switch, no port on that switch can apply new trunk configurations. Existing trunk configurations are not affected: the TE port continues to function in trunk mode but only supports traffic in VSANs that it negotiated with previously (when the trunking protocol was enabled). Other switches that are directly connected to this switch are similarly affected on the connected interfaces. If you need to merge traffic from different port VSANs across a nontrunking ISL, disable the trunking protocol.

Configuring VSAN Trunking

Guidelines and Limitations

When configuring VSAN trunking, note the following guidelines:

  • We recommend that both ends of a VSAN trunking ISL belong to the same port VSAN. On platforms or fabric switches where the port VSANs are different, one end returns an error, and the other is not connected.

  • To avoid inconsistent configurations, disable all E ports with a shutdown command before enabling or disabling the VSAN trunking protocol.

Enabling or Disabling the VSAN Trunking Protocol

You can enable or disable the VSAN trunking protocol.

Procedure

  Command or Action Purpose
Step 1

configure terminal

Example:

switch# configure terminal
switch(config)#

Enters global configuration mode.

Step 2

no trunk protocol enable

Example:

switch(config)# no trunk protocol enable

Disables the trunking protocol.

Step 3

trunk protocol enable

Example:

switch(config)# trunk protocol enable

Enables trunking protocol (default).

Trunk Mode

By default, trunk mode is enabled in all interfaces. However, trunk mode configuration takes effect only in E-port mode. You can configure trunk mode as on (enabled), off (disabled), or auto (automatic). The default trunk mode is on. The trunk mode configurations at the two ends of the link determine the trunking state of the link and the port modes at both ends (see the following table).

Table 1. Trunk Mode Status Between Switches

Your Trunk Mode Configuration

Resulting State and Port Mode

Switch 1

Switch 2

Trunking State

Port Mode

On

Auto or on

Trunking (EISL)

TE port

Off

Auto, on, or off

No trunking (ISL)

E port

Auto

Auto

No trunking (ISL)

E port

The preferred configuration on the Cisco SAN switches is that one side of the trunk is set to auto and the other is set to on.


Note

When connected to a third-party switch, the trunk mode configuration has no effect. The Inter-Switch Link (ISL) is always in a trunking disabled state.


Configuring Trunk Mode

You can configure trunk mode.

Procedure

  Command or Action Purpose
Step 1

configure terminal

Example:

switch# configure terminal
switch(config)#

Enters global configuration mode.

Step 2

switch(config)# interface fc slot/port

Selects an interface that will be connected to the core NPV switch.

Step 3

interface vfc vfc-id

Example:

switch(config)# interface vfc 15

Configures the specified Fibre Channel or virtual Fibre Channel interface.

Step 4

switchport trunk mode on

Example:

switch(config-if)# switchport trunk mode on

Enables (default) the trunk mode for the specified interface.

Step 5

switchport trunk mode auto

Example:

switch(config-if)# switchport trunk mode auto

Configures the trunk mode to auto mode, which provides automatic sensing for the interface.

EXAMPLES

This example shows how to configure a vFC interface in trunk mode:


switch# configure terminal
switch#(config)# vfc 200
switch(config-if)# switchport trunk mode on

This example shows the output for the vFC interface 200 in trunk mode:

switch(config-if)# show interface vfc200
vfc200 is trunking (Not all VSANs UP on the trunk)
    Bound interface is Ethernet1/3
    Hardware is Virtual Fibre Channel
    Port WWN is 20:c7:00:0d:ec:f2:08:ff
    Peer port WWN is 00:00:00:00:00:00:00:00
    Admin port mode is E, trunk mode is on
    snmp link state traps are enabled
    Port mode is TE
    Port vsan is 1
    Trunk vsans (admin allowed and active) (1-6,10,22)
    Trunk vsans (up)                       ()
    Trunk vsans (isolated)                 ()
    Trunk vsans (initializing)             (1-6,10,22)
    5 minute input rate 0 bits/sec, 0 bytes/sec, 0 frames/sec
    5 minute output rate 0 bits/sec, 0 bytes/sec, 0 frames/sec
      0 frames input, 0 bytes
        0 discards, 0 errors
      0 frames output, 0 bytes
        0 discards, 0 errors
    last clearing of "show interface" counters never
    Interface last changed at Mon Jan 18 10:01:27 2010

Trunk-Allowed VSAN Lists

Each Fibre Channel interface has an associated trunk-allowed VSAN list. In TE-port mode, frames are transmitted and received in one or more VSANs specified in this list. By default, the complete VSAN range (1 through 4093) is included in the trunk-allowed list.

The common set of VSANs that are configured and active in the switch are included in the trunk-allowed VSAN list for an interface, and they are called allowed-active VSANs. The trunking protocol uses the list of allowed-active VSANs at the two ends of an ISL to determine the list of operational VSANs in which traffic is allowed.

In the following figure, switch 1 has VSANs 1 through 5, switch 2 has VSANs 1 through 3, and switch 3 has VSANs 1, 2, 4, and 5 with a default configuration of trunk-allowed VSANs. All VSANs configured in all three switches are allowed-active. However, only the common set of allowed-active VSANs at the ends of the ISL become operational as shown in below.

Figure 3. Default Allowed-Active VSAN Configuration

You can configure a selected set of VSANs (from the allowed-active list) to control access to the VSANs specified in a trunking ISL.

Using the figure above as an example, you can configure the list of allowed VSANs on a per-interface basis (see the following figure). For example, if VSANs 2 and 4 are removed from the allowed VSAN list of ISLs connecting to switch 1, the operational allowed list of VSANs for each ISL would be as follows:

  • The ISL between switch 1 and switch 2 includes VSAN 1 and VSAN 3.

  • The ISL between switch 2 and switch 3 includes VSAN 1 and VSAN 2.

  • The ISL between switch 3 and switch 1 includes VSAN 1, 2, and 5.

VSAN 2 can only be routed from switch 1 through switch 3 to switch 2.

Figure 4. Operational and Allowed VSAN Configuration

Configuring an Allowed-Active List of VSANs

You can configure an allowed-active list of VSANs for an interface.

Procedure

  Command or Action Purpose
Step 1

configure terminal

Example:

switch# configure terminal
switch(config)#

Enters global configuration mode.

Step 2

switchport trunk allowed vsan vsan-id - vsan-id

Example:

switch(config-if)# switchport trunk allowed vsan 35-55

Changes the allowed list for the specified VSAN range.

Step 3

switchport trunk allowed vsan add vsan-id

Example:

switch(config-if)# switchport trunk allowed vsan add 40

Expands the specified VSAN to the new allowed list.

Step 4

no switchport trunk allowed vsan vsan-id - vsan-id

Example:

switch(config-if)# no switchport trunk allowed vsan 61-65  

Deletes the specified VSAN range.

Step 5

no switchport trunk allowed vsan add vsan-id

Example:

switch(config-if)# no switchport trunk allowed vsan add 40

Deletes the expanded allowed list.

Default Settings for VSAN Trunks

The following table lists the default settings for VSAN trunking parameters.

Table 2. Default VSAN Trunk Configuration Parameters

Parameters

Default

Switch port trunk mode

On

Allowed VSAN list

1 to 4093 user-defined VSAN IDs

Trunking protocol

Enabled