Configuring Fibre Channel Interfaces

This chapter contains the following sections:

Configuring Fibre Channel Interfaces

Information About Fibre Channel Interfaces

Licensing Requirements for Fibre Channel

On Cisco Nexus devices, Fibre Channel capability is included in the Storage Protocol Services license.

Ensure that you have the correct license installed (N5010SS or N5020SS) before using Fibre Channel interfaces and capabilities.


Note

You can configure virtual Fibre Channel interfaces without a Storage Protocol Services license, but these interfaces will not become operational until the license is activated.


QOS Requirements for Fibre Channel

The FCoE QoS must be configured if the following types of interfaces are in use:

  • Native FC - for FC
  • FCoE - for vFC
  • FC and FCoE - for FC and vFC

The FCoE QoS must be added even if Ethernet is not configured on the switch.

The following commands will enable the default QoS configuration which must be configured for native FC or FCoE or FC and FCoE:
switch(config)# system qos
switch(config-sys-qos)# service-policy type queuing input fcoe-default-in-policy
switch(config-sys-qos)# service-policy type queuing output fcoe-default-out-policy
switch(config-sys-qos)# service-policy type qos input fcoe-default-in-policy
switch(config-sys-qos)# service-policy type network-qos fcoe-default-nq-policy

Physical Fibre Channel Interfaces

Cisco Nexus devices support up to sixteen physical Fibre Channel (FC) uplinks through the use of two, optional explansion modules. The first module contains eight FC interfaces. The second module includes four Fibre Channel ports and four Ethernet ports.

Each Fibre Channel port can be used as a downlink (connected to a server) or as an uplink (connected to the data center SAN network). The Fibre Channel interfaces support the following modes: E, F, NP, TE, TF, TNP, SD, and Auto.

Virtual Fibre Channel Interfaces

Fibre Channel over Ethernet (FCoE) encapsulation allows a physical Ethernet cable to simultaneously carry Fibre Channel and Ethernet traffic. In Cisco Nexus devices, an FCoE-capable physical Ethernet interface can carry traffic for one virtual Fibre Channel (vFC) interface.

Like any interface in Cisco NX-OS, vFC interfaces are manipulable objects with properties such as configuration and state. Native Fibre Channel and vFC interfaces are configured using the same CLI commands.

vFC interfaces support only F mode and operate in trunk mode only.

The following capabilities are not supported for virtual Fibre Channel interfaces:

  • SAN port channels.

  • The SPAN destination cannot be a vFC interface.

  • Buffer-to-buffer credits.

  • Exchange link parameters (ELP), or Fabric Shortest Path First (FSPF) protocol.

  • Configuration of physical attributes (speed, rate, mode, transmitter information, MTU size).

  • Port tracking.

VF Port

vFC interfaces always operate in trunk mode; vFC interfaces do not operate in any other mode. You can configure allowed VSANs on a vFC by using the switchport trunk allowed vsan command under the vfc interface (which is similar to FC TF and TE ports). For vFC interfaces that are connected to hosts, port VSAN is the only VSAN that supports logins (FLOGI). We recommend that you restrict the allowed VSANs for such vFC interfaces to the port VSAN by using the switchport trunk allowed vsan command in the interface mode to configure a VF port.

Includes support for 160 vFC interfaces.

The vFC VSAN assignment and the global VLAN-to-VSAN mapping table enables the Cisco Nexus device to choose the appropriate VLAN for a VF port.

The VF port support over 10G-FEX interfaces feature is supported only in Cisco Nexus Fabric Extender straight-through topologies where each Fabric Extender is directly connected to a Cisco Nexus device.

VE Ports

A virtual E port (VE port) is a port that emulates an E port over a non-Fibre Channel link. VE port connectivity between Fibre Channel Forwarders (FCFs) is supported over point-to-point links. These links can be individual Ethernet interfaces or members of an Ethernet port-channel interface. For each of the FCF connected Ethernet interfaces you must create and bind an vFC interface to the Ethernet interface. Configure vFC interfaces as VE ports by using the switchport mode e command in interface mode.

VE ports have the following guidelines:

  • Auto mode on the vFC is not supported.

  • VE Port trunking is supported over FCoE-enabled VLANs.

  • VE Port interface binding to MAC addresses is not supported.

  • By default the VE Port is enabled for trunk mode.

    You can configure multiple VSANs on the VE port. You must configure the FCoE VLANs that correspond to the VE port’s VSANs on the bound Ethernet interface.

  • The Spanning Tree Protocol is disabled on the FCoE VLANs on any interface that a vFC interface is bound to, which includes the interfaces that the VE ports are bound to.

The number of VE port pairs that can be supported between a given FCF and a peer FCF depends on the FCF-MAC advertising capability of the peer FCF:

  • If a peer FCF advertises the same FCF-MAC address over all its interfaces, the FCF can connect to it over one VE port. In such a topology, we recommended that you use one port-channel interface for redundancy.

  • If a peer FCF advertises multiple FCF-MAC addresses, the limits in the table apply.

VE Ports in a vPC Topology

VE ports in a vPC topology have the following guidelines:

  • Dedicated links are required for FCoE VLANs between FCFs connected over a vPC for LAN traffic.

  • FCoE VLANs must not be configured on the inter-switch vPC interfaces.

FSPF Parameters

FSPF operates on a per-VSAN basis over a VE port once it is brought up on the VSAN. The default FSPF cost (metric) of the vFC interface is as per 10-Gbps bandwidth. For VE ports that are bound to Ethernet port channels, the cost is adjusted based on the number of operational member ports.

VE Port Configuration Limits

VNP Ports

Connectivity from an FCoE NPV bridge to the FCF is only supported over point-to-point links. These links can be individual Ethernet interfaces or members of an Ethernet port channel interface. For each FCF connected Ethernet interfaces, a vFC interface must be created and bound to the Ethernet interface. These vFC interfaces must be configured as VNP ports. On the VNP port, an FCoE NPV bridge emulates an FCoE-capable host with multiple enodes, each with a unique enode MAC address. A VNP port interface binding to MAC address is not supported. By default, the VNP port is enabled in trunk mode. Multiple VSANs can be configured on the VNP port. The FCoE VLANs that correspond to the VNP port VSANs must be configured on the bound Ethernet interface.

The spanning-tree protocol (STP) is automatically disabled in the FCoE VLAN on the interfaces that the VNP port are bound to.

Interface Modes

Each physical Fibre Channel interface in a switch may operate in one of several port modes: E mode, TE mode, F mode, TF mode, TNP mode, and SD mode. A physical Fibre Channel interface can be configured as an E port, an F port, or an SD port. Interfaces may also be configured in Auto mode; the port type is determined during interface initialization.

In NPV mode, Fibre Channel interfaces may operate in NP mode, F mode, or SD mode.

Virtual Fibre Channel interfaces can only be configured in F mode.

Interfaces are automatically assigned VSAN 1 by default.

Each interface has an associated administrative configuration and an operational status:

  • The administrative configuration does not change unless you modify it. This configuration has various attributes that you can configure in administrative mode.

  • The operational status represents the current status of a specified attribute such as the interface speed. This status cannot be changed and is read-only. Some values may not be valid when the interface is down (for example, the operational speed).

E Port

In expansion port (E port) mode, an interface functions as a fabric expansion port. This port may be connected to another E port to create an Inter-Switch Link (ISL) between two switches. E ports carry frames between switches for configuration and fabric management. They serve as a conduit between switches for frames destined to remote N ports. E ports support class 3 and class F service.

An E port connected to another switch may also be configured to form a SAN port channel.

F Port

In fabric port (F port) mode, an interface functions as a fabric port. This port may be connected to a peripheral device (host or disk) operating as a node port (N port). An F port can be attached to only one N port. F ports support class 3 service.

NP Port

When the switch is operating in NPV mode, the interfaces that connect the switch to the core network switch are configured as NP ports. NP ports operate like N ports that function as proxies for multiple physical N ports.

TE Port

In trunking E port (TE port) mode, an interface functions as a trunking expansion port. It may be connected to another TE port to create an extended ISL (EISL) between two switches. TE ports connect to another Cisco Nexus device or a Cisco MDS 9000 Family switch. They expand the functionality of E ports to support the following:

  • VSAN trunking

  • Fibre Channel trace (fctrace) feature

In TE port mode, all frames are transmitted in EISL frame format, which contains VSAN information. Interconnected switches use the VSAN ID to multiplex traffic from one or more VSANs across the same physical link. This feature is referred to as VSAN trunking in the Cisco Nexus device. TE ports support class 3 and class F service.

TF Port

When the switch is operating in NPV mode, the interfaces that connect the switch to the core network switch are configured as NP ports. NP ports operate like N ports that function as proxies for multiple physical N ports.

In trunking F port (TF port) mode, an interface functions as a trunking expansion port. It may be connected to another trunked N port (TN port) or trunked NP port (TNP port) to create a link between a core switch and an NPV switch or an HBA to carry tagged frames. TF ports expand the functionality of F ports to support VSAN trunking.

In TF port mode, all frames are transmitted in an EISL frame format, which contains VSAN information. Interconnected switches use the VSAN ID to multiplex traffic from one or more VSANs across the same physical link. This feature is referred to as VSAN trunking in Cisco Nexus devices. TF ports support class 3 and class F service.

TNP Port

In trunking NP port (TNP port) mode, an interface functions as a trunking expansion port. A TNP Port may be connected to a trunked F port (TF port) to create a link to a core NPIV switch from an NPV switch.

SD Port

In SPAN destination port (SD port) mode, an interface functions as a switched port analyzer (SPAN). The SPAN feature monitors network traffic that passes though a Fibre Channel interface. This monitoring is done using a standard Fibre Channel analyzer (or a similar switch probe) that is attached to an SD port. SD ports do not receive frames, instead they transmit a copy of the source traffic. The SPAN feature is nonintrusive and does not affect switching of network traffic for any SPAN source ports.

Auto Mode

Interfaces configured in auto mode can operate in one of the following modes: E, F, NP, TE, TF, and TNP port. The port mode is determined during interface initialization. For example, if the interface is connected to a node (host or disk), it operates in F port mode. If the interface is attached to a third-party switch, it operates in E port mode. If the interface is attached to another switch in the Cisco Nexus device or Cisco MDS 9000 Family, it may become operational in TE port mode.

SD ports are not determined during initialization and are administratively configured.

Interface States

The interface state depends on the administrative configuration of the interface and the dynamic state of the physical link.

Administrative States

The administrative state refers to the administrative configuration of the interface. The table below describes the administrative states.

Table 1. Administrative States

Administrative State

Description

Up

Interface is enabled.

Down

Interface is disabled. If you administratively disable an interface by shutting down that interface, the physical link layer state change is ignored.

Operational States

The operational state indicates the current operational state of the interface. The table below describes the operational states.

Table 2. Operational States

Operational State

Description

Up

Interface is transmitting or receiving traffic as desired. To be in this state, an interface must be administratively up, the interface link layer state must be up, and the interface initialization must be completed.

Down

Interface cannot transmit or receive (data) traffic.

Trunking

Interface is operational in TE or TF mode.

Reason Codes

Reason codes are dependent on the operational state of the interface. The following table describes the reason codes for operational states.

Table 3. Reason Codes for Interface States

Administrative Configuration

Operational Status

Reason Code

Up

Up

None.

Down

Down

Administratively down. If you administratively configure an interface as down, you disable the interface. No traffic is received or transmitted.

Up

Down

See the table below.

If the administrative state is up and the operational state is down, the reason code differs based on the nonoperational reason code. The table below describes the reason codes for nonoperational states.


Note

Only some of the reason codes are listed in the table.


Table 4. Reason Codes for Nonoperational States

Reason Code (long version)

Description

Applicable Modes

Link failure or not connected

The physical layer link is not operational.

All

SFP not present

The small form-factor pluggable (SFP) hardware is not plugged in.

All

Initializing

The physical layer link is operational and the protocol initialization is in progress.

All

Reconfigure fabric in progress

The fabric is currently being reconfigured.

Offline

The switch software waits for the specified R_A_TOV time before retrying initialization.

Inactive

The interface VSAN is deleted or is in a suspended state.

To make the interface operational, assign that port to a configured and active VSAN.

Hardware failure

A hardware failure is detected.

Error disabled

Error conditions require administrative attention. Interfaces may be error-disabled for various reasons. For example:

  • Configuration failure.

  • Incompatible buffer-to-buffer credit configuration.

To make the interface operational, you must first fix the error conditions causing this state and then administratively shut down or enable the interface.

Isolation because limit of active port channels is exceeded.

The interface is isolated because the switch is already configured with the maximum number of active SAN port channels.

Isolation due to ELP failure

The port negotiation failed.

Only E ports and TE ports

Isolation due to ESC failure

The port negotiation failed.

Isolation due to domain overlap

The Fibre Channel domains (fcdomain) overlap.

Isolation due to domain ID assignment failure

The assigned domain ID is not valid.

Isolation due to the other side of the link E port isolated

The E port at the other end of the link is isolated.

Isolation due to invalid fabric reconfiguration

The port is isolated due to fabric reconfiguration.

Isolation due to domain manager disabled

The fcdomain feature is disabled.

Isolation due to zone merge failure

The zone merge operation failed.

Isolation due to VSAN mismatch

The VSANs at both ends of an ISL are different.

port channel administratively down

The interfaces belonging to the SAN port channel are down.

Only SAN port channel interfaces

Suspended due to incompatible speed

The interfaces belonging to the SAN port channel have incompatible speeds.

Suspended due to incompatible mode

The interfaces belonging to the SAN port channel have incompatible modes.

Suspended due to incompatible remote switch WWN

An improper connection is detected. All interfaces in a SAN port channel must be connected to the same pair of switches.

Bound physical interface down

The Ethernet interface bound to a virtual Fibre Channel interface is not operational.

Only virtual Fibre Channel interfaces

STP not forwarding in FCoE mapped VLAN

The Ethernet interface bound to a virtual Fibre Channel interface is not in an STP forwarding state for the VLAN associated with the virtual Fibre Channel interface

Only virtual Fibre Channel interfaces

Buffer-to-Buffer Credits

Buffer-to-buffer credits (BB_credits) are a flow-control mechanism to ensure that Fibre Channel interfaces do not drop frames. BB_credits are negotiated on a per-hop basis.

In Cisco Nexus devices, the BB_credit mechanism is used on Fibre Channel interfaces but not on virtual Fibre Channel interfaces. The receive BB_credit determines the receive buffering capability on the receive side without having to acknowledge the peer. This is important for links with large bandwidth-delays (long links with large latency) to be able to sustain line-rate traffic with increased latency.

For virtual Fibre Channel interfaces, BB_credits are not used. Virtual Fibre Channel interfaces provide flow control based on capabilities of the underlying physical Ethernet interface.

Configuring Fibre Channel Interfaces

Configuring a Fibre Channel Interface

To configure a Fibre Channel interface, perform this task:

Procedure

  Command or Action Purpose
Step 1

switch# configuration terminal

Enters configuration mode.

Step 2

switch(config)# interface {fc slot/port}|{vfc vfc-id}

Selects a Fibre Channel interface and enters interface configuration mode.

Note 

When a Fibre Channel interface is configured, it is automatically assigned a unique world wide name (WWN). If the interface’s operational state is up, it is also assigned a Fibre Channel ID (FC ID).

Configuring a Range of Fibre Channel Interfaces

To configure a range of Fibre Channel interfaces, perform this task:

Procedure

  Command or Action Purpose
Step 1

switch# configuration terminal

Enters configuration mode.

Step 2

switch(config)# interface { fc slot/port - port [ , fc slot/port - port ] | vfc vfc-id - vfc-id [ , vfc vfc-id - vfc-id ] }

Selects the range of Fibre Channel interfaces and enters interface configuration mode.

Setting the Interface Administrative State

To gracefully shut down an interface, perform this task:

To enable traffic flow, perform this task:

Procedure

  Command or Action Purpose
Step 1

switch# configuration terminal

Enters configuration mode.

Step 2

switch(config)# interface {fc slot/port}|{vfc vfc-id}

Selects a Fibre Channel interface and enters interface configuration mode.

Step 3

switch(config-if)# shutdown

Gracefully shuts down the interface and administratively disables traffic flow (default).

Configuring Interface Modes

Procedure

  Command or Action Purpose
Step 1

configure terminal

Example:

switch# configure terminal
switch(config)#

Enters global configuration mode.

Step 2

switch(config) # interface vfc vfc-id}

Example:

switch(config) # interface vfc 20
switch(config-if) #

Selects a virtual Fibre Channel interface and enters interface configuration mode.

Step 3

switch(config-if) # switchport mode {E|NP}

Example:

switch(config-if) # switchport mode E
switch(config-if) #

Sets the port mode.

vFC interfaces support modes F, E, or NP.

Note 

SD ports cannot be configured automatically. They must be administratively configured.

Example

This example shows how to configure VE port 20 and bind it to Ethernet slot 1, port 3:

switch# config t
switch(config) # interface vfc 20
switch(config-if) # bind interface ethernet 1/3
switch(config-if) # switchport mode E
switch(config-if) # exit
switch#

This example shows the running configuration for vFC 20 bound to the Ethernet slot1,port 3 interface.

switch# show running-config
switch(config) # interface vfc20
switch(config-if) # bind interface Ethernet 1/3
switch(config-if) # switchport mode E
switch(config-if) # no shutdown

This example shows how to configure VNP port 10 and bind it to Ethernet slot 2, port 1:

switch # config t
switch(config) # interface vfc 10
switch(config-if) # bind interface ethernet 2/1
switch(config-if) # switchport mode NP
switch(config-if) # exit
switch#

Configuring the Interface Description

Interface descriptions should help you identify the traffic or use for that interface. The interface description can be any alphanumeric string.

To configure a description for an interface, perform this task:

Procedure

  Command or Action Purpose
Step 1

switch# configuration terminal

Enters configuration mode.

Step 2

switch(config)# interface {fc slot/port}|{vfc vfc-id}

Selects a Fibre Channel interface and enters interface configuration mode.

Step 3

switch(config-if)# switchport description cisco-HBA2

Configures the description of the interface. The string can be up to 80 characters long.

Step 4

switch(config-if)# no switchport description

Clears the description of the interface.

Configuring Unified Ports

Before you begin

Confirm that you have a supported Cisco Nexus switch. Unified Ports are available on the following Cisco Nexus switches:

If you're configuring a unified port as Fibre Channel or FCoE, confirm that you have enabled the feature fcoe command.

Procedure

  Command or Action Purpose
Step 1

switch# configure terminal

Enters global configuration mode.

Step 2

switch(config) # slot slot number

Identifies the slot on the switch.

Step 3

switch(config-slot) # port port number type {ethernet | fc}

Configures a unified port as a native Fibre Channel port and an Ethernet port.

  • type —Specifies the type of port to configure on a slot in a chassis.

  • ethernet —Specifies an Ethernet port.

  • fc —Specifies a Fibre Channel (FC) port.

Note 
  • Changing unified ports on an expansion module (GEM) requires that you power cycle the GEM card. You do not have to reboot the entire switch for changes to take effect.

  • When you configure unified ports as Fibre Channel, the existing configuration for Fibre Channel interfaces and VSAN memberships are unaffected.

Step 4

switch(config-slot) # copy running-config startup-config

Copies the running configuration to the startup configuration.

Step 5

switch(config-slot) # reload

Reboots the switch.

Step 6

switch(config) # slot slot number

Identifies the slot on the switch.

Step 7

switch(config-slot) # no port port number type fc

Removes the unified port.

Example

Configuring Port Speeds

Port speed can be configured on a physical Fibre Channel interface but not on a virtual Fibre Channel interface. By default, the port speed for an interface is automatically calculated by the switch.


Caution

Changing the interface speed is a disruptive operation.


To configure the port speed of the interface, perform this task:

Procedure

  Command or Action Purpose
Step 1

switch# configuration terminal

Enters configuration mode.

Step 2

switch(config)# interface fc slot/port

Selects the specified interface and enters interface configuration mode.

Note 

You cannot configure the port speed of a virtual Fibre Channel interface.

Step 3

switch(config-if)# switchport speed 1000

Step 4

switch(config-if)# no switchport speed

Reverts to the factory default (auto) administrative speed of the interface.

Autosensing

Configuring SD Port Frame Encapsulation

The switchport encap eisl command only applies to SD port interfaces. This command determines the frame format for all frames transmitted by the interface in SD port mode. If the encapsulation is set to EISL, all outgoing frames are transmitted in the EISL frame format, for all SPAN sources.

The switchport encap eisl command is disabled by default. If you enable encapsulation, all outgoing frames are encapsulated, and you will see a new line (Encapsulation is eisl) in the show interface SD_port_interface command output.

Configuring Receive Data Field Size

You can configure the receive data field size for native Fibre Channel interfaces (but not for virtual Fibre Channel interfaces). If the default data field size is 2112 bytes, the frame length will be 2148 bytes.

To configure the receive data field size, perform this task:

Procedure

  Command or Action Purpose
Step 1

switch# configuration terminal

Enters configuration mode.

Step 2

switch(config)# interface fc slot/port

Selects a Fibre Channel interface and enters interface configuration mode.

Step 3

switch(config-if)# switchport fcrxbufsize 2000

Reduces the data field size for the selected interface to 2000 bytes. The default is 2112 bytes and the range is from 256 to 2112 bytes.

Understanding Bit Error Thresholds

The bit error rate threshold is used by the switch to detect an increased error rate before performance degradation seriously affects traffic.

The bit errors can occur for the following reasons:

  • Faulty or bad cable.
  • Faulty or bad GBIC or SFP.
  • GBIC or SFP is specified to operate at 1 Gbps but is used at 2 Gbps.
  • GBIC or SFP is specified to operate at 2 Gbps but is used at 4 Gbps.
  • Short haul cable is used for long haul or long haul cable is used for short haul.
  • Momentary synchronization loss.
  • Loose cable connection at one or both ends.
  • Improper GBIC or SFP connection at one or both ends.

A bit error rate threshold is detected when 15 error bursts occur in a 5-minute period. By default, the switch disables the interface when the threshold is reached.

You can enter the shutdown/no shutdown command sequence to reenable the interface.

You can configure the switch to not disable an interface when the threshold is crossed.


Note

The switch generates a syslog message when bit error threshold events are detected, even if the interface is configured not to be disabled by bit-error threshold events.


To disable the bit error threshold for an interface, perform this task:

Procedure

  Command or Action Purpose
Step 1

switch# configuration terminal

Enters configuration mode.

Step 2

switch(config)# interface fc slot/port

Selects a Fibre Channel interface and enters interface configuration mode.

Step 3

switch(config-if)# switchport ignore bit-errors

Prevents the detection of bit error threshold events from disabling the interface.

Step 4

switch(config-if)# no switchport ignore bit-errors

Prevents the detection of bit error threshold events from enabling the interface.

Configuring Global Attributes for Fibre Channel Interfaces

Configuring Switch Port Attribute Default Values

You can configure attribute default values for various switch port attributes. These attributes will be applied globally to all future switch port configurations, even if you do not individually specify them at that time.

To configure switch port attributes, perform this task:

Procedure

  Command or Action Purpose
Step 1

switch# configuration terminal

Enters configuration mode.

Step 2

switch(config)# no system default switchport shutdown san

Configures the default setting for administrative state of an interface as Up. (The factory default setting is Down).

Tip 

This command is applicable only to interfaces for which no user configuration exists for the administrative state.

Step 3

switch(config)# system default switchport shutdown san

Configures the default setting for administrative state of an interface as Down. This is the factory default setting.

Tip 

This command is applicable only to interfaces for which no user configuration exists for the administrative state.

Step 4

switch(config)# system default switchport trunk mode auto

Configures the default setting for administrative trunk mode state of an interface as Auto.

Note 

The default setting is trunk mode on.

Information About N Port Identifier Virtualization

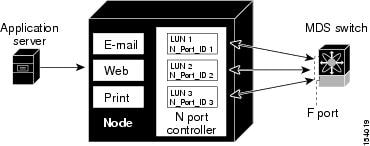
N port identifier virtualization (NPIV) provides a means to assign multiple FC IDs to a single N port. This feature allows multiple applications on the N port to use different identifiers and allows access control, zoning, and port security to be implemented at the application level. The following figure shows an example application using NPIV.

Figure 1. NPIV Example

Enabling N Port Identifier Virtualization

You can enable or disable NPIV on the switch.

Before you begin

You must globally enable NPIV for all VSANs on the switch to allow the NPIV-enabled applications to use multiple N port identifiers.


Note

All of the N port identifiers are allocated in the same VSAN.


Procedure

  Command or Action Purpose
Step 1

configure terminal

Example:

switch# configure terminal
switch(config)#

Enters configuration mode.

Step 2

feature npiv

Example:

switch(config)# feature npiv

Enables NPIV for all VSANs on the switch.

Step 3

no feature npiv

Example:

switch(config)# no feature npiv

Disables (default) NPIV on the switch.

Example Port Channel Configurations

This section shows examples on how to configure an F port channel in shared mode and how to bring up the link between F ports on the NPIV core switches and NP ports on the NPV switches. Before you configure the F port channel, ensure that F port trunking, F port channeling, and NPIV are enabled.

Example

This example shows how to create the port channel:

switch(config)# interface port-channel 2
switch(config-if)# switchport mode F
switch(config-if)# switchport  dedicated
switch(config-if)# channel mode active
switch(config-if)# exit
 

This example shows how to configure the port channel member interfaces on the core switch in dedicated mode:

switch(config)# interface fc1/4-6
switch(config-if)# shut
switch(config-if)# switchport mode F
switch(config-if)# switchport speed 4000
switch(config-if)# switchport rate-mode dedicated
switch(config-if)# switchport trunk mode on
switch(config-if)# channel-group 2
switch(config-if)# no shut
switch(config-if)# exit
 

This example shows how to create the port channel in dedicated mode on the NPV switch:

switch(config)# interface san-port-channel 2
switch(config-if)# switchport mode NP
switch(config-if)# no shut
switch(config-if)# exit
 

This example shows how to configure the port channel member interfaces on the NPV switch:

switch(config)# interface fc2/1-2
switch(config-if)# shut
switch(config-if)# switchport mode NP
switch(config-if)# switchport trunk mode on
switch(config-if)# channel-group 2
switch(config-if)# no shut
switch(config-if)# exit
 

Verifying Fibre Channel Interfaces

Verifying SFP Transmitter Types

The SPF transmitter type can be displayed for a physical Fibre Channel interface (but not for a virtual Fibre Channel).

The small form-factor pluggable (SFP) hardware transmitters are identified by their acronyms when displayed in the show interface brief command. If the related SFP has a Cisco-assigned extended ID, then the show interface and show interface brief commands display the ID instead of the transmitter type. The show interface transceiver command and the show interface fc slot/port transceiver command display both values for Cisco supported SFPs.

Verifying Interface Information

The show interface command displays interface configurations. If no arguments are provided, this command displays the information for all the configured interfaces in the switch.

You can also specify arguments (a range of interfaces or multiple, specified interfaces) to display interface information. You can specify a range of interfaces by entering a command with the following example format: interface fc2/1 - 4 , fc3/2 - 3

The following example shows how to display all interfaces:

switch# show interface

fc3/1 is up
...
fc3/3 is up
...
Ethernet1/3 is up
...
mgmt0 is up
...
vethernet1/1 is up
...
vfc 1 is up

The following example shows how to display multiple specified interfaces:

switch# show interface fc3/1 , fc3/3
fc3/1 is up
...
fc3/3 is up
...

The following example shows how to display a specific interface:

switch# show interface vfc 1
vfc 1 is up
...

The following example shows how to display interface descriptions:

switch# show interface description
-------------------------------------------------
Interface          Description
-------------------------------------------------
fc3/1              test intest
Ethernet1/1              --
vfc 1              --
...

The following example shows how to display all interfaces in brief:

switch# show interface brief

The following example shows how to display interface counters:

switch# show interface counters

The following example shows how to display transceiver information for a specific interface:

switch# show interface fc3/1 transceiver

Note

The show interface transceiver command is only valid if the SFP is present.


The show running-configuration command displays the entire running configuration with information for all interfaces. The interfaces have multiple entries in the configuration files to ensure that the interface configuration commands execute in the correct order when the switch reloads. If you display the running configuration for a specific interface, all the configuration commands for that interface are grouped together.

The following example shows the interface display when showing the running configuration for all interfaces:

switch# show running configuration
...
interface fc3/5
  switchport speed 2000
...
interface fc3/5
  switchport mode E 
...
interface fc3/5
  channel-group 11 force
  no shutdown

The following example shows the interface display when showing the running configuration for a specific interface:

switch# show running configuration fc3/5
interface fc3/5
  switchport speed 2000
  switchport mode E
  channel-group 11 force
  no shutdown

Verifying BB_Credit Information

The following example shows how to display the BB_credit information for all Fibre Channel interfaces:

switch# show interface fc2/1
...
fc2/1 is up
   Hardware is Fibre Channel, SFP is short wave laser w/o OFC (SN)
    Port WWN is 20:41:00:2a:6a:78:5a:80
    Admin port mode is F, trunk mode is on
    snmp link state traps are enabled
    Port mode is F, FCID is 0x400220
    Port vsan is 1
    Speed is 8 Gbps
    Transmit B2B Credit is 5
    Receive B2B Credit is 15
    Receive data field Size is 2112
    Beacon is turned off
    1 minute input rate 0 bits/sec, 0 bytes/sec, 0 frames/sec
    1 minute output rate 0 bits/sec, 0 bytes/sec, 0 frames/sec
      50797511 frames input, 94079655820 bytes
        0 discards, 0 errors
        1 CRC,  0 unknown class
        0 too long, 0 too short
      53584181 frames output, 94072838324 bytes
        0 discards, 0 errors
      0 input OLS, 0 LRR, 0 NOS, 0 loop inits
      1 output OLS, 1 LRR, 0 NOS, 0 loop inits
    last clearing of "show interface" counters never
      15 receive B2B credit remaining
      5 transmit B2B credit remaining
      0 low priority transmit B2B credit remaining
    Interface last changed at Mon May 19 20:15:53 2014
    

Default Fibre Channel Interface Settings

The following table lists the default settings for native Fibre Channel interface parameters.

Table 5. Default Native Fibre Channel Interface Parameters

Parameters

Default

Interface mode

Auto

Interface speed

Auto

Administrative state

Shutdown (unless changed during initial setup)

Trunk mode

On (unless changed during initial setup)

Trunk-allowed VSANs

1 to 4093

Interface VSAN

Default VSAN (1)

Beacon mode

Off (disabled)

EISL encapsulation

Disabled

Data field size

2112 bytes

The following table lists the default settings for virtual Fibre Channel interface parameters.

Table 6. Default Virtual Fibre Channel Interface Parameters

Parameters

Default

Interface mode

F mode

Interface speed

n/a

Administrative state

Shutdown (unless changed during initial setup)

Trunk mode

On

Trunk-allowed VSANs

All VSANs

Interface VSAN

Default VSAN (1)

EISL encapsulation

n/a

Data field size

n/a