- Title page
- Table of Contents
- What's in This Guide
- Getting to Know the Cisco TelePresence System
- Cisco TelePresence System Phone Softkeys (Systems that Use an IP Phone for Call Control Only)
- Cisco TelePresence System Calling Features (Systems That Use an IP Phone for Call Control Only)
- Cisco TelePresence System Meeting Controls (Systems That Use an IP Phone for Call Control Only)
- Booking Meeting Rooms and Scheduling Cisco TelePresence Meetings
- Using Cisco TelePresence Manager
- Using Cisco WebEx Conferencing
- Tips for Troubleshooting Your Cisco TelePresence Meeting (Systems That Use an IP Phone for Call Control Only)
- Managing Cisco TelePresence Call Security (Systems that Use an IP Phone for Call Control Only)
- Cisco TelePresence System Phone Alerts and CTS Main Display Screen Messages
- Creating and Viewing Recordings with the Cisco TelePresence Recording Server
- Glossary
- Index
Cisco TelePresence System User Guide (CTS 1.9)
Bias-Free Language
The documentation set for this product strives to use bias-free language. For the purposes of this documentation set, bias-free is defined as language that does not imply discrimination based on age, disability, gender, racial identity, ethnic identity, sexual orientation, socioeconomic status, and intersectionality. Exceptions may be present in the documentation due to language that is hardcoded in the user interfaces of the product software, language used based on RFP documentation, or language that is used by a referenced third-party product. Learn more about how Cisco is using Inclusive Language.
- Updated:
- March 21, 2014
Chapter: Using Cisco TelePresence Manager
- Contents
- Cisco TelePresence Manager Overview
- Scheduling Meetings Using CTS-Manager
- CTS-Manager Meeting Details
- Action Required Email
Cisco TelePresence Manager Overview
This chapter describes how to use the features associated with Cisco TelePresence Manager. CTS-Manager is an optional software application that can be configured with your Cisco TelePresence system so that meetings scheduled through applications such as Microsoft Outlook and Lotus Notes can be easily managed. CTS-Manager allows you to schedule both point-to-point and multipoint Cisco TelePresence meetings from your Microsoft Outlook or IBM Notes calendar. The meeting schedule is automatically sent to the Cisco TelePresence systems that are involved in the call.

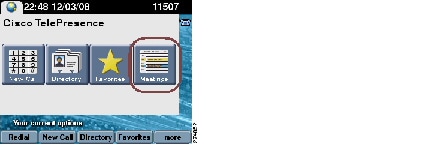
Tip You can tell if you have CTS-Manager installed when the initial home screen appears on your Cisco Unified IP phone: The Meetings touchscreen icon (as shown in Figure 6-1) indicates that you have Cisco TelePresence Manager installed. Some Cisco TelePresence features require CTS-Manager.
Figure 6-1 Meetings Icon on the Cisco Unified IP Phone Home Screen
Scheduling Meetings Using CTS-Manager
Cisco TelePresence meetings are scheduled between two or more conference rooms. The Calendar service (either Microsoft Exchange or IBM Domino) sends an acceptance email to the meeting organizer, with the notice that the rooms have been reserved and placed on the calendar. CTS-Manager also sends either a Confirmation email (meeting accepted) or an Action Required (scheduling error) email to the meeting organizer when a meeting is scheduled. The Confirmation email contains detailed meeting information, and the Action Required email lets you know what the scheduling error was so that you can correct the problem and try again.
See the following sections for scheduling options:
- Scheduling a Point-to-Point Meeting with Microsoft Outlook
- Scheduling a Multipoint Meeting with Microsoft Outlook
Scheduling a Point-to-Point Meeting with Microsoft Outlook
A point-to-point meeting has only two Cisco TelePresence participants attending. To schedule a Cisco TelePresence point-to-point meeting:
Step 1![]() Launch the Calendar application by clicking the
Calendar
button from the menu bar in Microsoft Outlook.
Launch the Calendar application by clicking the
Calendar
button from the menu bar in Microsoft Outlook.
Step 2![]() Select
Schedule Meeting
from the toolbar.
Select
Schedule Meeting
from the toolbar.
Step 3![]() Invite attendees by clicking the
To
button to display a list of available participants and Cisco TelePresence rooms.
Invite attendees by clicking the
To
button to display a list of available participants and Cisco TelePresence rooms.
Step 4![]() After inviting attendees, select a minimum of two Cisco TelePresence rooms as Resources. Then click
OK
.
After inviting attendees, select a minimum of two Cisco TelePresence rooms as Resources. Then click
OK
.
Step 5![]() Click the
Scheduling
tab to confirm that the Cisco TelePresence rooms you selected are available.
Click the
Scheduling
tab to confirm that the Cisco TelePresence rooms you selected are available.
Tip Make sure that the green “house” icon appears beside the Cisco TelePresence rooms listed as meeting attendees.
Step 6![]() Click the
Appointment
tab and make sure that the Cisco TelePresence rooms appear in both the
Location
and the
To
fields.
Click the
Appointment
tab and make sure that the Cisco TelePresence rooms appear in both the
Location
and the
To
fields.
Step 7![]() Click
Send
to schedule the meeting. You will receive three email notifications: one from each of the two Cisco TelePresence rooms that you scheduled, confirming that the meeting time is reserved, and one from CTS-Manager confirming that the meeting has been successfully scheduled, as shown in Figure 6-2. A link to Cisco TelePresence Manager is also provided.
Click
Send
to schedule the meeting. You will receive three email notifications: one from each of the two Cisco TelePresence rooms that you scheduled, confirming that the meeting time is reserved, and one from CTS-Manager confirming that the meeting has been successfully scheduled, as shown in Figure 6-2. A link to Cisco TelePresence Manager is also provided.
Figure 6-2 Point-to-Point Meeting Confirmation Email
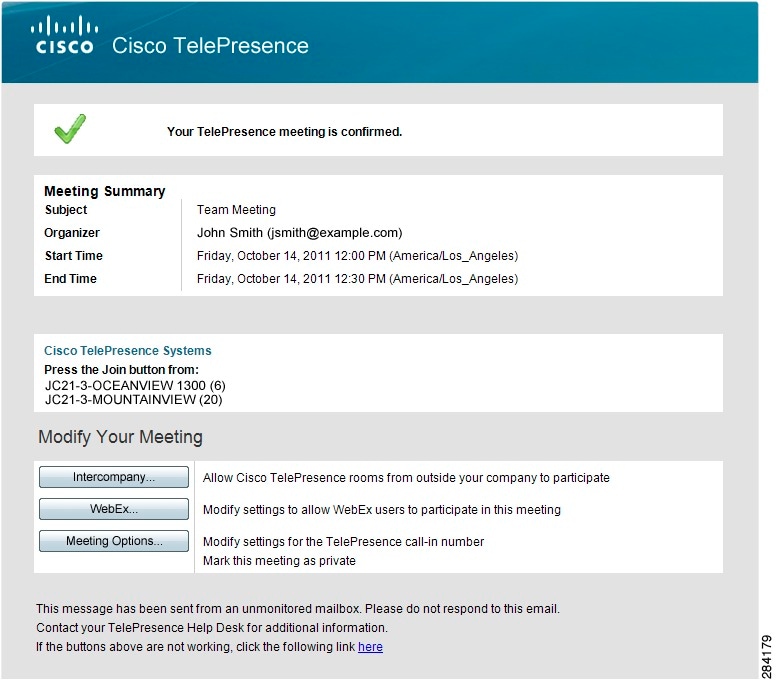
Table 6-1 describes Point-to-Point meeting confirmation email details.
This section confirms the meeting is properly scheduled and contains the link to the Meeting Details window. |
|
This section displays information about the scheduled meeting. |
|
This section displays buttons the allow the meeting organizer to set various options that are available depending on what how CTS-Manager is configured. These options include:
–
– |
|
The URL displayed at the bottom of the email is the same link to the Meeting Details window as the link in the Confirmation Statement above. For this link to work, the CTS-Manager hostname must have a DNS entry. |
Step 8![]() From the link provided, log in to Cisco TelePresence Manager using your email username and password to view meeting details on the CTS-Manager Meeting Details Summary page, as shown in Figure 6-3.
From the link provided, log in to Cisco TelePresence Manager using your email username and password to view meeting details on the CTS-Manager Meeting Details Summary page, as shown in Figure 6-3.
Figure 6-3 Meeting Details > Summary Window

If you have made an error in scheduling, CTS-Manager will send you an Action Required email, which will tell you what needs to be corrected. The Action Required email also includes a link to Cisco TelePresence Manager Meeting Details page. See the “Action Required Email” section.
Recurring Meetings
If you schedule a recurring meeting, the Meeting Details window displays two panes, as shown in Figure 6-4:
- All Occurrences: A list of each meeting by date. Clicking the date displays the details for the meeting for that date.
- Occurrence Details: The details for a specific occurrence of a recurring meeting.
Figure 6-4 Meeting Details > Summary WIndow for Recurring Meeting

Scheduling a Multipoint Meeting with Microsoft Outlook
A multipoint meeting has more than two Cisco TelePresence participants attending. To schedule a Cisco TelePresence multipoint meeting:
Step 1![]() Launch the Calendar application by clicking the
Calendar
button from the menubar in Microsoft Outlook.
Launch the Calendar application by clicking the
Calendar
button from the menubar in Microsoft Outlook.
Step 2![]() Select
Schedule Meeting
from the toolbar.
Select
Schedule Meeting
from the toolbar.
Step 3![]() Invite attendees by clicking the
To
button to display a list of available participants and Cisco TelePresence rooms.
Invite attendees by clicking the
To
button to display a list of available participants and Cisco TelePresence rooms.
Step 4![]() After inviting attendees, select a minimum of two to a maximum of eight (2 to 8) Cisco TelePresence rooms as Resources. Then click
OK
.
After inviting attendees, select a minimum of two to a maximum of eight (2 to 8) Cisco TelePresence rooms as Resources. Then click
OK
.
Step 5![]() Click the
Scheduling
tab to confirm that the Cisco TelePresence rooms you selected are available.
Click the
Scheduling
tab to confirm that the Cisco TelePresence rooms you selected are available.
Tip Make sure that the green “house” icon appears beside the Cisco TelePresence rooms listed as meeting attendees.
Step 6![]() Click the
Appointment
tab and make sure that the Cisco TelePresence rooms appear in both the
Location
and the
To
fields. Then click
Send
to schedule the meeting.
Click the
Appointment
tab and make sure that the Cisco TelePresence rooms appear in both the
Location
and the
To
fields. Then click
Send
to schedule the meeting.
Step 7![]() You will receive three email notifications:
You will receive three email notifications:
- One from each of the two Cisco TelePresence rooms that you scheduled, confirming that the meeting time is reserved.
- One from CTS-Manager confirming that the meeting has been successfully scheduled, as shown in Figure 6-5. A link to Cisco TelePresence Manager is also provided.
Figure 6-5 Multipoint Meeting Confirmation Email

Table 6-2 describes Multipoint meeting confirmation email details.
This section confirms the meeting is properly scheduled and contains the link to the Meeting Details window. |
|
This section displays information about the scheduled meeting, including some options that are set in the Meeting Details window. In addition to the standard meeting information, this section contains the Multipoint Bridge Call-In Number and the meeting’s Meeting Number. |
|
This section displays buttons the allow the meeting organizer to set various options that are available depending on what how CTS-Manager is configured. These options include:
–
– |
|
Copy the information in this section, paste it into an email and send it to your other meeting participants. |
|
The URL displayed at the bottom of the email is the same link to the Meeting Details window as the link in the Confirmation Statement above. For this link to work, the CTS-Manager hostname must have a DNS entry. |
Step 8![]() From the link provided, log in to Cisco TelePresence Manager using your email username and password to view meeting details on the CTS-Manager Meeting Details Summary page, as shown in Figure 6-6.
From the link provided, log in to Cisco TelePresence Manager using your email username and password to view meeting details on the CTS-Manager Meeting Details Summary page, as shown in Figure 6-6.
Figure 6-6 CTS-Manager Multipoint Meeting Details

If you have made an error in scheduling, CTS-Manager will send you an Action Required email, which will tell you what needs to be corrected. The Action Required email also includes a link to Cisco TelePresence Manager Meeting Details page. See the “Action Required Email” section.
CTS-Manager Meeting Details
When you receive your meeting confirmation email from CTS-Manager, you can access CTS-Manager to view or change your meeting details in the Meeting Details window. See the following sections for information about viewing, configuring, and managing Cisco TelePresence meetings in the CTS-Manager Meeting Details window:
- Scheduling an Intercompany Meeting
- Scheduling an Interoperability (Interop) Meeting
- Enabling or Disabling Cisco WebEx for a Cisco TelePresence Meeting
- Usage Survey Window
- Configuring Meeting Options
- Scheduling Meetings with Videoconference Rooms
- Cisco Multimedia Experience Engine (MXE)
Scheduling an Intercompany Meeting
A Cisco TelePresence intercompany meeting involves at least one attendee who belongs to a network outside of your company network. The Intercompany window provides the ability to schedule Cisco TelePresence meetings with other companies.
To schedule an intercompany meeting:
Step 1![]() Schedule a Cisco TelePresence point-to-point meeting by following the steps in the “Scheduling a Point-to-Point Meeting with Microsoft Outlook” section.
Schedule a Cisco TelePresence point-to-point meeting by following the steps in the “Scheduling a Point-to-Point Meeting with Microsoft Outlook” section.
Step 2![]() Schedule a Cisco TelePresence multipoint meeting by following the steps in the “Scheduling a Multipoint Meeting with Microsoft Outlook” section.
Schedule a Cisco TelePresence multipoint meeting by following the steps in the “Scheduling a Multipoint Meeting with Microsoft Outlook” section.
Step 3![]() You will receive three email notifications:
You will receive three email notifications:
Step 4![]() At the link provided, log in to Cisco TelePresence Manager using your email username and password. The Meeting Details page appears, as shown in Figure 6-7 and Figure 6-8.
At the link provided, log in to Cisco TelePresence Manager using your email username and password. The Meeting Details page appears, as shown in Figure 6-7 and Figure 6-8.
Figure 6-7 Intercompany Host Meeting Options

Figure 6-8 Intercompany Participant Meeting Options

Table 6-3 describes intercompany meeting details.
Scheduling an Interoperability (Interop) Meeting
A Cisco TelePresence interop meeting has at least one attendee who is using supported legacy video conferencing equipment, such as Cisco Unified Videoconferencing (CUVC).
To schedule an interop meeting:
Step 1![]() Schedule a Cisco TelePresence point-to-point meeting by following the steps in the “Scheduling a Point-to-Point Meeting with Microsoft Outlook” section.
Schedule a Cisco TelePresence point-to-point meeting by following the steps in the “Scheduling a Point-to-Point Meeting with Microsoft Outlook” section.
Step 2![]() Schedule a Cisco TelePresence multipoint meeting by following the steps in the “Scheduling a Multipoint Meeting with Microsoft Outlook” section.
Schedule a Cisco TelePresence multipoint meeting by following the steps in the “Scheduling a Multipoint Meeting with Microsoft Outlook” section.
Step 3![]() You will receive three email notifications:
You will receive three email notifications:
- One from each of the two Cisco TelePresence rooms that you scheduled, confirming that the meeting time is reserved.
- One from CTS-Manager confirming that the meeting has been successfully scheduled, as shown in Figure 6-9. A link to Cisco TelePresence Manager is also provided.
Figure 6-9 Video Conferencing Meeting Confirmation Email

Table 6-4 describes videoconferencing meeting confirmation email details.
Step 4![]() At the link provided, log in to Cisco TelePresence Manager using your email username and password. The Meeting Details page appears, as shown in Figure 6-3.
At the link provided, log in to Cisco TelePresence Manager using your email username and password. The Meeting Details page appears, as shown in Figure 6-3.
Step 5![]() In the Intercompany section, enter information in the following fields:
In the Intercompany section, enter information in the following fields:
a.![]() “Which company will host the TelePresence multipoint bridge?”—Select which company is hosting the meeting.
“Which company will host the TelePresence multipoint bridge?”—Select which company is hosting the meeting.
b.![]() “How many Video Conferencing end points will join this meeting?—Enter the sum total of CUVC participants. Options are from
2
to
47
participants.
“How many Video Conferencing end points will join this meeting?—Enter the sum total of CUVC participants. Options are from
2
to
47
participants.
Step 6![]() Click
Apply
to save your settings.
Click
Apply
to save your settings.
Scheduling Studio Mode Recording
Studio mode recording via the Cisco TelePresence Recording Server (CTRS) is mutually exclusive from Intercompany and Interop operation. The default setting for Studio Mode Recording is “No.” If recording is desired, select the “Yes” setting. This option allows the administrator to enable the studio mode recording support. Once this option is enabled, the user can enable this recording for a meeting from the meeting details view.
To reserve a Cisco TelePresence room with studio-mode recording capability:
Step 1![]() Schedule your room with Microsoft Outlook as a single-room meeting.
Schedule your room with Microsoft Outlook as a single-room meeting.
Step 2![]() After scheduling your room you will receive an email with a link to the entitlement form. Complete the entitlement form by selecting the purpose of your recording.
After scheduling your room you will receive an email with a link to the entitlement form. Complete the entitlement form by selecting the purpose of your recording.
Tip Single-room meetings scheduled for multipurpose and recording must follow the standard process for resolving Cisco TelePresence scheduling conflicts based on the purpose of the meeting.
See Chapter 11, “Creating and Viewing Recordings with the Cisco TelePresence Recording Server” for information about using CTRS.
Enabling or Disabling Cisco WebEx for a Cisco TelePresence Meeting
The CTS-Manager administration Meeting Details WebEx tab allows the meeting organizer to enable or disable Cisco WebEx for a scheduled meeting.
To enable or disable Cisco WebEx for a Cisco TelePresence meeting:
Step 1![]() Schedule a Cisco TelePresence meeting. A meeting confirmation email is sent.
Schedule a Cisco TelePresence meeting. A meeting confirmation email is sent.
Step 2![]() In the Modify Your Meeting section of the email confirmation, click the WebEx button to allow Cisco WebEx users to participate in this meeting. The Cisco TelePresence Manager meeting control portal appears.
In the Modify Your Meeting section of the email confirmation, click the WebEx button to allow Cisco WebEx users to participate in this meeting. The Cisco TelePresence Manager meeting control portal appears.
Step 3![]() Enter your username and password.
Enter your username and password.
Step 5![]() Click to select either Yes or No to allow Cisco WebEx users to participate in the scheduled meeting, as shown in Figure 6-10.
Click to select either Yes or No to allow Cisco WebEx users to participate in the scheduled meeting, as shown in Figure 6-10.
Figure 6-10 Meeting Details Cisco WebEx Tab

Step 6![]() Click Apply to save your changes.
Click Apply to save your changes.
See Chapter 7, “Using Cisco WebEx Conferencing” for information about using Cisco WebEx in your Cisco TelePresence meeting.
Usage Survey Window
The Usage Survey window allows the meeting organizer to fill out the usage survey that was set up by the administrator.
Configuring Meeting Options
The meeting options window allows the meeting organizer to adjust the following options for their meeting:
Tip Meeting options are different for Intercompany meetings. See the “Scheduling an Intercompany Meeting” section sections, for more information.
- Should TelePresence Be Disabled For This Meeting —Allows you to disable Cisco TelePresence for the meeting.
- Is this meeting intended for recording a video to be distributed later? —Allows you to record the meeting for distribution later.
- Meeting Subject on Phone —Allows you to show or hide the Cisco TelePresence meeting subject on the CTS Cisco Unified IP phone in the Cisco TelePresence room.
When you are finished making changes in the Meeting Options window, click Apply to save your changes.
Scheduling Meetings with Videoconference Rooms
To schedule a meeting with one or more video conference rooms:
Step 1![]() Invite Cisco TelePresence rooms and VC rooms through Outlook or Lotus Notes, and wait for the confirmation email. CTS-Manager automatically identifies the meeting as an Interop meeting, calculates and reserves required resources and emails the organizer with the video conference call-in information.
Invite Cisco TelePresence rooms and VC rooms through Outlook or Lotus Notes, and wait for the confirmation email. CTS-Manager automatically identifies the meeting as an Interop meeting, calculates and reserves required resources and emails the organizer with the video conference call-in information.
Step 2![]() Forward the video conference call-in information to the video conference participants.
Forward the video conference call-in information to the video conference participants.
Cisco Multimedia Experience Engine (MXE)
The Cisco Media Experience Engine is a modular media processing system that provides interoperability between Cisco TelePresence and video conferencing devices, extending the reach of collaboration and communication within organizations. MXE provides 720p interoperability with video conferencing.
To add an MXE device to Cisco TelePresence Manager:
Step 1![]() Go to the Configure > Bridges and Servers window.
Go to the Configure > Bridges and Servers window.
Step 2![]() Click
New
to display the New...Bridge or Server dialog box.
Click
New
to display the New...Bridge or Server dialog box.
Step 3![]() Choose MXE from the Type drop-down menu.
Choose MXE from the Type drop-down menu.
Step 4![]() Enter information into the fields and click
Save
.
Enter information into the fields and click
Save
.
Tip After you add the MXE, you can edit it later by selecting it and clicking the Edit button.
If MXE does not appear in the Type drop-down menu, go to the Configure > Application Settings > Bridges and Servers window and make sure Interoperability with Videoconferencing is enabled and MXE-HD is selected
Action Required Email
Action Required emails may be sent to the Meeting Organizer to alert them of the following error conditions. The Action Required email is described in Table 6-5 .
-
501205 - Missing Required Endpoints
: A second Cisco TelePresence endpoint, or other participant has not been defined for the meeting.
This is the only type of error a Meeting Organizer can correct without administrative assistance. You can see an example of this email in Figure 6-11. You or the Meeting Organizer can correct this error using the Meeting Details window, but the recommended way to resolve the error is to use the calendar client used to create the meeting.

Note This type of Action Required error can also be caused by an endpoint not being deleted properly from a calendar server, for example Microsoft Exchange. This can occur if the Meeting Organizer schedules a meeting that includes an endpoint in delegate mode. If the Meeting Organizer schedules the meeting and then deletes it before the endpoint delegate accepts the invitation, this Action Required email is sent to the Meeting Organizer.
- 501211 - Room (Endpoint) Not Compatible : One or more Cisco TelePresence rooms (endpoints) are running software that is incompatible with the Cisco TelePresence Multipoint Switch.
- 501212 - Resource Not Available : Not enough Multipoint Switch resources are available to support the multipoint meeting.
- 501213 - MCU Not Configured : A Multipoint Switch has not been configured for the network.
- 501217 - CUVC Resource Not Available : Insufficient Video Conferencing resources to setup multipoint meeting.
- 29105 - Inactive WebEx Account : Inactive WebEx user account. Whether the account is reactivated or a new one is created, the meeting organizer must reauthenticate with WebEx.
Figure 6-11 Action Required Email

Video Conferencing Error Email
The error email is sent to the meeting organizer when the endpoint is not reserved for a meeting. Follow the instructions in the email header to schedule endpoints for a meeting.
Figure 6-12 Video Conference Meeting Error Email

System Alert Notification Emails
In addition to the emails sent to the meeting organizer, system alert emails are sent to the SysAdmin each day after the maintenance cycle providing information about:
For more information about these emails, see System Alert Notification.
Meeting Manager
The meeting manager window provides detailed information about a specific meeting and allows the meeting organizer to make changes to the meeting’s settings. The meeting organizer accesses the Meeting Manager by clicking on of the e “Modify Your Meeting” buttons in the confirmation email for their meeting and then logs in to the Meeting Manager.
It is divided into the following tabbed sections:
In addition, the meeting organizer can specify other users to manage their meetings. For more information, refer to the Allowing Other Users to Manage Your Meetings section.
Summary
The Summary tab provides you the following fields:
Note If you have included only one Cisco TelePresence endpoint in a scheduled meeting, you enter a phone number to dial, by clicking the Meeting Options tab and entering the number in the Number to Dial field, If you mistakenly included only one Cisco TelePresence endpoint, use your calendar software (Microsoft Outlook or Lotus Notes) to add additional endpoints.
When you are finished making changes in the Summary window, click Apply to save your changes.
Intercompany
The Intercompany window allows you to enable the ability to schedule TelePresence meetings with other companies.
To enable this feature, click Yes and then click Apply .
If you want to remove what has been configured before you save it and set new values, click Cancel .
When you are finished making changes in the Intercompany window, click Apply to save your changes.
Intercompany Host Meeting Options
If your company is considered the Intercompany Cisco TelePresence meeting host you need to configure your side of the meeting as the host. You’ll need to obtain the Call-in Number and the Meeting Number from your CTS Manager Administrator.
Enter the information and click Apply to set the values.
Intercompany Participant Meeting Options
If another company is considered the Intercompany Cisco TelePresence meeting host you need to configure your side of the meeting as a participant. You’ll need to obtain the Call-In Number and the Meeting Number from your CTS Manager Administrator or from the Host meeting organizer
Enter the information and click Apply to set the values.
WebEx
The WebEx window allows the meeting organizer to enable WebEx for their meeting and provides them with the WebEx information for both the host and par tic pants to join the meeting. The first time they schedule a TelePresence meeting with WebEx, they must register their WebEx ID user account with CTS-Manager. For more information, see First-time WebEx Setup.
Note This window is not available if the meeting organizer is not permitted to use WebEx.
Allow WebEx users to participate in this meeting
Selecting Yes enables WebEx for the meeting. Selecting No disables Webex for the meeting.
WebEx Call-In Information
This section displays the WebEx information necessary for both the host and participants to join the meeting.
First-time WebEx Setup
If this is your first time setting up WebEx for a TelePresence meeting, you must register your WebEx ID user account with CTS-Manager. This makes using WebEx with future TelePresence meetings as easy as possible.
Note If you use the WebEx Productivity Tool plug-in for Microsoft Outlook to schedule your meeting, you do not need to go through this first-time setup.
Step 1![]() If there is more than one WebEx site available, select the WebEx site to which you have been assigned.
If there is more than one WebEx site available, select the WebEx site to which you have been assigned.
Note If you are not sure which site to select, contact your help desk for assistance.
The WebEx login window appears.
Note If a Security warning message appears: In Internet Explorer 6, click Yes. In Internet Explorer 8, click No
Step 3![]() Enter your WebEx Username and Password and click
Log In
.
Enter your WebEx Username and Password and click
Log In
.
Once you log in, you are redirected back to the Meeting Manager window for your meeting.
Note If a security warning message appears, click No.
Step 4![]() Click the WebEx tab, select the
YES
radio button, then click
Apply
.
Click the WebEx tab, select the
YES
radio button, then click
Apply
.
WebEx is enabled and the following WebEx details appear:
- Call-in Toll-Free Number
- Call-in Toll Number
- WebEx Meeting Host Key
- WebEx Meeting ID
- Meeting Password
- URL
After a few minutes, you will receive an updated confirmation email with the WebEx information listed in the “Provide the following information to your other participants” section.
Step 5![]() Copy the WebEx information from the confirmation email.
Copy the WebEx information from the confirmation email.
Step 6![]() In your email program, create a new email addressed to your WebEx participants.
In your email program, create a new email addressed to your WebEx participants.
Step 7![]() Paste the WebEx information into the email and send it.
Paste the WebEx information into the email and send it.
WebEx participants join the meeting by clicking the URL you sent in the email or copying and pasting it into their browser.
TelePresence participants join the meeting by pressing the button on their TelePresence phone.
When you are finished making changes in the WebEx window, click Apply to save your changes.
Note The process of authenticating with WebEx maps your enterprise user account to your WebEx account. If your WebEx account changes after you log into WebEx the first time, you will use the Re-authenticate button to log into WebEx the next time with your new username and password and, after successful login, the mapping will be updated to your new WebEx account. Any WebEx account created for your company can be used to authenticate with WebEx, as long as the you know the correct username and password. If your WebEx account is reactivated, or a new one is created, you must reauthenticate with WebEx to be able to schedule WebEx-enabled TelePresence meetings.
Changing Your WebEx Site or Username
If you want to change your WebEx site or username, do the following:
Step 1![]() Contact your WebEx administrator to get your new WebEx site and username/password information.
Contact your WebEx administrator to get your new WebEx site and username/password information.
Step 2![]() Open the confirmation email for an upcoming Cisco TelePresence meeting you scheduled. If you have no upcoming meetings, schedule one now.
Open the confirmation email for an upcoming Cisco TelePresence meeting you scheduled. If you have no upcoming meetings, schedule one now.
Step 3![]() Click the
WebEx
button in the email.
Click the
WebEx
button in the email.
Step 4![]() Log in to Cisco TelePresence Manager using your enterprise user ID and password.
Log in to Cisco TelePresence Manager using your enterprise user ID and password.
The Meeting Manager window appears with the WebEx tab selected.
Step 5![]() Next to “To change your WebEx Site or username” click the
here
link.
Next to “To change your WebEx Site or username” click the
here
link.
Note If there is only one site available, you can only change your WebEx username
Step 6![]() If changing your WebEx site, select the new WebEx site.
If changing your WebEx site, select the new WebEx site.
Step 7![]() Click
Update WebEx Credential
.
Click
Update WebEx Credential
.
The WebEx login window appears.
Note If a Security warning message appears: In Internet Explorer 6, click Yes. In Internet Explorer 8, click No
Step 8![]() Enter your WebEx username and password for the new WebEx site, provided by your WebEx administrator.
Enter your WebEx username and password for the new WebEx site, provided by your WebEx administrator.
Once you log in, you are redirected back to the Meeting Manager window for your meeting.
Note One or more WebEx sites may be available, but you can only use one for scheduling WebEx-enabled TelePresence meetings. If you are not sure which one to use, contact your help desk.
Reactivating Your WebEx Account
If your WebEx account is inactive, you will not be able to schedule WebEx-enabled TelePresence meetings.
Step 1![]() Contact your WebEx administrator to have your account reactivated.
Contact your WebEx administrator to have your account reactivated.
Step 2![]() Open the confirmation email for an upcoming Cisco TelePresence meeting you scheduled. If you have no upcoming meetings, schedule one now.
Open the confirmation email for an upcoming Cisco TelePresence meeting you scheduled. If you have no upcoming meetings, schedule one now.
Step 3![]() Click the WebEx button in the email.
Click the WebEx button in the email.
Step 4![]() Log in to Cisco TelePresence Manager using your enterprise user ID and password.
Log in to Cisco TelePresence Manager using your enterprise user ID and password.
Step 5![]() Select the WebEx site on which you have your account.
Select the WebEx site on which you have your account.
Step 6![]() Click the
Registe<
Click the
Registe<![]() /B>
r button and log in to WebEx using your reactivated account username and password.
/B>
r button and log in to WebEx using your reactivated account username and password.
After successful login, you are redirected to Cisco TelePresence Manager where you can enable WebEx for your TelePresence meeting.
WebEx Roles
The CTS-Manager administrator is responsible for assigning WebEx roles to users. Until the administrator assigns a role to a meeting organizer, their role is determined by the WebEx default user type configured in the Configure > Application Settings > Bridges and Servers window.
There are three types of WebEx users:
If you are a WebEx Permitted user, you can request WebEx on a meeting-by-meeting basis.
Using Microsoft Outlook, you can use the WebEx Productivity Tools plug-in to add WebEx to your meeting.
Alternatively, you can enable WebEx for your meeting by doing the following:
Step 1![]() Click the WebEx tab, select the
YES
radio button, then click
Apply
.
Click the WebEx tab, select the
YES
radio button, then click
Apply
.
WebEx is enabled and the following WebEx details appear:
- Call-in Toll-Free Number
- Call-in Toll Number
- WebEx Meeting Host Key
- WebEx Meeting ID
- Meeting Password
- URL
After a few minutes, you will receive an updated confirmation email with the WebEx information listed in the “Provide the following information to your other participants” section.
Step 2![]() Copy the WebEx information from the confirmation email.
Copy the WebEx information from the confirmation email.
Step 3![]() In your email program, create a new email addressed to your WebEx participants.
In your email program, create a new email addressed to your WebEx participants.
Step 4![]() Paste the WebEx information into the email and send it.
Paste the WebEx information into the email and send it.
WebEx participants join the meeting by clicking the URL you sent in the email or copying and pasting it into their browser.
TelePresence participants join the meeting by pressing the button on their TelePresence phone.
When you are finished making changes in the WebEx window, click Apply to save your changes.
If the meeting organizer is a WebEx Premium user, every meeting they schedule includes WebEx.
All they have to do is provide the WebEx information to their meeting participants:
Step 1![]() Copy the WebEx information from the confirmation email.
Copy the WebEx information from the confirmation email.
Step 2![]() In your email program, create a new email addressed to your WebEx participants.
In your email program, create a new email addressed to your WebEx participants.
Step 3![]() Paste the WebEx information into the email and send it.
Paste the WebEx information into the email and send it.
WebEx participants join the meeting by clicking the URL you sent in the email or copying and pasting it into their browser.
TelePresence participants join the meeting by pressing the button on their TelePresence phone.
Note All existing meetings scheduled by the user before they become a WebEx Premium User will remain unchanged. All meetings scheduled thereafter will have WebEx enabled. WebEx can be enabled for an existing meeting only by adding or deleting endpoints or changing the time of the meeting.
If the meeting organizer is a WebEx Non-Permitted user, they are not permitted to use WebEx with any of their meetings.
In this case, the WebEx button in the confirmation email and the WebEx tab in the Meeting Manager window are not available.
Usage Survey
The Usage Survey window allows you to view and fill out the survey.
Step 1![]() Select or enter an answer for each of the questions.
Select or enter an answer for each of the questions.
Meeting Options
The meeting options window allows you to adjust other options for your meeting.
Note Meeting options are different for an intercompany meeting. See the Intercompany Host Meeting Options and Intercompany Participant Meeting Options sections, for more information.
Mark this meeting as private: Allows you to show or hide the TelePresence meeting subject on the phone in the TelePresence endpoint.
Provide a call-in number for other participants?: Allows you to provide a call-in number for TelePresence endpoints that were not originally invited to the meeting to be able dial in to the meeting.
The following options are available only for a meeting scheduled with one endpoint:
Number to Dial: Enter a call-in number. You must enter only numbers. Other characters including dashes are not permitted.
Is this meeting intended for recording a video to be distributed later? : Allows you to record the meeting for distribution later.
Is TelePresence required for this meeting? : Allows you to disable TelePresence for the meeting. When TelePresence is disabled, Action Required emails will not be sent if any additional settings are changed.
When you are finished making changes in the Meeting Options window, click Apply to save your changes.
Allowing Other Users to Manage Your Meetings
The meeting organizer can select up to five other users who can also manage their meetings. The user(s) will receive the email notifications and have the ability to access meeting manager to view meeting details, change meeting options, as well as change preferences.
In the emails and in the meeting details, delegates will see the meeting information based on the organizer's time zone and locale preferences, not the delegates' own.
All feature options that are available to the meeting organizer are also available to the delegates.
To allow other users to manage your meetings:
Step 1![]() In the Meeting Manager window, click
Preferences
.
In the Meeting Manager window, click
Preferences
.
Step 2![]() In the Allow Others to Manage My Meetings field, enter the user ID of each user to whom you want to delegate management of your meetings. User IDs must be separated by a comma.
In the Allow Others to Manage My Meetings field, enter the user ID of each user to whom you want to delegate management of your meetings. User IDs must be separated by a comma.
Step 3![]() (Optional) If you want only the delegate users to receive email notifications for meetings that you schedule, uncheck
Send me email notifications
.
(Optional) If you want only the delegate users to receive email notifications for meetings that you schedule, uncheck
Send me email notifications
.
Note If a delegate user forwards the meeting organizer an email notification, they will receive it even if they unchecked Send me email notifications.
Step 4![]() (Optional) If you want to save the user IDs that you are entering and keep this window open while you find other user IDs to enter, click
Apply
.
(Optional) If you want to save the user IDs that you are entering and keep this window open while you find other user IDs to enter, click
Apply
.
Step 5![]() When you are finished, click
OK.
When you are finished, click
OK.
System Alert Notification
Each day after the CTS-Manager maintenance cycle, the SysAdmin receives a system alert notification email if there are any meetings that were scheduled but never took place (no-show meetings), and meetings for which the survey was not completed by the meeting organizer.
This email displays the following information:
Note The Meetings without Usage Survey Responses information will not be available if the Metrics Dashboard and Reporting API license is not uploaded. To upload the Metrics Dashboard and Reporting API license, go to the Configure > Licenses window, click the License Files tab and click Upload.
Where to Go Next
Go to Chapter 7, “Using Cisco WebEx Conferencing” for more information about Cisco WebEx.
See the Cisco TelePresence Manager home page on Cisco.com for support documentation.
 Feedback