Multiple Record Configuration

Access Bulk Configuration Tools

Procedure


Step 1

Double-click Configuration Manager in the Administration Data Server group or the Administration Client group.

Step 2

In the Menu selection box, select Tools > Bulk Configuration.

Step 3

From the submenu selection list, select Insert if you need to insert data or Edit if you need to edit.

Step 4

In the next menu selection list, select the type of table with which you need to work.


Bulk Configure Data

From the Bulk Configuration menu, you can choose to create or update records in the database tables.

Start by selecting the Bulk Configuration Insert or Edit menu. Then select the database table you want to modify.


Note

If you have any questions, refer to the online help. The help contains table record and field definitions and procedures for all that you can do with the Bulk Configuration tool.

The following sections briefly describe the tool and how to use it.


Insert and Edit Windows

Depending on whether you select Bulk Configuration Insert or Edit, the Bulk Configuration Insert or Edit window for the selected database table opens.

These two windows have the following features:

  • Same Options

    Both windows have the same options except for Insert (Insert window) and Retrieve (Edit window).


    Note

    The reason for having both an Insert and an Edit window is to prevent confusion when editing records since some configuration objects can only be edited when inserted into the database, the database being a relational one. For example, when you insert the record of a label, you can edit all its fields. However, after you define its routing client (and save it in the database), the only way you can redefine the routing client is by deleting the label and creating a new one.


  • Saving Changes

    The changes you make in the Insert or Edit window are not applied to the database until you click Save or Close. The Close button closes the window and allows you to save or cancel database changes.

  • Initial Display

    Initially, both windows open without data and wait for your retrieval command (in the Edit window) or insert/import command (in the Insert window).

  • Editable Data Table Fields

    Columns with an asterisk (*) next to the title indicate required fields. You cannot directly modify fields shaded in blue. However, in some cases setting or changing one field makes another field updateable.

  • Record State

The first data column contains a symbol indicating the condition of a row's record.

Symbol

Indicates the record is

Not changed since you retrieved the record or saved it.

Changed in the current editing session but not yet saved.

To be inserted into the database when you save your edits.

To be deleted from the database when you save your edits.

Multiple Record Configuration

In some cases, you might need to work with multiple records of configuration data simultaneously.

For example, you might want to:

  • Import records from a text file

  • Modify a specific field in multiple records

  • Insert a set of records

This chapter shows you how to use the Configuration Manager Bulk Configuration tool to insert and update multiple configuration records in a single transaction from a single screen.

The Bulk Configuration tool lets you perform these operations on several Unified Intelligent Contact Management (Unified ICM) data tables simultaneously. This tool supplements the Configuration Manager Explorer and List tools, which allow you to insert and update single records.


Note

Refer to the Bulk Configuration tool's online help for detailed information.

Bulk Configuration Features

You can do the following with the Bulk Configuration tool:

  • Retrieve records from the database (Edit window only)

  • Sort records by a single column or by multiple columns

  • Use the search tool to find data in a list of records

  • Apply a single value to a range of fields or apply a range of values to a range of fields

  • Insert additional new rows (records) into the database table (Insert Window only)

  • Import multiple record data (either whole records or record fields)

  • Export multiple record data (either whole records or record fields)

  • Set or change security settings to multiple records at a time

  • Delete records. After deletions are saved to the database (or after you close your editing session), you can no longer undelete deleted records.

  • Undelete records that are marked for deletion in the current editing session

The following sections describe how to use the Bulk Configuration tool.

Record retrieval from database

Use the Select filter data box in the Edit window to retrieve records from the database.

Edit Existing Records

To retrieve and edit existing records, follow these steps:

Procedure

Step 1

Within the Bulk Configuration > Edit menu, select the name of the database table you want to modify. The appropriate Edit window appears. (Initially, no records are shown.)

Step 2

Do one of the following:

  • To retrieve a range of records, specify values in the Select filter data fields. For example, you could enter values that would retrieve only dialed numbers associated with a specific customer, with a specific routing client, or both.
  • To retrieve all records, leave the Customer and Routing Client fields set to All.
Step 3

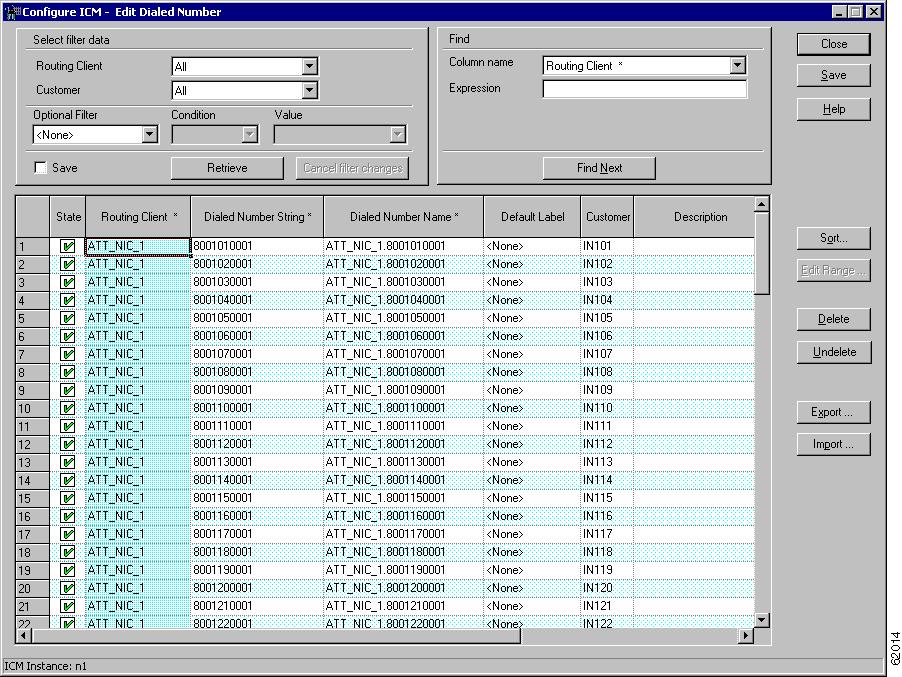
Click Retrieve. The appropriate rows are displayed in the Edit window as in the following example.

Figure 1. Example Bulk Configuration Edit Window

Example Bulk Configuration edit window
Step 4

After you retrieve the records you want to edit, you can edit individual records or a range of records. In a range of records, you can enter a range of values or the same value. You can also delete, import, export, and sort records.


Sorting Records

You can sort records (rows) in two ways: by one column or by multiple columns.

You might want to sort by multiple columns if the first column(s) to sort by has the same value in more than one field, for example, the same routing client, label, or customer name.

  • To sort records by one column: double-click that column's header. To reverse the sort, double-click a second time. When you double-click, an A (Ascending) or D (Descending) appears after the header to indicate the sort order.

  • To sort records by multiple columns, see the following procedure.

Sort Records by Multiple Columns

Procedure

Step 1

In the Insert or Edit window, click Sort. The Sort dialog displays.

Step 2

In the Columns available for sort list, select each column by which you want to sort and click Add.

The primary sorting column will be the first column listed in the Columns selected for sort list. To change the column sort order, select a column and click the up or down arrow.

The data within each column is sorted in Ascending order unless you deselect the check box beside the column.

Step 3

Click OK.


Specific Records Within a Set

After you have retrieved a set of records, you can use the Find area of the Edit window (Column Name and Expression fields) to search for specific records within the set.

Find Data in a List of Records

To find data in a list of records, follow these steps:

Procedure

Step 1

In the Find box of the Edit or Insert window, select the database column in which you want to search for data.

Note 
You can also select a column by clicking in that column.
Step 2

In the Find box Expression field, enter the value for which you want to search. You can enter a full value or a sub-string.

Step 3

Click Find Next to locate the first record that matches the search criteria. The first row that contains the specified expression in the selected column is highlighted.


Select Data

You can select whole records for importing, exporting, setting security, deleting, or undeleting. Or, you can select the same field in multiple records for simultaneous editing.

Select Records

Click in the left-most numbered field in a row to select that row and highlight it. Click in any other field in a row to select the row but not highlight it.

Select One Field in Multiple Records

You can select one edit-control field (when there is no section box in the field) in multiple records in any of the following three ways:

  • Click the field where you want to start and, keeping the left mouse button held down, move the cursor to the last field.

  • Click the field where you want to start. While holding down the Shift key, click the last field.

  • Click the field where you want to start. While holding down the Shift key, click the down arrow to select.

  • Press Ctrl, then click on each field you wish to select. This allows you to select a discontinuous group of fields.

Edit Range of Data

You can edit a range of data in a table column in three ways:

Procedure

  • Apply a single value to a range of edit-control fields

  • Apply a single value to a range of selection-box fields

  • Apply a range of values to a range of fields

Apply a Single Value to a Range of Edit-Control Fields

An edit-control field is one you can edit that does not contain a selection box.

To apply a single value to a range of edit-control fields:

Procedure

Step 1

Make your selection: click the field where you want the range to start and, keeping the left mouse button held down, move the cursor to the last field in the range.

Step 2

Type the new entry that you want to appear in all the fields.

Step 3

Click Enter or Tab. This applies the change to all the records in the range and moves the focus to the next data field.


Apply a Single Value to a Range of Selection-Box Fields

To apply a single value to a range of selection-box fields:

Procedure

Step 1

Select the first field where you want the range to start.

Step 2

Press the Shift key and hold it down for steps 3, 4, and 5.

Step 3

Click the selection-box down arrow but keep the left mouse button held down and select the fields you want in the range.

Step 4

Click the last field in the selection to display the selection list. You can also open the selection box by pressing Alt + an arrow key.

Step 5

Click your selection.

Step 6

Click Enter or Tab (or any other field). This applies the change to all the records and moves the focus to the next data field.


Apply a Range of Values to a Range of Fields in a Column

To apply a range of values to a range of fields in a column:

Procedure

Step 1

Select the range of fields in a database column. This enables the Edit Range button.

Note 
The Edit Range button does not work for selection-box fields.
Step 2

Click Edit Range. The Edit Range dialog displays.

Figure 2. Edit Range Dialog Box


Step 3

In the Edit Range From field, enter the first number of the range.

Step 4

In the Prefix and Suffix fields, you can optionally enter substrings to appear before or after each value. The Edit Range dialog lists the generated values.

Note 
When entering a numeric range, you may also enter leading zeros to ensure proper alignment (that is, 001 to 999).
Step 5

Click OK. This applies the changes to the fields you selected in the Insert or Edit window.


Add New Records

You can add records by inserting multiple blank rows (records) and filling in the data or by importing the data.

You can also edit the data you insert when you insert it.

Insert New Records

To insert a new record:

Procedure

Step 1

In the Bulk Configuration > Insert menu, select the name of the data table to which you want to add records. The appropriate Insert window opens, automatically displaying one new row.

Step 2

To create additional rows, enter the number of additional rows in the Quantity field and click Insert. The additional rows are added in the Insert window.

Step 3

Enter the data in the rows:

  1. If you want to edit individual fields in the new rows, type the information you want in each of the fields and skip to Step 8.

  2. If you want to edit a column in multiple rows so that a range of values is entered, continue to Step 4.

    Note 

    For other ways of entering data into multiple rows, see Edit Range of Data

Step 4

Select the rows in the column you want to modify.

Step 5

Click Edit Range. The Edit Range dialog appears.

Step 6

Enter a prefix (optional), the start value for the range, and a suffix (optional). The generated values are listed in the dialog.

Step 7

Click OK to close the Edit Range dialog and apply the values to the column you selected.

Step 8

When you have finished setting fields in the new rows, press Enter to apply your changes to the Unified CCE database.

Note 
You can leave empty rows, the system ignores them. No changes are made to the database until you press Enter.

Import Data

You can import data from a specified text file into the opened database table. You can import whole records or only columns of data if the data matches (see Step 3 of the following procedure). The process cancels if any error occurs during the import process.

Procedure

Step 1

In the Insert or Edit window, click Import.

Step 2

In the Import dialog, click File.

Step 3

In the File Open dialog, select the file containing the data that you want to import and click Open.

The Import File Data area displays the first few lines of the opened file.

  • When importing data in the Edit mode, the following rules apply:

    • The Bulk Configuration tool reads only those records whose primary key values match those of records in the Edit window.

      If a record does not match the primary key value, the record is considered to be an error and a message box with the primary key value pops up to ask you to correct the problem.

    • If any field in the import record is null, the corresponding field value in the grid window become blank for an edit cell or uses the default value for a drop-down list cell.

    • If any field is missing in the import file, the corresponding field in the Edit window remains unchanged.

    • If there is a larger number of records in the file to be imported than the number of rows in the grid, it is considered an error and a message box pops up asking you to correct it.

    • If there is a duplicated primary key in the file to be imported, it is considered an error and a message box with the duplicated primary key value pops up asking you to correct it.

    • After importing, all records imported (including records marked for deletion in the grid) are marked as "Changed" regardless of whether the value is changed or not.

    • After importing, the records display in index order (ordered by logical keys). If you did not sort before importing, the order appears the same after the import.

  • When importing data in the Insert mode, the following rules apply:

    • Only a single import is supported and any existing rows are removed from the grid. When you click Import, the following message box pops up if there is any record in the grid:

      All the existing data will be replaced by the data to be imported. If you want to retain the current data on the grid please click the Cancel button then save or export the existing data. Click the OK button to proceed with the importing.

    • After importing, all rows are marked as "New" and the ordering is the same as that in the file imported from.

    • In the Import Insert mode, the tool reads only those records whose primary key values are not presented. If the primary key field is selected for file to be imported, it is considered an error and a message box with the primary key field name pops up asking you to correct the problem.

    • If any field in the import record is null, the corresponding field value in the grid window becomes blank for an edit cell or uses the default value for a drop-down list cell.

      Note 
      If headers are included in the imported file, the Add and Remove buttons are not enabled and you can only import the records as a whole. In that case, skip to Step 6.
Step 4

If the imported data does not contain headers, in the Available Fields list box, select the names of the fields to import that match the data and click Add.

Step 5

To change the order of the columns, select a column and move it within the list by clicking Up or Down.

Step 6

Click OK. The data is imported into the data table.


Data File Format

The import and export files used by the Bulk Configuration tool can optionally include a header that identifies the table and columns in the file. The header is followed by one line for each row of data.

The following rules apply to file headers:

  • A line beginning with a number sign (#) is a comment and is ignored.

  • Blank lines are also ignored.

  • The header content is indicated by a line beginning with two underline characters and the word TABLE or COLUMNS. The following line contains the name of the table or the name of the columns. For example:

    __TABLE

    Call_Type __

    COLUMNS

    CallTypeID EnterpriseName Description Deleted CustomerDefinitionID

  • All column names must be on a single line and are separated by Tab characters.

    The following rules apply to the data in the files:

    • One row of table data per line.

    • Column values must be in the same order in all rows. If columns are specified in the header, the columns in the data rows must be in the same order.

    • Column values are separated by a single Tab character.

    • Fields intentionally left blank must be represented by two adjacent Tab characters or a Tab character at the end of a line. On import, the default value is used for such a value.

    • String values may include spaces.

    • An error occurs on import if a line contains too few or too many values.


    Note

    A simple way to create the import file with a valid format is to use Excel and save the file as Text (Tab delimited) (*.TXT).

Export Function

The export function saves the selected records or fields to a tab-delimited text file that you can import into the Unified ICM database or into a database tool such as Microsoft Excel. If any error occurs during the export process, the process is cancelled.

Export Data

To export data, follow these steps:

Procedure


Step 1

Select the rows with fields you want to export.

Note 

If you intend to import this data into the Edit window, you must export a primary key field along with any other fields. The primary key field has the same column name as the database table name.

Note 

All rows selected (including records marked for deletion) are exported.

Step 2

Click Export.

Step 3

Select the Header option if you want to include a header containing the table name and column names in the output file. Including the header clarifies the content of the file.

Step 4

In the Export dialog, select the columns you want to export and click Add or AddAll.

Step 5

To change the order of the columns to export, select one of them and move it within the list by clicking Up or Down.

Step 6

Click File and specify the file name and directory to which to save the data.

Step 7

Click OK.


Record deletion and undeletion

You can delete one or more records at a time and you can undelete records marked for deletion.

Delete a Record

To delete records, follow these steps:

Procedure

Step 1

Select the rows to be deleted.

Note 
Selecting a range of fields in a column selects all the rows those fields belong to.
Step 2

Click Delete. The selected rows are marked for deletion.

Step 3

Click Save. The rows marked for deletion are deleted from the database.


Note

You can no longer undelete records marked for deletion after you save your changes to the database.

Undelete a Record

To undelete a record:

Procedure

Step 1

Select the rows marked for deletion.

Step 2

Click Undelete. The deletion mark is removed from the records.

Step 3

Click Save. The change is saved to the database.