Hotspot 2.0

Introduction to Hotspot 2.0

The Hotspot 2.0 feature enables IEEE 802.11 devices to interwork with external networks. The interworking service aids network discovery and selection, enabling information transfer from external networks. It provides information to the stations about the networks before association.

Interworking not only helps users within the home, enterprise, and public access domains, but also assists manufacturers and operators to provide common components and services for IEEE 802.11 customers. These services are configured on a per-WLAN basis on the Cisco Wireless Controller (controller).

Hotspot 2.0, also known as HS2 and Wi-Fi Certified Passpoint, is based on the IEEE 802.11u and Wi-Fi Alliance Hotspot 2.0 standards. It seeks to provide better bandwidth and services-on-demand to end users. The Hotspot 2.0 feature allows mobile devices to join a Wi-Fi network automatically, including during roaming, when the devices enter the Hotspot 2.0 area.

The Hotspot 2.0 feature has four distinct parts:

  • Hotspot 2.0 Beacon Advertisement: Allows a mobile device to discover Hotspot 2.0-compatible and 802.11u-compatible WLANs.

  • Access Network Query Protocol (ANQP) Queries: Sends queries about the networks from IEEE 802.11 devices, such as network type (private or public); connectivity type (local network, internet connection, and so on), or the network providers supported by a given network.

  • Online Sign-up: Allows a mobile device to obtain credentials to authenticate itself with the Hotspot 2.0 or WLAN.

  • Authentication and Session Management: Provides authentication (802.1x) and management of the STA session (session expiration, extension, and so on).

In order to mark a WLAN as Hotspot 2.0-compatible, the 802.11u-mandated information element and the Hotspot 2.0 information element is added to the basic service set (BSS) beacon advertised by the corresponding AP, and in WLAN probe responses.


Note


The Hotspot 2.0 feature supports only local mode or FlexConnect mode (central switching and central authentication).

FlexConnect local switching is only supported when the Open Roaming configuration template is set up using the wireless hotspot anqp-server server-name type open-roaming command. If the configuration diverges from this template, FlexConnect local switching will not be supported.


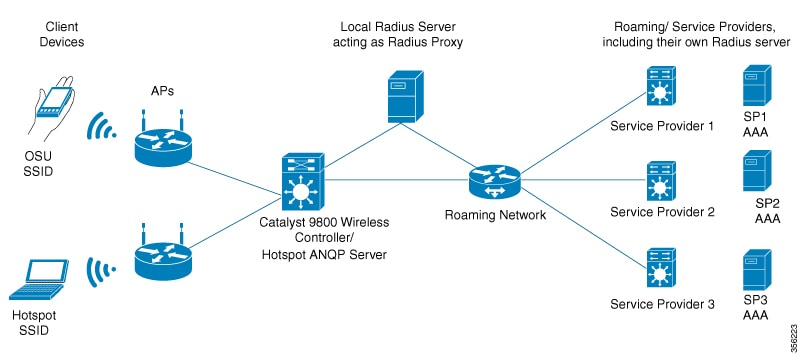
The following figure shows a standard deployment of the Hotspot 2.0 network architecture:

Figure 1. Hotspot 2.0 Deployment Topology

Hotspot 2.0 Enhancements

From Cisco IOS XE Amsterdam 17.3.1, the Hotspot 2.0 feature has been enhanced with the following options:

  • New ANQP elements:

    • Advice of charge: Provides information on the financial charges for using the SSID of the NAI realm

    • Operator icon metadata

    • Venue URL: Defines an optional URL for each of the configured venue names

  • Introduction of Terms and Conditions: This requires a user to accept certain Terms and Conditions before being allowed internet access, after connecting to a Hotspot SSID.

  • Integration of OSEN security and WPA2 security on the same SSID.

From Cisco IOS XE Amsterdam 17.3.1 onwards, two encryption methods are supported on a single SSID, namely WPA2 802.1x for Hotspot 2.0 and OSEN for online sign-up. Based on the type of encryption selected during client association, the client will be put on Hotspot 2.0 VLAN or online sign-up VLAN.

In WPA2 802.1x authentication, a client should match the credentials provisioned on a device. In online sign-up, a service provider WLAN is used by a client to perform online sign-up. For Hotspot 2.0 SSIDs, the RADIUS server enforces the terms and conditions before allowing internet connectivity to clients.

This release also supports OSEN-specific VLAN in a policy profile. If an OSEN VLAN is defined in a policy profile, OSEN clients are added to the VLAN. Otherwise, clients are added to the regular policy profile VLAN or to the default VLAN. If OSEN is enabled with WPA2 on an SSID, it is mandatory to define an OSEN VLAN in the policy profile. Otherwise, clients cannot join the VLAN.

In FlexConnect mode, if an OSEN VLAN is defined in a policy profile, the same VLAN needs to be added to the flex profile. Failing to do so excludes the clients from the VLAN.


Note


When Hotspot 2.0 is enabled in a WLAN, the Wi-Fi direct clients that support cross-connect feature should not be allowed to associate to the Hotspot 2.0 WLAN. To make sure this policy is enforced, ensure that the following configuration is in place:

wlan <wlan-name> <wlan-name> <ssid>
wifi-direct policy xconnect-not-allow

Restrictions

  • Clients are excluded if an OSEN VLAN is not added to a flex profile.

  • In FlexConnect mode, clients are excluded if an OSEN VLAN is not added in a flex profile.

  • In FlexConnect deployments, the URL filter should reference an existing URL filter (configured using the urlfilter list urlfilter-name command). Otherwise, a client is added to the excluded list, after authentication.

  • Only central authentication is supported.

  • Fragmented ANQP replies are not synchronized to the standby controller in high-availability mode. Therefore, clients have to re-issue a query if there is a switchover.

Open Roaming

From Cisco IOS XE Amsterdam Release 17.2.1, the controller supports open roaming configuration, which enables mobile users to automatically and seamlessly roam across Wi-Fi and cellular networks.

The new configuration template of the open roaming ANQP server simplifies the task of setting up a Hotspot 2.0 ANQP server. When you configure open roaming, fixed ANQP parameters are automatically populated.

You can configure different identity types by defining roaming organizational identifiers. The organizational unique identifier (OUI) is a three-octet number that identifies the type of organizations available in a given roaming consortium. The OUI list determines the type of identities allowed to roam into the network. The default configuration allows all the identities on the access network. However, access networks can customize the Roaming Consortium Organization Identifier (RCOI) they advertise.

You can configure three types of policies for access networks:

  • Allow all: Accepts users from any identity provider (IDP), with any privacy policy.

  • Real ID: Accepts users from any IDP, but only with a privacy policy that shares real identity (anonymous not accepted).

  • Custom: Accepts users of select identity types and privacy policies associated with the identity types; basically all the other RCOIs.

Users can select the following privacy modes:

  • Anonymous

  • Share real identity

The list of currently defined organizational identifiers and their aliases are given in the following table.

Table 1. Roaming Organizational Identifiers and Aliases

Description

Roaming Organizational Identifier

WBA Value

Display Name

All

004096

5A03BA0000

All

All with real ID

00500b

5A03BA1000

All with real-id only

All paid members

00500f

BAA2D00000

All paid

Device manufacturer all ID

00502a

5A03BA0A00

Device Manufacturer

Device manufacturer real ID only

0050a7

5A03BA1A00

Device Manufacturer real-id

Cloud or Social ID

005014

5A03BA0200

Cloud ID

Cloud or Social real ID

0050bd

5A03BA1200

Cloud ID real-id

Enterprise Employee ID

00503e

5A03BA0300

Enterprise ID

Enterprise Employee real ID

0050d1

5A03BA1300

Enterprise ID real ID

Enterprise Customer ID

005050

-

Enterprise Customer program ID

Enterprise Customer real ID

0050e2

-

Enterprise Customer program real ID

Loyalty Retail ID

005053

5A03BA0B00

Loyalty Retail

Loyalty Retail real ID

0050f0

5A03BA1B00

Loyalty Retail real ID

Loyalty Hospitality ID

005054

5A03BA0600

Loyalty Hospitality

Loyalty Hospitality real ID

00562b

5A03BA1600

Loyalty Hospitality real ID

SP free Bronze Qos

005073

5A03BA0100

SP free Bronze Qos

SP free Bronze Qos Real ID

0057D2

5A03BA1100

SP free Bronze Qos Real ID

SP paid Bronze QoS

-

BAA2D00100

SP paid Bronze QoS

SP paid Bronze QoS real ID

-

BAA2D01100

SP paid Bronze QoS real ID

SP paid Silver QoS

-

BAA2D02100

SP paid Silver QoS

SP paid Silver QoS real ID

-

BAA2D03100

SP paid Silver QoS real ID

SP paid Gold QoS

-

BAA2D04100

SP paid Gold QoS

SP paid Gold QoS real ID

-

BAA2D05100

SP paid Gold QoS real ID

Government ID free

-

5A03BA0400

Government ID free

Automotive ID free

-

5A03BA0500

Automotive ID free

Automotive Paid

-

BAA2D00500

Automotive Paid

Education or Research ID free

-

5A03BA0800

Education or Research ID free

Cable ID free

-

5A03BA0900

Cable ID free

Configuring Hotspot 2.0

Configuring an Access Network Query Protocol Server

The Access Network Query Protocol Server (ANQP) is a query and response protocol that defines the services offered by an AP, usually at a Wi-Fi Hotspot 2.0.


Note


When configuring roaming-oi in the ANQP server, ensure that you set the beacon keyword for at least one roaming-oi, as mandated by the 802.11u standard.


Procedure

  Command or Action Purpose

Step 1

configure terminal

Example:

Device# configure terminal

Enters global configuration mode.

Step 2

wireless hotspot anqp-server server-name

Example:

Device(config)# wireless hotspot anqp-server my_server

Configures a Hotspot 2.0 ANQP server.

Step 3

description description

Example:

Device(config-wireless-anqp-server)# description "My Hotspot 2.0"

Adds a description for the ANQP server.

Step 4

3gpp-info mobile-country-code mobile-network-code

Example:

Device(config-wireless-anqp-server)# 3gpp-info us mcc 

Configures a 802.11u Third Generation Partnership Project (3GPP) cellular network.

The mobile-country-code should be a 3-digit decimal number. The mobile-network-code should be a 2-digit or 3-digit decimal number.

Step 5

anqp fragmentation-threshold threshold-value

Example:

Device(config-wireless-anqp-server)# anqp fragmentation-threshold 100

Configures the ANQP reply fragmentation threshold, in bytes.

The ANQP protocol can be customized by setting the fragmentation threshold, after which the ANQP reply is split into multiple messages.

Note


We recommend that you use the default values for the deployment.

Step 6

anqp-domain-id domain-id

Example:

Device(config-wireless-anqp-server)# anqp-domain-id 100

Configures the Hotspot 2.0 ANQP domain identifier.

Step 7

authentication-type { dns-redirect | http-https-redirect | online-enrollment | terms-and-conditions}

Example:

Device(config-wireless-anqp-server)# authentication-type online-enrollment    

Configures the 802.11u network authentication type. Depending on the authentication type, a URL is needed for HTTP and HTTPS.

Step 8

connection-capability ip-protocol port-number { closed| open| unknown}

Example:

Device(config-wireless-anqp-server)# connection-capability 12 40 open

Configures the Hotspot 2.0 protocol and port capabilities.

Note


Hotspot 2.0 specifications require that you predefine some open ports and protocols. Ensure that you meet these requirements in order to comply with the Hotspot 2.0 specifications. See the connection-capability command in the Cisco Catalyst 9800 Series Wireless Controller Command Reference document for a list of open ports and protocols.

Step 9

domain domain-name

Example:

Device(config-wireless-anqp-server)# domain my-domain

Configures an 802.11u domain name. You can configure up to 32 domain names. The domain-name should not exceed 220 characters.

Step 10

ipv4-address-type ipv4-address-type

Example:

Device(config-wireless-anqp-server)# ipv4-address-type public

Configures an 802.11u IPv4 address type in the Hotspot 2.0 network.

Step 11

ipv6-address-type ipv6-address-type

Example:

Device(config-wireless-anqp-server)# ipv6-address-type available

Configures an 802.11u IPv6 address type in the Hotspot 2.0 network.

Step 12

nai-realm realm-name

Example:

Device(config-wireless-anqp-server)# nai cisco.com 

Configures an 802.11u NAI realm profile that identifies the realm that is accessible using the AP.

Step 13

operating-class class-id

Example:

Device(config-wireless-anqp-server)# operating-class 25

Configures a Hotspot 2.0-operating class identifier.

Step 14

operator operator-name language-code

Example:

Device(config-wireless-anqp-server)# operator XYZ-operator eng

Configures a Hotspot 2.0 operator-friendly name in a given language. Use only the first three letters of the language, in lower case, for the language code. For example, use eng for English.

To see the full list of language codes, go to: http://www.loc.gov/standards/iso639-2/php/code_list.php.

Note


You can configure only one operator per language.

Step 15

osu-ssid SSID

Example:

Device(config-wireless-anqp-server)# osu-ssid test

Configures the SSID that wireless clients will use for OSU.

The SSID length can be up to 32 characters.

Step 16

roaming-oi OI-value [ beacon]

Example:

Device(config-wireless-anqp-server)# roaming-oi 24 beacon

Configures the 802.11u roaming organization identifier.

If the beacon keyword is specified, the roaming OUI is advertised in the AP WLAN beacon or probe response. Otherwise, it will only be returned while performing the roaming OUI ANQP query.

Note


The hex string of a roaming OUI should contain only lowercase letters.

Step 17

venue venue-name language-code

Example:

Device(config-wireless-anqp-server)# venue bank eng 

Configures the 802.11u venue information.

The venue-name should not exceed 220 characters and the language-code should only be 2 or 3 lowercase letters (a-z) in length.

Configuring ANQP Global Server Settings (GUI)

Procedure


Step 1

Choose Configuration > Wireless > Hotspot/OpenRoaming.

Step 2

Select an existing server from the list of servers.

Step 3

Click the Server Settings tab.

Step 4

Go to the Global Server Settings section.

Step 5

From the IPv4 Type drop-down list, choose an IPv4 type.

Step 6

From the IPv6 Type drop-down list, choose an IPv6 type.

Step 7

In the OSU SSID field, enter the SSID that wireless clients will use for Online Sign-Up (OSU).

Step 8

Click the Show Advanced Configuration link to view the advanced options.

  • In the Fragmentation Threshold (bytes) field, enter the fragmentation threshold.

    Note


    Packets that are larger than the size you specify here will be fragmented.

  • In the GAS Request Timeout (ms) field, enter the number of Generic Advertisement Services (GAS) request action frames sent that can be sent to the controller by an AP in a given interval.

Step 9

Click Apply to Device.


Configuring Open Roaming (CLI)

The new configuration template of the open roaming ANQP server simplifies the task of setting up a Hotspot 2.0 ANQP server. When you configure open roaming using this template, default ANQP parameters are automatically populated. The default values defined in the template always override any user-defined configuration values. For example, these are the default values enforced with the type open-roaming template:
  • nai-realm open.openroaming.org

  • eap-method eap-tls

  • eap-method eap-ttls

  • inner-auth-non-eap mschap-v2

  • inner-auth-non-eap pap

  • eap-method eap-aka

You can add more fields to the existing template, but ensure that they do not overlap with the existing default values. Also, if you change any of these default values, you will need to re-configure every time you enter in anqp type open-roaming config.

Procedure

  Command or Action Purpose

Step 1

configure terminal

Example:

Device# configure terminal

Enters global configuration mode.

Step 2

wireless hotspot anqp-server server-name type open-roaming

Example:

Device(config)# wireless hotspot anqp-server my-server type open-roaming

Configures a Hotspot 2.0 ANQP server with open roaming.

Step 3

open-roaming-oi alias

Example:

Device(config-wireless-anqp-server)# open-roaming-oi allow-all

Sets the open roaming element alias.

Step 4

domain domain-name

Example:

Device(config)# domain my-domain

Configures a preferred domain name to ensure that clients roam into a preferred network.

You can configure up to 32 domain names. The domain-name should not exceed 220 characters.

Configuring Open Roaming (GUI)

Procedure


Step 1

Choose Configuration > Wireless > Hotspot/OpenRoaming.

Step 2

Click Add.

The Add New ANQP Server window is displayed.

Step 3

In the Name field, enter a name for the server.

Step 4

In the Description field, enter a description for the server.

Step 5

Check the OpenRoaming Server check box to use the server as an open roaming server.

Note


You can set the server as an open roaming server only at the time of server creation.

Step 6

Check the Internet Access check box to enable internet access for the server.

Step 7

From the Network Type drop-down list, choose the network type.

Step 8

Click Apply to Device.


Configuring NAI Realms (GUI)

Procedure


Step 1

Choose Configuration > Wireless > Hotspot/OpenRoaming.

Step 2

Select an existing server from the list of servers.

Step 3

Go to the NAI Realms section.

Step 4

Click Add.

The Add NAI Realm window is displayed.

Step 5

In the NAI Realm Name field, enter an 802.11u NAI realm of the OSU operator.

Step 6

In the EAP Methods section, use the toggle button to enable the required EAP methods.

After an EAP method is enabled, a pane is displayed to configure the details. Users are shown a configuration section where they can enable credential, inner-auth-eap, inner-auth-non-eap, tunneled-eap-credential. The user can select multiple options for each of the configuration.

  • The Credential window has options such as certificate, hw-token, nfc, none, sim, softoken, username-password, and usim. Check the corresponding check box.

  • The inner-auth-eap window has options such as eap-aka, eap-fast, eap-sim, eap-tls, eap-ttls, eap-leap, and eap-peap. Check the corresponding check box.

  • The inner-auth-eap window has options such as eap-aka, eap-fast, eap-sim, eap-tls, eap-ttls, eap-leap, and eap-peap. Check the corresponding check box.

  • The tunneled-eap-credential window has options such as anonymous, certificate, hw-token, nfc, sim, softoken, username-password, and usim. Check the corresponding check box.

  • Click Save.

Step 7

Click Apply to Device.


Configuring Organizational Identifier Alias (GUI)

Procedure


Step 1

Choose Configuration > Wireless > Hotspot/OpenRoaming.

Step 2

Select an existing server from the list of servers.

Step 3

In the Roaming OIs area, enter an 802.11u roaming organization identifier in the Roaming OI field.

Step 4

Check the Beacon State check box to enable the beacon.

If the beacon is specified, the roaming OUI is advertised in the AP WLAN beacon or probe response. Otherwise, it will only be returned while performing the roaming OUI ANQP query.

Note


Only three OUIs can be enabled in the beacon state.

Step 5

Click Add to add a roaming OI.

Step 6

In the Available OpenRoaming OI window, a list of organizational identifiers are displayed, along with the ones you have added. Select an organizational identifier and click the right arrow to add an OpenRoaming OI.

Step 7

In the Domains area, enter an 802.11u domain name in the Domain Name field.

Step 8

Click Add to use the domain name that you have entered as the preferred domain.

Step 9

Click Apply to Device.


Configuring WAN Metrics (GUI)

Procedure


Step 1

Choose Configuration > Wireless > Hotspot/OpenRoaming.

Step 2

Select an existing server from the list of servers.

Step 3

Click the Server Settings tab.

Step 4

Go to the WAN Metrics area.

Step 5

In the Downlink Load field, enter the WAN downlink load.

Step 6

In the Downlink Speed (kbps) field, enter the WAN downlink speed, in kbps.

Step 7

In the Load Duration (100ms) field, enter the load duration.

Step 8

In the Upload Load field, enter the WAN upload load.

Step 9

In the Upload Speed (kbps) field, enter the WAN upload speed, in kbps.

Step 10

From the Link Status drop-down list, choose the link status.

Step 11

Use the Full Capacity Link toggle button to enable the WAN link to operate at its maximum capacity.

Step 12

Click Apply to Device.


Configuring WAN Metrics

This procedure shows you how to configure the Wide Area Network (WAN) parameters such as uplink and downlink speed, link status, load, and so on.

Procedure

  Command or Action Purpose

Step 1

configure terminal

Example:

Device# configure terminal

Enters global configuration mode.

Step 2

wireless hotspot anqp-server server-name

Example:

Device(config)# wireless hotspot anqp-server my_server

Configures a Hotspot 2.0 ANQP server.

Step 3

wan-metrics downlink-load load-value

Example:

Device(config-wireless-anqp-server)# wan-metrics downlink-load 100

Configures the WAN downlink load.

Step 4

wan-metrics downlink-speed speed

Example:

Device(config-wireless-anqp-server)# wan-metrics downlink-speed 1000

Configures the WAN downlink speed, in kbps.

Step 5

wan-metrics full-capacity-link

Example:

Device(config-wireless-anqp-server)# wan-metrics full-capacity-link 

Configures the WAN link to operate at its maximum capacity.

Step 6

wan-metrics link-status { down| not-configured| test-state| up}

Example:

Device(config-wireless-anqp-server)# wan-metrics link-status down  

Sets the WAN link status.

Step 7

wan-metrics load-measurement-duration duration

Example:

Device(config-wireless-anqp-server)# wan-metrics 
load-measurement-duration 100  

Configures the uplink or downlink load measurement duration.

Step 8

wan-metrics uplink-load load-value

Example:

Device(config-wireless-anqp-server)# wan-metrics uplink-load 100

Configures the WAN uplink load.

Step 9

wan-metrics uplink-speed speed

Example:

Device(config-wireless-anqp-server)# wan-metrics uplink-speed 1000

Configures the WAN uplink speed, in kbps.

Configuring Beacon Parameters (GUI)

Procedure


Step 1

Choose Configuration > Wireless > Hotspot/OpenRoaming.

Step 2

Select an existing server from the list of servers.

Step 3

Click Server Settings tab.

Step 4

Go to the Beacon Parameters section.

Step 5

In the Hess id field, enter the homogenous extended service set identifier. The Hess ID can be either in xx:xx:xx:xx:xx:xx, xx-xx-xx-xx-xx-xx, or xxxx.xxxx.xxxx format.

Step 6

In the Domain id field, enter the domain's identifier.

Step 7

From the Venue Type drop-down list, select the venue.

Choosing a venue activates the subvenue type.

Step 8

From the subvenue-type drop-down list, select the sub-venue.

Step 9

Click Apply to Device.


Configuring Authentication and Venue (GUI)

Procedure


Step 1

Choose Configuration > Wireless > Hotspot/OpenRoaming.

Step 2

Select an existing server from the list of servers.

Step 3

Click the Authentication/Venue tab.

Step 4

Under the Network Auth Types section, check the DNS Redirect, Online Enrolment, HTTP/HTTPS Redirect, Terms and Conditions check boxes.

For HTTP/HTTPS Redirect and Terms and Conditions, the URL field is enabled after selecting them.

Step 5

Add the URL for the corresponding authentication type.

Step 6

Click Apply.

Step 7

Go to the Venues section and click Add.

The Venue Details pane is displayed.

Step 8

In the Language Code field, enter the language code.

Use the first two or three letters of the language, in lower case, for the language code. For example, use eng for English. To see the full list of language codes, go to: http://www.loc.gov/standards/iso639-2/php/code_list.php.

Step 9

In the Venue URL field, enter the URL of the venue.

Step 10

In the Venue Name field, enter the name of the venue.

Step 11

Click check mark icon to add the venue details.

Step 12

Go to the Connection Capability section and click Add.

The Connection Capabilities pane is displayed. See the connection-capability command in the Cisco Catalyst 9800 Series Wireless Controller Command Reference document for a list of open ports and protocols.

Step 13

In the Port Number field, enter the port number.

Step 14

From the Connection Status drop-down list, choose a connection status.

Step 15

In the IP Protocol field, enter the IP protocol number.

Hotspot 2.0 specifications require that you predefine some open ports and protocols. Ensure that you meet these requirements in order to comply with the Hotspot 2.0 specifications. See the connection-capability command in the Cisco Catalyst 9800 Series Wireless Controller Command Reference document for a list of open ports and protocols.

Step 16

Click the check mark icon to add the connection details.

Step 17

Click Apply to Device.


Configuring 3GPP/Operator (GUI)

Procedure


Step 1

Choose Configuration > Wireless > Hotspot/OpenRoaming.

Step 2

Select an existing server from the list of servers.

Step 3

Go to the 3GPP/Operator tab.

Step 4

In the Operating Class Indicator field, enter the operating class identifier and click the + icon.

The operating class identifier is added and displayed in the pane below. Use the delete icon to delete them, if required.

Note


Class IDs should be in the following ranges: 81-87, 94-96, 101-130, 180, and 192-254.

Step 5

Go to the 3GPP Cellular Networks section and click Add.

The 3GPP Network Details pane is displayed.

Step 6

In the Mobile Country Code (MCC) field, enter the mobile country code, which should be a 3-digit decimal number.

Step 7

In the Mobile Network Code (MNC) field, enter the mobile network code, which should be a 2 or 3-digit decimal number.

For the list of Mobile Country Codes (MCC) and Mobile Network Codes (MNC), see the following links: https://www.itu.int/pub/T-SP-E.212B-2018 or https://www.mcc-mnc.com.

Step 8

Click check mark icon to add the network details.

Step 9

Go to the Hotspot 2.0 Operators section and click Add.

The Operator Details pane is displayed.

Step 10

In the Language Code field, enter the language code.

Use only the first three letters of the language, in lower case, for the language code. For example, use eng for English. To see the full list of language codes, go to: http://www.loc.gov/standards/iso639-2/php/code_list.php.

Step 11

In the Name field, enter the name of the OSU operator.

Step 12

Click check mark icon to add the operator details.

Step 13

Click Apply to Device.


Configuring OSU Provider (GUI)

Procedure


Step 1

Choose Configuration > Wireless > Hotspot/OpenRoaming.

Step 2

Select an existing server from the list of servers.

Step 3

Go to the OSU Provider tab.

Step 4

Click Add.

The General Config pane is displayed.

Step 5

In the Provider Name field, enter the OSU provider name.

Step 6

In the NAI Realm field, enter the Network Access Identifier (NAI) realm of the OSU operator.

Step 7

From the Primary Method drop-down list, choose the primary supported OSU method of the OSU operator.

This activates the Secondary Method drop-down list. If you choose None as the primary supported OSU method, you will not get the secondary method.

Step 8

(Optional) From the Secondary Method drop-down list, choose the secondary supported OSU method of the OSU operator.

Step 9

In the Server URI field, enter the server Uniform Resource Identifier (URI) of the OSU operator.

Step 10

Click Icon Config tab.

Step 11

Click Add.

Step 12

From the Icon Name drop-down list, choose the icon name.

Step 13

Click Save.

Step 14

Click Friendly Names tab.

Step 15

Click Add.

Step 16

In the Language field, enter the language code.

Step 17

In the Name field, enter the name of the OSU operator.

Step 18

In the Description field, enter the description for the OSU operator.

Step 19

Click Save.

Step 20

Click the check mark icon to save.

Step 21

Click Apply to Device.


Configuring an Online Sign-Up Provider

Procedure

  Command or Action Purpose

Step 1

configure terminal

Example:

Device# configure terminal

Enters global configuration mode.

Step 2

wireless hotspot icon bootflash:system-file-name media-type language-code icon-width icon-height

Example:

Device(config)# wireless hotspot icon 
bootflash:logo1 image eng 100 200 

Configures an icon for Hotspot 2.0 and its parameters, such as media type, language code, icon width, and icon height.

Step 3

wireless hotspot anqp-server server-name

Example:

Device(config)# wireless hotspot anqp-server my_server

Configures a Hotspot 2.0 ANQP server.

Step 4

osu-provider osu-provider-name

Example:

Device(config-wireless-anqp-server)# osu-provider my-osu 

Configures a Hotspot 2.0 OSU provider name.

Step 5

name osu-operator-name lang-code description

Example:

Device(config-anqp-osu-provider)# name xyz-oper 
eng xyz-operator

Configures the name of the OSU operator in a given language.

The osu-operator-name and description should not exceed 220 characters. The language code should be 2 or 3 lower-case letters (a-z).

Step 6

server-uri server-uri

Example:

Device(config-anqp-osu-provider)# server-uri cisco.com

Configures the server Uniform Resource Identifier (URI) of the OSU operator.

Step 7

method { oma-dm| soap-xml-spp}

Example:

Device(config-anqp-osu-provider)# method oma-dm

Configures the primary supported OSU method of the OSU operator.

Step 8

nai-realm nai-realm

Example:

Device(config-anqp-osu-provider)# nai-realm cisco.com

Configures the Network Access Identifier (NAI) realm of the OSU operator.

The nai-realm should not exceed 220 characters.

Step 9

icon file-name

Example:

Device(config-anqp-osu-provider)# icon xyz.jpeg

Configures the icon for the OSU provider.

The file-name should not exceed 100 characters.

Configuring Hotspot 2.0 WLAN

Procedure

  Command or Action Purpose

Step 1

configure terminal

Example:

Device# configure terminal

Enters global configuration mode.

Step 2

wlan wlan-name wlan-id ssid

Example:

Device(config)# wlan hs2 1 hs2

Configures a WLAN and enters WLAN configuration mode.

Step 3

security wpa wpa2 gtk-randomize

Example:

Device(config-wlan)# security wpa 
wpa2 gtk-randomize

Configures random GTK for hole 196 mitigation.

Hole 196 is the name of WPA2 vulnerability.

Step 4

no shutdown

Example:

Device(config-wlan)# no shutdown

Enables the WLAN.

Configuring an Online Subscription with Encryption WLAN

Online subscription with Encryption (OSEN) WLAN is used to onboard a Hotspot 2.0 network (to get the necessary credentials) in a secure manner.


Note


You cannot apply a policy profile to the OSEN WLAN if a Hotspot 2.0 server is enabled on the WLAN.


Procedure

  Command or Action Purpose

Step 1

configure terminal

Example:

Device# configure terminal

Enters global configuration mode.

Step 2

wlan wlan-name wlan-id ssid

Example:

Device(config)# wlan hs2 1 hs2

Configures a WLAN and enters WLAN configuration mode.

Step 3

security wpa osen

Example:

Device(config-wlan)# security wpa osen

Enables WPA OSEN security support.

Note


OSEN and robust security network (RSN) are mutually exclusive. If RSN is enabled on a WLAN, OSEN cannot be enabled on the same WLAN.

Step 4

no shutdown

Example:

Device(config-wlan)# no shutdown

Enables the WLAN.

Attaching an ANQP Server to a Policy Profile

Procedure

  Command or Action Purpose

Step 1

configure terminal

Example:

Device# configure terminal

Enters global configuration mode.

Step 2

wireless profile policy policy-profile-name ssid

Example:

Device(config)# wireless profile 
policy policy-hotspot

Configures a policy profile.

Step 3

shutdown

Example:

Device(config-wireless-policy)# shutdown

Disables the policy profile.

Step 4

hotspot anqp-server server-name

Example:

Device(config-wireless-policy)# hotspot 
anqp-server my-server 

Attaches the Hotspot 2.0 ANQP server to the policy profile.

Step 5

no shutdown

Example:

Device(config-wireless-policy)# no shutdown

Enables the policy profile.

What to do next

Attach the policy profile to the WLAN to make the WLAN Hotspot 2.0 enabled.

Configuring Interworking for Hotspot 2.0

Procedure

  Command or Action Purpose

Step 1

configure terminal

Example:

Device# configure terminal

Enters global configuration mode.

Step 2

wireless hotspot anqp-server server-name

Example:

Device(config)# wireless hotspot anqp-server my_server

Configures a Hotspot 2.0 ANQP server.

Step 3

network-type allowed network-type internet-access{ allowed| forbidden}

Example:

Device(config-wireless-anqp-server)# network-type guest-private 
internet-access allowed

Configures a 802.11u network type.

Step 4

hessid HESSID-value

Example:

Device(config-wireless-anqp-server)# hessid 12.13.14

(Optional) Configures a homogenous extended service set.

Step 5

group venue-group venue-type

Example:

Device(config-wireless-anqp-server)# group business bank 

Selects a group type and venue type from the list of available options.

Configuring the Generic Advertisement Service Rate Limit

Procedure

  Command or Action Purpose

Step 1

configure terminal

Example:

Device# configure terminal

Enters global configuration mode.

Step 2

ap profile profile-name

Example:

Device(config)# ap profile hs2-profile

Configures an AP profile and enters AP profile configuration mode.

Step 3

gas-ap-rate-limit request-number interval

Example:

Device(config-ap-profile)# gas-ap-rate-limit 20 120  

Configures the number of Generic Advertisement Services (GAS) request action frames sent to the controller by an AP in a given interval.

Step 4

exit

Example:

Device(config-ap-profile)# exit 

Returns to global configuration mode.

Step 5

wireless hotspot gas-rate-limit gas-requests-to-process

Example:

Device(config)# wireless hotspot gas-rate-limit 100   

Configures the number of GAS request action frames to be processed by the controller.

Configuring Global Settings

Procedure


Step 1

Choose Configuration > Wireless > Hotspot/OpenRoaming > Global Settings.

Step 2

In the Gas Rate Limit (Requests per sec) field, enter the number of GAS request action frames to be processed by the controller.

Step 3

Go to the Icons Configuration area.

Step 4

Click Add.

The Add Global Icon window is displayed.

Step 5

From the System Path drop-down list, choose the path.

Step 6

In the Icon Name field, enter the icon name.

Step 7

In the Icon Type field, enter the icon type.

Step 8

In the Language Code field, enter the language code.

Step 9

In the Icon Height field, enter the icon height.

Step 10

In the Icon Width field, enter the icon width.

Step 11

Click Apply to Device.


Configuring Advice of Charge

Use the following procedure to configure the advice of charge information for using the SSID of the Network Access Identifier (NAI) realm.

Procedure

  Command or Action Purpose

Step 1

configure terminal

Example:

Device# configure terminal

Enters global configuration mode.

Step 2

wireless hotspot anqp-server server-name

Example:

Device(config)# wireless hotspot anqp-server my_server

Configures a Hotspot 2.0 ANQP server.

Step 3

advice-charge type

Example:

Device(config-wireless-anqp-server)# advice-charge data

Configures advice of charge for data usage.

Advice of charge provides information on the financial charges for using the SSID of the NAI realm.

Step 4

plan language currency info plan-info-file

Example:

Device(config-anqp-advice-charge)# plan eng eur info bootflash:plan_eng.xml 

Configures advice of charge information, which includes language, currency, and plan information.

Note


You can configure up to 32 plans.

Step 5

nai-realm nai-realm

Example:

Device(config-anqp-advice-charge)# nai-realm cisco 

Configures NAI realm for this advice of charge.

Note


You can configure up to 32 realms.

Configuring Terms and Conditions

Before you begin

Define a URL filter list, as shown in the following example:
urlfilter list <url-filter-name> 
    action permit 
    filter-type post-authentication 
    url <allow-url>

For information on configuring an URL list, see the Defining URL Filter List section.

Procedure

  Command or Action Purpose

Step 1

configure terminal

Example:

Device# configure terminal

Enters global configuration mode.

Step 2

wireless hotspot anqp-server server-name

Example:

Device(config)# wireless hotspot anqp-server my_server

Configures a Hotspot 2.0 ANQP server.

Step 3

terms-conditions filename file-name

Example:

Device(config-wireless-anqp-server)# terms-conditions filename xyz-file

Configures the terms and conditions filename for the clients.

Step 4

terms-conditions timestamp date time

Example:

Device(config-wireless-anqp-server)# terms-conditions timestamp 2020-02-20 20:20:20

Configures the terms and conditions timestamp.

Step 5

terms-conditions urlfilter list url-filter-list

Example:

Device(config-wireless-anqp-server)# terms-conditions urlfilter list filter-yy

Configures the terms and conditions URL filter list name.

Defining ACL and URL Filter in AP for FlexConnect

Procedure

  Command or Action Purpose

Step 1

configure terminal

Example:

Device# configure terminal

Enters global configuration mode.

Step 2

sequence-number permit udp any eq bootpc any eq bootps

Example:

Device(config-ext-nacl)# 10 permit udp any eq bootpc any eq bootps

Defines an extended UDP access list and sets the access conditions to match only the packets on a given port number of bootstrap protocol (BOOTP) clients from any source host to match only the packets on a given port number of the bootstrap protocol (BOOTP) server of a destination host.

Step 3

sequence-number permit udp any eq bootps any eq bootpc

Example:

Device(config-ext-nacl)# 20 permit udp any eq bootps any eq bootpc 

Defines an extended UDP access list to forward packets and sets the access conditions to match only the packets on a given port number of bootstrap protocol (BOOTP) server from any source host to match only the packets of a given port number of the bootstrap protocol (BOOTP) clients of a destination host.

Step 4

sequence-number permit udp any eq domain any eq domain

Example:

Device(config-ext-nacl)# 30 permit udp any eq domain any eq domain 

Defines an extended UDP access list to forward packets and sets the access conditions to match a destination host Domain Name Service (DNS) with only the packets from a given port number of the source DNS.

Step 5

sequence-number permit ip any host dest-address

Example:

Device(config-ext-nacl)# 40 permit ip any host 10.10.10.8 

Defines an extended IP access list to forward packets from a source host to a single destination host.

Step 6

sequence-number permit ip host dest-address any

Example:

Device(config-ext-nacl)# 50 permit ip host 10.10.10.8 any 

Defines an extended IP access list to forward packets from a single source host to a destination host.

Step 7

exit

Example:

Device(config-ext-nacl)# exit

Returns to global configuration mode.

Step 8

wireless profile flex flex-profile-name

Example:

Device(config)# wireless profile flex test-flex-profile

Configures a new FlexConnect policy and enters wireless flex profile configuration mode.

Step 9

acl-policy acl-policy-name

Example:

Device(config-wireless-flex-profile)# acl-policy acl_name

Configures an ACL policy.

Step 10

urlfilter list url-filter-name

Example:

Device(config-wireless-flex-profile)# urlfilter list urllist_flex

Applies the URL filter list to the FlexConnect profile.

Step 11

vlan-name prod-vlanID

Example:

Device(config-wireless-flex-profile)# vlan-name test-vlan 

Configures a production VLAN.

Ensure that filter-type post-authentication configuration is in place for the URL filter to work. For information on configuring URL filter list, see the Defining URL Filter List section of the chapter DNS-Based Access Control Lists.

Step 12

vlan-id prod-vlanID

Example:

Device(config-wireless-flex-profile-vlan)# vlan-id 10  

Creates a new production VLAN ID.

Step 13

vlan-name OSU-vlanID

Example:

vlan-name test-vlan 

Configures an OSU VLAN.

Step 14

vlan-id OSU-vlanID

Example:

vlan-id 20  

Creates an OSU VLAN ID.

Configuring an OSEN WLAN (Single SSID)

Procedure

  Command or Action Purpose

Step 1

configure terminal

Example:

Device# configure terminal

Enters global configuration mode.

Step 2

wlan wlan-name wlan-id ssid

Example:

Device(config)# wlan hs2 1 hs2

Configures a WLAN and enters WLAN configuration mode.

Step 3

no security ft over-the-ds

Example:

Device(config-wlan)# no security ft over-the-ds

Disables fast transition over the data source on the WLAN.

Step 4

no security ft adaptive

Example:

Device(config-wlan)# no security ft adaptive

Disables adaptive 11r.

Step 5

security wpa wpa2

Example:

Device(config-wlan)# security wpa wpa2

Enables WPA2 security.

Step 6

security wpa wpa2 ciphers aes

Example:

Device(config-wlan)# security wpa wpa2 ciphers aes

Enables WPA2 ciphers for AES.

Step 7

security wpa osen

Example:

Device(config-wlan)# security wpa osen

Enables WPA OSEN security support.

Step 8

no shutdown

Example:

Device(config-wlan)# no shutdown

Enables the WLAN.

Step 9

exit

Example:

Device(config-wlan)# exit

Returns to global configuration mode.

Step 10

wireless profile policy policy-profile-name ssid

Example:

Device(config)# wireless profile policy policy-hotspot

Configures a policy profile.

Step 11

hotspot anqp-server server-name

Example:

Device(config-wireless-policy)# hotspot anqp-server my-server 

Attaches the Hotspot 2.0 ANQP server to the policy profile.

Step 12

vlan vlan encryption osen

Example:

Device(config-wireless-policy)# vlan 10 encryption osen

Configures the VLAN ID with OSEN encryption for single SSID.

Verifying Hotspot 2.0 Configuration

Use the following show commands to verify the quality of service (QoS) and AP GAS rate limit.

To view whether a QoS map ID is user configured or the default one, use the following command:

Device# show ap profile <profile name> detailed

QoS Map                       : user-configured

To view the QoS map values used and their source, use the following command:

Device# show ap profile <profile name> qos-map  

QoS Map                       : default
DSCP ranges to User Priorities
 User Priority   DSCP low   DSCP high   Upstream UP to DSCP
-----------------------------------------------------------
             0          0           7                     0
             2         16          23                    10
             3         24          31                    18
             4         32          39                    26
             5         40          47                    34
             6         48          55                    46
             7         56          63                    48

DSCP to UP mapping exceptions
 DSCP   User Priority
---------------------
    0               0
    2               1
    4               1
    6               1
   10               2
   12               2
   14               2
   18               3
   20               3
   22               3

To view the AP rate limiter configuration, use the following command:

Device# show ap name AP0462.73e8.f2c0 config general | i GAS

GAS rate limit Admin status                     : Enabled
Number of GAS request per interval              : 30
GAS rate limit interval (msec)                  : 100

Verifying Client Details

To verify the wireless-specific configuration of active clients based on their MAC address, use the following command:

Device# show wireless client mac 001e.f64c.1eff detail
.
.
.
Hotspot version : Hotspot 2.0 Release 2
Hotspot PPS MO ID : 
Hotspot Terms and Conditions URL : http://host1.ciscohotspot.com/terms.php?addr=b8:27:eb:5a:dc:39&ap=123
.
.
.
Policy Type : OSEN (within RSN)
Resultant Policies:
  		VLAN Name        : VLAN0010
  		VLAN             : 10