Sensors
Cisco Spaces: IoT Explorer continually monitors data from the sensors attached to your assets—including battery levels, or telemetry data such as temperature or humidity. When any measure deviates from the norm established by your workflows, policies, and business rules, the solution swings into action. It can give you an immediate alert or, if you prefer, can trigger an automated action that is predefined by your workflows and business rules.
Once you have created your use case, you can include sensors to it in multiple ways.
Importing Sensors to Your Use Case Using a Template File
This task shows you how you can import sensors in bulk using a template (XLS) file.
Procedure
|
Step 1 |
From the Cisco Spaces: IoT Explorer: Active Use Cases, choose the newly created use case. |
|
Step 2 |
Navigate to Configure and in the Manage Sensors area, click Import Sensors. |
|
Step 3 |
In the Add Sensors page displayed, choose Bulk Import Sensors and click Next. |
|
Step 4 |
In the Add Sensors - Import Via Spreadsheet page, click Download Template Here to download the template file. |
|
Step 5 |
Fill the template file with the details of all the sensors that you want to import. |
|
Step 6 |
In the Add Sensors - Import Via Spreadsheet page, click Click here to browse or Drag a file to upload. Upload the edited template file. Click Import. |
You can see the imported sensors in the Sensor tab of this use case.
Importing Sensors to Your Use Case Using Location Hierarchy and Device Groups
This task shows you how you can import sensors from the Cisco Spaces Location Hierarchy. You can import sensors that are already on board the Cisco Spaces: IoT Service. You can also import sensors that are part of a device group. Although, you can only select those device groups that are within the scope of your location hierarchy.
Procedure
|
Step 1 |
From the Cisco Spaces: IoT Explorer: Active Use Cases, choose the newly created use case. |
|
Step 2 |
Navigate to Configure and in the Manage Sensors area, click Import Sensors. |
|
Step 3 |
In the Add Sensors page displayed, choose Setup Existing Sensor Filter Criteria. |
|
Step 4 |
Click Next. |
|
Step 5 |
In the Add Sensors – Set Up Filter Criteria: Select Locations page displayed, you can select locations to include in your use case. Click one of the following:
|
|
Step 6 |
Click Next. |
|
Step 7 |
In the Add Sensors – Set Up Filter Criteria: Select Device Groups page displayed, you can import only specific groups of devices from the selected locations to your use case. Click one of the following:
|
|
Step 8 |
Click Next. |
|
Step 9 |
Click Add Sensors. |
Adding Sensor Individually to Your Use Case
This task shows you how you can add a sensor individually to your use case, one by one. You can add a sensor that is already on board the Cisco Spaces: IoT Service location hierarchy.
Procedure
|
Step 1 |
From the Cisco Spaces: IoT Explorer: Active Use Cases, choose the newly created use case. |
|
Step 2 |
Navigate to Configure and in the Manage Sensors area, click Add individual Sensor. |
|
Step 3 |
In the Add Sensors page displayed, go to the TAG INFORMATION area, and select one of the tags types listed. |
|
Step 4 |
Fill the Device MAC address text field. |
|
Step 5 |
In the Asset Name text field, enter a preferred name for your sensor. |
|
Step 6 |
Click Save. |
|
Step 7 |
(Optional) Click Add Another Sensor to add more sensors to your use case. |
Viewing Sensors Added to Your Use Case
This task shows you how to view the list of sensors added to your use case. You can also view further details of the sensor such as:
-
Percentage of remaining battery
-
Last heard time of the sensor
-
Sensor location on the floor map
Procedure
|
Step 1 |
From the Cisco Spaces: IoT Explorer: Active Use Cases, choose the newly created use case. |
|
Step 2 |
Do one of the following:
In the Sensors Tab, you can view the following:
|
|
Step 3 |
Click a sensor to see further details of the sensor. If the sensor is part of the Cisco Spaces location hierarchy, then the Map Location tab contains the floor map where the sensor is located. |
Customizing Your View of Sensor List
You can customize your view of the list of sensors displayed for your use case.
Procedure
|
Step 1 |
From the Cisco Spaces: IoT Explorer: Active Use Cases, choose the newly created use case. |
|
Step 2 |
Do one of the following:
|
|
Step 3 |
Click a sensor to see further details of the sensor. If the sensor is part of the Cisco Spaces location hierarchy, then the Map Location tab contains the floor map where the sensor is located. |
|
Step 4 |
Click on the three dots near the title of any column to do one of the following:
|
|
Step 5 |
Once you have customized your view of the Sensor tab, you can save the view by clicking Save as a new view button that comes up. |
|
Step 6 |
You can also filter the view by certain parameters. |
Adding Custom Attributes to Sensors
You can add custom attributes to your sensor and monitor these attributes from a newly-added column on the Sensor tab.
Procedure
|
Step 1 |
From the Cisco Spaces: IoT Explorer: Active Use Cases, choose the newly created use case. |
|
Step 2 |
In the Configure tab Manage Sensors area, click Sensor Database. |
|
Step 3 |
In the Sensor Database page displayed, click Add Column. Do the following:
|
|
Step 4 |
Now navigate to the Sensors tab. You can see the newly added custom attribute displayed as column. 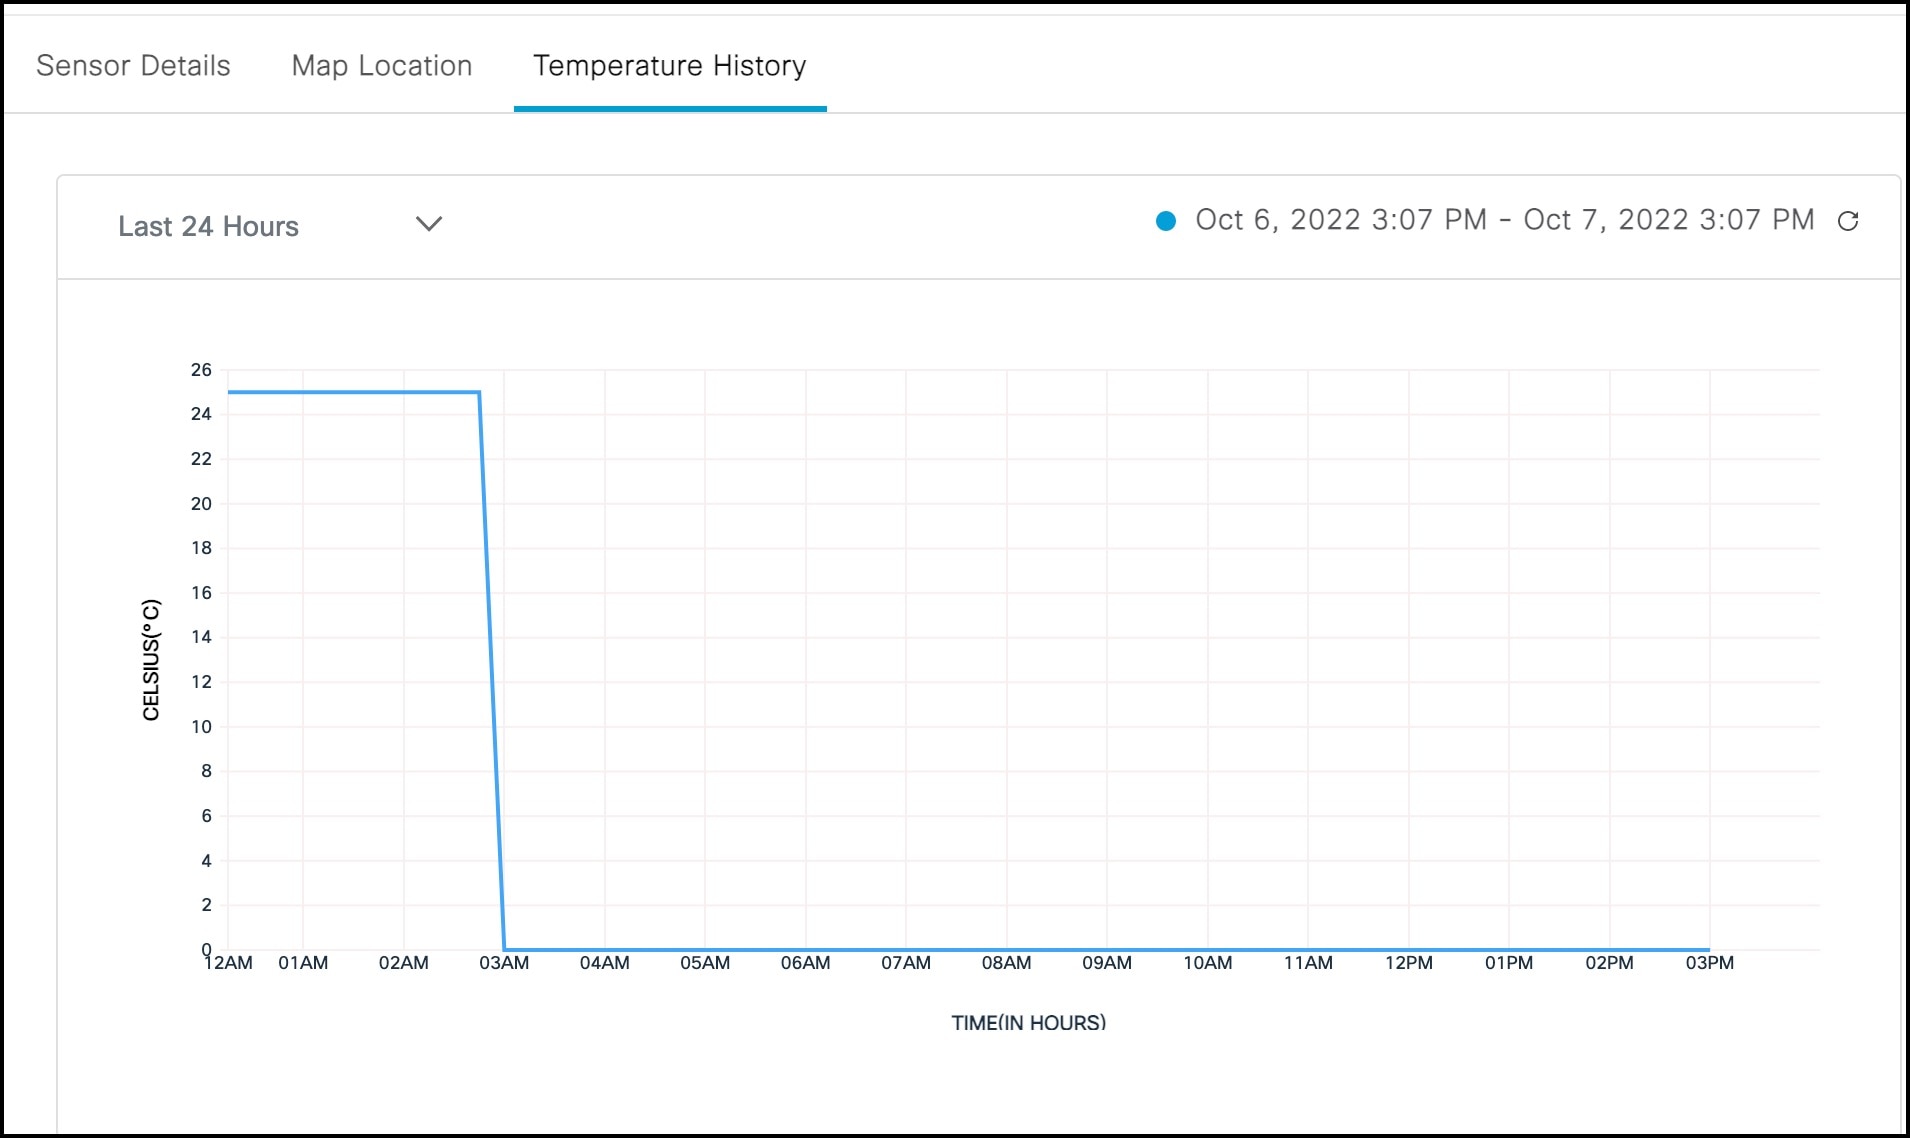 |
 Feedback