認証の概要
IEEE 802.1x サプリカントが実行されていないホスト システムでエンド ユーザーを認証するには、Web 認証プロキシとして知られている 認証機能を使用します。
 (注) |
Web ベース認証は、レイヤ 2 およびレイヤ 3 インターフェイス上に設定できます。 |
HTTP セッションを開始すると、認証は、ホストからの入力 HTTP パケットを代行受信し、ユーザーに HTML ログイン ページを送信します。ユーザーはクレデンシャルを入力します。このクレデンシャルは、認証機能により、認証のために認証、許可、アカウンティング(AAA)サーバーに送信されます。
認証に成功した場合、認証は、ログインの成功を示す HTML ページをホストに送信し、AAA サーバーから返されたアクセス ポリシーを適用します。
認証に失敗した場合、認証は、ログインの失敗を示す HTML ページをユーザーに転送し、ログインを再試行するように、ユーザーにプロンプトを表示します。最大試行回数を超過した場合、認証は、ログインの期限切れを示す HTML ページをホストに転送し、このユーザーは。
(注) |
Webauth クライアントの認証試行時に受信する traceback には、パフォーマンスや行動への影響はありません。これは、ACL アプリケーションの EPM に FFM が返信したコンテキストがすでにキュー解除済み(タイマーの有効期限切れの可能性あり)で、セッションが「未承認」になった場合にまれに発生します。 |
Web ページがホストされている場所に基づいて、ローカル Web 認証は次のように分類できます。
-
内部:ローカル Web 認証時に、 組み込みワイヤレスコントローラの内部デフォルト HTML ページ(ログイン、成功、失敗、および期限切れ)が使用されます。
-
カスタマイズ:ローカル Web 認証時に、カスタマイズされた Web ページ(ログイン、成功、失敗、および期限切れ)が 組み込みワイヤレスコントローラにダウンロードされ、使用されます。
-
外部:組み込みまたはカスタム Web ページを使用する代わりに、外部 Web サーバー上でカスタマイズされた Web ページがホストされます。
さまざまな Web 認証ページに基づき、Web 認証のタイプは次のように分類できます。
-
Webauth:これが基本的な Web 認証です。この場合、 組み込みワイヤレスコントローラはユーザー名とパスワードの入力が必要なポリシーページを提示します。ネットワークにアクセスするには、ユーザーは正しいクレデンシャルを入力する必要があります。
-
Consent または web-passthrough:この場合、コントローラは [Accept] ボタンまたは [Deny] ボタンが表示されたポリシー ページを提示します。ネットワークにアクセスするには、ユーザーは [Accept] ボタンをクリックする必要があります。
-
Webconsent:これは webauth と consent の Web 認証タイプの組み合わせです。この場合、 組み込みワイヤレスコントローラは、[Accept] ボタンまたは [Deny] ボタンがあり、ユーザー名とパスワードの入力が必要なポリシーページを提示します。ネットワークにアクセスするには、ユーザーは正しいクレデンシャルを入力して [Accept] ボタンをクリックする必要があります。
(注) |
|
(注) |
|
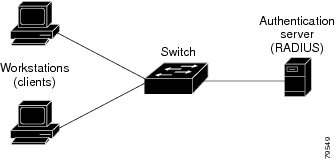
デバイスのロール
ローカル Web 認証では、ネットワーク上のデバイスに次のような固有の役割があります。
-
クライアント:ネットワークおよびコントローラへのアクセスを要求し、コントローラからの要求に応答するデバイス(ワークステーション)。このワークステーションでは、Java Script が有効な HTML ブラウザが実行されている必要があります。
-
認証サーバー:クライアントを認証します。認証サーバーはクライアントの ID を確認し、そのクライアントにネットワークおよびコントローラサービスへのアクセスを許可するか、そのクライアントを拒否するかをコントローラに通知します。
-
コントローラ:クライアントの認証ステータスに基づいて、ネットワークへの物理アクセスを制御します。コントローラはクライアントと認証サーバーとの仲介デバイス(プロキシ)として動作し、クライアントに識別情報を要求し、識別情報を認証サーバーで確認し、クライアントに応答をリレーします。
認証プロセス
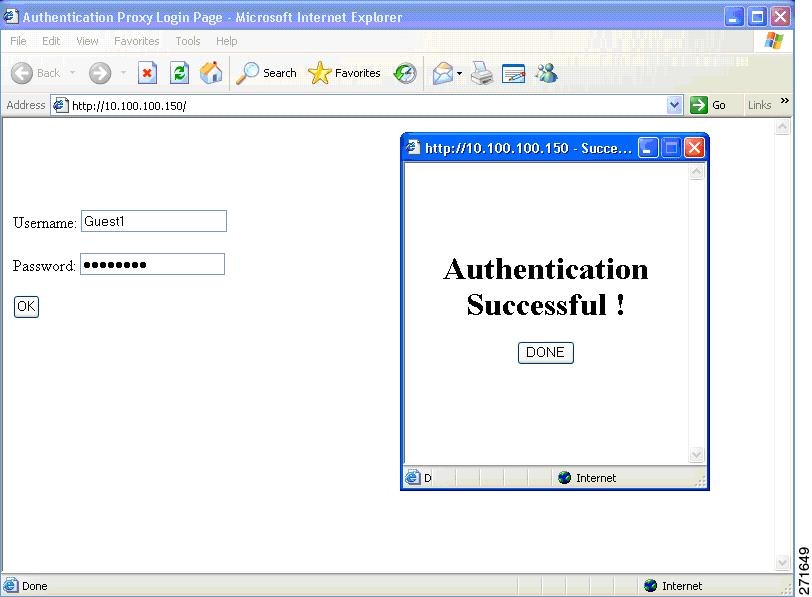
ローカル Web 認証を有効にすると、次のイベントが発生します。
-
ユーザーが HTTP セッションを開始します。
-
HTTP トラフィックが横取りされ、認証が開始されます。スイッチは、ユーザーにログイン ページを送信します。ユーザーはユーザー名とパスワードを入力します。スイッチはこのエントリを認証サーバーに送信します。
-
認証に成功した場合、スイッチは認証サーバーからこのユーザーのアクセス ポリシーをダウンロードし、アクティブ化します。ログインの成功ページがユーザーに送信されます
-
認証に失敗した場合は、スイッチはログインの失敗ページを送信します。ユーザーはログインを再試行します。失敗の回数が試行回数の最大値に達した場合、スイッチはログイン期限切れページを送信します。このホストはウォッチ リストに入れられます。ウォッチ リストのタイム アウト後、ユーザーは認証プロセスを再試行することができます。
-
認証サーバーを利用できない場合、Web 認証が再試行された後、クライアントは除外状態に移行し、クライアントに [Authentication Server is Unavailabble] ページが表示されます。
-
ホストがレイヤ 2 インターフェイス上の ARP プローブに応答しなかった場合、またはホストがレイヤ 3 インターフェイスでアイドル タイムアウト内にトラフィックを送信しなかった場合、スイッチはクライアントを再認証します。
-
クライアントにはすでに IP アドレスが割り当てられており、VLAN が変更された場合はクライアントの IP アドレスを変更できないため、Web 認証セッションは認証ポリシーの一部として新しい VLAN を適用できません。
-
Termination-Action が RADIUS である場合、この機能は、サーバーに NRH 要求を送信します。Termination-Action は、サーバーからの応答に含まれます。
-
Termination-Action がデフォルトである場合、セッションは廃棄され、適用されたポリシーは削除されます。
ローカル Web 認証バナー
Web 認証を使用して、デフォルトのカスタマイズ済み Web ブラウザバナーを作成して、コントローラにログインしたときに表示されるようにできます。
このバナーは、ログイン ページと認証結果ポップアップ ページの両方に表示されます。デフォルトのバナー メッセージは次のとおりです。
-
認証成功
-
認証失敗
-
認証期限切れ
ローカル Web 認証バナーは、次のように設定できます。
-
次のグローバル コンフィギュレーション コマンドを使用します。
Device(config)# parameter map type webauth global
Device(config-params-parameter-map)# banner ?
file <file-name>
text <Banner text>
title <Banner title>
ログイン ページには、デフォルトのバナー、Cisco Systems、および Switch host-name Authentication が表示されます。Cisco Systems は認証結果ポップアップ ページに表示されます。

バナーは次のようにカスタマイズ可能です。
-
スイッチ名、ルータ名、または会社名などのメッセージをバナーに追加する。
-
新スタイル モード:次のグローバル コンフィギュレーション コマンドを使用します。
parameter-map type webauth global
banner text <text>
-
-
ロゴまたはテキスト ファイルをバナーに追加する。
-
新スタイル モード:次のグローバル コンフィギュレーション コマンドを使用します。
parameter-map type webauth global
banner file <filepath>
図 3. カスタマイズされた Web バナー 
-
バナーが有効にされていない場合、Web 認証ログイン画面にはユーザー名とパスワードのダイアログボックスだけが表示され、スイッチにログインしたときにはバナーは表示されません。
カスタマイズされたローカル Web 認証
ローカル Web 認証プロセスでは、スイッチ内部の HTTP サーバーは、認証中のクライアントに配信される 4 種類の HTML ページをホストします。サーバーはこれらのページを使用して、ユーザーに次の 4 種類の認証プロセス ステートを通知します。
-
ログイン:資格情報が要求されています。
-
成功:ログインに成功しました。
-
失敗:ログインに失敗しました。
-
期限切れ:ログインの失敗回数が多すぎて、ログイン セッションが期限切れになりました。
(注) |
カスタム Web 認証を設定するには、仮想 IP アドレスが必要です。 |
ガイドライン
-
デフォルトの内部 HTML ページの代わりに、独自の HTML ページを使用することができます。
-
ロゴを使用することもできますし、ログイン、成功、失敗、および期限切れ Web ページでテキストを指定することもできます。
-
バナー ページで、ログイン ページのテキストを指定できます。
-
これらのページは、HTML で記述されています。
-
成功ページには、特定の URL にアクセスするための HTML リダイレクト コマンドを記入する必要があります。
-
この URL 文字列は有効な URL(例:http://www.cisco.com)でなければなりません。不完全な URL は、Web ブラウザで、「ページが見つかりません」またはこれに類似するエラーの原因となる可能性があります。
-
HTTP 認証で使用される Web ページを設定する場合、これらのページには適切な HTML コマンド(例:ページのタイム アウトを設定、暗号化されたパスワードの設定、同じページが 2 回送信されていないことの確認など)を記入する必要があります.
-
設定されたログイン フォームが有効な場合、特定の URL にユーザーをリダイレクトする CLI コマンドは使用できません。管理者は、Web ページにリダイレクトが設定されていることを保証する必要があります。
-
認証後、特定の URL にユーザーをリダイレクトする CLI コマンドを入力してから、Web ページを設定するコマンドを入力した場合、特定の URL にユーザーをリダイレクトする CLI コマンドは効力を持ちません。
-
設定された Web ページは、スイッチのブート フラッシュ、またはフラッシュにコピーできます。
-
ログインページを任意のフラッシュ上に、成功ページと失敗ページを別のフラッシュ(たとえば、アクティブスイッチ、またはメンバスイッチのフラッシュ)に配置できます。
-
4 ページすべてを設定する必要があります。
-
Web ページを使ってバナー ページを設定した場合、このバナー ページには効果はありません。
-
システム ディレクトリ(たとえば、flash、disk0、disk)に保存されていて、ログイン ページに表示する必要のあるロゴ ファイル(イメージ、フラッシュ、オーディオ、ビデオなど)すべてには、必ず、web_auth_<filename> の形式で名前をつけてください。
-
設定された認証プロキシ機能は、HTTP と SSL の両方をサポートしています。
デフォルトの内部 HTML ページの代わりに、自分の HTML ページを使用することができます。認証後のユーザーのリダイレクト先で、内部成功ページの代わりとなる URL を指定することもできます。

成功ログインに対するリダイレクト URL の注意事項
成功ログインに対するリダイレクション URL を設定する場合、次の注意事項に従ってください。
-
カスタム認証プロキシ Web ページ機能がイネーブルに設定されている場合、リダイレクション URL 機能はディセーブルにされ、CLI では使用できません。リダイレクションは、カスタム ログイン成功ページで実行できます。
-
リダイレクション URL 機能が有効に設定されている場合、設定された auth-proxy-banner は使用されません。
-
リダイレクション URL の指定を解除するには、このコマンドの no 形式を使用します。
-
Web ベースの認証クライアントが正常に認証された後にリダイレクション URL が必要な場合、URL 文字列は有効な URL(たとえば http://)で開始し、その後に URL 情報が続く必要があります。http:// を含まない URL が指定されると、正常に認証が行われても、そのリダイレクション URL によって Web ブラウザでページが見つからないまたは同様のエラーが生じる場合があります。
 フィードバック