- About This Guide
-
- Introduction to the Security Appliance
- Getting Started
- Enabling Multiple Context Mode
- Configuring Interfaces for the Cisco ASA 5505 Adaptive Security Appliance
- Configuring Ethernet Settings and Subinterfaces
- Adding and Managing Security Contexts
- Configuring Interface Parameters
- Configuring Basic Settings
- Configuring IP Routing
- Configuring Multicast Routing
- Configuring DHCP, DDNS, and WCCP Services
- Configuring IPv6
- Configuring AAA Servers and the Local Database
- Configuring Failover
-
- Firewall Mode Overview
- Identifying Traffic With Access Lists
- Applying NAT
- Permitting or Denying Network Access
- Applying AAA for Network Access
- Applying Filtering Services
- Using Modular Policy Framework
- Managing AIP SSM and CSC SSM
- Preventing Network Attacks
- Applying QoS Policies
- Applying Application Layer Protocol Inspection
- Configuring ARP Inspection and Bridging Parameters
-
- Configuring IPSec and ISAKMP
- Configuring L2TP over IPSec
- Setting General VPN Parameters
- Configuring Tunnel Groups, Group Policies, and Users
- Configuring IP Addresses for VPN
- Configuring Remote Access VPNs
- Configuring Network Admission Control
- Configuring Easy VPN on the ASA 5505
- Configuring the PPPoE Client
- Configuring LAN-to-LAN VPNs
- Configuring WebVPN
- Configuring SSL VPN Client
- Configuring Certificates
- Glossary
- Index
- Configuring VPNs in Single, Routed Mode
- Configuring IPSec/SSL to Bypass ACLs
- Permitting Intra-Interface Traffic (Hairpinning)
- Setting Maximum Active IPSec/SSL VPN Sessions
- Using Client Update to Ensure Acceptable IPSec Client Revision Levels
- Understanding Load Balancing
Setting General IPSec/SSL VPN Parameters
The security appliance implementation of virtual private networking includes useful features that do not fit neatly into categories. This chapter describes some of these features. It includes the following sections:
•![]() Configuring VPNs in Single, Routed Mode
Configuring VPNs in Single, Routed Mode
•![]() Configuring IPSec/SSL to Bypass ACLs
Configuring IPSec/SSL to Bypass ACLs
•![]() Permitting Intra-Interface Traffic (Hairpinning)
Permitting Intra-Interface Traffic (Hairpinning)
•![]() Setting Maximum Active IPSec/SSL VPN Sessions
Setting Maximum Active IPSec/SSL VPN Sessions
•![]() Using Client Update to Ensure Acceptable IPSec Client Revision Levels
Using Client Update to Ensure Acceptable IPSec Client Revision Levels
•![]() Configuring VPN Session Limits
Configuring VPN Session Limits
Configuring VPNs in Single, Routed Mode
VPNs work only in single, routed mode. VPN functionality is unavailable in configurations that include either security contexts, also referred to as multi-mode firewall, or Active/Active stateful failover.
The exception to this caveat is that you can configure and use one connection for administrative purposes to (not through) the security appliance in transparent mode.
Configuring IPSec/SSL to Bypass ACLs

Note ![]() Unless clienltess (browser-mode) SSL VPN is specified, the term SSL VPN in this chapter refers to the SSL VPN client (AnyConnect 2.x or previous SVC 1.x).
Unless clienltess (browser-mode) SSL VPN is specified, the term SSL VPN in this chapter refers to the SSL VPN client (AnyConnect 2.x or previous SVC 1.x).
To permit any packets that come from an IPSec/SSL tunnel without checking ACLs for the source and destination interfaces, enter the sysopt connection permit-vpn command in global configuration mode.
You might want to bypass interface ACLs for IPSec/SSL traffic if you use a separate VPN concentrator behind the security appliance and want to maximize the security appliance performance. Typically, you create an ACL that permits IPSec/SSL packets using the access-list command and apply it to the source interface. Using an ACL is more secure because you can specify the exact traffic you want to allow through the security appliance.
The syntax is sysopt connection permit-vpn. The command has no keywords or arguments.
The following example enables IPSec/SSL traffic through the security appliance without checking ACLs:
hostname(config)# sysopt connection permit-vpn
Permitting Intra-Interface Traffic (Hairpinning)
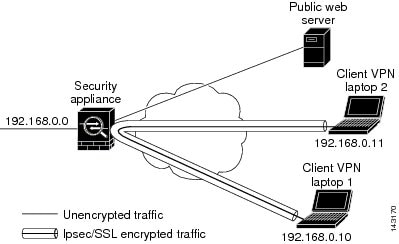
The security appliance includes a feature that lets a VPN client send IPSec-protected traffic to another VPN user by allowing such traffic in and out of the same interface. Also called "hairpinning", this feature can be thought of as VPN spokes (clients) connecting through a VPN hub (security appliance).
In another application, this feature can redirect incoming VPN traffic back out through the same interface as unencrypted traffic. This would be useful, for example, to a VPN client that does not have split tunneling but needs to both access a VPN and browse the Web.
Figure 29-1 shows VPN Client 1 sending secure IPSec/SSL traffic to VPN Client 2 while also sending unencrypted traffic to a public Web server.
Figure 29-1 VPN Client Using Intra-Interface feature for Hairpinning
To configure this feature, use the same-security-traffic command in global configuration mode with its intra-interface argument.
The command syntax is same-security-traffic permit {inter-interface | intra-interface}.
The following example shows how to enable intra-interface traffic:
hostname(config)# same-security-traffic permit intra-interface
hostname(config)#
Note ![]() You use the same-security-traffic command, but with the inter-interface argument, to permit communication between interfaces that have the same security level. This feature is not specific to IPSec/SSL connections. For more information, see the "Configuring Interface Parameters" chapter of this guide.
You use the same-security-traffic command, but with the inter-interface argument, to permit communication between interfaces that have the same security level. This feature is not specific to IPSec/SSL connections. For more information, see the "Configuring Interface Parameters" chapter of this guide.
To use hairpinning, you must apply the proper NAT rules to the security appliance interface, as discussed in the following section.
NAT Considerations for Intra-Interface Traffic
For the security appliance to send unencrypted traffic back out through the interface, you must enable NAT for the interface so that publicly routable addresses replace your private IP addresses (unless you already use public IP addresses in your local IP address pool). The following example applies an interface PAT rule to traffic sourced from the client IP pool:
hostname(config)# ip local pool clientpool 192.168.0.10-192.168.0.100
hostname(config)# global (outside) 1 interface
hostname(config)# nat (outside) 1 192.168.0.0 255.255.255.0
When the security appliance sends encrypted VPN traffic back out this same interface, however, NAT is optional. The VPN-to-VPN hairpinning works with or without NAT. To apply NAT to all outgoing traffic, implement only the commands above. To exempt the VPN-to-VPN traffic from NAT, add commands (to the example above) that implement NAT exemption for VPN-to-VPN traffic, such as:
hostname(config)# access-list nonat permit ip 192.168.0.0 255.255.255.0 192.168.0.0
255.255.255.0
hostname(config)# nat (outside) 0 access-list nonat
For more information on NAT rules, see the "Applying NAT" chapter of this guide.
Setting Maximum Active IPSec/SSL VPN Sessions
To limit VPN sessions to a lower value than the security appliance allows, enter the vpn-sessiondb max-session-limit command in global configuration mode.
•![]() This command applies to all types of VPN sessions, including SSL VPN (AnyConnect and clientless).
This command applies to all types of VPN sessions, including SSL VPN (AnyConnect and clientless).
•![]() This limit affects the calculated load percentage for VPN Load Balancing.
This limit affects the calculated load percentage for VPN Load Balancing.
The syntax is vpn-sessiondb max-session-limit {session-limit}.
The following example shows how to set a maximum VPN session limit of 450:
hostname (config)# vpn-sessiondb max-session-limit 450
hostname (config)#
To set both SSL VPN client and clientless max sessions, enter the vpn-sessiondb max-webvpn-session-limit {session-limit} command in global configuration mode.
Using Client Update to Ensure Acceptable IPSec Client Revision Levels
The client update feature lets administrators at a central location automatically notify VPN client users that it is time to update the VPN client software and the VPN 3002 hardware client image.
Remote users might be using outdated VPN software or hardware client versions. You can use the client-update command at any time to enable updating client revisions; specify the types and revision numbers of clients to which the update applies; provide a URL or IP address from which to get the update; and, in the case of Windows clients, optionally notify users that they should update their VPN client version. For Windows clients, you can provide a mechanism for users to accomplish that update. For VPN 3002 hardware client users, the update occurs automatically, with no notification. This command applies only to the IPSec remote-access tunnel-group type.
To perform client update, enter the client-update command in either general configuration mode or tunnel-group ipsec-attributes configuration mode. If the client is already running a software version on the list of revision numbers, it does not need to update its software. If the client is not running a software version on the list, it should update. The following procedure tells how to perform a client-update:
Step 1 ![]() In global configuration mode, enable client update by entering the command:
In global configuration mode, enable client update by entering the command:
hostname(config)# client-update enable
hostname(config)#
Step 2 ![]() In global configuration mode, specify the parameters for the client update that you want to apply to all clients of a particular type. That is, specify the type of client, the URL or IP address from which to get the updated image, and the acceptable revision number or numbers for that client. You can specify up to four revision numbers, separated by commas.
In global configuration mode, specify the parameters for the client update that you want to apply to all clients of a particular type. That is, specify the type of client, the URL or IP address from which to get the updated image, and the acceptable revision number or numbers for that client. You can specify up to four revision numbers, separated by commas.
If the user's client revision number matches one of the specified revision numbers, there is no need to update the client. This command specifies the client-update values for all clients of the specified type across the entire security appliance
The syntax of the command to do this is:
hostname(config)# client-update type type url url-string rev-nums rev-numbers
hostname(config)#
The available client types are win9X (includes Windows 95, Windows 98 and Windows ME platforms), winnt (includes Windows NT 4.0, Windows 2000 and Windows XP platforms), windows (Includes all Windows based platforms), and vpn3002 (VPN 3002 hardware client).
If the client is already running a software version on the list of revision numbers, it does not need to update its software. If the client is not running a software version on the list, it should update. You can specify up to three of these client update entries. The keyword windows covers all of the allowable Windows platforms. If you specify windows, do not specify the individual Windows client types.
Note ![]() For all Windows clients, you must use the protocol http:// or https:// as the prefix for the URL. For the VPN 3002 hardware client, you must specify protocol tftp:// instead.
For all Windows clients, you must use the protocol http:// or https:// as the prefix for the URL. For the VPN 3002 hardware client, you must specify protocol tftp:// instead.
The following example configures client update parameters for the remote-access tunnel-group. It designates the revision number, 4.6.1 and the URL for retrieving the update, which is https://support/updates:
hostname(config)# client-update type windows url https://support/updates/ rev-nums 4.6.1
hostname(config)#
Alternatively, you can configure client update just for individual tunnel-groups, rather than for all clients of a particular type. (See Step 3.)
VPN 3002 clients update without user intervention and users receive no notification message. The following example applies only to VPN 3002 Hardware Clients. Entered in tunnel-group ipsec-attributes configuration mode, it configures client update parameters for the IPSec remote-access tunnel-group "salesgrp". It designates the revision number, 4.7 and uses the TFTP protocol for retrieving the updated software from the site with the IP address 192.168.1.1:
hostname(config)# tunnel-group salesgrp type ipsec-ra
hostname(config)# tunnel-group salesgrp ipsec-attributes
hostname(config-tunnel-ipsec)# client-update type vpn3002 url tftp:192.168.1.1 rev-nums
4.7
hostname(config-tunnel-ipsec)#
Note ![]() You can have the browser automatically start an application by including the application name at the end of the URL; for example: https://support/updates/vpnclient.exe.
You can have the browser automatically start an application by including the application name at the end of the URL; for example: https://support/updates/vpnclient.exe.
Step 3 ![]() To define a set of client-update parameters for a particular ipsec-ra tunnel group, do the following. In tunnel-group ipsec-attributes mode, specify the tunnel-group name and its type, the URL or IP address from which to get the updated image, and a revision number. If the user's client's revision number matches one of the specified revision numbers, there is no need to update the client; for example, for a Windows client:
To define a set of client-update parameters for a particular ipsec-ra tunnel group, do the following. In tunnel-group ipsec-attributes mode, specify the tunnel-group name and its type, the URL or IP address from which to get the updated image, and a revision number. If the user's client's revision number matches one of the specified revision numbers, there is no need to update the client; for example, for a Windows client:
hostname(config)# tunnel-group remotegrp type ipsec-ra
hostname(config)# tunnel-group remotegrp ipsec-attributes
hostname(config-tunnel-ipsec)# client-update type windows url https://support/updates/
rev-nums 4.6.1
hostname(config-tunnel-ipsec)#
Step 4 ![]() Optionally, you can send a notice to active users with outdated Windows clients that their client needs updating. For these users, a pop-up window appears, offering them the opportunity to launch a browser and download the updated software from the site that you specified in the URL. The only part of this message that you can configure is the URL. (See Step 2 or 3.) Users who are not active get a notification message the next time they log on. You can send this notice to all active clients on all tunnel groups, or you can send it to clients on a particular tunnel group. For example, to notify all active clients on all tunnel groups, you would enter the following command in privileged EXEC mode:
Optionally, you can send a notice to active users with outdated Windows clients that their client needs updating. For these users, a pop-up window appears, offering them the opportunity to launch a browser and download the updated software from the site that you specified in the URL. The only part of this message that you can configure is the URL. (See Step 2 or 3.) Users who are not active get a notification message the next time they log on. You can send this notice to all active clients on all tunnel groups, or you can send it to clients on a particular tunnel group. For example, to notify all active clients on all tunnel groups, you would enter the following command in privileged EXEC mode:
hostname# client-update all
hostname#
If the user's client's revision number matches one of the specified revision numbers, there is no need to update the client, and no notification message is sent to the user. VPN 3002 clients update without user intervention and users receive no notification message.
Note ![]() If you specify the client-update type as windows (specifying all Windows-based platforms) and later want to enter a client-update type of win9x or winnt for the same entity, you must first remove the windows client type with the no form of the command, then use new client-update commands to specify the new client types.
If you specify the client-update type as windows (specifying all Windows-based platforms) and later want to enter a client-update type of win9x or winnt for the same entity, you must first remove the windows client type with the no form of the command, then use new client-update commands to specify the new client types.
Understanding Load Balancing
If you have a remote-access configuration in which you are using two or more security appliances or VPN Concentrators connected on the same network to handle remote sessions, you can configure these devices to share their session load. This feature is called load balancing. To implement load balancing, you group together logically two or more devices on the same private LAN-to-LAN network, private subnet, and public subnet into a virtual cluster.
All devices in the virtual cluster carry session loads. Load balancing directs session traffic to the least loaded device in the cluster, thus distributing the load among all devices. It makes efficient use of system resources and provides increased performance and high availability.
One device in the virtual cluster, the virtual cluster master, directs incoming traffic to the other devices, called secondary devices. The virtual cluster master monitors all devices in the cluster, keeps track of how busy each is, and distributes the session load accordingly. The role of virtual cluster master is not tied to a physical device; it can shift among devices. For example, if the current virtual cluster master fails, one of the secondary devices in the cluster takes over that role and immediately becomes the new virtual cluster master.
Note ![]() The output of a show command might show the secondary devices in the cluster as backup devices.
The output of a show command might show the secondary devices in the cluster as backup devices.
The virtual cluster appears to outside clients as a single virtual cluster IP address. This IP address is not tied to a specific physical device. It belongs to the current virtual cluster master; hence, it is virtual. A VPN Client attempting to establish a connection connects first to this virtual cluster IP address. The virtual cluster master then sends back to the client the public IP address of the least-loaded available host in the cluster. In a second transaction (transparent to the user), the client connects directly to that host. In this way, the virtual cluster master directs traffic evenly and efficiently across resources.
Note ![]() All Cisco IPsec clients (software and VPN 3002, PIX-501, IOS 800 series, ASA 5505 Hardware clients) and SSL VPN clients.
All Cisco IPsec clients (software and VPN 3002, PIX-501, IOS 800 series, ASA 5505 Hardware clients) and SSL VPN clients.
If a machine in the cluster fails, the terminated sessions can immediately reconnect to the virtual cluster IP address. The virtual cluster master then directs these connections to another active device in the cluster. Should the virtual cluster master itself fail, a secondary device in the cluster immediately and automatically takes over as the new virtual session master. Even if several devices in the cluster fail, users can continue to connect to the cluster as long as any one device in the cluster is up and available.
Implementing Load Balancing
Enabling load balancing involves:
•![]() Configuring the load-balancing cluster by establishing a common virtual cluster IP address, UDP port (if necessary), and IPSec/SSL shared secret for the cluster. These values are should be configured indentically for every device in the cluster.
Configuring the load-balancing cluster by establishing a common virtual cluster IP address, UDP port (if necessary), and IPSec/SSL shared secret for the cluster. These values are should be configured indentically for every device in the cluster.
•![]() Configuring the participating device by enabling load balancing on the device and defining device-specific properties. These values vary from device to device.
Configuring the participating device by enabling load balancing on the device and defining device-specific properties. These values vary from device to device.
Note ![]() VPN load balancing requires an active 3DES/AES license. The security appliance checks for the existence of this crypto license before enabling load balancing. If it does not detect an active 3DES or AES license, the security appliance prevents the enabling of load balancing and also prevents internal configuration of 3DES by the load balancing system unless the license permits this usage.
VPN load balancing requires an active 3DES/AES license. The security appliance checks for the existence of this crypto license before enabling load balancing. If it does not detect an active 3DES or AES license, the security appliance prevents the enabling of load balancing and also prevents internal configuration of 3DES by the load balancing system unless the license permits this usage.
Prerequisites
Load balancing is disabled by default. You must explicitly enable load balancing.
You must have first configured the public (outside) and private (inside) interfaces and also have previously configured the the interface to which the virtual cluster IP address refers. You can use the interface and nameif commands to configure different names for these interfaces. Subsequent references in this section use the names outside and inside.
All devices that participate in a cluster must share the same cluster-specific values: IP address, encryption settings, encryption key, and port.
Load Balancing Algorithm
Load balancing is calculated by a percentage of the user load. There is no preference to go with one appliance or another; the percentage of user load is the only factor taken into consideration with regards to load balanncing. If you want the user load percentage to increase faster on an appliance, you need to configure the maximum number of users that this specific appliance can support. Keep in mind that it takes 50 users to equal 1 % of the load if you are configured to support the maximum number of users (5000).
Eligible Platforms
A load-balancing cluster can include security appliance models ASA 5520 and above. You can also include VPN 3000 Series Concentrators in the cluster. While mixed configurations are possible, administration is generally simpler if the cluster is homogeneous.
Eligible Clients
Load balancing is effective only on remote sessions initiated with the following clients:
•![]() Cisco VPN Client (Release 3.0 and later)
Cisco VPN Client (Release 3.0 and later)
•![]() Cisco VPN 3002 Hardware Client (Release 3.5 or later)
Cisco VPN 3002 Hardware Client (Release 3.5 or later)
•![]() Cisco PIX 501/506E (when acting as an Easy VPN client).
Cisco PIX 501/506E (when acting as an Easy VPN client).
•![]() Cisco AnyConnect VPN Client (Release 2.0 and later)
Cisco AnyConnect VPN Client (Release 2.0 and later)
•![]() Cisco ASA 5505 Security Appliance (when acting as an Easy VPN client)
Cisco ASA 5505 Security Appliance (when acting as an Easy VPN client)
•![]() IOS EZVPN Client devices supporting IKE-redirect (eg. IOS 831/871)
IOS EZVPN Client devices supporting IKE-redirect (eg. IOS 831/871)
•![]() Clientless SSL VPN (browser mode; not a client)
Clientless SSL VPN (browser mode; not a client)
Load balancing works with both IPSec/SSL clients and SSL VPN (AnyConnect and clientless) sessions. All other clients, including LAN-to-LAN connections, can connect to a security appliance on which load balancing is enabled, but they cannot participate in load balancing.
VPN Load-Balancing Cluster Configurations
A load-balancing cluster can consist of all ASA Release 7.0(x) security appliances, all ASA Release 7.1(1) security appliances, all VPN 3000 Concentrators, or a mixture of these, subject to the following restrictions:
•![]() Load-balancing clusters that consist of all ASA 7.0(x) security appliances, all ASA 7.1(1) security appliances, or all VPN 3000 Concentrators can run load balancing for a mixture of IPSec/SSL and SSL VPN (AnyConnect and clientless) sessions.
Load-balancing clusters that consist of all ASA 7.0(x) security appliances, all ASA 7.1(1) security appliances, or all VPN 3000 Concentrators can run load balancing for a mixture of IPSec/SSL and SSL VPN (AnyConnect and clientless) sessions.
•![]() Load-balancing clusters that consist of a both of ASA 7.0(x) security appliances and VPN 3000 Concentrators can run load balancing for a mixture of IPSec/SSL and SSL VPN (AnyConnect and clientless) sessions.
Load-balancing clusters that consist of a both of ASA 7.0(x) security appliances and VPN 3000 Concentrators can run load balancing for a mixture of IPSec/SSL and SSL VPN (AnyConnect and clientless) sessions.
•![]() Load-balancing clusters that include ASA 7.1(1) security appliances and either ASA 7.0(x) or VPN 3000 Concentrators or both can support only IPSec/SSL sessions. In such a configuration, however, the ASA 7.1(1) security appliances might not reach their full IPSec/SSL capacity. "Scenario 1: Mixed Cluster with No SSL VPN (AnyConnect and clientless) Connections" on page 9 illustrates this situation.
Load-balancing clusters that include ASA 7.1(1) security appliances and either ASA 7.0(x) or VPN 3000 Concentrators or both can support only IPSec/SSL sessions. In such a configuration, however, the ASA 7.1(1) security appliances might not reach their full IPSec/SSL capacity. "Scenario 1: Mixed Cluster with No SSL VPN (AnyConnect and clientless) Connections" on page 9 illustrates this situation.
With Release 7.1(1), IPSec/SSL and SSL VPN (AnyConnect and clientless) sessions count or weigh equally in determining the load that each device in the cluster carries. This represents a departure from the load balancing calculation for the ASA Release 7.0(x) software and the VPN 3000 Concentrator, in that these platforms both use a weighting algorithm that, on some hardware platforms, calculates SSL VPN (AnyConnect and clientless) session load differently from IPSec/SSL session load.
The virtual master of the cluster assigns session requests to the members of the cluster. An ASA Release 7.1(1) security appliance regards all sessions, SSL VPN (AnyConnect and clientless) or IPSec/SSL, as equal and assigns them accordingly. An ASA Release 7.0(x) security appliance or a VPN 3000 Concentrator performs a weighting calculation in assigning session loads.
Note ![]() You can configure the number of IPSec/SSL and SSL VPN (AnyConnect and clientless) sessions to allow, up to the maximum allowed by your configuration and license. See Configuring VPN Session Limits for a description of how to set these limits.
You can configure the number of IPSec/SSL and SSL VPN (AnyConnect and clientless) sessions to allow, up to the maximum allowed by your configuration and license. See Configuring VPN Session Limits for a description of how to set these limits.
Some Typical Mixed Cluster Scenarios
If you have a mixed configuration—that is, if your load-balancing cluster includes devices running a mixture of ASA software releases or at least one security appliance running ASA Release 7.1(1) and a VPN 3000 Concentrator—the difference in weighting algorithms becomes an issue if the initial cluster master fails and another device takes over as master.
The following scenarios illustrate the use of VPN load balancing in clusters consisting of a mixture of security appliances running ASA Release 7.1(1) and ASA Release 7.0(x) software, as well as VPN 3000 Series Concentrators.
Scenario 1: Mixed Cluster with No SSL VPN (AnyConnect and clientless) Connections
In this scenario, the cluster consists of a mixture of security appliances and VPN 3000 Concentrators. Some of the security appliance cluster peers are running ASA Release 7.0(x), and some are running Release 7.1(1). The pre-7.1(1) and VPN 3000 peers do not have any SSL VPN connections, and the 7.1(1) cluster peers have only the base SSL VPN license, which allows two SSL VPN (AnyConnect and clientless) sessions, but there are no SSL VPN connections. In this case, all the connections are IPSec/SSL, and load balancing works fine.
The two SSL VPN (AnyConnect and clientless) licenses have a very small effect on the user's taking advantage of the maximum IPSec/SSL session limit, and then only when a VPN 3000 Concentrator is the cluster master. In general, the smaller the number of SSL VPN (AnyConnect and clientless) licenses is on a security appliance in a mixed cluster, the smaller the effect on the ASA 7.1(1) device being able to reach its IPSec/SSL session limit in a scenario where there are only IPSec/SSL sessions.
Scenario 2: Mixed Cluster Handling SSL VPN (AnyConnect and clientless) Connections
Suppose, for example, a security appliance running ASA Release 7.1(1) software is the initial cluster master; then that device fails. Another device in the cluster takes over automatically as master and applies its own load-balancing algorithm to determine processor loads within the cluster. A cluster master running ASA Release 7.1(1) software cannot weight session loads in any way other than what that software provides. Therefore, it cannot assign a combination of IPSec/SSL and SSL VPN (AnyConnect and clientless) session loads properly to ASA devices running earlier versions nor to VPN 3000 Concentrators. Conversely, a VPN 3000 Concentrator acting as the cluster master cannot assign loads properly to an ASA Release 7.1(1) security appliance. The following scenario illustrates this dilemma.
This scenario is similar to the previous one, in that the cluster consists of a mixture of security appliances and VPN 3000 Concentrators. Some of the security appliance cluster peers are running ASA Release 7.0,(x) and some are running Release 7.1(1). In this case, however, the cluster is handling SSL VPN connections as well as IPSec/SSL connections.
If a device that is running software earlier than ASA Release 7.1(1) is the cluster master, the master applies the protocol and logic in effect prior to Release 7.1(1). That is, sessions might be directed to load-balancing peers that have exceeded their session limit. In that case, the user is denied access.
If the cluster master is a device running ASA Release 7.0(x) software, the old session-weighting algorithm applies only to the pre-7.1(1) peers in the cluster. No one should be denied access in this case. Because the pre-7.1(1) peers use the session-weighting algorithm, they are more lightly loaded.
An issue arises, however, because you cannot guarantee that the 7.1(1) peer is always the cluster master. If the cluster master fails, another peer assumes the role of master. The new master might be any of the eligible peers. Because of the innately unpredictability of the results, we recommend that you avoid configuring this type of cluster.
Configuring Load Balancing
To use load balancing, configure the following elements for each device that participates in the cluster.
•![]() Public and private interfaces
Public and private interfaces
•![]() VPN load-balancing cluster attributes
VPN load-balancing cluster attributes
Note ![]() All participants in the cluster must have an identical cluster configuration, except for the device priority within the cluster.
All participants in the cluster must have an identical cluster configuration, except for the device priority within the cluster.
Configuring the Public and Private Interfaces for Load Balancing
To configure the public (outside) and private (inside) interfaces for the load-balancing cluster devices, do the following steps:
Step 1 ![]() Configure the public interface on the security appliance by entering the interface command with the lbpublic keyword in vpn-load-balancing configuration mode. This command specifies the name or IP address of the public interface for load balancing for this device:
Configure the public interface on the security appliance by entering the interface command with the lbpublic keyword in vpn-load-balancing configuration mode. This command specifies the name or IP address of the public interface for load balancing for this device:
hostname(config)# vpn load-balancing
hostname(config-load-balancing)# interface lbpublic outside
hostname(config-load-balancing)#
Step 2 ![]() Configure the private interface on the security appliance by entering the interface command with the lbprivate keyword in vpn-load-balancing configuration mode. This command specifies the name or IP address of the private interface for load balancing for this device:
Configure the private interface on the security appliance by entering the interface command with the lbprivate keyword in vpn-load-balancing configuration mode. This command specifies the name or IP address of the private interface for load balancing for this device:
hostname(config-load-balancing)# interface lbprivate inside
hostname(config-load-balancing)#
Step 3 ![]() Set the priority to assign to this device within the cluster. The range is from 1 to 10. The priority indicates the likelihood of this device becoming the virtual cluster master, either at start-up or when an existing master fails. The higher you set the priority (for example, 10), the more likely it is that this device becomes the virtual cluster master.
Set the priority to assign to this device within the cluster. The range is from 1 to 10. The priority indicates the likelihood of this device becoming the virtual cluster master, either at start-up or when an existing master fails. The higher you set the priority (for example, 10), the more likely it is that this device becomes the virtual cluster master.
hostname(config-load-balancing)# priority number
hostname(config-load-balancing)#
For example, to assign this device a priority of 6 within the cluster, enter the following command:
hostname(config-load-balancing)# priority 6
hostname(config-load-balancing)#
Step 4 ![]() If you want to apply network address translation for this device, enter the nat command with the NAT assigned address for the device:
If you want to apply network address translation for this device, enter the nat command with the NAT assigned address for the device:
hostname(config-load-balancing)# nat ip_address
hostname(config-load-balancing)#
For example, to assign this device a NAT address of 192.168.30.3, enter the following command:
hostname(config-load-balancing)# nat 192.168.30.3
hostname(config-load-balancing)#
Configuring the Load Balancing Cluster Attributes
To configure the load-balancing cluster attributes for each device in the cluster, do the following steps:
Step 1 ![]() Set up VPN load balancing by entering the vpn load-balancing command in global configuration mode:
Set up VPN load balancing by entering the vpn load-balancing command in global configuration mode:
hostname(config)# vpn load-balancing
hostname(config-load-balancing)#
This enters vpn-load-balancing configuration mode, in which you can configure the remaining load-balancing attributes.
Step 2 ![]() Configure the IP address of the cluster to which this device belongs. This command specifies the single IP address that represents the entire virtual cluster. Choose an IP address that is within the public subnet address range shared by all the security appliances in the virtual cluster
Configure the IP address of the cluster to which this device belongs. This command specifies the single IP address that represents the entire virtual cluster. Choose an IP address that is within the public subnet address range shared by all the security appliances in the virtual cluster
hostname(config-load-balancing)# cluster ip address ip_address
hostname(config-load-balancing)#
For example, to set the cluster IP address to 192.168.10.10, enter the following command:
hostname(config-load-balancing)# cluster ip address 192.168.10.10
hostname(config-load-balancing)#
Step 3 ![]() Configure the cluster port.This command specifies the UDP port for the virtual cluster in which this device is participating. The default value is 9023. If another application is using this port, enter the UDP destination port number you want to use for load balancing.
Configure the cluster port.This command specifies the UDP port for the virtual cluster in which this device is participating. The default value is 9023. If another application is using this port, enter the UDP destination port number you want to use for load balancing.
hostname(config-load-balancing)# cluster port port_number
hostname(config-load-balancing)#
For example, to set the cluster port to 4444, enter the following command:
hostname(config-load-balancing)# cluster port 4444
hostname(config-load-balancing)#
Step 4 ![]() Optionally, enable IPSec/SSL encryption for the cluster. The default is no encryption. This command enables or disables IPSec/SSL encryption. If you configure this check attribute, you must first specify and verify a shared secret.The security appliances in the virtual cluster communicate via LAN-to-LAN tunnels using IPSec/SSL. To ensure that all load-balancing information communicated between the devices is encrypted, enable this attribute.
Optionally, enable IPSec/SSL encryption for the cluster. The default is no encryption. This command enables or disables IPSec/SSL encryption. If you configure this check attribute, you must first specify and verify a shared secret.The security appliances in the virtual cluster communicate via LAN-to-LAN tunnels using IPSec/SSL. To ensure that all load-balancing information communicated between the devices is encrypted, enable this attribute.
hostname(config-load-balancing)# cluster encryption
hostname(config-load-balancing)#
Note ![]() When using encryption, you must have previously configured the load-balancing inside interface. If that interface is not enabled on the load-balancing inside interface, you get an error message when you try to configure cluster encryption.
When using encryption, you must have previously configured the load-balancing inside interface. If that interface is not enabled on the load-balancing inside interface, you get an error message when you try to configure cluster encryption.
If the load-balancing inside interface was enabled when you configured cluster encryption, but was disabled before you configured the participation of the device in the virtual cluster, you get an error message when you enter the participate command (or, in ASDM, select the Participate in Load Balancing Cluster check box), and encryption is not enabled for the cluster.
To use cluster encryption, you musts enable isakmp on the inside interface, using the crypto isakmp enable command with the inside interface specified.
Step 5 ![]() If you enable cluster encryption, you must also specify the IPSec/SSL shared secret by entering the cluster key command. This command specifies the shared secret to between IPSec/SSL peers when you have enabled IPSec/SSL encryption. The value you enter in the box appears as consecutive asterisk characters
If you enable cluster encryption, you must also specify the IPSec/SSL shared secret by entering the cluster key command. This command specifies the shared secret to between IPSec/SSL peers when you have enabled IPSec/SSL encryption. The value you enter in the box appears as consecutive asterisk characters
hostname(config-load-balancing)# cluster key shared_secret
hostname(config-load-balancing)#
For example, to set the shared secret to 123456789, enter the following command:
hostname(config-load-balancing)# cluster key 123456789
hostname(config-load-balancing)#
Step 6 ![]() Enable this device's participation in the cluster by entering the participate command:
Enable this device's participation in the cluster by entering the participate command:
hostname(config-load-balancing)# participate
hostname(config-load-balancing)#
Configuring VPN Session Limits
You can run as many IPSec/SSL and SSL VPN (AnyConnect and clientless) sessions as your platform and license for the security appliance supports. To view the licensing information for your security appliance, enter the show version command in global configuration mode. The following example shows the command and the licensing information excerpted from the output of this command:
hostname(config)# show version
Cisco Adaptive Security Appliance Software Version 7.1(0)182
Device Manager Version 5.1(0)128
Licensed features for this platform:
Maximum Physical Interfaces : Unlimited
Maximum VLANs : 100
Inside Hosts : Unlimited
Failover : Active/Active
VPN-DES : Enabled
VPN-3DES-AES : Enabled
Security Contexts : 10
GTP/GPRS : Enabled
VPN Peers : 750
SSLVPN Peers : 500
This platform has an ASA 5520 VPN Plus license.
To limit the maximum number of active IPSec/SSL VPN sessions to a lower value than the security appliance allows, enter the vpn-sessiondb max-session-limit command in global configuration mode. This limit affects the calculated load percentage for VPN Load Balancing.
hostname(config)# vpn-sessiondb max-session-limit number_of_sessions
hostname(config)#
For example, if the security appliance license allows 750 IPSec/SSL sessions, and you want to limit the number of IPSec/SSL sessions to 500, enter the following command:
hostname(config)# vpn-sessiondb max-session-limit 500
hostname(config)#
To remove the session limit, use the no version of this command:
hostname(config)# no vpn-sessiondb max-session-limit
hostname(config)#
To limit SSL VPN (AnyConnect and clientless) sessions to a lower value than the security appliance allows, use the vpn-sessiondb max-webvpn-session-limit command in global configuration mode. To remove the session limit, use the no version of this command.
hostname(config)# vpn-sessiondb max-webvpn-session-limit number_of_sessions
hostname(config)#
For example, if the security appliance license allows 500 SSL VPN (AnyConnect and clientless) sessions, and you want to limit the number of SSL VPN (AnyConnect and clientless) sessions to 250, enter the following command:
hostname(config)# vpn-sessiondb max-webvpn-session-limit 250
hostname(config)#
To remove the session limit, use the no version of this command:
hostname(config)# no vpn-sessiondb max-webvpn-session-limit
hostname(config)#
For a complete description of the features available with each license, see Appendix A, Feature Licenses and Specifications.
General Considerations
The following section provides questions and answers that you should consider as you set up VPN load balancing.
Q. ![]() Does the ASA consider IP Pool exhaustion as part of its VPN load balancing mechanism?
Does the ASA consider IP Pool exhaustion as part of its VPN load balancing mechanism?
A. ![]() No. If the VPN remote access session is directed to the least_loaded unit, which has exhausted its IP pools, then the session will fail to establish. The algorithm is based on Load, and is computed as an integer percentage (# of active/max sessions) supplied by each secondary cluster member.
No. If the VPN remote access session is directed to the least_loaded unit, which has exhausted its IP pools, then the session will fail to establish. The algorithm is based on Load, and is computed as an integer percentage (# of active/max sessions) supplied by each secondary cluster member.
Q. ![]() There are four ASAs in a cluster using a VIP via the ASA's own internal load balancing. Can we use the same group-url on all four members of the cluster w/o issues? And from a DNS perspective, can we just create an A record pointing at the VIP; or do we have to do something else?
There are four ASAs in a cluster using a VIP via the ASA's own internal load balancing. Can we use the same group-url on all four members of the cluster w/o issues? And from a DNS perspective, can we just create an A record pointing at the VIP; or do we have to do something else?
A. ![]() It appears that on each cluster member that we cannot use group-url https://vpn.rob.com/eng enable. Instead we have to use the real IP address (not the VIP) of the ASA. If we use the URL and/or the VIP IP, Anyconnect is unable to connect.
It appears that on each cluster member that we cannot use group-url https://vpn.rob.com/eng enable. Instead we have to use the real IP address (not the VIP) of the ASA. If we use the URL and/or the VIP IP, Anyconnect is unable to connect.
For example: I have a 2 ASA cluster setup and it turns out I have both the FQDN and IP address for group-url. When trying to access the cluster the ASA will use the IP address of the machines in the cluster. I removed the FQDN group-url and it stopped working.
ASA1 with group-url group-url https://10.94.147.93/BasicGroup
and
ASA2 with group-url group-url https://10.94.147.92/BasicGroup
I can then access the cluster and BasicGroup using the cluster name and group-url: cvc-asa.cisco.com/BasicGroup.
Q. ![]() When we implement VPN load balancing, shouldn't the address pools for AnyConnect clients (or IPSec/SSL clients) on different ASA's participating in cluster be different?
When we implement VPN load balancing, shouldn't the address pools for AnyConnect clients (or IPSec/SSL clients) on different ASA's participating in cluster be different?
A. ![]() Correct. If using address pools, they must be unique per device
Correct. If using address pools, they must be unique per device
Q. ![]() Can load load balancing and failover be combined?
Can load load balancing and failover be combined?
A. ![]() Yes.
Yes.
You can also have a configuration that combines both load balancing and failover. For example, the client connects to the IP address of the cluster and is redirected to the least-loaded ASA in the cluster. If that ASA goes down, the standby unit takes over immediately, and there is no impact to the client's tunnel.
Note ![]() Only the Active units participate in load balancing. Should the Active unit of a failover pair go down, then its Standby mate would become active and then join the Load Balancing cluster mechanism to distribute the VPN session load.
Only the Active units participate in load balancing. Should the Active unit of a failover pair go down, then its Standby mate would become active and then join the Load Balancing cluster mechanism to distribute the VPN session load.
Q. ![]() If we have SSL VPN (AnyConnect and clientless) enabled on multiple interfaces, is it possible to have VPN load balancing implemented for both of them?
If we have SSL VPN (AnyConnect and clientless) enabled on multiple interfaces, is it possible to have VPN load balancing implemented for both of them?
A. ![]() You can only define one interface to participate in the cluster as the `public' interface. The idea is to balance the CPU loads. Multiple interfaces still converge on the same cpu, so the concept of load-balancing on interfaces doesn't have any value. At this time there is no plans to support this.
You can only define one interface to participate in the cluster as the `public' interface. The idea is to balance the CPU loads. Multiple interfaces still converge on the same cpu, so the concept of load-balancing on interfaces doesn't have any value. At this time there is no plans to support this.
Q. ![]() By default, when a cluster master redirects an incoming connection, it redirects it by IP address so it would show up at the ASA with an IP address rather than FQDN.
By default, when a cluster master redirects an incoming connection, it redirects it by IP address so it would show up at the ASA with an IP address rather than FQDN.
A. ![]() The options are to add a group-url for the local ASA https://ip_address/group-url or add the following command to the ASA to allow them to forward by FQDN rather than IP address:
The options are to add a group-url for the local ASA https://ip_address/group-url or add the following command to the ASA to allow them to forward by FQDN rather than IP address:
(config)# vpn load-balancing
(config-load-balancing)# redirect-fqdn enable
Q. ![]() When trying to implement SSL licensing and failover, consider the following deployment:
When trying to implement SSL licensing and failover, consider the following deployment:
Two ASA5520's , each with 100-user SSL VPN licenses, in a load balancing cluster.
Does the maximum total number of users allow 200 simultaneous users or only a maximum of 100? If you add a third device later with 100 users, can you now support 300 simultaneous users?
A. ![]() With VPN load balancing, all devices are active. This allows you to take the licensed amount per device, and add them together to determine the maximum number of users that your cluster can support. For this example, 200 sessions for twoASAs and 300 sessions for three ASAs, respectively.
With VPN load balancing, all devices are active. This allows you to take the licensed amount per device, and add them together to determine the maximum number of users that your cluster can support. For this example, 200 sessions for twoASAs and 300 sessions for three ASAs, respectively.
Q. ![]() Is there a limit on the number of appliances that can participate in load balancing clustering?
Is there a limit on the number of appliances that can participate in load balancing clustering?
A. ![]() There is no hard limit. Engineering tests up to ten nodes in a cluster. Additional nodes may work, but we do not officially support that topology.
There is no hard limit. Engineering tests up to ten nodes in a cluster. Additional nodes may work, but we do not officially support that topology.
Q. ![]() How does load balancing work for the adapative security appliance?
How does load balancing work for the adapative security appliance?
A. ![]() Basically, load balancing works like this:
Basically, load balancing works like this:
•![]() The phase 1 negotiation is done on the virtual master.
The phase 1 negotiation is done on the virtual master.
•![]() An IKE redirect packet with the IP of a slave device was sent by the virtual master to the client.
An IKE redirect packet with the IP of a slave device was sent by the virtual master to the client.
•![]() The client will start a new phase 1 and 2 negotiation on the slave device just like a standalone vpn connection.
The client will start a new phase 1 and 2 negotiation on the slave device just like a standalone vpn connection.
For remote access, there is no need to setup any route manually. The situation is the same for a standalone as well as a load balancing redirected tunnel. Basically, a host route of the assigned IP address pointing to the public ip of the client device is installed on the inside interface of the ASA. "show route" will display the host route. Because of this reverse route, the inside interface of the ASA will respond to the ARP request of the client's assigned IP and hence, can return traffic from a server on the inside network to the client through the tunnel.
Load balancing works for IPSec/SSL Hardware Clients (VPN3002, PIX501, ASA5505)client/PAT mode and Network Extension Mode(NEM) as well.
 Feedback