- Information About the Botnet Traffic Filter
- Licensing Requirements for the Botnet Traffic Filter
- Prerequisites for the Botnet Traffic Filter
- Guidelines and Limitations
- Default Settings
- Configuring the Botnet Traffic Filter
- Monitoring the Botnet Traffic Filter
- Configuration Examples for the Botnet Traffic Filter
- Where to Go Next
- Feature History for the Botnet Traffic Filter
Botnet Traffic Filter
Malware is malicious software that is installed on an unknowing host. Malware that attempts network activity such as sending private data (passwords, credit card numbers, key strokes, or proprietary data) can be detected by the Botnet Traffic Filter when the malware starts a connection to a known bad IP address. The Botnet Traffic Filter checks incoming and outgoing connections against a dynamic database of known bad domain names and IP addresses (the blacklist), and then logs or blocks any suspicious activity.
You can also supplement the Cisco dynamic database with blacklisted addresses of your choosing by adding them to a static blacklist; if the dynamic database includes blacklisted addresses that you think should not be blacklisted, you can manually enter them into a static whitelist. Whitelisted addresses still generate syslog messages, but because you are only targeting blacklist syslog messages, they are informational.

Note![]() If you do not want to use the Cisco dynamic database at all, because of internal requirements, you can use the static blacklist alone if you can identify all the malware sites that you want to target.
If you do not want to use the Cisco dynamic database at all, because of internal requirements, you can use the static blacklist alone if you can identify all the malware sites that you want to target.
This chapter describes how to configure the Botnet Traffic Filter and includes the following sections:
- Information About the Botnet Traffic Filter
- Licensing Requirements for the Botnet Traffic Filter
- Prerequisites for the Botnet Traffic Filter
- Guidelines and Limitations
- Default Settings
- Configuring the Botnet Traffic Filter
- Monitoring the Botnet Traffic Filter
- Configuration Examples for the Botnet Traffic Filter
- Where to Go Next
- Feature History for the Botnet Traffic Filter
Information About the Botnet Traffic Filter
This section includes information about the Botnet Traffic Filter and includes the following topics:
- Botnet Traffic Filter Address Types
- Botnet Traffic Filter Actions for Known Addresses
- Botnet Traffic Filter Databases
- How the Botnet Traffic Filter Works
Botnet Traffic Filter Address Types
Addresses monitored by the Botnet Traffic Filter include:
- Known malware addresses—These addresses are on the blacklist identified by the dynamic database and the static blacklist.
- Known allowed addresses—These addresses are on the whitelist. The whitelist is useful when an address is blacklisted by the dynamic database and also identified by the static whitelist.
- Ambiguous addresses—These addresses are associated with multiple domain names, but not all of these domain names are on the blacklist. These addresses are on the greylist.
- Unlisted addresses—These addresses are unknown, and not included on any list.
Botnet Traffic Filter Actions for Known Addresses
You can configure the Botnet Traffic Filter to log suspicious activity, and you can optionally configure it to block suspicious traffic automatically.
Unlisted addresses do not generate any syslog messages, but addresses on the blacklist, whitelist, and greylist generate syslog messages differentiated by type. See Botnet Traffic Filter Syslog Messaging for more information.
Botnet Traffic Filter Databases
The Botnet Traffic Filter uses two databases for known addresses. You can use both databases together, or you can disable use of the dynamic database and use the static database alone. This section includes the following topics:
Information About the Dynamic Database
The Botnet Traffic Filter can receive periodic updates for the dynamic database from the Cisco update server. This database lists thousands of known bad domain names and IP addresses.
How the ASA Uses the Dynamic Database
The ASA uses the dynamic database as follows:
1.![]() When the domain name in a DNS reply matches a name in the dynamic database, the Botnet Traffic Filter adds the name and IP address to the DNS reverse lookup cache.
When the domain name in a DNS reply matches a name in the dynamic database, the Botnet Traffic Filter adds the name and IP address to the DNS reverse lookup cache.
2.![]() When the infected host starts a connection to the IP address of the malware site, then the ASA sends a syslog message informing you of the suspicious activity and optionally drops the traffic if you configured the ASA to do so.
When the infected host starts a connection to the IP address of the malware site, then the ASA sends a syslog message informing you of the suspicious activity and optionally drops the traffic if you configured the ASA to do so.
3.![]() In some cases, the IP address itself is supplied in the dynamic database, and the Botnet Traffic Filter logs or drops any traffic to that IP address without having to inspect DNS requests.
In some cases, the IP address itself is supplied in the dynamic database, and the Botnet Traffic Filter logs or drops any traffic to that IP address without having to inspect DNS requests.
Database Files
The database files are downloaded from the Cisco update server, and then stored in running memory; they are not stored in flash memory. Be sure to identify a DNS server for the ASA so that it can access the Cisco update server URL. In multiple context mode, the system downloads the database for all contexts using the admin context interface; be sure to identify a DNS server in the admin context.
If you need to delete the database, use the dynamic-filter database purge command instead. Be sure to first disable use of the database by entering the no dynamic-filter use-database command.
Note![]() To filter on the domain names in the dynamic database, you need to enable DNS packet inspection with Botnet Traffic Filter snooping; the ASA looks inside the DNS packets for the domain name and associated IP address.
To filter on the domain names in the dynamic database, you need to enable DNS packet inspection with Botnet Traffic Filter snooping; the ASA looks inside the DNS packets for the domain name and associated IP address.
Database Traffic Types
The dynamic database includes the following types of addresses:
- Ads—These are advertising networks that deliver banner ads, interstitials, rich media ads, pop-ups, and pop-unders for websites, spyware and adware. Some of these networks send ad-oriented HTML emails and email verification services.
- Data Tracking—These are sources associated with companies and websites that offer data tracking and metrics services to websites and other online entities. Some of these also run small advertising networks.
- Spyware—These are sources that distribute spyware, adware, greyware, and other potentially unwanted advertising software. Some of these also run exploits to install such software.
- Malware—These are sources that use various exploits to deliver adware, spyware and other malware to victim computers. Some of these are associated with rogue online vendors and distributors of dialers which deceptively call premium-rate phone numbers.
- Adult—These are sources associated with adult networks/services offering web hosting for adult content, advertising, content aggregation, registration & billing, and age verification. These may be tied to distribution of adware, spyware, and dialers.
- Bot and Threat Networks—These are rogue systems that control infected computers. They are either systems hosted on threat networks or systems that are part of the botnet itself.
Information About the Static Database
You can manually enter domain names or IP addresses (host or subnet) that you want to tag as bad names in a blacklist. Static blacklist entries are always designated with a Very High threat level. You can also enter names or IP addresses in a whitelist, so that names or addresses that appear on both the dynamic blacklist and the whitelist are identified only as whitelist addresses in syslog messages and reports. Note that you see syslog messages for whitelisted addresses even if the address is not also in the dynamic blacklist.
When you add a domain name to the static database, the ASA waits 1 minute, and then sends a DNS request for that domain name and adds the domain name/IP address pairing to the DNS host cache. (This action is a background process, and does not affect your ability to continue configuring the ASA). We recommend also enabling DNS packet inspection with Botnet Traffic Filter snooping. The ASA uses Botnet Traffic Filter snooping instead of the regular DNS lookup to resolve static blacklist domain names in the following circumstances:
- The ASA DNS server is unavailable.
- A connection is initiated during the 1 minute waiting period before the ASA sends the regular DNS request.
If DNS snooping is used, when an infected host sends a DNS request for a name on the static database, the ASA looks inside the DNS packets for the domain name and associated IP address and adds the name and IP address to the DNS reverse lookup cache.
If you do not enable Botnet Traffic Filter snooping, and one of the above circumstances occurs, then that traffic will not be monitored by the Botnet Traffic Filter.
Information About the DNS Reverse Lookup Cache and DNS Host Cache
When you use the dynamic database with DNS snooping, entries are added to the DNS reverse lookup cache. If you use the static database, entries are added to the DNS host cache (see Information About the Static Database about using the static database with DNS snooping and the DNS reverse lookup cache).
Entries in the DNS reverse lookup cache and the DNS host cache have a time to live (TTL) value provided by the DNS server. The largest TTL value allowed is 1 day (24 hours); if the DNS server provides a larger TTL, it is truncated to 1 day maximum.
For the DNS reverse lookup cache, after an entry times out, the ASA renews the entry when an infected host initiates a connection to a known address, and DNS snooping occurs.
For the DNS host cache, after an entry times out, the ASA periodically requests a refresh for the entry.
For the DNS host cache, the maximum number of blacklist entries and whitelist entries is 1000 each. The number of entries in the DNS reverse lookup cache varies per model.
How the Botnet Traffic Filter Works
Figure 22-1 shows how the Botnet Traffic Filter works with the dynamic database plus DNS inspection with Botnet Traffic Filter snooping.
Figure 22-1 How the Botnet Traffic Filter Works with the Dynamic Database
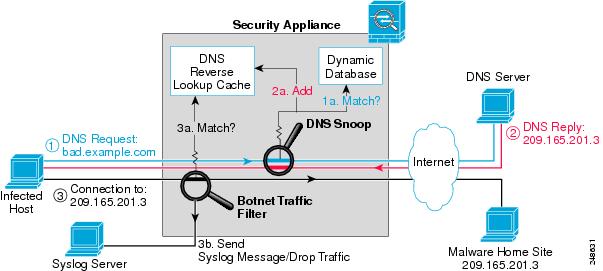
Figure 22-2 shows how the Botnet Traffic Filter works with the static database.
Figure 22-2 How the Botnet Traffic Filter Works with the Static Database

Licensing Requirements for the Botnet Traffic Filter
The following table shows the licensing requirements for this feature:
|
|
|
|---|---|
Prerequisites for the Botnet Traffic Filter
To use the dynamic database, identify a DNS server for the ASA so that it can access the Cisco update server URL. In multiple context mode, the system downloads the database for all contexts using the admin context interface; be sure to identify a DNS server in the admin context.
Guidelines and Limitations
This section includes the guidelines and limitations for this feature.
Supported in single and multiple context mode.
Supported in routed and transparent firewall mode.
Does not support replication of the DNS reverse lookup cache, DNS host cache, or the dynamic database in Stateful Failover.
Default Settings
By default, the Botnet Traffic Filter is disabled, as is use of the dynamic database.
For DNS inspection, which is enabled by default, Botnet Traffic Filter snooping is disabled by default.
Configuring the Botnet Traffic Filter
This section includes the following topics:
- Task Flow for Configuring the Botnet Traffic Filter
- Configuring the Dynamic Database
- Enabling DNS Snooping
- Adding Entries to the Static Database
- Enabling Traffic Classification and Actions for the Botnet Traffic Filter
- Blocking Botnet Traffic Manually
- Searching the Dynamic Database
Task Flow for Configuring the Botnet Traffic Filter
To configure the Botnet Traffic Filter, perform the following steps:
Step 1![]() Enable use of the dynamic database. See Configuring the Dynamic Database.
Enable use of the dynamic database. See Configuring the Dynamic Database.
This procedure enables database updates from the Cisco update server, and also enables use of the downloaded dynamic database by the ASA. Disallowing use of the downloaded database is useful in multiple context mode so you can configure use of the database on a per-context basis.
Step 2![]() (Optional) Add static entries to the database. See Adding Entries to the Static Database.
(Optional) Add static entries to the database. See Adding Entries to the Static Database.
This procedure lets you augment the dynamic database with domain names or IP addresses that you want to blacklist or whitelist. You might want to use the static database instead of the dynamic database if you do not want to download the dynamic database over the Internet.
Step 3![]() Enable DNS snooping. See Enabling DNS Snooping.
Enable DNS snooping. See Enabling DNS Snooping.
This procedure enables inspection of DNS packets, compares the domain name with those in the dynamic database or the static database (when a DNS server for the ASA is unavailable), and adds the name and IP address to the DNS reverse lookup cache. This cache is then used by the Botnet Traffic Filter when connections are made to the suspicious address.
Step 4![]() Enable traffic classification and actions for the Botnet Traffic Filter. See Enabling Traffic Classification and Actions for the Botnet Traffic Filter.
Enable traffic classification and actions for the Botnet Traffic Filter. See Enabling Traffic Classification and Actions for the Botnet Traffic Filter.
This procedure enables the Botnet Traffic Filter, which compares the source and destination IP address in each initial connection packet to the IP addresses in the dynamic database, static database, DNS reverse lookup cache, and DNS host cache, and sends a syslog message or drops any matching traffic.
Step 5![]() (Optional) Block traffic manually based on syslog message information. See Blocking Botnet Traffic Manually.
(Optional) Block traffic manually based on syslog message information. See Blocking Botnet Traffic Manually.
If you choose not to block malware traffic automatically, you can block traffic manually by configuring an access rule to deny traffic, or by using the shun command to block all traffic to and from a host.
Configuring the Dynamic Database
This procedure enables database updates, and also enables use of the downloaded dynamic database by the ASA. In multiple context mode, the system downloads the database for all contexts using the admin context interface. You can configure use of the database on a per-context basis.
By default, downloading and using the dynamic database is disabled.
Prerequisites
Enable ASA use of a DNS server according to the general operations configuration guide. In multiple context mode, the system downloads the database for all contexts using the admin context interface; be sure to identify a DNS server in the admin context.
Detailed Steps
Examples
The following multiple mode example enables downloading of the dynamic database, and enables use of the database in context1 and context2:
The following single mode example enables downloading of the dynamic database, and enables use of the database:
What to Do Next
Adding Entries to the Static Database
The static database lets you augment the dynamic database with domain names or IP addresses that you want to blacklist or whitelist. Static blacklist entries are always designated with a Very High threat level. See Information About the Static Database for more information.
Prerequisites
Detailed Steps
Examples
The following example creates entries for the blacklist and whitelist:
What to Do Next
Enabling DNS Snooping
This procedure enables inspection of DNS packets and enables Botnet Traffic Filter snooping, which compares the domain name with those on the dynamic database or static database, and adds the name and IP address to the Botnet Traffic Filter DNS reverse lookup cache. This cache is then used by the Botnet Traffic Filter when connections are made to the suspicious address.
The following procedure creates an interface-specific service policy for DNS inspection. See DNS Inspection and “Service Policy Using the Modular Policy Framework,” for detailed information about configuring advanced DNS inspection options using the Modular Policy Framework.
Prerequisites
In multiple context mode, perform this procedure in the context execution space.
Restrictions
Default DNS Inspection Configuration and Recommended Configuration
The default configuration for DNS inspection inspects all UDP DNS traffic on all interfaces, and does not have DNS snooping enabled.
We suggest that you enable DNS snooping only on interfaces where external DNS requests are going. Enabling DNS snooping on all UDP DNS traffic, including that going to an internal DNS server, creates unnecessary load on the ASA.
For example, if the DNS server is on the outside interface, you should enable DNS inspection with snooping for all UDP DNS traffic on the outside interface. See Examples section for the recommended commands for this configuration.
Detailed Steps
|
|
|
|
|---|---|---|
|
|
Creates a class map to identify the traffic for which you want to inspect DNS. |
|
|
|
Specifies traffic for the class map. See Identifying Traffic (Layer 3/4 Class Maps) for more information about available parameters. For example, you can specify an ACL for DNS traffic to and from certain addresses, or you can specify all UDP DNS traffic. |
|
|
|
Adds or edits a policy map so you can set the actions to take with the class map traffic. |
|
|
|
Identifies the class map you created in Step 1. |
|
inspect dns [ map_name ] dynamic-filter-snoop hostname(config-pmap-c)# inspect dns preset_dns_map dynamic-filter-snoop |
Enables DNS inspection with Botnet Traffic Filter snooping. To use the default DNS inspection policy map for the map_name, specify preset_dns_map for the map name. See DNS Inspection for more information about creating a DNS inspection policy map. |
|
service-policy policymap_name interface interface_name hostname(config)# service-policy dynamic-filter_snoop_policy interface outside |
Activates the policy map on an interface. The interface-specific policy overrides the global policy. You can only apply one policy map to each interface. |
Examples
The following recommended configuration creates a class map for all UDP DNS traffic, enables DNS inspection and Botnet Traffic Filter snooping with the default DNS inspection policy map, and applies it to the outside interface:
What to Do Next
See Enabling Traffic Classification and Actions for the Botnet Traffic Filter.
Enabling Traffic Classification and Actions for the Botnet Traffic Filter
This procedure enables the Botnet Traffic Filter. The Botnet Traffic Filter compares the source and destination IP address in each initial connection packet to the following:
- Dynamic database IP addresses
- Static database IP addresses
- DNS reverse lookup cache (for dynamic database domain names)
- DNS host cache (for static database domain names)
When an address matches, the ASA sends a syslog message. The only additional action currently available is to drop the connection.
Prerequisites
In multiple context mode, perform this procedure in the context execution space.
Recommended Configuration
Although DNS snooping is not required, we recommend configuring DNS snooping for maximum use of the Botnet Traffic Filter (see Enabling DNS Snooping). Without DNS snooping for the dynamic database, the Botnet Traffic Filter uses only the static database entries, plus any IP addresses in the dynamic database; domain names in the dynamic database are not used.
We recommend enabling the Botnet Traffic Filter on all traffic on the Internet-facing interface, and enabling dropping of traffic with a severity of moderate and higher. See Examples section for the recommended commands used for this configuration.
Detailed Steps
|
|
|
|
|---|---|---|
| access-list access_list_name extended { deny | permit } protocol source_address mask [ operator port ] dest_address mask hostname(config)# access-list dynamic-filter_acl extended permit tcp any any eq 80 hostname(config)# access-list dynamic-filter_acl_subset extended permit tcp 10.1.1.0 255.255.255.0 any eq 80 |
Identifies the traffic that you want to monitor or drop. If you do not create an ACL for monitoring, by default you monitor all traffic. You can optionally use an ACL to identify a subset of monitored traffic that you want to drop; be sure the ACL is a subset of the monitoring ACL. See the general operations configuration guide for more information about creating an ACL. |
|
dynamic-filter enable [ interface name ] [ classify-list access_list ] hostname(config)# dynamic-filter enable interface outside classify-list dynamic-filter_acl |
Enables the Botnet Traffic Filter; without any options, this command monitors all traffic. We recommend enabling the Botnet Traffic Filter on all traffic on the Internet-facing interface using the interface keyword. You can optionally limit monitoring to specific traffic by using the classify-list keyword with an ACL. You can enter this command one time for each interface and one time for the global policy (where you do not specify the interface keyword). Each interface and global command can have an optional classify-list keyword. Any interface-specific commands take precedence over the global command. |
|
| dynamic-filter drop blacklist [ interface name ] [ action-classify-list subset_access_list ] [ threat-level { eq level | range min max }] hostname(config)# dynamic-filter drop blacklist interface outside action-classify-list dynamic-filter_acl_subset threat-level range moderate very-high |
Automatically drops malware traffic. To manually drop traffic, see Blocking Botnet Traffic Manually. Be sure to first configure a dynamic-filter enable command to monitor any traffic you also want to drop. You can set an interface policy using the interface keyword, or a global policy (where you do not specify the interface keyword). Any interface-specific commands take precedence over the global command. You can enter this command multiple times for each interface and global policy. The action-classify-list keyword limits the traffic dropped to a subset of monitored traffic. The dropped traffic must always be equal to or a subset of the monitored traffic. For example, if you specify an ACL for the dynamic-filter enable command, and you specify the action-classify-list for this command, then it must be a subset of the dynamic-filter enable ACL. Make sure you do not specify overlapping traffic in multiple commands for a given interface/global policy. Because you cannot control the exact order that commands are matched, overlapping traffic means you do not know which command will be matched. For example, do not specify both a command that matches all traffic (without the action-classify-list keyword) as well as a command with the action-classify-list keyword for a given interface. In this case, the traffic might never match the command with the action-classify-list keyword. Similarly, if you specify multiple commands with the action-classify-list keyword, make sure each ACL is unique, and that the networks do not overlap. You can additionally limit the traffic dropped by setting the threat level. If you do not explicitly set a threat level, the level used is threat-level range moderate very-high. Note We highly recommend using the default setting unless you have strong reasons for changing the setting. The level and min and max options are: Note Static blacklist entries are always designated with a Very High threat level. |
|
| dynamic-filter ambiguous-is-black |
If you configured the dynamic-filter drop blacklist command, then this command treats greylisted traffic as blacklisted traffic for dropping purposes. If you do not enable this command, greylisted traffic will not be dropped. See Botnet Traffic Filter Address Types for more information about the greylist. |
Examples
The following recommended configuration monitors all traffic on the outside interface and drops all traffic at a threat level of moderate or higher:
If you decide not to monitor all traffic, you can limit the traffic using an ACL. The following example monitors only port 80 traffic on the outside interface, and drops traffic threat level very-high only:
Blocking Botnet Traffic Manually
If you choose not to block malware traffic automatically (see Enabling Traffic Classification and Actions for the Botnet Traffic Filter), you can block traffic manually by configuring an access rule to deny traffic, or by using the shun command tool to block all traffic to and from a host.
For example, you receive the following syslog message:
You can then perform one of the following actions:
For example, using the syslog message above, you might want to deny traffic from the infected host at 10.1.1.45 to the malware site at 209.165.202.129. Or, if there are many connections to different blacklisted addresses, you can create an ACL to deny all traffic from 10.1.1.45 until you resolve the infection on the host computer. For example, the following commands deny all traffic from 10.1.1.5 to 209.165.202.129, but permits all other traffic on the inside interface:
See the general operations configuration guide for more information about creating an ACL, and see “Access Rules,” for information about applying the ACL to the interface.
Note![]() ACLs block all future connections. To block the current connection, if it is still active, enter the clear conn command. For example, to clear only the connection listed in the syslog message, enter the clear conn address 10.1.1.45 address 209.165.202.129 command. See the command reference for more information.
ACLs block all future connections. To block the current connection, if it is still active, enter the clear conn command. For example, to clear only the connection listed in the syslog message, enter the clear conn address 10.1.1.45 address 209.165.202.129 command. See the command reference for more information.
Shunning blocks all connections from the host, so you should use an ACL if you want to block connections to certain destination addresses and ports. To shun a host, enter the following command. To drop the current connection as well as blocking all future connections, enter the destination address, source port, destination port, and optional protocol.
For example, to block future connections from 10.1.1.45, and also drop the current connection to the malware site in the syslog message, enter:
See for more information about shunning.
After you resolve the infection, be sure to remove the ACL or the shun. To remove the shun, enter no shun src_ip.
Searching the Dynamic Database
If you want to check if a domain name or IP address is included in the dynamic database, you can search the database for a string.
Detailed Steps
Examples
The following example searches on the string “example.com”, and finds 1 match:
The following example searches on the string “bad”, and finds more than 2 matches:
Monitoring the Botnet Traffic Filter
Whenever a known address is classified by the Botnet Traffic Filter, then a syslog message is generated. You can also monitor Botnet Traffic Filter statistics and other parameters by entering commands on the ASA. This section includes the following topics:
Botnet Traffic Filter Syslog Messaging
The Botnet Traffic Filter generates detailed syslog messages numbered 338 nnn. Messages differentiate between incoming and outgoing connections, blacklist, whitelist, or greylist addresses, and many other variables. (The greylist includes addresses that are associated with multiple domain names, but not all of these domain names are on the blacklist.)
See the syslog messages guide for detailed information about syslog messages.
Botnet Traffic Filter Commands
To monitor the Botnet Traffic Filter, enter one of the following commands:
Examples
The following is sample output from the show dynamic-filter statistics command:
The following is sample output from the show dynamic-filter reports top malware-sites command:
The following is sample output from the show dynamic-filter reports top malware-ports command:
The following is sample output from the show dynamic-filter reports top infected-hosts command:
Configuration Examples for the Botnet Traffic Filter
This section includes the recommended configuration for single and multiple context mode, as well as other possible configurations. This section includes the following topics:
Recommended Configuration Example
The following recommended example configuration for single context mode enables downloading of the dynamic database, and enables use of the database. It creates a class map for all UDP DNS traffic, enables DNS inspection and Botnet Traffic Filter snooping with the default DNS inspection policy map, and applies it to the outside interface, the Internet-facing interface.
Example 22-1 Single Mode Botnet Traffic Filter Recommended Example
The following recommended example configuration for multiple context mode enables the Botnet Traffic Filter for two contexts:
Example 22-2 Multiple Mode Botnet Traffic Filter Recommended Example
Other Configuration Examples
The following sample configuration adds static entries are to the blacklist and to the whitelist. Then, it monitors all port 80 traffic on the outside interface, and drops blacklisted traffic. It also treats greylist addresses as blacklisted addresses.
Where to Go Next
- To configure the syslog server, see the general operations configuration guide.
- To configure an ACL to block traffic, see the general operations configuration guide and also see “Access Rules,” for information about applying the ACL to the interface.
- To shun connections, see the legacy feature guide.
Feature History for the Botnet Traffic Filter
Table 22-1 lists each feature change and the platform release in which it was implemented.
 Feedback