Configuring Domains Using the GUI

Configuring Domains Using the GUI

This section provides a high-level description of the tasks that you must perform to configure domains. This document doesn’t cover how to configure interface access policies and AEP (Attachable Entity Profile). Please refer to other documents for this. The assumption is that you already have an AEP associated to your interface access policy for the interfaces where the external routers will be connected. The AEP needs to include the domains configured or modified in this section.


Note


If you have already created a Layer 3 domain that you want to use, but it lacks an available static VLAN range for a floating L3Out, add the VLAN pool with the static VLAN range using the procedure Configuring a VLAN Range for an Existing L3Out Domain VLAN Pool Using the GUI.


  • Create a physical domain or a VMware VDS Virtual Machine Manager (VMM) domain and specify the VLAN pool that includes the static encap VLAN ranges that you want to use for the floating L3Out. The use of a physical domain or a VMM domain depends on the specific form factors of the external routers (deploying a mix of physical and virtual external routers is also possible).

    For creating a physical domain, see the procedure Creating a Physical Domain Using the GUI.

    For creating a VMM domain, see the procedure Create a VMM Domain for VMware VDS Using the GUI.


Note


If you have already created a VMM domain or physical domain that you want to use, but it lacks an available static VLAN range for a floating L3Out, create the VLAN pool with the static VLAN range using the procedure Configuring a VLAN Range for an Existing VMM Domain VLAN Pool Using the GUI.


Domain configuration has the following considerations:

  • The VLAN pools associated to all the domains must include a static VLAN range. It is possible to define different VLAN pools for each domain, or a common VLAN pool used by all the domains. Also, the static VLAN range used for the L3Out domain must be the same as the VLAN pool of the VMM domain or physical domain. For example, both the VLAN range for the L3Out domain and the Virtual Machine Manager (VMM) or physical domain must include VLAN 200-209.

  • Floating L3Out with physical domains requires Cisco Application Policy Infrastructure Controller (APIC) release 5.0(1) or later.

  • If it is a physical domain, the floating IP address is deployed if the leaf port uses an AEP that, in addition to the physical domain, has an L3Out domain associated to the floating L3Out.

Use of an L3Out domain and a VMM domain for a floating L3Out below illustrates an example of an AEP that has an L3Out domain and a VMM domain for a floating L3Out.

Figure 1. Use of an L3Out domain and a VMM domain for a floating L3Out

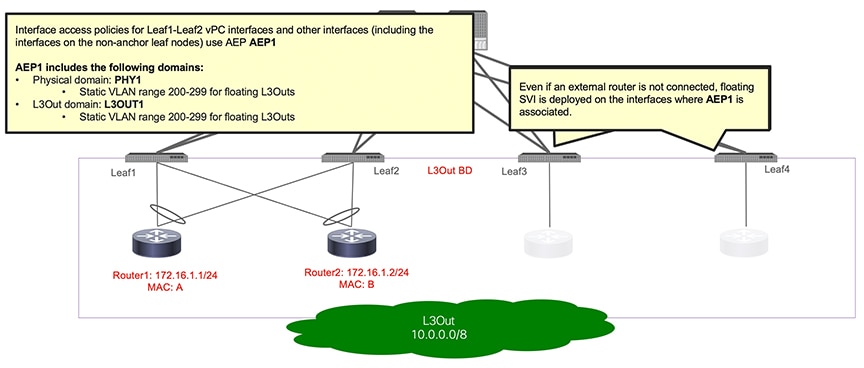
Use of an L3Out domain and a Physical domain for a floating L3Out below illustrates an example of an AEP that has an L3Out domain and a physical domain for a floating L3Out.

Figure 2. Use of an L3Out domain and a Physical domain for a floating L3Out

Create a Layer 3 Domain Using the GUI

Create a Layer 3 domain before you create the Layer 3 outside network connection (L3Out).

Procedure


Step 1

Log in to Cisco Application Policy Infrastructure Controller (APIC).

Step 2

Go to Fabric > Access Policies > .

Step 3

In the Policies navigation pane, expand the Physical and External Domains, right-click the L3 Domains folder, and then click Create L3 Domain.

Step 4

In the Create L3 Domain dialog box, complete the following steps:

  1. In the Name field, enter a name for the profile.

  2. From the Associated Attachable Entity Profile drop-down list, create or choose an attachable entity profile (AEP).

    If creating an attachable entity profile, enter the appropriate values in the Create Attachable Entity Profile dialog fields. You can click the ? icon to view a description of each field in the online help file.

    Note


    - For floating SVI deployment using a VMM domain, the AEP for the interfaces (anchor and non-anchor) must have both a Layer 3 domain and a VMM domain.

    - For floating SVI deployment using a physical domain, the AEP for the anchor node interfaces must have both a Layer 3 domain and a physical domain.

  3. From the VLAN Pool drop-down list, choose Create VLAN Pool.

  4. In the Create VLAN Pool dialog box, in the Name field, enter a name for the VLAN pool.

  5. In the Allocation Mode field, choose a mode.

  6. In the Encap Blocks area, click the + (plus) icon.

  7. In the Create Ranges dialog box, enter a range for the VLAN pool.

    Note

     
    See the note about configuring the VLAN pool range at the beginning of this procedure.
  8. In the Allocation Mode field, choose Static Allocation.

  9. Click OK.

  10. In the Create VLAN Pool dialog box, click OK.

Step 5

In the Create L3 Domain dialog box, click Submit.


Configuring a VLAN Range for an Existing L3Out Domain VLAN Pool Using the GUI

Use this procedure to configure the VLAN range for a floating Layer 3 outside network connection (L3Out) if you have already created the Layer 3 domain that you want to use. To use a floating L3Out, you must configure a VLAN pool for the Layer 3 domain that has the correct settings.

Before you begin

You must have created a Layer 3 domain. See the procedure

Procedure


Step 1

Log in to Cisco Application Policy Infrastructure Controller (APIC).

Step 2

Go to Fabric > Access Policies.

Step 3

In the Policies navigation pane, expand the Physical and External Domains and the L3 Domains folder, and choose the Layer 3 domain.

Step 4

In the central L3 Domain work pane, from the VLAN Pool drop-down list, choose an existing VLAN pool.

Step 5

In the Encap Blocks area, click the + (plus) icon.

Step 6

In the Create Ranges dialog box, enter a range for the VLAN pool.

Step 7

In the Allocation Mode field, choose Static Allocation.

Step 8

Click OK.

Step 9

In the Create VLAN Pool dialog box, click Submit.

Step 10

In the central Domain work pane click Submit.


What to do next

Configuring a VLAN Range for an Existing L3Out Domain VLAN Pool Using the GUI or Configuring a VLAN Range For an Existing Physical Domain VLAN Pool Using the GUI

Creating a Physical Domain Using the GUI

This section explains how to create a physical domain using the Cisco Application Centric Infrastructure (ACI) GUI.

Procedure


Step 1

From the menu bar click Fabric > Access Policies

Step 2

From the navigation bar, expand Physical and External Domains.

The Physical Domains folder appears in the navigation bar.

Step 3

From the navigation bar, right-click the Physical Domains folder and choose Create Physical Domain.

The Create Physical Domain dialog appears in the work pane.

Step 4

Enter the appropriate values in each field of the Create Physical Domain dialog.

Note


Click the ? icon to view a description of each field in the online help file.

Step 5

When finished, click Submit.


What to do next

Create a VMM Domain for VMware VDS Using the GUI.

Configuring a VLAN Range For an Existing Physical Domain VLAN Pool Using the GUI

Use this procedure to configure the VLAN range for a physical domain. You must configure a VLAN pool for the domain that has the correct settings. As previously mentioned, it is also possible to reuse the VLAN pool previously created for the L3Out domain.

Procedure


Step 1

Log in to Cisco Application Policy Infrastructure Controller (APIC).

Step 2

Go to Fabric > Access Policies.

Step 3

In the Policies navigation pane, expand the Physical and External Domains and the Physical Domains folder, and choose the domain.

Step 4

In the central Physical Domain work pane, from the VLAN Pool drop-down list, choose an existing VLAN pool.

Step 5

In the Encap Blocks area, click the + (plus) icon.

Step 6

In the Create Ranges dialog box, enter a range for the VLAN pool.

Step 7

In the Allocation Mode field, choose Static Allocation.

Step 8

Click OK.

Step 9

In the Create VLAN Pool dialog box, click Submit.

Step 10

In the central Domain work pane click Submit.


What to do next

Configuring a VLAN Range for an Existing VMM Domain VLAN Pool Using the GUI.

Create a VMM Domain for VMware VDS Using the GUI

Procedure


Step 1

Log in to Cisco Application Policy Infrastructure Controller (APIC).

Step 2

Go to Virtual Networking > Inventory.

Step 3

In the Inventory navigation pane, expand VMM Domains, right-click VMware, and then choose Create vCenter Domain.

Alternatively, in the Inventory navigation pane, you can choose Quick Start and in the central work pane choose (VMware hypervisor) Create a vCenter Domain Profile.

Step 4

In the Create vCenter Domain dialog box, complete the following steps:

  1. In the Virtual Switch Name field, enter a name.

  2. In the Virtual Switch Area, choose VMware vSphere Distributed Switch.

  3. From the Associated Attachable Entity Profile (AEP) drop-down list, create a new AEP or choose a profile that you created earlier.

    See "Create a Global Attachable Access Entity Profile" in the Cisco APIC Basic Configuration Guide for instructions.
  4. From the VLAN Pool drop-down list, choose or create a VLAN pool.

  5. In the vCenter Credentials area, click the + (plus) icon, and in the Create vCenter credential dialog box, do the following: Enter the VMware vCenter account profile name in the Name field, the VMware vCenter username in the Username field, enter and confirm the VMware vCenter password, and then click OK.

  6. In the vCenter area, click the + (plus) icon, and in the Create vCenter Controller dialog box, do the following: Enter the VMWare vCenter controller name, the VMWare vCenter host name or IP address, the DVS version, data center name (which must match the data center name configured in VMware vCenter), select the credentials created in the previous step, and then click OK.

  7. Fill out the remaining fields depending on your setup.

  8. In the Create vCenter Domain dialog box, click Submit.

    In the VMware work pane, you should see the newly created VMM domain, which is pushed to the VMware vCenter.


What to do next

Create a Layer 3 domain profile if you have not already done so. See the procedure Create a Layer 3 Domain Using the GUI.

Configuring a VLAN Range for an Existing VMM Domain VLAN Pool Using the GUI

Use this procedure to configure the VLAN range for an existing floating Layer 3 outside network connection (L3Out) if you have already created the Virtual Machine Manager (VMM) domain that you want to use. To use a floating L3Out, you must configure a VLAN pool for the VMM domain that has the correct settings.

Before you begin

You must have created a VMM domain profile. See the procedure Create a VMM Domain for VMware VDS Using the GUI.

Procedure


Step 1

Log in to Cisco Application Policy Infrastructure Controller (APIC).

Step 2

Go to Virtual Networking > Inventory.

Step 3

In the Inventory navigation pane, expand the VMM Domains and VMware folders, and then choose the VMM domain.

Step 4

In the central Domain work pane, from the VLAN Pool drop-down list, choose an existing VLAN pool.

Step 5

In the Encap Blocks area, click the + (plus) icon.

Step 6

In the Create Ranges dialog box, enter a range for the VLAN pool.

Note

 
See the note about configuring the VLAN pool range at the beginning of this procedure.

Step 7

In the Allocation Mode field, choose Static Allocation.

Step 8

Click OK.

Step 9

In the Create VLAN Pool dialog box, click Submit.

Step 10

In the central Domain work pane, click Submit.


What to do next

Create a Layer 3 domain if you have not done so already. See the section Create a Layer 3 Domain Using the GUI.