Configuring N Port Virtualization

This chapter provides information about N port virtualization and how to configure N port virtualization.

Feature History for N Port Virtualization

This table lists the New and Changed features.

Table 1. New and Changed Features

Feature Name

Release

Feature Information

N Port Virtualization (NPV) Load Balancing

8.5(1)

NPV load balancing scheme is enhanced to propose a mapping of server interfaces to external interfaces based on the throughput value so that the traffic can be evenly distributed on the external interfaces.

The following commands were introduced:

  • show npv traffic-map proposed

  • npv traffic-map analysis clear

N Port Identifier Virtualization

8.4(2)

The NPIV feature is enabled by default.

NP Ports

8.4(1)

Buffer-to-Buffer State Change Notification (BBSCN) allowed on NP Ports

Information About N Port Virtualization

N Port Virtualization Overview

Cisco N Port Virtualization (NPV) reduces the number of Fibre Channel domain IDs required in a fabric. Switches operating in the Cisco NPV mode do not join a fabric which eliminates the need for domain IDs for these switches. Such switches function as edge switches and pass traffic between an NPIV core switch and end devices. Cisco NPV switches cannot be standalone switches since they rely on an upstream NPIV enabled switch to provide many fabric services for them.

NPV is supported by the following Cisco MDS 9000 switches only:

  • Cisco MDS 9132T 32-Gbps 32-Port Fibre Channel Switch

  • Cisco MDS 9148T 32-Gbps 48-Port Fibre Channel Switch

  • Cisco MDS 9396T 32-Gbps 96-Port Fibre Channel Switch

  • Cisco MDS 9148S 16-Gbps Multilayer Fabric Switch

  • Cisco MDS 9396T 16-Gbps Multilayer Fabric Switch

  • Cisco MDS 9124V 64-Gbps 24-Port Fibre Channel Switch

  • Cisco MDS 9148V 64-Gbps 48-Port Fibre Channel Switch

  • Cisco MDS 9396V 64-Gbps 96-Port Fibre Channel Switch

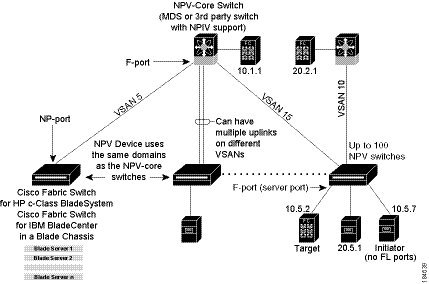
Cisco NPV technology is also available on Nexus and UCS Fabric Interconnects. Typically, Fibre Channel networks are deployed using a core-edge model with a large number of fabric switches connected to edge devices. Such a model is cost-effective because the per port cost for director class switches is higher than that of fabric switches. However, as the number of ports in the fabric increases, the number of switches deployed also increases, and you can end up with a significant increase in the number of domain IDs. This challenge becomes even more difficult when many blade chassis are deployed in Fibre Channel networks.

NPV addresses the increase in the number of domain IDs needed to deploy a large number of the ports by making a fabric switch or blade switch appear as a host to the core Fibre Channel switch, and as a Fibre Channel switch to the servers in the fabric or blade switch. NPV aggregates multiple locally connected N ports into one or more external NP links, which shares the domain ID of the core switch to which NPV devices are connected to. NPV also allows multiple devices to attach to same port on the core switch to which NPV devices are connected to, which reduces the need for more ports on the core

For more information on scalability limits, see the Cisco MDS NX-OS Configuration Limits guide.

Figure 1. Cisco NPV Fabric Configuration


While NPV is similar to N port identifier virtualization (NPIV), it does not offer exactly the same functionality. NPIV provides a means to assign multiple FC IDs to a single N port, and allows multiple applications on the N port to use different FCIDs. NPIV also allows access control, zoning, and port security to be implemented at the application level. NPV makes use of the NPIV feature on the core switch to get multiple FCIDs allocated on the NP port.

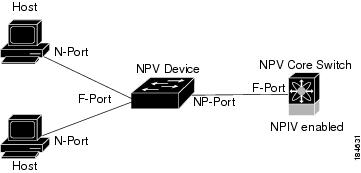
npv.html#wp4255863616__ shows a more granular view of an NPV configuration at the interface level.

Figure 2. Cisco NPV Configuration-Interface View


N Port Identifier Virtualization

The N port identifier virtualization (NPIV) feature provides a means to assign multiple FCIDs to a single N port. This feature allows multiple applications on the N port to use different FCIDs and allows access control, zoning, and port security to be implemented at the application level NPIV Example shows an example application using NPIV.

From Cisco MDS NX-OS Release 8.4(2), the NPIV feature is enabled by default.

Figure 3. NPIV Example


N Port Virtualization

Typically, Fibre Channel networks are deployed using a core-edge model with a large number of fabric switches connected to edge devices. Such a model is cost-effective because the per port cost for director class switches is much higher than that of fabric switches. However, as the number of ports in the fabric increases, the number of switches deployed also increases, and you can end up with a significant increase in the number of domain IDs. This challenge becomes even more difficult when additional blade chassis are deployed in Fibre Channel networks.

Figure 4. Cisco NPV Fabric Configuration


NPV addresses the increase in the number of domain IDs needed to deploy a large number of the ports by making a fabric or blade switch appear as a host to the core Fibre Channel switch, and as a Fibre Channel switch to the servers in the fabric or blade switch. NPV aggregates multiple locally connected N ports into one or more external NP links, which shares the domain ID of the core switch to which NPV devices are connected to among multiple NPV switches. NPV also allows multiple devices to attach to same port on the core switch to which NPV devices are connected to, which reduces the need for more ports on the core

For more information on scalability limits, see the Cisco MDS NX-OS Configuration Limits guide.

NPV Mode

A switch is in NPV mode after a user has enabled NPV and the switch has successfully rebooted. NPV mode applies to an entire switch. Use feature npv command to enable NPV. All end devices connected to a switch that is in NPV mode must log in as an N port to use this feature (loop-attached devices are not supported). All links from the edge switches (in NPV mode) to the NPIV switches are established as NP ports (not E ports), which are used for typical interswitch links. NPIV is used by the switches in NPV mode to log in to multiple end devices that share a link to the core switch to which NPV devices are connected to.


Note


In-order data delivery is not required in NPV mode because the exchange between two end devices always takes the same uplink to the core from the NPV device. For traffic beyond the NPV device, NPIV switches will enforce in-order delivery if needed and/or configured.

NP Ports

An NP port (proxy N port) is a port on a device that is in NPV mode and connected to the core switch to which NPV devices are connected to using an F port. NP ports behave like N ports except that in addition to providing N port behavior, they also function as proxies for multiple, physical N ports.

NP Links

An NP link is basically an NPIV uplink to a specific end device. NP links are established when the uplink to the core switch to which NPV devices are connected to comes up; the links are terminated when the uplink goes down. Once the uplink is established, the NPV switch performs an internal FLOGI to the core switch to which NPV devices are connected to, and then (if the FLOGI is successful) registers itself with the core switch to which NPV devices are connected to name server. Subsequent FLOGIs from end devices in this NP link are converted to FDISCs. For more details refer to the Internal FLOGI Parameters section.

Server links are uniformly distributed across the NP links. All the end devices behind a server link will be mapped to only one NP link.

Internal FLOGI Parameters

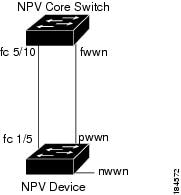
When an NP port comes up, the NPV device first logs itself in to the core switch to which NPV devices are connected to and sends a FLOGI request that includes the following parameters:

  • The fWWN (fabric port WWN) of the NP port used as the pWWN in the internal login.

  • The VSAN-based sWWN (switch WWN) of the NPV device used as nWWN (node WWN) in the internal FLOGI.

After completing its FLOGI request, the NPV device registers itself with the fabric name server using the following additional parameters:

  • Switch name and interface name (for example, fc1/4) of the NP port is embedded in the symbolic port name in the name server registration of the NPV device itself.

  • The IP address of the NPV device is registered as the IP address in the name server registration of the NPV device.


Note


The BB_SCN of internal FLOGIs on NP ports is always set to zero. The BB_SCN is supported at the F-port of the NPV device.

Internal FLOGI Flows shows the internal FLOGI flows between a core switch to which NPV devices are connected to and an NPV device.

Figure 5. Internal FLOGI Flows


Table 1 identifies the internal FLOGI parameters that appear in .

Table 2. Internal FLOGI Parameters

Parameter

Derived From

pWWN

The fWWN of the NP port.

nWWN

The VSAN-based sWWN of the NPV device.

fWWN

The fWWN of the F port on the core switch to which NPV devices are connected to.

symbolic port name

The switch name and NP port interface string.

Note

 
If there is no switch name available, then the output will display “switch.” For example, switch: fc1/5.

IP address

The IP address of the NPV device.

symbolic node name

The NPV switch name.

Although fWWN-based zoning is supported for NPV devices, it is not recommended because:

  • Zoning is not enforced at the NPV device (rather, it is enforced on the core switch to which NPV devices are connected to).

  • Multiple devices behind an NPV device log in via the same F port on the core (they use same fWWN and cannot be separated into different zones).

  • The same device might log in using different fWWNs on the core switch (depending on the NPV link it uses) and may need to be zoned using different fWWNs.

Default Port Numbers

Port numbers on NPV-enabled switches varies depending on the switch model. By default, the first port in every four ports is selected as NP port. For example, 1st, 5th, 9th, and so on. For details about port numbers for NPV-eligible switches, see Cisco MDS 9000 Series Licensing Guide.

NPV CFS Distribution over IP

NPV devices use only IP as the transport medium. CFS uses multicast forwarding for CFS distribution. NPV devices do not have ISL connectivity and FC domain. To use CFS over IP, multicast forwarding has to be enabled on the Ethernet IP switches all along the network that physically connects the NPV switch. You can also manually configure the static IP peers for CFS distribution over IP on NPV-enabled switches. For more information, see the Cisco MDS 9000 Series NX-OS System Management Configuration Guide.

NPV Traffic Management

Auto

Before Cisco MDS SAN-OS Release 3.3(1a), NPV supported automatic selection of external links. When a server interface is brought up, an external interface with the minimum load is selected from the available links. There is no manual selection on the server interfaces using the external links. Also, when a new external interface was brought up, the existing load was not distributed automatically to the newly available external interface. This newly brought up interface is used only by the server interfaces that come up after this interface.

Traffic Map

As in Cisco MDS SAN-OS Release 3.3(1a) and NX-OS Release 4.1(1a), NPV supports traffic management by allowing you to select and configure the external interfaces that the server uses to connect to the core switches.


Note


When the NPV traffic management is configured, the server uses only the configured external interfaces. Any other available external interface will not be used.

The NPV traffic management feature provides the following benefits:

  • Facilitates traffic engineering by providing dedicated external interfaces for the servers connected to NPV.
  • Uses the shortest path by selecting external interfaces per server interface.
  • Uses the persistent FC ID feature by providing the same traffic path after a link break, or reboot of the NPV or core switch.
  • Balances the load by allowing the user to evenly distribute the load across external interfaces.

Disruptive

Disruptive load balance works independent of automatic selection of interfaces and a configured traffic map of external interfaces. This feature forces reinitialization of the server interfaces to achieve load balance when this feature is enabled and whenever a new external interface comes up. To avoid flapping the server interfaces too often, enable this feature once and then disable it whenever the needed load balance is achieved.

If disruptive load balance is not enabled, you need to manually flap the server interface to move some of the load to a new external interface.

Cisco NPV Load Balancing

The Cisco NPV load balancing scheme automatically assigns traffic for each server to a logical external interface (uplink) when the server logs in to the fabric. These logical interfaces are usually F/NP port-channels but may also be individual Fibre Channel ports.

Cisco NPV switches can have multiple logical external interfaces, for example, when there are dual core switches in a single fabric. In this case, when a new server interface comes up, the external interface with the least number of server interfaces assigned to it is selected for the new server interface. Because individual server interfaces may have different loads, selecting external interfaces solely based on the number of logged in server interfaces may lead to uneven utilization on external interfaces in the transmit, receive, or both directions.

Also, if an additional external interface is activated, the existing logged in server interfaces are not automatically rebalanced to include the new external interface. Only the server interfaces that come up after the new external interface are activated will get assigned to it.

After a server interface is logged in and assigned to a specific external interface, it cannot be moved to another external interface nondisruptively. It must first log out from the fabric which stops traffic through the server interface, and then log in on the other external interface.

The following are the challenges of this load balancing scheme when used with multiple external interfaces:

  • Unable to optimally utilize the external interface bandwidth which may result in saturating bandwidth only on certain links and switches.

  • Impact on the performance of the servers that are connected to an external interface that is overloaded.

  • Sustained high load on any external interface may result in propagating slow drain condition to the other links in the fabric.

To improve the performance of the load balancing scheme, extra bandwidth can be added to each of the logical external interfaces. For example, in a dual core topology if there is an F/NP port-channel to each core switch, each should have sufficient bandwidth to handle the load of all server interfaces on the NPV switch. This is important in the event of a core switch failure and will also ensure that no single external interface gets over utilized.

Instead of using the traditional load balancing scheme and based on the least login count, users can now choose a new load balancing schema based on average link utilization. The show npv traffic-map proposed command may be used to find a mapping of server interfaces to external interfaces based on their measured loads so that server traffic can be evenly distributed on the external interfaces. This information is calculated and updated every 5 minutes. You can use this information to manually map the server interfaces to external interfaces using the npv traffic-map server-interface command. You can use the npv traffic-map analysis clear command to reset the link loads, but it does not reset the timer for calculating the loads.

Multiple VSAN Support

By grouping devices into different NPV sessions based on VSANs, it is possible to support multiple VSANs on the NPV-enabled switch. The correct uplink must be selected based on the VSAN that the uplink is carrying.

Guidelines and Limitations

The following sections provide information about guidelines and limitations for N Port Virtualization.

NPV Guidelines and Requirements

Following are recommended guidelines and requirements when deploying NPV:

  • For information on the number of NPV switches per NPIV switch, see the "Switch-Level Fibre Channel Configuration Limits for Cisco MDS 9000 Series Switches" section in the Cisco MDS NX-OS Configuration Limits.

  • Logins that are sent from Cisco NPV switch toggle on F port-channel when the FCNS limit reaches 20,000.

  • You can configure zoning for end devices that are connected to NPV switches using all available member types on an NPIV switch. However, the preferred way of zoning servers connected to any switch in NPV mode is via pWWN, device-alias, and fcalias. Multiple servers should be configured in the same zone only when using smart zoning. The smart zoning feature is available on all MDS switches. For more information, see the "Smart Zoning section in the "Configuring and Managing Zones" chapter of the Cisco MDS 9000 Series Fabric Configuration Guide.

  • NPV switches can be connected to upstream NPIV switches using links that are not part of port channel. In this configuration, NPV uses a load balancing algorithm to automatically and efficiently assign end devices to one of the NPIV switch links when they login to the fabric. Only links in the same VSAN as the end device are considered by the algorithm. All traffic to and from that end device then uses the assigned link; VSAN load balancing is not applied to traffic on the NPV-NPIV links. If there are multiple links between an NPV devices and the upstream NPIV switch, it is possible to override the default and assign end devices to a specific link using a traffic map. There is no dynamic login rebalancing in the case of a link brought up between the NPV and NPIV switches — it is not used until an end device logs in and is assigned to it.

    There is dynamic login rebalancing in the case of link failure between the NPV and NPIV switches. If an NPV-NPIV link fails, the end device assigned to it are logged out by the NPV switch and must relogin to the fabric. The logins are then distributed over the remaining NPV-NPIV links.

  • NPV switches can be connected to the NPIV switch via F port channels. In this configuration, end device logins are associated with the F port channel interface and not with any individual F port channel member. Failure of a member interface does not force end devices using the link to be logged out. Depending on the nature of the link failure, the end devices may experience some frame loss; however, if they can recover from this then they can continue normal operation using the remaining F port channel members. Likewise, if new members are added to an F port channel, all end devices utilizing it can immediately take advantage of the increased bandwidth. F port channels can also be configured for trunking (able to carry one or more VSANs). For these reasons, we recommend the use of F port channels when connecting NPV switches to the NPIV switch.

  • Both servers and targets can be connected to an NPV switch. Local switching is not supported; all traffic is switched using the NPIV switch.

  • NPV switches can be connected to multiple NPIV switches. In other words, different NP ports can be connected to different NPIV switches.

  • Some devices will login to the fabric multiple times requesting multiple FCIDs on a single interface. To support this multiple logins, the feature npiv command must be enabled. This is also supported on NPV switches. Consequently, both the feature npv and feature npiv commands can be enabled on the same switch.

  • You cannot configure BB_SCN on NPV switches that are using xNP ports because of interoperability issues with third-party NPIV switches.

  • Nondisruptive upgrades are supported on NPV switches.

  • Port security is supported on the NPIV switch for devices logged in via NPV.

  • Only F, NP, and SD ports are supported on NPV switches.

  • CDP is not supported on NPV devices.

NPV Traffic Management Guidelines:

  • Use NPV traffic management only when the default login balancing by the NPV switch is not sufficient.

  • Do not configure traffic maps for all servers. For non-configured servers, NPV will use the default login balancing.

  • Ensure that the persistent FCID feature is not disabled on the upstream NPIV switch. Traffic engineering directs the associated server interface to external interfaces that lead to the same NPIV switch.

  • A traffic map constrains the server interface to use the set of external interfaces specified. The server interface cannot use any other external interfaces that may be available even if all the specified external interfaces are not available.

  • Do not configure disruptive load balancing because this involves moving a device from one external interface to another interface. Moving the device between external interfaces requires NPV relogin to the NPIV switch through F port leading to traffic disruption.

  • If an NPV switch is connected to multiple upstream NPIV switches, server interface traffic may be forced to only use subset of the upstream NPIV switches by specifying the set of external interfaces between the NPV switch and the desired NPIV switches in a traffic map.

NPIV Guidelines and Limitations

  • If the NPIV feature was enabled using the feature npiv command and you are upgrading to Cisco MDS NX-OS Release 8.4(2) or later release, the NPIV feature remains enabled.

  • If the NPIV feature was not enabled using the feature npiv command and you are upgrading to Cisco MDS NX-OS Release 8.4(2) or later release, the NPIV feature remains disabled.

  • From Cisco MDS NX-OS Release 8.4(2), the NPIV feature is enabled by default. Therefore, the feature npiv command will not be displayed in the running configuration if this feature is enabled and the no feature npiv command will be displayed in the running configuration if this feature is disabled.

  • If migrating an MDS from Cisco MDS NX-OS Release 8.4(2) or a later release to a release earlier than Cisco MDS NX-OS Release 8.4(2), then the behaviour of the NPIV feature depends on how it is configured and how the migration is performed. If the NPIV feature is enabled before the migration (the default configuration) and the migration is done via an ISSD downgrade, then NPIV remains enabled when the migration has completed (a nondefault configuration in these releases). If the NPIV feature is enabled before the migration (the default configuration) and the migration is done via a reboot, then NPIV will be disabled after the migration has completed (the default configuration in these releases).

  • If you are upgrading switches that have the NPIV feature disabled to Cisco MDS NX-OS Release 8.4(2) or later releases and if you are adding new switches that are running Cisco MDS NX-OS Release 8.4(2) or later releases that have the NPIV feature enabled by default to a fabric, ensure that you either disable the NPIV feature on the new switches or enable the NPIV feature on your exiting switches.

DPVM Configuration Guidelines for NPIV

The following requirements must be met before you configure DPVM on the core switch to which NPV devices are connected to:

  • You must explicitly configure the WWN of the internal FLOGI in DPVM. If DPVM is configured on the core switch to which NPV devices are connected to for an end device that is connected to the NPV device, then that end device must be configured to be in the same VSAN. Logins from a device connected to an NPV device will fail if the device is configured to be in a different VSAN. To avoid VSAN mismatches, ensure that the internal FLOGI VSAN matches the port VSAN of the NP port.

  • The first login from an NP port determines the VSAN of that port. If DPVM is configured for this first login, which is the internal login of the NPV device, then the core switches to which NPV devices are connected to F port is located in that VSAN. Otherwise, the port VSAN remains unchanged.

For details about DPVM configuration, see Cisco MDS 9000 Series NX-OS Fabric Configuration Guide.

NPV and Port Security Configuration Guidelines

Port security is enabled on the NPIV switch on a per interface basis. To enable port security on the core switch to which NPV devices are connected to for devices logging in via NPV, you must adhere to the following requirements:

  • The internal FLOGI must be in the port security database so that, the port on the core switch to which NPV devices are connected to will allow communications and links.

  • All of the end device pWWNs must also be in the port security database.

Once these requirements are met, you can enable port security as you would in any other context. For details about enabling port security, see the Cisco MDS 9000 Series NX-OS Security Configuration Guide.

Configuring N Port Virtualization

The following sections provide information about guidelines and limitations for N Port Virtualization.

Enabling N Port Identifier Virtualization

You must globally enable NPIV for all VSANs on the MDS switch to allow the NPIV-enabled applications to use multiple N port FCIDs.


Note


All of the N port FCIDs are allocated in the same VSAN.

To enable or disable NPIV on the switch, perform these steps:

Procedure


Step 1

switch# configure terminal

Enters configuration mode.

Step 2

switch(config)# feature npiv

Enables NPIV for all VSANs on the switch.

switch(config)# no feature npiv

(Optional) Disables (default) NPIV on the switch.


Configuring NPV

When you enable NPV, the system configuration is erased and the system reboots with the NPV mode enabled.


Note


We recommend that you save the current configuration either on bootflash or a TFTP server before NPV (if the configuration is required for later use). Use the following commands to save either your non-NPV or NPV configuration:

switch# copy running bootflash:filename

The configuration can be reapplied later using the following command:

switch# copy bootflash:filename running-config


Note


NPV cannot be enabled or disabled from the ASCII configuration file. You can enable or disable only from the command line.

To configure NPV, perform the following steps:

Procedure


Step 1

switch# configure terminal

Enters configuration mode on the NPIV core switch.

Step 2

switch(config)# feature npiv

Enables NPIV mode on the NPIV core switch.

switch(config)# no feature npiv

(Optional) Disables NPIV mode on the NPIV core switch.

Step 3

switch(config)# interface fc 2/1

Configures the NPIV core switch port as an F port.

switch(config-if)# switchport mode F

switch(config-if)# no shutdown

Changes Admin status to bring up the interfaces.

Step 4

switch(config)# vsan database

switch(config-vsan-db)# vsan 8 interface fc 2/1

Configures the port VSANs for the F port on the NPIV core switch.

Step 5

switch(config)# feature npv

Enables NPV mode on a NPV device. The module or switch is rebooted, and when it comes back up, is in NPV mode.

Note

 
A write-erase is performed during the reboot.

Step 6

switch(config)# interface fc 1/1

On the NPV device, selects the interfaces that will be connected to the aggregator switch and configure them as NP ports.

switch(config-if)# switchport mode NP

switch(config-if)# no shutdown

Changes Admin status to bring up the interfaces.

Step 7

switch(config-if)# exit

Exits interface mode for the port.

Step 8

switch(config)# vsan database

switch(config-vsan-db)# vsan 9 interface fc 1/1

Configures the port VSANs for the NP port on the NPV device.

Step 9

switch(config)# interface fc 1/2 - 6

Selects the remaining interfaces (2 through 6) on the NPV-enabled device and configures them as F ports.

switch(config-if)# switchport mode F

switch(config-if)# no shutdown

Changes Admin status to bring up the interfaces.

Step 10

switch(config)# vsan database

switch(config-vsan-db)# vsan 12 interface fc 1/1 - 6

Configures the port VSANs for the F ports on the NPV device.

Step 11

switch(config-npv)# no feature npv

Terminates session and disables NPV mode, which results in a reload of the NPV device.


Configuring NPV Traffic Management

The NPV traffic management feature is enabled after configuring NPV. Configuring NPV traffic management involves configuring a list of external interfaces to the servers, and enabling or disabling disruptive load balancing.

Configuring List of External Interfaces per Server Interface

A list of external interfaces are linked to the server interfaces when the server interface is down, or if the specified external interface list includes the external interface already in use.

To configure the list of external interfaces per server interface, perform the following tasks:

Procedure

Step 1

switch# configure terminal

Enters configuration mode on the NPV.

Step 2

switch(config)# npv traffic-map server-interface svr-if-range external-interface fc ext-fc-if-range

Allows you to configure a list of external FC interfaces per server interface by specifying the external interfaces in the svr-if-range. The server to be linked is specified in the ext-fc-if-range.

Step 3

switch(config)# npv traffic-map server-interface svr-if-range external-interface port-channel ext-pc-if-range

Allows you to configure a list of external port channel interfaces per server interface by specifying the external interfaces in the svr-if-range. The server to be linked is specified in the ext-pc-if-range.

Note


While mapping non port channel interfaces and port channel interfaces to the server interfaces, include them separately in two steps.

Step 4

switch(config)# no npv traffic-map server-interface svr-if-range external-interface ext-if-range

Disables the Cisco NPV traffic management feature on Cisco NPV.


Enabling the Global Policy for Disruptive Load Balancing

Disruptive load balancing allows you to review the load on all the external interfaces and balance the load disruptively. Disruptive load balancing is done by moving the servers using heavily loaded external interfaces, to the external interfaces running with fewer loads.

To enable or disable the global policy for disruptive load balancing, perform the following tasks:

Procedure

Step 1

switch# configure terminal

Enters configuration mode on the NPV.

Step 2

switch(config)# npv auto-load-balance disruptive

Enables disruptive load balancing on the core switch to which NPV devices are connected to.

Step 3

switch (config)# no npv auto-load-balance disruptive

Disables disruptive load balancing on the core switch to which NPV devices are connected to.


Verifying NPV and NPIV Configuration

To display NPV configuration information, perform one of the following tasks:

Command

Purpose

show fcns database

Displays all the NPIV core devices in all the VSANs that the aggregator switch belongs to.

show fcns database detail

Displays additional details such as IP addresses, switch names, interface names about the NPIV core devices.

show npv flogi-table

Displays a list of the NPV devices that are logged in, along with VSANs, source information, pWWNs, and FCIDs.

show npv status

Displays the status of the different servers and external interfaces.

show npv traffic-map

Displays the NPV traffic map.

show npv internal info traffic-map

Displays the NPV internal traffic details.

For detailed information about the fields in the output from these commands, refer to Cisco MDS 9000 Series NX-OS Command Reference.

Verifying NPV

To view all the NPIV devices in all the VSANs that the aggregator switch belongs to, enter the show fcns database command.


switch# show fcns database
 
VSAN 1:
--------------------------------------------------------------------------
FCID TYPE PWWN (VENDOR) FC4-TYPE:FEATURE
--------------------------------------------------------------------------
0x010000 N 20:01:00:0d:ec:2f:c1:40 (Cisco) npv 
0x010001 N 20:02:00:0d:ec:2f:c1:40 (Cisco) npv 
0x010200 N 21:00:00:e0:8b:83:01:a1 (Qlogic) scsi-fcp:init 
0x010300 N 21:01:00:e0:8b:32:1a:8b (Qlogic) scsi-fcp:init 
Total number of entries = 4

For additional details (such as IP addresses, switch names, interface names) about the NPIV devices you see in the show fcns database output, enter the show fcns database detail command.


switch# show fcns database detail
 
------------------------
VSAN:1 FCID:0x010000
------------------------
port-wwn (vendor) :20:01:00:0d:ec:2f:c1:40 (Cisco) 
node-wwn :20:00:00:0d:ec:2f:c1:40
class :2,3
node-ip-addr :172.20.150.38
ipa :ff ff ff ff ff ff ff ff
fc4-types:fc4_features :npv 
symbolic-port-name :para-3:fc1/1
symbolic-node-name :para-3
port-type :N 
port-ip-addr :0.0.0.0
fabric-port-wwn :20:01:00:0d:ec:04:99:40
hard-addr :0x000000
permanent-port-wwn (vendor) :20:01:00:0d:ec:2f:c1:40 (Cisco) 
connected interface         :port-channel6
switch name (IP address)    :switch (192.0.2.1)
------------------------
VSAN:1 FCID:0x010001
------------------------
port-wwn (vendor) :20:02:00:0d:ec:2f:c1:40 (Cisco) 
node-wwn :20:00:00:0d:ec:2f:c1:40
class :2,3
node-ip-addr :172.20.150.38
ipa :ff ff ff ff ff ff ff ff
fc4-types:fc4_features :npv 
symbolic-port-name :para-3:fc1/2
symbolic-node-name :para-3
port-type :N 
port-ip-addr :0.0.0.0
fabric-port-wwn :20:02:00:0d:ec:04:99:40
hard-addr :0x000000
permanent-port-wwn (vendor) :20:02:00:0d:ec:2f:c1:40 (Cisco) 
connected interface         :port-channel6
switch name (IP address)    :switch (192.0.2.1)

If you need to contact support, enter the show tech-support NPV command and save the output so that support can use it to troubleshoot, if necessary.

To display a list of the NPV devices that are logged in, along with VSANs, source information, pWWNs, and FCIDs, enter the show npv flogi-table command.


switch# show npv flogi-table
--------------------------------------------------------------------------------
SERVER                                                                  EXTERNAL
INTERFACE VSAN FCID             PORT NAME               NODE NAME       INTERFACE
--------------------------------------------------------------------------------
fc1/19    1    0xee0008 10:00:00:00:c9:60:e4:9a 20:00:00:00:c9:60:e4:9a fc1/9   
fc1/19    1    0xee0009 20:00:00:00:0a:00:00:01 20:00:00:00:c9:60:e4:9a fc1/1   
fc1/19    1    0xee000a 20:00:00:00:0a:00:00:02 20:00:00:00:c9:60:e4:9a fc1/9   
fc1/19    1    0xee000b 33:33:33:33:33:33:33:33 20:00:00:00:c9:60:e4:9a fc1/1   
Total number of flogi = 4.

To display the status of the different servers and external interfaces, enter the show npv status command.


switch# show npv status
 
npiv is enabled
 
External Interfaces:
====================
  Interface: fc1/1, VSAN: 2, FCID: 0x1c0000, State: Up
  Interface: fc1/2, VSAN: 3, FCID: 0x040000, State: Up
 
  Number of External Interfaces: 2
 
Server Interfaces:
==================
  Interface: fc1/7, VSAN: 2, NPIV: No, State: Up
  Interface: fc1/8, VSAN: 3, NPIV: No, State: Up
 
  Number of Server Interfaces: 2

Verifying NPV Traffic Management

To display the NPV traffic map, enter the show npv traffic-map command.


switch# show npv traffic-map
 
NPV Traffic Map Information:
-----------------------------
Server-If    External-If(s)
-----------------------------
fc1/1        fc1/5
-----------------------------

To display the NPV internal traffic details, enter the show npv internal info traffic-map command.


switch# show npv internal info traffic-map
 
NPV Traffic Map Information:
------------------------------------------------------------
Server-If    Last Change Time                External-If(s)
------------------------------------------------------------
fc1/1        2015-01-15 03:24:16.247856       fc1/5
------------------------------------------------------------