Intrusion Prevention System

This feature enables Intrusion Prevention System (IPS) or Intrusion Detection System (IDS) for branch offices on Cisco SD-WAN. It is delivered using a virtual image on Cisco IOS XE SD-WAN devices. This feature uses the Snort engine to provide IPS and IDS functionalities.

Snort is an open source network IPS that performs real-time traffic analysis and generates alerts when threats are detected on IP networks. It can also perform protocol analysis, content searching or matching, and detect a variety of attacks and probes (such as buffer overflows).

Overview of Intrusion Prevention System

The IPS feature works in the network intrusion detection and prevention mode that provides IPS or IDS functionalities. In the network intrusion detection and prevention mode, the engine performs the following actions:

  • Monitors network traffic and analyzes against a defined rule set.

  • Performs attack classification.

  • Invokes actions against matched rules.

Based on your requirements, you can enable Snort either in IPS or IDS mode. In IDS mode, the engine inspects the traffic and reports alerts, but does not take any action to prevent attacks. In IPS mode, in addition to intrusion detection, actions are taken to prevent attacks.

IPS the traffic and reports events to vManage or an external log server (if configured). External third-party monitoring tools, which supports Snort logs, can be used for log collection and analysis.
Cisco SD-WAN IPS Solution

The Snort IPS solution consists of the following entities:

  • Snort sensor: Monitors the traffic to detect anomalies based on the configured security policies (that includes signatures, statistics, protocol analysis, and so on) and sends alert messages to the Alert/Reporting server. The Snort sensor is deployed as a security virtual image on the router.

  • Signature store: Hosts the Cisco Talos signature packages that are updated periodically. vManage periodically downloads signature packages to the Snort sensors. You can modify the time interval to check for and down signature updates in Administration > Settings > IPS Signature Update.

  • Alert/Reporting server: Receives alert events from the Snort sensor. Alert events generated by the Snort sensor can either be sent to vManage or an external syslog server or to both vManage and an external syslog server. vManage events can be viewed in Monitor > Events. No external log servers are bundled with the IPS solution.

Configure and Apply IPS or IDS

To configure and apply IPS or IDS to a Cisco IOS XE SD-WAN device, do the following:

Configure Intrusion Prevention or Detection

To configure Intrusion Prevention or Detection through a security policy, use the vManage security configuration wizard:

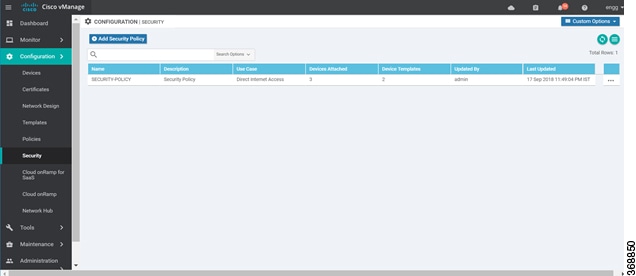
  1. In Cisco vManage, select the Configuration > Security tab in the left side panel.

  2. Click Add Security Policy. The Add Security Policy wizard opens, and various use-case scenarios are displayed.

  3. In Add Security Policy, select a scenario that supports intrusion prevention (Compliance, Direct Cloud Access, Direct Internet Access, or Custom).

  4. Click Proceed to add an Intrusion Prevention policy in the wizard.

  5. In the Add Security Policy wizard, click Next until the Intrusion Prevention screen is displayed.

  6. Click the Add Intrusion Prevention Policy drop-down and choose Create New to create a new Intrusion Prevention policy. The Intrusion Prevention - Policy Rule Configuration wizard appears.

  7. Click on Target VPNs to add the required number of target service VPNs in the Add Target VPNs wizard.

  8. Enter a policy name in the Policy Name field.

  9. Choose a signature set that defines rules for evaluating traffic from the Signature Set drop-down. The following options are available. Connectivity provides the least restrictions and the highest performance. Security provides the most restrictions but can affect system performance.

    • Balanced: Designed to provide protection without a significant effect on system performance.

      This signature set blocks vulnerabilities with a CVSS score that is greater than or equal to 9. It also blocks CVEs published in the last two years and that have the following rule categories: Malware CNC, Exploit Kits, SQL Injection or blocked list.

    • Connectivity: Designed to be less restrictive and provide better performance by imposing fewer rules.

      This signature set blocks vulnerabilities with a CVSS score of 10 and CVEs published in the last two years.

    • Security: Designed to provide more protection than Balanced but with an impact on performance.

      This signature set blocks vulnerabilities with a CVSS score that is greater than or equal to 8. It also blocks CVEs published in the last three years and that have the following rule categories: Malware CNC, Exploit Kits, SQL Injection, blocked list, and App Detect Rules.

  10. Choose mode of operation from the Inspection Mode drop-down. The following options are available:

    • Detection: Select this option for intrusion detection mode

    • Protection: Select this option for intrusion protection mode

  11. (Optional) From the Advanced tab, choose one or more existing IPS signature lists or create new ones as needed from the Signature Whitelist drop-down.

    Selecting an IPS signature list allows the designated IPS signatures to pass through.

    To create a new signature list, click New Signature List at the bottom of the drop-down. In the IPS Signature List Name field, enter a list name consisting of up to 32 characters (letters, numbers, hyphens and underscores only). In the IPS Signature field, enter signatures in the format Generator ID:Signature ID, separated with commas. You also can use the Import button to add a list from an accessible storage location. Click Save when you are finished.

    You also can create or manage IPS Signature lists by selecting the Configuration > Security tab in the left side panel, choosing Lists from the Custom Options drop-down at the top right of the page, and then selecting Signatures in the left panel.

    To remove an IPS Signature list from the Signature Whitelist field, click the X next to the list name in the field.

  12. (Optional) Choose an alert level for syslogs from the Alert Log Level drop-down. The options are:

    • Emergency

    • Alert

    • Critical

    • Error

    • Warning

    • Notice

    • Info

    • Debug

    You must configure the address of the external log server in the Policy Summary page.

  13. Click Save Intrusion Prevention Policy to add an Intrusion Prevention policy.

  14. Click Next until the Policy Summary page is displayed

  15. Enter Security Policy Name and Security Policy Description in the respective fields.

  16. If you set an alert level when configuring the Intrusion Prevention policy, in the Additional Policy Settings section, you must specify the following:

    • External Syslog Server VPN: The syslog server should be reachable from this VPN.

    • Server IP: IP address of the server.

    • Failure Mode: Open or Close

  17. Click Save Policy to configure the Security policy.

  18. You can edit the existing Intrusion Prevention policy by clicking on Custom Options in the right-side panel of the vManage > Configuration > Security wizard.

Apply a Security Policy to a Device

To apply a security policy to a device:

  1. In vManage, select the Configuration > Templates screen.

  2. In the Device tab, from the Create Template drop-down, select From Feature Template.

  3. From the Device Model drop-down, select one of the IOS XE SD-WAN devices.

  4. Click the Additional Templates tab located directly beneath the Description field. The screen scrolls to the Additional Templates section.

  5. From the Security Policy drop-down, select the name of the policy you configured in the previous procedure.

  6. Click Create to apply the security policy to a device.

Modify an Intrusion Prevention or Detection Policy

To modify a intrusion prevention or detection policy, do the following:

  1. In Cisco vManage, select the Configuration > Security tab in the left side panel.

  2. In the Security screen, click the Custom Options drop-down and select Intrusion Prevention.

  3. For the policy that you want to modify, click the More Actions icon to the far right of the policy and select Edit.

  4. Modify the policy as required and click Save Intrusion Prevention Policy.

Delete an Intrusion Prevention or Detection Policy

To delete an intrusion prevention or detection policy, you must first detach the policy from the security policy:

  1. In Cisco vManage, select the Configuration > Security tab in the left side panel.

  2. Detach the IPS or IDS policy from the security policy as follows:

    1. For the security policy that contains the IPS or IDS policy, click the More Actions icon to the far right of the policy and select Edit.

      The Policy Summary page is displayed.

    2. Click the Intrusion Prevention tab.

    3. For the policy that you want to delete, click the More Actions icon to the far right of the policy and select Detach.

    4. Click Save Policy Changes.

  3. Delete the IPS or IDS policy as follows:

    1. In the Security screen, click the Custom Options drop-down and select Intrusion Prevention.

    2. For the policy that you want to delete, click the More Actions icon to the far right of the policy and select Delete.

      A dialog box is displayed.

    3. Click OK.

Monitor Intrusion Prevention Policy

You can monitor the Intrusion Prevention System (IPS) signature violations by severity and by count using the following steps.

To monitor the Signatures of IPS Configuration on IOS XE SD-WAN device:

  1. From the Monitor > Network screen, select a device.

  2. In the left panel, under Security Monitoring, select Intrusion Prevention tab. The Intrusion Prevention wizard displays.

  3. Click By Severity or By Count to designate how you want to display intrusion prevention information.

Update IPS Signatures

IPS uses Cisco Talos signatures to monitor the network. Cisco recommends following this procedure to download the latest signatures.


Note

To download the signatures, vManage requires access to the following domains using port 443:

  • api.cisco.com

  • cloudsso.cisco.com

  • dl.cisco.com

  • dl1.cisco.com

  • dl2.cisco.com

  • dl3.cisco.com


  1. In Cisco vManage, select the Administration > Settings tab in the left side panel to configure IPS Signature Update.

  2. Click on Edit to Enable/Disable and provide your Cisco.com Username and Password details to save the Policy details as shown in the following screenshot.