Configure Management Remote Access
This section describes how to configure ASA access for ASDM, Telnet, or SSH, and other management parameters such as a login banner.
Configure ASA Access for HTTPS, Telnet, or SSH
This section describes how to configure ASA access for HTTPS, including ASDM and CSM, Telnet, or SSH. See the following guidelines:
-
To access the ASA interface for management access, you do not also need an access rule allowing the host IP address. You only need to configure management access according to the sections in this chapter. If, however, you configure HTTP redirect to redirect HTTP connections to HTTPS automatically, you must enable an access rule to allow HTTP; otherwise, the interface cannot listen to the HTTP port.
-
Management access to an interface other than the one from which you entered the ASA is not supported. For example, if your management host is located on the outside interface, you can only initiate a management connection directly to the outside interface. The only exception to this rule is through a VPN connection. See Configure Management Access Over a VPN Tunnel.
-
The ASA allows:
-
A maximum of 5 concurrent Telnet connections per context, if available, with a maximum of 100 connections divided among all contexts.
-
A maximum of 5 concurrent SSH connections per context, if available, with a maximum of 100 connections divided among all contexts.
-
In single context mode, you can have a maximum 5 ASDM concurrent sessions. In multiple context mode, you can have a maximum of 5 concurrent ASDM sessions per context, with a maximum of 200 ASDM instances among all contexts.
ASDM sessions use two HTTPS connections: one for monitoring that is always present, and one for making configuration changes that is present only when you make changes. For example, the multiple-context mode system limit of 200 ASDM sessions represents a limit of 400 HTTPS sessions.
-
A maximum of 6 concurrent non-ASDM HTTPS sessions in single context mode or per context, if available, with a maximum or 100 HTTPS sessions among all contexts.
-
Configure HTTPS Access for ASDM, Other Clients
This section describes how to configure ASA access for HTTPS, including ASDM and CSM.
If you enable both SSL (webvpn > enable interface) and HTTPS access on the same interface, you can access Secure Client from https://ip_address and ASDM from https://ip_address/admin, both on port 443. If you also enable authentication for HTTPS (Configure Authentication for CLI, ASDM, and enable command Access), then you must specify a different port for ASDM access.
Before you begin
-
In multiple context mode, complete this procedure in the context execution space. To change from the system to a context configuration, in the Configuration > Device List pane, double-click the context name under the active device IP address.
Procedure
|
Step 1 |
Choose , and click Add. The Add Device Access Configuration dialog box appears. |
|
Step 2 |
Choose ASDM/HTTPS. |
|
Step 3 |
Choose the management interface and set the host IP addresses allowed, and click OK. Specify any named interface. For bridge groups, specify the bridge group member interface. For VPN management access only (see Configure Management Access Over a VPN Tunnel), specify the named BVI interface. |
|
Step 4 |
To require certificate authentication, in the Specify the interface requires client certificate to access ASDM area, click Add to specify the interface and an optional certificate map that must be matched for successful authentication. See to create the certificate map. For more information, see Configure ASDM Certificate Authentication. |
|
Step 5 |
Configure HTTP Settings.
|
|
Step 6 |
Click Apply. |
|
Step 7 |
(Optional) Allow non-browser-based HTTPS clients to access HTTPS services on the ASA. By default, ASDM, CSM, and REST API are allowed. Many specialty clients (for example, python libraries, curl, and wget) do not support Cross-site request forgery (CSRF) token-based authentication, so you need to specifically allow these clients to use the ASA basic authentication method. For security purposes, you should only allow required clients. |
Configure SSH Access
This section describes how to configure ASA access for SSH. See the following guidelines:
-
To access the ASA interface for SSH access, you do not also need an access rule allowing the host IP address. You only need to configure SSH access according to this section.
-
SSH access to an interface other than the one from which you entered the ASA is not supported. For example, if your SSH host is located on the outside interface, you can only initiate a management connection directly to the outside interface. The only exception to this rule is through a VPN connection (only supported for the ASA SSH stack). See Configure Management Access Over a VPN Tunnel.
-
The ASA allows a maximum of 5 concurrent SSH connections per context/single mode, with a maximum of 100 connections divided among all contexts. However, because configuration commands might obtain locks on resources being changed, you should make changes in one SSH session at a time to ensure all changes are applied correctly.
-
By default, the ASA uses the CiscoSSH stack, which is based on OpenSSH. You can choose to enable the proprietary ASA SSH stack. CiscoSSH supports:
-
FIPS compliance
-
Regular updates, including updates from Cisco and the open source community
Note that the Cisco SSH stack does not support:
-
SSH to a different interface over VPN (management-access)
-
EDDSA key pair
-
RSA key pair in FIPS mode
If you need these features, you should continue to use the ASA SSH stack.
There is a small change to SCP functionality with the CiscoSSH stack: to use the ASA copy command to copy a file to or from an SCP server, you have to enable SSH access on the ASA for the SCP server subnet/host.
-
-
Only SSH Version 2 is supported.
-
The SSH default username is no longer supported. You can no longer connect to the ASA using SSH with the pix or asa username and the login password. To use SSH, you must configure AAA authentication by choosing ; then define a local user by choosing . If you want to use a AAA server for authentication instead of the local database, we recommend also configuring local authentication as a backup method.
Before you begin
In multiple context mode, complete this procedure in the context execution space. To change from the system to a context configuration, in the Configuration > Device List pane, double-click the context name under the active device IP address.
To set the SSH stack, complete the configuration in the System space on .
Procedure
|
Step 1 |
Choose , and click Add. The Add Device Access Configuration dialog box appears. |
||
|
Step 2 |
Choose SSH. |
||
|
Step 3 |
Choose the management interface and set the host IP addresses allowed, and click OK. Specify any named interface. For bridge groups, specify the bridge group member interface. For VPN management access only (see Configure Management Access Over a VPN Tunnel), specify the named BVI interface. |
||
|
Step 4 |
(Optional) Configure SSH Settings.
|
||
|
Step 5 |
Click Apply. |
||
|
Step 6 |
Configure SSH user authentication. |
||
|
Step 7 |
Generate a key pair (for physical ASAs only). For the ASAv, the key pairs are automatically created after deployment. The ASAv only supports the RSA key. |
||
|
Step 8 |
(Optional) Configure SSH cipher encryption and integrity algorithms: |
||
|
Step 9 |
Enable the Secure Copy server. |
Examples
The following example generates a shared key for SSH on a Linux or Macintosh system, and imports it to the ASA:
-
Generate the EdDSA public and private keys on your computer:
dwinchester-mac:~ dean$ ssh-keygen -t ed25519 Generating public/private ed25519 key pair. Enter file in which to save the key (/Users/dean/.ssh/id_ed25519): Enter passphrase (empty for no passphrase): key-pa$$phrase Enter same passphrase again: key-pa$$phrase Your identification has been saved in /Users/dean/.ssh/id_ed25519. Your public key has been saved in /Users/dean/.ssh/id_ed25519.pub. The key fingerprint is: SHA256:ZHOjfJa3DpZG+qPAp9A5PyCEY0+Vzo2rkGHJpplpw8Q dean@dwinchester-mac The key's randomart image is: +--[ED25519 256]--+ | . | | o | |. . + o+ o | |.E+ o ++.+ o | |B=.= .S = . | |** ooo. = o . | |.....o*.o = . | | o .. *.+.o | | . . oo... | +----[SHA256]-----+ dwinchester-mac:~ dean$ -
Convert the key to PKF format:
dwinchester-mac:~ dean$ cd .ssh dwinchester-mac:.ssh dean$ ssh-keygen -e -f id_ed25519.pub ---- BEGIN SSH2 PUBLIC KEY ---- Comment: "256-bit ED25519, converted by dean@dwinchester-mac from " AAAAC3NzaC1lZDI1NTE5AAAAIDmIeTNfEOnuH0094p1MKX80fW2O216g4trnf7gwWe5Q ---- END SSH2 PUBLIC KEY ---- dwinchester-mac:.ssh dean$ -
Copy the key to your clipboard.
-
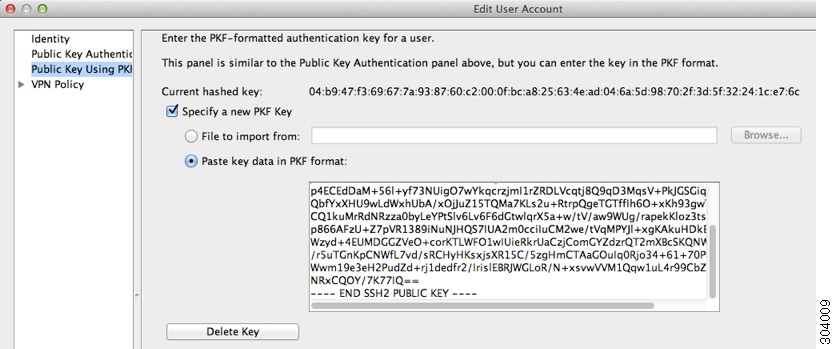
In ASDM, choose , select the username and then click Edit. Click Public Key Using PKF and paste the key into the window:

-
Verify the user can SSH to the ASA. For the password, enter the SSH key password you specified when you created the key pair.
dwinchester-mac:.ssh dean$ ssh dean@10.89.5.26
The authenticity of host '10.89.5.26 (10.89.5.26)' can't be established.
ED25519 key fingerprint is SHA256:6d1g2fe2Ovnh0GHJ5aag7GxZ68h6TD6txDy2vEwIeYE.
Are you sure you want to continue connecting (yes/no/[fingerprint])? yes
Warning: Permanently added '10.89.5.26' (ED25519) to the list of known hosts.
dean@10.89.5.26's password: key-pa$$phrase
User dean logged in to asa
Logins over the last 5 days: 2.  Last login: 18:18:13 UTC Jan 20 2021 from 10.19.41.227
Failed logins since the last login: 0.
Type help or '?' for a list of available commands.
asa>
The following example shows an SCP session to the ASA. From a client on the external host, perform an SCP file transfer. For example, in Linux enter the following command:
scp -v -pw password [path/]source_filename username @asa_address :{disk0|disk1}:/[path/]dest_filename
The -v is for verbose, and if -pw is not specified, you will be prompted for a password.
Configure Telnet Access
This section describes how to configure ASA access for Telnet. You cannot use Telnet to the lowest security interface unless you use Telnet inside a VPN tunnel.
Before you begin
-
In multiple context mode, complete this procedure in the context execution space. To change from the system to a context configuration, in the Configuration > Device List pane, double-click the context name under the active device IP address.
-
To gain access to the ASA CLI using Telnet, enter the login password. You must manually set the password before using Telnet.
Procedure
|
Step 1 |
Choose , and click Add. The Add Device Access Configuration dialog box appears. |
|
Step 2 |
Choose Telnet. |
|
Step 3 |
Choose the management interface and set the host IP addresses allowed, and click OK. Specify any named interface. For bridge groups, specify the bridge group member interface. For VPN management access only (see Configure Management Access Over a VPN Tunnel), specify the named BVI interface. |
|
Step 4 |
(Optional) Set the Telnet Timeout. The default timeout value is 5 minutes. |
|
Step 5 |
Click Apply. |
|
Step 6 |
Set a login password before you can connect with Telnet; there is no default password.
|
Configure HTTP Redirect for ASDM Access or Clientless SSL VPN
You must use HTTPS to connect to the ASA using ASDM or clientless SSL VPN. For your convenience, you can redirect HTTP management connections to HTTPS. For example, by redirecting HTTP, you can enter either http://10.1.8.4/admin/ or https://10.1.8.4/admin/ and still arrive at the ASDM launch page at the HTTPS address.
You can redirect both IPv4 and IPv6 traffic.
Before you begin
Normally, you do not need an access rule allowing the host IP address. However, for HTTP redirect, you must enable an access rule to allow HTTP; otherwise, the interface cannot listen to the HTTP port.
Procedure
|
Step 1 |
Choose . The table shows the currently configured interfaces and whether redirection is enabled on an interface. |
|
Step 2 |
Select the interface that you use for ASDM, and click Edit. |
|
Step 3 |
Configure the following options in the Edit HTTP/HTTPS Settings dialog box:
|
|
Step 4 |
Click OK. |
Configure Management Access Over a VPN Tunnel
If your VPN tunnel terminates on one interface, but you want to manage the ASA by accessing a different interface, you must identify that interface as a management-access interface. For example, if you enter the ASA from the outside interface, this feature lets you connect to the inside interface using ASDM, SSH, or Telnet; or you can ping the inside interface when entering from the outside interface.
 Note |
This feature is not supported for SSH if you use the CiscoSSH stack, which is the default. |
 Note |
This feature is not supported for SNMP. For SNMP over VPN, we recommend enabling SNMP on a loopback interface. You don't need the management-access feature enabled to use SNMP on the loopback interface. Loopback also works for SSH. |
VPN access to an interface other than the one from which you entered the ASA is not supported. For example, if your VPN access is located on the outside interface, you can only initiate a connection directly to the outside interface. You should enable VPN on the directly-accessible interface of the ASA and use name resolution so that you don’t have to remember multiple addresses.
Management access is available via the following VPN tunnel types: IPsec clients, IPsec Site-to-Site, Easy VPN, and the Secure Client SSL VPN.
Before you begin
-
This feature is not supported on management-only interfaces.
-
When you use a management-access interface and you configure identity NAT, you must configure NAT with the route lookup option. For more information see the "NAT and VPN Management Access" section in the NAT Examples and Reference chapter in the appropriate release of the ASA Firewall CLI Configuration Guide.
Procedure
|
Step 1 |
Choose . |
|
Step 2 |
Choose the interface with the highest security (the inside interface) from the Management Access Interface drop-down list. For Easy VPN and Site-to-Site tunnels, you can specify a named BVI (in routed mode). |
|
Step 3 |
Click Apply. The management interface is assigned, and the change is saved to the running configuration. |
Configure Management Access for FXOS on Firepower 2100 Platform Mode Data Interfaces
If you want to manage FXOS on the Firepower 2100 in Platform Mode from a data interface, you can configure SSH, HTTPS, and SNMP access. This feature is useful if you want to manage the device remotely, but you want to keep Management 1/1, which is the native way to access FXOS, on an isolated network. If you enable this feature, you can continue to use Management 1/1 for local access only. However, you cannot allow remote access to or from Management 1/1 for FXOS at the same time as using this feature. This feature requires forwarding traffic to the ASA data interfaces using an internal path (the default), and you can only specify one FXOS management gateway.
The ASA uses non-standard ports for FXOS access; the standard port is reserved for use by the ASA on the same interface. When the ASA forwards traffic to FXOS, it translates the non-standard destination port to the FXOS port for each protocol (do not change the HTTPS port in FXOS). The packet destination IP address (which is the ASA interface IP address) is also translated to an internal address for use by FXOS. The source address remains unchanged. For returning traffic, the ASA uses its data routing table to determine the correct egress interface. When you access the ASA data IP address for the management application, you must log in using an FXOS username; ASA usernames only apply for ASA management access.
You can also enable FXOS management traffic initiation on the ASA data interfaces, which is required for SNMP traps, or NTP and DNS server access, for example. By default, FXOS management traffic initiation is enabled for the ASA outside interface for DNS and NTP server communication (required for Smart Software Licensing communication).
Before you begin
-
Single context mode only.
-
Excludes ASA management-only interfaces.
-
You cannot use a VPN tunnel to the ASA data interface and access FXOS directly. As a workaround for SSH, you can VPN to the ASA, access the ASA CLI, and then use the connect fxos command to access the FXOS CLI. Note that SSH, HTTPS, and SNMPv3 are/can be encrypted, so direct connection to the data interface is safe.
-
Ensure that the FXOS gateway is set to forward traffic to the ASA data interfaces (the default). See the getting started guide for more information about setting the gateway.
Procedure
|
Step 1 |
In ASDM, choose . |
|
Step 2 |
Enable FXOS remote management. |
|
Step 3 |
Allow FXOS to initiate management connections from the ASA interface.
|
|
Step 4 |
Click Apply. |
|
Step 5 |
Connect to the chassis manager on Management 1/1 (by default https://192.168.45.45, with the username: admin and password: Admin123). |
|
Step 6 |
Click the Platform Settings tab, and enable SSH, HTTPS, or SNMP. SSH and HTTPS are enabled by default. |
|
Step 7 |
Configure an Access List on the Platform Settings tab to allow your management addresses. SSH and HTTPS only allow the Management 1/1 192.168.45.0 network by default. You need to allow any addresses that you specified in the FXOS Remote Management configuration on the ASA. |
Change the Console Timeout
The console timeout sets how long a connection can remain in privileged EXEC mode or configuration mode; when the timeout is reached, the session drops into user EXEC mode. By default, the session does not time out. This setting does not affect how long you can remain connected to the console port, which never times out.
Procedure
|
Step 1 |
Choose . |
|
Step 2 |
Define a new timeout value in minutes, To specify an unlimited amount of time, enter 0. The default value is 0. |
|
Step 3 |
Click Apply. The timeout value change is saved to the running configuration. |
Customize a CLI Prompt
The ability to add information to a prompt allows you to see at-a-glance which ASA you are logged into when you have multiple modules. During a failover, this feature is useful when both ASAs have the same hostname.
In multiple context mode, you can view the extended prompt when you log in to the system execution space or the admin context. Within a non-admin context, you only see the default prompt, which is the hostname and the context name.
By default, the prompt shows the hostname of the ASA. In multiple context mode, the prompt also displays the context name. You can display the following items in the CLI prompt:
|
cluster-unit |
Displays the cluster unit name. Each unit in a cluster can have a unique name. |
|
context |
(Multiple mode only) Displays the name of the current context. |
|
domain |
Displays the domain name. |
|
hostname |
Displays the hostname. |
|
priority |
Displays the failover priority as pri (primary) or sec (secondary). |
|
state |
Displays the traffic-passing state or role of the unit. For failover, the following values are displayed for the state keyword:
For clustering, the values for control and data are shown. |
Procedure
|
Step 1 |
Choose |
|
Step 2 |
Do any of the following to customize the prompt:
The prompt is changed and appears in the CLI Prompt Preview field. |
|
Step 3 |
Click Apply . The new prompt is saved to the running configuration. |
Configure a Login Banner
You can configure a message to display when a user connects to the ASA, before a user logs in, or before a user enters privileged EXEC mode.
Before you begin
-
From a security perspective, it is important that your banner discourage unauthorized access. Do not use the words “welcome” or “please,” as they appear to invite intruders in. The following banner sets the correct tone for unauthorized access:
You have logged in to a secure device. If you are not authorized to access this device, log out immediately or risk possible criminal consequences. -
After a banner has been added, Telnet or SSH sessions to the ASA may close if:
-
There is not enough system memory available to process the banner message(s).
-
A TCP write error occurs when trying to display banner message(s).
-
-
See RFC 2196 for guidelines about banner messages.
Procedure
|
Step 1 |
Choose . |
|
Step 2 |
Add your banner text to the field for the type of banner that you are creating for the CLI:
|
|
Step 3 |
Click Apply. The new banner is saved to the running configuration. |
Set a Management Session Quota
You can establish a maximum number of simultaneous ASDM, SSH, and Telnet sessions that are allowed on the ASA. If the maximum is reached, no additional sessions are allowed and a syslog message is generated. To prevent a system lockout, the management session quota mechanism cannot block a console session.
 Note |
In multiple context mode, you cannot configure the number of ASDM sessions, where the maximum is fixed at 5 sessions. |
 Note |
If you also set a resource limit per context for the maximum administrative sessions (SSH, etc.), then the lower value will be used. |
Before you begin
In multiple context mode, complete this procedure in the context execution space. To change from the System to a context configuration, in the pane, double-click the context name under the active device IP address.
Procedure
|
Step 1 |
Choose . |
|
Step 2 |
Enter the maximum number of simultaneous sessions.
|
|
Step 3 |
Click Apply to save the configuration changes. |


 Feedback