Multiple Context Mode

This chapter describes how to configure multiple security contexts on the ASA.

About Security Contexts

You can partition a single ASA into multiple virtual devices, known as security contexts. Each context acts as an independent device, with its own security policy, interfaces, and administrators. Multiple contexts are similar to having multiple standalone devices. For unsupported features in multiple context mode, see Guidelines for Multiple Context Mode.

This section provides an overview of security contexts.

Common Uses for Security Contexts

You might want to use multiple security contexts in the following situations:

  • You are a service provider and want to sell security services to many customers. By enabling multiple security contexts on the ASA, you can implement a cost-effective, space-saving solution that keeps all customer traffic separate and secure, and also eases configuration.

  • You are a large enterprise or a college campus and want to keep departments completely separate.

  • You are an enterprise that wants to provide distinct security policies to different departments.

  • You have any network that requires more than one ASA.

Context Configuration Files

This section describes how the ASA implements multiple context mode configurations.

Context Configurations

For each context, the ASA includes a configuration that identifies the security policy, interfaces, and all the options you can configure on a standalone device. You can store context configurations in flash memory, or you can download them from a TFTP, FTP, or HTTP(S) server.

System Configuration

The system administrator adds and manages contexts by configuring each context configuration location, allocated interfaces, and other context operating parameters in the system configuration, which, like a single mode configuration, is the startup configuration. The system configuration identifies basic settings for the ASA. The system configuration does not include any network interfaces or network settings for itself; rather, when the system needs to access network resources (such as downloading the contexts from the server), it uses one of the contexts that is designated as the admin context. The system configuration does include a specialized failover interface for failover traffic only.

Admin Context Configuration

The admin context is just like any other context, except that when a user logs in to the admin context, then that user has system administrator rights and can access the system and all other contexts. The admin context is not restricted in any way, and can be used as a regular context. However, because logging into the admin context grants you administrator privileges over all contexts, you might need to restrict access to the admin context to appropriate users. The admin context must reside on flash memory, and not remotely.

If your system is already in multiple context mode, or if you convert from single mode, the admin context is created automatically as a file on the internal flash memory called admin.cfg. This context is named “admin.” If you do not want to use admin.cfg as the admin context, you can change the admin context.

How the ASA Classifies Packets

Each packet that enters the ASA must be classified, so that the ASA can determine to which context to send a packet.


Note


If the destination MAC address is a multicast or broadcast MAC address, the packet is duplicated and delivered to each context.


Valid Classifier Criteria

This section describes the criteria used by the classifier.


Note


For management traffic destined for an interface, the interface IP address is used for classification.

The routing table is not used for packet classification.


Unique Interfaces

If only one context is associated with the ingress interface, the ASA classifies the packet into that context. In transparent firewall mode, unique interfaces for contexts are required, so this method is used to classify packets at all times.

Unique MAC Addresses

If multiple contexts share an interface, then the classifier uses unique MAC addresses assigned to the interface in each context. An upstream router cannot route directly to a context without unique MAC addresses. You can enable auto-generation of MAC addresses. You can also set the MAC addresses manually when you configure each interface.

NAT Configuration

If you do not enable use of unique MAC addresses, then the ASA uses the mapped addresses in your NAT configuration to classify packets. We recommend using MAC addresses instead of NAT, so that traffic classification can occur regardless of the completeness of the NAT configuration.

Classification Examples

The following figure shows multiple contexts sharing an outside interface. The classifier assigns the packet to Context B because Context B includes the MAC address to which the router sends the packet.
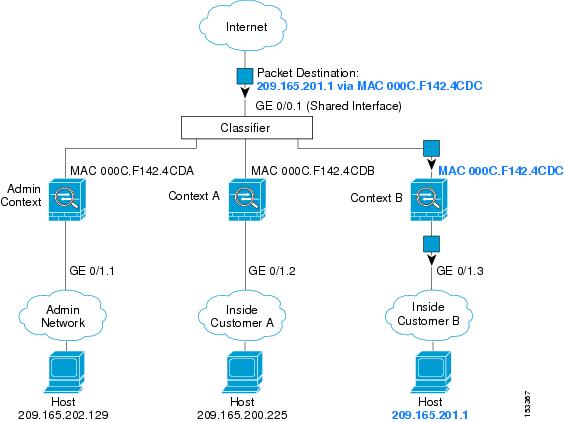
Figure 1. Packet Classification with a Shared Interface Using MAC Addresses

Note that all new incoming traffic must be classified, even from inside networks. The following figure shows a host on the Context B inside network accessing the Internet. The classifier assigns the packet to Context B because the ingress interface is Gigabit Ethernet 0/1.3, which is assigned to Context B.
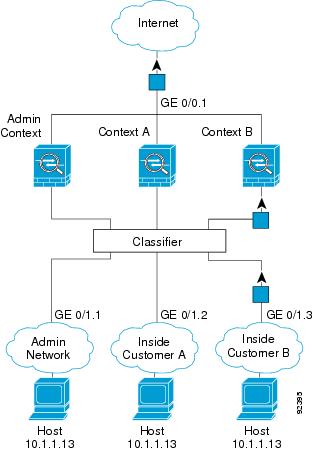
Figure 2. Incoming Traffic from Inside Networks

For transparent firewalls, you must use unique interfaces. The following figure shows a packet destined to a host on the Context B inside network from the Internet. The classifier assigns the packet to Context B because the ingress interface is Gigabit Ethernet 1/0.3, which is assigned to Context B.
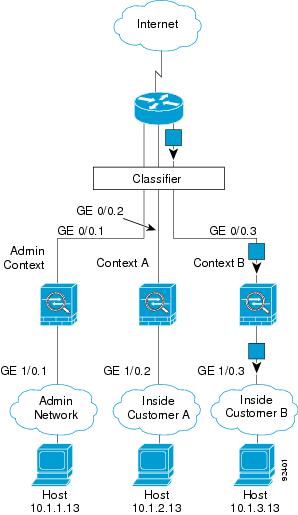
Figure 3. Transparent Firewall Contexts

Cascading Security Contexts

Placing a context directly in front of another context is called cascading contexts; the outside interface of one context is the same interface as the inside interface of another context. You might want to cascade contexts if you want to simplify the configuration of some contexts by configuring shared parameters in the top context.


Note


Cascading contexts requires unique MAC addresses for each context interface. Because of the limitations of classifying packets on shared interfaces without MAC addresses, we do not recommend using cascading contexts without unique MAC addresses.


The following figure shows a gateway context with two contexts behind the gateway.
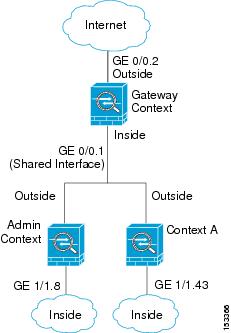
Figure 4. Cascading Contexts

Management Access to Security Contexts

The ASA provides system administrator access in multiple context mode as well as access for individual context administrators.

System Administrator Access

You can access the ASA as a system administrator in two ways:

  • Access the ASA console.

    From the console, you access the system execution space, which means that any commands you enter affect only the system configuration or the running of the system (for run-time commands).

  • Access the admin context using Telnet, SSH, or ASDM.

As the system administrator, you can access all contexts.

The system execution space does not support any AAA commands, but you can configure its own enable password, as well as usernames in the local database to provide individual logins.

Context Administrator Access

You can access a context using Telnet, SSH, or ASDM. If you log in to a non-admin context, you can only access the configuration for that context. You can provide individual logins to the context.

Management Interface Usage

The Management interface is a separate interface just for management traffic.

In routed firewall mode, you can share the Management interface across all contexts.

In transparent firewall mode, the Management interface is special. In addition to the maximum allowed through-traffic interfaces, you can also use the Management interface as a separate management-only interface. However, in multiple context mode, you cannot share any interfaces across transparent contexts. You can instead use subinterfaces of the Management interface, and assign one to each context. However, only Firepower device models allow subinterfaces on the Management interface. For ASA models, you must use a data interface or a subinterface of a data interface, and add it to a bridge group within the context.

For the Firepower 4100/9300 chassis transparent context, neither the Management interface nor subinterface retains its special status. In this case, you must treat it as a data interface, and add it to a bridge group. (Note that in single context mode, the Management interface does retain its special status.)

Another consideration about transparent mode: when you enable multiple context mode, all configured interfaces are automatically assigned to the Admin context. For example, if your default configuration includes the Management interface, then that interface will be assigned to the Admin context. One option is to leave the main interface allocated to the Admin context and manage it using the native VLAN, and then use subinterfaces to manage each context. Keep in mind that if you make the Admin context transparent, its IP address will be removed; you have to assign it to a bridge group and assign the IP address to the BVI.

About Resource Management

By default, all security contexts have unlimited access to the resources of the ASA, except where maximum limits per context are enforced; the only exception is VPN resources, which are disabled by default. If you find that one or more contexts use too many resources, and they cause other contexts to be denied connections, for example, then you can configure resource management to limit the use of resources per context. For VPN resources, you must configure resource management to allow any VPN tunnels.

Resource Classes

The ASA manages resources by assigning contexts to resource classes. Each context uses the resource limits set by the class. To use the settings of a class, assign the context to the class when you define the context. All contexts belong to the default class if they are not assigned to another class; you do not have to actively assign a context to default. You can only assign a context to one resource class. The exception to this rule is that limits that are undefined in the member class are inherited from the default class; so in effect, a context could be a member of default plus another class.

Resource Limits

You can set the limit for individual resources as a percentage (if there is a hard system limit) or as an absolute value.

For most resources, the ASA does not set aside a portion of the resources for each context assigned to the class; rather, the ASA sets the maximum limit for a context. If you oversubscribe resources, or allow some resources to be unlimited, a few contexts can “use up” those resources, potentially affecting service to other contexts. The exception is VPN resource types, which you cannot oversubscribe, so the resources assigned to each context are guaranteed. To accommodate temporary bursts of VPN sessions beyond the amount assigned, the ASA supports a “burst” VPN resource type, which is equal to the remaining unassigned VPN sessions. The burst sessions can be oversubscribed, and are available to contexts on a first-come, first-served basis.

Default Class

All contexts belong to the default class if they are not assigned to another class; you do not have to actively assign a context to the default class.

If a context belongs to a class other than the default class, those class settings always override the default class settings. However, if the other class has any settings that are not defined, then the member context uses the default class for those limits. For example, if you create a class with a 2 percent limit for all concurrent connections, but no other limits, then all other limits are inherited from the default class. Conversely, if you create a class with a limit for all resources, the class uses no settings from the default class.

For most resources, the default class provides unlimited access to resources for all contexts, except for the following limits:

  • Telnet sessions—5 sessions. (The maximum per context.)

  • SSH sessions—5 sessions. (The maximum per context.)

  • ASDM sessions—5 sessions. (The maximum per context.)

  • MAC addresses—(varies per model). (The maximum for the system.)

  • Secure Client peers—0 sessions. (You must manually configure the class to allow any Secure Client peers.)

  • VPN site-to-site tunnels—0 sessions. (You must manually configure the class to allow any VPN sessions.)

The following figure shows the relationship between the default class and other classes. Contexts A and C belong to classes with some limits set; other limits are inherited from the default class. Context B inherits no limits from default because all limits are set in its class, the Gold class. Context D was not assigned to a class, and is by default a member of the default class.
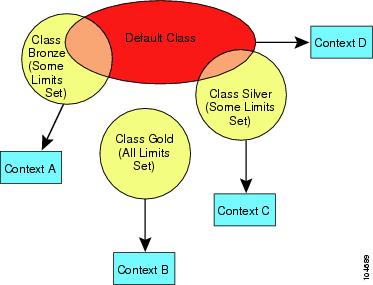
Figure 5. Resource Classes

Use Oversubscribed Resources

You can oversubscribe the ASA by assigning more than 100 percent of a resource across all contexts (with the exception of non-burst VPN resources). For example, you can set the Bronze class to limit connections to 20 percent per context, and then assign 10 contexts to the class for a total of 200 percent. If contexts concurrently use more than the system limit, then each context gets less than the 20 percent you intended.
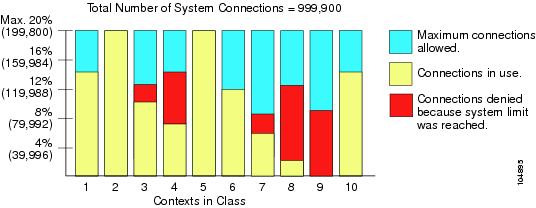
Figure 6. Resource Oversubscription

Use Unlimited Resources

The ASA lets you assign unlimited access to one or more resources in a class, instead of a percentage or absolute number. When a resource is unlimited, contexts can use as much of the resource as the system has available. For example, Context A, B, and C are in the Silver Class, which limits each class member to 1 percent of the connections, for a total of 3 percent; but the three contexts are currently only using 2 percent combined. Gold Class has unlimited access to connections. The contexts in the Gold Class can use more than the 97 percent of “unassigned” connections; they can also use the 1 percent of connections not currently in use by Context A, B, and C, even if that means that Context A, B, and C are unable to reach their 3 percent combined limit. Setting unlimited access is similar to oversubscribing the ASA, except that you have less control over how much you oversubscribe the system.

Figure 7. Unlimited Resources

About MAC Addresses

You can manually assign MAC addresses to override the default. For multiple context mode, you can automatically generate unique MAC addresses (for all interfaces assigned to a context) and single context mode (for subinterfaces)..


Note


You might want to assign unique MAC addresses to subinterfaces defined on the ASA, because they use the same burned-in MAC address of the parent interface. For example, your service provider might perform access control based on the MAC address. Also, because IPv6 link-local addresses are generated based on the MAC address, assigning unique MAC addresses to subinterfaces allows for unique IPv6 link-local addresses, which can avoid traffic disruption in certain instances on the ASA device.


MAC Addresses in Multiple Context Mode

The MAC address is used to classify packets within a context. If you share an interface, but do not have unique MAC addresses for the interface in each context, then other classification methods are attempted that might not provide full coverage.

To allow contexts to share interfaces, you should enable auto-generation of virtual MAC addresses to each shared context interface.

Automatic MAC Addresses

In multiple context mode, auto-generation assigns unique MAC addresses to all interfaces assigned to a context.

If you manually assign a MAC address and also enable auto-generation, then the manually assigned MAC address is used. If you later remove the manual MAC address, the auto-generated address is used, if enabled.

In the rare circumstance that the generated MAC address conflicts with another private MAC address in your network, you can manually set the MAC address for the interface.

Because auto-generated addresses (when using a prefix) start with A2, you cannot start manual MAC addresses with A2 if you also want to use auto-generation.

The ASA generates the MAC address using the following format:

A2xx.yyzz.zzzz

Where xx.yy is a user-defined prefix or an autogenerated prefix based on the last two bytes of the interface MAC address, and zz.zzzz is an internal counter generated by the ASA. For the standby MAC address, the address is identical except that the internal counter is increased by 1.

For an example of how the prefix is used, if you set a prefix of 77, then the ASA converts 77 into the hexadecimal value 004D (yyxx). When used in the MAC address, the prefix is reversed (xxyy) to match the ASA native form:

A24D.00zz.zzzz

For a prefix of 1009 (03F1), the MAC address is:

A2F1.03zz.zzzz


Note


The MAC address format without a prefix is a legacy version. See the mac-address auto command in the command reference for more information about the legacy format.


VPN Support

For VPN resources, you must configure resource management to allow any VPN tunnels.

You can use site-to-site VPN in multiple context mode.

For remote access VPN, you must use AnyConnect 3.x and later for SSL VPN and IKEv2 protocol. You can customize flash storage per context for Secure Client images and customizations, as well as using shared flash memory across all contexts. For unsupported features, see Guidelines for Multiple Context Mode. For a detailed list of supported VPN features per ASA release, see History for Multiple Context Mode.


Note


The Secure Client Premier license is required for multiple context mode; you cannot use the default or legacy license.


Licensing for Multiple Context Mode

Model

License Requirement

Firepower 1010

No support.

Firepower 1100

Essentials License: 2 contexts.

Optional License, Maximum:

Firepower 1120: 5

Firepower 1140: 10

Firepower 1150: 25

Firepower 2100

Essentials License: 2 contexts.

Optional License, Maximum:

Firepower 2110: 25

Firepower 2120: 25

Firepower 2130: 30

Firepower 2140: 40

Secure Firewall 3100

Essentials License: 2 contexts.

Optional License, Maximum:

Secure Firewall 3105: 100

Secure Firewall 3110: 100

Secure Firewall 3120: 100

Secure Firewall 3130: 100

Secure Firewall 3140: 100

Firepower 4100

Essentials License: 10 contexts.

Optional License: up to 250 contexts.

Secure Firewall 4200

Essentials License: 2 contexts.

Optional License, Maximum:

Secure Firewall 4215: 250

Secure Firewall 4225: 250

Secure Firewall 4245: 250

Firepower 9300

Essentials License: 10 contexts.

Optional License: up to 250 contexts.

ISA 3000

No support.

ASA Virtual

No support.


Note


If the Admin context only contains management-only interfaces, and does not include any data interfaces for through traffic, then it does not count against the limit.


Note


The Secure Client Premier license is required for multiple context mode; you cannot use the default or legacy license.


Prerequisites for Multiple Context Mode

After you are in multiple context mode, connect tothe admin context to access the system configuration. You cannot configure the system from a non-admin context. By default, after you enable multiple context mode, you can connect to the admin context by using the default management IP address.

Guidelines for Multiple Context Mode

Failover

Active/Active mode failover is only supported in multiple context mode.

IPv6

Cross-context IPv6 routing is not supported.

Unsupported Features

Multiple context mode does not support the following features:

  • RIP

  • OSPFv3. (OSPFv2 is supported.)

  • Multicast routing

  • Threat Detection

  • Unified Communications

  • QoS

  • Virtual Tunnel Interfaces (VTIs)

  • Static route tracking

Multiple context mode does not currently support the following features for remote access VPN:

  • AnyConnect 2.x and earlier

  • IKEv1

  • SAML

  • WebLaunch

  • VLAN Mapping

  • HostScan

  • VPN load balancing

  • Customization

  • L2TP

Additional Guidelines

  • The context mode (single or multiple) is not stored in the configuration file, even though it does endure reboots. If you need to copy your configuration to another device, set the mode on the new device to match.

  • If you store context configurations in the root directory of flash memory, on some models you might run out of room in that directory, even though there is available memory. In this case, create a subdirectory for your configuration files. Background: some models use the FAT 16 file system for internal flash memory, and if you do not use 8.3-compliant short names, or use uppercase characters, then fewer than 512 files and folders can be stored because the file system uses up slots to store long file names (see http://support.microsoft.com/kb/120138/en-us).

  • In ACI, Policy Based Redirect (PBR) health check is executed (L2 pings) using the same MAC address on all the leaves. This results in a MAC flap. To resolve the MAC flap, you can configure the tap-mode option on the inline set. However, if the threat defense high availability is configured, you must enable MAC learning for connection handling during a failover. Thus, in an ACI environment with threat defense in HA pair using inline-set interfaces, to avoid packet losses, deploy the threat defense in standalone or in a cluster.

Defaults for Multiple Context Mode

  • By default, the ASA is in single context mode.

  • See Default Class.

Configure Multiple Contexts

Procedure


Step 1

Enable or Disable Multiple Context Mode.

Step 2

(Optional) Configure a Class for Resource Management.

Note


For VPN support, you must configure VPN resources in a resource class; the default class does not allow VPN.

Step 3

Configure interfaces in the system execution space.

Step 4

Configure a Security Context.

Step 5

(Optional) Assign MAC Addresses to Context Interfaces Automatically.

Step 6

Complete interface configuration in the context. See Routed and Transparent Mode Interfaces.


Enable or Disable Multiple Context Mode

Your ASA might already be configured for multiple security contexts depending on how you ordered it from Cisco. If you need to convert from single mode to multiple mode, follow the procedures in this section.

ASDM supports changing modes from single to multiple mode if you use the High Availability and Scalability Wizard and you enable Active/Active failover. See Failover for High Availability for more information. If you do not want to use Active/Active failover or want to change back to single mode, you must change modes using the CLI; because changing modes requires confirmation, you cannot use the Command Line Interface tool. This section describes changing modes at the CLI.

Enable Multiple Context Mode

When you convert from single mode to multiple mode, the ASA converts the running configuration into two files: a new startup configuration that comprises the system configuration, and admin.cfg that comprises the admin context (in the root directory of the internal flash memory). The original running configuration is saved as old_running.cfg (in the root directory of the internal flash memory). The original startup configuration is not saved. The ASA automatically adds an entry for the admin context to the system configuration with the name “admin.”

Before you begin

Back up your startup configuration if it differs from the running configuration. When you convert from single mode to multiple mode, the ASA converts the running configuration into two files. The original startup configuration is not saved. See Manage Files.

Procedure

Change to multiple context mode.

mode multiple

Example:

You are prompted to change the mode and convert the configuration, and then the system reloads.

Note


You will have to regenerate the RSA key pair in the Admin context before you can reestablish an SSH connection. From the console, enter the crypto key generate rsa modulus command. See Configure SSH Access for more information.

Example:

ciscoasa(config)# mode multiple
WARNING: This command will change the behavior of the device
WARNING: This command will initiate a Reboot
Proceed with change mode? [confirm]
Convert the system configuration? [confirm]
!
The old running configuration file will be written to flash

Converting the configuration - this may take several minutes for a large configuration

The admin context configuration will be written to flash

The new running configuration file was written to flash
Security context mode: multiple
ciscoasa(config)#


***
*** --- START GRACEFUL SHUTDOWN ---
***
*** Message to all terminals:
***
***   change mode
Shutting down isakmp
Shutting down webvpn
Shutting down License Controller
Shutting down File system


***
*** --- SHUTDOWN NOW ---
***
*** Message to all terminals:
***
***   change mode
                                                                          

Restore Single Context Mode

To copy the old running configuration to the startup configuration and to change the mode to single mode, perform the following steps.

Before you begin

Perform this procedure in the system execution space.

Procedure

Step 1

Copy the backup version of your original running configuration to the current startup configuration:

copy disk0:old_running.cfg startup-config

Example:

ciscoasa(config)# copy disk0:old_running.cfg startup-config

Step 2

Set the mode to single mode:

mode single

Example:

ciscoasa(config)# mode single

You are prompted to reboot the ASA.


Configure a Class for Resource Management

To configure a class in the system configuration, perform the following steps. You can change the value of a particular resource limit by reentering the command with a new value.

Before you begin

  • Perform this procedure in the system execution space.

  • The following table lists the resource types and the limits.


    Note


    If the System Limit is N/A, then you cannot set a percentage of the resource because there is no hard system limit for the resource.


    Table 1. Resource Names and Limits

    Resource Name

    Rate or Concurrent

    Minimum and Maximum Number per Context

    System Limit

    Description

    ASDM Sessions

    Concurrent

    1 minimum

    5 maximum

    200

    ASDM management sessions.

    ASDM sessions use two HTTPS connections: one for monitoring that is always present, and one for making configuration changes that is present only when you make changes. For example, the system limit of 200 ASDM sessions represents a limit of 400 HTTPS sessions.

    Connections

    Conns/sec

    Concurrent or Rate

    N/A

    Concurrent connections: See Licenses Per Model for the connection limit available for your model.

    Rate: N/A

    TCP or UDP connections between any two hosts, including connections between one host and multiple other hosts.

    Note


    Syslog messages are generated for whichever limit is lower, xlates or conns. For example, if you set the xlates limit to 7 and the conns to 9, then the ASA only generates syslog message 321001 (“Resource 'xlates' limit of 7 reached for context 'ctx1'”) and not 321002 (“Resource 'conn rate' limit of 5 reached for context 'ctx1'”).

    Hosts

    Concurrent

    N/A

    N/A

    Hosts that can connect through the ASA.

    Inspects/sec

    Rate

    N/A

    N/A

    Application inspections per second.

    MAC Entries

    Concurrent

    N/A

    (varies per model)

    For transparent firewall mode, the number of MAC addresses allowed in the MAC address table.

    Routes

    Concurrent

    N/A

    N/A

    Dynamic routes.

    Secure Client Burst

    Concurrent

    N/A

    The Secure Client Premium Peers for your model minus the sum of the sessions assigned to all contexts for Secure Client.

    The number of Secure Client sessions allowed beyond the amount assigned to a context with Secure Client. For example, if your model supports 5000 peers, and you assign 4000 peers across all contexts with Secure Client, then the remaining 1000 sessions are available for Secure Client Burst. Unlike Secure Client, which guarantees the sessions to the context, Secure Client Burst can be oversubscribed; the burst pool is available to all contexts on a first-come, first-served basis.

    Secure Client

    Concurrent

    N/A

    See Licenses Per Model for the Secure Client Premium Peers available for your model.

    Secure Client peers. You cannot oversubscribe this resource; all context assignments combined cannot exceed the model limit. The peers you assign for this resource are guaranteed to the context.

    Other VPN Burst

    Concurrent

    N/A

    The Other VPN session amount for your model minus the sum of the sessions assigned to all contexts for Other VPN.

    The number of site-to-site VPN sessions allowed beyond the amount assigned to a context with Other VPN. For example, if your model supports 5000 sessions, and you assign 4000 sessions across all contexts with Other VPN, then the remaining 1000 sessions are available for Other VPN Burst. Unlike Other VPN, which guarantees the sessions to the context, Other VPN Burst can be oversubscribed; the burst pool is available to all contexts on a first-come, first-served basis.

    Other VPN

    Concurrent

    N/A

    See Supported Feature Licenses Per Model for the Other VPN sessions available for your model.

    Site-to-site VPN sessions. You cannot oversubscribe this resource; all context assignments combined cannot exceed the model limit. The sessions you assign for this resource are guaranteed to the context.

    IKEv1 SAs In Negotiation

    Concurrent (percentage only)

    N/A

    A percentage of the Other VPN sessions assigned to this context. See the Other VPN resources to assign sessions to the context.

    Incoming IKEv1 SA negotiations, as a percentage of the context Other VPN limit.

    SSH

    Concurrent

    1 minimum

    5 maximum

    100

    SSH sessions.

    Storage

    MB

    The maximum depends on your specified flash memory drive

    The maximum depends on your specified flash memory drive

    Storage limit of context directory in MB.

    Syslogs/sec

    Rate

    N/A

    N/A

    Syslog messages per second.

    Telnet

    Concurrent

    1 minimum

    5 maximum

    100

    Telnet sessions.

    Xlates

    Concurrent

    N/A

    N/A

    Network address translations.

Procedure


Step 1

If you are not already in the System configuration mode, in the Device List pane, double-click System under the active device IP address.

Step 2

Choose Configuration > Context Management > Resource Class, and click Add.

The Add Resource Class dialog box appears.

Step 3

Enter a class name up to 20 characters in length, in the Resource Class field.

Step 4

In the Count Limited Resources area, set the concurrent limits for resources,.

See the preceding table for a description of each resource type.

For resources that do not have a system limit, you cannot set the percentage; you can only set an absolute value. If you do not set a limit, the limit is inherited from the default class. If the default class does not set a limit, then the resource is unlimited, or the system limit if available. For most resources, 0 sets the limit to unlimited. For VPN types, 0 sets the limit none.

Note


If you also set the Configuration > Device Management > Management Access > Management Session Quota within a context to set the maximum administrative sessions (SSH, etc.), then the lower value will be used.

Step 5

In the Rate Limited Resources area, set the rate limit for resources.

See the preceding table for a description of each resource type.

If you do not set a limit, the limit is inherited from the default class. If the default class does not set a limit, then it is unlimited by default. 0 sets the limit to unlimited.

Step 6

Click OK.


Configure a Security Context

The security context definition in the system configuration identifies the context name, configuration file URL, interfaces that a context can use, and other settings.

Before you begin

Procedure


Step 1

If you are not already in the System configuration mode, in the Device List pane, double-click System under the active device IP address.

Step 2

Choose Configuration > Context Management > Security Contexts, and click Add.

The Add Context dialog box appears.

Step 3

In the Security Context field, enter the context name as a string up to 32 characters long.

This name is case sensitive, so you can have two contexts named “customerA” and “CustomerA,” for example. “System” or “Null” (in upper or lower case letters) are reserved names, and cannot be used.

Step 4

In the Interface Allocation area, click the Add button to assign an interface to the context.

  1. From the Interfaces > Physical Interface drop-down list, choose an interface.

    You can assign the main interface, in which case you leave the subinterface ID blank, or you can assign a subinterface or a range of subinterfaces associated with this interface. In transparent firewall mode, only interfaces that have not been allocated to other contexts are shown. If the main interface was already assigned to another context, then you must choose a subinterface.

  2. (Optional) In the Interfaces > Subinterface Range drop-down list, choose a subinterface ID.

    For a range of subinterface IDs, choose the ending ID in the second drop-down list, if available.

    In transparent firewall mode, only subinterfaces that have not been allocated to other contexts are shown.

  3. (Optional) In the Aliased Names area, check Use Aliased Name in Context to set an aliased name for this interface to be used in the context configuration instead of the interface ID.

    • In the Name field, set the aliased name.

      An aliased name must start with a letter, end with a letter, and have as interior characters only letters, digits, or an underscore. This field lets you specify a name that ends with a letter or underscore; to add an optional digit after the name, set the digit in the Range field.

    • (Optional) In the Range field, set the numeric suffix for the aliased name.

      If you have a range of subinterfaces, you can enter a range of digits to be appended to the name.

  4. (Optional)Check Show Hardware Properties in Context to enable context users to see physical interface properties even if you set an aliased name.

  5. Click OK to return to the Add Context dialog box.

Step 5

(Optional) In the Resource Assignment area, choose a class name from the Resource Class drop-down list to assign this context to a resource class.

You can add or edit a resource class directly from this area.

Step 6

From the Config URL drop-down list, choose a file system type. In the field, identify the URL for the context configuration location.

For example, the combined URL for FTP has the following format:

ftp://server.example.com/configs/admin.cfg

Step 7

(Optional) Click Login to set the username and password for external file systems.

Step 8

(Optional) From the Failover Group drop-down list, choose the group name to set the failover group for Active/Active failover.

Step 9

(Optional) For Cloud Web Security, click Enable to enable Web Security inspection in this context. To override the license set in the system configuration, enter a license in the License field.

Step 10

(Optional) In the Description field, add a description.

Step 11

(Optional) In the Storage URL Assignment area, you can allow each context to use flash memory to store VPN packages, such as Secure Client, as well as providing storage for Secure Client and clientless SSL VPN portal customizations. For example, if you are using multiple context mode to configure an Secure Client profile with Dynamic Access Policies, you must plan for context specific private and shared storage. Each context can use a private storage space as well as a shared read-only storage space. Note: Make sure the target directory is already present on the specified disk using Tools > File Management.

  1. Check the Configure private storage assignment check box, and from the Select drop-down list, choose the private storage directory. You can specify one private storage space per context. You can read/write/delete from this directory within the context (as well as from the system execution space). Under the specified path, the ASA creates a sub-directory named after the context. For example, for contextA if you specify disk1:/private-storage for the path, then the ASA creates a sub-directory for this context at disk1:/private-storage/contextA/. You can also optionally name the path within the context by entering a name in the is mapped to field so that the file system is not exposed to context administrators. For example, if you specify the mapped name as context, then from within the context, this directory is called context:. To control how much disk space is allowed per context, see Configure a Class for Resource Management.

  2. Check the Configure shared storage assignment check box, and from the Select drop-down list, choose the shared storage directory. You can specify one read-only shared storage space per context, but you can create multiple shared directories. To reduce duplication of common large files that can be shared among all contexts, such as Secure Client packages, you can use the shared storage space. The ASA does not create context sub-directories for this storage space because it is a shared space for multiple contexts. Only the system execution space can write and delete from the shared directory.

Step 12

Click OK to return to the Security Contexts pane.

Step 13

(Optional) Select the context, and click Change Firewall Mode to set the firewall mode to transparent.

If this is a new context, there is no configuration to erase. Click Change Mode to change to transparent firewall mode.

If this is an existing context, then be sure to back up the configuration before you change the mode.

Note

 
You cannot change the mode of the currently connected context in ASDM (typically the admin context); see Set the Firewall Mode (Single Mode) to set the mode at the command line.

Step 14

(Optional) To customize auto-generation of MAC addresses, see Assign MAC Addresses to Context Interfaces Automatically.

Step 15

(Optional) Check the Specify the maximum number of TLS Proxy sessions that the ASA needs to support check box, to specify the maximum TLS Proxy sessions for the device. For more information about TLS proxy, see the firewall configuration guide.


Assign MAC Addresses to Context Interfaces Automatically

This section describes how to configure auto-generation of MAC addresses. The MAC address is used to classify packets within a context.

Before you begin

  • When you configure a name for the interface in a context, the new MAC address is generated immediately. If you enable this feature after you configure context interfaces, then MAC addresses are generated for all interfaces immediately after you enable it. If you disable this feature, the MAC address for each interface reverts to the default MAC address. For example, subinterfaces of GigabitEthernet 0/1 revert to using the MAC address of GigabitEthernet 0/1.

  • In the rare circumstance that the generated MAC address conflicts with another private MAC address in your network, you can manually set the MAC address for the interface within the context.

Procedure


Step 1

If you are not already in the System configuration mode, in the Device List pane, double-click System under the active device IP address.

Step 2

Choose Configuration > Context Management > Security Contexts, and check Mac-Address auto. If you do not enter a prefix, then the ASA autogenerates the prefix based on the last two bytes of the interface.

Step 3

(Optional) Check the Prefix check box, and in the field, enter a decimal value between 0 and 65535.

This prefix is converted to a four-digit hexadecimal number, and used as part of the MAC address.


Change Between Contexts and the System Execution Space

If you log in to the system execution space (or the admin context), you can change between contexts and perform configuration and monitoring tasks within each context. The running configuration that you edit in a configuration mode depends on your location. When you are in the system execution space, the running configuration consists only of the system configuration; when you are in a context, the running configuration consists only of that context.

Procedure


Step 1

In the Device List pane, double-click System under the active device IP address, to configure the System.

Step 2

In the Device List pane, double-click the context name under the active device IP address, to configure a context.


Manage Security Contexts

This section describes how to manage security contexts.

Remove a Security Context

You cannot remove the current admin context.


Note


If you use failover, there is a delay between when you remove the context on the active unit and when the context is removed on the standby unit.


Before you begin

Perform this procedure in the system execution space.

Procedure


Step 1

If you are not already in the System configuration mode, in the Device List pane, double-click System under the active device IP address.

Step 2

Choose Configuration > Context Management > Security Contexts.

Step 3

Select the context you want to delete, and click Delete.

The Delete Context dialog box appears.

Step 4

If you might want to re-add this context later, and want to keep the configuration file for future use, uncheck the Also delete config URL file from the disk check box.

If you want to delete the configuration file, then leave the check box checked.

Step 5

Click Yes.


Change the Admin Context

The system configuration does not include any network interfaces or network settings for itself; rather, when the system needs to access network resources (such as downloading the contexts from the server), it uses one of the contexts that is designated as the admin context.

The admin context is just like any other context, except that when a user logs in to the admin context, then that user has system administrator rights and can access the system and all other contexts. The admin context is not restricted in any way, and can be used as a regular context. However, because logging into the admin context grants you administrator privileges over all contexts, you might need to restrict access to the admin context to appropriate users.


Note


For ASDM, you cannot change the admin context within ASDM because your ASDM session would disconnect. You can perform this procedure using the Command Line Interface tool noting that you will have to reconnect to the new admin context.


Before you begin

  • You can set any context to be the admin context, as long as the configuration file is stored in the internal flash memory.

  • Perform this procedure in the system execution space.

Procedure


Step 1

If you are not already in the System configuration mode, in the Device List pane, double-click System under the active device IP address.

Step 2

Choose Tools > Command Line Interface.

The Command Line Interface dialog box appears.

Step 3

Enter the following command:

admin-context context_name

Step 4

Click Send.

Any remote management sessions, such as Telnet, SSH, or HTTPS (ASDM), that are connected to the admin context are terminated. You must reconnect to the new admin context.

Note


A few system configuration commands, including ntp server, identify an interface name that belongs to the admin context. If you change the admin context, and that interface name does not exist in the new admin context, be sure to update any system commands that refer to the interface.


Change the Security Context URL

This section describes how to change the context URL.

Before you begin

  • You cannot change the security context URL without reloading the configuration from the new URL. The ASA merges the new configuration with the current running configuration.

  • Reentering the same URL also merges the saved configuration with the running configuration.

  • A merge adds any new commands from the new configuration to the running configuration.

    • If the configurations are the same, no changes occur.

    • If commands conflict or if commands affect the running of the context, then the effect of the merge depends on the command. You might get errors, or you might have unexpected results. If the running configuration is blank (for example, if the server was unavailable and the configuration was never downloaded), then the new configuration is used.

  • If you do not want to merge the configurations, you can clear the running configuration, which disrupts any communications through the context, and then reload the configuration from the new URL.

  • Perform this procedure in the system execution space.

Procedure


Step 1

If you are not already in the System configuration mode, in the Device List pane, double-click System under the active device IP address.

Step 2

Choose Configuration > Context Management > Security Contexts.

Step 3

Select the context you want to edit, and click Edit.

The Edit Context dialog box appears.

Step 4

Enter a new URL in the Config URL field, and click OK.

The system immediately loads the context so that it is running.


Reload a Security Context

You can reload the context in two ways:

  • Clear the running configuration and then import the startup configuration.

    This action clears most attributes associated with the context, such as connections and NAT tables.

  • Remove the context from the system configuration.

    This action clears additional attributes, such as memory allocation, which might be useful for troubleshooting. However, to add the context back to the system requires you to respecify the URL and interfaces.

Reload by Clearing the Configuration

Procedure

Step 1

In the Device List pane, double-click the context name under the active device IP address.

Step 2

Choose Tools > Command Line Interface.

The Command Line Interface dialog box appears.

Step 3

Enter the following command:

clear configure all

Step 4

Click Send.

The context configuration is cleared.

Step 5

Choose Tools > Command Line Interface again.

The Command Line Interface dialog box appears.

Step 6

Enter the following command:

copy startup-config running-config

Step 7

Click Send.

The ASA reloads the configuration. The ASA copies the configuration from the URL specified in the system configuration. You cannot change the URL from within a context.


Reload by Removing and Re-adding the Context

To reload the context by removing the context and then re-adding it, perform the steps.

Procedure

Step 1

Remove a Security Context. Be sure to uncheck the Also delete config URL file from the disk check box.

Step 2

Configure a Security Context


Monitoring Security Contexts

This section describes how to view and monitor context information.

Monitor Context Resource Usage       

Procedure


Step 1

If you are not already in the System mode, in the Device List pane, double-click System under the active device IP address.

Step 2

Click the Monitoring button on the toolbar.

Step 3

Click Context Resource Usage.

Click each resource type to view the resource usage for all contexts:

  • ASDM/Telnet/SSH—Shows the usage of ASDM, Telnet, and SSH connections.

    • Context—Shows the name of each context.

      For each access method, see the following usage statistics:

    • Existing Connections (#)—Shows the number of existing connections.

    • Existing Connections (%)—Shows the connections used by this context as a percentage of the total number of connections used by all contexts.

    • Peak Connections (#)—Shows the peak number of connections since the statistics were last cleared, either using the clear resource usage command or because the device rebooted.

  • Routes—Shows the usage of dynamic routes.

    • Context—Shows the name of each context.

    • Existing Connections (#)—Shows the number of existing connections.

    • Existing Connections (%)—Shows the connections used by this context as a percentage of the total number of connections used by all contexts.

    • Peak Connections (#)—Shows the peak number of connections since the statistics were last cleared, either using the clear resource usage command or because the device rebooted.

  • Xlates—Shows the usage of network address translations.

    • Context—Shows the name of each context.

    • Xlates (#)—Shows the number of current xlates.

    • Xlates (%)—Shows the xlates used by this context as a percentage of the total number of xlates used by all contexts.

    • Peak (#)—Shows the peak number of xlates since the statistics were last cleared, either using the clear resource usage command or because the device rebooted.

  • NATs—Shows the number of NAT rules.

    • Context—Shows the name of each context.

    • NATs (#)—Shows the current number of NAT rules.

    • NATs (%)—Shows the NAT rules used by this context as a percentage of the total number of NAT rules used by all contexts.

    • Peak NATs (#)—Shows the peak number of NAT rules since the statistics were last cleared, either using the clear resource usage command or because the device rebooted.

  • Syslogs—Shows the rate of system log messages.

    • Context—Shows the name of each context.

    • Syslog Rate (#/sec)—Shows the current rate of system log messages.

    • Syslog Rate (%)—Shows the system log messages generated by this context as a percentage of the total number of system log messages generated by all contexts.

    • Peak Syslog Rate (#/sec)—Shows the peak rate of system log messages since the statistics were last cleared, either using the clear resource usage command or because the device rebooted.

  • VPN—Shows the usage of VPN site-to-site tunnels.

    • Context—Shows the name of each context.

    • VPN Connections—Shows usage of guaranteed VPN sessions.

    • VPN Burst Connections—Shows usage of burst VPN sessions.

      • Existing (#)—Shows the number of existing tunnels.

      • Peak (#)—Shows the peak number of tunnels since the statistics were last cleared, either using the clear resource usage command or because the device rebooted.

Step 4

Click Refresh to refresh the view.


View Assigned MAC Addresses

You can view auto-generated MAC addresses within the system configuration or within the context.

View MAC Addresses in the System Configuration

This section describes how to view MAC addresses in the system configuration.

Before you begin

If you manually assign a MAC address to an interface, but also have auto-generation enabled, the auto-generated address continues to show in the configuration even though the manual MAC address is the one that is in use. If you later remove the manual MAC address, the auto-generated one shown will be used.

Procedure

Step 1

If you are not already in the System configuration mode, in the Device List pane, double-click System under the active device IP address.

Step 2

Choose Configuration > Context Management > Security Contexts, and view the Primary MAC and Secondary MAC columns.


View MAC Addresses Within a Context

This section describes how to view MAC addresses within a context.

Procedure

Step 1

If you are not already in the System configuration mode, in the Device List pane, double-click System under the active device IP address.

Step 2

Choose Configuration > Interfaces, and view the MAC Address address column.

This table shows the MAC address in use; if you manually assign a MAC address and also have auto-generation enabled, then you can only view the unused auto-generated address from within the system configuration.


History for Multiple Context Mode

Table 2. History for Multiple Context Mode

Feature Name

Platform Releases

Feature Information

Multiple security contexts

7.0(1)

Multiple context mode was introduced.

We introduced the following screens: Configuration > Context Management.

Automatic MAC address assignment

7.2(1)

Automatic assignment of MAC address to context interfaces was introduced.

We modified the following screen: Configuration > Context Management > Security Contexts.

Resource management

7.2(1)

Resource management was introduced.

We introduced the following screen: Configuration > Context Management > Resource Management.

Virtual sensors for IPS

8.0(2)

The AIP SSM running IPS software Version 6.0 and above can run multiple virtual sensors, which means you can configure multiple security policies on the AIP SSM. You can assign each context or single mode ASA to one or more virtual sensors, or you can assign multiple security contexts to the same virtual sensor.

We modified the following screen: Configuration > Context Management > Security Contexts.

Automatic MAC address assignment enhancements

8.0(5)/8.2(2)

The MAC address format was changed to use a prefix, to use a fixed starting value (A2), and to use a different scheme for the primary and secondary unit MAC addresses in a failover pair. The MAC addresses are also now persistent across reloads. The command parser now checks if auto-generation is enabled; if you want to also manually assign a MAC address, you cannot start the manual MAC address with A2.

We modified the following screen: Configuration > Context Management > Security Contexts.

Maximum contexts increased for the ASA 5550 and 5580

8.4(1)

The maximum security contexts for the ASA 5550 was increased from 50 to 100. The maximum for the ASA 5580 was increased from 50 to 250.

Automatic MAC address assignment enabled by default

8.5(1)

Automatic MAC address assignment is now enabled by default.

We modified the following screen: Configuration > Context Management > Security Contexts.

Automatic generation of a MAC address prefix

8.6(1)

In multiple context mode, the ASA now converts the automatic MAC address generation configuration to use a default prefix. The ASA auto-generates the prefix based on the last two bytes of the interface (ASA 5500-X) or backplane (ASASM) MAC address. This conversion happens automatically when you reload, or if you reenable MAC address generation. The prefix method of generation provides many benefits, including a better guarantee of unique MAC addresses on a segment. If you want to change the prefix, you can reconfigure the feature with a custom prefix. The legacy method of MAC address generation is no longer available.

Note


To maintain hitless upgrade for failover pairs, the ASA does not convert the MAC address method in an existing configuration upon a reload if failover is enabled. However, we strongly recommend that you manually change to the prefix method of generation when using failover, especially for the ASASM. Without the prefix method, ASASMs installed in different slot numbers experience a MAC address change upon failover, and can experience traffic interruption. After upgrading, to use the prefix method of MAC address generation, reenable MAC address generation to use the default prefix.

We modified the following screen: Configuration > Context Management > Security Contexts

Automatic MAC address assignment disabled by default on all models except for the ASASM

9.0(1)

Automatic MAC address assignment is now disabled by default except for the ASASM.

We modified the following screen: Configuration > Context Management > Security Contexts.

Dynamic routing in Security Contexts

9.0(1)

EIGRP and OSPFv2 dynamic routing protocols are now supported in multiple context mode. OSPFv3, RIP, and multicast routing are not supported.

New resource type for routing table entries

9.0(1)

A new resource type, routes, was created to set the maximum number of routing table entries in each context.

We modified the following screen: Configuration > Context Management > Resource Class > Add Resource Class

Site-to-Site VPN in multiple context mode

9.0(1)

Site-to-site VPN tunnels are now supported in multiple context mode.

New resource type for site-to-site VPN tunnels

9.0(1)

New resource types, vpn other and vpn burst other, were created to set the maximum number of site-to-site VPN tunnels in each context.

We modified the following screen: Configuration > Context Management > Resource Class > Add Resource Class

New resource type for IKEv1 SA negotiations

9.1(2)

New resource type, ikev1 in-negotiation, was created to set the maximum percentage of IKEv1 SA negotiations in each context to prevent overwhelming the CPU and crypto engines. Under certain conditions (large certificates, CRL checking), you might want to restrict this resource.

We modified the following screen: Configuration > Context Management > Resource Class > Add Resource Class

Support for Remote Access VPN in multiple context mode

9.5(2)

You can now use the following remote access features in multiple context mode:

  • AnyConnect 3.x and later (SSL VPN only; no IKEv2 support)

  • Centralized Secure Client image configuration

  • Secure Client image upgrade

  • Context Resource Management for Secure Client connections

Note


The Secure Client Premier license is required for multiple context mode; you cannot use the default or legacy license.

We modified the following screen: Configuration > Context Management > Resource Class > Add Resource Class

Pre-fill/Username-from-cert feature for multiple context mode

9.6(2)

Secure Client SSL support is extended, allowing pre-fill/username-from-certificate feature CLIs, previously available only in single mode, to be enabled in multiple context mode as well.

We did not modify any screens.

Flash Virtualization for Remote Access VPN

9.6(2)

Remote access VPN in multiple context mode now supports flash virtualization. Each context can have a private storage space and a shared storage place based on the total flash that is available:

  • Private storage—Store files associated only with that user and specific to the content that you want for that user.

  • Shared storage—Upload files to this space and have it accessible to any user context for read/write access once you enable it.

We modified the following screens: Configuration > Context Management > Resource Class > Add Resource Class

Configuration > Context Management > Security Contexts

Secure Clientprofiles supported in multi-context devices

9.6(2)

Secure Client profiles are supported in multi-context devices. To add a new profile using ASDM, you must have the Secure Client release 4.2.00748 or 4.3.03013 and later.

Stateful failover for Secure Client connections in multiple context mode

9.6(2)

Stateful failover is now supported for Secure Client connections in multiple context mode.

We did not modify any screens.

Remote Access VPN Dynamic Access Policy (DAP) is supported in multiple context mode

9.6(2)

You can now configure DAP per context in multiple context mode.

We did not modify any screens.

Remote Access VPN CoA (Change of Authorization) is supported in multiple context mode

9.6(2)

You can now configure CoA per context in multiple context mode.

We did not modify any screens.

Remote Access VPN localization is supported in multiple context mode

9.6(2)

Localization is supported globally. There is only one set of localization files that are shared across different contexts.

We did not modify any screens.

Remote Access VPN for IKEv2 is supported in multiple context mode

9.9(2)

You can configure Remote Access VPN in multiple context mode for IKEv2.

Configurable limitation of admin sessions

9.12(1)

You can configure the maximum number of aggregate, per user, and per-protocol administrative sessions. Formerly, you could configure only the aggregate number of sessions. This feature does not affect console sessions. Note that in multiple context mode, you cannot configure the number of HTTPS sessions, where the maximum is fixed at 5 sessions. The quota management-session command is also no longer accepted in the system configuration, and is instead available in the context configuration. The maximum aggregate sessions is now 15; if you configured 0 (unlimited) or 16+, then when you upgrade, the value is changed to 15.

New/Modified screens: Configuration > Device Management > Management Access > Management Session Quota

Firepower 1140 maximum contexts increased from 5 to 10

9.16(1)

The Firepower 1140 now supports up to 10 contexts.