Installing the Fabric Interconnect

This chapter contains the following topics:

Installation Guidelines and Limitations

Be aware of the following limitations when installing the Cisco UCS X-Series Direct Fabric Interconnect 9108 100G into the Cisco UCS X9508 chassis:

  • The fabric interconnects are always deployed in pairs. You cannot install and operate the fabric interconnect system with only one installed in the chassis.

  • Fabric interconnect can either be installed in the chassis or not. If no fabric interconnect is used in the Cisco UCS X9508 chassis, then you must install a pair of Cisco UCS Intelligent Fabric Modules (IFMs). The chassis cannot be used or operated without any fabric interconnects (FIs) or IFMs in place.

Installing and Removing the Fabric Interconnect

Each Cisco UCS X-Series Direct Fabric Interconnect 9108 100G in the rear of the chassis. They are always deployed in pairs, and the minimum fabric interconnect configuration for each UCS X9508 is two.


Caution


When working with the fabric interconnects, handle them carefully to avoid damage to the modules, connectors, and pins.


Use the following procedures to replace the fabric interconnect

Removing the Fabric Interconnect

The fabric interconnects must be deployed in pairs, so if you remove one, you must insert another fabric interconnect in its place for normal runtime operation.


Caution


When working with the fabric interconnects, handle them carefully to avoid damage to the modules, connectors, and pins! Make sure that the modules are level during removal and slide them out of the chassis slowly.


Before you begin

If the UCS X9508 server chassis has cable management arms attached, you might need to remove them if the cables obstruct the removal of the Cisco UCS X-Series Direct 9108 100G Fabric Interconnect. If you need to remove the cable management arms, you will need a #2 Phillps screwdriver to perform the task.

Procedure


Step 1

If the Cisco UCS X9508 server chassis that contains the fabric interconnects has a cable management tray, move the cables out of the way. If the cables cannot be moved sufficiently, unplug them and, if necessary, remove the cable management arms.

For reference, go to Installing the Top Cable Management Arms. Removing the cable management arms is the reverse of the installation procedure.

Step 2

Using your fingers, pinch the interior end of both of the fabric interconnects' handles to disengage each ejector latch.

This step unlocks the module handles so that they can move.

Step 3

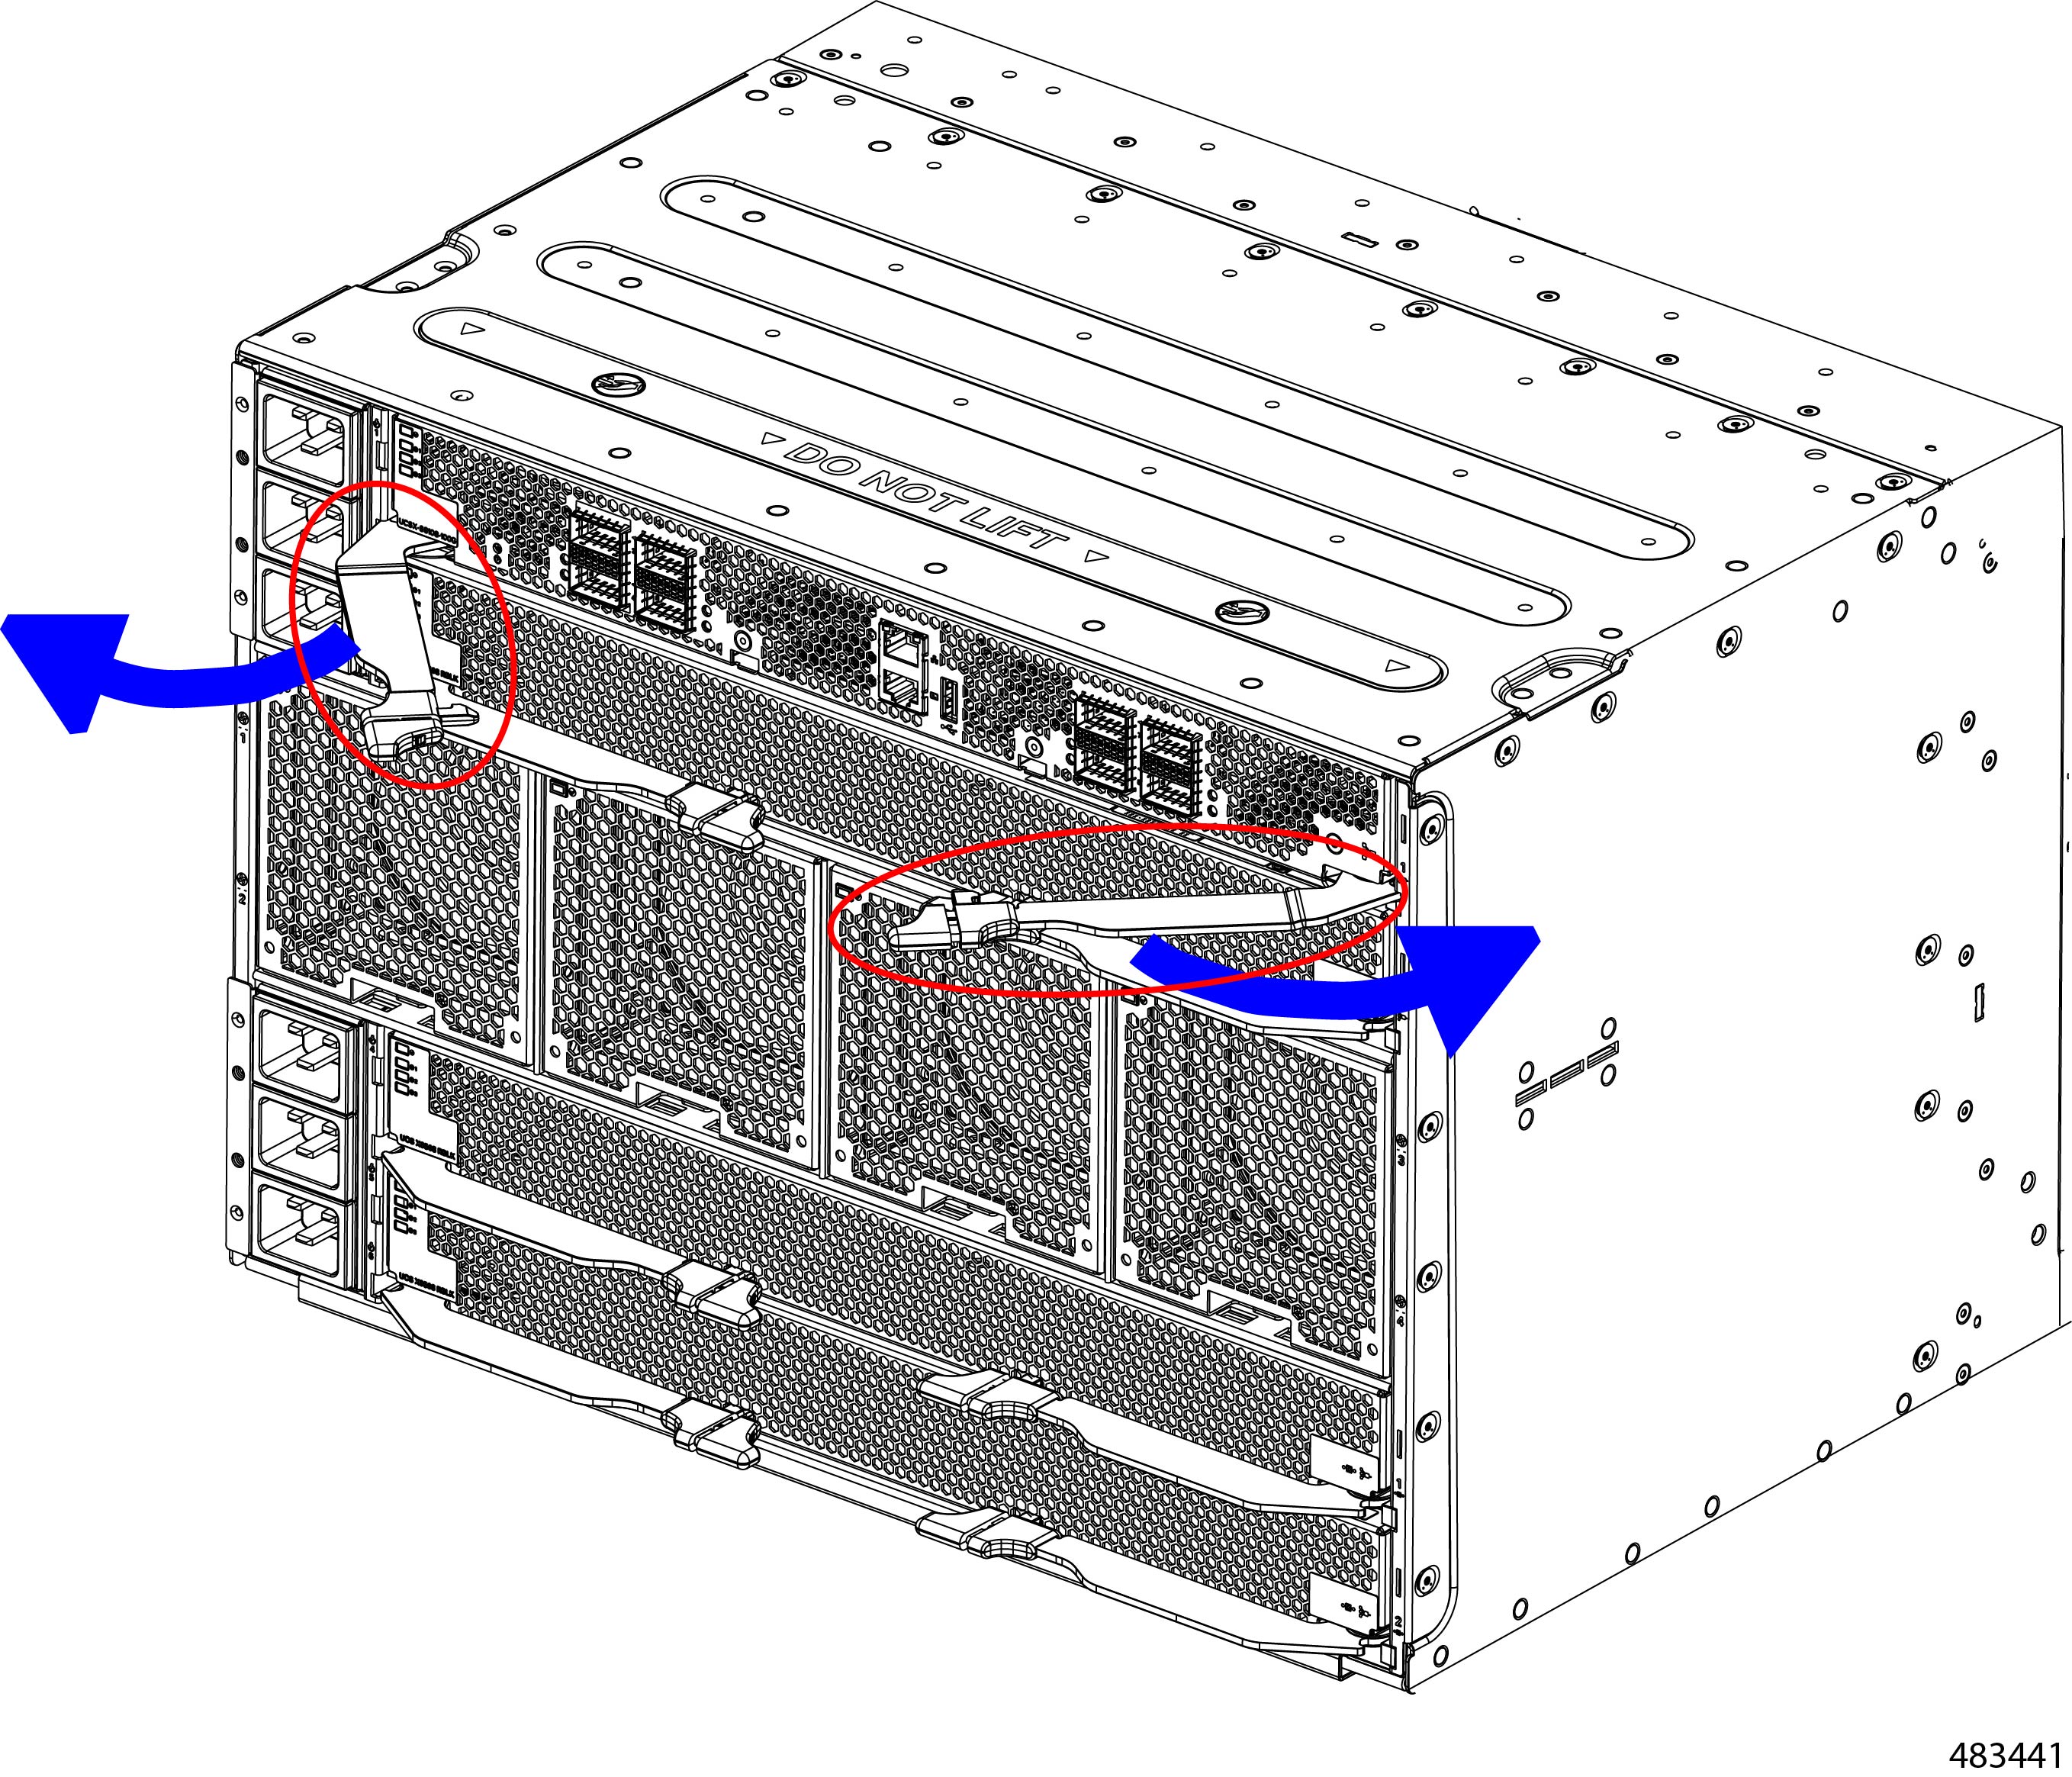
Keeping the modules handles level, pull them towards you so that they arc away from the chassis.

You might feel some resistance as the fabric interconnect disconnects from the socket inside the chassis.

Figure 1. Opening the Module Handles

Step 4

Slide the module about halfway out of the chassis, then place your other hand underneath the fabric interconnect to support it.

Caution


Make sure to apply even pressure when sliding the module out of the chassis. Do not push down or pull up on the module handles, and do not apply more force to one ejector handle than the other.

Step 5

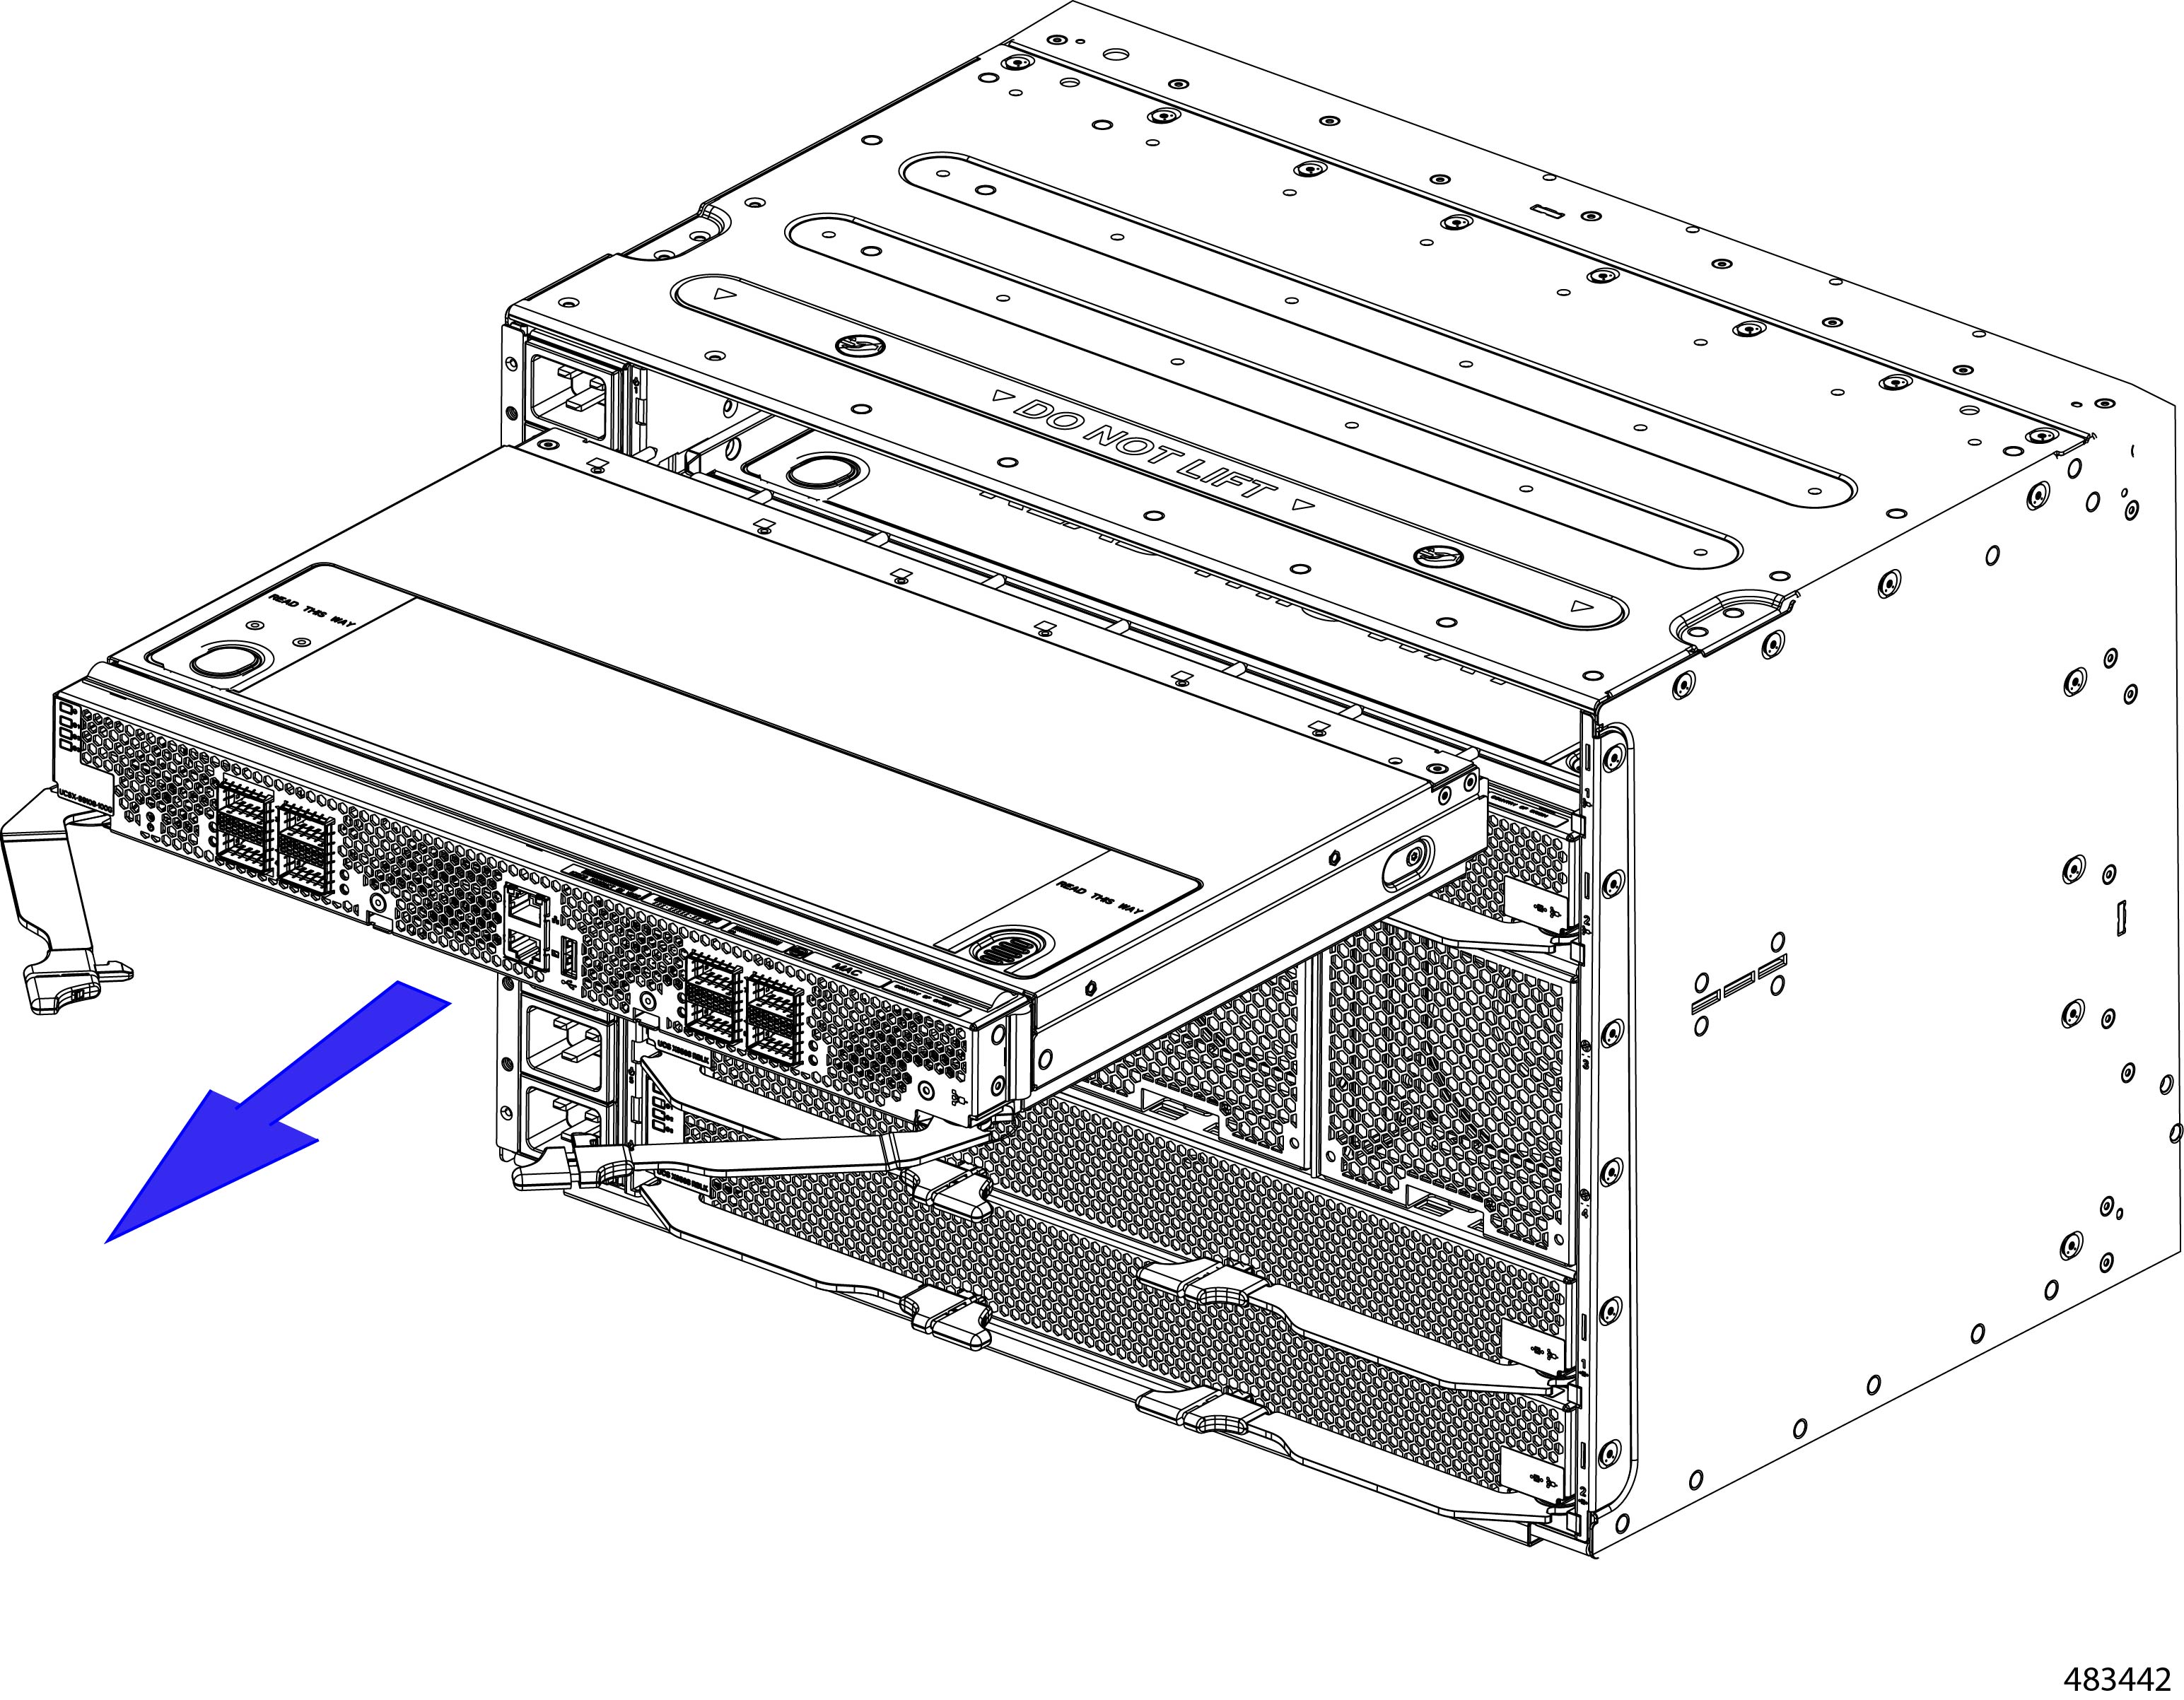
Continue sliding the fabric interconnect out of the chassis until it is completely removed.

Figure 2. Removing a Fabric Interconnect

What to do next

Insert a fabric interconnect. Go to Installing the Fabric Interconnect.

Installing the Fabric Interconnect

The Cisco UCS X-Series Direct Fabric Interconnect 9108 100G must be deployed in pairs, so there are no fabric interconnect module blanks that can be installed.


Caution


When working with the fabric interconnect, handle them carefully to avoid damage to the modules, connectors, and pins! Make sure that the modules are level during insertion and slide them into the chassis slowly.


Procedure


Step 1

If the fabric interconnect has a cable management tray, remove it.

Step 2

Swing the ejector handles to the open position.

Step 3

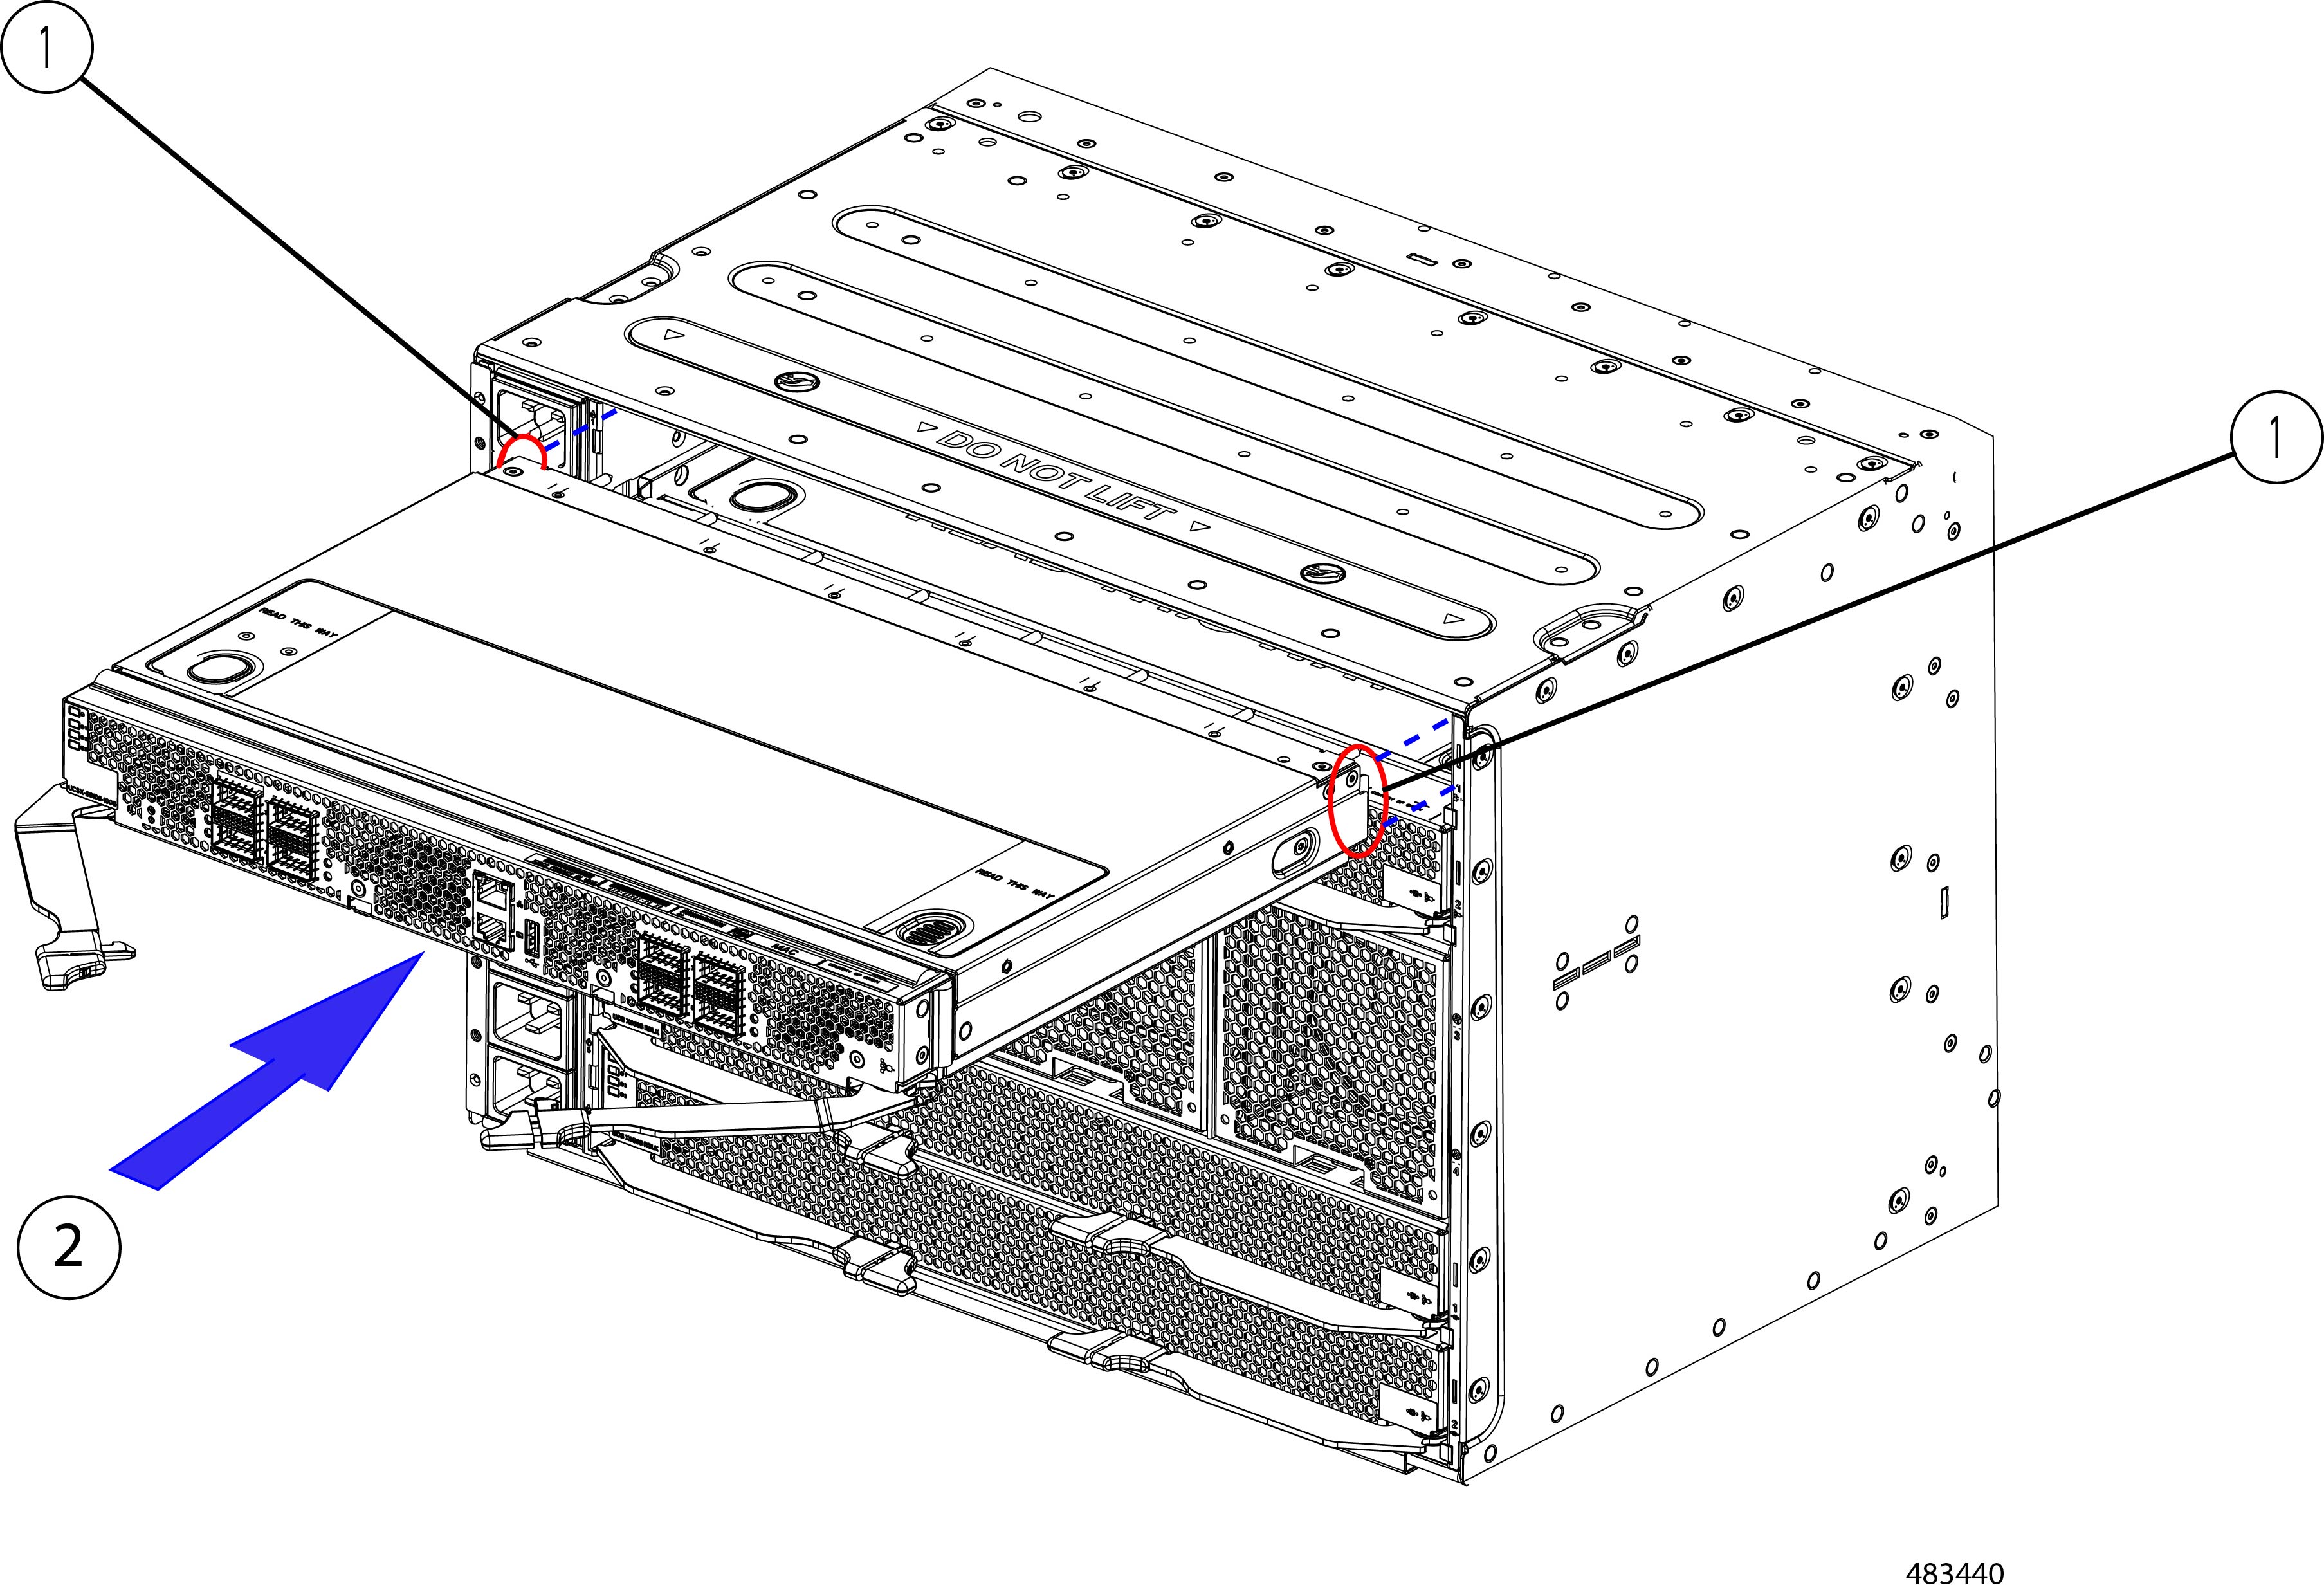
Placing one hand underneath the fabric interconnect, align the module with the empty slot on the rear of the chassis.

Figure 3. Aligning the Fabric Interconnect

Step 4

Holding the fabric interconnect level, slide it almost all the way into the chassis until you feel some resistance.

This resistance is normal. It occurs when the connectors at the rear of the fabric interconnect contact the socket inside the chassis.

Caution


Make sure to apply even pressure when sliding the module into the chassis. Do not push down or pull up on the module handles, and do not apply more force to one ejector handle than the other.

Step 5

Grasp each of the ejector handles, and keeping them level, slowly arc them inward toward the chassis.

This step seats the fabric interconnect connectors into the sockets on the midplane.

Caution


Make sure to apply even pressure when closing the module ejector handles! Do not push down or pull up on the module handles, and do not apply more force to one ejector handle than the other.

Step 6

Push the ejector handles until both are parallel with the face of the fabric interconnect.

Make sure the ejector latch is fully inserted in the front panel.

Step 7

If the Cisco UCS X9508 server chassis that contains the fabric interconnect module has a cable management tray, attach it.

Go to Installing the Top Cable Management Arms.


Fabric Interconnect Configuration

Cisco UCS X-Series Direct Fabric Interconnect 9108 100G can be configured and managed using the following Cisco management platforms.

Cisco Intersight

The fabric interconnect can be configured and managed through the Cisco Intersight management platform in Intersight Managed Mode (Cisco Intersight Managed Mode). For details, see the Cisco Intersight Managed Mode Configuration Guide, which is available at the following URL: Cisco Intersight Managed Mode Configuration Guide.

Cisco UCS Manager

The fabric interconnect can be configured and managed through UCS Manager version 4.3(4). For details, see the latest version of the Cisco UCS Manager Administration Guide, which is available at the following URL: https://www.cisco.com/c/en/us/td/docs/unified_computing/ucs/ucs-manager/GUI-User-Guides/Admin-Management/4-3/b_cisco_ucs_admin_mgmt_guide_4-3.html