Routing Target Selection

Routing Targets

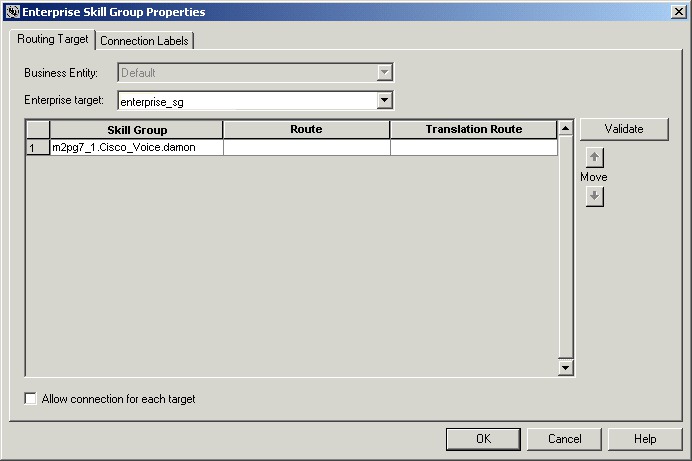
After defining how a script is used to categorize contacts, you typically use the nodes available in Script Editor to specify how the contact is to be routed to a target destination. A routing target is an entity to which the system can route a contact, including agents and skill groups. The routing target receives the contact and processes it accordingly.

Transfer Calls from Agents to Agents

You can transfer a call from an agent to an agent by using the Agent to Agent node in the Targets tab of the Palette.
Figure 1. Agent to Agent Icon

The Agent to Agent node routes the call to the specified agent. You define the agent either by directly selecting the agent from the database or by providing an expression using a formula. The expression must translate to agent peripheral number or SkillTargetID. The router then finds a valid label for the agent. If there are no labels configured for the specified agent, the failure node of the Agent to Agent node is run.

Following is the Properties dialog box for the Agent to Agent node:

Figure 2. Agent to Agent Properties
Define Agent to Agent node properties as follows:

Procedure


Step 1

Choose an option from the Select agent by drop-down list:

  1. Peripheral number - To select a peripheral and a provide formula that translates to the agent's peripheral number.

  2. Enterprise Name - To select the agent from the list of configured agents.

  3. Skill target ID - To select the agent by providing an expression that translates into the agent's SkillTargetID. In the supervisory case, the expression should use the call's PreferredAgentID.

Step 2

Based on your selection in Step 1, select the peripheral or agent, or enter an expression, as necessary.

Step 3

Optionally, check or uncheck Fail node if agent is unavailable:

  1. When checked, the success branch of the Agent to Agent node is run and the router sends the call if the router finds a valid label for the agent, the agent is available, and the agent state is Ready.

  2. The failure branch of the Agent to Agent node is run if the router does not find a valid label for the agent, or the agent is not available or the agent is in TempUnavailable mode (the router has just send a call to the agent).

  3. When not checked, the success branch of the Agent to Agent node is run and the router sends the call if the router finds a valid label for the agent. The failure branch of the Agent to Agent node is run if the Router does not find a valid label for the agent.

Step 4

Optionally, add comments and connection labels.

Step 5

Optionally, check Enable Target Requery.


Nodes Used to Receive Contacts

Use the following nodes in Script Editor to specify how a contact is to be routed to a target.

  • Enterprise Skill Group

  • Enterprise Service

  • Service

Define Set of Enterprise Skill Groups to Receive the Contact

You define a set of enterprise skill groups that can receive the contact by using the Enterprise Skill Group node in the Targets tab of the Palette.
Figure 3. The Enterprise Skill Group Icon
The script can determine the target enterprise skill group from the set by one of the following methods:
  • Selecting the target by rules (Select node)

  • Distributing contacts to targets in the set (Distribute node)

  • A combination of selecting the target and distributing contacts (Route Select node)

Following is the Properties dialog box of the Enterprise Skill Group node:

Figure 4. Enterprise Skill Group Properties - Routing Tab
Define Enterprise Skill Group node properties as follows:

Procedure


Step 1

From the Business Entity drop-down list, select the business entity for the enterprise skill groups.

Step 2

From the Enterprise target drop-down list, select the enterprise target for the enterprise skill groups.

Step 3

For each enterprise skill group in the target set the following:

  1. In the Skill Group column, for each row used, select the enterprise skill group to which the contact can be routed.

  2. In the Route column, select the route that maps to a specific target at the peripheral.

  3. Optionally, in the Translation Route column, select a translation route.

Step 4

Optionally, check Allow connection for each target to have an output terminal appear to the right of each individual target defined in the node. Control passes through this terminal when the associated target is chosen. When the script terminates, the route for the selected enterprise skill group is still used.

Step 5

Click Validate to check whether the targets you defined are valid. Correct any errors that are flagged.

Step 6

Optionally, add connection labels.


Define Set of Enterprise Services to Receive the Contact

You define a set of enterprise services that can receive the contact by using the Enterprise Service node in the Targets tab of the Palette.
Figure 5. The Enterprise Service Icon
The script can determine the target enterprise service from the set by one of the following methods:
  • Selecting the target by rules (Select node)

  • Distributing contacts to targets in the set (Distribute node)

  • A combination of selecting the target and distributing contacts (Route Select node)

Following is the Properties dialog box of the Enterprise Service node:

Figure 6. Enterprise Service Properties - Routing Target tab
Define Enterprise Service node properties as follows:

Procedure


Step 1

From the Business Entity drop-down list, select the business entity for the enterprise services.

Step 2

Choose the enterprise target for the enterprise services from the Enterprise target drop-down list.

Step 3

For each enterprise service in the target set the following:

  1. In the Service column, for each row used, select the enterprise service to which the contact can be routed.

  2. In the Route column, select the route that maps to a specific target at the peripheral.

  3. Optionally, in the Translation Route column, select a translation route.

Step 4

Optionally, check Allow connection for each target to have an output terminal appear to the right of each individual target defined in the node. Control passes through this terminal when the associated target is chosen. When the script terminates, the route for the selected enterprise service is still used.

Step 5

Click Validate to check whether the targets you defined are valid. Correct any errors that are flagged.

Step 6

Optionally, add connection labels.


Define Set of Services to Receive the Contact

You define a set of services that can receive the contact by using the Service node in the Targets tab of the Palette.
Figure 7. The Service Icon
The script can determine the target service from the set by one of the following methods:
  • Selecting the target by rules (Select node)

  • Distributing contacts to targets in the set (Distribute node)

  • A combination of selecting the target and distributing contacts (Route Select node)

Following is the Properties dialog box of the Service node:

Figure 8. Service Properties - Routing Target Tab
Define Service node properties as follows:

Procedure


Step 1

For each service in the target set the following:

  1. In the Service column, for each row used, select the service to which the contact can be routed. You can use the drop-down list for each table cell, or select multiple services by clicking Add Targets and using the dialog box that opens to select multiple services.

  2. In the Route column, select the route that maps to a specific target at the peripheral.

  3. Optionally, in the Translation Route column, select a translation route.

Step 2

Optionally, check Allow connection for each target to have an output terminal appear to the right of each individual target defined in the node. Control passes through this terminal when the associated target is chosen. When the script terminates, the route for the selected service is still used.

Step 3

Click Validate to check whether the targets you defined are valid. Correct any errors that are flagged.

Step 4

Optionally, add connection labels.


Send Call to a VRU with Translation Route to VRU

Before you begin

The translation route to CVP from other sites, CCE instance, or Avaya PG require translation route to VRU node to be used in the Routing script. To transfer a call to CVP using the Translation Route scheme, you must use the Command Execution Pane to configure DNIS numbers in the CVP call server. You must replicate the DNIS configurations in all the CVP call servers configured in the same site.


Note


The DNIS configuration in CVP is erased when you perform a full sync from the Inventory page of Packaged CCE Administration. To reconfigure the DNIS number in the CVP call server, use the Command Execution Pane.


For more information, see the Command Execution Pane.

Following is the Properties dialog box for the Translation Route to VRU node:

Figure 9. Translation Route to VRU Properties

Define Translation Route to VRU node properties as follows:

Procedure


Step 1

To change the type of target:

  1. Click Change. The Select Type dialog box opens.

  2. Choose the Target Type (Enterprise Service, Service, or Service Array).

  3. If you selected Enterprise Service, select a Business Entity and Enterprise target.

  4. Specify whether the Translation Route to VRU node is to act like a Select or Distribute node.

    • Distribute Among Targets. The Translation Route to VRU node is to act like a Distribute node, distributing calls among the targets based on the relative values.

    • Select Most Eligible Target. (Radio button.) The Translation Route to VRU node is to act like a Select node.

      If you select this option, you:

      • Define whether to pick the target with the maximum value or the minimum value.

      • Define a formula that determines which target is to be accepted.

      • Define the type of target search.

Step 2

To add targets, click Add Targets. The Add Targets dialog box opens. Use the Available Targets list and the Add button to select targets.

Note


If you choose Enterprise Service as a target type, you can select just one item from the list. If you choose Service or Service Array, you can select one or more items from the list.

Step 3

Click OK to close the Add Targets dialog box. The target members you selected appear in the Properties dialog box.

Step 4

Continue defining Target information for each target:

  • Consider If (Optional.) A formula that must evaluate to true for the target when the Packaged CCE initiates the Translation Route to VRU node, or that target is not considered.

  • Select Max/Select Min Value of A formula that determines which of the targets is selected.

  • (Drop-down list.) The route on which to send the call if you select this target. (The list contains all routes associated with the target.)

  • Translation Route (Drop-down list.) The route to send the call for initial VRU processing if you select this target. (The list contains all translation routes associated with the same peripheral as the target.)

    Note

     
    You must specify a value for this field. When a call is sent to a translation route, the PG retrieves the final route from the Packaged CCE and coordinates the other processing with the VRU.
  • Per-node success connection(Radio button.) Select this option to attach one success output terminal to the node. This terminal is used regardless of which target you select.

  • Per-target success connection (Radio button.) Select this option to attach a success output terminal to each target in the node.

    Note

     
    This option is useful in situations where you want to use different scripts depending on the selected target for a call.

Step 5

Optionally, click Validate to validate the node properties.

Step 6

Optionally, add connection labels.


Nodes Used to Stop Script Processing

You can use the following nodes to stop script processing:

  • End Node

  • Termination Node

  • Release Call Node

End Node

You can terminate the script by using the End node in the General tab of the Palette.

Figure 10. End Icon

If the script reaches the End node, it has failed to find a target for the contact. Packaged CCE then uses the default route for the Dialed Number.

Several End nodes can appear in the same script. The End node is never required; a script can terminate with any node.

You do not define any properties for the End node. You can optionally add comments.

Release Call Node

You can terminate the script and disconnect the caller by using the Release Call node in the Targets tab of the Palette.

Figure 11. Release Call Icon

You can use a Release Call node in situations where the caller needs no further service after executing several Unified CVP scripts.

You do not define any properties for the Release Call node. You can optionally add comments.

Service Requested

ServiceRequested is a call variable available in Script Editor. It provides more details regarding the routing request. The field is currently only set for multichannel routing (Task Routing), voice callback (Agent Request) and Pick/ Pull routing, otherwise it is set to 0. Based on the value of this field, the script can take different actions.

ServiceRequested Variable

Service Requested Variable

Description

0 = ROUTE_SERVICE_REQUEST_NONE

No service requested.

1 = ROUTE_SERVICE_REQUEST_VOICE_CALLBACK

Caller is requesting a voice callback.

2 = ROUTE_SERVICE_REQUEST_TRANSFER

Transfer a task that is already assigned to an agent back to a queue.

3 = ROUTE_SERVICE_REQUEST_RONA

A task is being rerouted on no answer (RONA).

Target Requery

Target Requery is a script node feature that you can use to handle routing failures, for example due to No Answer or Busy responses, or for unreachable targets caused by transient failures in the network (such as network congestion). If the determined destination for a contact is available but not reachable, Target Requery attempts to find a different valid destination.

You need Target Requery to address the following failures:

  • Failure to deliver a call to an agent.

  • Failure of the outbound leg of a blind-mode Network Transfer.

  • Target Requery works on a per call basis; that is, the routing information for one call does not affect the state for other calls. If the first target selected for the contact was not reachable, the target is not eliminated from the potential routing destinations for other contacts.


Note


You can enable the Target Requery feature for CVP, ICM to ICM gateway, and a subset of the supported carrier NICs. You cannot use the requery feature with any of the multimedia requests because the MR PG does not support requery mechanism.


Target Requery Functionality

In the system, when queried, the CallRouter returns a label to the routing client. The routing client then routes the call to the destination specified by the label. If the destination is not reachable (for example, because of a busy signal or no answer), the call is routed to the default destination.

With Target Requery in a Label, Route Select, or Select node, if the router fails to route to a target node, a second attempt is made. If the failure occurs a second time, then the router continues from the failure path in the node.


Note


In a Queue node, just one target is used. If the router fails to route to the target node, the failure path of the node is taken immediately. To implement requery in a Queue node, you can create a script that increases the priority and requeries the call from the failure path to the same queue.

In the event of a failure, you can handle requerying in the scripting environment, as you deem appropriate.

Target Requery does not require different definitions for different failure cases. However, you can choose to handle different failures differently.

Test of the RequeryStatus Variable

You can test the error path of these script nodes using Target Requery to determine the specific network cause of failure and conditionally retry the attempt as necessary. You can accomplish this using an If node to check the value of the call variable RequeryStatus. The decision path for the script is then determined by the value of the RequeryStatus variable.

The following are possible values for the RequeryStatus variable:

Table 1. RequeryStatus Variables

Requery Status Variable

Description

REQUERY_ANSWER (0)

Script ends. The call was successfully sent to the chosen target.

Note

 
This variable is used internally by the CallRouter. You cannot test for this variable in an IF node.

REQUERY_ROUTE_SELECT_FAILURE (1)

Routing client generated an error code from ReRouteReq msg indicating a Route Select failure.

REQUERY_CALLED_PARTY_BUSY (2)

Routing client generated error code from ReRouteReq msg indicating the called party is busy.

REQUERY_NO_ANSWER (3)

Routing client generated an error code from ReRouteReq msg indicating no answer.

REQUERY_ERROR (4)

CallRouter generated an error code. The attempt to send the call to target failed because the target was not reachable (i.e., busy, ring no answer).

REQUERY_ABORTED (5)

The attempt to send the call to a target failed because the caller abandoned before the call could be delivered to its destination. In the case of ABANDON and DISCONNECT, the CallRouter assumes the call has ended and ends the script. The RequeryStatus value is set to 5, indicating REQUERY_ABORTED.

Note

 
This variable is used internally by the CallRouter. You cannot test this variable in an IF node.

REQUERY_TIMED_OUT (6)

The call attempt failed because the routing client did not respond to the router within the DivertOnBusyCallTimeout period (180 seconds by default). If the target node has Router Requery enabled, when DivertOnBusyCallTimeout period expires, the Router closes the Router Requery with REQUERY_TIMED_OUT .

Note

 
This variable is used internally by the CallRouter. You cannot test this variable in an IF node.

Nodes That Support Target Requery

The following nodes support Target Requery:

  • Label

  • Queue

  • Queue to Agent

  • Precision Queue

  • Route Select

  • Select

  • Agent to Agent

Use Target Requery

You define nodes to enable Target Requery. For the Queue, Queue to Agent, Agent to Agent, and Route Select nodes:

Procedure


Step 1

Open the node properties.

Step 2

Click Change. A dialog box opens.

Step 3

Check Enable target requery.

Step 4

Click OK to close the dialog box.

Step 5

Click OK to close the properties dialog box.

Step 6

For the Label, Select and Precision Queue nodes:

For Select nodes:

  1. Open the node properties.

  2. Check Enable Target Requery.

  3. Click OK to close the properties dialog box.