Common Tasks

Common Tasks

This section contains information about common tasks you perform in Script Editor. This section does not contain information about every possible task you can perform. For more information on Script Editor, see the Script Editor online help.


Note


If you are a department administrator for Packaged CCE deployments (Packaged CCE: CCE-PAC-M1 and Packaged CCE: CCE-PAC-M1 Lab Only), then you will not have access to the Script Editor. Instead, you have to use the Internet Script Editor client, unless restricted by the feature control of the client or by your role.


The Palette

Figure 1. Palette Icon

You can display the Palette by clicking the Palette icon in the Main toolbar or by selecting Palette from the View menu. The Palette contains the icons that represent the nodes used in scripts.

Create Routing Script

Procedure


Step 1

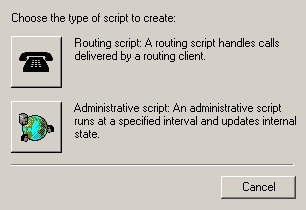
In Script Editor, choose File > New or click New. You are prompted to select a Routing Script or an Administrative Script:

Figure 2. New Dialog Box

Step 2

Click the following icon.

Figure 3. Routing Script

The new script opens in the Edit window, with a Start node. (See Start Node.

Step 3

Build the script.

Step 4

To save the script, choose File > Save or click Save. You are prompted for a script name.


Add Comments to a Node

Figure 4. Comment icon

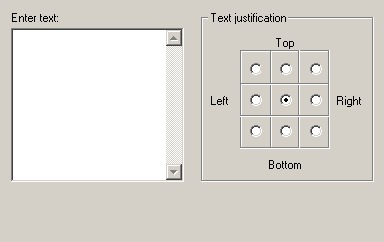
Most nodes have a Comment tab :

Figure 5. Comment Tab

Procedure


Step 1

To add a comment, type in the Enter text field.

Step 2

To select the location where you want your comment to appear in the node, select a radio button in the Text justification area.


Specify a Connection Label Location for a Node

Most nodes have a Connection Labels tab.

Procedure


Step 1

When viewing a script in monitor mode, you can specify the location of connection labels by moving the slider in the Label position area to one of the following locations:

  1. Origin, displays the connection label close to the node you are editing.

  2. Destination, displays the connection label close to the targeted node.

  3. Center, displays the connection label between the nodes.

Step 2

You can remove the connection label by clearing the Display monitor labels check box.


Validate Scripts

Procedure


Step 1

To validate a single script, with the script open in the active window, choose Script > Validate or click the Validate Icon on the toolbar.

Step 2

To validate multiple scripts, choose Script > Validate All or on the toolbar, click the Validate All Icon.

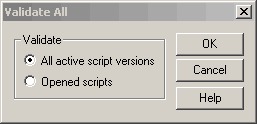
You are prompted to choose between validating active versions of all scripts or all the opened scripts.

Figure 6. Validate All Query Dialog

Step 3

Make the appropriate selection and click OK.

  1. If a script is valid, a dialog box opens stating that script is valid.

  2. If the script is not valid, the Validate Script dialog box opens with a list of the errors and warnings. When you select an error, the node where the error occurs is highlighted in the Edit window.


Open Script Explorer

Procedure


In Script Editor, choose File > Script Explorer or on the toolbar, click the Explorer Icon.

The Script Explorer dialog box opens, listing scripts by customer and business entity:

You can then set the active version of the script, view its properties, rename it, or delete it. For more information, see the Script Editor Online Help.


Schedule Routing Script

You schedule a script by associating it with a call type as follows:

Procedure


Step 1

Choose Script > Call Type Manager. The Call Type Manager dialog box opens.

Figure 7. Call Type Manager Dialog Box—Schedules Tab

Step 2

Select the call type to associate with the script.

Step 3

Click Add. The Add Call Type Schedule dialog box opens.

Step 4

In the Script tab, select the script to schedule:

Figure 8. Add Call Type Dialog Box - Script Tab

Step 5

In the Period tab, choose the information to define the period for which the schedule will be effective.

Figure 9. Add Call Type Schedule Dialog Box - Period Tab

Step 6

Optionally, in the Description tab, enter a description of the schedule.

Step 7

Click OK in the Add Call Type Schedule dialog box.

Step 8

Click OK in the Call Type Manager dialog box.

Note

 
The schedule is not saved until you click OK in the Call Type Manager dialog box.

Viewing Modes

You can view a script in four different modes:

  • Browse - Allows you to view the script.

  • Edit - Allows you to edit the script.

  • Monitor - Allows you to monitor the script

  • Quick Edit - Allows you to make certain modifications to a script, with the following guidelines:

    • In Quick Edit mode, you cannot add or delete a node.

    • In Quick Edit mode, you can adjust most of the properties of the script nodes you select in the Node Control table of your assigned feature control set. However, in Quick Edit mode you cannot edit any properties of the selected nodes that change the structure of a script or that reset previous reporting data.

  • As a Quick Edit Only User:

    • You can only edit scripts through Quick Edit mode.

    • You cannot create or delete a script.

    • You can access the Properties of any script node in any mode by either right-clicking the node and selecting Properties, or by double-clicking the node.

    • You cannot edit the Call Type Manager dialog box (Script > Call Type Manager).

    • You cannot edit the Administrative Manager dialog box (Script > Administrative Manager).

    • You cannot edit the Custom Functions dialog box (Script > Custom Functions).

    • You can choose the viewing mode from the Scripting toolbar, or from the Script menu.

Making Packaged CCE Work with Unified CVP

The following sections describe the differences between Packaged Contact Center Enterprise ( Packaged CCE) and Unified Customer Voice Portal (Unified CVP) scripting and show how they work together in common tasks.

Difference Between Unified CCE and Unified CVP Scripting

Packaged CCE scripting offers call control such as how a call should be treated based on time of day, call type, and so on. It also handles queuing for an agent based on skill group or service. It determines when to send the call to Unified CVP (for example, to play prompts, collect call entered digits, and get or put information in a database), or for queuing the call while waiting for an agent.

Unified CVP scripting offers IVR interaction, like playing a prompt based on an audio file or text-to-speech or collecting caller-entered digits via touch tone or speech. It also offers advanced features such as accessing an external database or web service for information used in creating a dynamic caller interaction experience. Examples include accessing current balance or storing collected customer information in a database.

Packaged CCE scripting is used for routing the call; but when the call needs to go to the Unified CVP, a self-service component is enlisted with Unified CVP scripts that have been created in Call Studio. For example, if a customer calls a credit card company and gets a voice recorded message, the Packaged CCE component makes the decision which script to run, whether the interaction is treated as a sales call or a service call and then selects which VRU (voice response unit) scripts get run, The call is then sent to a VRU, which connects the call to the Unified CVP "self-service engine". It accomplishes these tasks without the customer talking to an agent, such as getting the account balance with touch tone activation or speech. Once the information is collected control is then returned to the Packaged CCE script. The Packaged CCE script queues the customer for an agent, and connects the customer to an agent.

How Packaged CCE and Unified CVP Work Together

To summarize, Packaged CCE and Unified CVP work together to perform such tasks as:

  • Playing media, such as a recording stating office hours, to a caller.

  • Playing streaming audio, such as a radio broadcast, to a caller.

  • Retrieving caller-entered data, DTMF, or speech.

  • Playing back different types of data, such as an account number or balance, to a caller.

  • Moving calls to other destinations. For example, forwarding calls to an agent.

Packaged CCE uses Unified CVP messaging technology to direct Unified CVP and to receive the responses from Unified CVP.

For more information about Packaged CCE working with Unified CVP, proceed to Before You Begin.