- Information About the ASA Integrated with Cisco TrustSec
- Information about Cisco TrustSec
- About SGT and SXP Support in Cisco TrustSec
- Roles in the Cisco TrustSec Feature
- Security Group Policy Enforcement
- How the ASA Enforces Security Group-Based Policies
- Effects of Changes to Security Groups on the ISE
- About Speaker and Listener Roles on the ASA
- SXP Chattiness
- SXP Timers
- IP-SGT Manager Database
- Features of the ASA-Cisco TrustSec Integration
- Licensing Requirements for Cisco TrustSec
- Prerequisites for Using Cisco TrustSec
- Guidelines and Limitations
- Configuring the ASA for Cisco TrustSec Integration
- Task Flow for Configuring the ASA to Integrate with Cisco TrustSec
- Configuring the AAA Server for Cisco TrustSec Integration
- Importing a Protected Access Credential (PAC) File
- Configuring the Security Exchange Protocol (SXP)
- Adding an SXP Connection Peer
- Refreshing Environment Data
- Configuring the Security Policy
- Configuration Example
- Additional References
- Monitoring Cisco TrustSec
- Feature History for the Cisco TrustSec Integration
ASA and Cisco TrustSec
This chapter includes the following sections:
- Information About the ASA Integrated with Cisco TrustSec
- Licensing Requirements for Cisco TrustSec
- Prerequisites for Using Cisco TrustSec
- Guidelines and Limitations
- Configuring the ASA for Cisco TrustSec Integration
- Configuration Example
- Additional References
- Monitoring Cisco TrustSec
- Feature History for the Cisco TrustSec Integration
Information About the ASA Integrated with Cisco TrustSec
This section includes the following topics:
- Information about Cisco TrustSec
- About SGT and SXP Support in Cisco TrustSec
- Roles in the Cisco TrustSec Feature
- Security Group Policy Enforcement
- How the ASA Enforces Security Group-Based Policies
- Effects of Changes to Security Groups on the ISE
- About Speaker and Listener Roles on the ASA
- SXP Chattiness
- SXP Timers
- IP-SGT Manager Database
- Features of the ASA-Cisco TrustSec Integration
Information about Cisco TrustSec
Traditionally, security features such as firewalls performed access control based on predefined IP addresses, subnets and protocols. However, with enterprises transitioning to borderless networks, both the technology used to connect people and organizations and the security requirements for protecting data and networks have evolved significantly. End points are becoming increasingly nomadic and users often employ a variety of end points (for example, laptop versus desktop, smart phone, or tablet), which means that a combination of user attributes plus end-point attributes provide the key characteristics (in addition to existing 6-tuple based rules), that enforcement devices such as switches and routers with firewall features or dedicated firewalls can reliably use for making access control decisions.
As a result, the availability and propagation of end point attributes or client identity attributes have become increasingly important requirements to enable security across the customers’ networks, at the access, distribution, and core layers of the network, and in the data center.
Cisco TrustSec provides access control that builds upon an existing identity-aware infrastructure to ensure data confidentiality between network devices and integrate security access services on one platform. In the Cisco TrustSec feature, enforcement devices use a combination of user attributes and end-point attributes to make role-based and identity-based access control decisions. The availability and propagation of this information enables security across networks at the access, distribution, and core layers of the network.
Implementing Cisco TrustSec into your environment has the following advantages:
- Provides a growing mobile and complex workforce with appropriate and more secure access from any device
- Lowers security risks by providing comprehensive visibility of who and what is connecting to the wired or wireless network
- Offers exceptional control over activity of network users accessing physical or cloud-based IT resources
- Reduces total cost of ownership through centralized, highly secure access policy management and scalable enforcement mechanisms
For more information about using the Cisco TrustSec feature across various Cisco products, see Additional References.
About SGT and SXP Support in Cisco TrustSec
In the Cisco TrustSec feature, security group access transforms a topology-aware network into a role-based network, which enables end-to-end policies enforced on the basis of role-based access control (RBAC). Device and user credentials acquired during authentication are used to classify packets by security groups. Every packet entering the Cisco TrustSec cloud is tagged with an security group tag (SGT). The tagging helps trusted intermediaries identify the source identity of the packet and enforce security policies along the data path. An SGT can indicate a privilege level across the domain when the SGT is used to define a security group ACL.
An SGT is assigned to a device through IEEE 802.1X authentication, web authentication, or MAC authentication bypass (MAB), which occurs with a RADIUS vendor-specific attribute. An SGT can be assigned statically to a particular IP address or to a switch interface. An SGT is passed along dynamically to a switch or access point after successful authentication.
The Security-group eXchange Protocol (SXP) is a protocol developed for Cisco TrustSec to propagate the IP-to-SGT mapping database across network devices that do not have SGT-capable hardware support to hardware that supports SGTs and security group ACLs. SXP, a control plane protocol, passes IP-SGT mapping from authentication points (such as legacy access layer switches) to upstream devices in the network.
The SXP connections are point-to-point and use TCP as the underlying transport protocol. SXP uses the well-known TCP port number 64999 to initiate a connection. Additionally, an SXP connection is uniquely identified by the source and destination IP addresses.
Roles in the Cisco TrustSec Feature
To provide identity and policy-based access enforcement, the Cisco TrustSec feature includes the following roles:
- Access Requestor (AR)—Access requestors are end point devices that request access to protected resources in the network. They are primary subjects of the architecture and their access privilege depends on their Identity credentials.
Access requestors include end-point devices such PCs, laptops, mobile phones, printers, cameras, and MACsec-capable IP phones.
- Policy Decision Point (PDP)—A policy decision point is responsible for making access control decisions. The PDP provides features such as 802.1x, MAB, and web authentication. The PDP supports authorization and enforcement through VLAN, DACL, and security group access (SGACL/SXP/SGT).
In the Cisco TrustSec feature, the Cisco Identity Services Engine (ISE) acts as the PDP. The Cisco ISE provides identity and access control policy functionality.
- Policy Information Point (PIP)—A policy information point is a source that provides external information (for example, reputation, location, and LDAP attributes) to policy decision points.
Policy information points include devices such as Session Directory, Sensor IPS, and Communication Manager.
- Policy Administration Point (PAP)—A policy administration point defines and inserts policies into the authorization system. The PAP acts as an identity repository by providing Cisco TrustSec tag-to-user identity mapping and Cisco TrustSec tag-to-server resource mapping.
In the Cisco TrustSec feature, the Cisco Secure Access Control System (a policy server with integrated 802.1x and SGT support) acts as the PAP.
- Policy Enforcement Point (PEP)—A policy enforcement point is the entity that carries out the decisions (policy rules and actions) made by the PDP for each AR. PEP devices learn identity information through the primary communication path that exists across networks. PEP devices learn the identity attributes of each AR from many sources, such as end point agents, authorization servers, peer enforcement devices, and network flows. In turn, PEP devices use SXP to propagate IP-SGT mapping to mutually trusted peer devices across the network.
Policy enforcement points include network devices such as Catalyst switches, routers, firewalls (specifically the ASA), servers, VPN devices, and SAN devices.
The ASA serves the PEP role in the identity architecture. Using SXP, the ASA learns identity information directly from authentication points and uses it to enforce identity-based policies.
Security Group Policy Enforcement
Security policy enforcement is based on security group name. An end-point device attempts to access a resource in the data center. Compared to traditional IP-based policies configured on firewalls, identity-based policies are configured based on user and device identities. For example, mktg-contractor is allowed to access mktg-servers; mktg-corp-users are allowed to access mktg-server and corp-servers.
The benefits of this type of deployment include:
- User group and resource are defined and enforced using single object (SGT) simplified policy management.
- User identity and resource identity are retained throughout the Cisco TrustSec-capable switch infrastructure.
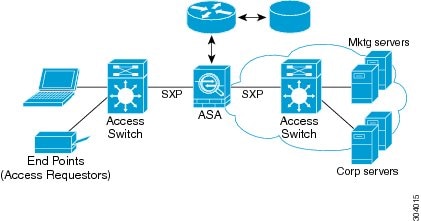
Figure 41-1 show a deployment for security group name-based policy enforcement.
Figure 41-1 Security Group Name-Based Policy Enforcement Deployment
Implementing Cisco TrustSec allows you to configure security policies that support server segmentation and includes the following features:
- A pool of servers can be assigned an SGT for simplified policy management.
- The SGT information is retained within the infrastructure of Cisco Trustsec-capable switches.
- The ASA can use the IP-SGT mapping for policy enforcement across the Cisco TrustSec domain.
- Deployment simplification is possible because 802.1x authorization for servers is mandatory.
How the ASA Enforces Security Group-Based Policies

Note![]() User-based security policies and security-group based policies can coexist on the ASA. Any combination of network, user-based, and security-group based attributes can be configured in an security policy. See Chapter 40, “Identity Firewall” for information about configuring user-based security policies.
User-based security policies and security-group based policies can coexist on the ASA. Any combination of network, user-based, and security-group based attributes can be configured in an security policy. See Chapter 40, “Identity Firewall” for information about configuring user-based security policies.
To configure the ASA to function with Cisco TrustSec, you must import a Protected Access Credential (PAC) file from the ISE. For more information, see Importing a Protected Access Credential (PAC) File.
Importing the PAC file to the ASA establishes a secure communication channel with the ISE. After the channel is established, the ASA initiates a PAC secure RADIUS transaction with the ISE and downloads Cisco TrustSec environment data (that is, the security group table). The security group table maps SGTs to security group names. Security group names are created on the ISE and provide user-friendly names for security groups.
The first time that the ASA downloads the security group table, it walks through all entries in the table and resolves all the security group names included in security policies that have been configured on it; then the ASA activates those security policies locally. If the ASA cannot resolve a security group name, it generates a syslog message for the unknown security group name.
Figure 41-2 shows how a security policy is enforced in Cisco TrustSec.
Figure 41-2 Security Policy Enforcement

1.![]() An end point device connects to an access layer device directly or via remote access and authenticates with Cisco TrustSec.
An end point device connects to an access layer device directly or via remote access and authenticates with Cisco TrustSec.
2.![]() The access layer device authenticates the end-point device with the ISE by using authentication methods such as 802.1X or web authentication. The end-point device passes role and group membership information to classify the device into the appropriate security group.
The access layer device authenticates the end-point device with the ISE by using authentication methods such as 802.1X or web authentication. The end-point device passes role and group membership information to classify the device into the appropriate security group.
3.![]() The access layer device uses SXP to propagate the IP-SGT mapping to the upstream devices.
The access layer device uses SXP to propagate the IP-SGT mapping to the upstream devices.
4.![]() The ASA receives the packet and looks up the SGTs for the source and destination IP addresses using the IP-SGT mapping passed by SXP.
The ASA receives the packet and looks up the SGTs for the source and destination IP addresses using the IP-SGT mapping passed by SXP.
If the mapping is new, the ASA records it in its local IP-SGT Manager database. The IP-SGT Manager database, which runs in the control plane, tracks IP-SGT mapping for each IPv4 or IPv6 address. The database records the source from which the mapping was learned. The peer IP address of the SXP connection is used as the source of the mapping. Multiple sources can exist for each IP-SGT mapped entry.
If the ASA is configured as a Speaker, the ASA transmits all IP-SGT mapping entries to its SXP peers. For more information, see About Speaker and Listener Roles on the ASA.
5.![]() If a security policy is configured on the ASA with that SGT or security group name, the ASA enforces the policy. (You can create security policies on the ASA that include SGTs or security group names. To enforce policies based on security group names, the ASA needs the security group table to map security group names to SGTs.)
If a security policy is configured on the ASA with that SGT or security group name, the ASA enforces the policy. (You can create security policies on the ASA that include SGTs or security group names. To enforce policies based on security group names, the ASA needs the security group table to map security group names to SGTs.)
If the ASA cannot find a security group name in the security group table and it is included in a security policy, the ASA considers the security group name to be unknown and generates a syslog message. After the ASA refreshes the security group table from the ISE and learns the security group name, the ASA generates a syslog message indicating that the security group name is known.
Effects of Changes to Security Groups on the ISE
The ASA periodically refreshes the security group table by downloading an updated table from the ISE. Security groups can change on the ISE between downloads. These changes are not reflected on the ASA until it refreshes the security group table.

Tip![]() We recommend that you schedule policy configuration changes on the ISE during a maintenance window, then manually refresh the security group table on the ASA to make sure the security group changes have been incorporated.
We recommend that you schedule policy configuration changes on the ISE during a maintenance window, then manually refresh the security group table on the ASA to make sure the security group changes have been incorporated.
Handling policy configuration changes in this way maximizes the chances of security group name resolution and immediate activation of security policies.
The security group table is automatically refreshed when the environment data timer expires. You can also trigger a security group table refresh on demand.
If a security group changes on the ISE, the following events occur when the ASA refreshes the security group table:
- Only security group policies that have been configured using security group names need to be resolved with the security group table.Policies that include security group tags are always active.
- When the security group table is available for the first time, all policies with security group names are walked through, security group names are resolved, and policies are activated. All policies with tags are walked through, and syslogs are generated for unknown tags.
- If the security group table has expired, policies continue to be enforced according to the most recently downloaded security group table until you clear it, or a new table becomes available.
- When a resolved security group name becomes unknown on the ASA, it deactivates the security policy; however, the security policy persists in the ASA running configuration.
- If an existing secuity group is deleted on the PAP, a previously known security group tag can become unknown, but no change in policy status occurs on the ASA. A previously known security group name can become unresolved, and the policy is then inactivated. If the security group name is reused, the policy is recompiled using the new tag.
- If a new security group is added on the PAP, a previously unknown security group tag can become known, a syslog message is generated, but no change in policy status occurs. A previously unknown security group name can become resolved, and associated policies are then activated.
- If a tag has been renamed on the PAP, policies that were configured using tags display the new name, and no change in policy status occurs. Policies that were configured with security group names are recompiled using the new tag value.
About Speaker and Listener Roles on the ASA
The ASA supports SXP to send and receive IP-SGT mapping entries to and from other network devices. Using SXP allows security devices and firewalls to learn identity information from access switches without the need for hardware upgrades or changes. SXP can also be used to pass IP-SGT mapping entries from upstream devices (such as datacenter devices) back to downstream devices. The ASA can receive information from both upstream and downstream directions.
When configuring an SXP connection on the ASA to an SXP peer, you must designate the ASA as a Speaker or a Listener for that connection so that it can exchange Identity information:
- Speaker mode—Configures the ASA so that it can forward all active IP-SGT mapping entries collected on the ASA to upstream devices for policy enforcement.
- Listener mode—Configures the ASA so that it can receive IP-SGT mapping entries from downstream devices (SGT-capable switches) and use that information to create policy definitions.
If one end of an SXP connection is configured as a Speaker, then the other end must be configured as a Listener, and vice versa. If both devices on each end of an SXP connection are configured with the same role (either both as Speakers or both as Listeners), the SXP connection fails and the ASA generates a syslog message.
Multiple SXP connections can learn IP-SGT mapping entries that have been downloaded from the IP-SGT mapping database. After an SXP connection to an SXP peer is established on the ASA, the Listener downloads the entire IP-SGT mapping database from the Speaker. All changes that occur after this are sent only when a new device appears on the network. As a result, the rate of SXP information flow is proportional to the rate at which end hosts authenticate to the network.
IP-SGT mapping entries that have been learned through SXP connections are maintained in the SXP IP-SGT mapping database. The same mapping entries may be learned through different SXP connections. The mapping database maintains one copy for each mapping entry learned. Multiple mapping entries of the same IP-SGT mapping value are identified by the peer IP address of the connection from which the mapping was learned. SXP requests that the IP-SGT Manager add a mapping entry when a new mapping is learned the first time and remove a mapping entry when the last copy in the SXP database is removed.
Whenever an SXP connection is configured as a Speaker, SXP requests that the IP-SGT Manager forward all the mapping entries collected on the device to the peer. When a new mapping is learned locally, the IP-SGT Manager requests that SXP forward it through connections that are configured as Speakers.
Configuring the ASA to be both a Speaker and a Listener for an SXP connection can cause SXP looping, which means that SXP data can be received by an SXP peer that originally transmitted it.
SXP Chattiness
The rate of SXP information flow is proportional to the rate at which end hosts authenticate into the network. After an SXP peering is established, the listener device downloads the entire IP-SGT database from the speaker device. After that, all changes are sent incrementally only when a new device appears on the network or leaves the network. Also, note that only access devices that are attached to the new device initiate this incremental update to the upstream device.
In other words, SXP protocol is no chattier than the authentication rate, which is limited to the capability of the authentication server. Therefore, SXP chattiness is not a major concern.
SXP Timers
- Retry Open Timer—The retry open timer is triggered if one SXP connection on the device is not up. After the retry open timer expires, the device goes through the entire connection database and if any connection is in the off or “pending on” state, the retry open timer restarts. The default timer value is 120 seconds. A zero value means the retry timer does not start. The retry open timer continues until all the SXP connections are set up, or the retry open timer has been configured to be 0.
- Delete Hold-Down Timer—The connection-specific delete hold-down timer is triggered when a connection on the Listener is torn down. The mapping entries that have been learned are not deleted immediately, but are held until the delete hold-down timer expires. The mapping entries are deleted after this timer expires. The delete hold-down timer value is set to 120 seconds and is not configurable.
- Reconciliation Timer—If an SXP connection is brought up within the delete hold-down timer period, a bulk update is performed on this connection. This means that the most recent mapping entries are learned and are associated with a new connection instantiation identifier. A periodic, connection-specific reconciliation timer starts in the background. When this reconciliation timer expires, it scans the entire SXP mapping database and identifies all mapping entries that have not been learned in the current connection session (that is, mapping entries with an unmatched connection instantiation identifier), and marks them for deletion. These entries are deleted in the subsequent reconciliation review. The default reconciliation timer value is 120 seconds. A zero value is not allowed on the ASA to prevent obsolete entries from staying for an unspecified length of time and causing unexpected results in policy enforcement.
- HA Reconciliation Timer—When HA is enabled, the SXP mapping database of the active and standby units are in sync. The new active unit tries to establish new SXP connections to all its peers and acquires the latest mapping entries. An HA reconciliation timer provides a way of identifying and removing old mapping entries. It starts after a failover occurs, which gives the ASA time to acquire the latest mapping entries. After the HA reconciliation timer expires, the ASA scans the entire SXP mapping database and identifies all the mapping entries have not been learned in the current connection session. Mapping entries with unmatched instantiation identifiers are marked for deletion. This reconciliation mechanism is the same as that of the reconciliation timer. The time value is the same as the reconciliation timer and is configurable.
After an SXP peer terminates its SXP connection, the ASA starts a delete hold-down timer. Only SXP peers designated as Listeners can terminate a connection. If an SXP peer connects while the delete hold-down timer is running, the ASA starts the reconciliation timer; then the ASA updates the IP-SGT mapping database to learn the most recent mapping.
IP-SGT Manager Database
The IP-SGT Manager database does not synchronize any entries from the active unit to the standby unit. Each source from which the IP-SGT Manager database receives IP-SGT mapping entries synchronizes its database from the active unit to the standby unit, then provides the final IP-SGT mapping to the IP-SGT Manager on the standby unit.
For Version 9.0(1), the IP-SGT Manager database receives IP-SGT mapping updates from the SXP source only.
Features of the ASA-Cisco TrustSec Integration
The ASA includes Cisco TrustSec as part of its identity-based firewall feature. Cisco TrustSec provides the following capabilities:
See About Speaker and Listener Roles on the ASA.
- The ASA supports SXP for IPv6 and IPv6-capable network devices.
- SXP can change mapping entries for IPv4 and IPv6 addresses.
- SXP end points support IPv4 and IPv6 addresses.
- The ASA supports SXP Version 2 only.
- The ASA negotiates SXP versions with different SXP-capable network devices. SXP version negotiation eliminates the need for static configuration of versions.
- You can configure the ASA to refresh the security group table when the SXP reconcile timer expires and you can download the security group table on demand. When the security group table on the ASA is updated from the ISE, changes are reflected in the appropriate security policies.
- The ASA supports security policies based on security group names in the source or destination fields, or both. You can configure security policies on the ASA based on combinations of security groups, IP address, Active Directory group/user name, and FQDN.
- You can configure security group-based policies on the ASA in both the Active/Active and Active/Standby configurations.
- The ASA can communicate with the ISE configured for high availability (HA).
- You can configure multiple ISE servers on the ASA and if the first server is unreachable, it continues to the next server, and so on. However, if the server list is downloaded as part of the Cisco TrsutSec environment data, it is ignored.
- If the PAC file downloaded from the ISE expires on the ASA and it cannot download an updated security group table, the ASA continues to enforce security policies based on the last downloaded security group table until the ASA downloads an updated table.
- For Layer 2 networks, all units share the same IP address. When you change the interface address, the changed configuration is sent to all other units. When the IP address is updated from the interface of a particular unit, a notification is sent to update the IP-SGT local database on this unit.
- For Layer 3 networks, a pool of addresses is configured for each interface on the master unit, and this configuration is synchronized to the slave units. On the master unit, a notification of the IP addresses that have been assigned to the interface is sent, and the IP-SGT local database is updated. The IP-SGT local database on each slave unit can be updated with the IP address information for the master unit by using the address pool configuration that has been synchronized to it, where the first address in the pool for each interface always belongs to the master unit.
When a slave unit boots, it notifies the master unit. Then the master unit goes through the address pool on each interface and computes the IP address for the new slave unit that sent it the notification, and updates the IP-SGT local database on the master unit. The master unit also notifies the other slave units about the new slave unit. As part of this notification processing, each slave unit computes the IP address for the new slave unit and adds this entry to the IP-SGT local database on each slave unit. All the slave units have the address pool configuration to determine the IP address value. For each interface, the value is determined as follows:
M—Maximum number of units (up to 8 are allowed)
N—Slave unit number that sent the notification
When the IP address pool changes on any interface, the IP addresses for all the slave units and the master unit need to be recalculated and updated in the IP-SGT local database on the master unit, as well as on every other slave unit. The old IP address needs to be deleted, and the new IP address needs to be added.
When this changed address pool configuration is synchronized to the slave unit, as a part of configuration change processing, each slave unit recomputes the IP address for the master unit and for every other slave unit whose IP address has changed, then removes the entry for the old IP address and adds the new IP address.
Table 41-1 show the number of IP-SGT mapping entries that the ASA supports.
|
|
|
|---|---|
Table 41-2 shows the number of SXP connections that the ASA supports.
|
|
|
|---|---|
Licensing Requirements for Cisco TrustSec
|
|
|
|---|---|
Prerequisites for Using Cisco TrustSec
Before configuring the ASA to use Cisco TrustSec, you must perform the following tasks:
Registering the ASA with the ISE
The ASA must be configured as a recognized Cisco TrustSec network device in the ISE before the ASA can successfully import a PAC file. To register the ASA with the ISE, perform the following steps:
2.![]() Choose Administration > Network Devices > Network Devices.
Choose Administration > Network Devices > Network Devices.
4.![]() Enter the IP address of the ASA.
Enter the IP address of the ASA.
5.![]() When the ISE is being used for user authentication, enter a shared secret in the Authentication Settings area.
When the ISE is being used for user authentication, enter a shared secret in the Authentication Settings area.
When you configure the AAA sever on the ASA, provide the shared secret that you create here on the ISE. The AAA server on the ASA uses this shared secret to communicate with the ISE.
6.![]() Specify a device name, device ID, password, and a download interval for the ASA. See the ISE documentation for how to perform these tasks.
Specify a device name, device ID, password, and a download interval for the ASA. See the ISE documentation for how to perform these tasks.
Creating a Security Group on the ISE
When configuring the ASA to communicate with the ISE, you specify a AAA server. When configuring the AAA server on the ASA, you must specify a server group. The security group must be configured to use the RADIUS protocol. To create a security group on the ISE, perform the following steps:
2.![]() Choose Policy > Policy Elements > Results > Security Group Access > Security Group.
Choose Policy > Policy Elements > Results > Security Group Access > Security Group.
3.![]() Add a security group for the ASA. (Security groups are global and not ASA specific.)
Add a security group for the ASA. (Security groups are global and not ASA specific.)
The ISE creates an entry under Security Groups with a tag.
4.![]() Under the Security Group Access section, configure device ID credentials and a password for the ASA.
Under the Security Group Access section, configure device ID credentials and a password for the ASA.
Generating the PAC File
Before generating the PAC file, you must have registered the ASA with the ISE. To generate the PAC file, perform the following steps:
2.![]() Choose Administration > Network Resources > Network Devices.
Choose Administration > Network Resources > Network Devices.
3.![]() From the list of devices, choose the ASA.
From the list of devices, choose the ASA.
4.![]() Under the Security Group Access (SGA), click Generate PAC.
Under the Security Group Access (SGA), click Generate PAC.
5.![]() To encrypt the PAC file, enter a password.
To encrypt the PAC file, enter a password.
The password (or encryption key) that you enter to encrypt the PAC file is independent of the password that was configured on the ISE as part of the device credentials.
The ISE generates the PAC file. The ASA can import the PAC file from flash or from a remote server via TFTP, FTP, HTTP, HTTPS, or SMB. (The PAC file does not have to reside on the ASA flash before you can import it.)
For information about the PAC file, see Importing a Protected Access Credential (PAC) File.
Guidelines and Limitations
This section includes the guidelines and limitations for this feature.
Supported in single and multiple context mode.
Supported in routed and transparent firewall mode.
Supports IPv6 for SXP endpoints.
Supported on the master unit and on slave units in a clustering environment.
Supports a list of servers via configuration. If the first server is unreachable, the ASA tries to contact the second server in the list, and so on. However, the server list downloaded as part of the Cisco TrustSec environment data is ignored.
Supports both Active/Standby and Active/Active scenarios. All SXP data is replicated from the active unit to the standby unit after it takes over.
Cisco TrustSec supports the Smart Call Home feature in single context and multi-context mode, but not in the system context.
- The ASA can only be configured to interoperate in a single Cisco TrustSec domain.
- The ASA does not support static configuration of SGT-name mapping on the device.
- NAT is not supported in SXP messages.
- SXP conveys IP-SGT mapping to enforcement points in the network. If an access layer switch belongs to a different NAT domain than the enforcing point, the IP-SGT map that it uploads is invalid, and an IP-SGT mapping database lookup on the enforcement device does not yield valid results. As a result, the ASA cannot apply security group-aware security policy on the enforcement device.
- You can configure a default password for the ASA to use for SXP connections, or you can choose not to use a password; however, connection-specific passwords are not supported for SXP peers. The configured default SXP password should be consistent across the deployment network. If you configure a connection-specific password, connections may fail and a warning message appears. If you configure the connection with the default password, but it is not configured, the result is the same as when you have configured the connection with no password.
- SXP connection loops can form when a device has bidirectional connections to a peer or is part of a unidirectionally connected chain of devices. (The ASA can learn IP-SGT mapping for resources from the access layer in the data center. The ASA might need to propagate these tags to downstream devices.) SXP connection loops can cause unexpected behavior of SXP message transport. In cases where the ASA is configured to be a Speaker and Listener, an SXP connection loop can occur, causing SXP data to be received by the peer that originally transmitted it.
- When changing the ASA local IP address, you must ensure that all SXP peers have updated their peer list. In addition, if SXP peers changes its IP addresses, you must ensure those changes are reflected on the ASA.
- Automatic PAC file provisioning is not supported. The ASA administrator must request the PAC file from the ISE administrative interface and import it into the ASA. For information about the PAC file, see Generating the PAC File and the Importing a Protected Access Credential (PAC) File.
- PAC files have expiration dates. You must import the updated PAC file before the current PAC file expires; otherwise, the ASA cannot retrieve environment data updates.
- When a security group changes on the ISE (for example, it is renamed or deleted), the ASA does not change the status of any ASA security policies that contain an SGT or security group name associated with the changed security group; however, the ASA generates a syslog message to indicate that those security policies changed.
See Refreshing Environment Data for information about manually updating the security group table on the ASA to include changes from the ISE.
- The multicast types are not supported in ISE 1.0.
- An SXP connection stays in the initializing state among two SXP peers interconnected by the ASA; as shown in the following example:
(SXP peer A) - - - - (ASA) - - - (SXP peer B)
Therefore, when configuring the ASA to integrate with Cisco TrustSec, you must enable the no-NAT, no-SEQ-RAND, and MD5-AUTHENTICATION TCP options on the ASA to configure SXP connections. Create a TCP state bypass policy for traffic destined to SXP port TCP 64999 among the SXP peers. Then apply the policy on the appropriate interfaces.
For example, the following set of commands shows how to configure the ASA for a TCP state bypass policy:
Configuring the ASA for Cisco TrustSec Integration
This section includes the following topics:
- Task Flow for Configuring the ASA to Integrate with Cisco TrustSec
- Configuring the AAA Server for Cisco TrustSec Integration
- Importing a Protected Access Credential (PAC) File
- Configuring the Security Exchange Protocol (SXP)
- Adding an SXP Connection Peer
- Refreshing Environment Data
- Configuring the Security Policy
Task Flow for Configuring the ASA to Integrate with Cisco TrustSec
Before configuring the ASA to integrate with Cisco TrustSec, you must complete the following tasks:
- Register the ASA with the ISE.
- Create a security group on the ISE.
- Generate the PAC file on the ISE to import into the ASA.
See Prerequisites for Using Cisco TrustSec for more information.
To configure the ASA to integrate with Cisco TrustSec, perform the following tasks:
Step 1![]() Configure the AAA server.
Configure the AAA server.
See Configuring the AAA Server for Cisco TrustSec Integration.
Step 2![]() Import the PAC file from the ISE.
Import the PAC file from the ISE.
See Importing a Protected Access Credential (PAC) File.
Step 3![]() Enable and set the default values for SXP.
Enable and set the default values for SXP.
See Configuring the Security Exchange Protocol (SXP).
Step 4![]() Add SXP connection peers for the Cisco TrustSec architecture.
Add SXP connection peers for the Cisco TrustSec architecture.
See Adding an SXP Connection Peer.
Step 5![]() As necessary, refresh environment data for the ASA.
As necessary, refresh environment data for the ASA.
See Refreshing Environment Data.
Step 6![]() Configure the security policy.
Configure the security policy.
See Configuring the Security Policy.
Configuring the AAA Server for Cisco TrustSec Integration
As part of configuring the ASA to integrate with Cisco TrustSec, you must configure the ASA so that it can communicate with the ISE.
- The referenced server group must be configured to use the RADIUS protocol. If you add a non-RADIUS server group to the ASA, the configuration fails.
- If the ISE is also used for user authentication, obtain the shared secret that was entered on the ISE when you registered the ASA with the ISE. Contact your ISE administrator to obtain this information.
To configure the AAA server group for the ISE on the ASA, perform the following steps:
|
|
|
|
|---|---|---|
|
|
Creates the AAA server group and configures the AAA server parameters for the ASA to communicate with the ISE server. server-tag specifies the server group name. See Creating a Security Group on the ISE for more information. |
|
|
|
||
|
|
Configures a AAA server as part of a AAA server group and sets host-specific connection data. interface-name specifies the network interface where the ISE server resides. The parentheses are required in this parameter. |
|
|
|
Specifies the server secret value used to authenticate the ASA with the ISE server. key is an alphanumeric keyword up to 127 characters long. If the ISE is also used for user authentication, enter the shared secret that was entered on the ISE when you registered the ASA with the ISE. See Registering the ASA with the ISE for more information. |
|
|
|
||
|
|
Identifies the AAA server group that is used by Cisco TrustSec for environment data retrieval. AAA-server-group-name is the name of the AAA server group that you specified in Step 1 in the server-tag argument. Only one instance of the server group can be configured on the ASA for Cisco TrustSec. |
Examples
The following example shows how to configure the ASA to communicate with the ISE server for Cisco TrustSec integration:
Importing a Protected Access Credential (PAC) File
Importing the PAC file to the ASA establishes the connection with the ISE. After the channel is established, the ASA initiates a secure RADIUS transaction with the ISE and downloads Cisco TrustSec environment data (that is, the security group table). The security group table maps SGTs to security group names. Security group names are created on the ISE and provide user-friendly names for security groups.
More specifically, no channel is established before the RADIUS transaction. The ASA initiates a RADIUS transaction with the ISE using the PAC file for authentication.
Tip![]() The PAC file includes a shared key that allows the ASA and ISE to secure the RADIUS transactions that occur between them. Given the sensitive nature of this key, it must be stored securely on the ASA.
The PAC file includes a shared key that allows the ASA and ISE to secure the RADIUS transactions that occur between them. Given the sensitive nature of this key, it must be stored securely on the ASA.
After successfully importing the file, the ASA downloads Cisco TrustSec environment data from the ISE without requiring the device password configured in the ISE.
- The ASA must be configured as a recognized Cisco TrustSec network device in the ISE before the ASA can generate a PAC file. The ASA can import any PAC file, but it only works on the ASA when the file was generated by a correctly configured ISE. See Registering the ASA with the ISE for more information.
- Obtain the password used to encrypt the PAC file when generating it on the ISE.
The ASA requires this password to import and decrypt the PAC file.
- Access to the PAC file generated by the ISE. The ASA can import the PAC file from flash or from a remote server via TFTP, FTP, HTTP, HTTPS, or SMB. (The PAC file does not need to reside on the ASA flash before you can import it.)
- The server group has been configured for the ASA.
- When the ASA is part of an HA configuration, you must import the PAC file to the primary ASA device.
- When the ASA is part of a clustering configuration, you must import the PAC file to the master device.
To import a PAC file, enter the following command:
Examples
The following example shows how to import a PAC file into the ASA:
The following example shows how to use the terminal to import a PAC file into the ASA:
Configuring the Security Exchange Protocol (SXP)
Configuring the Security Exchange Protocol (SXP) involves enabling the protocol in the ASA and setting the following default values for SXP:
- The source IP address of SXP connections
- The authentication password between SXP peers
- The retry interval for SXP connections
- The Cisco TrustSec SXP reconcile period
Note![]() For SXP to be operational on the ASA, at least one interface must be in the UP/UP state.
For SXP to be operational on the ASA, at least one interface must be in the UP/UP state.
Currently, when SXP is enabled with all interfaces down, the ASA does not display a message indicating that SXP is not working or it could not be enabled. If you check the configuration by entering the show running-config command, the command output displays the following message: “WARNING: SXP configuration in process, please wait for a few moments and try again.”
This message is generic and does not specify the reason why SXP is not working.
To configure SXP, perform the following steps:
|
|
|
|
|---|---|---|
|
|
If necessary, enables SXP on the ASA. By default, SXP is disabled. |
|
|
|
Configures the default source IP address for SXP connections. ipaddress is an IPv4 or IPv6 address. When you configure a default source IP address for SXP connections, you must specify the same address as the ASA outbound interface. If the source IP address does not match the address of the outbound interface, SXP connections fail. When a source IP address for an SXP connection is not configured, the ASA performs a route/ARP lookup to determine the outbound interface for the SXP connection. See Adding an SXP Connection Peer for more information. |
|
|
|
Configures the default password for TCP MD5 authentication with SXP peers. By default, SXP connections do not have a password set. Configuring an encryption level for the password is optional. If you configure an encryption level, you can only set one level: password specifies an encrypted string up to 162 characters or an ASCII key string up to 80 characters. |
|
|
|
Specifies the default time interval between ASA attempts to set up new SXP connections between SXP peers. The ASA continues to make connection attempts until a successful connection is made. The retry timer is triggered as long as there is one SXP connection on the ASA that is not up. timervalue is in the range of 0 to 64000 seconds. By default, the timervalue is 120 seconds. If you specify 0 seconds, the timer never expires and the ASA does not try to connect to SXP peers. When the retry timer expires, the ASA goes through the connection database and if the database contains any connections that are off or in a “pending on” state, the ASA restarts the retry timer. We recommend that you configure the retry timer to a different value from its SXP peer devices. |
|
|
|
Specifies the value of the default reconcile timer. After an SXP peer terminates its SXP connection, the ASA starts a hold-down timer. If an SXP peer connects while the hold-down timer is running, the ASA starts the reconcile timer; then the ASA updates the SXP mapping database to learn the latest mapping. When the reconcile timer expires, the ASA scans the SXP mapping database to identify stale mapping entries (entries that were learned in a previous connection session). The ASA marks these connections as obsolete. When the reconcile timer expires, the ASA removes the obsolete entries from the SXP mapping database. timervalue is in the range of 1 to 64000 seconds. By default, the timervalue is 120 seconds. You cannot specify 0 seconds for the timer, because this value prevents the reconcile timer from starting. Not allowing the reconcile timer to run would keep stale entries for an undefined time and cause unexpected results from policy enforcement. |
Examples
The following example shows how to set default values for SXP:
Adding an SXP Connection Peer
SXP connections between peers are point-to-point and use TCP as the underlying transport protocol.
To add an SXP connection peer, perform the following steps:
|
|
|
|
|---|---|---|
|
|
If necessary, enables SXP on the ASA. By default, SXP is disabled. |
|
|
ciscoasaciscoasa(config)# cts sxp connection peer 192.168.1.100 password default mode peer speaker |
Sets up an SXP connection to an SXP peer. SXP connections are set per IP address; a single device pair can service multiple SXP connections. peer_ip_address is the IPv4 or IPv6 address of the SXP peer. The peer IP address must be reachable from the ASA outgoing interface. source_ip_address is the local IPv4 or IPv6 address of the SXP connection. The source IP address must be the same as the ASA outbound interface or the connection fails. We recommend that you do not configure a source IP address for an SXP connection and allow the ASA to perform a route/ARP lookup to determine the source IP address for the SXP connection. Specifies whether or not to use the authentication key for the SXP connection:
Specifies the mode of the SXP connection: Specifies whether the ASA functions as a Speaker or Listener for the SXP connection. See About Speaker and Listener Roles on the ASA. |
Examples
The following example shows how to configure SXP peers on the ASA:
Refreshing Environment Data
The ASA downloads environment data from the ISE, which includes the Security Group Tag (SGT) name table. The ASA automatically refreshes its environment data that is obtained from the ISE when you complete the following tasks on the ASA:
- Configure a AAA server to communicate with the ISE.
- Import a PAC file from the ISE.
- Identify the AAA server group that the ASA will use for retrieval of Cisco TrustSec environment data.
Normally, you do not need to manually refresh the environment data from the ISE; however, security groups can change on the ISE. These changes are not reflected on the ASA until you refresh the data in the ASA security group table, so refresh the data on the ASA to make sure that any security group changes made on the ISE are reflected on the ASA.
Tip![]() We recommend that you schedule policy configuration changes on the ISE and the manual data refresh on the ASA during a maintenance window. Handling policy configuration changes in this way maximizes the chances of security group names getting resolved and security policies becoming active immediately on the ASA.
We recommend that you schedule policy configuration changes on the ISE and the manual data refresh on the ASA during a maintenance window. Handling policy configuration changes in this way maximizes the chances of security group names getting resolved and security policies becoming active immediately on the ASA.
The ASA must be configured as a recognized Cisco TrustSec network device in the ISE and the ASA must have successfully imported a PAC file, so that the changes made for Cisco TrustSec are applied to the ASA.
- When the ASA is part of an HA configuration, you must refresh the environment data on the primary ASA device.
- When the ASA is part of a clustering configuration, you must refresh the environment data on the master device.
To refresh the environment data, enter the following command:
|
|
|
|---|---|
|
|
Refreshes the environment data from the ISE and resets the reconcile timer to the configured default value. |
Configuring the Security Policy
You can incorporate TrustSec policy in many ASA features. Any feature that uses extended ACLs (unless listed in this chapter as unsupported) can take advantage of TrustSec. You can now add security group arguments to extended ACLs, as well as traditional network-based parameters.
- To configure an extended ACL, see the firewall configuration guide.
- To configure security group object groups, which can be used in the ACL, see Configuring Local User Groups.
For example, an access rule permits or denies traffic on an interface using network information. With TrustSec, you can control access based on security group. For example, you could create an access rule for sample_securitygroup1 10.0.0.0 255.0.0.0, meaning the security group could have any IP address on subnet 10.0.0.0/8.
You can configure security policies based on combinations of security group names (servers, users, unmanaged devices, and so on), user-based attributes, and traditional IP-address-based objects (IP address, Active Directory object, and FQDN). Security group membership can extend beyond roles to include device and location attributes and is independent of user group membership.
Examples
The following example shows how to create an ACL that uses a locally defined security object group:
The ACL configured in the previous example can be activated by configuring an access group or the Modular Policy Framework.
Configuration Example
The following example shows how to configure the ASA to use Cisco TrustSec:
Additional References
|
|
|
|---|---|
http://www.cisco.com/content/dam/en/us/td/docs/solutions/Enterprise/Security/TrustSec_2-0/trustsec_2-0_dig.pdf |
Describes the Cisco TrustSec system and architecture for the enterprise. |
http://www.cisco.com/c/en/us/solutions/enterprise/design-zone-security/landing_DesignZone_TrustSec.html |
Provides instructions for deploying the Cisco TrustSec solution in the enterprise, including links to component design guides. |
http://www.cisco.com/c/en/us/solutions/collateral/enterprise-networks/trustsec/solution_overview_c22-591771.pdf |
Describes the Cisco TrustSec solution when used with the ASA, switches, wireless LAN (WLAN) controllers, and routers. |
http://www.cisco.com/c/en/us/solutions/enterprise-networks/trustsec/trustsec_matrix.html |
Provides the Cisco TrustSec Platform Support Matrix, which lists the Cisco products that support the Cisco TrustSec solution. |
Monitoring Cisco TrustSec
To monitor Cisco TrustSec on the ASA, enter one or more of the following commands:
Feature History for the Cisco TrustSec Integration
Table 41-3 lists each feature change and the platform release in which it was implemented.
 Feedback