Basic Interface Configuration (ASA 5505)
This chapter includes tasks for starting your interface configuration for the ASA 5505, including creating VLAN interfaces and assigning them to switch ports.
Information About ASA 5505 Interfaces
This section describes the ports and interfaces of the ASA 5505 and includes the following topics:
- Understanding ASA 5505 Ports and Interfaces
- Maximum Active VLAN Interfaces for Your License
- VLAN MAC Addresses
- Power over Ethernet
- Monitoring Traffic Using SPAN
- Auto-MDI/MDIX Feature
Understanding ASA 5505 Ports and Interfaces
The ASA 5505 supports a built-in switch. There are two kinds of ports and interfaces that you need to configure:
- Physical switch ports—The ASA has 8 Fast Ethernet switch ports that forward traffic at Layer 2, using the switching function in hardware. Two of these ports are PoE ports. See Power over Ethernet for more information. You can connect these interfaces directly to user equipment such as PCs, IP phones, or a DSL modem. Or you can connect to another switch.
- Logical VLAN interfaces—In routed mode, these interfaces forward traffic between VLAN networks at Layer 3, using the configured security policy to apply firewall and VPN services. In transparent mode, these interfaces forward traffic between the VLANs on the same network at Layer 2, using the configured security policy to apply firewall services. See Maximum Active VLAN Interfaces for Your License for more information about the maximum VLAN interfaces. VLAN interfaces let you divide your equipment into separate VLANs, for example, home, business, and Internet VLANs.
To segregate the switch ports into separate VLANs, you assign each switch port to a VLAN interface. Switch ports on the same VLAN can communicate with each other using hardware switching. But when a switch port on VLAN 1 wants to communicate with a switch port on VLAN 2, then the ASA applies the security policy to the traffic and routes or bridges between the two VLANs.
Maximum Active VLAN Interfaces for Your License
In routed mode, you can configure the following VLANs depending on your license:
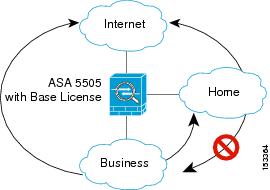
- Base license—3 active VLANs. The third VLAN can only be configured to initiate traffic to one other VLAN. See Figure 11-1 for more information.
- Security Plus license—20 active VLANs.
In transparent firewall mode, you can configure the following VLANs depending on your license:
- Base license—2 active VLANs in 1 bridge group.
- Security Plus license—3 active VLANs: 2 active VLANs in 1 bridge group, and 1 active VLAN for the failover link.

Note![]() An active VLAN is a VLAN with a nameif command configured.
An active VLAN is a VLAN with a nameif command configured.
With the Base license in routed mode, the third VLAN can only be configured to initiate traffic to one other VLAN. See Figure 11-1 for an example network where the Home VLAN can communicate with the Internet, but cannot initiate contact with Business.
Figure 11-1 ASA 5505 with Base License

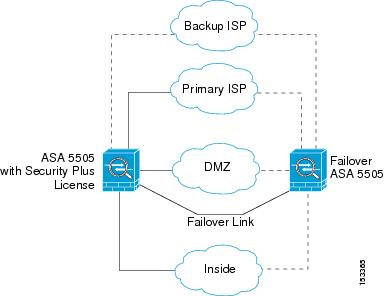
With the Security Plus license, you can configure 20 VLAN interfaces in routed mode, including a VLAN interface for failover and a VLAN interface as a backup link to your ISP. You can configure the backup interface to not pass through traffic unless the route through the primary interface fails. You can configure trunk ports to accommodate multiple VLANs per port.

Note![]() The ASA 5505 supports Active/Standby failover, but not Stateful Failover.
The ASA 5505 supports Active/Standby failover, but not Stateful Failover.
See Figure 11-2 for an example network.
Figure 11-2 ASA 5505 with Security Plus License

VLAN MAC Addresses
- Routed firewall mode—All VLAN interfaces share a MAC address. Ensure that any connected switches can support this scenario. If the connected switches require unique MAC addresses, you can manually assign MAC addresses. See Configuring the MAC Address, MTU, and TCP MSS.
- Transparent firewall mode—Each VLAN has a unique MAC address. You can override the generated MAC addresses if desired by manually assigning MAC addresses. See Configuring the MAC Address, MTU, and TCP MSS.
Power over Ethernet
Ethernet 0/6 and Ethernet 0/7 support PoE for devices such as IP phones or wireless access points. If you install a non-PoE device or do not connect to these switch ports, the ASA does not supply power to the switch ports.
If you shut down the switch port using the shutdown command, you disable power to the device. Power is restored when you enable the port using the no shutdown command. See Configuring and Enabling Switch Ports as Access Ports for more information about shutting down a switch port.
To view the status of PoE switch ports, including the type of device connected (Cisco or IEEE 802.3af), use the show power inline command.
Monitoring Traffic Using SPAN
If you want to monitor traffic that enters or exits one or more switch ports, you can enable SPAN, also known as switch port monitoring. The port for which you enable SPAN (called the destination port) receives a copy of every packet transmitted or received on a specified source port. The SPAN feature lets you attach a sniffer to the destination port so you can monitor all traffic; without SPAN, you would have to attach a sniffer to every port you want to monitor. You can only enable SPAN for one destination port.
See the switchport monitor command in the command reference for more information.
Auto-MDI/MDIX Feature
All ASA 5505 interfaces include the Auto-MDI/MDIX feature. Auto-MDI/MDIX eliminates the need for crossover cabling by performing an internal crossover when a straight cable is detected during the auto-negotiation phase. You cannot disable Auto-MDI/MDIX.
Licensing Requirements for ASA 5505 Interfaces
Guidelines and Limitations
The ASA 5505 does not support multiple context mode.
- In transparent mode, you can configure up to eight bridge groups. Note that you must use at least one bridge group; data interfaces must belong to a bridge group.
- Each bridge group can include up to four VLAN interfaces, up to the license limit.
Active/Standby failover is only supported with the Security Plus license. Active/Active failover is not supported.
Default Settings
This section lists default settings for interfaces if you do not have a factory default configuration. For information about the factory default configurations, see Factory Default Configurations.
Starting ASA 5505 Interface Configuration
This section includes the following topics:
- Task Flow for Starting Interface Configuration
- Configuring VLAN Interfaces
- Configuring and Enabling Switch Ports as Access Ports
- Configuring and Enabling Switch Ports as Trunk Ports
Task Flow for Starting Interface Configuration
To configure interfaces in single mode, perform the following steps:
Step 1![]() Configure VLAN interfaces. See Configuring VLAN Interfaces.
Configure VLAN interfaces. See Configuring VLAN Interfaces.
Step 2![]() Configure and enable switch ports as access ports. See Configuring and Enabling Switch Ports as Access Ports.
Configure and enable switch ports as access ports. See Configuring and Enabling Switch Ports as Access Ports.
Step 3![]() (Optional for Security Plus licenses) Configure and enable switch ports as trunk ports. See Configuring and Enabling Switch Ports as Trunk Ports.
(Optional for Security Plus licenses) Configure and enable switch ports as trunk ports. See Configuring and Enabling Switch Ports as Trunk Ports.
Step 4![]() Complete the interface configuration according to “Routed Mode Interfaces,” or Chapter14, “Transparent Mode Interfaces”
Complete the interface configuration according to “Routed Mode Interfaces,” or Chapter14, “Transparent Mode Interfaces”
Configuring VLAN Interfaces
This section describes how to configure VLAN interfaces. For more information about ASA 5505 interfaces, see Information About ASA 5505 Interfaces.
Guidelines
We suggest that you finalize your interface configuration before you enable Easy VPN.
Detailed Steps
What to Do Next
Configure the switch ports. See Configuring and Enabling Switch Ports as Access Ports and the Configuring and Enabling Switch Ports as Trunk Ports.
Configuring and Enabling Switch Ports as Access Ports
By default (with no configuration), all switch ports are shut down, and assigned to VLAN 1. To assign a switch port to a single VLAN, configure it as an access port. To create a trunk port to carry multiple VLANs, see Configuring and Enabling Switch Ports as Trunk Ports. If you have a factory default configuration, see ASA 5505 Default Configuration to check if you want to change the default interface settings according to this procedure.
For more information about ASA 5505 interfaces, see Information About ASA 5505 Interfaces.

Detailed Steps
|
|
|
|
|---|---|---|
|
|
Specifies the switch port you want to configure, where port is 0 through 7. |
|
|
|
Assigns this switch port to a VLAN, where number is the VLAN ID, between 1 and 4090. See Configuring VLAN Interfaces to configure the VLAN interface that you want to assign to this switch port. To view configured VLANs, enter the show interface command. Note You might assign multiple switch ports to the primary or backup VLANs if the Internet access device includes Layer 2 redundancy. |
|
|
|
Prevents the switch port from communicating with other protected switch ports on the same VLAN. You might want to prevent switch ports from communicating with each other if the devices on those switch ports are primarily accessed from other VLANs, you do not need to allow intra-VLAN access, and you want to isolate the devices from each other in case of infection or other security breach. For example, if you have a DMZ that hosts three web servers, you can isolate the web servers from each other if you apply the switchport protected command to each switch port. The inside and outside networks can both communicate with all three web servers, and vice versa, but the web servers cannot communicate with each other. |
|
|
|
Sets the speed. The auto setting is the default. If you set the speed to anything other than auto on PoE ports Ethernet 0/6 or 0/7, then Cisco IP phones and Cisco wireless access points that do not support IEEE 802.3af will not be detected and supplied with power. |
|
|
|
Sets the duplex. The auto setting is the default. If you set the duplex to anything other than auto on PoE ports Ethernet 0/6 or 0/7, then Cisco IP phones and Cisco wireless access points that do not support IEEE 802.3af will not be detected and supplied with power. |
|
|
|
Enables the switch port. To disable the switch port, enter the shutdown command. |
What to Do Next
- If you want to configure a switch port as a trunk port, see Configuring and Enabling Switch Ports as Trunk Ports.
- To complete the interface configuration, see “Routed Mode Interfaces,” or Chapter14, “Transparent Mode Interfaces”
Configuring and Enabling Switch Ports as Trunk Ports
This procedure describes how to create a trunk port that can carry multiple VLANs using 802.1Q tagging. Trunk mode is available only with the Security Plus license.
To create an access port, where an interface is assigned to only one VLAN, see Configuring and Enabling Switch Ports as Access Ports.
Guidelines
This switch port cannot pass traffic until you assign at least one VLAN to it, native or non-native.
Detailed Steps
Monitoring Interfaces
To monitor interfaces, enter one of the following commands:
|
|
|
|---|---|
|
|
Configuration Examples for ASA 5505 Interfaces
This section includes the following topics:
Access Port Example
The following example configures five VLAN interfaces, including the failover interface which is configured using the failover lan command:
Trunk Port Example
The following example configures seven VLAN interfaces, including the failover interface which is configured using the failover lan command. VLANs 200, 201, and 202 are trunked on Ethernet 0/1.
Where to Go Next
Complete the interface configuration according to “Routed Mode Interfaces,” or Chapter14, “Transparent Mode Interfaces”
Feature History for ASA 5505 Interfaces
Table 11-1 lists the release history for this feature.
 Feedback