Navigate to the External Orchestrators Page
The main page for external orchestrators can be reached by selecting from the menu bar on the left.
The documentation set for this product strives to use bias-free language. For the purposes of this documentation set, bias-free is defined as language that does not imply discrimination based on age, disability, gender, racial identity, ethnic identity, sexual orientation, socioeconomic status, and intersectionality. Exceptions may be present in the documentation due to language that is hardcoded in the user interfaces of the product software, language used based on RFP documentation, or language that is used by a referenced third-party product. Learn more about how Cisco is using Inclusive Language.
External orchestrators are used to gather existing metadata describing your workloads from systems on your network. Some external orchestrators can also enforce segmentation policy.
For deployments where an authorized system of record exists with labels for workloads, we provide a way for automatically importing the labels through external orchestrator integrations. Any modifications in the system of record will be learnt automatically by Secure Workload and used for updating labels in your inventory.
For detailed information about the power and uses of labels, see Workload Labels.
Due to recent GUI updates, some of the images or screenshots used in the user guide may not fully reflect the current design of the product. We recommend using this guide in conjunction with the latest version of the software for the most accurate visual reference.
The main page for external orchestrators can be reached by selecting from the menu bar on the left.
The External Orchestrators page shows the existing external orchestrators and provides functions to modify and delete them as well as to create new external orchestrators:
|
Type |
Description/ When to use |
|---|---|
|
VMware vCenter |
To import virtual machine data, such as host name, IP address, and labels, from a vCenter server to Secure Workload. The generated labels can be used to create Secure Workload scopes and enforcement policies. |
|
Amazon Web Services |
(You cannot create new AWS orchestrators; instead, create AWS connectors. See AWS Connector. Any existing AWS orchestrators are read-only). To import data of EC2 server instances, such as host name, IP address, and labels, from the given AWS account to Secure Workload. The generated labels are useful to create Secure Workload scopes and policies. |
|
Kubernetes/OpenShift |
To import Kubernetes’ entities, such as nodes, pods, services, and labels. These labels can be used within Secure Workload to define scopes and policies. |
|
DNS |
To import A/AAAA and CNAME records from a DNS server via zone transfer. This produces DNS names as labels, which are useful in defining Secure Workload scopes and policies. |
|
Infoblox |
To import networks, hosts, and A/AAAA records with extensible attributes from an Infoblox appliance with IPAM/DNS enabled. The imported extensible attributes can be used as labels in Secure Workload scopes and policies. |
|
F5 BIG-IP |
To read virtual server configurations from the given F5 load balancer and generate labels for the provided services, which can be used to define enforcement policies in Secure Workload. The policy enforcement feature will translate them into F5 policy rules via F5 REST API. |
|
Citrix Netscaler |
To read virtual server configurations from the given Netscaler load balancer and generate labels for the provided services, which can be used to define enforcement policies in Secure Workload. The policy enforcement feature will translate them into Netscaler ACLs via its REST API. |
|
Secure Firewall Management Center |
To deploy policies to all Secure Firewall Threat Defense (formerly known as Firepower Threat Defense or FTD) devices registered to the given Secure Firewall Management Center using REST API. |
Each row shows a short version of the external orchestrator with its Name, Type, Description, Enforcement, Created at, Connection Status, and Secure Connector Status. The Connection Status tells if a connection to the given external data source could be made successfully. The Secure Connector Status displays the status of the Secure Connector tunnel- Success or Failure. If the tunnel is not enabled then N/A is displayed.
Enable Secure Connector tunnel while creating an external orchestrator configuration. If Secure Connector tunnel is enabled, the external orchestrator 'Connection Status' is dependent on both the authentication status and secure connector status. If Secure Connector tunnel is not enabled, the external orchestrator 'Connection Status' is only dependent on the authentication status. Irrespective of the status- Success or Failure, you can click the respective row to get more details. For more details on the Secure Connector client metrics, click the Status row or in the left pane, navigate to .
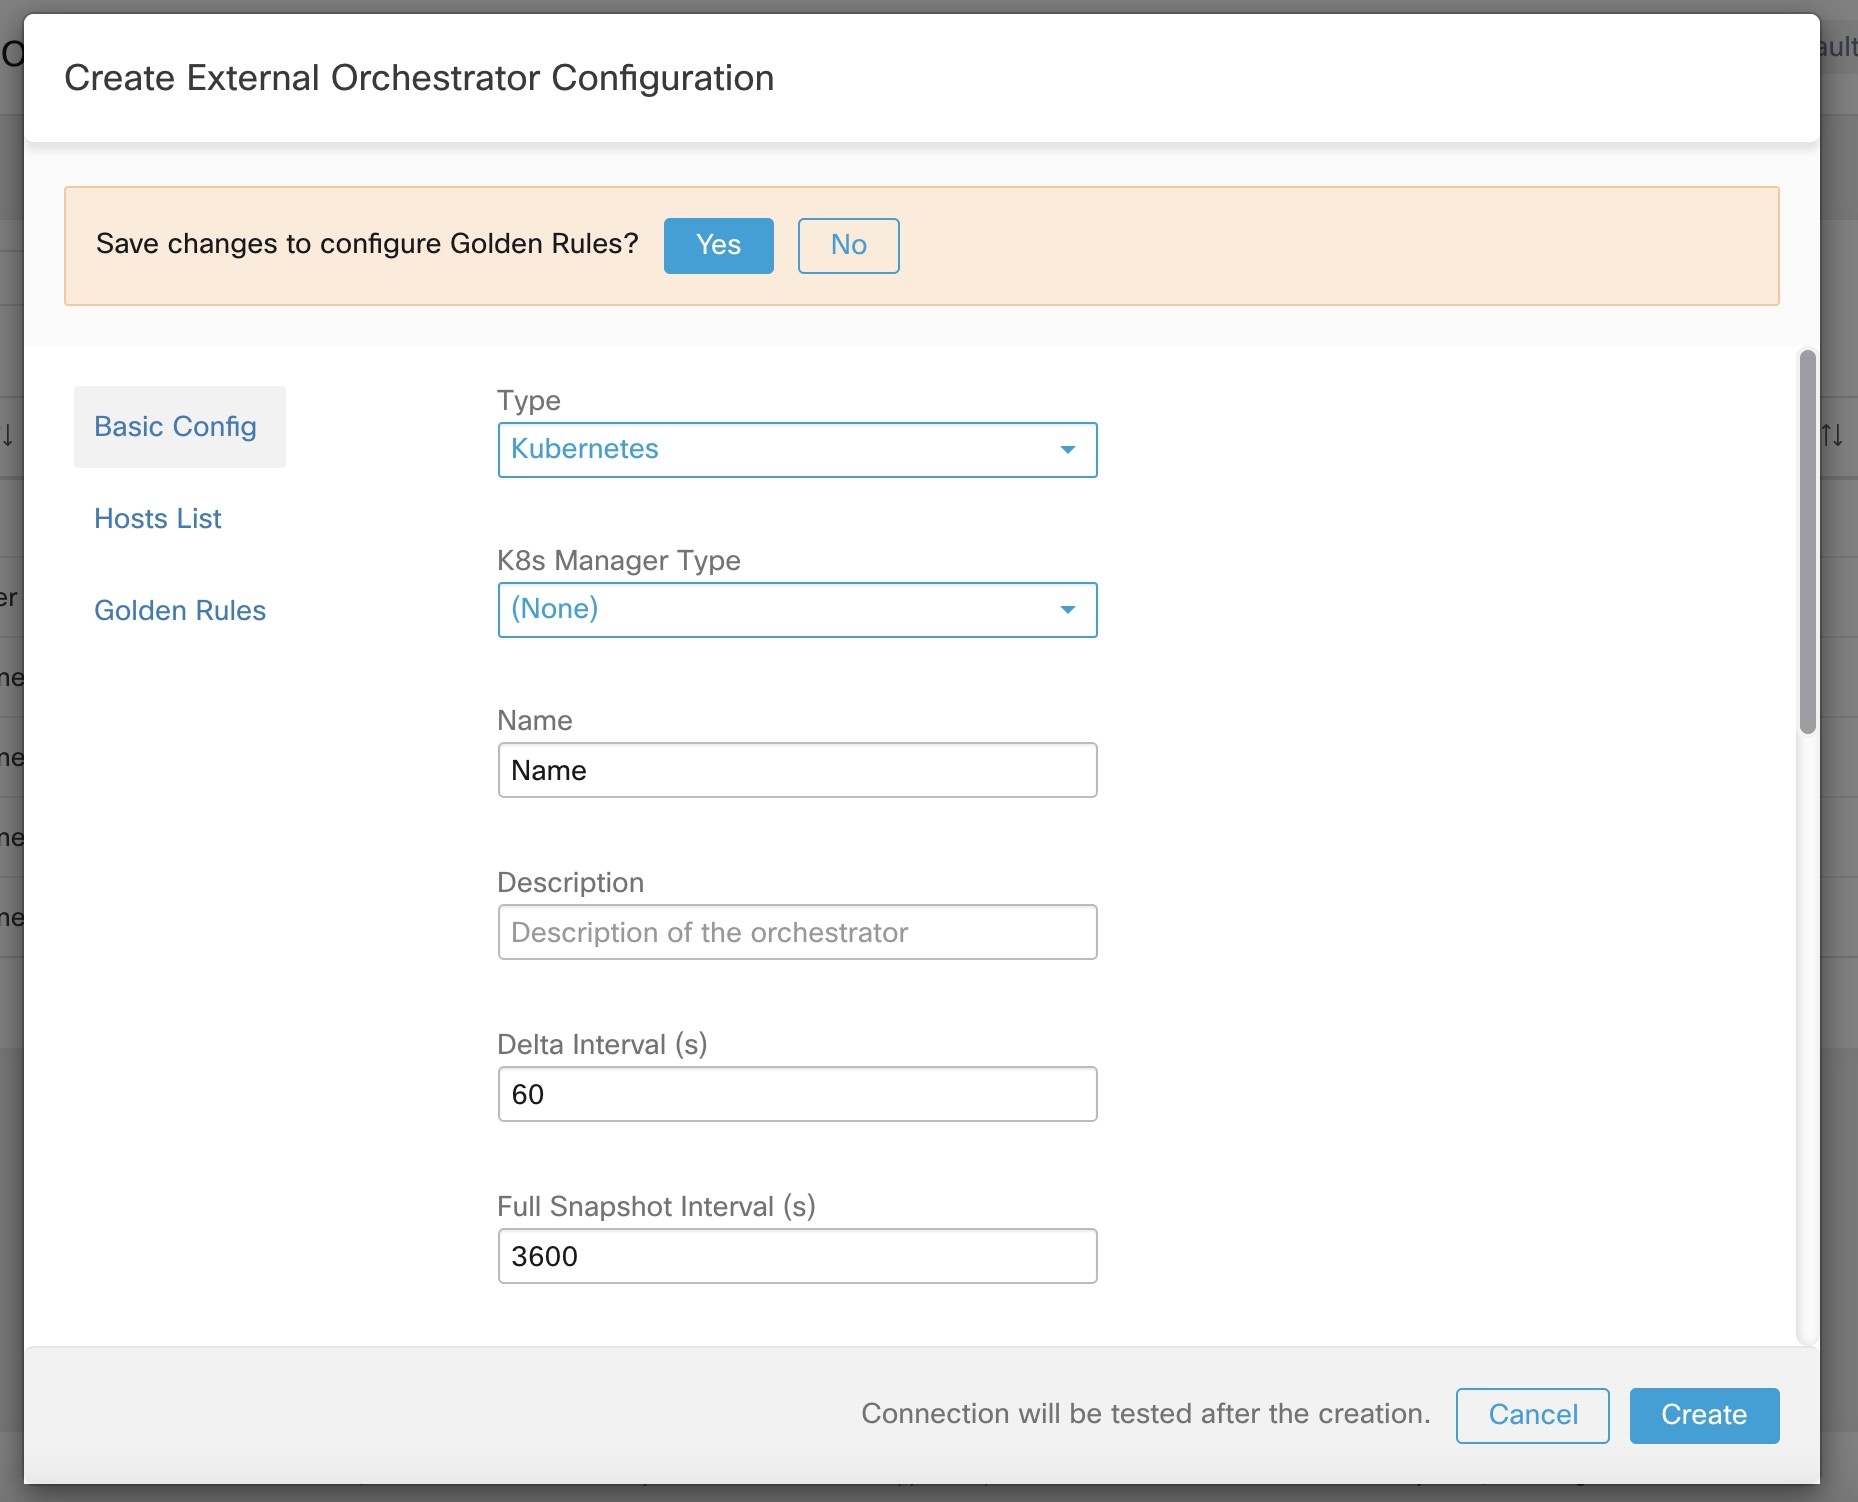
A new external orchestrator can be created by clicking the Create New Configuration button in the external orchestrators main page. This leads to a modal dialog, where you can enter a name and choose an external orchestrator type. The picture below shows the basic configuration page:

The following table describes the common fields for external orchestrators. Depending on the selected type the Basic Config page requires additional parameters to be given. These will be covered by the respective section of the individual external orchestrators below.
|
Common Field |
Required |
Description |
|---|---|---|
|
Type |
Yes |
Select an external orchestrator from the list. |
|
Name |
Yes |
Name of the external orchestrator, which must be unique for the active tenant. |
|
Description |
No |
Description of the external orchestrator. |
|
Full Snapshot Interval(s) |
Yes |
Interval in seconds the external orchestrator will try to import the full snapshot of configuration from the selected Type. |
|
Accept Self-signed Cert |
No |
Check this option to accept self-signed server certificates for the HTTPS connection used by Secure Workload to retrieve configuration data from the selected Type. Default is not to allow self-signed server certificates. |
|
Secure Connector Tunnel |
No |
Check this option to set connections to the Secure Workload cluster to be tunneled through a Secure Connector tunnel. |
 Note |
The fields Delta interval and Verbose TSDB Metrics as shown in the picture above are optional and applicable only for certain external orchestrators, which are explained in the respective description below. |
Except for the external orchestrator type AWS, the Hosts List must be given. It specifies the network address(es) of the external data source from which the external orchestrator will fetch data and generate labels. This can be done by clicking on the tab Hosts List on the left hand side, which is shown in the following picture:

In order to add new host list entry click the plus sign. Each row must contain a valid DNS host name, IPv4 or IPv6 address and a port number. Depending on the chosen external orchestrator type, you can enter multiple hosts for high availability or redundancy purposes. For more information, see the description for the chosen external orchestrator.
To set the alert for the external orchestrator, this can be done by clicking on the Alert tab on the left hand side, which is shown in the following picture:

For each external orchestrator, configuring alerts requires additional parameters to be given. These will be covered by the respective section of the individual external orchestrators below.
To enable alerts for this external orchestrator, check the Alert enabled check box.
Note |
Make sure that Connector Alerts are also enabled from page. |
Select the Alert Severity level and Disconnect Duration in minutes for configuring external orchestrator alert.
|
Field |
Description |
|---|---|
|
Severity |
Select severity level of this rule: LOW, MEDIUM, HIGH, CRITICAL or IMMEDIATE ACTION |
|
Disconnect Duration(m) |
The amount of time that a connection is disconnected. |
Click the Create button to create the new external orchestrator, whose configuration details can be viewed by clicking on the respective row in the list view:
Note |
Since the first full snapshot pull from an external orchestrator is an asynchronous operation, expect about one minute for the connection status field to be updated. |
Click the pencil button on the right hand side of an external orchestrator row as shown below to open a modal dialog similar to the one for creating an external orchestrator, where the configuration can be modified.

Note |
|
Click the Update button to save the changes made to the configuration.
 Caution |
Deleting an external orchestrator also deletes labels provided by that orchestrator, which will impact policies. In order to delete an external orchestrator click the trash bin button as shown below: |

Secure Workload adds the following labels to all the AWS instances.
|
Key |
Value |
|---|---|
|
orchestrator_system/orch_type |
aws |
|
orchestrator_system/cluster_name |
<Name of kubernetes cluster> |
|
orchestrator_system/name |
<Name of the connector> |
|
orchestrator_system/cluster_id |
<UUID of the orchestrator’s configuration in |product|> |
In order for Secure Workload to import user tags or enforce policies on external orchestrators (see External Orchestrators), Secure Workload needs to establish outgoing connections to the orchestrator API servers (vCenter, Kubernetes, F5 BIG-IP, etc.). Sometimes it is not possible to allow direct incoming connections to the orchestrators from the Secure Workload cluster. Secure Connector solves this issue by establishing an outgoing connection from the same network as the orchestrator to the Secure Workload cluster. This connection is used as a reverse tunnel to pass requests from the cluster back to the orchestrator API server.
For each root scope, only one tunnel may be active at any time. Attempts to start additional tunnels will be rejected with an error message indicating that one is already active. The active tunnel can be used to connect to multiple orchestrators that are reachable from the network in which the client is running. A per-orchestrator configuration is used to indicate whether connections to that orchestrator should go through the Secure Connector tunnel.
All communication between the Secure Connector client and the Secure Workload cluster is mutually authenticated and encrypted using TLS.
For improved security, customers are advised to install the Secure Connector client on an isolated appropriately secured machine. The machine should have firewall rules to allow outgoing connections only to the Secure Workload cluster and any external orchestrator API servers Secure Workload should be allowed to access.
To configure orchestrators to use the Secure Connector tunnel, see instructions for configuring the external orchestrator for your product.
For more details on OpenAPI endpoints for the Secure connector, see Secure Connector API endpoints
To bootstrap the tunnel, the Secure Connector client creates a public or private key pair and signs its public key certificate remotely by the server. A cryptographic single-use time-limited token is used to secure this remote signing process and identify the root scope to which the client belongs. On the server side, each root scope has a unique certificate that the client uses to authenticate the server. These certificates are periodically rotated to ensure the continued secrecy of communication.
The Secure Connector client is internally constructed of a tunnel client and a SOCKS5 server. After the tunnel is started, the client waits for incoming tunnelling connections from the Secure Workload Cluster. Incoming connections are handled by the SOCKS5 server and forwarded to the destination host.
The following are the requirements for the Secure Connector client:
RHEL or CentOS 7 (x86_64)
2 CPU cores
4 GB RAM
Sufficient network bandwidth for handling data from the on-premises orchestrators that use the Secure Connector.
Outgoing connectivity to the Secure Workload cluster on port 443 (direct or through HTTP(S) proxy).
Outgoing connectivity to internal Orchestrator API servers (direct).
[Service]
Environment="HTTPS_PROXY=<Proxy Server Address>"
The Secure Connector creates a reverse tunnel from the Secure Workload cluster to your internal network in order to reach your orchestrator API servers.
Starting the Secure Connector client requires downloading Secure Connector RPM and generating a one-time registration token.
Download and install Secure Connector client package on a supported platform.
Copy the generated token on the host to start the client.
|
Step 1 |
In the navigation pane, click . |
|
Step 2 |
Click Download Latest RPM. |
|
Step 3 |
Copy the RPM package to the Linux host for deployment, and then execute the following command with root privileges: |
|
Step 1 |
Click . |
|
Step 2 |
Click Generate Registration Token. |
After generating a registration token on the Secure Connector page, you will have a registration.token file that contains the single-use limited-time token for bootstrapping the client. Stop the Secure Connector client on the host and copy the token file where you have installed the Secure Connector client package.
To stop the client, run the following command: systemctl stop tetration-secure-connector
Copy the registration.token file to the /etc/tetration/cert/ folder.
To restart the client, run the following command: systemctl start tetration-secure-connector
|
Step 1 |
Download a specific version of Secure Connector Client RPM. |
|
Step 2 |
Retrieve a new token using the API. Secure Connector tokens can also be retrieved through OpenAPI (Get Tokenendpoint). The following Python and Bash snippets can be used to retrieve a new token. Note that the API key used must have the external_integration capability and must have write access to the specified root scope. See OpenAPI Authentication for information on installing the Secure Workload OpenAPI client for python and creating a new API key.
|
|
Step 3 |
Copy the token and start the client. For detailed instructions, see Copy the Token and Start the Client. |
To check if the Secure Connector client is installed, query the RPM database for the tet- secureconnector-client-site package by running the following command: rpm -q tet-secureconnector-client-site
To check the state of the installed client, you can check the status of the tetration-secure- connector systemd service by running the following command: systemctl status tetration-secure-connector
On the External Orchestrators page, the status of the configured external orchestrators and Secure Connector tunnel is displayed. If Secure Connector is enabled while configuring the external orchestrators, you can view the Secure Connector client metrics on the Secure Connector page.
However, if the Secure Connector tunnel status is Active but the client metrics are not visible, it implies an older version of Secure Connector is installed. A message to upgrade the Secure Connector Client version is displayed as shown:
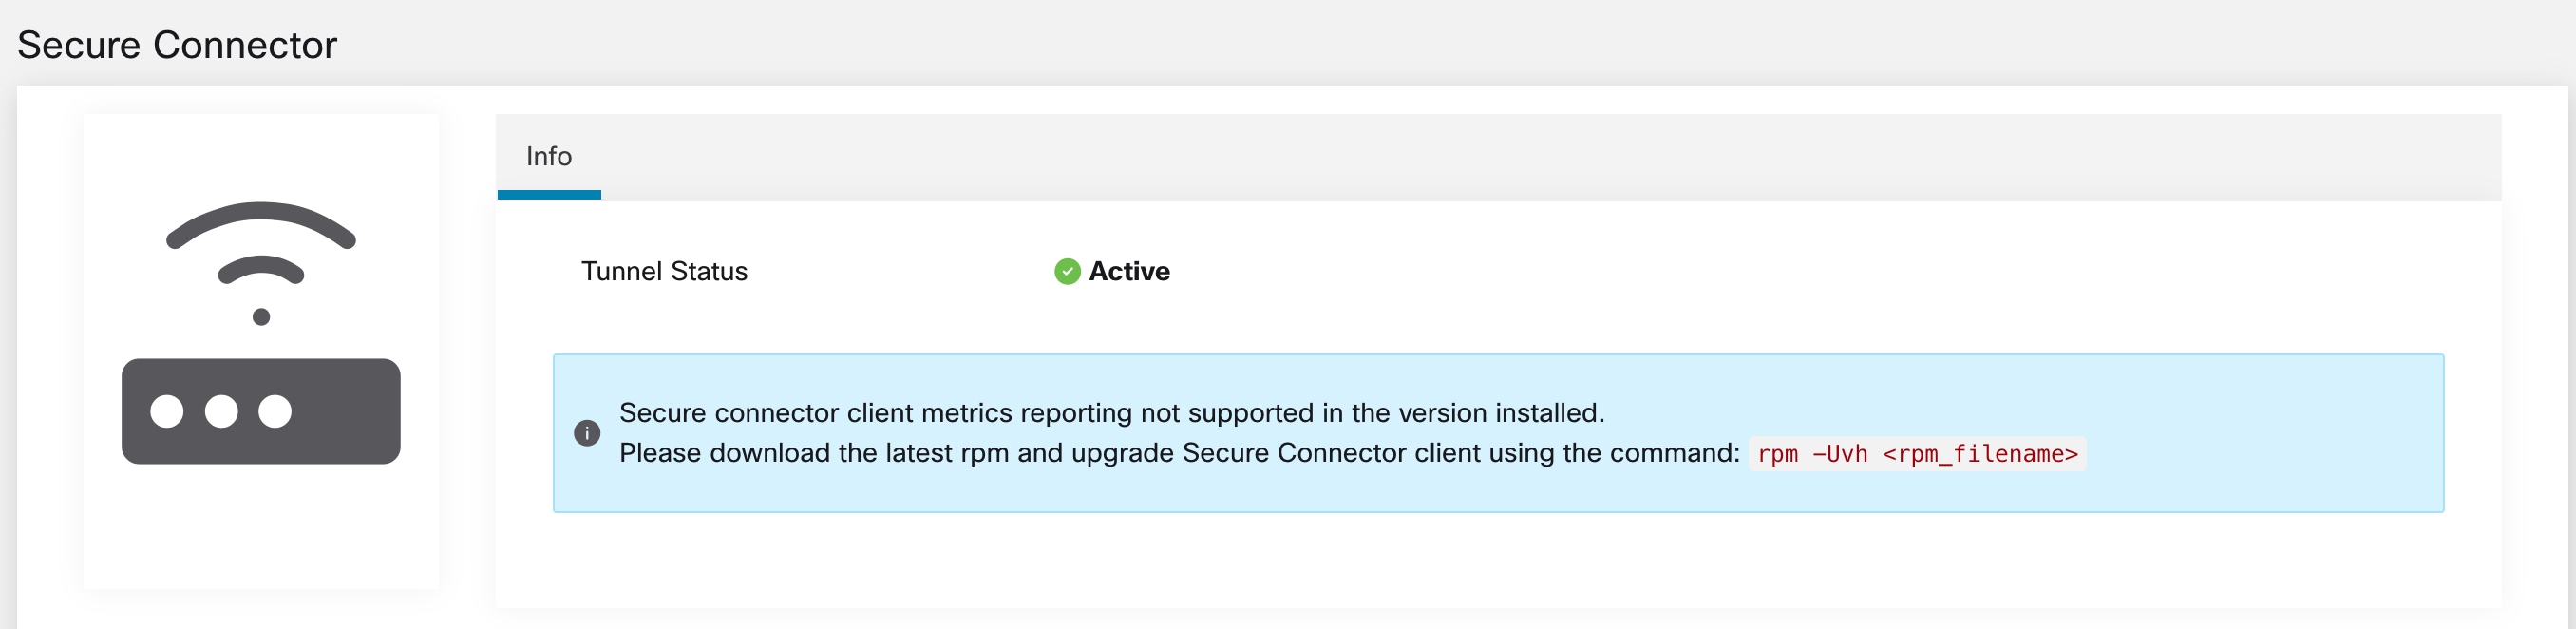
Note |
For instructions on installing the latest Secure Connector RPM, see Download and Install Latest Secure Connector Client RPM |
To view the client metrics:
|
Step 1 |
Under Configure Details, click the Status row. The Secure Connector page is displayed.
|
||||||||
|
Step 2 |
Select the tabs - General, Interface, or Routes to access more details on the connectivity status between the client and Secure Workload cluster.
|
The alert is generated when Secure Connector stops functioning or if there is no heartbeat in the past one minute.
Step 1: To enable alert, click Manage > Workloads > Secure Connector.
Step 2: Click the Alerts tab.
Step 3: Check the Enable Alert checkbox.
Step 4: Choose a Severity value from the drop-down.
Step 5: Click Update Config.

Note |
Ensure that the Connectors alerts is enabled in the Manage > Alerts - Configuration page. |
Navigate to Investigate > Alerts and click on an alert to view more details.
Alert text: Secure Connector: <reason for connection failure>

|
Field |
Type |
Description |
|---|---|---|
|
Name |
String |
Secure Connector name |
|
Type |
String |
Secure Connector type |
|
Last Checkin At |
String |
Last known time when there was a heartbeat |
|
Hostname |
String |
Name of the machine hosting this Secure Connector |
|
Total Memory (GB) |
String |
RAM in GB |
|
No. vCPU's |
String |
Number of CPUs |
|
VM IPs |
String |
List of network interfaces on the Secure Connector client host |
The Secure Connector client does not support automatic updates. To deploy a new version:
Run the following command to uninstall the current version: rpm -e tet-secureconnector-client-site
Deploy the new version. For detailed instructions, see Deploy the Secure Connector Client.
The Secure Connector Client can be uninstalled using the following command: rpm -e tet-secureconnector-client-site
Note |
AWS external orchestrator functionality is now part of the new AWS cloud connector feature. If you upgraded to this release, your existing AWS external orchestrators are now read-only; if you need to make changes, create a new AWS connector. For complete information, see AWS Connector. |
Secure Workload supports automated ingestion of inventory live from an AWS region. When an external orchestrator configuration is added for type “aws”, the Secure Workload appliance will connect to the AWS endpoint and fetch the metadata for all the instances in running/stopped state.
Security tokens (access key and secret key) used should have the right kind of IAM privileges to allow fetching of orchestrator information.
|
Attribute |
Description |
||
|---|---|---|---|
|
ID |
Unique identifier for the orchestrator. |
||
|
Name |
User-specified name of the orchestrator. |
||
|
Type |
Type of orchestrator - (aws in this case) |
||
|
Description |
A brief description of the orchestrator. |
||
|
AWS Access Key ID |
ACCESS KEY associated with the account for which orchestrator config is being created. |
||
|
AWS Secret Access key |
SECRET KEY associated with the account you create for the orchestrator configuration.
|
||
|
AWS Region |
The Region in which workload has been deployed. If a workload is spread across multiple regions, a separate config is required for every region. See the link below for correct region values. :ref:https://docs.aws.amazon.com/general/latest/gr/rande.html. |
||
|
Accept Self-signed Cert |
Is automatically marked true for AWS. User cannot edit it. |
||
|
Full Snapshot Interval |
Full snapshot interval in seconds. Orchestrator Inventory manager will perform a full refresh poll from the orchestrator. |
||
|
Delta Snapshot Interval |
Delta snapshot interval in seconds. Orchestrator Inventory manager will only fetch incremental updates from the orchestrator. |
||
|
Hosts List |
AWS orchestrator type doesn’t require hosts list. The endpoint for AWS will be derived from AWS Region field above. This field should be left empty. |
||
|
Verbose TSDB metrics |
If enabled, tsdb metrics for each individual orchestrator will be reported. Else an aggregation of all orchestrator metrics will be reported. |
||
|
Secure Connector Tunnel |
Tunnel connections to this orchestrator’s hosts through the Secure Connector tunnel. |
Configure an AWS orchestrator filled with the configuration fields above.
Secure Workload adds the following labels to all the AWS instances.
|
Key |
Value |
|---|---|
|
orchestrator_system/orch_type |
aws |
|
orchestrator_system/cluster_name |
<Name of kubernetes cluster> |
|
orchestrator_system/name |
<Name of the connector> |
|
orchestrator_system/cluster_id |
<UUID of the orchestrator’s configuration in |product|> |
The following labels are instance specific.
|
Key |
Value |
|---|---|
|
orchestrator_system/workload_type |
vm |
|
orchestrator_system/machine_id |
<InstanceID assigned by AWS> |
|
orchestrator_system/machine_name |
<PublicDNS(FQDN) given to this node by AWS> |
|
orchestrator_‘<AWS Tag Key>‘ |
<AWS Tag Value> |
Confusion between AWS Region and Availability Zone.
Both these values are interrelated and should not be confused. For example us-west-1 might be the region and availability zone can be either of us-west-1a or us-west-1b etc. While configuring orchestrator, Region should be used. Refer to https://docs.aws.amazon.com/general/latest/gr/rande.html for all regions.
Connectivity/Credentials issue after updating the orchestrator config.
Customers must re-submit the AWS Secret Key every time the config gets updated.
Note |
EKS and AKS external orchestrator functionalities are now part of the new AWS and Azure cloud connector features, respectively. If you upgraded to this release, your existing EKS and AKS external orchestrators are now read-only; if you need to make changes, create a new AWS or Azure connector. For complete information, see the relevant topics under Cloud Connectors. The external orchestrator for plain-vanilla Kubernetes and OpenShift has not changed. |
Secure Workload supports automated ingestion of inventory live from a Kubernetes cluster. When an external orchestrator configuration is added for a Kubernetes/OpenShift cluster, Secure Workload connects to the cluster’s API server and tracks the status of nodes, pods and services in that cluster. For each object type, Secure Workload imports all Kubernetes labels and labels associated with the object. All values are imported as-is.
In addition to importing the labels defined for Kubernetes/OpenShift objects, Secure Workload also generates labels that facilitate the use of these objects in inventory filters. These additional labels are especially useful in defining scopes and policies.
For more information about all of these labels, see Labels Related to Kubernetes Clusters.
If enforcement is enabled on the Kubernetes nodes (enforcement agents are installed and the configuration profile enables enforcement on these agents), enforcement policies will be installed in both the nodes as well as inside the pod namespaces using the information ingested about the Kubernetes entities via this integration.
About Kubernetes on Cloud Platforms
For the following managed kubernetes services running on supported cloud platforms, this orchestrator’s functionality is provided using cloud connectors:
Elastic Kubernetes Service (EKS) running on Amazon Web Services (AWS)
Azure Kubernetes Service (AKS) running on Microsoft Azure
Google Kubernetes Engine (GKE) running on Google Cloud Platform (GCP)
For details about obtaining data from kubernetes clusters on cloud platforms, see the topics under Cloud Connectors.
For supported Kubernetes and OpenShift versions, see https://www.cisco.com/go/secure-workload/requirements/integrations
Secure Connector tunnel, if needed for connectivity.
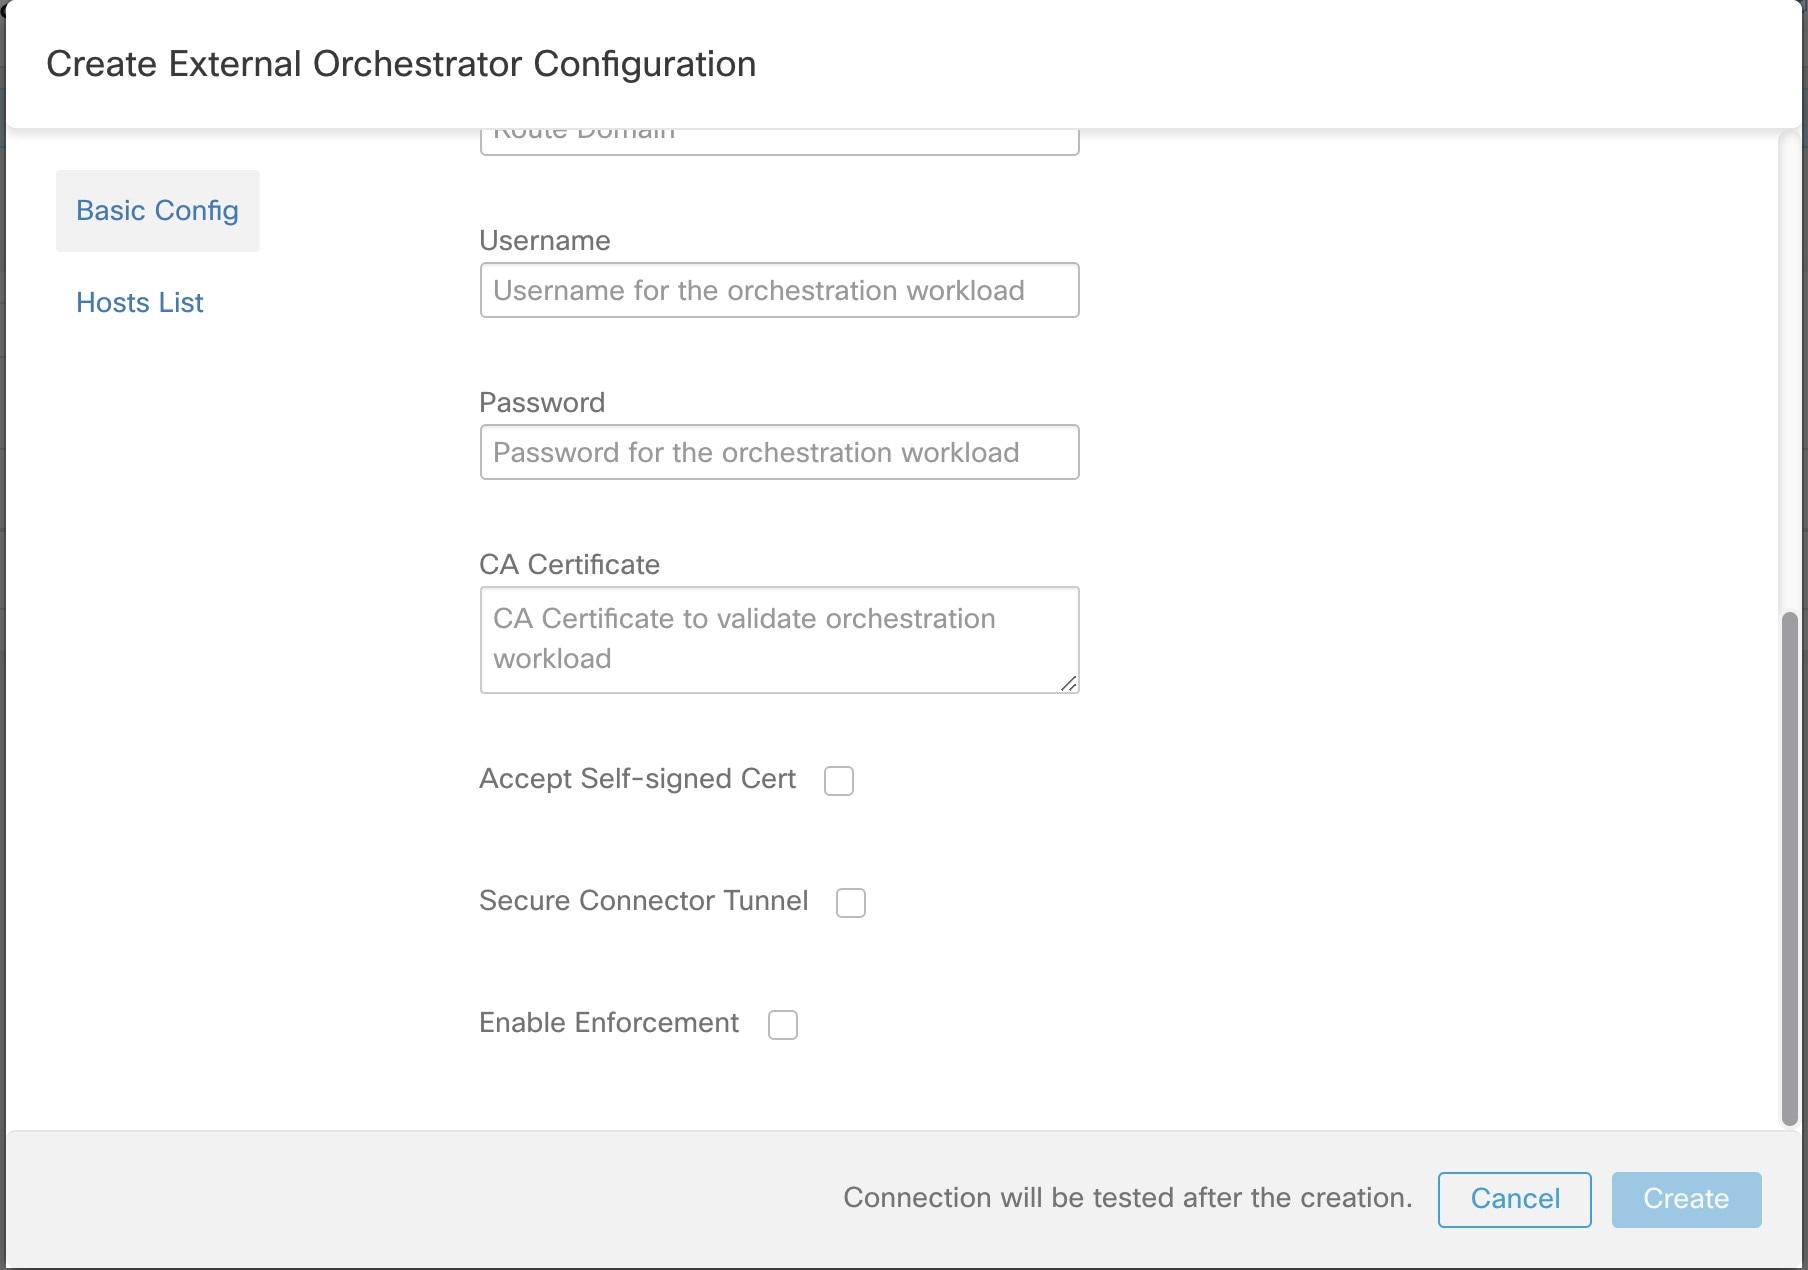
The following configuration fields pertain to Kubernetes Orchestrator configuration in the Orchestrator Object.
| Field |
Description |
|---|---|
|
Name |
User specified name of the orchestrator. |
|
Description |
User specified description of the orchestrator. |
|
Delta Interval |
Interval (in seconds) to check the Kubernetes endpoint for changes |
|
Full Snapshot Interval |
Interval (in seconds) to perform a full snapshot of Kubernetes data |
|
Username |
Username for the orchestration endpoint. |
|
Password |
Password for the orchestration endpoint. |
|
Certificate |
Client certificate used for authentication. |
|
Key |
Key corresponding to client certificate. |
|
Auth Token |
Opaque authentication token (bearer token). |
|
CA Certificate |
CA Certificate to validate orchestration endpoint. |
|
Accept Self-Signed Cert |
Checkbox to disable strictSSL checking of the Kubernetes API server certificate |
|
Verbose TSDB Metrics |
Maintain per Kubernetesorchestrator metrics - if set to False, only Secure Workload clusterwide metrics are maintained. |
|
Secure connector Tunnel |
Tunnel connections to this orchestrator’s hosts through the Secure Connector tunnel |
|
Hosts List |
Array of { “host_name”, port_number} pairs that specify how Secure Workload must connect to the orchestrator |
|
K8s manager type |
Manager type for the kubernetes cluster(None for Vanilla/Openshift kubernetes deployments) |
|
AWS cluster name |
Name of the orchestrator as specified at time of creation of cluster (Pre-existing EKS) |
|
AWS Access ID |
ACCESS KEY associated with the account for which orchestrator config is being created (Pre-existing EKS) |
|
AWS Secret Access Key |
The SECRET KEY associated with the account the orchestrator configuration is created. Re-enter the SECRET KEY every time the config is edited. (Pre-existing EKS) |
|
AWS Region |
The Region in which workload has been deployed. If a workload is spread across multiple regions, a separate config is required for every region. See the link below for correct region values. :ref: https://docs.aws.amazon.com/general/latest/gr/rande.html. (Pre-existing EKS) |
|
AWS Assume Role ARN |
Amazon resource number of the roles to assume while connecting to the orchestrator ref: https://docs.aws.amazon.com/STS/latest/APIReference/API_AssumeRole.html (Pre-existing EKS) . |
|
Azure Tenant ID |
Tenant ID associated with Azure subscription. (Pre-existing AKS only) |
|
Azure Client ID |
Globally unique ID associated with the application that needs to authenticate with Azure AD. (Pre-existing AKS only) |
|
Azure Client Secret |
Password associated with the service principal for the application that needs to authenticate with Azure AD. (Pre-existing AKS only) |
The golden rules object attributes are described below. These golden rules allow a concise specification of rules necessary for the Kubernetes cluster to stay functional once enforcement is enabled on the Kubernetes cluster nodes.
|
Attribute |
Description |
|---|---|
|
Kubelet Port |
Kubelet node-local API port |
|
Services |
Array of Kubernetes Services objects |
The kubelet port is necessary to create policies to allow traffic from the Kubernetes management daemons to kubelets such as for live logs, execs of pods in interactive mode etc. Vital connectivity between the various kubernetes services and daemons is specified as a series of services - each entry in the services array has the following structure
Description: A string that describes the service
Addresses: A list of service endpoint addresses of the format <IP>:<port>/<protocol>.
Consumed By: A list of consumers of the endpoints (allowed values are Pods or Nodes)
Note |
If kubernetes is chosen as the type, Golden Rules configuration will be allowed. |
Configure Secure Connector tunnel, if needed, for connectivity from the Secure Workload cluster to a Kubernetes API server (or servers).
Configure a Kubernetes orchestrator filled with the configuration fields above.
Configure the Golden Rules for the Kubernetes orchestrator.
The Kubernetes client attempts to GET/LIST/WATCH the following resources. It is highly recommended NOT to configure the admin key/cert or an admin service account.
The provided Kubernetes authentication credentials should have a minimum set of privileges to the following resources:
|
Resources |
Kubernetes Verbs |
|---|---|
|
endpoints |
[get list watch] |
|
namespaces |
[get list watch] |
|
nodes |
[get list watch] |
|
pods |
[get list watch] |
|
services |
[get list watch] |
|
ingresses |
[get list watch] |
|
replicationcontrollers |
[get list watch] |
|
replicasets |
[get list watch] |
|
deployments |
[get list watch] |
|
daemonsets |
[get list watch] |
|
statefulsets |
[get list watch] |
|
jobs |
[get list watch] |
|
cronjobs |
[get list watch] |
Essentially, you can create a special service account on your Kubernetes server with these minimal privileges. An example sequence of kubectl commands is below that will facilitate the creation of this serviceaccount. Note the use of the clusterrole (not role) and clusterrolebindings (not rolebindings) - these are cluster-wide roles and not per namespace. Using a role/rolebinding will not work as Secure Workload attempts to retrieve data from all namespaces.
$ kubectl create serviceaccount csw.read.onlyCreate the clusterrole.
A sample clusterrole.yaml with minimal privileges is provided below
    kind: ClusterRole
    apiVersion: rbac.authorization.k8s.io/v1
    metadata:
      name: csw.read.only
    rules:
      - apiGroups:
        - ""
        resources:
          - nodes
          - services
          - endpoints
          - namespaces
          - pods
          - replicationcontrollers
          - ingresses
        verbs:
          - get
          - list
          - watch
      - apiGroups:
        - extensions
        - networking.k8s.io
        resources:
          - ingresses
        verbs:
          - get
          - list
          - watch
      - apiGroups:
        - apps
        resources:
          - replicasets
          - deployments
          - statefulsets
          - daemonsets
        verbs:
          - get
          - list
          - watch
      - apiGroups:
        - batch
        resources:
          - jobs
          - cronjobs
        verbs:
          - get
          - list
          - watch

    $ kubectl create -f clusterrole.yaml
Note |
API groups for these different resources are susceptible to change across Kubernetes versions. The sample above should work for Kubernetes versions 1.20-1.24 and might require some tweaks for other versions. |
Create the cluster role binding
$ kubectl create clusterrolebinding csw.read.only --clusterrole=csw.read.
˓→only --serviceaccount=default:csw.read.only
To retrieve the authtoken secret from the serviceaccount (used in the Auth Token field in the GUI) and decode from base64, you can retrieve the name of the secret by listing the serviceaccount with yaml output.
  $ kubectl get serviceaccount -o yaml csw.read.only
  apiVersion: v1
  kind: ServiceAccount
  metadata:
    creationTimestamp: 2020-xx-xxT19:59:57Z
    name: csw.read.only
    namespace: default
    resourceVersion: "991"
    selfLink: /api/v1/namespaces/default/serviceaccounts/e2e.minimal
    uid: ce23da52-a11d-11ea-a990-525400d58002
  secrets:
  - name: csw.read.only-token-vmvmz
Listing the secret in yaml output mode will yield the token but in Base64 format (which is standard Kubernetes procedure for secret data). Secure Workload does not accept the token in this format, you must decode it from Base64.
  $ kubectl get secret -o yaml csw.read.only-token-vmvmz
  apiVersion: v1
  data:
    ca.crt: ...
    namespace: ZGVmYXVsdA==
    token: ZXlKaGJHY2lPaUpTVX....HRfZ2JwMVZR
  kind: Secret
  metadata:
    annotations:
      kubernetes.io/service-account.name: csw.read.only
      kubernetes.io/service-account.uid: ce23da52-a11d-11ea-a990-525400d58002
    creationTimestamp: 2020-05-28T19:59:57Z
    name: csw.read.only-token-vmvmz
    namespace: default
    resourceVersion: "990"
    selfLink: /api/v1/namespaces/default/secrets/csw.read.only-token-vmvmz
    uid: ce24f40c-a11d-11ea-a990-525400d58002
  type: kubernetes.io/service-account-token
.data.token field and decode from base 64 encoding in one command, the following command that use the --template option is helpful. $ kubectl get secret csw.read.only-token-vmvmz --template "{{ .data.token }}" | base64 -dThis authtoken can be used for configuring a Kubernetes orchestrator in the Secure Workload UI instead of username/password or key/cert.
See EKS specific RBAC considerations.
Client key or certificate Credentials parsing or mismatch
These must be supplied in PEM format and be the correct entry from the kubectl.conf file. We have encountered customers pasting CA certs into client cert fields, as well as keys and certs not matching each other.
Gcloud credentials instead of GKE credentials
Customers using GKE under the gcloud CLI mistakenly provide the gcloud credentials when the GKE cluster credentials are needed.
Kubernetes cluster version unsupported
Using an incompatible version of Kubernetes may result in failures. Verify that the Kubernetes version is in the supported versions list.
Credentials have insufficient privileges
verify that the authtoken or user or client key or cert used has all the privileges listed in the table above.
Kubernetes inventory keeps flipping around
The hosts_list field specifies a pool of API servers for the same Kubernetes cluster - you cannot use this to configure multiple Kubernetes clusters. Secure Workload will probe for aliveness and randomly select one of these endpoints to connect to and retrieve the Kubernetes inventory information. No load balancing is performed here, nor is there a guarantee of evenly distributing load across these endpoints. If these are different clusters, the Kubernetes inventory will keep flipping between them, depending on which cluster’s API server we connect to.
Multiple authorization methods
Multiple authorization methods may be filled in during configuration (username or password, authtoken, client key or certificate) and will be used in the client connection established with the API server. The standard Kubernetes rules for valid simultaneous authorization methods apply here.
SSL Certificate validation fails
If the Kubernetes API endpoint is behind a NAT or load balancer, then the DN in the SSL certificate generated on the kube control plane nodes may mismatch with the IP address configured in Secure Workload. This will cause an SSL validation failure even if the CA certificate is provided and is valid. The Insecure knob bypasses strict server SSL certificate validation and will help workaround this issue but can lead to MITM issues. The correct fix for this is to change the CA certificate to provide SAN (Subject Alternative Name) entries for all DNS or IP entries that can be used to connect to the Kubernetes cluster.
vCenter integration allows user to fetch bare metal and VM attributes from configured vCenter.
When an external orchestrator configuration is added for type “vCenter”, Secure Workload fetches bare metal and VM attributes for all the bare metals and VM’s controlled by that vCenter instance. Secure Workload will import the following attributes of a bare metal/VM:- a) Hostname b) IP addresses c) BIOS UUID d) Categories/Labels.
A new inventory will be created in Secure Workload with the above bare metal/VM attributes, if the inventory is not present in the appliance. If the inventory is already present in the appliance (created by Secure Workload visibility sensor running on the bare metal/VM), the existing inventory will be labelled with the fetched bare metal/VM Categories/Labels list.
Secure Connector Tunnel, if needed for connectivity.
vCenter version supported is 6.5+
Beside the common configuration fields as described in Create External Orchestrator the following fields can be configured:
Hosts List is an array of hostname/ip and port pairs pointing to the vCenter server from which bare metal/VM attributes will be fetched.
First, the user must verify that the vCenter server is reachable on that IP/Port from the Secure Workload cluster.
For TaaS or in cases where the vCenter server is not directly reachable, the user must configure a secure connector tunnel to provide connectivity.
Secure Workload adds the following labels to all the VM’s learnt from vCenter server.
|
Key |
Value |
|---|---|
|
orchestrator_system/orch_type |
vCenter |
|
orchestrator_system/cluster_name |
<Name given to this cluster’s configuration> |
|
orchestrator_system/cluster_id |
<UUID of the cluster’s configuration in |product|> |
The following labels are instance specific.
|
Key |
Value |
|---|---|
|
orchestrator_system/workload_type |
vm |
|
orchestrator_system/machine_id |
BIOS UUID of bare metal/VM |
|
orchestrator_system/machine_name |
Hostname of the bare metal/VM |
|
orchestrator_‘<Category Name>‘ |
<Tag Value> |
When an external orchestrator configuration is added for vCenter, Secure Workload software will connect to the vCenter server specified in the hosts list. After the connection to the server is successful, Secure Workload software will import hostnames, IP addresses and Category/Labels for all the bare metals and Virtual Machines present in the vCenter server. In order to import hostnames and IP addresses of the bare metals and VM’s, VM tools must be installed on all the bare metals and VM’s. If VM tools is not installed for a given bare metal/Virtual Machine, Secure Workload software will not display Category/Labels for that particular bare metal/VM.
Secure Workload software doesn’t import Custom attributes of the bare metal/VM.
It is recommended to set Delta interval timer to more than 10 min so as to reduce the load on the vCenter server. Any change in the inventory/labels on the vCenter server will have a propagation delay of at least 10 min, once the above mentioned timer is modified.
Connectivity Issues
In case, Secure Workload appliance is not able to connect/reach the vCenter server, Connection Status tab of the External orchestrator will display the failure status along with the appropriate error if any.
Secure Workload software health check.
Check the MAINTENANCE/Service Status page to see if any service is down. Check if OrchestratorInventoryManager is up and running.
The DNS Integration allows Secure Workload to annotate known inventory with DNS information such as hostnames from CNAME and A/AAAA records.
When an external orchestrator configuration is added for type “dns”, the Secure Workload appliance will attempt to connect to the DNS server(s) and perform a zone transfer download of DNS records. These records (only A/AAAA and CNAME records) will be parsed and used to enrich inventory in the Secure Workload pipelines (as belonging to the Tenant under which the orchestrator is configured) with a single multi-value label called “orchestrator_system/dns_name”, whose value will be the DNS entries that point (directly or indirectly) to that IP address.
Secure Connector Tunnel, if needed for connectivity
Supported DNS Servers: BIND9, servers supporting AXFR (RFC 5936), Microsoft Windows Server 2016
DNS zones is an array of strings, each of which represents a DNS zone to be transferred from the DNS server. All dns zones must have a trailing period (“.”) character.
Hosts List is an array of hostname/ip and port pairs pointing to the DNS server(s) from which to fetch the DNS records. Multiple DNS servers may be configured here for HA purposes only. High Availability behavior across multiple DNS servers specified in the hosts_list is “first healthy server” and will favor the earlier entries in the hosts_list. Zones cannot be split across the DNS servers.
First, the user must verify that the DNS server is reachable on that IP/Port from the Secure Workload cluster.
For TaaS or in cases where the DNS server is not directly reachable, the user must configure a secure connector tunnel to provide connectivity.
Configure the correct DNS Zone Transfers ACLs/configuration on the DNS server. Refer to the documentation for the particular DNS server software for more information.
orchestrator_system/dns_name -> a multi-value field whose values are all the CNAME and A/AAAA hostnames pointing to that IP.
The DNS orchestrator feed is a metadata feed - IP addresses learnt from a DNS zone transfer will not create inventory items in Secure Workload, rather, labels for an existing IP address will be updated with the new DNS metadata. DNS data for unknown IPs is silently discarded. In order to annotate DNS metadata to IPs not learnt from any sensor or via any other orchestrator integrations, IPs must be uploaded via the CMDB bulk upload mechanism to create inventory entries for them. Subnets learnt from CMDB uploads do not create inventory entries.
Only CNAME and A/AAAA records from the DNS server are processed. CNAME records will be processed to their ultimate IPv4/IPv6 records via the A/AAAA records they point to. Only a single level of deferencing is supported (i.e. chains of CNAME -> CNAME -> A/AAAA or longer are not deferenced) as long as the CNAME points to an A/AAAA record from that same orchestrator. CNAME deferencing across different DNS orchestrators is not supported.
Connectivity Issues
Secure Workload will attempt to connect to the provided ip/hostname and port number using a TCP connection originating from one of the Secure Workload appliance servers or from the cloud in the case of TaaS or from the VM hosting the Secure Workload Secure Connector VPN tunnel service. In order to correctly establish this connection, firewalls must be configured to permit this traffic.
DNS AXFR Privilege Issues
In addition, most DNS servers (BIND9 or Windows DNS or Infoblox) require additional configuration when client IPs attempt DNS zone transfers (AXFR requests as per the DNS protocol opcodes) as these are more resource intensive and privileged as compared to simple DNS requests to resolve individual DNS records. These errors typically show up as AXFR refused with reason code 5 (REFUSED).
Thus, any manual testing to establish that the DNS server is configured correctly must not depend on succesful hostname lookups but rather they must test AXFR requests specifically (using a tool such as dig).
Any failure to perform an AXFR zone transfer from the DNS server will be reported in the “authentication_failure_error” field by Secure Workload appliance.
Also, note that Secure Workload will attempt zone transfers from all configured DNS zones and all must succeed in order for the DNS data to be injected into the Secure Workload label database.
Inventory Hostname fields are not populated by DNS Field ‘hostname’ is always learnt from the Secure Workload sensor. If the inventory was uploaded via CMDB upload and not from the sensor, it may be missing the hostname. All data from the DNS orchestrator workflow only shows up under the “orchestrator_system/dns_name” label and will never populate the hostname field.
Default Full Snapshot Interval is 24 hours
Default Delta Snapshot Interval is 60 minutes
These are also the minimum allowed values for these timers.
DNS Records may rarely change. So, for optimal fetching behaviour, at every delta snapshot interval, Secure Workload will check if the serial numbers of any of the DNS zones has changed from the previous interval. If no zones have changed, no action is needed.
If any zones have changed, we will perform a zone transfer from all configured DNS zones (not just the single zone that has changed).
Every full snapshot interval, Secure Workload will perform zone transfer downloads from all zones and inject into the label database regardless of whether the zone serial numbers have changed.
 Warning |
|
The Infoblox integration allows Secure Workload to import Infoblox subnets, hosts (record:host) and A/AAAA records into Secure Workload inventory database. The extensible attribute names and values are imported as is and can be used as Secure Workload labels to define scopes and enforcement policies.
Note |
Only Infoblox objects with extensible attributes are considered, ie. those without any extensible attributes attached will be excluded from the import. |
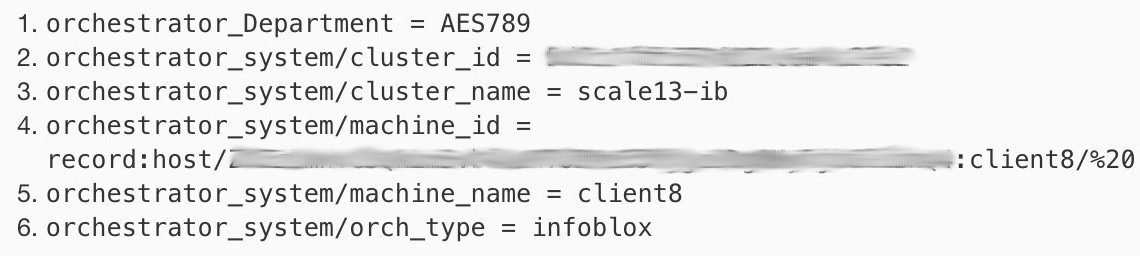
Below picture shows an example of generated labels for a host object imported from Infoblox with the extensible attribute Department:
Infoblox REST API endpoint supporting WAPI version 2.6, 2.6.1, 2.7, 2.7.1 (recommended)
Beside the common configuration fields as described in Create External Orchestrator the following fields can be configured:
|
Common Field |
Required |
Description |
|---|---|---|
|
Hosts List |
Yes |
The hosts list denotes one Infoblox grid, ie. more than one grid members with REST API access can be added, and the external orchestrator will switch over to the next one in the list in case of connection errors. If you want to import labels from another Infoblox grid, create a new external orchestrator for it. |
Note |
For Infoblox external orchestrator, IPv4 and IPv6 (dual stack mode) addresses are supported. However, do note that dual stack support is a BETA feature. |
First, the user must verify that the Infoblox REST API endpoint is reachable from the Secure Workload cluster.
For TaaS or in cases, where the Infoblox server is not directly reachable, the user must configure a Secure Connector tunnel to provide connectivity.
Create an external orchestrator with type Infoblox. Depending on the volume of Infoblox data, ie. the number of subnets, hosts and A/AAAA records it can take up to one hour for the first full snapshot is available in Secure Workload.
While creating infoblox config, the user has an option to deselect any of the record types(subnet, host, A/AAAA records).
Secure Workload adds the following system labels to all objects retrieved from Infoblox.
|
Key |
Value |
|---|---|
|
orchestrator_system/orch_type |
infoblox |
|
orchestrator_system/cluster_id |
<UUID of the external orchestrator in Secure Workload |
|
orchestrator_system/cluster_name |
<Name given to this external orchestrator> |
|
orchestrator_system/machine_id |
<Infoblox object reference/identifier> |
|
orchestrator_system/machine_name |
<Infoblox host (DNS) name> |
All Infoblox extensible attributes will be imported as Secure Workload labels with the prefix orchestrator_. For instance, a host with an extensible attribute called Department can be addressed in Secure Workload inventory search as orchestrator_Department.
|
Key |
Value |
|---|---|
|
orchestrator_<extensible attribute> |
<value(s) of the extensible attribute as retrieved from Infoblox> |
The maximal number of subnets that can be imported from Infoblox is 50000.
The maximal number of hosts and A/AAAA records that can be imported from Infoblox is 400000 in total.
Connectivity issue Secure Workload will attempt to connect to the provided IP/hostname and port number using an HTTPS connection originating from one of the Secure Workload appliance servers or from the cloud in the case of TaaS or from the VM hosting the Secure Workload Secure Connector tunnel service. In order to correctly establish this connection, firewalls must be configured to permit this traffic. Also, make sure the given credentials are correct and have privileges to send REST API requests to the Infoblox appliance.
Not all expected objects are imported Secure Workload imports only subnets, hosts and A/AAAA records with attached extensible attributes. Note there is a limit number objects that can be imported from Infoblox, see Caveats.
Could not find subnets in inventory It is not possible to use inventory search to find Infoblox subnets as Secure Workload inventory by design includes only IP addresses, ie. hosts and A/AAAA records.
Could not find a host or A/AAAA record Secure Workload imports all extensible attributes as retrieved from Infoblox. Remember to add the prefix orchestrator_ to the extensible attribute name in eg. inventory search. Note subnets extensible attributes, if not marked as inherited in Infoblox, are not part of hosts and hence not searchable in Secure Workload.
The F5 BIG-IP integration allows Secure Workload to import the Virtual Servers from an F5 BIG-IP load balancer appliance and to derive service inventories. A service inventory corresponds to an F5 BIG-IP virtual server, whose service is characterized by the VIP (virtual IP address), protocol and port. Once imported into Secure Workload this service inventory will have labels such as service_name, which can be used in inventory search as well as to create Secure Workload scopes and policies.
A big benefit of this feature is the enforcement of policies in that the external orchestrator for F5 BIG-IP translates Secure Workload policies to security rules assigned to the virtual server and deploys them to the F5 BIG-IP load balancer via its REST API.
Secure Connector Tunnel, if needed for connectivity
F5 BIG-IP REST API endpoint version 12.1.1
Beside the common configuration fields as described in Create External Orchestrator the following fields can be configured:
|
Field |
Required |
Description |
|---|---|---|
|
Hosts List |
Yes |
This specifies the REST API endpoint for F5 BIG-IP load balancer. If High Availability is configured for F5 BIG-IP, enter the standby member node so that in case of a failover, the external orchestrator switches over to the current node. If you want to import labels from another F5 BIG-IP load balancer, you need to create a new external orchestrator. |
|
Enable Enforcement |
No |
Default value is false (unchecked). If checked, this allows Secure Workload policy enforcement to deploy security policy rules to the corresponding F5 BIG-IP load balancer. Note the given credentials must have write access for the F5 BIG-IP REST API. |
|
Route Domain |
No |
Default value is 0 (zero). The route domain specifies which virtual server are to be considered by the external orchestrator. This is determined by the list of partitions assigned to the given route domain, and only the virtual servers defined in those partitions will be imported in Secure Workload. |
First, the user must verify that the F5 BIG-IP REST API endpoint is reachable from Secure Workload.
For TaaS or in cases, where the F5 BIG-IP appliance is not directly reachable, the user must configure a Secure Connector tunnel to provide connectivity.
Create an external orchestrator with type F5 BIG-IP.
Depending on the delta interval value it might take up to 60 seconds (default delta interval) for the first full snapshot of F5 BIG-IP virtual servers to complete. Thereafter the generated labels can be used to create Secure Workload scopes and enforcement policies.
Secure Workload adds the following system labels for an external orchestrator for F5 BIG-IP:
|
Key |
Value |
|---|---|
|
orchestrator_system/orch_type |
f5 |
|
orchestrator_system/cluster_id |
<UUID of the external orchestrator> |
|
orchestrator_system/cluster_name |
<Name given to this external orchestrator> |
|
orchestrator_system/workload_type |
service |
|
orchestrator_system/namespace |
<Partition the virtual server belongs to> |
|
orchestrator_system/service_name |
<Name of the F5 BIG-IP virtual server> |
For each virtual server the external orchestrator will generate the following labels:
|
Key |
Value |
|---|---|
|
orchestrator_annotation/snat_address |
<Virtual servers SNAT address> |
This feature enables Secure Workload to translate logical policies with provider groups that match labelled F5 BIG-IP virtual servers into F5 BIG-IP security policy rules and deploys them to the load balancer appliance using its REST API. As mentioned above any assignment of existing security policy to the respective F5 BIG-IP virtual server will be replaced by a new assignment pointing to Secure Workload generated security policy. Existing security policies will not be changed or removed from the F5 BIG-IP policy list.
By default, enforcement is not enabled in the external orchestrator configuration:
This option can be modified any time as needed.
Enabling enforcement does not deploy policies to the load balancer appliance unless and until you enable enforcement in a workspace that includes at least one policy that applies to the load balancer, or due to any updates of inventories.
However, disabling enforcement for the orchestrator will cause all deployed security policy rules being removed from the F5 BIG-IP load balancer immediately.

Note |
|
The OpenAPI Policy enforcement status for external orchestrator can be used to retrieve the status of Secure Workload policy enforcement to the load balancer appliance associated with the external orchestrator. This helps to verify if the deployment of security policy rules to the F5 BIG-IP appliance has succeeded or failed.
Secure Workload enforces policies both at the F5 BIG-IP load balancer and at the backend pods when the pods are exposed to the external clients using Kubernetes ingress object.
Following are the steps to enforce the policy using the F5 ingress controller.
|
Step 1 |
Create an external orchestrator for F5 BIG-IP load balancer as described earlier. |
|
Step 2 |
Create an external orchestrator for Kubernetes/OpenShift as described here. 
|
|
Step 3 |
Create an ingress object in the Kubernetes cluster. A snapshot of the yaml file used to create the ingress object is provided in the following picture. 
|
|
Step 4 |
Deploy an F5 ingress controller pod in the Kubernetes cluster. 
|
|
Step 5 |
Create a backend service, which is accessed by the consumers outside the cluster. In the example provided below we have created a nginx service. 
|
|
Step 6 |
Create a policy between external consumer and backend service. Enforce the policy using Policy Enforcement tab. 
|
|
Step 7 |
Check the policies on F5 BIG-IP load balancer and backend pods. In case of F5 load balancer Secure Workload will apply the appropriate allow/drop rule where the source will be the consumer specified in step 6 and the destination will be VIP [VIP for the ingress virtual service for F5]. In case of backend pods, Secure Workload will apply the appropriate allow/drop rule where the source will the SNIP [in case SNAT pool is enabled] or F5 IP [auto map enabled] and destination will be backend pod IP.  |
During deployment phase of F5 BIG-IP HA mode, enable the configuration sync option. This ensures the external orchestrator can fetch the latest list of virtual servers from the currently connected host.
In case of F5 BIG-IP HA deployment mode, if Auto-Map is configured instead of SNAT pool for Address translation, ensure that the Primary BIG-IP is configured with the floating Self IP address.
Only VIP specified as a single address is supported, ie. VIP given as a subnet is not supported.
Connectivity issue Secure Workload will attempt to connect to the provided IP/hostname and port number using an HTTPS connection originating from one of the Secure Workload appliance servers or from the cloud in the case of TaaS or from the VM hosting the Secure Workload Secure Connector tunnel service. In order to correctly establish this connection, firewalls must be configured to permit this traffic. Also, make sure the given credentials are correct and have privileges with read and write access to send REST API requests to the F5 BIG-IP appliance.
Security rules not found In case no security rules for a defined virtual server are found, after policy enforcement was performed, make sure the corresponding virtual server is enabled, ie. its availability/status must be available/enabled.
The Citrix Netscaler integration allows Secure Workload to import the Load Balancing Virtual Servers from a Netscaler load balancer appliance and to derive service inventories. A service inventory corresponds to a Netscaler service provided by a virtual server and has labels such as service_name, which can be used in inventory search and to create Secure Workload scopes and policies.
A big benefit of this feature is the enforcement of policies in that the external orchestrator for Citrix Netscaler translates Secure Workload policies to Netscaler ACLs rules and deploys them to the Netscaler load balancer via its REST API.
Secure Connector Tunnel, if needed for connectivity
Netscaler REST API endpoint version 12.0.57.19
Beside the common configuration fields as described in Create External Orchestrator the following fields can be configured:
|
Common Field |
Required |
Description |
|---|---|---|
|
Hosts List |
Yes |
This specifies the REST API endpoint for Citrix Netscaler load balancer. If High Availability is configured on Citrix Netscaler, enter another member node so that in case of a failover, the external orchestrator switches over to the current node. If you want to import labels from another Citrix Netscaler load balancer, create a new external orchestrator. |
|
Enable Enforcement |
No |
Default value is false (unchecked). If checked, this allows Secure Workload policy enforcement to deploy ACL rules to the corresponding Citrix Netscaler load balancer. Note the given credentials must have write access for the Citrix Netscaler REST API. |
First, the user must verify that the Netscaler REST API endpoint is reachable from the Secure Workload cluster.
For TaaS or in cases, where the Netscaler appliance is not directly reachable, the user must configure a Secure Connector tunnel to provide connectivity.
Create an external orchestrator with type Citrix Netscaler.
Depending on the delta interval value it might take up to 60 seconds (default delta interval) for the first full snapshot of Netscaler virtual servers to complete. Thereafter the generated labels can be used to create Secure Workload scopes and enforcement policies.
Enforce policies from Secure Workload to deploy Netscaler ACL rules.
Secure Workload adds the following system labels for an external orchestrator for Citrix Netscaler:
|
Key |
Value |
|---|---|
|
orchestrator_system/orch_type |
nsbalancer |
|
orchestrator_system/cluster_id |
<UUID of the external orchestrator> |
|
orchestrator_system/cluster_name |
<Name given to this external orchestrator> |
|
orchestrator_system/workload_type |
service |
|
orchestrator_system/service_name |
<Name of the load balancing virtual server> |
For each load balancing virtual server the external orchestrator will generate the following labels:
|
Key |
Value |
|---|---|
|
orchestrator_annotation/snat_address |
<Virtual servers SNAT address> |
This feature enables Secure Workload to translate logical policies with provider groups that match labelled Citrix Netscaler virtual servers into Citrix Netscaler ACL rules and deploys them to the load balancer appliance using its REST API. As mentioned above all existing ACL rules will be replaced by Secure Workload generated policy rules.
By default, the field Enable Enforcement is not checked, ie. disabled, in the dialog Create Orchestrator as shown in the picture below:
Just click on the designated check box to enable enforcement for the orchestrator. This option can be modified any time as needed.
Enable enforcement for the orchestrator, regardless whether it is done by creating or editing the orchestrators configuration, will not deploy the current logical policies to the load balancer appliance immediately. This task is performed as part of the workspace policy enforcement to be triggered by the user as shown in the following picture or due to any updates of inventories. However, disable enforcement for the orchestrator will cause all deployed ACL rules being removed from the Citrix Netscaler load balancer immediately.
Note |
|
The OpenAPI Policy enforcement status for external orchestrator can be used to retrieve the status of Secure Workload policy enforcement to the load balancer appliance associated with the external orchestrator. This helps to verify if the deployment of ACL rules to the Citrix Netscaler appliance has succeeded or failed.
If enforcement is enabled, the Secure Workload policies will always be deployed to the global list of ACLs, ie. partition default.
Only VIP specified as a single address is supported, ie. VIP given as an address pattern is not supported.
Visibility for the detected services (Citrix Netscaler virtual servers) is not supported.
Connectivity issue Secure Workload will attempt to connect to the provided IP/hostname and port number using an HTTPS connection originating from one of the Secure Workload appliance servers or from the cloud in the case of TaaS or from the VM hosting the Secure Workload Secure Connector tunnel service. In order to correctly establish this connection, firewalls must be configured to permit this traffic. Also, make sure the given credentials are correct and have privileges with read and write access to send REST API requests to the Citrix Netscaler appliance.
ACL rules not found In case no ACL rules are found, after policy enforcement was performed, make sure the corresponding virtual server is enabled, ie. its status must be up.
The TAXII (Trusted Automated Exchange of Intelligence Information) Integration allows Secure Workload to ingest threat intelligence data feeds from security vendors to annotate network flows and process hashes with STIX (Structured Threat Information Expression) indicators such as malicious IPs, malicious hashes.
When an external orchestrator configuration is added for type “taxii”, the Secure Workload appliance will attempt to connect to the TAXII server(s) and poll STIX data feed collections. The STIX data feeds (only IPs and binary hashes indicators) will be parsed and used to annotate network flows and process hashes in the Secure Workload pipelines (as belonging to the Tenant under which the orchestrator is configured).
Network flows with either provider or consumer addresses matched imported malicious IPs will be tagged with multi-value label “orchestrator_malicious_ip_by_<vendor name>” where <vendor name> is the user orchestrator configuration input TAXII vendor, and the label value is “Yes”.
The ingested STIX binary hash indicators will be used to annotate workload process hashes, which will be displayed (if matched) in the Security Dashboard / Process Hash Score Details and in the Workload Profile / File Hashes.
Secure Connector Tunnel, if needed for connectivity
Supported TAXII Servers: 1.0
Supported TAXII feeds with STIX version: 1.x
Beside the common configuration fields as described in Create External Orchestrator the following fields can be configured:
|
Common Field |
Required |
Description |
|---|---|---|
|
Name |
Yes |
User specified name of the orchestrator. |
|
Description |
Yes |
User specified description of the orchestrator. |
|
Vendor |
Yes |
The vendor provides intelligence data feeds. |
|
Full Snapshot Interval |
Yes |
The interval (in seconds) to perform a full snapshot of the TAXII feed. (Default: 1 day) |
|
Poll Url |
Yes |
The polling full URL path to poll data. |
|
Collection |
Yes |
The TAXII feed collection name to be polled. |
|
Poll Days |
Yes |
The number of earlier days threat data to poll from TAXII feed. |
|
Username |
Username for authentication. |
|
|
Password |
Password for authentication. |
|
|
Certificate |
Client certificate used for authentication. |
|
|
Key |
Key corresponding to client certificate. |
|
|
CA Certificate |
CA Certificate to validate orchestration endpoint. |
|
|
Accept Self-Signed Cert |
Checkbox to disable strictSSL checking of the TAXII API server cer- tificate |
|
|
Secureconnector Tunnel |
Tunnel connections to this orchestrator’s hosts through the Secure Con- nector tunnel. |
|
|
Hosts List |
Yes |
The hostname/ip and port pairs pointing to the TAXII server(s). |
First, the user must verify that the TAXII server is reachable on that IP/Port from the Secure Workload cluster.
Configure the correct TAXII server with the poll path and TAXII feed name.
|
Key |
Value |
|---|---|
|
orchestrator_system/orch_type |
TAXII |
|
orchestrator_system/cluster_id |
UUID of the cluster’s configuration in Secure Workload. |
|
orchestrator_system/cluster_name |
Name given to this cluster’s configuration>. |
|
orchestrator_malicious_ip_by_ <vendor> |
Yes if the flow provider/consumer address matches the imported TAXII malicious IPs data. |
The TAXII integration is supported only on on-premise Secure Workload.
Only IPs and hashes indicators from TAXII feeds are ingested.
Maximum number of ingested IPs is 100K (most recently updated) per TAXII feed.
Maximum number of ingested hashes is 500K (most recently updated) for all TAXII feeds.
Only TAXII feeds with STIX version 1.x are supported.
Connectivity Issues
The Secure Workload will attempt to connect to the provided poll URL path from one of the Secure Workload appliance servers or from the VM hosting the Secure Workload Secure Connector VPN tunnel service. In order to correctly establish this connection, firewalls must be configured to permit this traffic.
Default Full Snapshot Interval is 24 hours
Every full snapshot interval, Secure Workload will perform pulling TAXII feeds of IPs and hashes up to the above limits into the label database.
 Feedback