Configuring SNMP
The CLI and SNMP use common roles in all switches in the Cisco MDS 9000 Family. You can use SNMP to modify a role that was created using the CLI and vice versa.
Users, passwords, and roles for all CLI and SNMP users are the same. A user configured through the CLI can access the switch using SNMP (for example, the DCNM-SAN or the Device Manager) and vice versa.
Information About SNMP Security
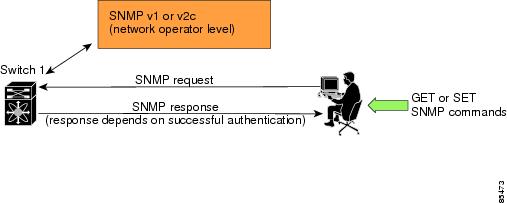
SNMP is an application layer protocol that facilitates the exchange of management information between network devices. In all Cisco MDS 9000 Family switches, three SNMP versions are available: SNMPv1, SNMPv2c, and SNMPv3.
This section includes the following topics:
SNMP Version 1 and Version 2c
SNMP Version 1 (SNMPv1) and SNMP Version 2c (SNMPv2c) use a community string match for user authentication. Community strings provided a weak form of access control in earlier versions of SNMP. SNMPv3 provides much improved access control using strong authentication and should be preferred over SNMPv1 and SNMPv2c wherever it is supported.
SNMP Version 3
SNMP Version 3 (SNMPv3) is an interoperable standards-based protocol for network management. SNMPv3 provides secure access to devices by a combination of authenticating and encrypting frames over the network. The security features provided in SNMPv3 are:
-
Message integrity—Ensures that a packet has not been tampered with in-transit.
-
Authentication—Determines the message is from a valid source.
-
Encryption—Scrambles the packet contents to prevent it from being seen by unauthorized sources.
SNMPv3 provides for both security models and security levels. A security model is an authentication strategy that is set up for a user and the role in which the user resides. A security level is the permitted level of security within a security model. A combination of a security model and a security level determines which security mechanism is employed when handling an SNMP packet.
SNMPv3 CLI User Management and AAA Integration
The Cisco NX-OS software implements RFC 3414 and RFC 3415, including user-based security model (USM) and role-based access control. While SNMP and the CLI have common role management and share the same credentials and access privileges, the local user database was not synchronized in earlier releases.
SNMPv3 user management can be centralized at the AAA server level. This centralized user management allows the SNMP agent running on the Cisco MDS switch to leverage the user authentication service of the AAA server. Once user authentication is verified, the SNMP PDUs are processed further. The AAA server also is used to store user group names. SNMP uses the group names to apply the access/role policy that is locally available in the switch.
Restricting Switch Access
You can restrict access to a Cisco MDS 9000 Family switch using IP access control lists (IP-ACLs).
Group-Based SNMP Access
 Note |
Because group is a standard SNMP term used industry-wide, we refer to role(s) as group(s) in this SNMP section. |
SNMP access rights are organized by groups. Each group in SNMP is similar to a role through the CLI. Each group is defined with three accesses: read access, write access, and notification access. Each access can be enabled or disabled within each group.
You can begin communicating with the agent once your user name is created, your roles are set up by your administrator, and you are added to the roles.
Creating and Modifying Users
You can create users or modify existing users using SNMP, DCNM-SAN, or the CLI.
-
SNMP—Create a user as a clone of an existing user in the usmUserTable on the switch. Once you have created the user, change the cloned secret key before activating the user. Refer to RFC 2574.
-
DCNM-SAN.
-
CLI—Create a user or modify an existing user using the snmp-server user command.
A network-operator and network-admin roles are available in a Cisco MDS 9000 Family switch. There is also a default-role if you want to use the GUI (DCNM-SAN and Device Manager). You can also use any role that is configured in the Common Roles database.
 Tip |
All updates to the CLI security database and the SNMP user database are synchronized. You can use the SNMP password to log into either DCNM-SAN or Device Manager. However, after you use the CLI password to log into DCNM-SAN or Device Manager, you must use the CLI password for all future logins. If a user exists in both the SNMP database and the CLI database before upgrading to Cisco MDS SAN-OS Release 2.0(1b), then the set of roles assigned to the user becomes the union of both sets of roles after the upgrade. |
AES Encryption-Based Privacy
The Advanced Encryption Standard (AES) is the symmetric cipher algorithm. The Cisco NX-OS software uses AES as one of the privacy protocols for SNMP message encryption and conforms with RFC 3826.
The priv option offers a choice of DES or 128-bit AES encryption for SNMP security encryption. The priv option along with the aes-128 token indicates that this privacy password is for generating a 128-bit AES key. The AES priv password can have a minimum of eight characters. If the passphrases are specified in clear text, you can specify a maximum of 64 characters. If you use the localized key, you can specify a maximum of 130 characters.
Note |
For an SNMPv3 operation using the external AAA server, user configurations in the external AAA server require AES to be the privacy protocol to use SNMP PDU encryption. |
Enabling SNMP Notifications
Notifications (traps and informs) are system alerts that the switch generates when certain events occur. You can enable or disable notifications. By default, no notification is defined or issued. If a notification name is not specified, all notifications are disabled or enabled.
With the SNMP central infra feature, you can add the traps that need to be enabled or disabled. The MIB CISCO-NOTIFICATION-CONTROL-MIB is supported to enable the use of a MIB browser to control notification generation.
LinkUp/LinkDown Notifications for Switches
You can configure which LinkUp/LinkDown notifications to enable on switches. You can enable the following types of LinkUp/LinkDown notifications:
-
Cisco—Only notifications (cieLinkUp, cieLinkDown) defined in CISCO-IF-EXTENSION-MIB.my are sent for an interface, if ifLinkUpDownTrapEnable (defined in IF-MIB) is enabled for that interface.
-
IETF—Only notifications (LinkUp, LinkDown) defined in IF-MIB are sent for an interface, if ifLinkUpDownTrapEnable (defined in IF-MIB) is enabled for that interface. Only the varbinds defined in the notification definition are sent with the notifications.
-
IEFT extended—Only notifications (LinkUp, LinkDown) defined in IF-MIB are sent for an interface, if ifLinkUpDownTrapEnable (defined in IF-MIB) is enabled for that interface. In addition to the varbinds defined in the notification definition, varbinds defined in the IF-MIB specific to the Cisco Systems implementation are sent. This is the default setting.
-
IEFT Cisco—Only notifications (LinkUp, LinkDown) defined in IF-MIB and notifications (cieLinkUp, cieLinkDown) defined in CISCO-IF-EXTENSION-MIB.my are sent for an interface, if ifLinkUpDownTrapEnable (defined in IF-MIB) is enabled for that interface. Only the varbinds defined in the notification definition are sent with the linkUp and linkDown notifications.
-
IEFT extended Cisco—Only notifications (LinkUp, LinkDown) defined in IF-MIB and notifications (cieLinkUp, cieLinkDown) defined in CISCO-IF-EXTENSION-MIB.my are sent for an interface, if ifLinkUpDownTrapEnable (defined in IF-MIB) is enabled for that interface. In addition to the varbinds defined in linkUp and linkDown notification definition, varbinds defined in the IF-MIB specific to the Cisco Systems implementation are sent with the LinkUp and LinkDown notifications.
Note |
For more information on the varbinds defined in the IF-MIB specific to the Cisco Systems implementation, refer to the Cisco MDS 9000 Family MIB Quick Reference. |
Scope of LinkUp and LinkDown Trap Settings
The LinkUp and LinkDown trap settings for the interfaces generate traps based on the following scope:
|
Switch-level Trap Setting |
Interface-level Trap Setting |
Trap Generated for Interface Links? |
|---|---|---|
|
Enabled (defualt) |
Enabled (default) |
Yes |
|
Enabled |
Disabled |
No |
|
Disabled |
Enabled |
No |
|
Disabled |
Disabled |
No |
Default Settings
The following table lists the default settings for all SNMP features in any switch.
|
Parameters |
Default |
|---|---|
|
User account |
No expiry (unless configured) |
|
Password |
None |
Configuring SNMP
SNMP is an application layer protocol that facilitates the exchange of management information between network devices.
Assigning SNMP Switch Contact and Location Information
You can assign the switch contact information, which is limited to 32 characters (without spaces), and the switch location.
To configure contact and location information, follow these steps:
Procedure
| Step 1 |
Expand Switches from the Physical Attributes pane. You see the switch settings in the Information pane. |
| Step 2 |
Fill in the Location and Contact fields for each switch. |
| Step 3 |
Click Apply Changes to save these changes or click Undo Changes to discard any unsaved changes. |
Configuring SNMP Users from the CLI
The passphrase specified in the snmp-server user command and the username command are synchronized.
Restrictions
- Avoid using the localizedkey option when configuring an SNMP user from the CLI. The localized keys are not portable across devices as they contain device engine ID information. If a configuration file is copied to the device, the passwords may not be set correctly if the configuration file was generated at a different device. Explicitly configure the desired passwords after copying the configuration into the device. Passwords specified with the localizedkey option are limited to 130 characters.
Note |
The snmp-server user command takes the engineID as an additional parameter. The engineID creates the notification target user (see the Configuring the Notification Target User). If the engineID is not specified, the local user is created. |
Enforcing SNMPv3 Message Encryption
By default the SNMP agent allows the securityLevel parameters of authNoPriv and authPriv for the SNMPv3 messages that use user-configured SNMPv3 message encryption with auth and priv keys.
Note |
Either to create a new SNMPv3 user or modify password of SNMPv3 user, the DCNM login user need to have enabled with DES/AES privacy password. Since the creating and modifying SNMP SET request need to be encrypted, the login user password needs to have the privacy password. |
To enforce the message encryption for a user, follow these steps:
Procedure
| Step 1 |
Expand Switches, expand Security, and then select Users and Roles from the Physical Attributes pane. |
| Step 2 |
Click the Users tab in the Information pane to see a list of users. |
| Step 3 |
Click Create Row. You see the Create Users dialog box. |
| Step 4 |
Enter the user name in the New User field. |
| Step 5 |
Select the role from the Role drop-down menu. You can enter a new role name in the field if you do not want to select one from the drop-down menu. If you do this, you must go back and configure this role appropriately. |
| Step 6 |
Enter a password for the user in Password field. |
| Step 7 |
Click the Privacy tab. |
| Step 8 |
Check the Enforce SNMP Privacy Encryption check box to encrypt management traffic. |
| Step 9 |
Click Create to create the new entry. |
Enforce the SNMPv3 message encryption globally
To enforce the SNMPv3 message encryption globally on all the users, follow these steps:
Procedure
| Step 1 |
Select a VSAN in the Logical Domains pane. This will not work if you select All VSANS. |
| Step 2 |
Expand Switches, expand Security, and then select Users and Roles in the Physical Attributes pane. Click the Global tab in the Information pane. |
| Step 3 |
Check the GlobalEnforcePriv check box. |
| Step 4 |
Click the Apply Changes icon to save these changes. |
Assigning SNMPv3 Users to Multiple Roles
The SNMP server user configuration is enhanced to accommodate multiple roles (groups) for SNMPv3 users. After the initial SNMPv3 user creation, you can map additional roles for the user.
-
Only users belonging to a network-admin role can assign roles to other users.
To add multiple roles to a new user, follow these steps:
Procedure
| Step 1 |
Expand Switches, expand Security, and then select Users and Roles from the Physical Attributes pane. |
| Step 2 |
Click the Users tab in the Information pane to see a list of users. |
| Step 3 |
Click Create Row. You see the Create Users dialog box. |
| Step 4 |
Choose roles using the check boxes. |
| Step 5 |
Choose an option for Digest and one for Encryption. |
| Step 6 |
(Optional) Provide an expiration date for the user and the file name of an SSH key. |
| Step 7 |
Click Create to create the new roles. |
Adding or Deleting Communities
You can configure read-only or read-write access for SNMPv1 and SNMPv2 users. Refer to RFC 2576.
To create an SNMPv1 or SNMPv2c community string, follow these steps:
Procedure
| Step 1 |
Expand Switches, expand Security, and then select Users and Roles from the Physical Attributes pane. |
||
| Step 2 |
Click the Communities tab in the Information pane. You see the existing communities. |
||
| Step 3 |
Click Create Row. You see the Create Community String dialog box. |
||
| Step 4 |
Check the Switch check boxes to specify one or more switches. |
||
| Step 5 |
Enter the community name in the Community field. |
||
| Step 6 |
Select the role from Role drop-down list.
|
||
| Step 7 |
Click Create to create the new entry. |
Deleting a Community String
To delete a community string, follow these steps:
Procedure
| Step 1 |
Expand Switches, expand Security, and then select Users and Roles from the Physical Attributes pane. |
| Step 2 |
Click the Communities tab in the Information pane. |
| Step 3 |
Click the name of the community you want to delete. |
| Step 4 |
Click Delete Row to delete this community. |
Configuring SNMP Trap and Inform Notifications
You can configure the Cisco MDS switch to send notifications to SNMP managers when particular events occur.
Note |
You must enable the RMON traps in the SNMP configuration. For more information, refer to Configuring SNMP. |
Note |
Use the SNMP-TARGET-MIB to obtain more information on the destinations to which notifications are to be sent either as traps or as informs. Refer to the Cisco MDS 9000 Family MIB Quick Reference. |
Configuring SNMPv2c Notifications
To configure SNMPv2c notifications, follow these steps:
Procedure
| Step 1 |
Expand Events and then select SNMP Traps in the Physical Attributes pane. You see the SNMP notification configuration in the Information pane. |
| Step 2 |
Click the Destinations tab to add or modify a receiver for SNMP notifications. |
| Step 3 |
Click Create Row to create a new notification destination. You see the Create Destinations dialog box. |
| Step 4 |
Check the switches for which you want to configure a new destination. |
| Step 5 |
Set the destination IP address and UDP port. |
| Step 6 |
Choose either the trap or inform radio button. |
| Step 7 |
(Optional) Set the timeout or retry count values. |
| Step 8 |
Click Create to add this destination to the selected switches. |
| Step 9 |
(Optional) Click the Other tab to enable specific notification types per switch. |
| Step 10 |
Click the Apply changes icon to create the entry. |
What to do next
Note |
Switches can forward events (SNMP traps and informs) up to 10 destinations. |
Configuring SNMPv3 Notifications
To configure SNMPv3 notifications, follow these steps:
Procedure
| Step 1 |
Select v3 from the Security drop-down list in the Create Destinations dialog box. |
||
| Step 2 |
(Optional) Set the inform time out and retry values. |
||
| Step 3 |
Click Create to add this destination to the selected switches.
|
Enabling SNMP Notifications
This lists the DCNM-SAN procedures that enable the notifications for Cisco NX-OS MIBs. Expand Events > SNMP Traps to see the check boxes listed in this table.
Note |
Choosing Events > SNMP Traps enables both traps and informs, depending on how you configured SNMP notifications. See the notifications displayed with the Configuring SNMPv3 Notifications. |
|
MIB |
DCNM-SAN Check Boxes |
|---|---|
|
CISCO-ENTITY-FRU-CONTROL-MIB |
Click the Other tab and check FRU Changes. |
|
CISCO-FCC-MIB |
Click the Other tab and check FCC. |
|
CISCO-DM-MIB |
Click the FC tab and check Domain Mgr RCF. |
|
CISCO-NS-MIB |
Click the FC tab and check Name Server. |
|
CISCO-FCS-MIB |
Click the Other tab and check FCS Rejects. |
|
CISCO-FDMI-MIB |
Click the Other tab and check FDMI. |
|
CISCO-FSPF-MIB |
Click the FC tab and check FSPF Neighbor Change. |
|
CISCO-LICENSE-MGR-MIB |
Click the Other tab and check License Manager. |
|
CISCO-IPSEC-SIGNALLING-MIB |
Click the Other tab and check IPSEC. |
|
CISCO-PSM-MIB |
Click the Other tab and check Port Security. |
|
CISCO-RSCN-MIB |
Click the FC tab and check RSCN ILS, and RCSN ELS. |
|
SNMPv2-MIB |
Click the Other tab and check SNMP AuthFailure. |
|
VRRP-MIB, CISCO-IETF-VRRP-MIB |
Click the Other tab and check VRRP. |
|
CISCO-ZS-MIB |
Click the FC tab and check Zone Rejects, Zone Merge Failures, Zone Merge Successes, Zone Default Policy Change, and Zone Unsuppd Mode. |
The following notifications are enabled by default:
- entity fru
- license
- link ietf-extended
All other notifications are disabled by default.
You can enable or disable the supported traps at the following levels:
- Switch level—You can use snmp-server enable traps command to enable all the traps in the supported MIBs at the switch level.
- Feature level—You can use snmp-server enable traps command with the feature name to enable traps at the feature level.
switch =>snmp-server enable traps callhome ? event-notify Callhome External Event Notification smtp-send-fail SMTP Message Send Fail notification - Individual traps - You can use snmp-server enable traps command with the feature name to enable traps at the individual level.
switch =>snmp-server enable traps callhome event-notify ?
Note |
The snmp-server enable traps CLI command enables both traps and informs, depending on how you configured SNMP. See the notifications displayed with the snmp-server host CLI command. |
-
Expand Events and then select SNMP Traps in the Physical Attributes pane.
You see the SNMP notification configuration in the Information pane.
-
Click the FC tab to enable Fibre Channel related notifications.
-
Check each notification check box that you want to enable.
-
Click the Other tab to enable other notifications.
-
Check each notification check box that you want to enable.
-
Click the Control tab to enable notification applicable variables.
-
From NX-OS Release 4.2(1), the Control tab is available for the notification control feature. This feature allows you to enable or disable all the notification-applicable variables via SNMP.
The Control tab is available for NX-OS Release 4.2(1) and later only.
-
Check each notification check box that you want to enable.
-
Click the Apply changes icon to create the entry.
Note |
In Device Manager, the no snmp-server enable traps link command disables generation of link traps in the switch, however the individual interfaces may have the link trap enabled. |
To enable individual notifications, follow these steps:
-
Expand Admin > Events and then select Filters.
You see the event filters window showing a table populated by the switch
-
Click the Control tab to enable notification applicable variables.
From NX-OS Release 4.2(1), the Control tab is available for the notification control feature. This feature allows you to enable or disable all the notification-applicable variables via SNMP.
Note
The Control tab is available for NX-OS Release 4.2(1) and later only.
-
Check each notification check box that you want to enable.
-
Click the Apply changes icon to create the entry.
Enable individual notifications
To enable individual notifications, follow these steps:
Procedure
| Step 1 |
Expand Events and then select SNMP Traps in the Physical Attributes pane. You see the SNMP notification configuration in the Information pane. |
| Step 2 |
Click the FC tab to enable Fibre Channel related notifications. |
| Step 3 |
Check each notification check box that you want to enable. |
| Step 4 |
Click the Other tab to enable other notifications. |
| Step 5 |
Check each notification check box that you want to enable. |
| Step 6 |
Click the Control tab to enable notification applicable variables. |
| Step 7 |
From NX-OS Release 4.2(1), the Control tab is available for the notification control feature. This feature allows you to enable or disable all the notification-applicable variables via SNMP. The Control tab is available for NX-OS Release 4.2(1) and later only. |
| Step 8 |
Check each notification check box that you want to enable. |
| Step 9 |
Click the Apply changes icon to create the entry. |
Enable individual notifications using Device Manager
In Device Manager, the no snmp-server enable traps link command disables generation of link traps in the switch, however the individual interfaces may have the link trap enabled.
To enable individual notifications using Device Manager, follow these steps:
Procedure
| Step 1 |
Expand Admin > Events and then select Filters. You see the event filters window showing a table populated by the switch. |
||
| Step 2 |
Click the Control tab to enable notification applicable variables. From NX-OS Release 4.2(1), the Control tab is available for the notification control feature. This feature allows you to enable or disable all the notification-applicable variables via SNMP.
|
||
| Step 3 |
Check each notification check box that you want to enable. |
||
| Step 4 |
Click the Apply changes icon to create the entry. |
Configuring the Notification Target User
You must configure a notification target user on the switch for sending SNMPv3 inform notifications to the SNMP manager.
For authenticating and decrypting the received INFORM PDU, the SNMP manager should have the same user credentials in its local configuration data store of users.
To configure the notification target user, refer to the Cisco MDS 9000 Family NX-OS System Management Configuration Guide.
Configuring LinkUp/LinkDown Notifications for Switches
To configure the LinkUp/LinkDown notification for a switch using NX-OS Release 4.1(x) and earlier, follow these steps:
Note |
If both IETF and IETF extended are enabled, the show snmp traps command displays both as enabled. However, as a trap, you will receive only one trap with IETF extended payload. |
Configuring Up/Down SNMP Link-State Traps for Interfaces
By default, SNMP link-state traps are enabled for all interfaces. Whenever a link toggles its state from Up to Down or vice versa, an SNMP trap is generated.
In some instances, you may find that you have numerous switches with hundreds of interfaces, many of which do not require monitoring of the link state. In such cases, you may elect to disable link-state traps.
Configuring Entity (FRU) Traps
Note |
All these traps have to do with legacy FRU traps. |
Configuring Event Security
SNMP events can be secured against interception or eavesdropping in the same way that SNMP messages are secured. DCNM-SAN or Device Manager allow you to configure the message processing model, the security model, and the security level for the SNMP events that the switch generates.
Note |
This is an advanced function that should only be used by administrators having experience with SNMPv3. |
To configure SNMP event security, follow these steps:
Procedure
| Step 1 |
Expand Events and then select SNMP Traps. |
| Step 2 |
Click the Security tab in the Information pane. You see the security information for SNMP notifications. |
| Step 3 |
Set the message protocol model (MPModel), security model, security name, and security level. |
| Step 4 |
Click the Apply Changes icon to save and apply your changes. |
Viewing the SNMP Events Log
- You must set up the MDS syslog manager before you can view the event logs.
- Changing these values from different DCNM-SAN workstations at the same time may cause unpredictable results.
Procedure
|
To view the SNMP events log from DCNM-SAN, click the Events tab. You see the Events listed with a log of events for a single switch in the following image. 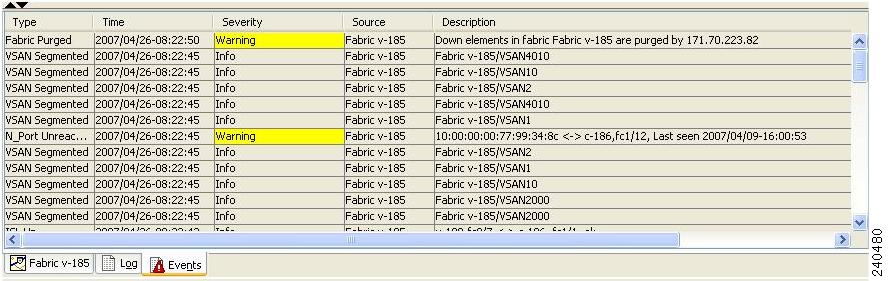 |
Field Descriptions for SNMP
This section describes the field descriptions for SNMP.
IP Statistics SNMP
|
Field |
Description |
|---|---|
|
BadVersions |
The total number of SNMP messages which were delivered to the SNMP entity and were for an unsupported SNMP version. |
|
BadCommunityNames |
The total number of SNMP messages delivered to the SNMP entity which used a SNMP community name not known to said entity. |
|
BadCommunityUses |
The total number of SNMP messages delivered to the SNMP entity which represented an SNMP operation which was not allowed by the SNMP community named in the message. |
|
ASNParseErrs |
The total number of ASN.1 or BER errors encountered by the SNMP entity when decoding received SNMP messages. |
|
TooBigs |
The total number of SNMP PDUs which were delivered to the SNMP protocol entity and for which the value of the error-status field is tooBig. |
|
SilentDrops |
The total number of GetRequest-PDUs, GetNextRequest-PDUs, GetBulkRequest-PDUs, SetRequest-PDUs, and InformRequest-PDUs delivered to the SNMP entity which were silently dropped because the size of a reply containing an alternate Response-PDU with an empty variable-bindings field was greater than either a local constraint or the maximum message size associated with the originator of the request. |
|
ProxyDrops |
The total number of GetRequest-PDUs, GetNextRequest-PDUs, GetBulkRequest-PDUs, SetRequest-PDUs, and InformRequest-PDUs delivered to the SNMP entity which were silently dropped because the transmission of the (possibly translated) message to a proxy target failed in a manner (other than a time-out) such that no Response-PDU could be returned. |
|
NoSuchNames |
The total number of SNMP PDUs which were delivered to the SNMP protocol entity and for which the value of the error-status field is noSuchName. |
|
BadValues |
The total number of SNMP PDUs which were delivered to the SNMP protocol entity and for which the value of the error-status field is badValue. |
|
ReadOnlys |
The total number valid SNMP PDUs which were delivered to the SNMP protocol entity and for which the value of the error-status field is readOnly. It should be noted that it is a protocol error to generate an SNMP PDU which contains the value readOnly in the error-status field, as such this is provided as a means of detecting incorrect implementations of the SNMP. |
|
GenErrs |
The total number of SNMP PDUs which were delivered to the SNMP protocol entity and for which the value of the error-status field is genErr. |
|
Pkts |
The total number of messages delivered to the SNMP entity from the transport service. |
|
GetRequests |
The total number of SNMP Get-Request PDUs which have been accepted and processed by the SNMP protocol entity. |
|
GetNexts |
The total number of SNMP Get-Next PDUs which have been accepted and processed by the SNMP protocol entity. |
|
SetRequests |
The total number of SNMP Set-Request PDUs which have been accepted and processed by the SNMP protocol entity. |
|
OutTraps |
The total number of SNMP Trap PDUs which have been generated by the SNMP protocol entity. |
|
OutGetResponses |
The total number of SNMP Get-Response PDUs which have been generated by the SNMP protocol entity. |
|
OutPkts |
The total number of SNMP Messages which were passed from the SNMP protocol entity to the transport service. |
|
TotalReqVars |
The total number of MIB objects which have been retrieved successfully by the SNMP protocol entity as the result of receiving valid SNMP Get-Request and Get-Next PDUs. |
|
TotalSetVars |
The total number of MIB objects which have been altered successfully by the SNMP protocol entity as the result of receiving valid SNMP Set-Request PDUs. |
SNMP Security Users
|
Field |
Description |
|---|---|
|
Role |
The user in Security Model independent format. |
|
Password |
Password of the common user. For SNMP, this password is used for both authentication and privacy. For CLI and XML, it is used for authentication only. |
|
Digest |
The type of digest authentication protocol which is used. |
|
Encryption |
The type of encryption authentication protocol which is used. |
|
ExpiryDate |
The date on which this user will expire. |
|
SSH Key File Configured |
Specifies whether the user is configured with SSH public key. |
|
SSH Key File |
The name of the file storing the SSH public key. The SSH public key is used to authenticate the SSH session for this user. Note that this applies to only CLI user. The format can be one of the following:
|
|
Creation Type |
The type of the credential store of the user. When a row is created in this table by a user, the user entry is created in a credential store local to the device. In case of remote authentication mechanism like AAA Server based authentication, credentials are stored in other (remote) system/device. |
|
Expiry Date |
The date on which this user will expire. |
SNMP Security Communities
|
Field |
Description |
|---|---|
|
Community |
The community string. |
|
Role |
The Security Model name. |
For more information, refer Adding or Deleting Communities and Deleting a Community String.
Security Users Global
|
Field |
Description |
|---|---|
|
Enforce SNMP Privacy Encryption |
Specifies whether the SNMP agent enforces the use of encryption for SNMPv3 messages globally on all the users in the system. |
|
Cache Timeout |
This specifies maximum timeout value for caching the user credentials in the local system. |
Note |
The privacy password and authentication password are required for an administrator to create a new user or delete an existing user in Device Manager. However, if the administrator does not provide these credentials at the time of creating a new user, Device Manager uses the authentication password of the administrator as the privacy password. If the privacy protocol defined for the user is not DES (default), the SNMP Agent in the MDS will not be able to decrypt the packet and the SNMP Agent times out. If the privacy protocol defined for the user is not DES, the user needs to provide both the privacy password and the protocol when logging in. |
 Feedback