
-
Dial Technologies Configuration Guide, Cisco IOS Release 15.2S
- Part 1: Dial Interfaces, Controllers, and Lines
-
Part 2 - Modem Configuration and Management
-
Overview of Modem Interfaces
-
Configuring and Managing Integrated Modems
-
1- and 2-Port V.90 Modem WICs for Cisco 2600 and Cisco 3600 Series Multiservice Platforms
-
Call Tracker show Commands Extensions
-
Cisco NM-8AM-V2 and NM-16AM-V2 Analog Modem Network Modules with V.92
-
MICA and NextPort Modem Tech-Support Command Additions
-
PIAFS Wireless Data Protocol Version 2.1 for Cisco MICA Modems
-
V.92 and V.44 Support for Digital Modems
-
V.92 Modem on Hold for Cisco AS5300 and Cisco AS5800 Universal Access Servers
-
V.92 Modem on Hold for Cisco AS5350, Cisco AS5400, and Cisco AS5850 Universal Gateways and Cisco AS5800 Universal Access Servers
-
V.92 Quick Connect for Cisco AS5300 and Cisco AS5800 Universal Access Servers
-
V.92 Quick Connect for Cisco AS5350, Cisco AS5400, and Cisco AS5850 Universal Gateways and Cisco AS5800 Universal Access Servers
-
V.92 Reporting Using RADIUS Attribute v.92-info
-
Configuring and Managing Cisco Access Servers and Dial Shelves
-
Configuring and Managing External Modems
-
Modem Signal and Line States
-
Creating and Using Modem Chat Scripts
-
Cisco Modem User Interface
-
Modem Script and System Script Support in Large-Scale Dial-Out
-
- Part 3 - ISDN Configuration
- Part 4 - Signaling Configuration
-
Part 5 - Dial-on-Demand Routing Configuration
-
Preparing to Configure DDR
-
Configuring Legacy DDR Spokes
-
Configuring Legacy DDR Hubs
-
Configuring Peer-to-Peer DDR with Dialer Profiles
-
Dialer Map VRF-Aware for an MPLS VPN
-
Dialer Persistent
-
PPPoE Client DDR Idle-Timer
-
Redial Enhancements
-
Rotating Through Dial Strings
-
Configuring Dialer CEF
-
CEF Support for Dialer Profiles on Cisco 7500 Routers
-
Configuring Snapshot Routing
-
- Part 6: Dial-Backup Configuration
- Part 7: Dial-Related Addressing Services
- Part 8: Virtual Templates and Profiles
-
Part 9: PPP Configuration
-
Configuring Asynchronous SLIP and PPP
-
Optimized PPP Negotiation
-
Customer Profile Idle Timer Enhancements for Interesting Traffic
-
Multiclass Multilink PPP
-
Configuring Media-Independent PPP and Multilink PPP
-
PPP/MLP MRRU Negotiation Configuration
-
Troubleshooting Enhancements for Multilink PPP over ATM Link Fragmentation and Interleaving
-
Multichassis Multilink PPP
-
- Part 10: Callback and Bandwidth Allocation Configuration
- Part 11: Dial Access Specialized Features
- Appendix
Table Of Contents
How to Configure Cisco Easy IP
Defining NAT for the LAN Interface
Defining NAT for the Dialer Interface
Configuring the Dialer Interface
Configuration Examples for Cisco Easy IP
Configuring Cisco Easy IP
This chapter describes how to configure the Cisco Easy IP feature. It includes the following main sections:
•
How to Configure Cisco Easy IP
•
Configuration Examples for Cisco Easy IP
To identify the hardware platform or software image information associated with a feature, use the Feature Navigator on Cisco.com to search for information about the feature or refer to the software release notes for a specific release. For more information, see the "Identifying Supported Platforms" section in the "Using Cisco IOS Software" chapter.
For a complete description of the Cisco Easy IP commands in this chapter, refer to the Cisco IOS Dial Technologies Command Reference. To locate documentation of other commands that appear in this chapter, use the command reference master index or search online.
Cisco Easy IP Overview
Cisco Easy IP enables transparent and dynamic IP address allocation for hosts in remote environments using the following functionality:
•
Cisco Dynamic Host Configuration Protocol (DHCP) server
•
Port Address Translation (PAT), a subset of Network Address Translation (NAT)
•
Dynamic PPP/IP Control Protocol (PPP/IPCP) WAN interface IP address negotiation
With the Cisco IOS Easy IP, a Cisco router automatically assigns local IP addresses to remote hosts (such as small office, home office or SOHO routers) using DHCP with the Cisco IOS DHCP server, automatically negotiates its own registered IP address from a central server via PPP/IPCP, and uses PAT functionality to enable all SOHO hosts to access the Internet using a single registered IP address. Because Cisco IOS Easy IP uses existing port-level multiplexed NAT functionality within Cisco IOS software, IP addresses on the remote LAN are invisible to the Internet, making the remote LAN more secure.
Cisco Easy IP provides the following benefits:
•
Minimizes Internet access costs for remote offices
•
Minimizes configuration requirements on remote access routers
•
Enables transparent and dynamic IP address allocation for hosts in remote environments
•
Improves network security capabilities at each remote site
•
Conserves registered IP addresses
•
Maximizes IP address manageability
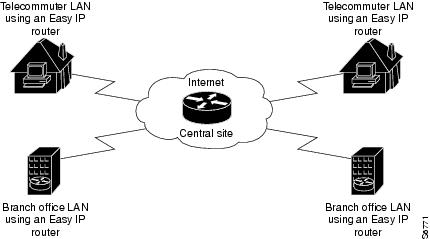
Figure 1 shows a typical scenario for using the Cisco Easy IP feature.
Figure 1 Telecommuter and Branch Office LANs Using Cisco Easy IP
Steps 1 through 4 show how Cisco Easy IP works:
Step 1
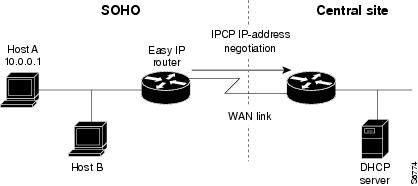
When a SOHO host generates "interesting" traffic (as defined by Access Control Lists) for dialup (first time only), the Easy IP router requests a single registered IP address from the access server at the central site via PPP/IPCP. (See Figure 2.)
Figure 2 Cisco Easy IP Router Requests a Dynamic Global IP Address
Step 2
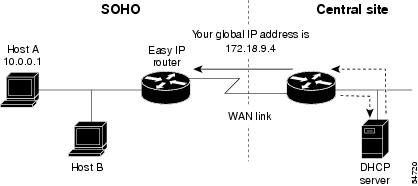
The central site router replies with a dynamic global address from a local DHCP IP address pool. (See Figure 3.)
Figure 3 Dynamic Global IP Address Delivered to the Cisco Easy IP Router
Step 3
The Cisco Easy IP router uses port-level NAT functionality to automatically create a translation that associates the registered IP address of the WAN interface with the private IP address of the client. (See Figure 4.)
Figure 4 Port-Level NAT Functionality Used for IP Address Translation
Step 4
The remote hosts contain multiple static IP addresses while the Cisco Easy IP router obtains a single registered IP address using PPP/IPCP. The Cisco Easy IP router then creates port-level multiplexed NAT translations between these addresses so that each remote host address (inside private address) is translated to a single external address assigned to the Cisco Easy IP router. This many-to-one address translation is also called port-level multiplexing or PAT. Note that the NAT port-level multiplexing function can be used to conserve global addresses by allowing the remote routers to use one global address for many local addresses. (See Figure 5.)
Figure 5 Multiple Private Internal IP Addresses Bound to a Single Global IP Address
How to Configure Cisco Easy IP
Before using Cisco Easy IP, perform the following tasks:
•
Configure the ISDN switch type and service provider identifier (SPID), if using ISDN.
•
Configure the static route from LAN to WAN interface.
•
Configure the Cisco IOS DHCP server.
For information about configuring ISDN switch types, see the chapter "Setting Up ISDN Basic Rate Service" earlier in this publication. For information about configuring static routes, refer to the chapter "Configuring IP Services" in the Cisco IOS IP Configuration Guide.
The Cisco IOS DHCP server supports both DHCP and BOOTP clients and supports finite and infinite address lease periods. DHCP address binding information is stored on a remote host via remote copy protocol (RCP), FTP, or TFTP. Refer to the Cisco IOS IP Configuration Guide for DHCP configuration instructions.
In its most simple configuration, a Cisco Easy IP router or access server will have a single LAN interface and a single WAN interface. Based on this model, to use Cisco Easy IP you must perform the tasks in the following sections:
•
Defining the NAT Pool (Required)
•
Configuring the LAN Interface (Required)
•
Defining NAT for the LAN Interface (Required)
•
Configuring the WAN Interface (Required)
•
Enabling PPP/IPCP Negotiation (Required)
•
Defining NAT for the Dialer Interface (Required)
•
Configuring the Dialer Interface (Required)
For configuration examples, see the section "Configuration Examples for Cisco Easy IP" at the end of this chapter.
Defining the NAT Pool
The first step in enabling Cisco Easy IP is to create a pool of internal IP addresses to be translated. To define the NAT pool, use the following commands in global configuration mode:
For information about creating access lists, refer to the chapter "Configuring IP Services" in the Cisco IOS IP Configuration Guide.
Configuring the LAN Interface
To configure the LAN interface, use the following commands beginning in global configuration mode:
For information about assigning IP addresses and subnet masks to network interfaces, refer to the chapter "Configuring IP Services" in the Cisco IOS IP Configuration Guide.
Defining NAT for the LAN Interface
To ensure that the LAN interface is connected to the inside network (and therefore subject to NAT), use the following command in interface configuration mode:
Configuring the WAN Interface
To configure the WAN interface, use the following commands beginning in global configuration mode:
Enabling PPP/IPCP Negotiation
To enable PPP/IPCP negotiation on the dialer interface, use the following commands beginning in global configuration mode:
Defining NAT for the Dialer Interface
To define that the dialer interface is connected to the outside network, use the following commands beginning in global configuration mode:
Configuring the Dialer Interface
To configure the dialer interface information, use the following commands beginning in global configuration mode:
Step 1
Router(config)# interface dialer-name
Selects the dialer interface and begins interface configuration mode.
Step 2
Router(config-if)# dialer wait-for-carrier-time seconds
Specifies for a dialer interface the length of time the interface waits for a carrier before timing out.
Step 3
Router(config-if)# dialer hold-queue packets
Creates a dialer hold queue and specifies the number of packets to be held in it.
Step 4
Router(config-if)# dialer remote-name username
Specifies the remote router Challenge Handshake Authentication Protocol (CHAP) authentication name.
Step 5
Router(config-if)# dialer idle-timeout seconds
Specifies the amount of idle time that can pass before calls to the central access server are disconnected. See the next section "Timeout Considerations," for more details on this setting.
Step 6
Router(config-if)# dialer string dialer-string
Specifies the telephone number required to reach the central access server.
Step 7
Router(config-if)# dialer pool number
Specifies the dialing pool to use.
Step 8
Router(config-if)# dialer-group group-number
Assigns the dialer interface to a dialer group.
Timeout Considerations
Dynamic NAT translations time out automatically after a predefined default period. Although configurable, with the port-level NAT functionality in Cisco Easy IP, Domain Name System (DNS) User Datagram Protocol (UDP) translations time out after 5 minutes, while DNS translations time out after 1 minute by default. TCP translations time out after 24 hours by default, unless a TCP Reset (RST) or TCP Finish (FIN) is seen in the TCP stream, in which case the translation times out after 1 minute.
If the Cisco IOS Easy IP router exceeds the dialer idle-timeout period, it is expected that all active TCP sessions were previously closed via an RST or FIN. NAT times out all TCP translations before the Cisco Easy IP router exceeds the dialer idle-timeout period. The router then renegotiates another registered IP address the next time the WAN link is brought up, thereby creating new dynamic NAT translations that bind the IP addresses of the LAN host to the newly negotiated IP address.
Configuration Examples for Cisco Easy IP
The following example shows how to configure BRI interface 0 (shown as interface bri0) to obtain its IP address via PPP/IPCP address negotiation:
! The following command defines the NAT pool.ip nat inside source list 101 interface dialer1 overload!! The following commands define the ISDN switch type.isdn switch type vn3isdn tei-negotiation first-call!! The following commands define the LAN address and subnet mask.interface ethernet0ip address 10.0.0.4 255.0.0.0! The following command defines ethernet0 as internal for NAT.ip nat inside!! The following commands binds the physical interface to the dialer1 interface.interface bri0no ip addressencapsulation pppdialer pool-member 1!interface dialer1!! The following command enables PPP/IPCP negotiation for this interface.ip address negotiatedencapsulation ppp!! The following command defines interface dialer1 as external for NAT.ip nat outsidedialer remote-name dallasdialer idle-timeout 180!! The following command defines the dialer string for the central access server.dialer string 4159991234dialer pool 1dialer-group 1!! The following commands define the static route to the WAN interface.ip route 0.0.0.0 0.0.0.0 dialer1access-list 101 permit ip 10.0.0.0 0.255.255.255 anydialer-list 1 protocol ip list 101The following example shows how to configure an asynchronous interface (interface async1) to obtain its IP address via PPP/IPCP address negotiation:
! This command defines the NAT pool.ip nat inside source list 101 interface dialer 1 overload!! The following commands define the LAN IP address and subnet mask.interface ethernet0ip address 10.0.0.4 255.0.0.0!! The following command defines ethernet0 as internal for NAT.ip nat inside!! The following commands bind the physical dialer1 interface.interface async1no ip addressencapsulation pppasync mode dedicateddialer pool-member 1!interface dialer1!! The following command enables PPP/IPCP negotiation for this interface.ip address negotiatedencapsulation ppp!! The following command defines interface dialer1 as external for NAT.ip nat outsidedialer wait-for-carrier-time 30dialer hold-queue 10dialer remote-name dallasdialer idle-timeout 180!! The following command defines the dialer string for the central access server.dialer string 4159991234dialer pool 1dialer-group 1!! The following commands define the static route to the WAN interface.ip route 0.0.0.0 0.0.0.0 dialer1access-list 101 permit ip 10.0.0.0 0.255.255.255 anydialer-list 1 protocol ip list 101Cisco and the Cisco Logo are trademarks of Cisco Systems, Inc. and/or its affiliates in the U.S. and other countries. A listing of Cisco's trademarks can be found at www.cisco.com/go/trademarks. Third party trademarks mentioned are the property of their respective owners. The use of the word partner does not imply a partnership relationship between Cisco and any other company. (1005R)
.Any Internet Protocol (IP) addresses and phone numbers used in this document are not intended to be actual addresses and phone numbers. Any examples, command display output, network topology diagrams, and other figures included in the document are shown for illustrative purposes only. Any use of actual IP addresses or phone numbers in illustrative content is unintentional and coincidental.
© 2007-2009 Cisco Systems, Inc. All rights reserved.

 Feedback


