Loopback Interfaces

This chapter tells how to configure loopback interfaces.

About Loopback Interfaces

A loopback interface is a software-only interface that emulates a physical interface. This interface is reachable on IPv4 and IPv6 through multiple physical interfaces. The loopback interface helps to overcome path failures; it is accessible from any physical interface, so if one goes down, you can access the loopback interface from another.

Loopback interfaces can be used for:

  • AAA

  • BGP

  • DNS

  • HTTP

  • ICMP

  • SNMP

  • SSH

  • Static and dynamic VTI tunnels

  • Syslog

  • Telnet

The ASA can distribute the loopback address using dynamic routing protocols, or you can configure a static route on the peer device to reach the loopback IP address through one of the ASA's physical interfaces. You cannot configure a static route on the ASA that specifies the loopback interface.

Guidelines for Loopback Interfaces

Failover and Clustering

  • No clustering support.

Context Mode

  • VTI is supported in single context mode only. Other loopback uses are supported in multiple context mode.

Additional Guidelines and Limitations

  • TCP sequence randomization is always disabled for traffic from the physical interface to the loopback interface.

Configure a Loopback Interface

Add a loopback interface.

Procedure


Step 1

Choose Configuration > Device Setup > Interface Settings > Interfaces.

Step 2

Choose Add > Loopback Interface.

The Add Loopback Interface dialog box appears.

Step 3

In the Loopback ID field, enter an integer between 0 and 10413.

Step 4

If the interface is not already enabled, check the Enable Interface check box.

The interface is enabled by default.

Step 5

(Optional) Enter a description in the Description field.

Step 6

Configure the name and IP address. See Routed and Transparent Mode Interfaces.

Step 7

Click OK.

You return to the Interfaces pane.

Step 8

Configure rate-limiting for loopback traffic. See Rate-Limit Traffic to the Loopback Interface.


Rate-Limit Traffic to the Loopback Interface

You should rate-limit traffic going to the loopback interface IP address to prevent excessive load on the system. You can add a connection limit rule to the global service policy. This procedure shows adding to the default global policy (global_policy).

Procedure


Step 1

Choose Configuration > Firewall > Service Policy, and click Add > Add Service Policy Rule.

Step 2

Choose the Global policy and click Next.

Figure 1. Service Policy
Service Policy

Step 3

On the Traffic Classification Criteria page, set the following values and click Next.

Figure 2. Traffic Classification Criteria
Traffic Classification Criteria
  • Create a new traffic class—Name the loopback traffic class.

  • Source and Destination IP Address (uses ACL)

Step 4

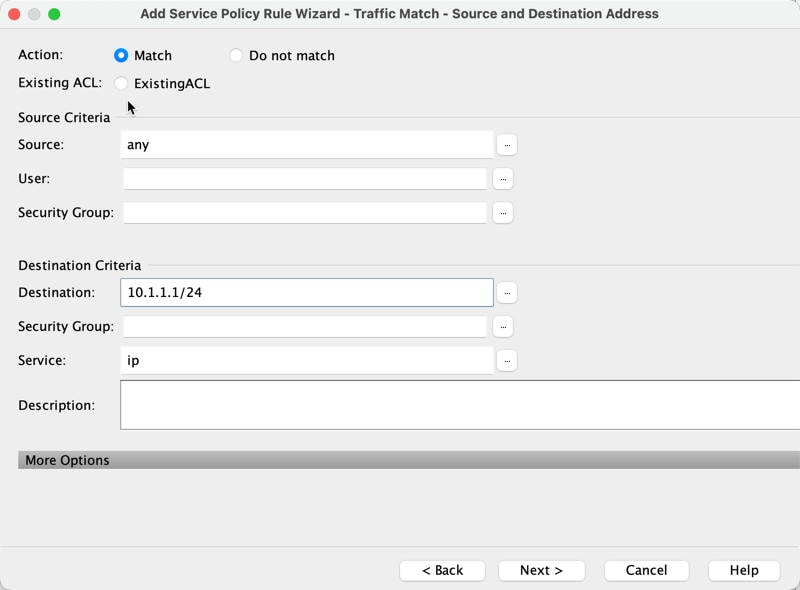
On the Traffic Match - Source and Destination Address page, define the access control list to specify all IP traffic going to the loopback IP address, and click Next.

Figure 3. Traffic Match - Source and Destination Address
Traffic Match - Source and Destination Address
  • Action: Match

  • Source—any. You can also narrow this access list by specifiying the source IP addresses instead of any.

  • Destination—The loopback interface IP addresses

  • Service—ip

Step 5

On the Rule Actions page, click the Connection Settings tab, and in the Maximum Connections area, set the following values.

Figure 4. Rule Actions
Rule Actions
  • Maximum TCP, UDP and SCTP Connections—Set the maximum connections to the expected number of connections for the loopback interface, and the embryonic connections to a lower number. For example, you can set it to 5/2, or 10/5, or 1024/512, depending on the expected loopback interface sessions you need.

  • Embryonic Connections—Setting the embryonic connection limit enables TCP Intercept, which protects the system from a DoS attack perpetrated by flooding an interface with TCP SYN packets.

Step 6

Click Finish.

The rule is added to the global policy.

Figure 5. Service Policy Rules Table
Service Policy Rules Table

Step 7

Click Apply.


History for Loopback Interfaces

Table 1. History for Loopback Interfaces

Feature Name

Version

Feature Information

Loopback interface support for DNS, HTTP, ICMP, and IPsec Flow Offload

9.20(1)

You can now add a loopback interface and use it for:

  • DNS

  • HTTP

  • ICMP

  • IPsec Flow Offload

Loopback interface support for VTI

9.19(1)

A loopback interface provides redundancy of static and dynamic VTI VPN tunnels. You can now set a loopback interface as the source interface for a VTI. The VTI interface can also inherit the IP address of a loopback interface instead of a statically configured IP address. The loopback interface helps to overcome path failures. If an interface goes down, you can access all interfaces through the IP address of the loopback interface.

New/Modified screens: Configuration > Device Setup > Interface Settings > Interfaces > Add VTI Interface > Advanced

ASDM support for loopback interfaces

9.19(1)

ASDM now supports loopback interfaces.

New/Modified screens: Configuration > Device Setup > Interface Settings > Interfaces > Add Loopback Interface

Support for loopback interface

9.18(2)

You can now add a loopback interface and use it for:

  • BGP

  • AAA

  • SNMP

  • Syslog

  • SSH

  • Telnet

New/Modified commands: interface loopback , logging host , neighbor update-source , snmp-server host , ssh , telnet

No ASDM support.