Access Control Rules

The following topics describe how to configure access control rules:

Introduction to Access Control Rules

Within an access control policy, access control rules provide a granular method of handling network traffic across multiple managed devices.


Note


Security Intelligence filtering, decryption, user identification, and some decoding and preprocessing occur before access control rules evaluate network traffic.


The system matches traffic to access control rules in the order you specify. In most cases, the system handles network traffic according to the first access control rule where all the rule’s conditions match the traffic.

Each rule also has an action, which determines whether you monitor, trust, block, or allow matching traffic. When you allow traffic, you can specify that the system first inspect it with intrusion or file policies to block any exploits, malware, or prohibited files before they reach your assets or exit your network.

The following scenario summarizes the ways that traffic can be evaluated by access control rules in an inline, intrusion prevention deployment.
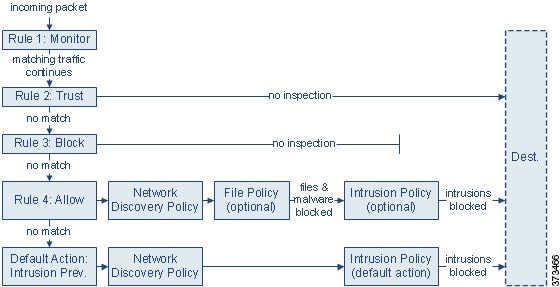
Diagram that summarizes the ways traffic can be evaluated by access control rules

In this scenario, traffic is evaluated as follows:

  • Rule 1: Monitor evaluates traffic first. Monitor rules track and log network traffic. The system continues to match traffic against additional rules to determine whether to permit or deny it. (However, see an important exception and caveat at Access Control Rule Monitor Action.)

  • Rule 2: Trust evaluates traffic next. Matching traffic is allowed to pass to its destination without further inspection, though it is still subject to identity requirements and rate limiting. Traffic that does not match continues to the next rule.

  • Rule 3: Block evaluates traffic third. Matching traffic is blocked without further inspection. Traffic that does not match continues to the final rule.

  • Rule 4: Allow is the final rule. For this rule, matching traffic is allowed; however, prohibited files, malware, intrusions, and exploits within that traffic are detected and blocked. Remaining non-prohibited, non-malicious traffic is allowed to its destination, though it is still subject to identity requirements and rate limiting. You can configure Allow rules that perform only file inspection, or only intrusion inspection, or neither.

  • Default Action handles all traffic that does not match any of the rules. In this scenario, the default action performs intrusion prevention before allowing non-malicious traffic to pass. In a different deployment, you might have a default action that trusts or blocks all traffic, without further inspection. (You cannot perform file or malware inspection on traffic handled by the default action.)

Traffic you allow, whether with an access control rule or the default action, is automatically eligible for inspection for host, application, and user data by the network discovery policy. You do not explicitly enable discovery, although you can enhance or disable it. However, allowing traffic does not automatically guarantee discovery data collection. The system performs discovery only for connections involving IP addresses that are explicitly monitored by your network discovery policy; additionally, application discovery is limited for encrypted sessions.

Note that access control rules handle encrypted traffic when your decryption configuration allows it to pass, or if you do not configure decryption. However, some access control rule conditions require unencrypted traffic, so encrypted traffic may match fewer rules. Also, by default, the system disables intrusion and file inspection of encrypted payloads. This helps reduce false positives and improve performance when an encrypted connection matches an access control rule that has intrusion and file inspection configured.

Access Control Rule Management

The rules table of the access control policy editor allows you to add, edit, categorize, search, filter, move, enable, disable, delete, and otherwise manage access control rules in the current policy.

Properly creating and ordering access control rules is a complex task, but one that is essential to building an effective deployment. If you do not plan your policy carefully, rules can preempt other rules, require additional licenses, or contain invalid configurations. To help ensure that the system handles traffic as you expect, the access control policy interface has a robust warning and error feedback system for rules.

Use the search bar to filter the list of access control policy rules. Matched rules are highlighted.

For each access control rule, the policy editor displays its name, a summary of its conditions, the rule action, and icons that communicate the rule’s inspection options or status. These icons represent:

  • Time Range Option (time range icon)

  • Intrusion policy (intrusion policy icon)

  • File policy (file policy icon)

  • Safe search (safe search icon)

  • YouTube EDU (YouTube EDU icon)

  • Logging (logging icon)

  • Comment (comment icon)

  • Warning (warning icon)

  • Errors (error icon)

Disabled rules are dimmed and marked (disabled) after the rule name.

To create or edit a rule, use the access control rule editor.

You can:

  • Configure basic properties such as the rule’s name, state, position, and action in the upper portion of the editor.

  • Add conditions using the tabs on the left side of the lower portion of the editor.

  • Use the tabs on the right side of the lower portion to configure inspection and logging options, and also to add comments to the rule. For your convenience, the editor lists the rule’s inspection and logging options regardless of which tab you are viewing.

Access Control Rule Components

In addition to its unique name, each access control rule has the following basic components:

State

By default, rules are enabled. If you disable a rule, the system does not use it and stops generating warnings and errors for that rule.

Position

Rules in an access control policy are numbered, starting at 1. If you are using policy inheritance, rule 1 is the first rule in the outermost policy. The system matches traffic to rules in top-down order by ascending rule number. With the exception of Monitor rules, the first rule that traffic matches is the rule that handles that traffic.

Rules can also belong to a section and a category, which are organizational only and do not affect rule position. Rule position goes across sections and categories.

Section and Category

To help you organize access control rules, every access control policy has two system-provided rule sections, Mandatory and Default. To further organize access control rules, you can create custom rule categories inside the Mandatory and Default sections.

If you are using policy inheritance, the current policy's rules are nested between its parent policy's Mandatory and Default sections.

Conditions

Conditions specify the specific traffic the rule handles. Conditions can be simple or complex; their use often depends on license.

Traffic must meet all of the conditions specified in a rule. For example, if the Application condition specifies HTTP but not HTTPS, the URL category and reputation conditions will not apply to HTTPS traffic.

Applicable Time

You can specify days and times during which a rule is applicable.

Action

A rule’s action determines how the system handles matching traffic. You can monitor, trust, block, or allow (with or without further inspection) matching traffic. The system does not perform deep inspection on trusted, blocked, or encrypted traffic.

Inspection

Deep inspection options govern how the system inspects and blocks malicious traffic you would otherwise allow. When you allow traffic with a rule, you can specify that the system first inspect it with intrusion or file policies to block any exploits, malware, or prohibited files before they reach your assets or exit your network.

Logging

A rule’s logging settings govern the records the system keeps of the traffic it handles. You can keep a record of traffic that matches a rule. In general, you can log sessions at the beginning or end of a connection, or both. You can log connections to the database, as well as to the system log (syslog) or to an SNMP trap server.

Comments

Each time you save changes to an access control rule, you can add comments.

Access Control Rule Order

Rules in an access control policy are numbered, starting at 1. The system matches traffic to access control rules in top-down order by ascending rule number.

In most cases, the system handles network traffic according to the first access control rule where all the rule’s conditions match the traffic. Except for Monitor rules, the system does not continue to evaluate traffic against additional, lower-priority rules after that traffic matches a rule.

To help you organize access control rules, every access control policy has two system-provided rule sections, Mandatory and Default. To further organize, you can create custom rule categories inside the Mandatory or Default sections. After you create a category, you cannot move it, although you can delete it, rename it, and move rules into, out of, within, and around it. The system assigns rule numbers across sections and categories.

If you use policy inheritance, the current policy's rules are nested between its parent policy's Mandatory and Default rule sections. Rule 1 is the first rule in the outermost policy, not the current policy, and the system assigns rule numbers across policies, sections, and categories.

Any predefined user role that allows you to modify access control policies also allows you to move and modify access control rules within and among rules categories. You can, however, create custom roles that restrict users from moving and modifying rules. Any user who is allowed to modify access control policies can add rules to custom categories and modify rules in them without restriction.


Caution


Failure to set up your access control rules properly can have unexpected results, including traffic being allowed that should be blocked. In general, application control rules should be lower in your access control list because it takes longer for those rules to match than rules based on IP address, for example.

Access control rules that use specific conditions (such as networks and IP addresses) should be ordered before rules that use general conditions (such as applications). If you're familiar with the Open Systems Interconnect (OSI) model, use similar numbering in concept. Rules with conditions for layers 1, 2, and 3 (physical, data link, and network) should be ordered first in your access control rules. Conditions for layers 5, 6, and 7 (session, presentation, and application) should be ordered later in your access control rules. For more information about the OSI model, see this Wikipedia article.


Tip


Proper access control rule order reduces the resources required to process network traffic, and prevents rule preemption. Although the rules you create are unique to every organization and deployment, there are a few general guidelines to follow when ordering rules that can optimize performance while still addressing your needs.


Access Control Rule Actions

Every access control rule has an action that determines how the system handles and logs matching traffic. You can monitor, trust, block, or allow (with or without further inspection).

The access control policy’s default action handles traffic that does not meet the conditions of any access control rule with an action other than Monitor.

Access Control Rule Monitor Action

The Monitor action is not designed to permit or deny traffic. Rather, its primary purpose is to force connection logging, regardless of how matching traffic is eventually handled.

If a connection matches a Monitor rule, the next non-Monitor rule that the connection matches should determine traffic handling and any further inspection. If there are no additional matching rules, the system should use the default action.

There is an exception, however. If a Monitor rule contains layer 7 conditions—such as an application condition—the system allows early packets to pass and the connection to be established (or the SSL handshake to complete). This occurs even if the connection should be blocked by a subsequent rule; this is because these early packets are not evaluated against subsequent rules. So that these packets do not reach their destination completely uninspected, you can specify an intrusion policy for this purpose in the access control policy’s Advanced settings; see Inspection of Packets That Pass Before Traffic Is Identified. After the system completes its layer 7 identification, it applies the appropriate action to the remaining session traffic.


Caution


As a best practice, avoid placing layer 7 conditions on broadly-defined monitor rules high in your rule priority order, to prevent inadvertently allowing traffic into your network. Also, if locally bound traffic matches a Monitor rule in a Layer 3 deployment, that traffic may bypass inspection. To ensure inspection of the traffic, enable Inspect Local Router Traffic in the advanced device settings for the managed device routing the traffic.

Access Control Rule Trust Action

The Trust action allows traffic to pass without deep inspection or network discovery. Trusted traffic is still subject to identity requirements and rate limiting.
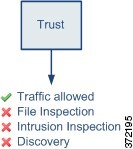
Diagram showing that the Trust rule action allows traffic to pass and you cannot further inspect the traffic with a file, intrusion, or network discovery policy.


Note


Some protocols, such as FTP and SIP, use secondary channels, which the system opens through the process of inspection. In some cases, trusted traffic can bypass all inspection, and these secondary channels cannot be opened properly. If you run into this problem, change the trust rule to Allow.


Access Control Rule Blocking Actions

The Block and Block with reset actions deny traffic without further inspection of any kind.

Diagram showing that the Block and Block with reset rule actions deny traffic, and you cannot inspect blocked traffic with a file, intrusion, or network discovery policy.

Block with reset rules reset the connection, with the exception of web requests met with an HTTP response page. This is because the response page, which you configure to appear when the system blocks web requests, cannot display if the connection is immediately reset.

For more information, see Configure HTTP Response Pages.

Access Control Rule Interactive Blocking Actions

The Interactive Block and Interactive Block with reset actions give web users a choice to continue to their intended destinations.

Diagram showing that, when the user bypasses a traffic block by the Interactive Block or Interactive Block with Reset rule action, inspection occurs as if the action were Allow and, when the block is not bypassed, you cannot inspect the blocked traffic with a file, intrusion, or network discovery policy.

If a user bypasses the block, the rule mimics an allow rule. Therefore, you can associate interactive block rules with file and intrusion policies, and matching traffic is also eligible for network discovery.

If a user does not (or cannot) bypass the block, the rule mimics a block rule. Matching traffic is denied without further inspection.

Note that if you enable interactive blocking, you cannot reset all blocked connections. This is because the response page cannot display if the connection is immediately reset. Use the Interactive Block with reset action to (non-interactively) block-with-reset all non-web traffic, while still enabling interactive blocking for web requests.

For more information, see Configure HTTP Response Pages.

Access Control Rule Allow Action

The Allow action allows matching traffic to pass, though it is still subject to identity requirements and rate limiting.

Optionally, you can use deep inspection to further inspect and block unencrypted or decrypted traffic before it reaches its destination:

  • You can use an intrusion policy to analyze network traffic according to intrusion detection and prevention configurations, and drop offending packets depending on the configuration.

  • You can perform file control using a file policy. File control allows you to detect and block your users from uploading (sending) or downloading (receiving) files of specific types over specific application protocols.

  • You can perform network-based advanced malware protection (AMP), also using a file policy. AMP for Networks can inspect files for malware, and block detected malware depending on the configuration.

The following diagram illustrates the types of inspection performed on traffic that meets the conditions of an Allow rule (or a user-bypassed Interactive Block rule. Notice that file inspection occurs before intrusion inspection; blocked files are not inspected for intrusion-related exploits.
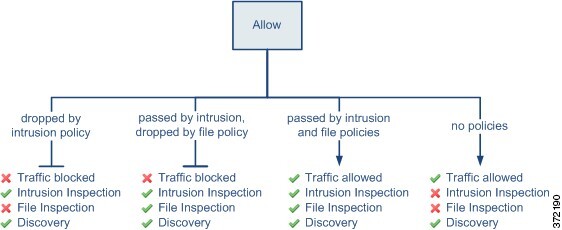
Diagram showing types of inspection performed on traffic that meets the conditions of an Allow rule. The diagram shows that, when file inspection results in dropped traffic, the same traffic is not inspected for intrusions but can be inspected for nework discovery. The diagram also shows that, in three cases, traffic can be inspected by network discovery. The three cases are when traffic is passed by a file policy and dropped by an intrusion policy, when traffic is passed by both intrusion and file policies, and when allowed traffic is not inspected by an intrusion or file policy.

For simplicity, the diagram displays traffic flow for situations where both (or neither) an intrusion and a file policy are associated with an access control rule. You can, however, configure one without the other. Without a file policy, traffic flow is determined by the intrusion policy; without an intrusion policy, traffic flow is determined by the file policy.

Regardless of whether the traffic is inspected or dropped by an intrusion or file policy, the system can inspect it using network discovery. However, allowing traffic does not automatically guarantee discovery inspection. The system performs discovery only for connections involving IP addresses that are explicitly monitored by your network discovery policy; additionally, application discovery is limited for encrypted sessions.

Requirements and Prerequisites for Access Control Rules

Model Support

Any

Supported Domains

Any

User Roles

  • Admin

  • Access Admin

  • Network Admin

Guidelines and Limitations for Access Control Rules

  • If you edit an access control rule that is actively in use, the changes do not apply to established connections at deploy-time. The updated rule is used to match against future connections. However, if the system is actively inspecting a connection (for example, with an intrusion policy), it will apply changed matching or action criteria to existing connections.

    For FTD, you can ensure that your changes apply to all current connections by using the FTD clear conn CLI command to end established connections. Note that you should only do this if it is acceptable to end those connections, on the assumption that the sources for the connections will then attempt to reestablish the connection and thus be matched appropriately against the new rule.

  • VLAN tags in access rules only apply to inline sets; they cannot be used in access rules applied to firewall interfaces.

  • To use fully-qualified domain name (FQDN) network objects as source or destination criteria, you must also configure DNS for the data interfaces in the platform settings policy. The system does not use the management DNS server setting to do lookups for FQDN objects used in access control rules.

    Note that controlling access by FQDN is a best-effort mechanism. Consider the following points:

    • Because DNS replies can be spoofed, only use fully trusted internal DNS servers.

    • Some FQDNs, especially for very popular servers, can have hundreds if not thousands of IP addresses, and these can frequently change. Because the system uses cached DNS lookup results, users might get addresses that are not yet in the cache, and their connections will not match the FQDN rule. Rules that use FQDN network objects function effectively only for names that resolve to fewer than 100 addresses.

      We recommend that you do not create network object rules for an FQDN that resolves to more than 100 addresses, as the likelihood of the address in a connection being one that has been resolved and available in the DNS cache on the device is low. For these cases, use a URL-based rule instead of an FQDN network object rule.

    • For popular FQDNs, different DNS servers can return a different set of IP addresses. Thus, if your users use a different DNS server than the one you configure, FQDN-based access control rules might not apply to all IP addresses for the site that are used by your clients, and you will not get the intended results for your rules.

    • Some FQDN DNS entries have very short time to live (TTL) values. This can result in frequent recompilation of the lookup table, which can impact overall system performance.

Managing Access Control Rules

The following topics explain how to manage access control rules.

Adding an Access Control Rule Category

You can divide an access control policy's Mandatory and Default rule sections into custom categories. After you create a category, you cannot move it, although you can delete it, rename it, and move rules into, out of, within, and around it. The system assigns rule numbers across sections and categories.

Procedure


Step 1

In the access control policy editor, click Add Category.

Tip


If your policy already contains rules, you can click a blank area in the row for an existing rule to set the position of the new category before you add it. You can also right-click an existing rule and select Insert new category.

Step 2

Enter a Name.

Step 3

From the Insert drop-down list, choose where you want to add the category:

  • To insert a category below all existing categories in a section, choose into Mandatory or into Default.

  • To insert a category above an existing category, choose above category, then choose a category.

  • To insert a category above or below an access control rule, choose above rule or below rule, then enter an existing rule number.

Step 4

Click OK.

Step 5

Click Save to save the policy.


Create and Edit Access Control Rules

Use access control rules to apply actions to specific traffic classes. Rules allow you to selectively allow desirable traffic and drop unwanted traffic.

Procedure


Step 1

In the access control policy editor, you have the following options:

  • To add a new rule, click Add Rule.

  • To edit an existing rule, click Edit (edit icon) .

  • To edit multiple rules, shift-click a range of rules or control-click multiple rules to edit, then right-click and choose an option.

If View (View button) appears next to a rule instead, the rule belongs to an ancestor policy, or you do not have permission to modify the rule.

Step 2

If this is a new rule, enter a Name.

Step 3

Configure the rule components.

If you are bulk-editing multiple rules, only a subset of options are available.

  • Enabled—Specify whether the rule is Enabled.

  • Position—Specify the rule position; see Access Control Rule Order.

  • Action—Choose a rule Action; see Access Control Rule Actions.

  • Time Range—(Optional.) For FTD devices, choose the days and times when the rule is applicable. For details, see Creating Time Range Objects.

  • Conditions—Click the corresponding condition you want to add. See Access Control Rule Conditions for more information.

    Note


    VLAN tags in access rules only apply to inline sets; they cannot be used in access rules applied to firewall interfaces.

  • Deep Inspection—(Optional.) For Allow and Interactive Block rules, click Intrusion policy (intrusion policy icon) or File policy (file policy icon) to configure the rule’s Inspection options. If the option is dimmed, no policy of that type is selected for the rule. See Access Control Overview for more information.

  • Content Restriction—Click Safe search (safe search icon) or YouTube EDU (YouTube EDU icon) to configure content restriction settings on Applications of the rule editor. If the option are dimmed, content restriction is disabled for the rule. See About Content Restriction for more information.

  • Logging—Click Logging (logging icon) to specify Logging options. If the option is dimmed, connection logging is disabled for the rule. See Best Practices for Connection Logging in the Firepower Management Center Administration Guide for more information.

  • Comments—Click the number in the comment column to add Comments. The number indicates how many comments the rule already contains.

Step 4

Click OK to save the rule.

Step 5

Click Save to save the policy.


What to do next

If you will deploy time-based rules, specify the time zone of the device to which the policy is assigned. See Time Zone.

Deploy configuration changes; see Deploy Configuration Changes.

Access Control Rule Conditions

Rule conditions define the characteristics of the connections you want to target with each rule. Use the conditions precisely to fine-tune the rule to apply to all, and only, the traffic that should be handled by the rule. The following topics explain the match conditions that you can use.

Security/Tunnel Zone Rule Conditions

You can use security zones and tunnel zones to select traffic for a rule.

Security zones segment your network to help you manage and classify traffic flow by grouping interfaces across multiple devices. Tunnel zones allow you to identify tunneled traffic, such as GRE, that should be handled as a tunnel rather than apply access control rules to the encapsulated connections within the tunnel.

You can use security zones to control traffic by its source and destination interfaces. If you add both source and destination zones to a zone condition, matching traffic must originate from an interface in one of the source zones and leave through an interface in one of the destination zones for it to match the rule. Just as all interfaces in a security zone must be of the same type (all inline, passive, switched, or routed), all zones used in a zone condition must be of the same type. Because devices deployed passively do not transmit traffic, you cannot use a zone with passive interfaces as a destination zone.

When using tunnel zones, ensure that you have matching rules in the prefilter policy to associate tunneled traffic with the zone. Then, you can select the tunnel zone as a source zone in a rule; tunnel zones cannot be destinations. If you do not have prefilter rules to rezone the tunnels into the tunnel zone, an access control rule for the tunnel will never apply to any connections. You can specify destination security zones to target tunnels that leave the device through specific interfaces.

Security Zone Considerations

Consider the following when deciding on security zone criteria:

  • Leave matching criteria empty whenever possible, especially those for security zones, network objects, and port objects. When you specify multiple criteria, the system must match against every combination of the contents of the criteria you specify.

  • Access control rules generate ACL entries (ACEs) in the device configuration to provide early processing and drops whenever possible. If you specify security zones in rules, ACEs are created for each interface in the zone, which can greatly increase the size of the ACL. Excessively large ACLs generated from access control rules can impact system performance.

  • In a multidomain deployment, a zone created in an ancestor domain can contain interfaces that reside on devices in different domains. When you configure a zone condition in an descendant domain, your configurations apply to only the interfaces you can see.

Network Rule Conditions

Network rule conditions are the network objects or geographical locations that define the network addresses or locations of the traffic.

  • To match traffic from an IP address or geographical location, add the criteria to the Sources list.

  • To match traffic to an IP address or geographical location, add the criteria to the Destinations list.

  • If you add both source and destination network conditions to a rule, matching traffic must originate from one of the specified IP addresses and be destined for one of the destination IP addresses.

When you add this criteria, you select from the following tabs:

  • Network—Select the network objects or groups that define the source or destination IP addresses for the traffic you want to control.

    Whenever possible, combine multiple network objects into a single object group. The system automatically creates an object group (during deployment) when you select more than one object (for source or destination separately). Selecting existing groups can avoid object group duplication and reduce the potential impact on CPU usage when there are a large number of duplicate objects.

    You can use objects that define the address using the fully-qualified domain name (FQDN); the address is determined through a DNS lookup. However, FQDN objects are not supported in the following sections in access control policies: Original Client networks, SGT/ISE attributes, Network Analysis And Intrusion policy, Security Intelligence, Threat Detection, Elephant Flow Settings.

  • Geolocation—Select the geographical location to control traffic based on its source or destination country or continent. Selecting a continent selects all countries within the continent. Besides selecting geographical location directly in the rule, you can also select a geolocation object that you created to define the location. Using geographical location, you could easily restrict access to a particular country without needing to know all of the potential IP addresses used there.


    Note


    To ensure that you are using up-to-date geographical location data to filter your traffic, Cisco strongly recommends that you regularly update the geolocation database (GeoDB).


Original Client in Network Conditions (Filtering Proxied Traffic)

For some rules, you can handle proxied traffic based on the originating client. Use a source network condition to specify proxy servers, then add an original client constraint to specify original client IP addresses. The system uses a packet's X-Forwarded-For (XFF), True-Client-IP, or custom-defined HTTP header field to determine original client IP.

Traffic matches the rule if the proxy's IP address matches the rule's source network constraint, and the original client's IP address matches the rule's original client constraint. For example, to allow traffic from a specific original client address, but only if it uses a specific proxy, create three access control rules:

Access Control Rule 1: Blocks proxied traffic from a specific IP address (209.165.201.1)

  • Source Networks: 209.165.201.1
  • Original Client Networks: none/any
  • Action: Block

Access Control Rule 2: Allows proxied traffic from the same IP address, but only if the proxy server for that traffic is one you choose (209.165.200.225 or 209.165.200.238)

  • Source Networks: 209.165.200.225 and 209.165.200.238
  • Original Client Networks: 209.165.201.1
  • Action: Allow

Access Control Rule 3: Blocks proxied traffic from the same IP address if it uses any other proxy server.

  • Source Networks: any
  • Original Client Networks: 209.165.201.1
  • Action: Block
VLAN Tags Rule Conditions

Note


VLAN tags in access rules only apply to inline sets. Access rules with VLAN tags do not match traffic on firewall interfaces.


VLAN rule conditions control VLAN-tagged traffic, including Q-in-Q (stacked VLAN) traffic. The system uses the innermost VLAN tag to filter VLAN traffic, with the exception of the prefilter policy, which uses the outermost VLAN tag in its rules.

Note the following Q-in-Q support:

  • FTD on Firepower 4100/9300—Does not support Q-in-Q (supports only one VLAN tag).

  • FTD on all other models:

    • Inline sets and passive interfaces—Supports Q-in-Q, up to 2 VLAN tags.

    • Firewall interfaces—Does not support Q-in-Q (supports only one VLAN tag).

You can use predefined objects to build VLAN conditions, or manually enter any VLAN tag from 1 to 4094. Use a hyphen to specify a range of VLAN tags.

You can specify a maximum of 50 VLAN conditions.

In a cluster, if you encounter problems with VLAN matching, edit the access control policy advanced options, Transport/Network Preprocessor Settings, and select the Ignore the VLAN header when tracking connections option.


Note


The system builds a separate network map for each leaf domain. In a multidomain deployment, using literal VLAN tags to constrain this configuration can have unexpected results. Using override-enabled objects allows descendant domain administrators to tailor Global configurations to their local environments.
User Rule Conditions

User rule conditions match traffic based the user who initiates the connection, or the group to which the user belongs. For example, you could configure a Block rule to prohibit anyone in the Finance group from accessing a network resource.

For access control rules only, you must first associate an identity policy with the access control policy as discussed in Associating Other Policies with Access Control.

In addition to configuring users and groups for configured realms, you can set policies for the following Special Identities users:

  • Failed Authentication: User that failed authentication with the captive portal.

  • Guest: Users configured as guest users in the captive portal.

  • No Authentication Required: Users that match an identity No Authentication Required rule action.

  • Unknown: Users that cannot be identified; for example, users that are not downloaded by a configured realm.

Application Rule Conditions

When the system analyzes IP traffic, it can identify and classify the commonly used applications on your network. This discovery-based application awareness is the basis for application control—the ability to control application traffic.

System-provided application filters help you perform application control by organizing applications according to basic characteristics: type, risk, business relevance, category, and tags. You can create reuseable user-defined filters based on combinations of the system-provided filters, or on custom combinations of applications.

At least one detector must be enabled for each application rule condition in the policy. If no detector is enabled for an application, the system automatically enables all system-provided detectors for the application; if none exist, the system enables the most recently modified user-defined detector for the application. For more information about application detectors, see Application Detector Fundamentals.

You can use both application filters and individually specified applications to ensure complete coverage. However, understand the following note before you order your access control rules.

Benefits of Application Filters

Application filters help you quickly configure application control. For example, you can easily use system-provided filters to create an access control rule that identifies and blocks all high risk, low business relevance applications. If a user attempts to use one of those applications, the system blocks the session.

Using application filters simplifies policy creation and administration. It assures you that the system controls application traffic as expected. Because Cisco frequently updates and adds application detectors via system and vulnerability database (VDB) updates, you can ensure that the system uses up-to-date detectors to monitor application traffic. You can also create your own detectors and assign characteristics to the applications they detect, automatically adding them to existing filters.

Application Characteristics

The system characterizes each application that it detects using the criteria described in the following table. Use these characteristics as application filters.

Table 1. Application Characteristics

Characteristic

Description

Example

Type

Application protocols represent communications between hosts.

Clients represent software running on a host.

Web applications represent the content or requested URL for HTTP traffic.

HTTP and SSH are application protocols.

Web browsers and email clients are clients.

MPEG video and Facebook are web applications.

Risk

The likelihood that the application is being used for purposes that might be against your organization’s security policy.

Peer-to-peer applications tend to have a very high risk.

Business Relevance

The likelihood that the application is being used within the context of your organization’s business operations, as opposed to recreationally.

Gaming applications tend to have a very low business relevance.

Category

A general classification for the application that describes its most essential function. Each application belongs to at least one category.

Facebook is in the social networking category.

Tag

Additional information about the application. Applications can have any number of tags, including none.

Video streaming web applications often are tagged high bandwidth and displays ads.

Configuring Application Conditions and Filters

To build an application condition or filter, choose the applications whose traffic you want to control from a list of available applications. Optionally (and recommended), constrain the available applications using filters. You can use filters and individually specified applications in the same condition.

Before you begin
Procedure

Step 1

Invoke the rule or configuration editor:

  • Access control, decryption, QoS rule condition—In the rule editor, click Applications.
  • Identity rule condition—In the rule editor, click Realms & Settings and enable active authentication; see Create an Identity Rule.
  • Application filter—On the Application Filters page of the object manager, add or edit an application filter. Provide a unique Name for the filter.
  • Intelligent Application Bypass (IAB)—In the access control policy editor, click Advanced, edit IAB settings, then click Bypassable Applications and Filters.

Step 2

Find and choose the applications you want to add from the Available Applications list.

To constrain the applications displayed in Available Applications, choose one or more Application Filters or search for individual applications.

Tip


Click Information (import section icon) next to an application to display summary information and internet search links. Unlock marks applications that the system can identify only in decrypted traffic.

When you choose filters, singly or in combination, the Available Applications list updates to display only the applications that meet your criteria. You can choose system-provided filters in combination, but not user-defined filters.

  • Multiple filters for the same characteristic (risk, business relevance, and so on)—Application traffic must match only one of the filters. For example, if you choose both the medium and high-risk filters, the Available Applications list displays all medium and high-risk applications.

  • Filters for different application characteristics—Application traffic must match both filter types. For example, if you choose both the high-risk and low business relevance filters, the Available Applications list displays only applications that meet both criteria.

Step 3

Click Add to Rule, or drag and drop.

Tip


Before you add more filters and applications, click Clear Filters to clear your current choices.

Step 4

Save or continue editing the rule or configuration.


Example: Application Condition in an Access Control Rule

The following graphic shows the application condition for an access control rule that blocks a user-defined application filter for MyCompany, all applications with high risk and low business relevance, gaming applications, and some individually selected applications.

Screenshot of a sample application condition

What to do next
Port, Protocol, and ICMP Code Rule Conditions

Port conditions match traffic based on the source and destination ports. Depending on the rule type, “port” can represent any of the following:

  • TCP and UDP—You can control TCP and UDP traffic based on the port. The system represents this configuration using the protocol number in parentheses, plus an optional associated port or port range. For example: TCP(6)/22.

  • ICMP—You can control ICMP and ICMPv6 (IPv6-ICMP) traffic based on its internet layer protocol plus an optional type and code. For example: ICMP(1):3:3.

  • Protocol—You can control traffic using other protocols that do not use ports.

Leave matching criteria empty whenever possible, especially those for security zones, network objects, and port objects. When you specify multiple criteria, the system must match against every combination of the contents of the criteria you specify.

Best Practices for Port-Based Rules

Specifying ports is the traditional way to target applications. However, applications can be configured to use unique ports to bypass access control blocks. Thus, whenever possible, use application filtering criteria rather than port criteria to target traffic. Note that application filtering is not available in prefilter rules.

Application filtering is also recommended for applications, like FTP, that open separate channels dynamically for control vs. data flow. Using port-based access control rules can prevent these kinds of applications from performing correctly, and could result in blocking desirable connections.

Using Source and Destination Port Constraints

If you add both source and destination port constraints, you can only add ports that share a single transport protocol (TCP or UDP). For example, if you add DNS over TCP as a source port, you can add Yahoo Messenger Voice Chat (TCP) as a destination port but not Yahoo Messenger Voice Chat (UDP).

If you add only source ports or only destination ports, you can add ports that use different transport protocols. For example, you can add both DNS over TCP and DNS over UDP as destination port conditions in a single access control rule.

Matching Non-TCP Traffic with Port Conditions

You can match non-port-based protocols. By default, if you do not specify a port condition, you are matching IP traffic. Although you can configure port conditions to match non-TCP traffic, there are some restrictions:

  • Access control rules—For Classic devices, you can match GRE-encapsulated traffic with an access control rule by using the GRE (47) protocol as a destination port condition. To a GRE-constrained rule, you can add only network-based conditions: zone, IP address, port, and VLAN tag. Also, the system uses outer headers to match all traffic in access control policies with GRE-constrained rules. For FTD devices, use tunnel rules in the prefilter policy to control GRE-encapsulated traffic.

  • SSL rules—These rules support TCP port conditions only.

  • IMCP echo—A destination ICMP port with the type set to 0 or a destination ICMPv6 port with the type set to 129 only matches unsolicited echo replies. ICMP echo replies sent in response to ICMP echo requests are ignored. For a rule to match on any ICMP echo, use ICMP type 8 or ICMPv6 type 128.

URL Rule Conditions

Use URL conditions to control the websites that users on your network can access.

For complete information, see URL Filtering.

Dynamic Attributes Rule Conditions

Dynamic attributes include the following:

  • Dynamic objects (such as from the Cisco Secure Dynamic Attributes Connector)

    The dynamic attributes connector enables you to collect data (such as networks and IP addresses) from cloud providers and send it to the Firepower Management Center so it can be used in access control rules. .

    For more information about the dynamic attributes connector, see the Cisco Secure Dynamic Attributes Connector Configuration Guide.

  • SGT objects

  • Location IP objects

  • Device type objects

  • Endpoint profile objects

Dynamic attributes can be used as source criteria and destination criteria in access control rules. Use the following guidelines:

  • Objects of different types are ANDd together

  • Objects of a similar type are ORd together

For example, if you choose source destination criteria SGT 1, SGT 2, and device type 1; the rule is matched if device type 1 is detected on either SGT 1 or SGT 2.

About API-Created Dynamic Objects

A dynamic object is an object that specifies one or many IP addresses retrieved either using REST API calls or using the Cisco Secure Dynamic Attributes Connector, which is capable of updating IP addresses from cloud sources. These dynamic objects can be used in access control rules without the need to deploy the access control policy afterward.

For more information about the dynamic attributes connector, see the Cisco Secure Dynamic Attributes Configuration Guide (link to guide).

Differences between dynamic objects and network objects follow:

  • Dynamic objects created using the dynamic attributes connector are pushed to the FMC as soon as they're created and are updated at a regular interval.

  • API-created dynamic objects:

    • Are IP addresses, with or without or classless inter-domain routing (CIDR), that can be used in access control rules much like a network object.

    • Do not support fully-qualified domain names or address ranges.

    • Must be updated using an API.

Configure Dynamic Attributes Conditions

When you configure dynamic attributes for an access control rule, objects of the same type are ORed together and objects of different types are ANDed together. An example is shown at the end of this topic.

Before you begin

Create some dynamic objects and understand how those objects are used in access control policy.

For more information about dynamic objects, see About API-Created Dynamic Objects.

For more information about how dynamic objects are used in access control policy, see Dynamic Attributes Rule Conditions.

Procedure

Step 1

In the rule editor, click Dynamic Attributes.

Step 2

Do any of the following in the Available Attributes section:

  • Enter part of all of the name of an attribute in the field.

  • Click Security Group Tag or Dynamic Objects to view only objects of that type.

Step 3

To apply the objects you selected to source matching criteria, click Add to Source.

Step 4

To apply the objects you selected to destination matching criteria, click Add to Destination.

Step 5

When you're finished configuring the rule, click Save.


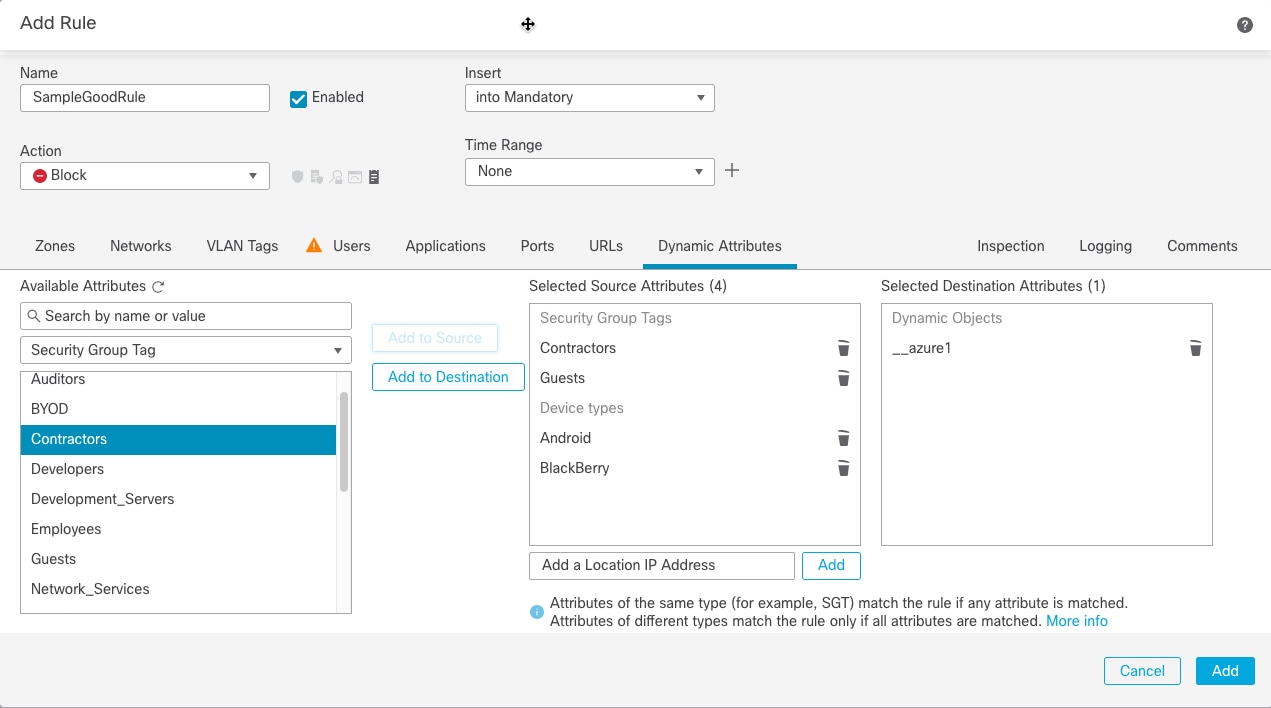
Example: Using multiple source conditions in a block rule

The following example blocks traffic from Security Group Tags Contractors or Guests; and device types Android or Blackberry from accessing the dynamic object __azure1 .

Configure External Attributes in an access control rule to block traffic from Security Group Tags Contractors or Guests; and device types Android or Blackberry from accessing the dynamic object __azure1

What to do next
Time and Day Rule Conditions

You can specify a continuous time range or a recurring time period.

For example, a rule can apply only during weekday working hours, or every weekend, or during a holiday shutdown period.

Time-based rules are applied based on the local time of the device that processes the traffic.

Time-based rules are supported only on FTD devices. If you assign a policy with a time-based rule to a different type of device, the time restriction associated with the rule is ignored on that device. You will see warnings in this case.

Enabling and Disabling Access Control Rules

When you create an access control rule, it is enabled by default. If you disable a rule, the system does not use it to evaluate network traffic and stops generating warnings and errors for that rule. When viewing the list of rules in an access control policy, disabled rules are grayed out, although you can still modify them.

You can also enable or disable an access control rule using the rule editor.

Procedure


Step 1

In the access control policy editor, right-click the rule and choose a rule state.

If View (View button) appears next to a rule instead, the rule belongs to an ancestor policy, or you do not have permission to modify the rule.

Step 2

Click Save.


What to do next

Copying Access Control Rules from One Access Control Policy to Another

You can copy access control rules from one access control policy to another. You can copy the rules either to the Default section or the Mandatory section of the access control policy.

All the settings of the copied rules, except the comments, are retained in the pasted version. However, a new comment is added in the copied rule mentioning the source access control policy.

Procedure


Step 1

In the access control policy editor, select the rule that you want to copy.

To select multiple rules, use Ctrl+click.

Step 2

Right-click the selected rules and choose Copy to > Another policy.

Step 3

Select the destination access control policy from the Access Policy drop-down list.

Step 4

From the Place Rules drop-down list, choose where you want to position the copied rules.

  • To position as the last set of rules in the Default section, choose At the bottom (within the Default section).
  • To position as the first set of rules in the Mandatory section, choose At the top (within the Mandatory section).

Step 5

Click Copy.


What to do next

Moving Access Control Rules to a Prefilter Policy

You can move access control rules from an access control policy to the associated non-default prefilter policy.

You must first apply a user-defined prefilter policy to the access control policy. The access control rules cannot be moved to the default prefilter policy because the default prefilter policy cannot have rules.

Before you begin

Note the following conditions before you proceed:

  • When moving an access control rule to a prefilter policy the layer 7 (L7) parameters in the access control rule cannot be moved. The L7 parameters are dropped during the operation.

  • The comments in the access control rule configuration are lost after moving the rule. However, a new comment is added in the moved rule mentioning the source access control policy.

  • You cannot move access control rules with Monitor set as the Action parameter.

  • The Action parameter in the access control rule is changed to a suitable action in the prefilter rule when moved. To know what each action in the access control rule maps to, see the following table:

    Action in the access control rule

    Action in the prefilter rule

    Allow

    Analyze

    Block

    Block

    Block with reset

    Block

    Interactive Block

    Block

    Interactive Block with reset

    Block

    Trust

    Fastpath

  • Similarly, based on the action configured in the access control rule, the logging configuration is set to an appropriate setting after the rule is moved, as mentioned in the following table.

    Action in the access control rule

    Enabled Logging configurations in the prefilter rule

    Allow

    None of the check boxes are checked.

    Block

    • Log at Beginning of Connection

    • Event Viewer

    • Syslog Server

    • SNMP Trap

    Block with reset

    • Log at Beginning of Connection

    • Event Viewer

    • Syslog Server

    • SNMP Trap

    Interactive Block

    • Log at Beginning of Connection

    • Event Viewer

    • Syslog Server

    • SNMP Trap

    Interactive Block with reset

    • Log at Beginning of Connection

    • Event Viewer

    • Syslog Server

    • SNMP Trap

    Trust

    • Log at Beginning of Connection

    • Log at End of Connection

    • Event Viewer

    • Syslog Server

    • SNMP Trap

  • While moving rules from the source policy, if another user modifies those rules, you will see get a message. You may continue with the process after refreshing the page.

Procedure


Step 1

In the access control policy editor, select the rule that you want to move.

To select multiple rules, use the Ctrl+click.

Step 2

Right-click the selected rules and choose Move to another policy.

Step 3

From the Place Rules drop-down list, choose where you want to position the moved rules:

  • To position as the last set of rules, choose At the bottom.
  • To position as the first set of rules, choose At the top.

Step 4

Click Move.


What to do next

Positioning an Access Control Rule

You can move an existing rule within an access control policy, or insert new rules in a desired location. When you add or move a rule to a category, the system places it last in the category.

The procedure below explains how to move a rule while editing it. You can also do the following:

  • Insert a new rule at a specific location by right-clicking the rule and selecting Insert Rule. The Add Rule dialog box opens with an Insert menu and the selected rule number specified. You can insert the rule below or above the rule, and change the rule number if necessary.

  • Move an existing rule by right-clicking the rule, selecting either Cut or Copy to Same Policy, then right-clicking the new location and selecting either Paste Above or Paste Below. When copying, make sure you delete the rule at the old location so you do not have a duplicate rule.

Before you begin

Review rule order guidelines in Best Practices for Access Control Rules.

Procedure


Step 1

In the access control rule editor, you have the following options:

  • If you are adding a new rule, use the Insert drop-down list.
  • If you are editing an existing rule, click Move.

Step 2

Choose where you want to move or insert the rule:

  • Choose into Mandatory or into Default.
  • Choose a into Category, then choose the category.
  • Choose above rule or below rule, then type the appropriate rule number.

Step 3

Save the rule.

Step 4

Click Save to save the policy.


What to do next

Adding Comments to an Access Control Rule

When you create or edit an access control rule, you can add a comment. For example, you might summarize the overall configuration for the benefit of other users, or note when you change a rule and the reason for the change. You can display a list of all comments for a rule along with the user who added each comment and the date the comment was added.

When you save a rule, all comments made since the last save become read-only.

To search access control rule comments, use the "Search Rules" bar on the rule listing page.

Procedure


Step 1

In the access control rule editor, click Comments.

Step 2

Click New Comment, enter your comment, and click OK. You can edit or delete this comment until you save the rule.

Step 3

Save the rule.


Examples for Access Control Rules

The following topics provide examples of access control rules.

How to Control Access Using Security Zones

Consider a deployment where you want hosts to have unrestricted access to the internet, but you nevertheless want to protect them by inspecting incoming traffic for intrusions and malware.

First, create two security zones: Internal and External. Then, assign interface pairs on one or more devices to those zones, with one interface in each pair in the Internal zone and one in the External zone. Hosts connected to the network on the Internal side represent your protected assets.


Note


You are not required to group all internal (or external) interfaces into a single zone. Choose the grouping that makes sense for your deployment and security policies.


Then, configure an access control rule with a destination zone condition set to Internal. This simple rule matches traffic that leaves the device from any interface in the Internal zone. To inspect matching traffic for intrusions and malware, choose a rule action of Allow, then associate the rule with an intrusion and a file policy.

How to Block QUIC Traffic

As a best practice, we recommend you to block QUIC traffic. Chrome browsers have the QUIC protocol enabled by default. When you try to access Google applications using the Chrome browser, a session to a Google server is established using the QUIC protocol instead of TLS/SSL. QUIC is an experimental protocol at its early stages of development, and it uses proprietary encryption methods.

Secure Hypertext Transfer Protocol (HTTPS) uses Transmission Control Protocol (TCP), as does Hypertext Transfer Protocol (HTTP). Transmission Control Protocol is connection oriented or stateful. HTTPS uses TCP port 443 and HTTP uses TCP port 80. HTTP/3 runs on the QUIC protocol. For QUIC, HTTP/3 relies on the User Datagram Protocol (UDP), not the TCP.

QUIC could inadvertently have a negative impact on network security. Security appliances, such as firewalls and network sensors, typically are not able to access information that can be accessed with legacy TCP sessions. With the QUIC traffic getting blocked by the firewall, the Chrome browser falls back to using traditional TLS/SSL. Note that this does not cause loss of any functionality on the browser. Firewall gains better visibility and control of Google applications with or without the SSL decryption enabled. QUIC traffic is therefore not scrutinized as it should be and it is not forwarded to the firewall's web protection features.

In this use case, we show how to create an access control rule to block QUIC and HTTP/3 traffic.

Procedure


Step 1

Choose Policies > Access Control and edit the access control policy.

Step 2

Click Add Rule.

Step 3

Enter a meaningful name for the rule, such as Block-QUIC.

Name rule as Block-QUIC

Step 4

From the Actions drop-down list, choose Block.

Choose action as Block

Step 5

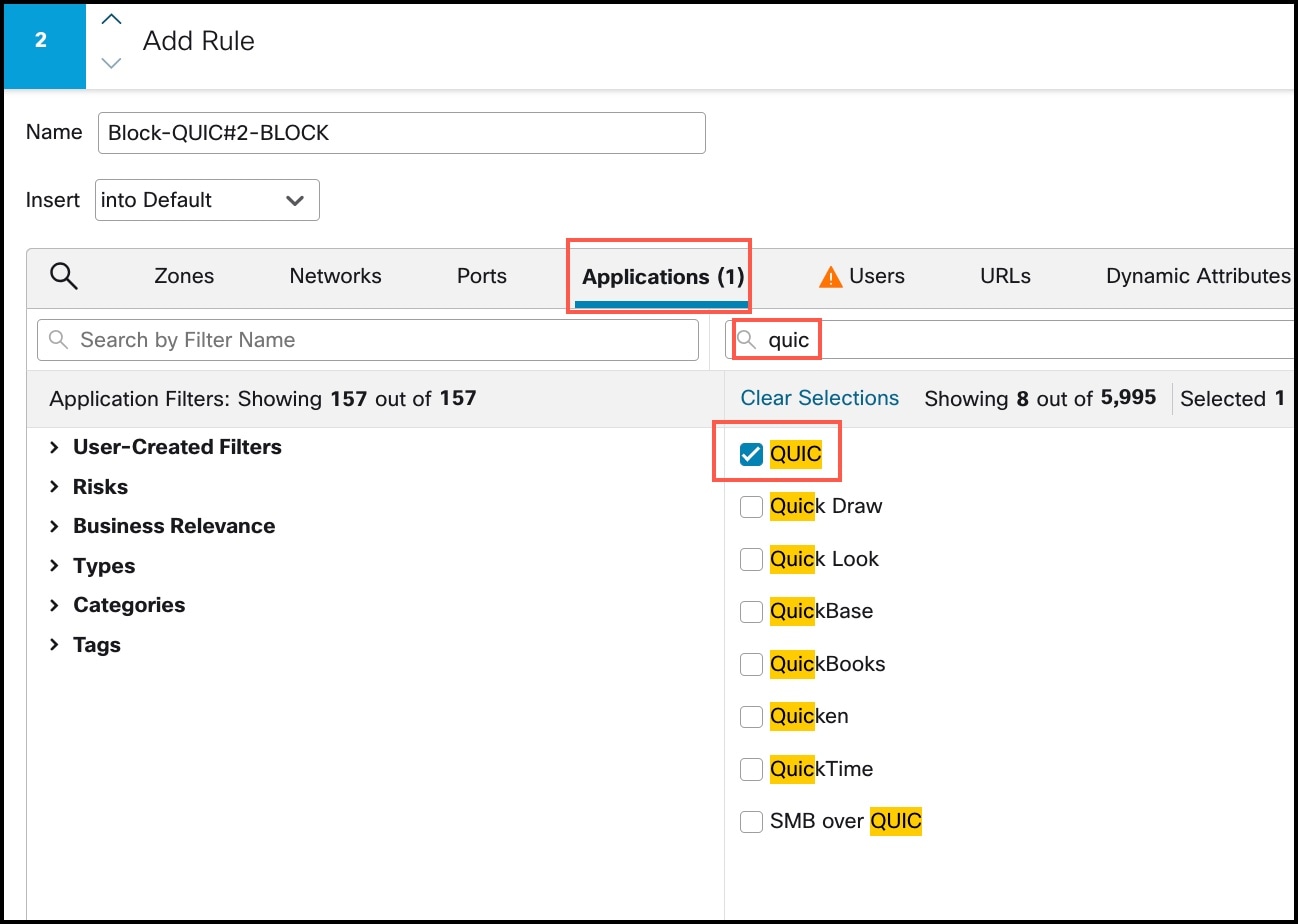
Click the Applications tab.

Step 6

Search for "quic" in the Search box and check the QUIC application check box.

Choose QUIC from list of applications

Step 7

Search for "HTTP/3" in the search box and check the HTTP/3 check box.

Choose HTTP/3 from list of applications

Step 8

Click Add Application to add to Destinations and Applications.

Step 9

Click Logging next to the rule action, and enable logging at the start of the connection. You must enable logging to get information about any connections blocked by this rule.

Step 10

Click Apply to save the rule, and then Save to save the updated policy.

Step 11

Move the rule to the appropriate location in the access control policy.

Step 12

Deploy your changes.


History for Access Control Rules

Feature

Minimum FMC

Minimum FTD

Details

Search for access control rule comments

6.7

Any

The Search Rules bar now offers the option to search for comments.

New/modified pages: Access control rules page, Search Rules text entry field.

Supported platforms: FMC

Copy or move rules between access control and prefilter policies

6.7

Any

You can copy access control rules from one access control policy to another. You can also move access control rules from an access control policy to the associated prefilter policy.

New/modified pages: Access control policy page; the right-click menu for the selected rules provides additional options to copy and move.

Supported platforms: FMC

Bulk edit of certain settings in access control rules

6.6

Any

In the list of rules in a policy, shift-click or control-click to select multiple rules, then right-click and choose an option. Example bulk operations: You can enable or disable the rules, select a rule action, and edit most inspection and logging settings.

New/modified pages: Access control rules page.

Supported platforms: FMC

Enhanced searching on configured rules

6.6

Any

Enhanced searching on configured rules.

New/modified pages: Access control rules page.

Supported platforms: FMC

Time ranges for rule application

6.6

Any

Ability to specify an absolute or recurring time or time range for a rule to be applied. The rule is applied based on the time zone of the device that processes the traffic.

New/modified pages:

  • A new option on the access control Add Rule page.

  • A related new option on the Devices > Platform Settings > Threat Defense page to specify time zones for managed devices.

Supported platforms: FTD devices only

View object details from access control rule pages

pre-6.6

Any

To see information about an object in a list of rules or from the rule configuration dialog, right-click the object.

New/modified pages: Policies > Access Control > Access Control, and Add Rule page.

Supported platforms: FMC