Cisco Unified Communications Manager Release 10.5(1) での IM and Presence Service の設定と管理
偏向のない言語
この製品のマニュアルセットは、偏向のない言語を使用するように配慮されています。このマニュアルセットでの偏向のない言語とは、年齢、障害、性別、人種的アイデンティティ、民族的アイデンティティ、性的指向、社会経済的地位、およびインターセクショナリティに基づく差別を意味しない言語として定義されています。製品ソフトウェアのユーザーインターフェイスにハードコードされている言語、RFP のドキュメントに基づいて使用されている言語、または参照されているサードパーティ製品で使用されている言語によりドキュメントに例外が存在する場合があります。シスコのインクルーシブランゲージに対する取り組みの詳細は、こちらをご覧ください。
翻訳について
このドキュメントは、米国シスコ発行ドキュメントの参考和訳です。リンク情報につきましては、日本語版掲載時点で、英語版にアップデートがあり、リンク先のページが移動/変更されている場合がありますことをご了承ください。あくまでも参考和訳となりますので、正式な内容については米国サイトのドキュメントを参照ください。
- Updated:
- 2017年5月28日
章のタイトル: IM and Presence Service のネットワーク設定
目次
- IM and Presence Service のネットワーク設定
- 設定変更通知およびサービス再起動通知
- サービス再起動通知
- Cisco XCP Router の再起動
- Cisco XCP Router サービスの再起動
- DNS ドメイン コンフィギュレーション
- 別々の DNS ドメインまたはサブドメインに展開された IM and Presence Service クラスタ
- 別々の DNS ドメインまたはサブドメインに展開されたクラスタ内の IM and Presence Service ノード
- 関連する Cisco Unified Communications Manager クラスタとは異なる DNS ドメインに展開されているクラスタ内の IM and Presence Service ノード
- Cisco Unified Communications Manager クラスタに関連付ける DNS ドメインの指定
- IM and Presence Service のデフォルトのドメイン設定
- インストール後のデフォルト ドメインの置換
- IM and Presence サービスのデフォルト ドメインの変更
- IM アドレス設定
- IM アドレスの設定要件
- UserID @ Default_Domain IM アドレス インタラクションと制約事項
- ディレクトリ URI IM アドレスの連携動作と制約事項
- IM アドレス スキームの設定
- IM and Presence Service クラスタのドメイン管理
- IM ドメイン管理のインタラクションと制約事項
- IM アドレス ドメインの表示
- IM アドレス ドメインの追加または更新
- IM アドレス ドメインの削除
- IM and Presence Service のルーティング情報の設定
- ルーティング通信の推奨事項
- MDNS ルーティングとクラスタ ID の設定
- ルーティング通信の設定
- クラスタ ID の設定
- アベイラビリティ状態変更メッセージのスロットル レートの設定
- IPv6 設定
- IPv6 の相互作用と制限事項
- IM and Presence サービスの Eth0 で IPv6 を有効にする
- IM and Presence サービスの Eth0 での IPv6 の無効化
- IPv6 エンタープライズ パラメータの有効化
- プロキシ サーバの設定
- IM and Presence Service のサービス
- IM and Presence サービスのサービスのオン
- 設定変更通知およびサービス再起動通知
- DNS ドメイン コンフィギュレーション
- IM and Presence Service のデフォルトのドメイン設定
- IM アドレス設定
- IM and Presence Service クラスタのドメイン管理
- IM and Presence Service のルーティング情報の設定
- IPv6 設定
- プロキシ サーバの設定
- IM and Presence Service のサービス
サービス再起動通知
Cisco Unified CM IM and Presence の管理で IM and Presence XCP サービスに影響する設定変更を行う場合は、変更を有効にするために XCP サービスを再起動する必要があります。 IM and Presence Service は、設定変更が影響する正確なノードおよび再起動する必要があるサービスを通知します。 アクティブな通知のポップアップ ウィンドウが Cisco Unified CM IM and Presence の管理の各ページに表示され、サービスを再起動する必要があることを視覚的に示します。 マウスをダイアログ バブル アイコンに合わせると、アクティブな通知(存在する場合)および関連する重大度の一覧が表示されます。 アクティブな通知のリストから Cisco Unified IM and Presence Serviceability に直接アクセスして、必要なサービスを再起動できます。
特にネットワークに IM and Presence Service を展開した後で設定変更を行う場合は、サービス再起動通知のサービス再起動ポップアップ ウィンドウをモニタすることを推奨します。 付属マニュアルのほとんどのタスクでは、サービスの再起動が必要かどうかが示されます。
サービス通知のタイプおよびサービス通知のセキュリティ レベルに関する情報については、サービス再起動通知のオンライン ヘルプ トピックを参照してください。
Cisco XCP Router の再起動
すべての可用性およびメッセージング サービスが IM and Presence Service で適切に機能するには、Cisco XCP Router を実行する必要があります。 これは、SIP ベースと XMPP ベースの両方のクライアント メッセージングに適用されます。 Cisco XCP ルータを再起動すると、IM and Presence Service によりすべてのアクティブな XCP サービスが自動的に再起動されます。
このモジュールのトピックは、設定変更後に Cisco XCP Router を再起動する必要があるかどうかを示します。 Cisco XCP ルータは、停止して再開するのではなく、再起動する必要があります。 Cisco XCP Router を再起動するのではなく停止した場合、IM and Presence Service により他のすべての XCP サービスが停止されます。 その後 XCP ルータを起動しても、IM and Presence Service により他の XCP サービスは自動的に起動されません。手動で他の XCP サービスを起動する必要があります。
Cisco XCP Router サービスの再起動
DNS ドメイン コンフィギュレーション
 (注) |
ある IM and Presence サービス ノード名がホスト名だけに基づいている場合、すべての IM and Presence サービス ノードが同じ DNS ドメインを共有する必要があります。 システムによって、IM and Presence サービス のデフォルト ドメインまたは DNS ドメインと一致するように設定される他の IM ドメインは必要はありません。 IM and Presence サービス展開に共通のプレゼンス ドメインを配置し、ノードを複数の DNS ドメインに展開できます。 |
詳細情報については、『Changing IP Address and Hostname for Cisco Unified Communications Manager and IM and Presence Service』を参照してください。
- 別々の DNS ドメインまたはサブドメインに展開された IM and Presence Service クラスタ
- 別々の DNS ドメインまたはサブドメインに展開されたクラスタ内の IM and Presence Service ノード
- 関連する Cisco Unified Communications Manager クラスタとは異なる DNS ドメインに展開されているクラスタ内の IM and Presence Service ノード
- Cisco Unified Communications Manager クラスタに関連付ける DNS ドメインの指定
別々の DNS ドメインまたはサブドメインに展開された IM and Presence Service クラスタ
IM and Presence Service は、ピアの IM and Presence Service クラスタを構成するノードとは異なる DNS ドメインまたはサブドメイン内の 1 つの IM and Presence Service クラスタに関連付けられたノードをサポートします。 次の図に、サポートされている展開シナリオの例を示します。

別々の DNS ドメインまたはサブドメインに展開されたクラスタ内の IM and Presence Service ノード
IM and Presence Service は、複数の DNS ドメインまたはサブドメインに展開された IM and Presence Service クラスタ内へのノードの配置をサポートします。 次の図に、サポートされている展開シナリオの例を示します。

(注) |
ハイ アベイラビリティは、プレゼンス冗長グループ内の 2 台のノードが別々の DNS ドメインまたはサブドメインにあるシナリオでも完全にサポートされます。 |
関連する Cisco Unified Communications Manager クラスタとは異なる DNS ドメインに展開されているクラスタ内の IM and Presence Service ノード
IM and Presence Service は、関連する Cisco Unified Communications Manager クラスとは異なる DNS ドメインへの IM and Presence Service ノードの配置をサポートします。 次の図に、サポートされている展開シナリオの例を示します。
(注) |
Cisco Unified Communications Manager とのアベイラビリティ統合をサポートするには、CUCM Domain の SIP Proxy サービス パラメータが Cisco Unified Communications Manager クラスタの DNS ドメインと一致する必要があります。 デフォルトでは、CUCM ドメインの SIP Proxy サービス パラメータは IM and Presence データベース パブリッシャ ノードの DNS ドメインに設定されます。 したがって、IM and Presence データベース パブリッシャ ノードの DNS ドメインが Cisco Unified Communications Manager クラスタの DNS ドメインと異なる場合、IM and Presence データベース パブリッシャ ノードで Cisco Unified CM IM and Presence の管理 GUI を使用してこのサービス パラメータを更新する必要があります。 詳細については、トピック「Specify DNS domain associated with Cisco Unified Communications Manager」を参照してください。 |
Cisco Unified Communications Manager クラスタに関連付ける DNS ドメインの指定
(注) |
この手順は、IM and Presence データベース パブリッシャ ノードの DNS ドメインが Cisco Unified Communications Manager ノードの DNS ドメインとは異なる場合にのみ必要です。 |
IM and Presence サービスはクラスタ内のすべての Cisco Unified Communications Manager ノード用の アクセス コントロール リスト(ACL)エントリを維持します。 これにより、ノード間でのアベイラビリティのシームレス共有が可能になります。 これらの ACL エントリは FQDN ベースであり、Cisco Unified Communications Manager のホスト名を IM and Presence データベース パブリッシャ ノードの DNS ドメインに付加することによって生成されます。
IM and Presence データベース パブリッシャ ノードの DNS ドメインが Cisco Unified Communications Manager ノードの DNS ドメインとは異なる場合、無効な ACL エントリが追加されます。 これを回避するには、IM and Presence データベース パブリッシャ ノードの Cisco Unified CM IM and Presence の管理 GUI で次の手順を実行する必要があります。
IM and Presence Service のデフォルトのドメイン設定
インストール後のデフォルト ドメインの置換
IM and Presence サービスは IM and Presence サービスのインストール時に指定された DNS ドメインに自動的に IM and Presence サービス クラスタのデフォルト ドメインを設定します。 DNS ドメインが IM and Presence サービスの全社レベルのデフォルト ドメインに一致していない場合は、DNS ドメイン値を全社レベルの IM and Presence サービスのデフォルト ドメインに置き換えます。
ネットワークで DNS を使用せず、インストール時にDNS ドメインを設定していなかった場合に、IM and Presence サービス のデフォルト ドメインに「DOMAIN.NOT.SET」がデフォルトで設定されます。 再度、全社レベルの IM and Presence サービス のデフォルト ドメインでこのデフォルト値を置き換えます。
(注) |
IM and Presence サービス のデフォルトドメインは社内のすべてのクラスタ全体で同じである必要があります。 そうでない場合は、クラスタ間の通信ができなくなります。 |
クラスタの新しい IM and Presence サービス のデフォルト ドメイン値を設定するには、次の手順を実行します。
(注) |
次の手順は、クラスタの IM and Presence サービス のデフォルト ドメインだけを変更します。 そのクラスタ内のすべての IM and Presence サービス ノードに関連付けられている DNS ドメインは変更されません。 IM and Presence サービス ノードの DNS ドメインを変更する手順については、『IP Address, Domain and Hostname for IM and Presence Service on Cisco Unified Communications Manager 』を参照してください。 |
IM and Presence サービスのデフォルト ドメインの変更
クラスタ内で IM and Presence Service のデフォルト ドメイン 値を変更する場合、この手順に従ってください。 DNS または非 DNS 展開が存在する場合、この手順を適用できます。
 注意 |
この手順の一環として、サービスを停止する前に、プレゼンス冗長グループのハイ アベイラビリティを無効にします。 ハイ アベイラビリティが有効な間にサービスを停止すると、システムのフェールオーバーが行われます。 |
この手順では、IM and Presence Service のクラスタのデフォルト ドメインだけを変更します。 そのクラスタ内のすべての IM and Presence Service ノードに関連付けられている DNS ドメインは変更されません。 IM and Presence Service ノードの DNS ドメインを変更する方法の手順については、『Changing IP Address and Hostname for Cisco Unified Communications Manager and IM and Presence Service』を参照してください。
(注) |
Cisco Unified Communications Manager に IM and Presence Service パブリッシャのノードを追加すると、デフォルト ドメインが設定されます。 ノードのインストール中、Cisco Unified Communications Manager からデフォルト ドメイン 値が取得できない場合、デフォルト ドメイン値は「DOMAIN.NOT.SET(DOMAIN.NOT.SET)」にリセットされます。 IM and Presence Service のデフォルト ドメイン値を有効なドメイン値に変更するには、この手順を使用します。 |
IM アドレスの設定要件
M and Presence Service のデフォルト ドメインと、使用する IM アドレス スキームは、IM and Presence Service クラスタ全体で一貫している必要があります。 設定する IM アドレス スキームはすべてのユーザ JID に影響を与え、別の設定を持つ可能性があるクラスタ間での通信を中断せずに段階的に実行することはできません。
展開した クライアントが IM アドレスとしてディレクトリ URI をサポートしない場合は、管理者がディレクトリ URI IM アドレス スキームを無効にする必要があります。
IM and Presence Service で IM アドレスを設定する前に、各 IM アドレスに固有の詳細な要件については連動操作と制約事項についてのトピックを、追加情報については IM アドレス設定の計画のトピックを参照してください。
UserID @ Default_Domain IM アドレス インタラクションと制約事項
ディレクトリ URI IM アドレスの連携動作と制約事項
複数のドメイン設定をサポートするには、IM and Presence Service の IM アドレス スキームとしてディレクトリ URI を設定する必要があります。
注意 |
IM アドレス スキームとしてディレクトリ URI を使用するようにノードを設定する場合は、ディレクトリ URI をサポートするクライアントのみを展開することを推奨します。 ディレクトリ URI をサポートしないクライアントは、ディレクトリ URI IM アドレス スキームが有効になっている場合は動作しません。 ディレクトリ URI をサポートしないクライアントが展開されている場合は、UserID@Default_Domain IM アドレス スキームを使用し、ディレクトリ URI IM アドレス スキームは使用しないでください。 |
ディレクトリ URI IM アドレス スキームを使用する場合は、次の制約事項および連係動作を順守します。
-
すべてのユーザに Cisco Unified Communications Manager に有効なディレクトリ URI 値が設定されています。
-
展開されたすべてのクライアントが、IM アドレスとしてディレクトリ URI をサポートし、EDI ベースのディレクトリ統合を使用する必要があります。
-
UDS ベースのディレクトリ統合はサポートされていません。
-
すべての IM and Presence Service クラスタで IM アドレス スキームが一貫している必要があります。
-
すべてのクラスタが、ディレクトリ URI アドレス スキームをサポートする Cisco Unified Communications Manager のバージョンを実行している必要があります。
-
LDAP 同期が無効になっている場合は、ディレクトリ URI を自由形式の URI として設定することができます。 LDAP ディレクトリ同期が有効になっている場合は、ディレクトリ URI を電子メール アドレス(mailid)または Microsoft OCS/Lync SIP URI(msRTCSIP-PrimaryUserAddress)にマップできます。
-
ディレクトリ URI IM アドレス設定はグローバルであり、クラスタ内のすべてのユーザに適用されます。 クラスタ内の個々のユーザに対して異なるディレクトリ URI IM アドレスを設定できません。
-
Cisco Jabber クライアントは、ディレクトリ URI をサポートする必要があります。 互換性を判断するには、Cisco Jabber クライアントに付属のマニュアルを参照してください。
-
Cisco Jabber クライアントは、IM and Presence Service の IM アドレス スキームとディレクトリ URI 設定に合わせて設定する必要があります。 デフォルトでは、Cisco Jabber は、デフォルトの IM アドレス スキーム UserID@ Default_Domain を想定します。 ディレクトリ URI を使用する場合は、ディレクトリ検索がディレクトリ URI 値と合うように、Cisco Jabber クライアントでの追加設定が必要です。
たとえば、IM アドレス スキームがディレクトリ URI で、Active Directory でメールするようにマッピングされている場合は、連絡先の追加時に IM アドレスとしてメール フィールドを使用するように Active Directory に対する Windows ディレクトリ検索用の Jabber を設定する必要があります。 詳細については、お使いの Cisco Jabber for Windows のバージョンのインストールおよび設定ガイドを参照してください。
(注)
Cisco Jabber クライアントのディレクトリ URI IM アドレス スキームを設定するには、xml 形式のコンフィギュレーション ファイルを手動で編集する必要があります。 xml コンフィギュレーション ファイルは、TFTP サーバにファイルをアップロードする前に有効になっている必要があります。 Cisco Jabber クライアントは、無効なコンフィギュレーション ファイルを無視します。
IM アドレス スキームの設定
新規インストールする、または以前のバージョンから IM and Presence Service をアップグレードするとき、UserID @ Default_Domain IM アドレス スキームがデフォルトのオプションです。 Cisco Unified CM IM and Presence Administration GUI を使用して IM and Presence Service クラスタの IM address スキームを設定できます。
注意 |
この手順の一環として、サービスを停止する前に、プレゼンス冗長グループのハイ アベイラビリティを無効にします。 ハイ アベイラビリティが有効な間にサービスを停止すると、システムのフェールオーバーが行われます。 |
(注) |
選択したIM アドレス スキームは、IM and Presence Service クラスタ全体で一貫している必要があります。 |
(注) |
エンド ユーザが正しくプロビジョニングされているか、また、無効または重複ユーザがないかを判断するために、IM and Presence Service トラブルシュータを使用します。 |
次の作業
システムが正常に更新された場合、クラスタの停止しているすべてのサービスと前に実行されている XCP 機能サービスを再起動できます。 設定を確認するには、トラブルシュータを使用します。
IM and Presence Service クラスタのドメイン管理
Cisco Unified CM IM and Presence の管理 GUI を使用して、ローカル IM アドレス ドメインを手動で追加、更新、削除できます。
ドメインが [IM and Presence Domain(IM and Presence ドメイン)] ウィンドウに表示されている場合は、ドメインは有効になっています。 有効化または無効化するドメインはありません。
Cisco Sync Agent サービスが夜間監査を実行し、ローカル クラスタ、およびクラスタ間が設定されている場合はピア クラスタの各ユーザのディレクトリ URI を確認して、一意のドメインのリストを自動的に構築します。 クラスタ内のユーザがそのドメインに割り当てられると、そのドメインは管理者が管理するドメインからシステムが管理するドメインに変更されます。 クラスタ内のユーザがドメインを使用しなくなった場合は、ドメインは管理者が管理するドメインに戻ります。
(注) |
この機能を使用するには、IM and Presence Service および Cisco Unified Communications Manager のすべてのノードおよびクラスタが複数のドメインをサポートする必要があります。 IM and Presence Service クラスタ内のすべてのノードが Release 10.0 以降を使用して実行しており、ディレクトリ URI IM アドレッシングが設定されていることを確認します。 |
IM ドメイン管理のインタラクションと制約事項
-
ローカル クラスタに関連付けられている管理者が管理するドメインのみを追加または削除できます。
-
システムが管理するドメインは編集できません。
-
他のクラスタに関連付けられている、システムが管理するかまたは管理者が管理するドメインは編集できません。
-
2 個のクラスタでドメインを設定することはできますが、ピア クラスタのみで使用されている場合に限ります。 これは、ローカル クラスタのシステムが管理するドメインとして表示されますが、ピア クラスタで使用中であると識別されます。
-
一部のセキュリティ証明書は、手動でドメインを追加、更新、または削除した後で再作成することが必要になる場合があります。 自己署名証明書または証明書署名要求(CSR)を生成すると、サブジェクト共通名(CN)がノードの FQDN に設定されます。また、ローカルの IM and Presence のデフォルト ドメインおよび システムがホストするすべての追加ドメインが、サブジェクトの別名(SAN)として証明書に追加されます。
-
TLS による XMPP フェデレーションでは、IM アドレス ドメインを追加または削除する場合、TLS 証明書を再作成する必要があります。
IM アドレス ドメインの表示
|
|
IM アドレス ドメインの追加または更新
Cisco Unified CM IM Presence 管理 GUI を使用して、ローカル クラスタに手動で IM アドレス ドメインを追加し、ローカル クラスタにある既存の IM アドレスのドメインを更新できます。
最大 255 文字のドメイン名を入力でき、各ドメインはクラスタ全体で一意である必要があります。 指定できる値は、すべての大文字または小文字(a-zA-Z)、すべての番号(0-9)、ハイフン(-)、またはドット(.)です。 ドメイン ラベルの区切り文字はドットです。 ドメイン ラベルの先頭文字をハイフンにすることはできません。 最後のラベル(たとえば、.com)の先頭文字を数字にすることはできません。 たとえば、Abc.1om は無効なドメインです。
システム管理ドメインが使用中であるため、編集できません。 IM アドレス ドメインを持つシステムでユーザが設定されていない場合(たとえば、ユーザが削除された場合)、システム管理ドメインは自動的に管理者の管理ドメインになります。 管理者の管理ドメインを編集または削除できます。
| ステップ 1 |
を選択します。 すべての管理者の管理 IM アドレス ドメインとシステム管理 IM アドレス ドメインを表示する [Find and List Domains(ドメインの検索と一覧)] ウィンドウが表示されます。 |
||
| ステップ 2 | 次のいずれかの操作を実行します。 | ||
| ステップ 3 |
最大 255 文字の一意なドメイン名を [Domain Name(ドメイン名)] フィールドに入力し、[Save(保存)] をクリックします。
|
IM アドレス ドメインの削除
Cisco Unified CM IM and Presence の管理 GUI を使用して、ローカル クラスタにある管理者の管理 IM アドレス ドメインを削除できます。
システム管理ドメインは使用中のため削除できません。 その IM アドレス ドメインのシステムにユーザが存在しない場合(たとえば、ユーザが削除された場合)、システム管理ドメインは自動的に管理者の管理ドメインになります。 管理者の管理ドメインを編集または削除できます。
(注) |
ローカル クラスタとピア クラスタの両方に設定された管理者の管理ドメインを削除すると、ドメインは管理者の管理ドメインのリストに保持されます。ただし、そのドメインはピア クラスタでのみ設定済みとマークされます。 完全にエントリを削除するには、設定されたすべてのクラスタからドメインを削除する必要があります。 |
| ステップ 1 |
を選択します。 すべての管理者の管理 IM アドレス ドメインとシステム管理 IM アドレス ドメインを表示する [Find and List Domains(ドメインの検索と一覧)] ウィンドウが表示されます。 |
||
| ステップ 2 |
次の方法の 1 つを使用して削除する管理者の管理ドメインを選択し、次に [Delete Selected(選択項目の削除)] をクリックします。
|
||
| ステップ 3 | [OK(OK)] をクリックして削除を確定するか、[Cancel(取消)] をクリックします。 |
ルーティング通信の推奨事項
MDNS は IM and Presence Service の XCP ルート ファブリックを確立するためのデフォルトのメカニズムで、ネットワークは、クラスタ内にあるすべての IM and Presence Service ノード間のルータ間接続を自動的に確立します。 MDNS ルーティングの要件は、クラスタのすべてのノードが同じマルチキャスト ドメインにあることです。 XCP ルート ファブリックに参加する新しい XCP ルータをシームレスにサポートできるため、MDNS ルーティングを推奨します。
ルーティング通信として MDNS を選択する場合は、ネットワークでマルチキャスト DNS を有効にする必要があります。 一部のネットワークでは、マルチキャストはデフォルトで有効であるか、特定のネットワーク領域(クラスタを構成するノードが含まれている領域など)で有効です。 このようなネットワークでは、MDNS ルーティングを使用するために、ネットワークで追加設定を行う必要はありません。 ネットワークでマルチキャスト DNS を無効にすると、MDNS パケットはクラスタ内の他のノードに到達できません。 ネットワークでマルチキャスト DNS が無効になっている場合、MDNS ルーティングを使用するには、ネットワーク機器の設定変更を実行する必要があります。
または、展開にルータ間通信を選択できます。 この場合、IM and Presence Service は動的にクラスタ内のノード間のすべてのルータ間接続を設定します。 クラスタのすべてのノードが同じマルチキャスト ドメインにない場合は、このルーティング設定タイプを選択します。 ルータ間通信を選択する場合は、次のことに注意してください。
MDNS ルーティングとクラスタ ID の設定
インストール時に、システムは固有のクラスタ ID を IM and Presence データベース パブリッシャ ノードに割り当てます。 システムはクラスタ ID を配布して、クラスタ内のすべてのノードが同じクラスタ ID 値を共有できるようにします。 クラスタ内のノードは、クラスタ ID を使用して、MDNS を使用するマルチキャスト ドメインにある他のノードを識別します。 MDNS ルーティングの要件は、1 つのスタンドアロンの IM and Presence サービス クラスタにあるノードが別のスタンドアロン クラスタ内のノードとのルータ間接続を確立することを防ぐために、クラスタ ID 値が一意であることです。 スタンドアロン クラスタはクラスタ間ピア接続上でのみ通信します。
クラスタのクラスタ ID 値を表示または設定するには、 を選択します。 クラスタ ID 値を変更する場合は、値が IM and Presence サービス展開に固有であることを確認します。
(注) |
チャット機能を導入する場合は、IM and Presence サービスがチャット ノードのエイリアスを定義するクラスタ ID を使用します。 クラスタ ID 値の変更が必要になる可能性がある特定の設定シナリオがあります。 詳細については、グループ チャット モジュールを参照してください。 |
ルーティング通信の設定
クラスタ内のノードがメッセージを相互にルーティングできるようにするには、ルーティング通信タイプを設定する必要があります。 この設定により、クラスタ内のノード間のルータ接続を確立するためのメカニズムが決定されます。 IM and Presence データベース パブリッシャ ノードでルーティングの通信タイプを設定し、IM and Presence Service はクラスタのすべてのノードにこのルーティング設定を適用します。
単一ノードの IM and Presence Service 展開の場合は、ルーティング通信タイプをデフォルト設定のままにすることを推奨します。
注意 |
クラスタ設定を完了し、IM and Presence Service 展開へのユーザ トラフィックの受け入れを開始する前に、ルーティング通信タイプを設定する必要があります。 |
- MDNS ルーティングを使用する場合は、MDNS がネットワーク内で有効になっていることを確認します。
- ルータ間通信を使用する必要があり、DNS がネットワークで使用できない場合は、ノードごとにクラスタ トポロジでノード名として IP アドレスを設定する必要あります。 ノード名を編集するには、 を選択し、ノードの [edit(編集)] リンクをクリックします。 この設定は、IM and Presence Service のインストール後、すべてのノードで Cisco XCP Router を再起動する前に実行します。
Cisco Jabber クライアントを使用する時、証明書の警告メッセージは、IP アドレスが IM and Presence Service ノード名として設定されると発生する場合があります。 Cisco Jabber で証明書の警告メッセージの生成を防止するには、ノード名として FQDN を使用する必要があります。
| ステップ 1 | を選択します。 |
| ステップ 2 | [Server(サーバ)] ドロップダウン リストから [IM and Presence Service(IM and Presence Service)] ノードを選択します。 |
| ステップ 3 | [Service(サービス)] ドロップダウン リストから [Cisco XCP Router(Cisco XCP ルータ)] を選択します。 |
| ステップ 4 | メニューから次の [Routing Communication Types(ルーティング通信タイプ)] のいずれかを選択します。 |
| ステップ 5 | [Save(保存)] をクリックします。 |
| ステップ 6 | 展開内のすべてのノードで Cisco XCP Router サービスを再起動します。 |
クラスタ ID の設定
インストール時に、システムはデフォルトの固有のクラスタ ID を IM and Presence データベース パブリッシャ ノードに割り当てます。 クラスタ内の複数のノードを設定する場合、システムはクラスタの各ノードが同じクラスタ ID 値を共有するようにクラスタ ID を配布します。
クラスタ ID 値をデフォルト設定のままにすることを推奨します。 クラスタ ID 値を変更する場合は、次の点に注意してください。
- MDNS ルーティングを選択した場合は、すべてのノードにマルチキャスト ドメインにある他のノードを識別できるようにするために同じクラスタ ID が必要です。
- グループ チャット機能を展開する場合、IM and Presence サービスは、チャット ノードのエイリアス マッピングにクラスタ ID 値を使用し、クラスタ ID 値の変更が必要になる可能性がある特定の設定シナリオがあります。 詳細については、グループ チャット モジュールを参照してください。
デフォルトのクラスタ ID 値を変更する場合は、IM and Presence データベース パブリッシャ ノードでのみこの変更を行う必要があります。システムはクラスタ内の他のノードに新しいクラスタ ID 値を複製します。
| ステップ 1 | を選択します。 | ||
| ステップ 2 |
クラスタ ID 値を表示または編集します。
|
||
| ステップ 3 |
[Save(保存)] をクリックします。
|
アベイラビリティ状態変更メッセージのスロットル レートの設定
IM and Presence サービスの過負荷を防ぐために、メッセージで Cisco XCP Router に送信されるアベイラビリティ(プレゼンス)変更のレート(秒当たり)を設定できます。 この値を設定すると、IM and Presence サービスはアベイラビリティ(プレゼンス)変更のレートを設定値に合わせて小さくします。
| ステップ 1 | を選択します。 |
| ステップ 2 | [Server(サーバ)] メニューから [IM and Presence Service(IM and Presence サービス)] ノードを選択します。 |
| ステップ 3 | [Service(サービス)] メニューから [Cisco Presence Engine(Cisco Presence エンジン)] を選択します。 |
| ステップ 4 | [Clusterwide Parameters(クラスタ全体のパラメータ)] セクションで、[Presence Change Throttle Rate(プレゼンス変更スロットル レート)] パラメータを編集します。 このパラメータは、秒当たりのプレゼンス更新の数を定義します。 |
| ステップ 5 | [Save(保存)] をクリックします。 |
IPv6 設定
IM and Presence Service の企業ネットワークと Eth0 の両方に対して、各 IM and Presence Service ノードで IPv6 を使用するように設定する必要があります。そのようにしないと、システムは IP トラフィック向けに IPv4 を使おうとします。 たとえば、エンタープライズ パラメータが IPv6 に設定され、クラスタ内の 2 つのノードのうちの 1 つだけで Eth0 ポートが IPv6 に設定されている場合、ポートを IPv6 に設定したノードのみが IPv6 に対して有効になります。 他のノードは IPv4 を使おうとします。
コマンドライン インターフェイスを使用して IPv6 パラメータを設定する場合の詳細については、『Cisco Unified Communications Manager Administration Guide』および『Command Line Interface Guide for Cisco Unified Communications Solutions』を参照してください。
- IPv6 の相互作用と制限事項
- IM and Presence サービスの Eth0 で IPv6 を有効にする
- IM and Presence サービスの Eth0 での IPv6 の無効化
- IPv6 エンタープライズ パラメータの有効化
IPv6 の相互作用と制限事項
-
IM and Presence Service と Cisco Unified Communications Manager 間の接続に IPv4 を使用していても、IM and Presence Service では外部とのやりとりに IPv6 を使用できます。
-
IM and Presence Service の企業ネットワークと Eth0 の両方に対して、各 IM and Presence Service ノードで IPv6 を使用するように設定する必要があります。そのようにしないと、システムは外部インターフェイス上で IP トラフィック向けに IPv4 を使おうとします。 たとえば、エンタープライズ パラメータが IPv6 に設定され、クラスタ内の 2 つのノードのうちの 1 つだけで Eth0 ポートが IPv6 に設定されている場合、ポートを IPv6 に設定したノードのみが IPv6 に対して有効になります。 他のノードは IPv4 を使おうとします。
(注)
IM and Presence Service ノードで、エンタープライズ パラメータまたは ETH0 のいずれかに対して、何らかの理由で IPv6 が無効になった場合でも、IM and Presence Service で設定されているサーバのホスト名が解決可能な IPv6 アドレスならば、ノードは内部 DNS クエリを実行し、外部の LDAP やデータベース サーバに接続できます。
-
フェデレーションでは、IPv6 が有効な外国企業へのフェデレーション リンクをサポートする必要がある場合は、IM and Presence Service で IPv6 を有効にする必要があります。 これは、IM and Presence Service ノードとフェデレーション企業間に ASA がインストールされている場合にも当てはまります。 ASA は、IM and Presence Service ノードに対して透過的です。
-
IM and Presence Service ノードで次のいずれかの項目に IPv6 を設定する場合、ノードは着信する IPv4 パケットを受け入れず、自動的に IPv4 の使用に復帰することはありません。 IPv4 を使用するには、次の項目が展開に存在する場合、これらが IPv4 に設定されていることを確認する必要があります。
IM and Presence サービスの Eth0 で IPv6 を有効にする
IPv6 を使用するクラスタの各 IM and Presence サービス ノードの Eth0 ポートで IPv6 を有効にするには、Cisco Unified IM and Presence Operating System の管理 GUI を使用します。 変更を適用するには、ノードを再起動する必要があります。
(注) |
IPv6 設定を完了するには、Eth0 を設定しノードをリブートした後に、クラスタの IPv6 エンタープライズ パラメータを有効にし、IPv6 Name パラメータも設定する必要があります。 |
| ステップ 1 | を選択します。 [Ethernet IPv6 Configuration(Ethernet IPv6 の設定)] ウィンドウが表示されます。 | ||
| ステップ 2 | [Enable IPv6(IPv6 を有効にする)] チェックボックスをオンにします。 | ||
| ステップ 3 |
[Address Source(アドレス ソース)] を選択します。
[Manual Entry(手動入力)] を選択した場合は、IPv6 アドレス、サブネット マスク、およびデフォルト ゲートウェイの値を入力します。 |
||
| ステップ 4 |
[Update with Reboot(リブートを使用した更新)] チェックボックスをオンにします。
|
||
| ステップ 5 |
[Save(保存)] をクリックします。 [Update with Reboot(リブートを使用した更新)] チェックボックスをオンにした場合は、ノードがリブートされ、変更が適用されます。 |
次の作業
Cisco Unified CM IM and Presence の管理を使用して IM and Presence サービス クラスタの IPv6 エンタープライズ パラメータを有効に設定し、次に共通トポロジ(Common Topology)を使用して IPv6 名のパタメータを設定します。
IM and Presence サービスの Eth0 での IPv6 の無効化
IPv6 を使用しないクラスタで各 IM and Presence サービス ノードの Eth0 ポートの IPv6 を無効にするには、Cisco Unified IM and Presence Operating System の管理 GUI を使用します。 変更を適用するには、ノードを再起動する必要があります。
(注) |
IPv6 を使用するクラスタのいずれのノードも使用しない場合は、IPv6 エンタープライズ パラメータがクラスタで無効になっていることを確認します。 |
| ステップ 1 | を選択します。 [Ethernet IPv6 Configuration(Ethernet IPv6 の設定)] ウィンドウが表示されます。 | ||
| ステップ 2 | [Enable IPv6(IPv6 を有効にする)] チェックボックスをオフにします。 | ||
| ステップ 3 |
[Update with Reboot(リブートを使用した更新)] チェックボックスをオンにします。
|
||
| ステップ 4 |
[Save(保存)] を選択します。 [Update with Reboot(リブートを使用した更新)] チェックボックスをオンにした場合は、ノードがリブートされ、変更が適用されます。 |
IPv6 エンタープライズ パラメータの有効化
 ヒント |
[Cisco Unified CM IM and Presence Administration(Cisco Unified CM IM and Presence の管理)] を使用してシステム再起動通知をモニタするには、 を選択します。 |
| ステップ 1 | を選択します。 [Enterprise Parameters Configuration(エンタープライズ パラメータ設定)] ウィンドウが表示されます。 |
| ステップ 2 | [IPv6(IPv6)] パネルで [True(True)] を選択します。 |
| ステップ 3 | [Save(保存)] を選択します。 |
次の作業
変更を適用するには、IM and Presence Service ノードのサービスを再起動します。
プロキシ サーバの設定
| ステップ 1 | を選択します。 |
| ステップ 2 | [Method/Event Routing Status(メソッド/イベント ルーティングのステータス)] で [On(オン)] を選択します。 |
| ステップ 3 | [Preferred Proxy Server(優先プロキシ サーバ)] で [Default SIP Proxy TCP Listener(デフォルト SIP プロキシ TCP リスナー)] を選択します。 |
| ステップ 4 | [Save(保存)] をクリックします。 |
IM and Presence Service のサービス
IM and Presence サービスのサービスのオン
次の手順は、基本的な IM and Presence サービス設定を導入するときにオンにする必要のあるサービスを一覧表示します。 IM and Presence サービス クラスタの各ノードで次のサービスをオンにします。
IM and Presence サービスで導入する追加機能によって他の任意サービスをオンにする必要があります。 詳細については、固有の機能に関連する IM and Presence サービス のマニュアルを参照してください。 特定のシステム コンポーネントまたは機能を設定できるようにサービスを手動で停止した場合は、この手順を使用して、手動でこれらのサービスを再起動します。
Cisco XCP Router サービスを、基本的な IM and Presence サービス 展開のために実行する必要があります。 IM and Presence サービスは、デフォルトで Cisco XCP Router をオンにします。 を選択して、このネットワーク サービスがオンになっていることを確認します。
| ステップ 1 | を選択します。 |
| ステップ 2 |
[Server(サーバ)] メニューから [IM and Presence Service(IM and Presence サービス)] ノードを選択します。 このメニューから [Cisco Unified Communications Manager(Cisco Unified Communications マネージャー)] ノードを選択して、Cisco Unified Communications Manager サービスのステータスを変更することもできます。 |
| ステップ 3 | 基本的な IM and Presence サービス展開では、次のサービスをオンにします。 |
| ステップ 4 | [Save(保存)] をクリックします。 |
目次
- IM and Presence Service のネットワーク設定
- 設定変更通知およびサービス再起動通知
- サービス再起動通知
- Cisco XCP Router の再起動
- Cisco XCP Router サービスの再起動
- DNS ドメイン コンフィギュレーション
- 別々の DNS ドメインまたはサブドメインに展開された IM and Presence Service クラスタ
- 別々の DNS ドメインまたはサブドメインに展開されたクラスタ内の IM and Presence Service ノード
- 関連する Cisco Unified Communications Manager クラスタとは異なる DNS ドメインに展開されているクラスタ内の IM and Presence Service ノード
- Cisco Unified Communications Manager クラスタに関連付ける DNS ドメインの指定
- IM and Presence Service のデフォルトのドメイン設定
- インストール後のデフォルト ドメインの置換
- IM and Presence サービスのデフォルト ドメインの変更
- IM アドレス設定
- IM アドレスの設定要件
- UserID @ Default_Domain IM アドレス インタラクションと制約事項
- ディレクトリ URI IM アドレスの連携動作と制約事項
- IM アドレス スキームの設定
- IM and Presence Service クラスタのドメイン管理
- IM ドメイン管理のインタラクションと制約事項
- IM アドレス ドメインの表示
- IM アドレス ドメインの追加または更新
- IM アドレス ドメインの削除
- IM and Presence Service のルーティング情報の設定
- ルーティング通信の推奨事項
- MDNS ルーティングとクラスタ ID の設定
- ルーティング通信の設定
- クラスタ ID の設定
- アベイラビリティ状態変更メッセージのスロットル レートの設定
- IPv6 設定
- IPv6 の相互作用と制限事項
- IM and Presence サービスの Eth0 で IPv6 を有効にする
- IM and Presence サービスの Eth0 での IPv6 の無効化
- IPv6 エンタープライズ パラメータの有効化
- プロキシ サーバの設定
- IM and Presence Service のサービス
- IM and Presence サービスのサービスのオン
- 設定変更通知およびサービス再起動通知
- DNS ドメイン コンフィギュレーション
- IM and Presence Service のデフォルトのドメイン設定
- IM アドレス設定
- IM and Presence Service クラスタのドメイン管理
- IM and Presence Service のルーティング情報の設定
- IPv6 設定
- プロキシ サーバの設定
- IM and Presence Service のサービス
サービス再起動通知
Cisco Unified CM IM and Presence の管理で IM and Presence XCP サービスに影響する設定変更を行う場合は、変更を有効にするために XCP サービスを再起動する必要があります。 IM and Presence Service は、設定変更が影響する正確なノードおよび再起動する必要があるサービスを通知します。 アクティブな通知のポップアップ ウィンドウが Cisco Unified CM IM and Presence の管理の各ページに表示され、サービスを再起動する必要があることを視覚的に示します。 マウスをダイアログ バブル アイコンに合わせると、アクティブな通知(存在する場合)および関連する重大度の一覧が表示されます。 アクティブな通知のリストから Cisco Unified IM and Presence Serviceability に直接アクセスして、必要なサービスを再起動できます。
特にネットワークに IM and Presence Service を展開した後で設定変更を行う場合は、サービス再起動通知のサービス再起動ポップアップ ウィンドウをモニタすることを推奨します。 付属マニュアルのほとんどのタスクでは、サービスの再起動が必要かどうかが示されます。
サービス通知のタイプおよびサービス通知のセキュリティ レベルに関する情報については、サービス再起動通知のオンライン ヘルプ トピックを参照してください。
Cisco XCP Router の再起動
すべての可用性およびメッセージング サービスが IM and Presence Service で適切に機能するには、Cisco XCP Router を実行する必要があります。 これは、SIP ベースと XMPP ベースの両方のクライアント メッセージングに適用されます。 Cisco XCP ルータを再起動すると、IM and Presence Service によりすべてのアクティブな XCP サービスが自動的に再起動されます。
このモジュールのトピックは、設定変更後に Cisco XCP Router を再起動する必要があるかどうかを示します。 Cisco XCP ルータは、停止して再開するのではなく、再起動する必要があります。 Cisco XCP Router を再起動するのではなく停止した場合、IM and Presence Service により他のすべての XCP サービスが停止されます。 その後 XCP ルータを起動しても、IM and Presence Service により他の XCP サービスは自動的に起動されません。手動で他の XCP サービスを起動する必要があります。
Cisco XCP Router サービスの再起動
手順
ステップ 1 IM and Presence サービスで、 を選択します。 ステップ 2 ノードを [Server(サーバ)] リストボックスから選択して、[Go(進む)] を選択します。 ステップ 3 [IM and Presence Service(IM and Presence サービス)] セクションで、[Cisco XCP Router(Cisco XCP ルータ)] サービスの横にあるオプション ボタンをクリックします。 ステップ 4 [Restart(再起動)] をクリックします。 ステップ 5 リスタートに時間がかかることを示すメッセージが表示されたら、[OK(OK)] をクリックします。
DNS ドメイン コンフィギュレーション
Cisco Unified Communications Manager IM and Presence サービスは、任意の数の DNS ドメインへの柔軟なノード展開をサポートします。 この柔軟性をサポートするには、展開内のすべての IM and Presence サービス ノードにそのノードの完全修飾ドメイン名(FQDN)に設定されたノード名が必要です。 いくつかのサンプル ノード展開オプションは、次のとおりです。
(注)
ある IM and Presence サービス ノード名がホスト名だけに基づいている場合、すべての IM and Presence サービス ノードが同じ DNS ドメインを共有する必要があります。
システムによって、IM and Presence サービス のデフォルト ドメインまたは DNS ドメインと一致するように設定される他の IM ドメインは必要はありません。 IM and Presence サービス展開に共通のプレゼンス ドメインを配置し、ノードを複数の DNS ドメインに展開できます。
詳細情報については、『Changing IP Address and Hostname for Cisco Unified Communications Manager and IM and Presence Service』を参照してください。
- 別々の DNS ドメインまたはサブドメインに展開された IM and Presence Service クラスタ
- 別々の DNS ドメインまたはサブドメインに展開されたクラスタ内の IM and Presence Service ノード
- 関連する Cisco Unified Communications Manager クラスタとは異なる DNS ドメインに展開されているクラスタ内の IM and Presence Service ノード
- Cisco Unified Communications Manager クラスタに関連付ける DNS ドメインの指定
関連資料
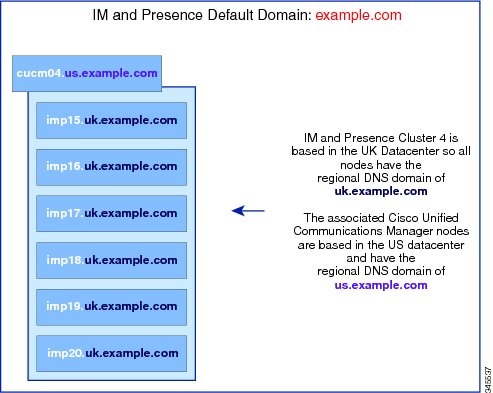
関連する Cisco Unified Communications Manager クラスタとは異なる DNS ドメインに展開されているクラスタ内の IM and Presence Service ノード
IM and Presence Service は、関連する Cisco Unified Communications Manager クラスとは異なる DNS ドメインへの IM and Presence Service ノードの配置をサポートします。 次の図に、サポートされている展開シナリオの例を示します。
図 3. 関連する Cisco Unified Communications Manager クラスタとは異なる DNS ドメインに展開されているクラスタ内の IM and Presence Service ノード
(注)
Cisco Unified Communications Manager とのアベイラビリティ統合をサポートするには、CUCM Domain の SIP Proxy サービス パラメータが Cisco Unified Communications Manager クラスタの DNS ドメインと一致する必要があります。
デフォルトでは、CUCM ドメインの SIP Proxy サービス パラメータは IM and Presence データベース パブリッシャ ノードの DNS ドメインに設定されます。 したがって、IM and Presence データベース パブリッシャ ノードの DNS ドメインが Cisco Unified Communications Manager クラスタの DNS ドメインと異なる場合、IM and Presence データベース パブリッシャ ノードで Cisco Unified CM IM and Presence の管理 GUI を使用してこのサービス パラメータを更新する必要があります。 詳細については、トピック「Specify DNS domain associated with Cisco Unified Communications Manager」を参照してください。
Cisco Unified Communications Manager クラスタに関連付ける DNS ドメインの指定
手順
(注)
この手順は、IM and Presence データベース パブリッシャ ノードの DNS ドメインが Cisco Unified Communications Manager ノードの DNS ドメインとは異なる場合にのみ必要です。
IM and Presence サービスはクラスタ内のすべての Cisco Unified Communications Manager ノード用の アクセス コントロール リスト(ACL)エントリを維持します。 これにより、ノード間でのアベイラビリティのシームレス共有が可能になります。 これらの ACL エントリは FQDN ベースであり、Cisco Unified Communications Manager のホスト名を IM and Presence データベース パブリッシャ ノードの DNS ドメインに付加することによって生成されます。
IM and Presence データベース パブリッシャ ノードの DNS ドメインが Cisco Unified Communications Manager ノードの DNS ドメインとは異なる場合、無効な ACL エントリが追加されます。 これを回避するには、IM and Presence データベース パブリッシャ ノードの Cisco Unified CM IM and Presence の管理 GUI で次の手順を実行する必要があります。
ステップ 1 を選択します。 ステップ 2 [Server(サーバ)] ドロップダウン リストから、[IM and Presence Service(IM and Presence サービス)] ノードを選択します。 ステップ 3 [Service(サービス)] ドロップダウン リストから、[Cisco SIP Proxy(Cisco SIP プロキシ)] を選択します。 ステップ 4 Cisco Unified Communications Manager ノードの DNS ドメインと一致するように [General Proxy Parameters(Clusterwide)(一般的なプロキシ パラメータ(クラスタ全体))] セクションの [CUCM Domain(CUCM ドメイン)] フィールドを編集します。 デフォルトで、このパラメータは IM and Presence データベース パブリッシャ ノードの DNS ドメインに設定されます。
ステップ 5 [Save(保存)] をクリックします。
関連資料
IM and Presence Service のデフォルトのドメイン設定
インストール後のデフォルト ドメインの置換
手順IM and Presence サービスは IM and Presence サービスのインストール時に指定された DNS ドメインに自動的に IM and Presence サービス クラスタのデフォルト ドメインを設定します。 DNS ドメインが IM and Presence サービスの全社レベルのデフォルト ドメインに一致していない場合は、DNS ドメイン値を全社レベルの IM and Presence サービスのデフォルト ドメインに置き換えます。
ネットワークで DNS を使用せず、インストール時にDNS ドメインを設定していなかった場合に、IM and Presence サービス のデフォルト ドメインに「DOMAIN.NOT.SET」がデフォルトで設定されます。 再度、全社レベルの IM and Presence サービス のデフォルト ドメインでこのデフォルト値を置き換えます。
(注)
IM and Presence サービス のデフォルトドメインは社内のすべてのクラスタ全体で同じである必要があります。 そうでない場合は、クラスタ間の通信ができなくなります。
クラスタの新しい IM and Presence サービス のデフォルト ドメイン値を設定するには、次の手順を実行します。
(注)
次の手順は、クラスタの IM and Presence サービス のデフォルト ドメインだけを変更します。 そのクラスタ内のすべての IM and Presence サービス ノードに関連付けられている DNS ドメインは変更されません。 IM and Presence サービス ノードの DNS ドメインを変更する手順については、『IP Address, Domain and Hostname for IM and Presence Service on Cisco Unified Communications Manager 』を参照してください。
ステップ 1 クラスタ内のすべてのノードの次のサービスの停止します。停止するサービスとは、クラスタ内のすべての IM and Presence ノードの Cisco SIP Proxy、Cisco Presence Engine および Cisco XCP Router サービスです。 ステップ 2 を選択します。 ステップ 3 [Default Domain(デフォルト ドメイン)] を選択します。 ステップ 4 [Domain Name(ドメイン名)] フィールドに、新しい IM and Presence サービス デフォルト のドメインを入力し、[Save(保存)] を選択します。 ステップ 5 クラスタ内のすべてのノードで、手動でこの手順の初めに停止したすべてのサービスを再起動します。 前に実行していた XCP サービスをクラスタ内の各ノードで手動で再起動する必要があります。
IM and Presence サービスのデフォルト ドメインの変更
手順クラスタ内で IM and Presence Service のデフォルト ドメイン 値を変更する場合、この手順に従ってください。 DNS または非 DNS 展開が存在する場合、この手順を適用できます。
注意
この手順の一環として、サービスを停止する前に、プレゼンス冗長グループのハイ アベイラビリティを無効にします。 ハイ アベイラビリティが有効な間にサービスを停止すると、システムのフェールオーバーが行われます。
この手順では、IM and Presence Service のクラスタのデフォルト ドメインだけを変更します。 そのクラスタ内のすべての IM and Presence Service ノードに関連付けられている DNS ドメインは変更されません。 IM and Presence Service ノードの DNS ドメインを変更する方法の手順については、『Changing IP Address and Hostname for Cisco Unified Communications Manager and IM and Presence Service』を参照してください。
(注)
Cisco Unified Communications Manager に IM and Presence Service パブリッシャのノードを追加すると、デフォルト ドメインが設定されます。 ノードのインストール中、Cisco Unified Communications Manager からデフォルト ドメイン 値が取得できない場合、デフォルト ドメイン値は「DOMAIN.NOT.SET(DOMAIN.NOT.SET)」にリセットされます。 IM and Presence Service のデフォルト ドメイン値を有効なドメイン値に変更するには、この手順を使用します。
ステップ 1 表示された順番で、クラスタ内のすべての IM and Presence Service ノードで次のサービスを停止します。 ステップ 2 IM and Presence Service データベース パブリッシャ ノードで、新しいドメイン値を設定するには、次のステップを実行します。
ステップ 3 クラスタ内のすべてのノードで、手動でこの手順の初めで停止したすべてのサービスを起動します。 クラスタ内のすべてのノードで、前に実行されていた、XCP 機能サービスを手動で再起動します。
IM アドレスの設定要件
M and Presence Service のデフォルト ドメインと、使用する IM アドレス スキームは、IM and Presence Service クラスタ全体で一貫している必要があります。 設定する IM アドレス スキームはすべてのユーザ JID に影響を与え、別の設定を持つ可能性があるクラスタ間での通信を中断せずに段階的に実行することはできません。
展開した クライアントが IM アドレスとしてディレクトリ URI をサポートしない場合は、管理者がディレクトリ URI IM アドレス スキームを無効にする必要があります。
IM and Presence Service で IM アドレスを設定する前に、各 IM アドレスに固有の詳細な要件については連動操作と制約事項についてのトピックを、追加情報については IM アドレス設定の計画のトピックを参照してください。
ディレクトリ URI IM アドレスの連携動作と制約事項
複数のドメイン設定をサポートするには、IM and Presence Service の IM アドレス スキームとしてディレクトリ URI を設定する必要があります。
注意
IM アドレス スキームとしてディレクトリ URI を使用するようにノードを設定する場合は、ディレクトリ URI をサポートするクライアントのみを展開することを推奨します。 ディレクトリ URI をサポートしないクライアントは、ディレクトリ URI IM アドレス スキームが有効になっている場合は動作しません。 ディレクトリ URI をサポートしないクライアントが展開されている場合は、UserID@Default_Domain IM アドレス スキームを使用し、ディレクトリ URI IM アドレス スキームは使用しないでください。
ディレクトリ URI IM アドレス スキームを使用する場合は、次の制約事項および連係動作を順守します。
すべてのユーザに Cisco Unified Communications Manager に有効なディレクトリ URI 値が設定されています。
展開されたすべてのクライアントが、IM アドレスとしてディレクトリ URI をサポートし、EDI ベースのディレクトリ統合を使用する必要があります。
UDS ベースのディレクトリ統合はサポートされていません。
すべての IM and Presence Service クラスタで IM アドレス スキームが一貫している必要があります。
すべてのクラスタが、ディレクトリ URI アドレス スキームをサポートする Cisco Unified Communications Manager のバージョンを実行している必要があります。
LDAP 同期が無効になっている場合は、ディレクトリ URI を自由形式の URI として設定することができます。 LDAP ディレクトリ同期が有効になっている場合は、ディレクトリ URI を電子メール アドレス(mailid)または Microsoft OCS/Lync SIP URI(msRTCSIP-PrimaryUserAddress)にマップできます。
ディレクトリ URI IM アドレス設定はグローバルであり、クラスタ内のすべてのユーザに適用されます。 クラスタ内の個々のユーザに対して異なるディレクトリ URI IM アドレスを設定できません。
Cisco Jabber クライアントは、ディレクトリ URI をサポートする必要があります。 互換性を判断するには、Cisco Jabber クライアントに付属のマニュアルを参照してください。
Cisco Jabber クライアントは、IM and Presence Service の IM アドレス スキームとディレクトリ URI 設定に合わせて設定する必要があります。 デフォルトでは、Cisco Jabber は、デフォルトの IM アドレス スキーム UserID@ Default_Domain を想定します。 ディレクトリ URI を使用する場合は、ディレクトリ検索がディレクトリ URI 値と合うように、Cisco Jabber クライアントでの追加設定が必要です。
たとえば、IM アドレス スキームがディレクトリ URI で、Active Directory でメールするようにマッピングされている場合は、連絡先の追加時に IM アドレスとしてメール フィールドを使用するように Active Directory に対する Windows ディレクトリ検索用の Jabber を設定する必要があります。 詳細については、お使いの Cisco Jabber for Windows のバージョンのインストールおよび設定ガイドを参照してください。
(注)
Cisco Jabber クライアントのディレクトリ URI IM アドレス スキームを設定するには、xml 形式のコンフィギュレーション ファイルを手動で編集する必要があります。 xml コンフィギュレーション ファイルは、TFTP サーバにファイルをアップロードする前に有効になっている必要があります。 Cisco Jabber クライアントは、無効なコンフィギュレーション ファイルを無視します。
IM アドレス スキームの設定
新規インストールする、または以前のバージョンから IM and Presence Service をアップグレードするとき、UserID @ Default_Domain IM アドレス スキームがデフォルトのオプションです。 Cisco Unified CM IM and Presence Administration GUI を使用して IM and Presence Service クラスタの IM address スキームを設定できます。
注意
この手順の一環として、サービスを停止する前に、プレゼンス冗長グループのハイ アベイラビリティを無効にします。 ハイ アベイラビリティが有効な間にサービスを停止すると、システムのフェールオーバーが行われます。
(注)
選択したIM アドレス スキームは、IM and Presence Service クラスタ全体で一貫している必要があります。
はじめる前に手順
(注)
エンド ユーザが正しくプロビジョニングされているか、また、無効または重複ユーザがないかを判断するために、IM and Presence Service トラブルシュータを使用します。
ステップ 1 を選択します。 [Advanced Configuration(詳細設定)] ウィンドウが表示されます。
ステップ 2 [IM Address Scheme(IM アドレス スキーム)] を選択し、[UserID @ [Default Domain](ユーザ ID @ [デフォルト ドメイン])] または [Directory URI(ディレクトリ URI)] を選択します。
ヒント IM and Presence Service の要求サービスを停止した後でのみ、IM アドレス スキームが使用可能になります。
ステップ 3 [Save(保存)] をクリックします。 ステータス領域の更新進行状況を監視できます。
IM アドレス スキームとしてディレクトリ URI を選択する場合、展開クライアントが複数ドメインをサポートできることを確認するプロンプトが表示される場合があります。 続行するには [OK(OK)] をクリックします。または [Cancel(取消)] をクリックします。
ユーザが [Directory URI(ディレクトリ URI)] 設定が無効に設定されている場合は、ダイアログボックスが表示されます。 続行するには、[OK(OK)] をクリックし、または [Cancel(取消)] をクリックします。次に、IM アドレス スキームを再設定する前にユーザ設定をします。
システム アップデートは完了まで最長で 1 時間かかる場合があります。 アップデートに失敗すると、[Re-try(再試行)] ボタンが表示されます。 変更を再適用するには、[Re-try(再試行)] をクリックします。または [Cancel(取消)] をクリックします。
次の作業
システムが正常に更新された場合、クラスタの停止しているすべてのサービスと前に実行されている XCP 機能サービスを再起動できます。 設定を確認するには、トラブルシュータを使用します。
IM and Presence Service クラスタのドメイン管理
Cisco Unified CM IM and Presence の管理 GUI を使用して、ローカル IM アドレス ドメインを手動で追加、更新、削除できます。
[IM and Presence Domain(IM and Presence ドメイン)] ウィンドウに次のドメインが表示されます。ドメインが [IM and Presence Domain(IM and Presence ドメイン)] ウィンドウに表示されている場合は、ドメインは有効になっています。 有効化または無効化するドメインはありません。
Cisco Sync Agent サービスが夜間監査を実行し、ローカル クラスタ、およびクラスタ間が設定されている場合はピア クラスタの各ユーザのディレクトリ URI を確認して、一意のドメインのリストを自動的に構築します。 クラスタ内のユーザがそのドメインに割り当てられると、そのドメインは管理者が管理するドメインからシステムが管理するドメインに変更されます。 クラスタ内のユーザがドメインを使用しなくなった場合は、ドメインは管理者が管理するドメインに戻ります。
(注)
この機能を使用するには、IM and Presence Service および Cisco Unified Communications Manager のすべてのノードおよびクラスタが複数のドメインをサポートする必要があります。 IM and Presence Service クラスタ内のすべてのノードが Release 10.0 以降を使用して実行しており、ディレクトリ URI IM アドレッシングが設定されていることを確認します。
IM ドメイン管理のインタラクションと制約事項
ローカル クラスタに関連付けられている管理者が管理するドメインのみを追加または削除できます。
システムが管理するドメインは編集できません。
他のクラスタに関連付けられている、システムが管理するかまたは管理者が管理するドメインは編集できません。
2 個のクラスタでドメインを設定することはできますが、ピア クラスタのみで使用されている場合に限ります。 これは、ローカル クラスタのシステムが管理するドメインとして表示されますが、ピア クラスタで使用中であると識別されます。
一部のセキュリティ証明書は、手動でドメインを追加、更新、または削除した後で再作成することが必要になる場合があります。 自己署名証明書または証明書署名要求(CSR)を生成すると、サブジェクト共通名(CN)がノードの FQDN に設定されます。また、ローカルの IM and Presence のデフォルト ドメインおよび システムがホストするすべての追加ドメインが、サブジェクトの別名(SAN)として証明書に追加されます。
TLS による XMPP フェデレーションでは、IM アドレス ドメインを追加または削除する場合、TLS 証明書を再作成する必要があります。
IM アドレス ドメインの表示
IM アドレス ドメインの追加または更新
手順Cisco Unified CM IM Presence 管理 GUI を使用して、ローカル クラスタに手動で IM アドレス ドメインを追加し、ローカル クラスタにある既存の IM アドレスのドメインを更新できます。
最大 255 文字のドメイン名を入力でき、各ドメインはクラスタ全体で一意である必要があります。 指定できる値は、すべての大文字または小文字(a-zA-Z)、すべての番号(0-9)、ハイフン(-)、またはドット(.)です。 ドメイン ラベルの区切り文字はドットです。 ドメイン ラベルの先頭文字をハイフンにすることはできません。 最後のラベル(たとえば、.com)の先頭文字を数字にすることはできません。 たとえば、Abc.1om は無効なドメインです。
システム管理ドメインが使用中であるため、編集できません。 IM アドレス ドメインを持つシステムでユーザが設定されていない場合(たとえば、ユーザが削除された場合)、システム管理ドメインは自動的に管理者の管理ドメインになります。 管理者の管理ドメインを編集または削除できます。
ステップ 1 を選択します。 すべての管理者の管理 IM アドレス ドメインとシステム管理 IM アドレス ドメインを表示する [Find and List Domains(ドメインの検索と一覧)] ウィンドウが表示されます。
ステップ 2 次のいずれかの操作を実行します。 ステップ 3 最大 255 文字の一意なドメイン名を [Domain Name(ドメイン名)] フィールドに入力し、[Save(保存)] をクリックします。
ヒント 警告メッセージが表示されます。 TLS XMPP フェデレーションを使用した場合、新しい TLS 証明書を生成する手順に進みます。
IM アドレス ドメインの削除
手順Cisco Unified CM IM and Presence の管理 GUI を使用して、ローカル クラスタにある管理者の管理 IM アドレス ドメインを削除できます。
システム管理ドメインは使用中のため削除できません。 その IM アドレス ドメインのシステムにユーザが存在しない場合(たとえば、ユーザが削除された場合)、システム管理ドメインは自動的に管理者の管理ドメインになります。 管理者の管理ドメインを編集または削除できます。
(注)
ローカル クラスタとピア クラスタの両方に設定された管理者の管理ドメインを削除すると、ドメインは管理者の管理ドメインのリストに保持されます。ただし、そのドメインはピア クラスタでのみ設定済みとマークされます。 完全にエントリを削除するには、設定されたすべてのクラスタからドメインを削除する必要があります。
ステップ 1 を選択します。 すべての管理者の管理 IM アドレス ドメインとシステム管理 IM アドレス ドメインを表示する [Find and List Domains(ドメインの検索と一覧)] ウィンドウが表示されます。
ステップ 2 次の方法の 1 つを使用して削除する管理者の管理ドメインを選択し、次に [Delete Selected(選択項目の削除)] をクリックします。
ヒント すべての選択をクリアするには、[Clear All(すべてをクリア)] をクリックします。
ステップ 3 [OK(OK)] をクリックして削除を確定するか、[Cancel(取消)] をクリックします。
ルーティング通信の推奨事項
MDNS は IM and Presence Service の XCP ルート ファブリックを確立するためのデフォルトのメカニズムで、ネットワークは、クラスタ内にあるすべての IM and Presence Service ノード間のルータ間接続を自動的に確立します。 MDNS ルーティングの要件は、クラスタのすべてのノードが同じマルチキャスト ドメインにあることです。 XCP ルート ファブリックに参加する新しい XCP ルータをシームレスにサポートできるため、MDNS ルーティングを推奨します。
ルーティング通信として MDNS を選択する場合は、ネットワークでマルチキャスト DNS を有効にする必要があります。 一部のネットワークでは、マルチキャストはデフォルトで有効であるか、特定のネットワーク領域(クラスタを構成するノードが含まれている領域など)で有効です。 このようなネットワークでは、MDNS ルーティングを使用するために、ネットワークで追加設定を行う必要はありません。 ネットワークでマルチキャスト DNS を無効にすると、MDNS パケットはクラスタ内の他のノードに到達できません。 ネットワークでマルチキャスト DNS が無効になっている場合、MDNS ルーティングを使用するには、ネットワーク機器の設定変更を実行する必要があります。
または、展開にルータ間通信を選択できます。 この場合、IM and Presence Service は動的にクラスタ内のノード間のすべてのルータ間接続を設定します。 クラスタのすべてのノードが同じマルチキャスト ドメインにない場合は、このルーティング設定タイプを選択します。 ルータ間通信を選択する場合は、次のことに注意してください。
MDNS ルーティングとクラスタ ID の設定
インストール時に、システムは固有のクラスタ ID を IM and Presence データベース パブリッシャ ノードに割り当てます。 システムはクラスタ ID を配布して、クラスタ内のすべてのノードが同じクラスタ ID 値を共有できるようにします。 クラスタ内のノードは、クラスタ ID を使用して、MDNS を使用するマルチキャスト ドメインにある他のノードを識別します。 MDNS ルーティングの要件は、1 つのスタンドアロンの IM and Presence サービス クラスタにあるノードが別のスタンドアロン クラスタ内のノードとのルータ間接続を確立することを防ぐために、クラスタ ID 値が一意であることです。 スタンドアロン クラスタはクラスタ間ピア接続上でのみ通信します。
クラスタのクラスタ ID 値を表示または設定するには、 を選択します。 クラスタ ID 値を変更する場合は、値が IM and Presence サービス展開に固有であることを確認します。
(注)
チャット機能を導入する場合は、IM and Presence サービスがチャット ノードのエイリアスを定義するクラスタ ID を使用します。 クラスタ ID 値の変更が必要になる可能性がある特定の設定シナリオがあります。 詳細については、グループ チャット モジュールを参照してください。
関連情報
ルーティング通信の設定
クラスタ内のノードがメッセージを相互にルーティングできるようにするには、ルーティング通信タイプを設定する必要があります。 この設定により、クラスタ内のノード間のルータ接続を確立するためのメカニズムが決定されます。 IM and Presence データベース パブリッシャ ノードでルーティングの通信タイプを設定し、IM and Presence Service はクラスタのすべてのノードにこのルーティング設定を適用します。
単一ノードの IM and Presence Service 展開の場合は、ルーティング通信タイプをデフォルト設定のままにすることを推奨します。
注意
クラスタ設定を完了し、IM and Presence Service 展開へのユーザ トラフィックの受け入れを開始する前に、ルーティング通信タイプを設定する必要があります。
はじめる前に手順
- MDNS ルーティングを使用する場合は、MDNS がネットワーク内で有効になっていることを確認します。
- ルータ間通信を使用する必要があり、DNS がネットワークで使用できない場合は、ノードごとにクラスタ トポロジでノード名として IP アドレスを設定する必要あります。 ノード名を編集するには、 を選択し、ノードの [edit(編集)] リンクをクリックします。 この設定は、IM and Presence Service のインストール後、すべてのノードで Cisco XCP Router を再起動する前に実行します。
注目:Cisco Jabber クライアントを使用する時、証明書の警告メッセージは、IP アドレスが IM and Presence Service ノード名として設定されると発生する場合があります。 Cisco Jabber で証明書の警告メッセージの生成を防止するには、ノード名として FQDN を使用する必要があります。
ステップ 1 を選択します。 ステップ 2 [Server(サーバ)] ドロップダウン リストから [IM and Presence Service(IM and Presence Service)] ノードを選択します。 ステップ 3 [Service(サービス)] ドロップダウン リストから [Cisco XCP Router(Cisco XCP ルータ)] を選択します。 ステップ 4 メニューから次の [Routing Communication Types(ルーティング通信タイプ)] のいずれかを選択します。 ステップ 5 [Save(保存)] をクリックします。 ステップ 6 展開内のすべてのノードで Cisco XCP Router サービスを再起動します。
クラスタ ID の設定
手順インストール時に、システムはデフォルトの固有のクラスタ ID を IM and Presence データベース パブリッシャ ノードに割り当てます。 クラスタ内の複数のノードを設定する場合、システムはクラスタの各ノードが同じクラスタ ID 値を共有するようにクラスタ ID を配布します。
クラスタ ID 値をデフォルト設定のままにすることを推奨します。 クラスタ ID 値を変更する場合は、次の点に注意してください。
- MDNS ルーティングを選択した場合は、すべてのノードにマルチキャスト ドメインにある他のノードを識別できるようにするために同じクラスタ ID が必要です。
- グループ チャット機能を展開する場合、IM and Presence サービスは、チャット ノードのエイリアス マッピングにクラスタ ID 値を使用し、クラスタ ID 値の変更が必要になる可能性がある特定の設定シナリオがあります。 詳細については、グループ チャット モジュールを参照してください。
デフォルトのクラスタ ID 値を変更する場合は、IM and Presence データベース パブリッシャ ノードでのみこの変更を行う必要があります。システムはクラスタ内の他のノードに新しいクラスタ ID 値を複製します。
ステップ 1 を選択します。 ステップ 2 クラスタ ID 値を表示または編集します。
(注) デフォルトでは、IM and Presence サービスはクラスタにクラスタ ID 値の "StandaloneCluster" を割り当てます。
ステップ 3 [Save(保存)] をクリックします。
ヒント IM and Presence サービスは、クラスタ ID 値でのアンダースコア文字(_)を許可しません。 クラスタ ID 値にこの文字が含まれていないことを確認します。
関連情報
アベイラビリティ状態変更メッセージのスロットル レートの設定
手順IM and Presence サービスの過負荷を防ぐために、メッセージで Cisco XCP Router に送信されるアベイラビリティ(プレゼンス)変更のレート(秒当たり)を設定できます。 この値を設定すると、IM and Presence サービスはアベイラビリティ(プレゼンス)変更のレートを設定値に合わせて小さくします。
ステップ 1 を選択します。 ステップ 2 [Server(サーバ)] メニューから [IM and Presence Service(IM and Presence サービス)] ノードを選択します。 ステップ 3 [Service(サービス)] メニューから [Cisco Presence Engine(Cisco Presence エンジン)] を選択します。 ステップ 4 [Clusterwide Parameters(クラスタ全体のパラメータ)] セクションで、[Presence Change Throttle Rate(プレゼンス変更スロットル レート)] パラメータを編集します。 このパラメータは、秒当たりのプレゼンス更新の数を定義します。 ステップ 5 [Save(保存)] をクリックします。
IPv6 設定
IM and Presence Service に対して IPv6 を有効にするには、次のタスクを実行する必要があります。IM and Presence Service の企業ネットワークと Eth0 の両方に対して、各 IM and Presence Service ノードで IPv6 を使用するように設定する必要があります。そのようにしないと、システムは IP トラフィック向けに IPv4 を使おうとします。 たとえば、エンタープライズ パラメータが IPv6 に設定され、クラスタ内の 2 つのノードのうちの 1 つだけで Eth0 ポートが IPv6 に設定されている場合、ポートを IPv6 に設定したノードのみが IPv6 に対して有効になります。 他のノードは IPv4 を使おうとします。
IPv6 エンタープライズ パラメータへの設定変更を有効にするには、 IM and Presence Service で次のサービスを再起動する必要があります。コマンドライン インターフェイスを使用して IPv6 パラメータを設定する場合の詳細については、『Cisco Unified Communications Manager Administration Guide』および『Command Line Interface Guide for Cisco Unified Communications Solutions』を参照してください。
- IPv6 の相互作用と制限事項
- IM and Presence サービスの Eth0 で IPv6 を有効にする
- IM and Presence サービスの Eth0 での IPv6 の無効化
- IPv6 エンタープライズ パラメータの有効化
IPv6 の相互作用と制限事項
IM and Presence Service で IPv6 を設定する場合、および外部の IPv6 デバイスやネットワークとのインタラクションを行う場合は、次のインタラクションと制限事項に注意してください。
IM and Presence Service と Cisco Unified Communications Manager 間の接続に IPv4 を使用していても、IM and Presence Service では外部とのやりとりに IPv6 を使用できます。
IM and Presence Service の企業ネットワークと Eth0 の両方に対して、各 IM and Presence Service ノードで IPv6 を使用するように設定する必要があります。そのようにしないと、システムは外部インターフェイス上で IP トラフィック向けに IPv4 を使おうとします。 たとえば、エンタープライズ パラメータが IPv6 に設定され、クラスタ内の 2 つのノードのうちの 1 つだけで Eth0 ポートが IPv6 に設定されている場合、ポートを IPv6 に設定したノードのみが IPv6 に対して有効になります。 他のノードは IPv4 を使おうとします。
(注)
IM and Presence Service ノードで、エンタープライズ パラメータまたは ETH0 のいずれかに対して、何らかの理由で IPv6 が無効になった場合でも、IM and Presence Service で設定されているサーバのホスト名が解決可能な IPv6 アドレスならば、ノードは内部 DNS クエリを実行し、外部の LDAP やデータベース サーバに接続できます。
フェデレーションでは、IPv6 が有効な外国企業へのフェデレーション リンクをサポートする必要がある場合は、IM and Presence Service で IPv6 を有効にする必要があります。 これは、IM and Presence Service ノードとフェデレーション企業間に ASA がインストールされている場合にも当てはまります。 ASA は、IM and Presence Service ノードに対して透過的です。
IM and Presence サービスの Eth0 で IPv6 を有効にする
手順IPv6 を使用するクラスタの各 IM and Presence サービス ノードの Eth0 ポートで IPv6 を有効にするには、Cisco Unified IM and Presence Operating System の管理 GUI を使用します。 変更を適用するには、ノードを再起動する必要があります。
(注)
IPv6 設定を完了するには、Eth0 を設定しノードをリブートした後に、クラスタの IPv6 エンタープライズ パラメータを有効にし、IPv6 Name パラメータも設定する必要があります。
ステップ 1 を選択します。 [Ethernet IPv6 Configuration(Ethernet IPv6 の設定)] ウィンドウが表示されます。 ステップ 2 [Enable IPv6(IPv6 を有効にする)] チェックボックスをオンにします。 ステップ 3 [Address Source(アドレス ソース)] を選択します。 [Manual Entry(手動入力)] を選択した場合は、IPv6 アドレス、サブネット マスク、およびデフォルト ゲートウェイの値を入力します。
ステップ 4 [Update with Reboot(リブートを使用した更新)] チェックボックスをオンにします。
ヒント 予定されていたメンテナンス時間中などに、後で手動でノードを再起動する場合は、[Update with Reboot(リブートを使用した更新)] チェックボックスはオンにしないでください。ただし、変更した内容はノードがリブートされるまで有効になりません。
ステップ 5 [Save(保存)] をクリックします。 [Update with Reboot(リブートを使用した更新)] チェックボックスをオンにした場合は、ノードがリブートされ、変更が適用されます。
次の作業
Cisco Unified CM IM and Presence の管理を使用して IM and Presence サービス クラスタの IPv6 エンタープライズ パラメータを有効に設定し、次に共通トポロジ(Common Topology)を使用して IPv6 名のパタメータを設定します。
IM and Presence サービスの Eth0 での IPv6 の無効化
手順IPv6 を使用しないクラスタで各 IM and Presence サービス ノードの Eth0 ポートの IPv6 を無効にするには、Cisco Unified IM and Presence Operating System の管理 GUI を使用します。 変更を適用するには、ノードを再起動する必要があります。
(注)
IPv6 を使用するクラスタのいずれのノードも使用しない場合は、IPv6 エンタープライズ パラメータがクラスタで無効になっていることを確認します。
ステップ 1 を選択します。 [Ethernet IPv6 Configuration(Ethernet IPv6 の設定)] ウィンドウが表示されます。 ステップ 2 [Enable IPv6(IPv6 を有効にする)] チェックボックスをオフにします。 ステップ 3 [Update with Reboot(リブートを使用した更新)] チェックボックスをオンにします。
ヒント 予定されていたメンテナンス時間中などに、後で手動でノードを再起動する場合は、[Update with Reboot(リブートを使用した更新)] チェックボックスはオンにしないでください。ただし、変更した内容はノードがリブートされるまで有効になりません。
ステップ 4 [Save(保存)] を選択します。 [Update with Reboot(リブートを使用した更新)] チェックボックスをオンにした場合は、ノードがリブートされ、変更が適用されます。
IPv6 エンタープライズ パラメータの有効化
手順IM and Presence Service クラスタの IPv6 エンタープライズ パラメータを有効にするには [Cisco Unified CM IM and Presence Administration(Cisco Unified CM IM and Presence の管理)] を使用します。 変更を適用するには、次のサービスを再起動する必要があります。
ヒント
[Cisco Unified CM IM and Presence Administration(Cisco Unified CM IM and Presence の管理)] を使用してシステム再起動通知をモニタするには、 を選択します。
ステップ 1 を選択します。 [Enterprise Parameters Configuration(エンタープライズ パラメータ設定)] ウィンドウが表示されます。 ステップ 2 [IPv6(IPv6)] パネルで [True(True)] を選択します。 ステップ 3 [Save(保存)] を選択します。
次の作業
変更を適用するには、IM and Presence Service ノードのサービスを再起動します。
IM and Presence Service のサービス
IM and Presence サービスのサービスのオン
手順次の手順は、基本的な IM and Presence サービス設定を導入するときにオンにする必要のあるサービスを一覧表示します。 IM and Presence サービス クラスタの各ノードで次のサービスをオンにします。
IM and Presence サービスで導入する追加機能によって他の任意サービスをオンにする必要があります。 詳細については、固有の機能に関連する IM and Presence サービス のマニュアルを参照してください。 特定のシステム コンポーネントまたは機能を設定できるようにサービスを手動で停止した場合は、この手順を使用して、手動でこれらのサービスを再起動します。
Cisco XCP Router サービスを、基本的な IM and Presence サービス 展開のために実行する必要があります。 IM and Presence サービスは、デフォルトで Cisco XCP Router をオンにします。 を選択して、このネットワーク サービスがオンになっていることを確認します。
ステップ 1 を選択します。 ステップ 2 [Server(サーバ)] メニューから [IM and Presence Service(IM and Presence サービス)] ノードを選択します。 このメニューから [Cisco Unified Communications Manager(Cisco Unified Communications マネージャー)] ノードを選択して、Cisco Unified Communications Manager サービスのステータスを変更することもできます。
ステップ 3 基本的な IM and Presence サービス展開では、次のサービスをオンにします。 ステップ 4 [Save(保存)] をクリックします。
関連タスク
 フィードバック