-
Cisco MDS 9000 Family Fabric Manager Configuration Guide, Release 2.x
-
New and Changed Information
-
Index
-
Preface
- Part 1 - Fabric Manager Applications
- Part 2 - Cisco MDS SAN-OS Installation and Configuration Files
-
Part 3 - Switch Configuration
-
Cisco Fabric Services
-
VSAN Configuration
-
Dynamic VSAN Configuration
-
Zone Configuration
-
Inter-VSAN Routing Configuration
-
PortChannel Configuration
-
Interface Configuration
-
FCIP Configuration
-
Configuring the SAN Extension Tuner
-
iSCSI configuration
-
FICON Configuration
-
Configuring Intelligent Storage Services
-
Additional Configuration
-
- Part 4 - Security Configuration
- Part 5 - Network and Performance Monitoring
- Part 6 - Troubleshooting
-
GUI/CLI Usage Chart
-
Interface Nonoperational Reason Codes
-
Managing Cisco FabricWare
-
 Feedback
Table Of Contents
SNMP v3 CLI User Management and AAA Integration
CLI and SNMP User Synchronization
Software Upgrade Synchronization
Adding A Community String to the communities.properties File
Viewing SNMP Community and User Information
Assigning SNMPv3 Users to Multiple Roles
Configuring SNMP Notifications
SNMP Configuration
Fabric Manager provides the capability to configure SNMP for managing switches in the fabric.
This chapter includes the following sections:
•
Adding A Community String to the communities.properties File
•
•
About SNMP
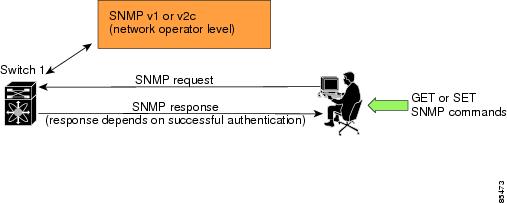
SNMP is an application layer protocol that facilitates the exchange of management information between network devices. In all Cisco MDS 9000 Family switches, three SNMP versions are available: SNMPv1, SNMPv2c, and SNMPv3 (see Figure 26-1).
Figure 26-1 SNMP
SNMP Version 1 and Version 2c
SNMPv1 and SNMPv2c use a community string match for user authentication. Community strings provided a weak form of access control in earlier versions of SNMP. SNMPv3 provides much improved access control using strong authentication and should be preferred over SNMPv1 and SNMPv2c wherever it is supported.
SNMP Version 3
SNMPv3 is an interoperable standards-based protocol for network management. SNMPv3 provides secure access to devices by a combination of authenticating and encrypting frames over the network. The security features provided in SNMPv3 are:
•
•
•
SNMPv3 provides for both security models and security levels. A security model is an authentication strategy that is set up for a user and the role in which the user resides. A security level is the permitted level of security within a security model. A combination of a security model and a security level determines which security mechanism is employed when handling an SNMP packet.
Note
SNMP v3 CLI User Management and AAA Integration
The Cisco MDS SAN-OS software implement RFC 3414 and RFC 3415, including user-based security model (USM) and role-based access control. While SNMP and the CLI have common role management and share the same credentials and access privileges, the local user database was not synchronized in earlier releases.
As of Cisco MDS SAN-OS Release 2.0(1b), SNMP v3 user management can be centralized at the AAA server level. This centralized user management allows the SNMP agent running on the Cisco MDS switch to leverage the user authentication service of AAA server. Once user authentication is verified, the SNMP PDUs are processed further. Additionally, the AAA server is also used to store user group names. SNMP uses the group names to apply the access/role policy that is locally available in the switch.
CLI and SNMP User Synchronization
In Cisco MDS SAN-OS Release 2.0(1b) or later, all updates to the CLI security database and the SNMP user database are synchronized. You can use the CLI password for accessing Fabric Manager or Device Manager and CLI. After you upgrade to Cisco MDS SAN-OS Release 2.0(1b) or later, you can continue using the SNMP password for Fabric Manager or Device Manager. If you use the CLI password for Fabric Manager or Device Manager login, you need to use the CLI password for future logins as well.
In Cisco MDS SAN-OS Release 2.0(1b) or later, users present in the prior release are assigned set of roles that is the union of both the CLI and the SNMP rules. Any configuration changes made to the user group, role, or password, results in the database synchronization for both SNMP and AAA.
Note
Software Upgrade Synchronization
When you upgrade from an earlier release to Cisco MDS SAN-OS Release 2.0(1b) or later, the following synchronization steps occur:
•
•
•
Restricting Switch Access
You can restrict access to a Cisco MDS 9000 Family switch using IP Access Control Lists (IP-ACLs). See the "IP-ACL Configuration Guidelines" section on page 28-1.
Adding a Community String
To add a community string, follow these steps:
Step 1
From Device Manager, choose Security > SNMP and click the Communities tab.
Step 2
You see the Create Community string dialog box.
The dialog box in Fabric Manager also provides check boxes to specify one or more switches.
Step 3
Step 4
Step 5
Deleting a Community String
To delete a community string, follow these steps:
Step 1
From Device Manager, choose Security > SNMP and click the Communities tab.
Step 2
Step 3
Adding A Community String to the communities.properties File
If you have a mixed fabric of Cisco SAN-OS and Cisco FabricWare switches, we recommend that you securely open the fabric with a Cisco SAN-OS switch using SNMPv3. The SNMPv1/v2c community strings for the Cisco FabricWare switches should be entered in the communities.properties file.
To modify the communities.properties file using a text editor, follow these steps:
Step 1
Step 2
Step 3
•
•
•
The following example shows the addition of a pair of read:write community strings for switch 192.168.10.12:
192.168.10.12 = public:privateStep 4
Understanding Users
Every Cisco MDS 9000 Family switch user has the account information stored by the system. Your authentication information, user name, user password, password expiration date, and role membership are stored in your user profile.
Adding a User
To add a user, follow these steps:
Step 1
From Device Manager, choose Security > SNMP and click the Users tab.
Step 2
You see the Create Users dialog box.
The dialog box from Fabric Manager also provides check boxes to specify one or more switches.
Step 3
Step 4
Step 5
Step 6
Enter the same new privacy password in the New Password and Confirm Password fields.
Step 7
Deleting a User
To delete a user, follow these steps:
Step 1
From Device Manager, choose Security > SNMP and click the Users tab.
Step 2
Step 3
Viewing SNMP Community and User Information
To view information about SNMP users, roles, and communities from Fabric Manager, choose Security > SNMP from the Physical tree and click the Users, Roles, or Communities tab. You see the list of SNMP users, roles, or communities in the Information pane.
To view this information from the Device Manager, choose SNMP from the Security menu. You see the SNMP dialog box.
Group-Based SNMP Access
Note
SNMP access rights are organized by groups. Each group in SNMP is similar to a role through the CLI. Each group is defined with three accesses: read access, write access, and notification access. Each access can be enabled or disabled within each group.
You can begin communicating with the agent once your user name is created, your roles are set up by your administrator, and you are added to the roles.
Assigning SNMPv3 Users to Multiple Roles
As of Cisco MDS SAN-OS Release 2.0(1b), the SNMP server user configuration is enhanced to accommodate multiple roles (groups) for SNMPv3 users. You map additional roles for the user at the time you create the user.
Note
To add multiple roles to a new user using Device Manager, follow these steps:
Step 1
Step 2
Step 3
Step 4
Step 5
Step 6
Enter the same new privacy password in the New Password and Confirm Password fields.
Step 7
Configuring SNMP Notifications
You can configure the Cisco MDS switch to send notifications to SNMP managers when particular events occur. You can send these notifications as traps or inform requests. Traps are unreliable because the receiver does not send any acknowledgment when it receives a trap. The sender cannot determine if the trap was received. However, an SNMP manager that receives an inform request acknowledges the message with an SNMP response PDU. If the sender never receives a response, the inform request can be sent again. Thus, informs are more likely to reach their intended destination.
Note
To configure SNMP notifications (traps or informs) using Fabric Manager, follow these steps:
Step 1
Step 2
Step 3
Step 4
Step 5
Step 6
Step 7
Step 8
Step 9
Step 10