About Licenses
Cisco Smart Licensing is a flexible licensing model that provides you with an easier, faster, and more consistent way to purchase and manage software across the Cisco portfolio and across your organization. And it’s secure—you control what users can access. With Smart Licensing you get:
-
Easy Activation: Smart Licensing establishes a pool of software licenses that can be used across the entire organization—no more PAKs (Product Activation Keys).
-
Unified Management: Cisco License Central provides a complete view into all of your Cisco products and services in an easy-to-use portal, so you always know what you have and what you are using.
-
License Flexibility: Your license is not node-locked to your hardware, so you can easily use and transfer licenses as needed.
To use Smart Licensing, you must first set up a Smart Account on Cisco Software Central (software.cisco.com).
For a more detailed overview on Cisco Licensing, go to cisco.com/go/licensingguide
Smart Software Manager and Accounts
When you purchase one or more licenses, you manage them in the Smart Software Manager: https://software.cisco.com/#module/SmartLicensing. The Smart Software Manager lets you create a primary account for your organization. If you do not yet have an account, click the link to set up a new account. The Smart Software Manager lets you create a primary account for your organization. For instructions, see Create a Cisco Account.
By default, your licenses are assigned to the Default Virtual Account under your primary account. As the account administrator, you can create additional virtual accounts; for example, for regions, departments, or subsidiaries. Multiple virtual accounts help you manage large numbers of licenses and devices.
You manage licenses by virtual account. Only that virtual account’s devices can use the licenses assigned to the account. If you need additional licenses, you can transfer an unused license from another virtual account. You can also transfer devices between virtual accounts.
How Licensing Works for the Management Center and Devices
The Cloud-Delivered Firewall Management Center registers with the Smart Software Manager, and then assigns licenses for each managed device. Devices do not register directly with the Smart Software Manager.
A physical Cloud-Delivered Firewall Management Center does not require a license for its own use.
Periodic Communication with the Smart Software Manager
In order to maintain your product license entitlement, your product must communicate periodically with the Smart Software Manager.
You use a Product Instance Registration Token to register the Cloud-Delivered Firewall Management Center with the Smart Software Manager. The Smart Software Manager issues an ID certificate for communication between the Cloud-Delivered Firewall Management Center and the Smart Software Manager. This certificate is valid for one year, although it will be renewed every six months. If an ID certificate expires (after a year with no communication), the Cloud-Delivered Firewall Management Center may be removed from your account.
The Cloud-Delivered Firewall Management Center communicates with the Smart Software Manager on a periodic basis. If you make changes in the Smart Software Manager, you can refresh the authorization on the Cloud-Delivered Firewall Management Center so the changes immediately take effect. You also can wait for the Cloud-Delivered Firewall Management Center to communicate as scheduled.
Your Cloud-Delivered Firewall Management Center must either have direct internet access to the Smart Software Manager. In non-airgapped deployments, normal license communication occurs every 30 days, but with the grace period, your Cloud-Delivered Firewall Management Center will operate for up to 90 days without contacting the Smart Software Manager. Ensure that the Cloud-Delivered Firewall Management Center contacts the Smart Software Manager before 90 days have passed, or else the Cloud-Delivered Firewall Management Center will revert to an unregistered state.
Cloud-Delivered Firewall Management Center licensing and registration
Register Cloud-Delivered Firewall Management Center with Cisco Smart Licensing the same way you would for On-Premises Firewall Management Center.
Overview
Cloud-Delivered Firewall Management Center is included with the base subscription and trial for Security Cloud Control Firewall Management. You do not need to purchase a separate license for Cloud-Delivered Firewall Management Center. The base subscription or trial covers Cloud-Delivered Firewall Management Center, enabling you to manage Firewall Threat Defense devices through the cloud.
Cloud-Delivered Firewall Management Center is provisioned with a 90-day evaluation license upon deployment.
 Important |
We strongly recommend registering Cloud-Delivered Firewall Management Center with Cisco Smart Software Manager immediately after deployment to access all features, including those requiring export encryption such as RAVPN and SSL VPN. Early registration prevents feature limitations and deployment interruptions. |
Evaluation license
-
Features requiring export encryption, such as Remote Access VPN, SSL VPN, and other encryption-dependent options, remain disabled until you register Cloud-Delivered Firewall Management Center with Cisco Smart Software Manager (CSSM).
-
After the 90-day evaluation period ends, you can continue onboarding Firewall Threat Defense devices, but manually triggered or scheduled deployments are blocked until registration with CSSM is completed.
-
Security Cloud Control Firewall Management sends alert notifications as the evaluation license nears expiration.
Note
The Smart license field displays a warning when the evaluation license is expiration.
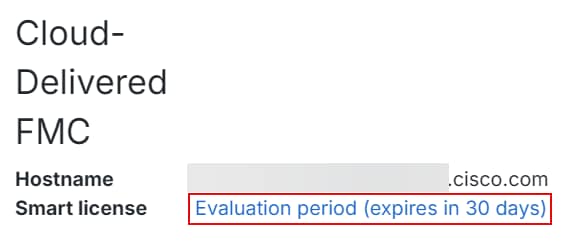
When the evaluation period ends, Cloud-Delivered Firewall Management Center is unregistered. Registering Cloud-Delivered Firewall Management Center with Cisco Smart Software Manager converts from evaluation mode to a fully licensed state.
Click the evaluation warning link to open the smart licensing registration page and register Cloud-Delivered Firewall Management Center with Cisco Smart Software Manager.
Registration with Cisco Smart Software Manager (CSSM)
-
Connect Cloud-Delivered Firewall Management Center to your smart licensing account, following the same process as On-Premises Firewall Management Center. The high-level procedure is provided in this section.
-
No separate license purchase is needed for Cloud-Delivered Firewall Management Center; the license is automatically applied upon registration.
-
Registering with smart licensing enables encryption export features.
-
Registration ensures compliance and prevents deployment issues.
To learn how to get a Cloud-Delivered Firewall Management Center provisioned on your Security Cloud Control tenant, see Request a Cloud-Delivered Firewall Management Center for your Security Cloud Control Tenant.
Licensing for Firewall Threat Defense devices
-
No separate license purchase is needed for Cloud-Delivered Firewall Management Center.
-
Each Firewall Threat Defense device managed by Cloud-Delivered Firewall Management Center requires an individual license.
-
After registering Cloud-Delivered Firewall Management Center with CSSM, an administrator may apply feature licenses to security devices.
Step-by-step registration
A high-level procedure is provided here. For detailed steps, see Register the Management Center with the Smart Software Manager.
-
Create or Access Your Smart Account:
Ensure you have a Cisco Smart Software Manager account. If you do not have one, create it at Smart Software Manager.
-
Generate a Registration Token or Use a Registration Token:
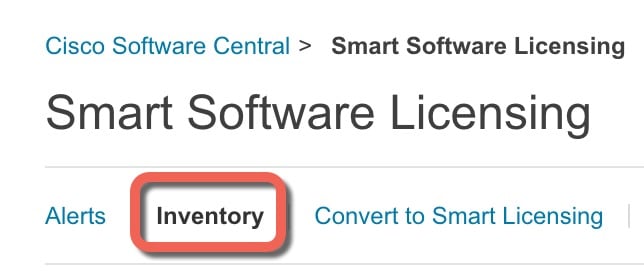
In the Smart Software Manager, use an existing valid registration token or generate a registration token for the virtual account to which you want to register the Cloud-Delivered Firewall Management Center.
-
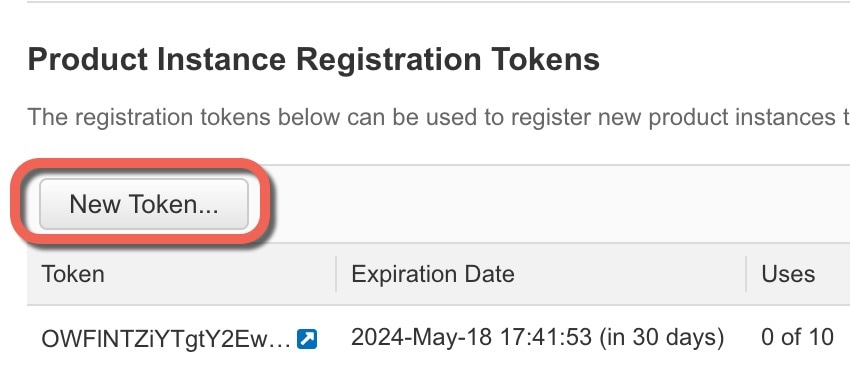
Navigate to Inventory > New Token.
-
Enter a description and set an expiration (Cisco recommends 30 days).
-
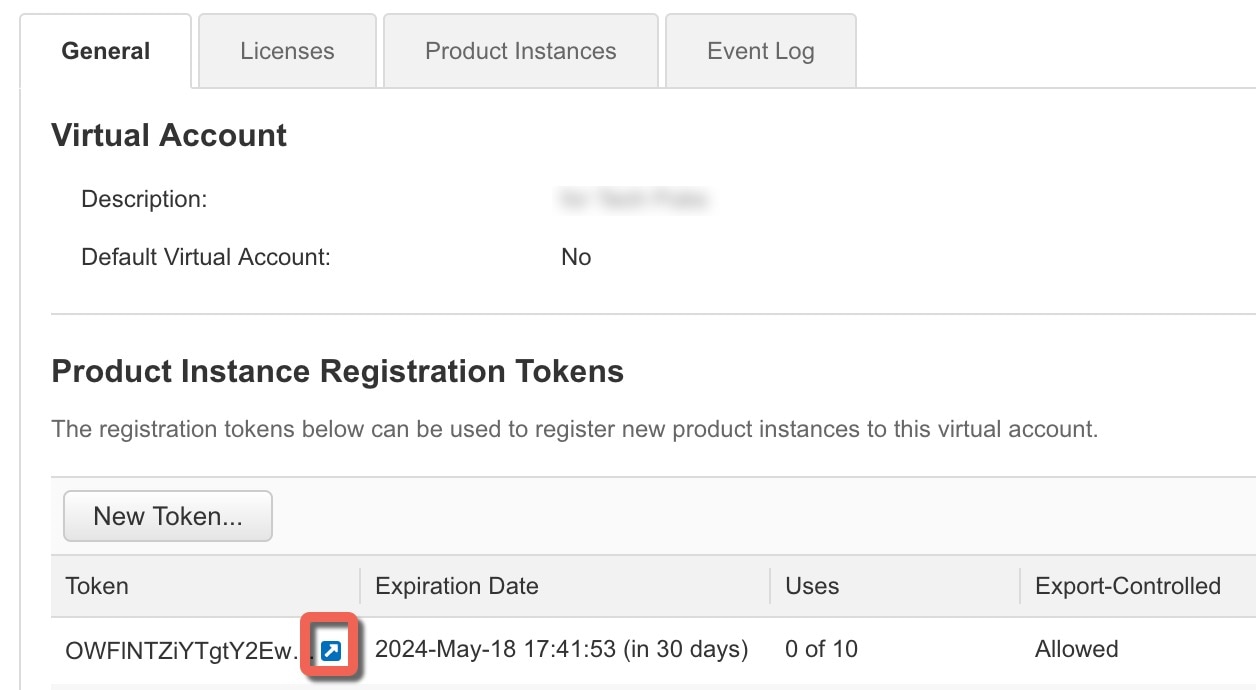
Create and copy the token.
-
-
Register Cloud-Delivered Firewall Management Center with the Token:
-
Log in to the Cloud-Delivered Firewall Management Center interface.
-
Navigate to System > Licenses > Smart Licenses.
-
Click Register and paste the registration token into the Product Instance Registration Token field.
-
Ensure there are no extra spaces or blank lines before or after the token.
-
Click Apply Changes.
-
-
Verify Registration:
After registration, verify the license status under System > Licenses > Smart Licenses to confirm successful registration, license application, and that “Export-Controlled Features” are enabled.
Out-of-Compliance State
The Cloud-Delivered Firewall Management Center can become out of compliance in the following situations:
-
License expiration—When a managed device term-based license expires.
In an out-of-compliance state, see the following effects:
-
All managed device licenses—Operation is not affected.
After you resolve the licensing problem, the Cloud-Delivered
Firewall Management Center will show that it is now in compliance after its regularly scheduled authorization
with the Smart Software Manager. To force an authorization, click
Re-Authorize on the System ( ) page.
Unregistered State
The Cloud-Delivered Firewall Management Center can become unregistered in the following situations:
-
Evaluation mode expiration—Evaluation mode expires after 90 days.
-
Manual deregistration of the Cloud-Delivered Firewall Management Center
-
Lack of communication with the Smart Software Manager—The Cloud-Delivered Firewall Management Center does not communicate with the Smart Software Manager for 1 year. Note: After 90 days, the Cloud-Delivered Firewall Management Center authorization expires, but it can successfully resume communication within one year to automatically re-authorize. After a year, the ID certificate expires, and the Cloud-Delivered Firewall Management Center is removed from your account so you will have to manually re-register the Cloud-Delivered Firewall Management Center.
In an unregistered state, the Cloud-Delivered Firewall Management Center cannot deploy any configuration changes to devices for features that require licenses.
End-User License Agreement
The Cisco end-user license agreement (EULA) and any applicable supplemental agreement (SEULA) that governs your use of this product are available from http://www.cisco.com/go/softwareterms.
License Types and Restrictions
This section describes the types of licenses available.
|
License You Assign |
Duration |
Granted Capabilities |
||
|---|---|---|---|---|
|
Essentials |
Perpetual or Subscription
|
Except for Specific License Reservation and the Secure Firewall 1200/3100/4200, Essentials perpetual licenses are automatically assigned with all Firewall Threat Defenses. User and application control Switching and routing NAT For details, see Essentials Licenses. |
||
|
IPS |
Subscription |
Intrusion detection and prevention File control Security Intelligence filtering For details, see IPS Licenses |
||
|
Malware defense |
Subscription |
Malware defense Secure Malware Analytics File storage (IPS license is a prerequisite for a Malware defense license.) For details, see Malware Defense Licenses and License Requirements for File and Malware Policies in the Cisco Secure Firewall Management Center Device Configuration Guide. |
||
|
Carrier |
Subscription for Firepower 4100/9300, Secure Firewall 3100/4200, and Firewall Threat Defense Virtual |
Diameter, GTP/GPRS, M3UA, and SCTP inspection For details, see Carrier License. |
||
|
URL Filtering |
Subscription |
Category and reputation-based URL filtering For details, see URL Filtering Licenses. (IPS license is a prerequisite for a URL Filtering license.) |
||
|
Export-Controlled Features |
Perpetual |
Features that are subject to national security, foreign policy, and anti-terrorism laws and regulations; see Licensing for Export-Controlled Functionality. |
||
|
Remote Access VPN:
|
Subscription or perpetual |
Remote access VPN configuration. Your account must allow export-controlled functionality to configure remote access VPN. You select whether you meet export requirements when you register the device. The Firewall Threat Defense can use any valid Secure Client license. The available features do not differ based on license type. For more information, see Secure Client Licenses and VPN Licensing in the Cisco Secure Firewall Management Center Device Configuration Guide. |
Note |
Subscription licenses are term-based licenses. |
Essentials Licenses
The Essentials license allows you to:
-
Configure your devices to perform switching and routing (including DHCP relay and NAT)
-
Configure devices as a high availability pair
-
Configure clustering
-
Implement user and application control by adding user and application conditions to access control rules
-
Update the Vulnerability database (VDB) and geolocation database (GeoDB).
-
Download intrusion rules such as SRU/LSP. However, you cannot deploy access control policy or rules that have intrusion policy to the device unless IPS license is enabled.
Secure Firewall 1200/3100/4200
You obtain a Essentials license when you purchase the Secure Firewall 1200/3100/4200.
Other Models
Except in deployments using Specific License Reservation, a Essentials license is automatically added to your account when you register a device to the Cloud-Delivered Firewall Management Center. For Specific License Reservation, you need to add the Essentials license to your account.
Malware Defense Licenses
A Malware defense license lets you perform Malware Defense and Secure Malware Analytics. With this feature, you can use devices to detect and block malware in files transmitted over your network. To support this feature license, you can purchase the Malware defense (AMP) service subscription as a stand-alone subscription or in combination with IPS (TM) or IPS and URL Filtering (TMC) subscriptions. IPS license is a prerequisite for a Malware defense license.
Note |
Managed devices with Malware defense licenses enabled periodically attempt to connect to the Secure Malware Analytics Cloud even if you have not configured dynamic analysis. Because of this, the device’s Interface Traffic dashboard widget shows transmitted traffic; this is expected behavior. |
You configure Malware Defense as part of a file policy, which you then associate with one or more access control rules. File policies can detect your users uploading or downloading files of specific types over specific application protocols. Malware Defense allows you to use local malware analysis and file preclassification to inspect a restricted set of those file types for malware. You can also download and submit specific file types to the Secure Malware Analytics Cloud for dynamic and Spero analysis to determine whether they contain malware. For these files, you can view the network file trajectory, which details the path the file has taken through your network. The Malware Defense license also allows you to add specific files to a file list and enable the file list within a file policy, allowing those files to be automatically allowed or blocked on detection.
Note that a Malware defense license is required only if you deploy Malware Defense and Secure Malware Analytics. Without a Malware defense license, the Cloud-Delivered Firewall Management Center can receive Secure Endpoint malware events and indications of compromise (IOC) from the Secure Malware Analytics Cloud.
See also important information at License Requirements for File and Malware Policies in the Cisco Secure Firewall Management Center Device Configuration Guide.
When you disable this license:
-
The system stops querying the Secure Malware Analytics Cloud, and also stops acknowledging retrospective events sent from the Secure Malware Analytics Cloud.
-
You cannot re-deploy existing access control policies if they include Malware Defense configurations.
-
For a very brief time after a Malware defense license is disabled, the system can use existing cached file dispositions. After the time window expires, the system assigns a disposition of
Unavailableto those files.
If the license expires, your entitlement for the above capabilities ceases and the Cloud-Delivered Firewall Management Center moves to the out-of-compliance state.
IPS Licenses
A IPS license allows you to perform intrusion detection and prevention, file control, and Security Intelligence filtering:
-
Intrusion detection and prevention allows you to analyze network traffic for intrusions and exploits and, optionally, drop offending packets.
-
File control allows you to detect and, optionally, block users from uploading (sending) or downloading (receiving) files of specific types over specific application protocols. Malware defense, which requires a Malware defense license, allows you to inspect and block a restricted set of those file types based on their dispositions.
-
Security Intelligence filtering allows you to block —deny traffic to and from—specific IP addresses, URLs, and DNS domain names, before the traffic is subjected to analysis by access control rules. Dynamic feeds allow you to immediately block connections based on the latest intelligence. Optionally, you can use a “monitor-only” setting for Security Intelligence filtering.
You can purchase a IPS license as a stand-alone subscription (T) or in combination with URL Filtering (TC), Malware defense (TM), or both (TMC).
When you disable this license:
-
The Cloud-Delivered Firewall Management Center stops acknowledging intrusion and file events from the affected devices. As a consequence, correlation rules that use those events as a trigger criteria stop firing.
-
The Cloud-Delivered Firewall Management Center does not contact the internet for either Cisco-provided or third-party Security Intelligence information.
-
You cannot re-deploy existing intrusion policies until you re-enable IPS.
If the license expires, your entitlement for the above capabilities ceases and the Cloud-Delivered Firewall Management Center moves to the out-of-compliance state.
Carrier License
The Carrier license enables the inspection of the following protocols:
-
Diameter—Diameter is an Authentication, Authorization, and Accounting (AAA) protocol used in next-generation mobile and fixed telecom networks such as EPS (Evolved Packet System) for LTE (Long Term Evolution) and IMS (IP Multimedia Subsystem). It replaces RADIUS and TACACS in these networks.
-
GTP/GPRS—GPRS Tunneling Protocol (GTP) is used in GSM, UMTS, and LTE networks for general packet radio service (GPRS) traffic. GTP provides a tunnel control and management protocol to provide GPRS network access for a mobile station by creating, modifying, and deleting tunnels. GTP also uses a tunneling mechanism for carrying user data packets.
-
M3UA—MTP3 User Adaptation (M3UA) is a client/server protocol that provides a gateway to the Signaling System 7 (SS7) network for IP-based applications that interface with the SS7 Message Transfer Part 3 (MTP3) layer. M3UA makes it possible to run the SS7 User Parts (such as ISUP) over an IP network.
-
SCTP—Stream Control Transmission Protocol (SCTP) is a transport-layer protocol that supports the SS7 protocol over IP networks. It supports the 4G LTE mobile network architecture. SCTP can handle multiple simultaneous streams, multiplexed streams, and provides more security features.
Note |
After you enable this license on a device, use a FlexConfig policy to enable the protocol inspection. |
The Carrier license PIDs are available per family and not per device model. You can enable this license for each device either in the evaluation mode or with a Smart License.
The Carrier license for Firepower 4100/9300, Secure Firewall 3100/4200, and Firewall Threat Defense Virtual is term-based. This license also supports Specific License Reservation.
Supported Devices
The devices that support the Carrier License are:
-
Secure Firewall 3110
-
Secure Firewall 3120
-
Secure Firewall 3130
-
Secure Firewall 3140
-
Firepower 4112
-
Firepower 4115
-
Firepower 4125
-
Firepower 4145
-
Secure Firewall 4215
-
Secure Firewall 4225
-
Secure Firewall 4245
-
Firepower 9300
-
Firewall Threat Defense Virtual
URL Filtering Licenses
The URL Filtering license allows you to write access control rules that determine the traffic that can traverse your network based on URLs requested by monitored hosts, correlated with information about those URLs. To support this feature license, you can purchase the URL Filtering service subscription as a stand-alone subscription or in combination with IPS (TC) or Threat and Malware defense (TMC) subscriptions. IPS license is a prerequisite for this license.
 Tip |
Without a URL Filtering license, you can specify individual URLs or groups of URLs to allow or block. This option gives you granular, custom control over web traffic, but does not allow you to use URL category and reputation data to filter network traffic. |
Although you can add category and reputation-based URL conditions to access control rules without a URL Filtering license, the Cloud-Delivered Firewall Management Center will not download URL information. You cannot deploy the access control policy until you first add a URL Filtering license to the Cloud-Delivered Firewall Management Center, then enable it on the devices targeted by the policy.
When you disable this license:
-
You may lose access to filtering network traffic based on the URL category and reputation ACP rules. The manual URL filtering options will continue to be supported.
-
Access control rules with URL conditions immediately stop filtering URLs.
-
Your Cloud-Delivered Firewall Management Center can no longer download updates to URL data.
-
You cannot re-deploy existing access control policies if they include rules with category and reputation-based URL conditions.
If the license expires, your entitlement for the above capabilities ceases and the Cloud-Delivered Firewall Management Center moves to the out-of-compliance state.
Secure Client Licenses
You can configure remote access VPN using the Secure Client and standards-based IPSec/IKEv2.
To enable remote access VPN, you must purchase and enable one of the following licenses: Secure Client Advantage, Secure Client Premier, or Secure Client VPN Only. You can select Secure Client Advantage and Secure Client Premier if you have both licenses and you want to use them both. The Secure Client VPN Onlylicense cannot be used with Apex or Plus. The Secure Client license must be shared with the Smart Account. For more instructions, see http://www.cisco.com/c/dam/en/us/products/collateral/security/anyconnect-og.pdf.
You cannot deploy the remote access VPN configuration to the device if the specified device does not have the entitlement for a minimum of one of the specified Secure Client license types. If the registered license moves out of compliance or entitlements expire, the system displays licensing alerts and health events.
While using remote access VPN, your Smart Account must have the export controlled features (strong encryption) enabled. The Firewall Threat Defense requires strong encryption (which is higher than DES) for successfully establishing remote access VPN connections with Secure Clients.
You cannot deploy remote access VPN if the following are true:
-
Smart Licensing on the Cloud-Delivered Firewall Management Center is running in evaluation mode.
-
Your Smart Account is not configured to use export-controlled features (strong encryption).
Licensing for Export-Controlled Functionality
Features that require export-controlled functionality
Certain software features are subject to national security, foreign policy, and anti-terrorism laws and regulations. These export-controlled features include:
-
Security certifications compliance
-
Remote access VPN
-
Site-to-site VPN with strong encryption
-
SSH platform policy with strong encryption
-
SSL policy with strong encryption
-
Functionality such as SNMPv3 with strong encryption
How to determine whether export-controlled functionality is currently enabled for your system
To determine whether export-controlled functionality is currently enabled for your system: Go toSystem () and see if Export-Controlled Features displays Enabled.
About enabling export-controlled functionality
If Export-Controlled Features shows Disabled and you want to use features that require strong encryption, there are two ways to enable strong cryptographic features. Your organization may be eligible for one or the other (or neither), but not both.
-
If there is no option to enable export-controlled functionality when you generate a new Product Instance Registration Token in the Smart Software Manager, contact your account representative.
-
If the option “Allow export-controlled functionality on the products registered with this token” appears when you generate a new Product Instance Registration Token in the Smart Software Manager, make sure you check it before generating the token.
If you did not enable export-controlled functionality for the Product Instance Registration Token that you used to register the Cloud-Delivered Firewall Management Center, then you must deregister and then re-register the Cloud-Delivered Firewall Management Center using a new Product Instance Registration Token with export-controlled functionality enabled.
If you registered devices to the Cloud-Delivered Firewall Management Center in evaluation mode or before you enabled strong encryption on the Cloud-Delivered Firewall Management Center, reboot each managed device to make strong encryption available. In a high availability deployment, the active and standby devices must be rebooted together to avoid an Active-Active condition.
The entitlement is perpetual and does not require a subscription.
More Information
For general information about export controls, see https://www.cisco.com/c/en/us/about/legal/global-export-trade.html.
Firewall Threat Defense Virtual Licenses
This section describes the performance-tiered license entitlements available for the Firewall Threat Defense Virtual.
Any Firewall Threat Defense Virtual license can be used on any supported Firewall Threat Defense Virtual vCPU/memory configuration. This allows Firewall Threat Defense Virtual customers to run on a wide variety of VM resource footprints. This also increases the number of supported AWS and Azure instances types. When configuring the Firewall Threat Defense Virtual VM, the maximum supported number of cores (vCPUs) is 16 ; and the maximum supported memory is 32 GB RAM .
Performance Tiers for Firewall Threat Defense Virtual Smart Licensing
Session limits for RA VPNs are determined by the installed Firewall Threat Defense Virtual platform entitlement tier, and enforced via a rate limiter. The following table summarizes the session limits based on the entitlement tier and rate limiter.
|
Performance Tier |
Device Specifications (Core/RAM) |
Rate Limit |
RA VPN Session Limit |
|---|---|---|---|
|
FTDv5, 100Mbps |
4 core/8 GB |
100Mbps |
50 |
|
FTDv10, 1Gbps |
4 core/8 GB |
1Gbps |
250 |
|
FTDv20, 3Gbps |
4 core/8 GB |
3Gbps |
250 |
|
FTDv30, 5Gbps |
8 core/16 GB |
5Gbps |
250 |
|
FTDv50, 10Gbps |
12 core/24 GB |
10Gbps |
750 |
|
FTDv100, 16Gbps |
16 core/32 GB |
16Gbps |
10,000 |
|
FTDvU |
32 core/64 GB |
Not limited |
20,000 |
|
FTDvU |
64 core/128 GB |
Not limited |
32,000 |
Firewall Threat Defense Virtual Performance Tier Licensing Guidelines and Limitations
Please keep the following guidelines and limitations in mind when licensing your Firewall Threat Defense Virtual device.
-
The Firewall Threat Defense Virtual supports performance-tiered licensing that provides different throughput levels and VPN connection limits based on deployment requirements.
-
Any Firewall Threat Defense Virtual license can be used on any supported Firewall Threat Defense Virtual core/memory configuration. This allows the Firewall Threat Defense Virtual customers to run on a wide variety of VM resource footprints.
-
You can select a performance tier when you deploy the Firewall Threat Defense Virtual, whether your device is in evaluation mode or is already registered with Cisco Smart Software Manager.
Note
Make sure your Smart Licensing account contains the available licenses you need. It’s important to choose the tier that matches the license you have in your account. If you are upgrading your Firewall Threat Defense Virtual to Version 7.0, you can choose FTDv - Variable to maintain your current license compliance. Your Firewall Threat Defense Virtual continues to perform with session limits based on your device capabilities (number of cores/RAM).
-
The default performance tier is FTDv50 when deploying a new Firewall Threat Defense Virtual device, or when provisioning the Firewall Threat Defense Virtual using the REST API.
-
Essentials licenses are subscription-based and mapped to performance tiers. Your virtual account needs to have the Essentials license entitlements for the Firewall Threat Defense Virtual devices, as well as for IPS, Malware Defense, and URL Filtering licenses.
-
Each HA peer consumes one entitlement, and the entitlements on each HA peer must match, including Essentials license.
-
A change in performance tier for an HA pair should be applied to the primary peer.
-
You assign feature licenses to the cluster as a whole, not to individual nodes. However, each node of the cluster consumes a separate license for each feature. The clustering feature itself does not require any licenses.
-
Universal PLR licensing is applied to each device in an HA pair separately. The secondary device will not automatically mirror the performance tier of the primary device. It must be updated manually.


 Feedback