Migrate On-Prem Management Center Managed Secure Firewall Threat Defense to Cloud-delivered Firewall Management Center

About Migrating Threat Defense to Cloud-delivered Firewall Management Center

CDO admin users can migrate threat defense devices to the cloud-delivered Firewall Management Center from on-prem management centers. For supported versions, see Supported On-Prem Firewall Management Center and Threat Defense Software for Migration.

Before initiating the migration process, it is important to upgrade the on-prem management center models to a CDO-supported version and onboard it to CDO. Only after this step, you can proceed with migrating the devices that are associated with the on-prem management center.

You have a 14-day evaluation period to review and assess the migration changes that are made to the threat defense devices before CDO automatically commits them. During this evaluation period, if you are not satisfied with the changes, you can either undo the changes and continue managing the device with the on-prem management center or commit the migration changes. It's important to note that after the evaluation period expires, CDO will automatically commit the changes, and it will no longer be possible to undo them.

After migrating the devices, the cloud-delivered Firewall Management Center onboards the threat defense devices and imports all shared policies and associated objects, device-specific policies, and device configuration from the on-prem management center to the cloud-delivered Firewall Management Center. In addition, the devices can be found in CDO's Inventory page.


Note


Cloud-delivered Firewall Management Center handles all duplicate policy and object names that are identified during the on-prem management center migration process. This behavior is explained in detail later in this document.


User Roles

The user roles of the on-prem management center are no longer applicable in CDO after migration. Your authorization to perform tasks on the migrated device is based on your user role in CDO. See the Users topic to understand the on-prem management center and cloud-delivered Firewall Management Center user role mapping.

Pause Migration to Review Imported Shared Policies

CDO provides an option that allows the migration to be paused once the shared access policies, including Access Control and NAT policies, have been prepared within the cloud-delivered Firewall Management Center. This strategic pause prevents the start of the 14-day evaluation period, ensuring the device's current state or the device's manager is affected during the review phase. This window provides an opportunity for a thorough evaluation of the staged configuration.

Upon a satisfactory review of the configuration within the planned migration window, the process can be resumed. Resuming migration will import the device-specific settings, such as routing and interfaces, and will register the threat defenses with the cloud-delivered Firewall Management Center. Note that this action starts the 14-day evaluation period. Post-migration, it is mandatory to execute deployment from the cloud-delivered Firewall Management Center to finalize the migration successfully.

Supported On-Prem Firewall Management Center and Threat Defense Software for Migration

Supported Virtual On-Prem Firewall Management Center and Threat Defense

This section describes the minimum software requirements for migrating threat defense devices from the following on-prem management center version:

  • Minimum on-prem management center: 7.2

  • Minimum threat defense: 7.0.3 or 7.2 (not supported for Version 7.1)

Supported Physical On-Prem Management Center 1000/2500/4500 Model-Managed Threat Defense

You can migrate threat defense devices to the cloud-delivered Firewall Management Center from a physical on-prem management center 1000/2500/4500 model. We support a temporary upgrade from Version 7.0 to Version 7.4. You can download the upgrade package here.


Note


The physical on-prem management center 1000/2500/4500, you would have migrated devices from Version 7.4, which is unsupported for general operations but serves as an interim solution until the migration is complete. To return the on-prem management center to a supported version you must remove the re-migrated devices, reimage back to Version 7.0.x, restore from backup, and re-register the devices.


Unzip (but do not untar) the upgrade package before uploading it to the on-prem management center. To upgrade to Version 7.4, see Cisco Secure Firewall Management Center Upgrade Guide, Version 6.0-7.0.

We recommend upgrading the devices to Version 7.0.x before upgrading the on-prem management center to Version 7.4.


Important


An upgrade is required because Version 7.0 on-prem management centers do not support device migration to the cloud. Version 7.4 is only supported during the device migration and evaluation process. These on-prem management centers will not run any intermediate versions. Only standalone and high availability threat defense devices running Version 7.0.3+ (7.0.5 recommended) are eligible for migration.


Licensing

  • When the threat defense is migrated to the cloud, all feature licenses associated with the device are transferred to CDO and released from the management center to the Smart License pool. The device reclaims the device-specific licenses during its registration with CDO. You need not apply license on the device again.

  • The device-specific licenses are not required if you want to keep devices in the management center for analytics.

  • Ensure you have registered the cloud-delivered Firewall Management Center with a smart license.

Supported Features

Handling Shared Policies and Objects

When the migration process begins, the shared policies and associated objects that are associated with the threat defense devices are imported first and then followed by the device configuration.

The following shared policies are imported to CDO after changing the manager on threat defense devices:

  • Access control

  • IPS

  • SSL

  • Prefilter

  • NAT

  • QoS

  • Identity

  • Platform settings

  • Flex config

  • Network analysis

  • DNS

  • Malware & file

  • Health

  • Remote Access VPN

  • Site-to-Site VPN

If a policy or object in CDO has the same name as the policy or object that is imported from the on-prem management center, CDO takes the following actions after changing the management successfully.

Policies, Objects

Condition

Action

Access control, SSL, IPS, Prefilter, NAT, QoS, Identity, Platform settings, Network analysis, DNS, Malware & File policies.

Name of the cloud-delivered Firewall Management Center policy matches the on-prem management center policy.

The cloud-delivered Firewall Management Center policy is used instead of the imported policy from the on-prem management center.

RA VPN Default group policy DfltGrpPolicy

The default group policyDfltGrpPolicy from the on-prem management center is ignored.

The existing cloud-delivered Firewall Management Center default group policy DfltGrpPolicy is used instead.

Network, Port objects

Name and content of network and port objects in the cloud-delivered Firewall Management Center match the ones in the on-prem management center.

The existing cloud-delivered Firewall Management Center network and port objects with the same name and content are used instead of imported objects from the on-prem management center.

If the object has the same name but different content, an object override is created.

All other objects

The existing cloud-delivered Firewall Management Center object is used instead of the imported object from the on-prem management center.

Any Syslog alert object that is associated with the access control policy is imported into CDO.

Migration Support for Threat Defense in a High-Availability Pair

You can migrate a device in a high-availability pair to the cloud-delivered Firewall Management Center. The device management of both active and standby devices shifts to the cloud-delivered Firewall Management Center.


Important


We strongly recommend committing the manager changes before performing any advanced operations, such as creating high-availability configurations or breaking high-availability configurations from the management center on the devices that are being migrated.

Performing such tasks during the evaluation period is not supported and may result in migration commit failure.


Migration Support for Management Center in a High Availability Pair

You can migrate the threat defense devices in a high availability from on-prem management center to the cloud.

The on-prem management center can be onboarded using the auto-onboarding of on-prem management center method or credentials method. Always onboard the active management center and not the standby.


Note


If you have already onboarded a standalone management center and later configured it as a standby, delete the standby management center and onboard the active one.


Points to Remember:

  • Auto-onboarding On-Prem Management Center Method

    • High availability break is not supported during the 14 days evaluation period. You can break high availability after committing the changes manually or automatically after the evaluation period.

    • High availability switchover is supported during the 14 days evaluation period.

  • Onboarding On-Prem Management Center Method Using SDC

    • High availability break or high availability switchover is not supported during the 14 days evaluation period. You can perform these operations after committing the changes manually or automatically after the evaluation period.

    • After a switchover, onboard the new active unit, which was previously in standby mode, and then start a migration job on the devices.

Migration Support for Threat Defense Cluster

Migration of the threat defense cluster from the on-prem management center to the cloud-delivered Firewall Management Center is supported as long as the minimum supported versions of the threat defense on the following platforms are met.

Secure Firewall Threat Defense Platforms

Minimum Secure Firewall Threat Defense Version for Cluster Migration

Minimum On-Prem Management Center Version for Cluster Migration

VMware, KVM

7.2.1

7.4.1

AWS, GCP

7.2.1

7.4.1

Azure

7.3

7.4.1

Secure Firewall 3100

7.2.1

7.4.1

Firepower 4100

7.0.6

7.4.1

Secure Firewall 4200

7.4

7.4.1

Firepower 9300

7.0.6

7.4.1


Important


Before migrating the threat defense cluster, it is important to keep in mind the following points:

  • Do not attempt to migrate the threat defense cluster during any clustering-related operations initiated from the on-prem management center.

  • After the cluster migration, it is recommended to commit the manager changes manually before carrying out any advanced operations, such as adding a node, breaking a node, or breaking a cluster from the on-prem management center on the clusters. This is because performing such tasks during the evaluation period is not supported and may result in migration commit failure.


Unsupported Features

Migration of a threat defense device registered only for analytics-only with the management center feature is not currently supported.

The following configuration are not imported from the management center to CDO as part of migration:

  • Custom Widgets, Application Detectors, Correlation, SNMP and Email Alerts, Scanners, Groups, Dynamic Access Policy, Custom AMP Configuration, Users, Domains, Scheduled Deployment Tasks, ISE configuration, Scheduled GeoDB Updates, Threat Intelligence Director configuration, Dynamic Analysis Connections.

  • ISE internal certificate object is not imported as part of the migration. You must export a new system certificate or a certificate and its associated private key from ISE and import it into CDO.

Secure Firewall Recommended Rules

Migrating threat defense to the cloud mirates the rule recommendations that are already associated with any of the intrusion policies. However, the cloud-delivered Firewall Management Center does not allow the generation of new rule recommendations or auto-update the already migrated recommendations post migration. This is because the cloud-delivered Firewall Management Center does not support rule recommendations. See Auto Cisco Recommended Rules.

Custom Network Analysis

If the device is associated with a custom network analysis policy, you must remove all references to this policy from the on premise before migration.

  1. Log on to the on premise management center.

  2. Choose Policies > Access Control.

  3. Click the edit icon on the access control policy you want to disassociate the custom NAP and then click the Advanced tab.

  4. In the Network Analysis and Intrusion Policies area, click the edit icon.

  5. In the Default Network Analysis Policy list, select a system-provided policy.

  6. Click OK.

  7. Click Save to save the changes and then click Deploy to download the changes to the device.

After migration, you can manually create the Network Analysis Policy in CDO.

Migration Guidelines and Limitations for VPN Configuration

Keep the following in mind when you migrate a device with VPN configuration.

Migration Support for Remote Access VPN Policy

CDO imports all remote access VPN policy settings, with the following exceptions:

  • Object overrides.

    If overrides are used in the address pool object, you must manually add them to the imported object using CDO, after migration.

  • Local users.

    If the authentication server is configured to a local database for user authentication, the associated local realm object is imported into CDO. However, you must manually add the local users to the imported local realm object using CDO, after migration. See Create a Realm and Realm Directory.

  • Remote Access VPN load-balancing configuration.

  • Remote Access VPN certificate enrollment with domain configuration.

    Perform the following after migration to enroll the certificate with domain configuration:

    1. In CDO, choose Inventory > FTD.

    2. Select the migrated FTD and in the Device Management on the right, click Device Overview.

    3. Choose Devices > Certificates.

      Perform one of the following tasks:

      • If the certificates are imported in an Error state, click the Refresh certificate status icon to synchronize the certificate status with the device. The certificate status turns green.

      • If the certificates are not imported, you must manually add the certificates defined in the Remote Access VPN policy that is configured in the management center.

Migration Support for Site-to-Site VPN Policy

After you've selected a threat defense device with a site-to-site VPN configuration, CDO will automatically select all its peers from different topologies. This is because devices in the site-to-site VPN topology must be migrated together to ensure a migration to succeed.


Note


Although the migration wizard doesn't list the extranet devices that are associated with them, they will still be included automatically during the migration process.


CDO imports all the settings of a site-to-site VPN policy, with the following exceptions:

  • If object overrides are used in the network object, you must manually add them to the imported object using CDO, after migration.

  • If the authentication type is configured as "Preshared Automatic Key" in the on-prem management center, CDO defines a new pre-shared key for the VPN postmigration deployment. The updated pre-shared key does not break existing tunnels, and the new tunnels start using the new pre-shared key.

  • When the devices are moved to CDO, and the changes have yet to be committed, the site-to-site VPN policy that is associated with those devices can be edited using the on-prem management center, however, it doesn't update the device configuration in CDO.

  • If devices are configured for SASE tunnels on Cisco Umbrella, refrain from migrating such devices.

Managing Threat Defense Events and Analytics

The events and analytics management can be retained in the on-prem management center or transferred to CDO, where the devices must be configured to send events to CDO. While initiating the migration process, you are allowed to choose the manager to which the device events must be sent for analytics.


Attention


If you are migrating devices from on-prem management center 1000/2500/4500, it is not possible to use the on-prem management center for managing events due to limited availability. Therefore, you must use Security Analytics and Logging (OnPrem) or Security Analytics and Logging (SAAS) for devices to send events for analytics. See Cisco Security Analytics and Logging.


If you select the on-prem management center for analytics, CDO becomes the manager for selected devices but retains a copy of those devices on the on-prem management center in analytics-only mode. The devices continue to send events to the on-prem management center, and CDO manages the configuration changes.

If you select CDO for analytics, CDO becomes the manager for the selected devices and deletes these devices from the on-prem management center. CDO manages both configuration changes and events and analytics management. You must configure threat defense devices to send events to the Cisco cloud. You can use either Security Services Exchange or the Secure Event Connector (SEC) to send events from the devices to the Cisco Secure Analytics and Logging (SAL) in the cloud.

eStreamer Server Streaming

When you manage a threat defense device with cloud-delivered Firewall Management Center, the device supports sending only fully-qualified events (FQE) to eStreamer clients. If you have configured eStreamer clients in the on-prem management center, ensure that the clients support the detailed data formats used by FQE when you migrate the device management to cloud-delivered Firewall Management Center. Any legacy clients, security information and event management (SIEM) systems, or log management solutions that do not support the data format of FQE or lack the necessary storage to handle the larger volume of FQE data will not work when you migrate.

Before You Begin Migration

Before you begin the process, ensure that the following prerequisites are met:

  • A provisioned CDO tenant is registered with a Smart License.

  • DNS Server Configuration:

    The threat defenses must have correct DNS server configuration to resolve cloud-delivered Firewall Management Center hostnames. To check device connectivity with cloud-delivered Firewall Management Center, see Check device connectivity with cloud-delivered Firewall Management Center.

  • Network Access:

    The required network access is enabled for threat defenses to reach cloud-delivered Firewall Management Center through the TCP port 8305. Note that outbound connectivity from the threat defenses to cloud-delivered Firewall Management Center is sufficient.

  • Threat Defense Outbound Port 443:

    The threat defenses must have outbound port 443 open to access cloud to use CDO event viewer.

  • On-Prem Management Center Outbound Port 443:

    The on-prem management center must have outbound port 443 open to access the “*.cdo.cisco.com” domain.

  • The on-prem management center is onboarded to CDO. Onboarding the on-prem management center also onboards all the threat defense devices registered to that on-prem management center. See Onboard an On-Prem FMC.


    Note


    Create a new user in the on-prem management center with Administrator role or a custom user role with "Devices" and "System" permissions for onboarding purposes.


    Caution


    If you onboard an on-prem management center to CDO and simultaneously sign in to that on-prem management center with the same user name, the onboarding fails.


  • For the on-prem management center 1000/2500/4500 migration:

  • The threat defense devices must be synchronized and not have pending changes on them. The migration fails on a device if CDO identifies pending changes on that device.

  • All peer devices in a site-to-site VPN topology must be online and have no pending deployment.

  • On-Prem Management Center should allow outbound HTTP/HTTPS to upload configurations to Amazon S3.

  • CDO imports Syslog alert object used in the access control policy from the on-prem management center. If CDO already contains an alert object with the same name but a different type (SNMP, Email), it is reused during configuration import.

    The user must check whether the Syslog object name matches the existing SNMP or Email alert object in CDO. If the name matches, you must rename the Syslog object in the on-prem management center before starting the migration process.

  • If you attempt to migrate firewalls with modified system defined FlexConfig text objects from an on-prem management center to the cloud-delivered Firewall Management Center, the values of the modified system defined FlexConfig text objects are not migrated to the cloud-delivered Firewall Management Center, and the deployment will fail.

    To avoid this, perform these tasks before you start the migration:

    • Copy the modified system defined FlexConfig text object values from the on-prem management center to cloud-delivered Firewall Management Center before migration.

    • Initiate migration from on-prem management center to cloud-delivered Firewall Management Center after verifying the predefined FlexConfig text objects.

High Availability Failover Link Must Be Up

The high availability failover link should be up for a successful migration. Before initiating the migration process on CDO, determine the health status of the failover link on the on-prem management center.

  1. Identify the failover interfaces of all HA pairs you want to migrate to cloud-delivered Firewall Management Center.

    1. Choose Devices > Device Management.

    2. Next to the device high-availability pair you want to edit, click Edit ( ).

    3. Click the High Availability tab.

    4. In the High Availability Link area, the Interface field shows the failover interface used in the pair.

    5. Identify the interfaces used for failover communication if there are multiple HA pairs for migration.

  2. Check the health status of the failover interfaces.

    1. Choose Devices > Device Management.

    2. Next to the device high-availability pair you want, click Health Monitor.

    3. In the left pane, expand the high availability pair to see the threat defense devices.

    4. Click the device indicated in the exclamation mark ( ).

    5. Click the Critical button at the top.

      The Interface Status shows the errors associated with interfaces.

    6. If the failover interface is down, the Interface ‘failover_interfacename’ has no link message is displayed.


      Note


      However, you can migrate the HA pair to cloud-delivered Firewall Management Center if you see any other data interface issues except for the failover interface.


    7. Rectify the issue and click Sync from onprem fmc now to obtain the latest changes on the device.

Migrate Threat Defense to Cloud-delivered Firewall Management Center

Procedure


Step 1

In the navigation bar on the left, choose Tools & Services > Migrations > Migrate FTD to cdFMC.

Step 2

Click and choose On-Prem FMC-managed FTD to cdFMC.

Note

 
You can initiate only one migration job at one time.

Step 3

In the Select OnPrem FMC area, perform the following:

  1. You can click the Onboard an FMC link to onboard the on-prem management center if you have not done already. See Onboard an FMC.

  2. Select the on-prem management center from the available list and click Next.

In the Select Devices step, you will see the threat defense devices that the selected on-prem management center manages. If a high-availability pair is set up on the on-premise on-prem management center, the high availability node will be shown instead of the active and standby devices.

The Last Synced time field indicates the time that is elapsed since the device configuration is synchronized into the on-prem management center. You can click Sync from OnPrem FMC Now to fetch the latest device changes.

Step 4

In the Select Devices step, perform the following:

  1. Select the devices that you want to migrate.

    These devices can include standalone, high-availability pairs, or clusters. If you have a high-availability pair or a cluster, select the node that represents it. Also, you can hover your mouse pointer over the cluster to view more details about the control node.

    Note

     
    • The devices running on unsupported versions are not available for selection.

    • The devices that are registered for analytics only with the on-prem management center or have pending changes to be deployed are not eligible for migration.

    • When you select a device that is associated with a site-to-site VPN topology, CDO automatically selects its peer devices belonging to either the same topology or a different topology, because all devices in the site-to-site VPN topology must be migrated together for a successful migration to take place. The wizard does not list the extranet devices, if any. However, CDO migrates extranet devices.

      The S2S VPN Topology column indicates the number of site-to-site VPN topologies in which a selected device participates. You click the topology link to view the topologies and devices that are migrated along with the selected device. This field is not applicable to devices that are not part of the site-to-site VPN topology.

    • A high availability pair is presented as a single node. You must select this node to include active and standby devices in the migration.

  2. In the Multi-Device Action list, you can choose a common action to apply on all devices.

  3. In the Commit Action column, you can choose one of the following actions for the selected device:

    • Retain on OnPrem FMC for Analytics: After the migration process is completed, the analytics management for selected threat defense devices is retained on the on-prem management center.

    • Delete FTD from OnPrem FMC: After the migration process is completed, the selected devices are removed from the on-prem management center and are available for CDO to handle the analytics. You must configure the devices to send events to CDO for managing analytics. When the devices are deleted from the on-prem management center, they cannot be revoked.

      Important


      For the on-prem management center 1000/2500/4500, when you select devices to migrate, make sure you choose Delete FTD from OnPrem FMC. Note that the device is not fully deleted unless you commit the changes or 14 days pass.

Note


The actions that are specified here are committed automatically after the 14 days evaluation period or after the changes are committed manually.

Step 5

(Optional) Check the Pause migration to review imported shared policies check box.

When you enable this option, the migration process will pause after the shared access policies like Access Control and NAT policies are staged in the cloud-delivered Firewall Management Center. This pause ensures that the evaluation doesn't start and that the device's current state and manager remain unaffected. It gives you ample time to review the imported configuration for accuracy. After you've assessed everything, you can resume the migration during the planned migration interval, which will then kick off the 15-day evaluation period.

Step 6

Check the Auto deploy to FTDs after successful migration check box to deploy the migrated configuration automatically to the device after successfully migrating and registering the device with the cloud-delivered Firewall Management Center.

However, if you prefer to review and manually deploy the configuration from the cloud-delivered Firewall Management Center after successful migration, you can uncheck this option and proceed to the next step.

Step 7

Click Migrate FTD to cdFMC.

Step 8

Click View Migration to Cloud Progress to see the progress.


What to do next

If you have paused the migration for review, you must manually click Proceed Migration to import the remaining configuration. See Proceed Migration Process.

You can view the overall and individual status of migration jobs and generate a report when a job is completed successfully. See View a Threat Defense Migration Job.

View a Threat Defense Migration Job

The migration dashboard provides the status of all migration jobs initiated from the CDO. You can expand a specific job to see the status of individual devices associated with that tenant. This helps you keep track of the progress of your migration and identify issues, if any, that need to be addressed.

If you have set up alerts for device workflows, click the notifications icon to see the alerts that have been triggered during the migration process. Additionally, if you have opted to receive email notifications from CDO, you will also receive an email notification regarding alerts, if any.

About the 14-day Evaluation Period

When a migration job is successful, you have 14 days to test and assess migration changes using cloud-delivered Firewall Management Center. If you are convinced about the migration changes, we recommend that you commit the devices manually, and not wait for CDO to automatically commit the migration changes. See Commit Migration Changes Manually.

Note that for the on-prem management center 1000/2500/4500, you would have migrated devices from Version 7.4, which is unsupported for general operations. To return the on-prem management center to a supported version you must remove the re-migrated devices, reimage back to Version 7.0.x, restore from backup, and re-register the devices.


Note


  • You cannot revoke the actions that are specified in the migration commit window after committing the changes.

  • You can cancel the migration during the evaluation period and return the device to the on-prem management center.

  • You cannot delete a device from either the on-prem management center or cloud-delivered Firewall Management Center during the evaluation period.


Important


Changes can be made and deployed to the device using CDO during the evaluation period. If you switch device management back to the on-prem management center, CDO-specific changes made during the evaluation period is not saved on the device once it is reverted to the source CDO tenant. You must deploy the changes from the on-prem management center to the device after reverting the device's manager.


  • Name: Represents the job name that shows the on-prem management center name and the date and time when the job was initiated.

  • Number of FTDs: Shows the total number of devices that are being migrated to the cloud.

  • Status: Shows the status of the job. Expand the job to see the status of individual devices.

    When a job is completed successfully, the FTD Migration job is successful message appears in the Status column. You can click the tooltip to see the number of days remaining for evaluating the manager.

    You can click Commit Migration Changes to commit the changes manually before the 14 days evaluation period ends.

  • Last Update: Shows the date and time that are updated only when a change is made to the device.

  • Actions: Click to execute the following actions:

After a successful migration, CDO deploys the configuration to the device. If the system identifies errors or warnings in the changes to be deployed, it displays them in the Validation Messages window. To view complete details, click the arrow icon before the warnings or errors. If the deployment fails, see the Best Practices for Deploying Configuration Changes section of Firepower Management Center Device Configuration Guide X.Y.

Configure Relam Sequence for Identity Policy

If the device contains an identity policy with a Realm or ISE configuration, configure your device as a proxy for CDO to communicate with the identity source. The identity policies don't function if CDO fails to connect to the Identity Realms.

A tooltip appears in the Status column for a device that requires additional configuration.

  1. Click the tooltip icon and then click Learn more.

  2. In the Configure Proxy window, click Configure my realms.

    To add a proxy sequence, see the Create a Proxy Sequence section in the Firepower Management Center Device Configuration Guide, 7.2.

Proceed Migration Process

If the Pause migration to review imported shared policies option was checked during the migration setup, the migration process will pause after the shared access policies were staged in the cloud-delivered Firewall Management Center. After you've reviewed the staged configurations, you must manually instruct CDO to resume the migration, which will then import device-specific configurations such as routing and interfaces, as well as register the threat defense with the cloud-delivered Firewall Management Center. Completion of the migration triggers a 14-day evaluation period.

To proceed, go to the migration job page and click Proceed with migration for the relevant job.

Remember that deployment from the cloud-delivered Firewall Management Center must be done after a successful migration.

Commit Migration Changes Manually to Cloud-delivered Firewall Management Center

We recommend that you commit migration changes manually if you are convinced with your changes and not waiting for CDO to auto commit changes. The Commit Migration Changes window shows the remaining days to commit the migration to cloud-delivered Firewall Management Center or revert the device to on-prem management center. During the evaluation period, you can modify the actions for selected threat defense devices before committing the changes. Once the changes are committed, you can't revoke the actions.


Note


The commit manager changes actions are disabled in the following conditions:


  • The 14-day evaluation period has passed.

  • The threat defense devices have either been reverted to the on-prem management center or deleted from on-prem management center, in which case, no further actions can be taken.

Procedure


Step 1

In the migration jobs page, click the under the Actions column of a completed job.

Step 2

Click Commit Migration Changes. (This link is available only after a job is completed successfully.)

Step 3

Select a device and in the Commit Actions list, choose one of the following actions:

  • Retain on OnPrem FMC for Analytics: After committing the changes, analytics management for selected threat defense devices is retained on the management center.
  • DeleteThreat Defense from OnPrem FMC: After committing the changes, the selected devices are removed from the on-prem management center and are available for CDO to handle the analytics. You must configure the threat defense to send events to CDO for managing analytics. After the threat defense devices are deleted from the on-prem management center, they cannot be revoked.

Note


If you want to revert the device management to on-prem management center, refer to Revert the Threat Defense Management to On-Prem Firewall Management Center.

Step 4

Click Commit executes your specified actions immediately without further confirmation.

On the migration jobs screen, you can expand the job to check the progress of the actions specified.

The migrated devices appear on CDO's Inventory page. These devices can be managed using the cloud-delivered Firewall Management Center portal that is linked to CDO. Ensure you deploy the changes to the devices from cloud-delivered Firewall Management Center.


Revert the Threat Defense Management to On-Prem Firewall Management Center

You can revert the device management to the on-prem management center during the evaluation period. This means that the devices will no longer be managed through the CDO platform. However, it is important to note that any changes made during the migration process in the CDO will not be reflected in the on-prem management center after reverting threat defense management.


Note


When the threat defense management has been returned to the on-prem management center , you can begin the migration job again to switch the threat defense management to CDO.


Procedure


Step 1

In the migration jobs page, click the under the Actions column of a completed job.

Step 2

Click Commit Migration Changes. (This link is available only after a job is completed successfully.)

Step 3

Select a device and in the Commit Actions list, choose Revert Manager to OnPrem FMC.

Step 4

Click Commit executes your specified actions immediately without further confirmation.

Step 5

Deploy the changes to the device from the on-prem management center.


View Migrated Devices

The migrated devices appear on the Inventory page in CDO. You can cross-launch and configure the required feature on the cloud-delivered Firewall Management Center.


Note


The devices on the cloud-delivered Firewall Management Center device listing page may show No-IP instead of the device's management IP address. Because the device registration uses the NAT ID, the device initiates the process, and therefore, the management IPs aren't discovered or used for the connection. Note that this applies to newly onboarded devices and devices migrated from the on-prem management center.


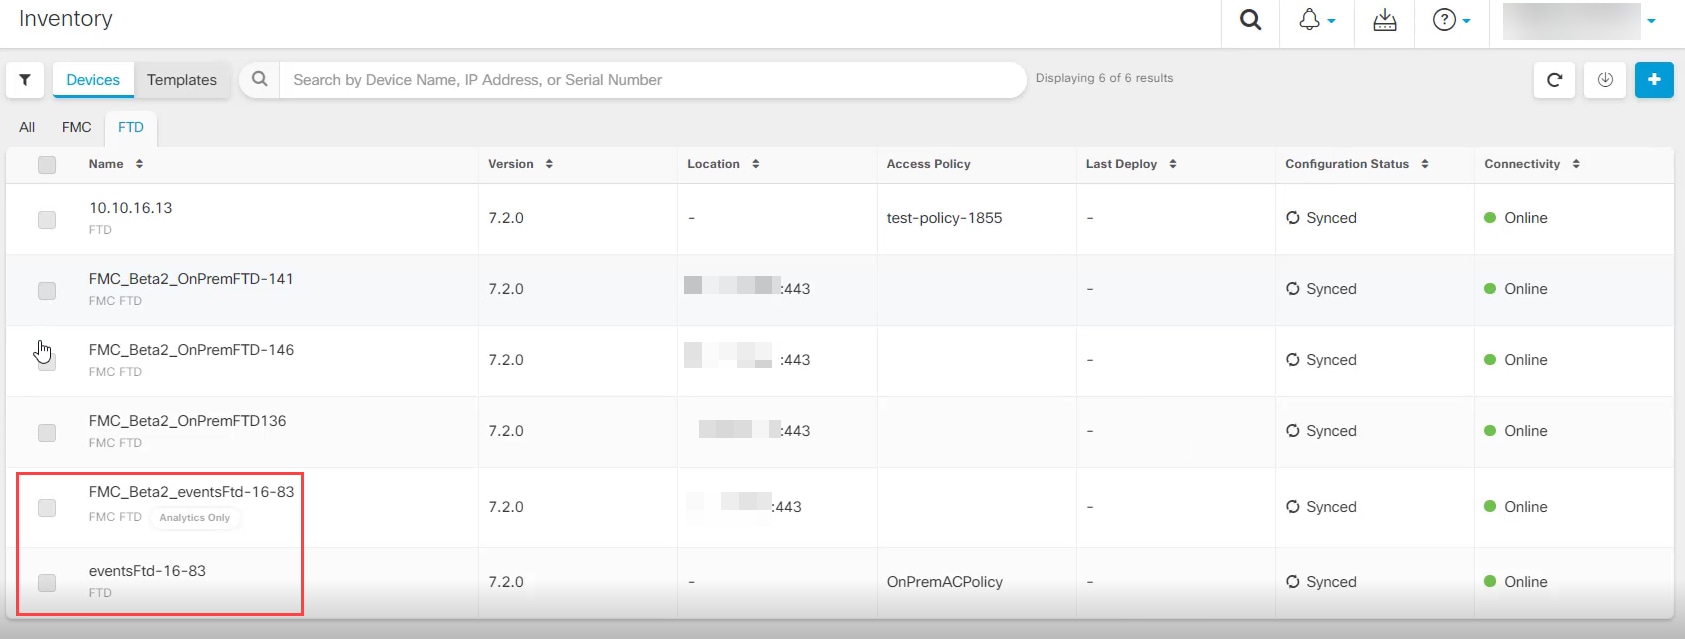
Analytics Only Threat Defense Device Example

CDO creates two instances of the same device that is configured to retain on the management center for analytics.

The device instance with FMC FTD and Analytics Only labels shows that the management center handles the analytics. The device instance with the FTD label indicates that CDO manages its configuration.

You can manage the configuration of the device using CDO. To see the device in the cloud-delivered Firewall Management Center, do the following:

Select the device having FTD label and in the Management pane on the right, click Device Summary.

You can view the events from the device in the management center. To see the events, do the following:

  1. Select the device having FMC FTD and Analytics Only labels and on the right, click the Manage Devices link.

  2. Log on to the on premise management center.

  3. Click Device > Device Management.

You can't select this device as CDO manages the configuration. The management center shows the CDO Managed label for this device.

To see the live events in the management center, click Analysis > Events.

Generate a Threat Defense Migration Report

When a migration job is successful, you can generate and download a report in PDF format to analyze every parameter imported from the on-prem management center to cloud-delivered Firewall Management Center. The report provides details of each device associated with the job. Details include information about devices, values of shared policies, objects, routing details, interfaces, network settings, and more.

On the migration jobs page, click the under the Actions column of a completed job and then click Download Report.. You must download a report within a year of the job being triggered.

Delete a Migration Job

If you have completed a migration job and no longer need it to be displayed on the migration page, you can easily remove it by deleting it. This cleans up the migration page and make it easier to navigate.


Attention


If you want to delete a migration job during the evaluation period, you must first commit the migration changes or revert the manager to the on-prem management center. Failing to do so may result in an inconsistent state of the on-prem management center, which could be unrecoverable. See Commit Migration Changes Manually.

If you don't have access to your on-prem management center or if it is no longer available and you are blocked from performing a commit or revert, you can delete the job.


Procedure


Step 1

Choose Tools & Services > Migrate FTD to cdFMC.

Step 2

Click the under the Actions column and then click Remove Migration Job.

Step 3

Click Delete to confirm your action.


Enable Notification Settings

You can subscribe to get email notifications from CDO whenever a device associated with your tenant experiences a specific action when migrating a threat defense device to CDO.

CDO sends an email if you enable to receive a notification for the following states during migration:

  • Failed: When a migration job fails.

  • Started: When a migration job is initiated.

  • Succeeded: When a migration job is completed successfully.

  • Commit Pending: When the manager changes have to be committed.

To enable notification settings, see Notification Settings.

Troubleshoot Threat Defense Migration to Cloud

This section provides information to troubleshoot specific errors that may occur when migrating threat defense to the cloud.

HTTP Status Code 201 (Created) Found in FMC Response

CDO shows this error at the device level.

Issue:

The Secure Device Connector (SDC) version is not compatible.

Resolution:

Ensure that the SDC is upgraded to version "202205191350" or later.

  1. Navigate to Admin > Secure Connectors.

  2. Click the SDC to see the existing SDC version in the Details pane on the right.

  3. Update your Secure Device Connector.

Device Connectivity to CDO Failed

The device is unable to reach CDO for one of the following reasons:

  • The device is cabled incorrectly.

  • Your network may require a static IP address for the device.

  • Your network uses custom DNS, or there is external DNS blocking on the customer network.

  • PPPoE authentication is needed.

  • The device is behind a proxy.

Resolution:

Failed to Configure CDO as Configuration Manager

When CDO cannot communicate with the device due to network loss, it fails to execute the configure manager command with the cloud-delivered Firewall Management Center.

Resolution:

  1. Check the cabling and network connectivity.

  2. Ensure that your firewall is not blocking any traffic.

  3. Ensure that threat defense has internet connectivity and the DNS address is resolved to an IP address. See Verify Threat Defense Connectivity with Cloud-delivered Firewall Management Center.

  4. Retry migration for this threat defense from CDO in a new change manager job.

Change Manager Already Exists or in Progress for Source Manager

You can create a threat defense migration job for a on-prem management center only when the previous job is completed.

This error occurs when you create a new job when the previous job is in progress.

Resolution:

  1. Navigate to the migration table to see if another job is in progress for a particular source on premise management center.

  2. Wait for the current migration job to complete.

  3. Initiate the next migration job.

Verify Threat Defense Connectivity with Cloud-delivered Firewall Management Center

This section provides the commands to determine the threat defense connectivity with the cloud-delivered Firewall Management Center.

Check internet connectivity on the device

Execute the ping system <any OpenDNS server address> command to check whether the device can reach the internet.

  1. Connect to the CLI of the device, either from the console port or using SSH.

  2. Log in with the Admin username and password.

  3. Enter ping system <OpenDNS IPAddress>.

ping system 208.67.222.222
PING 208.67.222.222 (208.67.222.222) 56(84) bytes of data.
64 bytes from 208.67.222.222: icmp_seq=1 ttl=48 time=22.10 ms
64 bytes from 208.67.222.222: icmp_seq=2 ttl=48 time=22.10 ms
64 bytes from 208.67.222.222: icmp_seq=3 ttl=48 time=22.8 ms
64 bytes from 208.67.222.222: icmp_seq=4 ttl=48 time=22.6 ms
^C
--- 208.67.222.222 ping statistics ---
4 packets transmitted, 4 received, 0% packet loss, time 7ms
rtt min/avg/max/mdev = 22.588/22.841/22.995/0.223 ms

The above example shows that the device can connect to the internet using the OpenDNS Server IP address. Also, the number of packets transmitted is the same as received, indicating that internet connectivity is available on the device. This shows that the device can reach the internet.


Note


If your results don't match, check the internet connection manually.


Check device connectivity with Cloud-delivered Firewall Management Center

  1. Obtain the host name of the cloud-delivered Firewall Management Center.

    1. In the CDO navigation pane, click Tools & Services > Firewall Management Center.

    2. Choose Cloud-Delivered FMC to see the cloud-delivered Firewall Management Center details on the right pane.

    3. In the Hostname field, copy only the hostname shown in the following example image.

      In the above figure, the highlighted text is the hostname (CDO-acc10.app.us.CDO.cisco.com) of the FMC to be copied.

  2. Connect to the CLI of the device, either from the console port or using SSH.

  3. Enter ping system <hostname of the FMC>.

ping system cdo-acc10.app.us.cdo.cisco.com
PING cdo-acc10.app.us.cdo.cisco.com (54.187.125.161) 56(84) bytes of data.
^C
--- cdo-acc10.app.us.cdo.cisco.com ping statistics ---
2 packets transmitted, 0 received, 100% packet loss, time 64ms

In the above example, the hostname is resolved with the IP address, indicating your connection is successful. Ignore the "100% packet loss" message shown in the response.


Note


If you can't connect to the host, you can rectify the DNS configuration in the CLI using configure network dns <address>.