The documentation set for this product strives to use bias-free language. For the purposes of this documentation set, bias-free is defined as language that does not imply discrimination based on age, disability, gender, racial identity, ethnic identity, sexual orientation, socioeconomic status, and intersectionality. Exceptions may be present in the documentation due to language that is hardcoded in the user interfaces of the product software, language used based on RFP documentation, or language that is used by a referenced third-party product. Learn more about how Cisco is using Inclusive Language.
When you login to Cisco Spaces dashboard, the Cisco Spaces apps are displayed on the Cisco Spaces Home page. The apps are displayed under the license type for which they are available. You can access other features of Cisco Spaces such as Location Hierarchy, Monitor, Admin Management, and Setup using the three-line menu icon displayed at the top-left of the Dashboard. You can navigate to the Home page by clicking
Cisco Spaces displayed at the top-left of the dashboard or using the Home option the three-line menu.
An app launcher (Grid) icon appears at the top-right of the dashboard using which you can easily navigate from one app to
another app. When you click the app launcher icon, it lists all the Cisco Spaces apps activated for the user. From an app you can navigate to the home page by clicking Cisco Spaces displayed at the top-left of the dashboard.
Cisco Spaces Dashboard
Cisco Spaces dashboard is the default home page of Cisco Spaces application. The Cisco Spaces GUI adopts the Magnetic design implementation. Magnetic design follows a persistent header and collapsible left navigation
pane.
After you log in to Cisco Spaces, the Home window is displayed as shown in the following image:
Figure 1. Cisco Spaces Home
The Cisco SpacesHome window includes the Dashboard drop-down list (in the left navigation pane) which allows you to search and view the available apps associated with your
Cisco Spaces license.
Use the Dashboard drop-down list to choose and navigate to any selected app. To navigate back to the Cisco SpacesHome window, choose Dashboard option from the drop-down list.
The dashboard has the following main areas: Menu Bar, Information icon, Profile icon, Digitization Stats and various applications
available as per your subscription.
Menu Bar
Click the Menu icon () at the left of the menu bar to access the following menu items:
App Search - Dashboard drop-down list
Location Hierarchy
Integrations
Monitor
Admin Management
IoT Services
Setup
Icons
Click the icons at the right of the menu bar to perform common tasks:
Icon
Description
Support: Displays help center, support and documentation links.
User Profile: Displays account, smart licenses and logout options. The license information is available under My Account > License Information > License Units Consumed.
This app search option is available in the left navigation pane in the Dashboard drop-down list.The Dashboard drop-down list displays all the applications that are available in your Cisco Spaces subscription.
Digitization Stats
The Cisco Spaces dashboard displays the cumulative statistics values for locations, APs, location updates from your network and location visits.
The information in the Digitization Stats section displays as a single row.
Cisco Spaces: Connector 3.0
Cisco Spaces: Connector (referred to as Connector in all subsequent references in this document) is a fully redesigned version of the Connector with
the capability to efficiently manage multiple services that connect to different network devices such as Cisco Wireless controller
and switches for data. The Connector platform makes it easy to add/remove new services from the cloud. It enables enhanced
troubleshooting with debugging, log upload, and restart functionalities from the cloud. Connector also provides detailed metrics
for each service with CPU, Memory, Connectivity and Up/Down status.
Connector is the next generation connector of Cisco Spaces that provides an enhanced user experience, architecture to support
multiple services, simplicity, modularity, seamless upgrade and High Availability. Connector supports an active-active High
Availability setup. Unlike the earlier releases of Connector 2.x, you can specifically configure and monitor the High Availability
pair. All services and device configurations are managed at the Connector level to make it easy to pair with High Availability.
The Connector and device status is also aggregated at the Connector level from each instance for easy monitoring. Connector
provides full visibility to each instance of a High Availability pair. You can view how the services are running on each instance,
their upgrade status and so on. You can also perform actions on a particular instance, such as restarting of services.
OpenRoaming SDK Profile
Cisco Spaces now supports configuration of OpenRoaming Wi-Fi profile using the Menu () Integrations > Cisco Spaces SDK > Configure Profile window. You can create a customer specific profile for a particular tenant based on the values you provide in the Configure Profile window.
Prior to this enhancement, the profile used to be updated manually in the backend.
Cisco Spaces Features
The major features of Cisco Spaces dashboard includes:
Digitization Stats
In the Cisco Spaces dashboard, the Digitization Stats area displays the following cumulative statistics values. You can view the Digitization Stats as a single row.
Locations: The total network locations configured in Cisco Spaces for various wireless networks.
Access Points: The total number of APs added to Cisco Spaces
Location Updates: The total number of location updates received from the wireless networks from the date of deployment of Cisco Spaces.
Square Foot: The total area configured for network locations in the Location Info option in Location Hierarchy . However, if total area is not configured for network locations in the Location Hierarchy,
then the Square Foot value will be displayed based on number of APs.
Visits: The total number of visits (including repeated visits of unique visitors) that occurred in your business locations from
the date of deployment of Cisco Spaces.
Note
If a location is removed from the location hierarchy, the corresponding Location Updates and the Visits counter values are still retained in the Digitization Stats area.
You can now click or hover your cursor on any counter to view the tooltip with the corresponding information.
If data is not available for the counters, the tooltip displays a warning message as shown in the following image:
Overview of Cisco Spaces Apps
In the Cisco Spaces Home page, you can view all available applications. Use the Dashboard drop-down list to search apps.
The apps available in Cisco Spaces are tied to various Cisco Spaces License Packages. In the Cisco Spaces home page, you can view the app tiles segregated according to your Cisco Spaces account license.
The following apps are available under EXTEND license:
Behavior Metrics
Right Now
Camera Metrics
OpenRoaming
Location Analytics
Detect and Locate
Impact Analysis
IoT Device Marketplace
The following apps are available under ACT license:
Proximity Reporting
Space Manager
Space Experience
The following apps available under SMART OPERATIONS license:
Asset Locator
IoT Explorer
The following apps are available under SMART VENUES license.
Note
For a Cisco Spaces account tied to SMART VENUES license, all apps under EXTEND license is available.
Captive Portals
Engagements
Location Personas
Location Hierarchy
The Location Hierarchy feature enables you to define your business locations in Cisco Spaces. You can import the locations in the same structure in which they are defined it your wireless network . The apps such as
Engagements, Captive Portals, and Location Personas Rules depend on the location hierarchy defined. Cisco Spaces provides universal account, and you can add the locations of multiple wireless networks to the location hierarchy.
The APs that you can add to the location hierarchy depends on the type of Cisco Spaces license you own.
For more information, see “Location Hierarchy in Cisco DNA Spaces”.
Monitor
The Monitor section enables you to monitor the performance status of Cisco Spaces, and its apps. It also displays the app latencies and anomalies. For more information, see the “Monitoring” section .
Admin Management
The Admin Management feature enables you to create Cisco Spaces users. You can restrict the privileges for each user based on the their role. For more information, see the “Managing Cisco
DNA Spaces Users and Accounts” section.
Setup
Wireless Networks and Camera
Wireless Network
Displays features and instructions to connect Cisco Spaces to a particular wireless network through various methods. For more information, see Setting Up Cisco Spaces to Work with Various Wireless Networks.
Camera
Displays features and instructions to configure Cisco Meraki Camera to work with Cisco Spaces.
Map Service
Map Service enables you to upload the map of locations for Cisco CMX tethering.
Wireless Network Status
The Wireless Network Status option enables you to view the synchronization status of your wireless network. You can view the time at which the last synchronization
happened.
User Profile
The User Profile option () in the top-left of the Cisco Spaces dashboard helps to view account, smart licenses and logout options.
Figure 2. User Profile
You can view the last login and timestamp details. Click View History to the recent and failed login attempts.
The User Profile feature includes the following options:
View Change Log: Click to open the Change Log tab that displays the activity details of all the users in a particular account. For more information, see Viewing Cisco Spaces Account Details.
Activate Smart License: Click to activate Smart License. For more information, see Activate Smart License.
Viewing Cisco Spaces Account Details
Use the My Account window to view the Cisco Spaces profile details, account activity, and other account related information. The My Account window has the following tabs:
My Profile: Displays the basic profile information such as first name, last name, email and mobile number.
Account Activity: Displays the failed attempt account activity details such as IP address, date and browser in which the account activity
failed.
License Information: Displays the Cisco Spaces account information, access points limit and Smart Software License details. Click Link your Smart Account to activate Cisco Smart License.
Preferences: This tab includes the following options:
Add new domain: Click to add a new domain for SSO authentication.
Enable Support Access: Click this option to enable or disable access to their account to the Cisco Spaces support team. Enabling this option helps the Cisco Spaces support team to detect and debug issues under exceptional situations.
Note
By default, the Enable Support Access option is enabled.
When access is enabled, the Cisco Spaces support team gets access to the customer's Cisco Spaces account.
Change Log: Displays the change log details such as user activity, time, app, section and user. Click the Filter option to filter log details.
Cisco Smart License
Cisco Smart License is a flexible licensing model that streamlines the way you activate and manage software. The solution
allows you to easily track the status of your license and software usage trends.
Smart License support in Cisco Spaces allows you to view and manage Cisco Spaces software license for your Cisco Smart Account. To enable Cisco Smart License in Cisco Spaces, you must have a smart account that is configured with Cisco Smart Software Manager (CSSM). In the Cisco Spaces dashboard, choose Profile Icon > Activate Smart License to activate Cisco Smart License.
You can also activate Cisco Smart License from My Accounts > License Information tab.
Note
To enable smart licenses in Cisco Spaces, you must have a smart account configured with Cisco. For more information about Cisco Smart License, see Smart Software Licensing.
In the Cisco Spaces dashboard, choose Profile Icon () > Activate Smart License.
The Terms and Conditions window is displayed.
Step 3
Read the terms and comdition statements and click Accept Terms and Conditions.
The Smart License Configuration window is displayed.
Step 4
Click the Yes, I have radio button if you already have an account in the Cisco Smart Software Manager (CSSM).
If you do not have an accout in the CSSM, click the No, I don't have radio button and procced to view the instructions to create an account in CSSM.
Step 5
Click Next.
Step 6
Follow the on-screen instructions to create a token in the CSSM tool.
Note
Ensure that you copy the generated token to use the same in step 7.
Step 7
Click Next after you have generated the token.
Step 8
In the Product Instance Token field, paste the generated token.
Step 9
Click Register to register Cisco Spaces with your CSSM account.
A success notification message is displayed. You can view the Smart License Software registration details and license compliance
information in the My Accounts window under License Information tab.
Note
After the Cisco Smart License activation, you can contact the Cisco Spaces support team to enable the trial support. If trial mode is enabled, the smart agent will not update the license usage to
Cisco Smart License Management.
After you activate your Cisco Smart License, you can upgrade or downgrade the Cisco Spaces license. To do this, choose Profile Icon > License Info > Select License Level.For more information, see Update License Information.
Update License Information
Use the License Information tab in the My Accounts window to manage your Cisco Spaces licenses. The following licenses are available:
Cisco Spaces See
Cisco Spaces Act
Cisco Spaces Extend
SMART OPERATIONS
SMART VENUES
SPACES UNLIMITED
You can renew authorization and registration, re-register and de-register Cisco Spaces smart licenses.
In the Cisco Spaces dashboard, choose Profile Icon () > My Account.
The My Account window is displayed.
Step 3
Click the License Information tab.
The LICENSE USAGE area displays the Cisco Spaces license details and compliance status.
Figure 3. License Usage
Step 4
To upgrade or downgrade the license, click Change.
The Select License Level window is displayed. Your current plan is indicated by a green tick mark.The upgrade or downgrade possibilities are also
indicated in the Select License Level window.
Select the plan you would like to upgrade or downgrade.
A warning message is displayed with license upgrade or downgrade information.
Check the I accept the terms and conditions checkbox to proceed.
Click Change Plan.
A success notification message is displayed.
To view the latest license details, click Login and log in to Cisco Spaces.
Step 5
In the Smart License Status area, the following information is displayed:
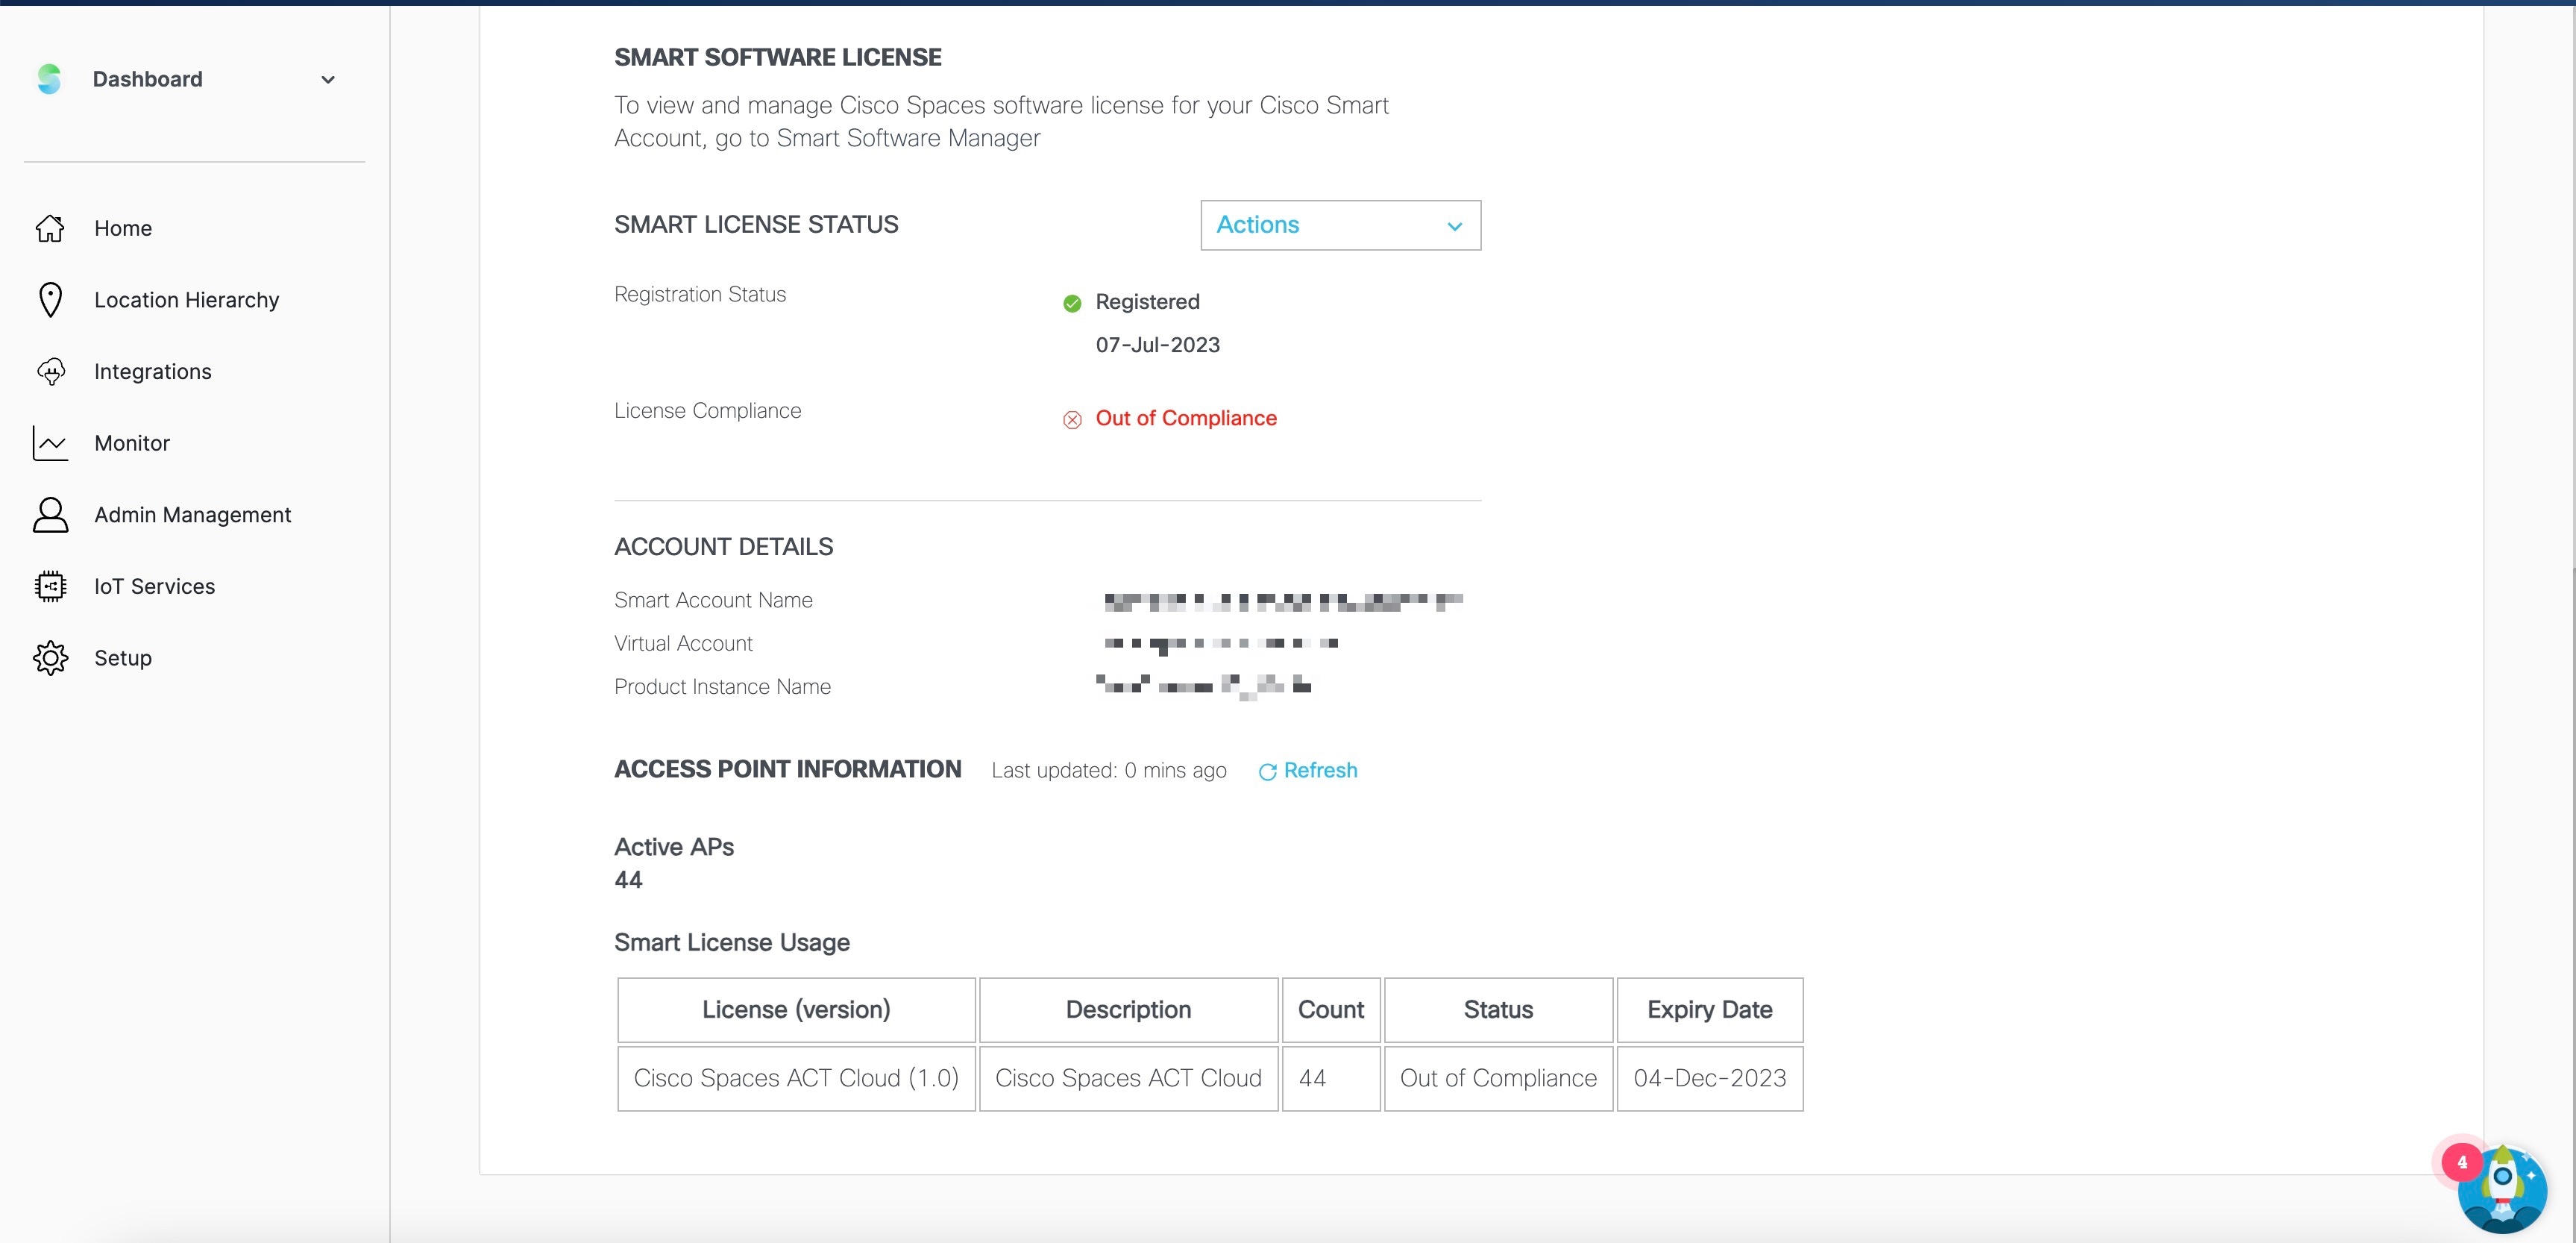
Figure 4. Smart Software License
Registration Status: Displays the Cisco Spaces smart license registered status.
License Compliance: Displays the Cisco Spaces smart license compliance details. The compliance statuses available are: Init (Initiated), In Compliance and Out of Compliance.
Note
If the status indicates Out of Compliance, you cannot access the Cisco Spaces dashboard once the Smart Account licenses expire. However, Cisco Spaces will still allow access to the Cisco Spaces dashboard if the number of access points exceeds the license limit or the account is in an Out of Compliance status.
Step 6
Click Actions drop-down list to view the following options:
Renew Authorization: Click to renew Cisco Spaces smart license authorization.
Note
This action is optional as renew authorization is performed automatically when Cisco Spaces communicates with CSSM. Alternatively, Smart License agent performs renew authorization automatically after every 30 days
from backend.
We recommend that you perfrom this action if you want to troubleshoot or renew authorization manually if status is Out of Compliance. You also can renew authorization manually to reflect any recent Smart Account updates to reflect in Cisco Spaces.
Renew Registration: Click to renew Cisco Spaces smart license registration.
Note
This action is optional as renew registration is performed by Cisco Spaces automatically in backend at the time of registration.
This action renews the Registration ID and Certificate with CSSM. Cisco Spaces performs this action automatically every 6 months from backend.
Re-register: Click to re-register Cisco Spaces smart license in the CSSM.
Note
This action forcefully re-registers Smart License and overrides any existing registered instance. This action results in reported
data loss of that particular instance in Smart Account.
We recommend that you perform this action to troubleshoot Smart License.
De-register: Click to de-register Cisco Spaces smart license in the CSSM.
Note
We recommend that you perform this action if Cisco Spaces is not in use and you want to deregister the instance from CSSM.
Step 7
In the Account Details area, the following information is displayed:


 ) in the top-left of the


 Feedback