- Information About the Local Database
- Fallback Support
- How Fallback Works with Multiple Servers in a Group
- Licensing Requirements for the Local Database
- Guidelines and Limitations
- Adding a User Account to the Local Database
- Testing Local Database Authentication and Authorization
- Monitoring the Local Database
- Feature History for the Local Database
Local Database for AAA
This chapter describes how to configure local servers for AAAand includes the following sections:
- Information About the Local Database
- Fallback Support
- How Fallback Works with Multiple Servers in a Group
- Licensing Requirements for the Local Database
- Guidelines and Limitations
- Adding a User Account to the Local Database
- Testing Local Database Authentication and Authorization
- Monitoring the Local Database
- Feature History for the Local Database
Information About the Local Database
You can use the local database for the following functions:
- ASDM per-user access
- Console authentication
- Telnet and SSH authentication
- enable command authentication
This setting is for CLI-access only and does not affect the ASDM login.
If you turn on command authorization using the local database, then the ASA refers to the user privilege level to determine which commands are available. Otherwise, the privilege level is not generally used. By default, all commands are either privilege level 0 or level 15. ASDM allows you to enable three predefined privilege levels, with commands assigned to level 15 (Admin), level 5 (Read Only), and level 3 (Monitor Only). If you use the predefined levels, then assign users to one of these three privilege levels.
For multiple context mode, you can configure usernames in the system execution space to provide individual logins at the CLI using the login command; however, you cannot configure any AAA rules that use the local database in the system execution space.

Note![]() You cannot use the local database for network access authorization.
You cannot use the local database for network access authorization.
Fallback Support
The local database can act as a fallback method for several functions. This behavior is designed to help you prevent accidental lockout from the ASA.
When a user logs in, the servers in the group are accessed one at a time, starting with the first server that you specify in the configuration, until a server responds. If all servers in the group are unavailable, the ASA tries the local database if you have configured it as a fallback method (for management authentication and authorization only). If you do not have a fallback method, the ASA continues to try the AAA servers.
For users who need fallback support, we recommend that their usernames and passwords in the local database match their usernames and passwords on the AAA servers. This practice provides transparent fallback support. Because the user cannot determine whether a AAA server or the local database is providing the service, using usernames and passwords on AAA servers that are different than the usernames and passwords in the local database means that the user cannot be certain which username and password should be given.
The local database supports the following fallback functions:
- Console and enable password authentication—If the servers in the group are all unavailable, the ASA uses the local database to authenticate administrative access, which can also include enable password authentication.
- Command authorization—If the TACACS+ servers in the group are all unavailable, the local database is used to authorize commands based on privilege levels.
- VPN authentication and authorization—VPN authentication and authorization are supported to enable remote access to the ASA if AAA servers that normally support these VPN services are unavailable. When a VPN client of an administrator specifies a tunnel group configured to fallback to the local database, the VPN tunnel can be established even if the AAA server group is unavailable, provided that the local database is configured with the necessary attributes.
How Fallback Works with Multiple Servers in a Group
If you configure multiple servers in a server group and you enable fallback to the local database for the server group, fallback occurs when no server in the group responds to the authentication request from the ASA. To illustrate, consider this scenario:
You configure an LDAP server group with two Active Directory servers, server 1 and server 2, in that order. When the remote user logs in, the ASA attempts to authenticate to server 1.
If server 1 responds with an authentication failure (such as user not found), the ASA does not attempt to authenticate to server 2.
If server 1 does not respond within the timeout period (or the number of authentication attempts exceeds the configured maximum), the ASA tries server 2.
If both servers in the group do not respond, and the ASA is configured to fall back to the local database, the ASA tries to authenticate to the local database.
Licensing Requirements for the Local Database
|
|
|
|---|---|
Guidelines and Limitations
This section includes the guidelines and limitations for this feature.
Supported in single and multiple context mode.
Supported in routed and transparent firewall mode.
To prevent lockout from the ASA when using the local database for authentication or authorization, see Recovering from a Lockout.
Adding a User Account to the Local Database
To add a user to the local database, perform the following steps:
Detailed Steps
Step 1![]() Choose Configuration > Device Management > Users/AAA > User Accounts, and then click Add.
Choose Configuration > Device Management > Users/AAA > User Accounts, and then click Add.
The Add User Account-Identity dialog box appears.
Step 2![]() In the Username field, enter a username from 4 to 64 characters long.
In the Username field, enter a username from 4 to 64 characters long.
Step 3![]() In the Password field, enter a password between 3 and 32 characters. Passwords are case-sensitive. The field displays only asterisks. To protect security, we recommend a password length of at least 8 characters.
In the Password field, enter a password between 3 and 32 characters. Passwords are case-sensitive. The field displays only asterisks. To protect security, we recommend a password length of at least 8 characters.
Note![]() To configure the enable password from the User Accounts pane (see Configuring the Hostname, Domain Name, and Passwords), change the password for the enable_15 user. The enable_15 user is always present in the User Accounts pane, and represents the default username. This method of configuring the enable password is the only method available in ASDM for the system configuration. If you configured other enable level passwords at the CLI (enable password 10, for example), then those users are listed as enable_10, and so on.
To configure the enable password from the User Accounts pane (see Configuring the Hostname, Domain Name, and Passwords), change the password for the enable_15 user. The enable_15 user is always present in the User Accounts pane, and represents the default username. This method of configuring the enable password is the only method available in ASDM for the system configuration. If you configured other enable level passwords at the CLI (enable password 10, for example), then those users are listed as enable_10, and so on.
Step 4![]() In the Confirm Password field, reenter the password.
In the Confirm Password field, reenter the password.
For security purposes, only asterisks appear in the password fields.
Step 5![]() To specify the VPN groups that the user belongs to, enter a group name in the Member of field, and click Add.
To specify the VPN groups that the user belongs to, enter a group name in the Member of field, and click Add.
To delete a VPN group, choose the group in the window, and click Delete.
Step 6![]() In the Access Restriction area, set the management access level for a user. You must first enable management authorization by clicking the Perform authorization for exec shell access option on the Configuration > Device Management > Users/AAA > AAA Access > Authorization tab.
In the Access Restriction area, set the management access level for a user. You must first enable management authorization by clicking the Perform authorization for exec shell access option on the Configuration > Device Management > Users/AAA > AAA Access > Authorization tab.
Choose one of the following options:
- Full Access (ASDM, Telnet, SSH and console) —If you configure authentication for management access using the local database (see Configuring Authentication for CLI, ASDM, and enable command Access), then this option lets the user use ASDM, SSH, Telnet, and the console port. If you also enable authentication, then the user can access global configuration mode.
–![]() Privilege Level —Selects the privilege level for this user to use with local command authorization. The range is 0 (lowest) to 15 (highest). see Configuring Command Authorization for more information.
Privilege Level —Selects the privilege level for this user to use with local command authorization. The range is 0 (lowest) to 15 (highest). see Configuring Command Authorization for more information.
- CLI login prompt for SSH, Telnet and console (no ASDM access) —If you configure authentication for management access using the local database (see Configuring Authentication for CLI, ASDM, and enable command Access), then this option lets the user use SSH, Telnet, and the console port. The user cannot use ASDM for configuration (if you configure HTTP authentication). ASDM monitoring is allowed. If you also configure enable authentication, then the user cannot access global configuration mode.
- No ASDM, SSH, Telnet, or console access —If you configure authentication for management access using the local database (see Configuring Authentication for CLI, ASDM, and enable command Access), then this option disallows the user from accessing any management access method for which you configured authentication (excluding the Serial option; serial access is allowed).
Step 7![]() (Optional) To enable public key authentication for SSH connections to the ASA on a per-user basis, click one of the following options in the navigation pane:
(Optional) To enable public key authentication for SSH connections to the ASA on a per-user basis, click one of the following options in the navigation pane:
- Public Key Authentication —Paste in a Base64-encoded public key. You can generate the key using any SSH key generation software (such as ssh keygen) that can generate SSH-RSA raw keys (with no certificates).When you view an existing key, the key is encrypted using a SHA-256 hash. If you need to copy and paste a hashed key, check the Key is hashed check box.
To remove an authentication key, click Delete Key to display a confirmation dialog box. Click Yes to remove the authentication key, or click No to retain it.
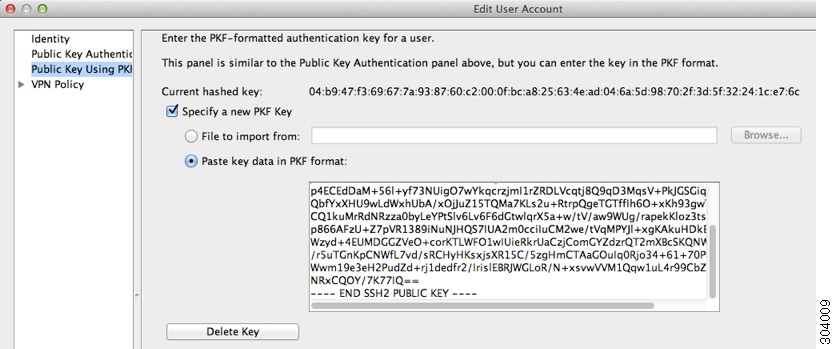
- Public Key Using PKF —Check the Specify a new PKF key check box, and paste or import a public key file (PKF) formatted key, up to 4096 bits. Use this format for keys that are too large to paste in Base64 format. For example, you can generate a 4096-bit key using ssh keygen, then convert it to PKF, and import on this pane. When you view an existing key, the key is encrypted using a SHA-256 hash. If you need to copy and paste a hashed key, copy it from the Public Key Athentication pane, and paste it in that pane on the new ASA with the Key is hashed check box checked.
To remove an authentication key, click Delete Key to display a confirmation dialog box. Click Yes to remove the authentication key, or click No to retain it.
Step 8![]() Click VPN Policy to configure VPN policy attributes for this user. See the VPN configuration guide.
Click VPN Policy to configure VPN policy attributes for this user. See the VPN configuration guide.
The user is added to the local database, and the changes are saved to the running configuration.

Tip You can search for specific text in each column of the Configuration > Device Management > Users/AAA > User Accounts pane. Enter the specific text that you want to locate in the Find box, then click the Up or Down arrow. You can also use the asterisk (“*”) and question mark (“?”) as wild card characters in the text search.
The following example generates a shared key for SSH on a Linux or Macintosh system, and imports it to the ASA:
Step 1![]() Generate the ssh-rsa public and private keys for 4096 bits on your computer:
Generate the ssh-rsa public and private keys for 4096 bits on your computer:
Step 2![]() Convert the key to PKF format:
Convert the key to PKF format:
Step 3![]() Copy the key to your clipboard.
Copy the key to your clipboard.
Step 4![]() In ASDM, choose Configuration > Device Management > Users/AAA > User Accounts, select the username and then click Edit. Click Public Key Using PKF and paste
In ASDM, choose Configuration > Device Management > Users/AAA > User Accounts, select the username and then click Edit. Click Public Key Using PKF and paste ![]() the key into the window:
the key into the window:
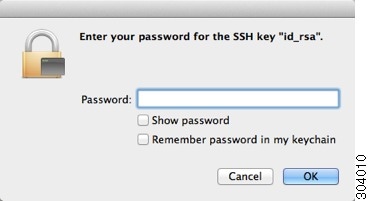
Step 5![]() Verify the user (test) can SSH to the ASA:
Verify the user (test) can SSH to the ASA:
The following dialog box appears for you to enter your passphrase:
Meanwhile, in the terminal session:
Testing Local Database Authentication and Authorization
To determine whether the ASA can contact a local database and authenticate or authorize a user, perform the following steps:
Step 1![]() From the Configuration > Device Management > Users/AAA > AAA Server Groups > AAA Server Groups table, click the server group in which the server resides.
From the Configuration > Device Management > Users/AAA > AAA Server Groups > AAA Server Groups table, click the server group in which the server resides.
The row is highlighted in the table.
Step 2![]() From the Servers in the Selected Group table, click the server that you want to test.
From the Servers in the Selected Group table, click the server that you want to test.
The row is highlighted in the table.
The Test AAA Server dialog box appears for the selected server.
Step 4![]() Click the type of test that you want to perform— Authentication or Authorization.
Click the type of test that you want to perform— Authentication or Authorization.
Step 5![]() In the Username field, enter a username.
In the Username field, enter a username.
Step 6![]() If you are testing authentication, in the Password field, enter the password for the username.
If you are testing authentication, in the Password field, enter the password for the username.
The ASA sends an authentication or authorization test message to the server. If the test fails, ASDM displays an error message.
Monitoring the Local Database
To monitor the local database, see the following panes:
|
|
|
Feature History for the Local Database
Table 34-1 lists each feature change and the platform release in which it was implemented. ASDM is backwards-compatible with multiple platform releases, so the specific ASDM release in which support was added is not listed.
 Feedback