Onboard an FTD to the Cloud-delivered Firewall Management Center

Read the following information for onboarding prerequisties and procedures.

Onboarding Overview

Review the following use cases and supported sofware versions that are compatible with cloud-delivered Firewall Management Center management.


Note


You must ensure that the threat defense device ports have external and outbound access for the cloud-delivered Firewall Management Center to onboard them. There is no requirement for an on-premises or cloud-based Security Device Controller (SDC) for this operation. For more information, see Network Requirements.

To send threat defense Syslog events to the Cisco cloud, you can set up the Secure Event Connector (SEC). For more information, see Installing Secure Event Connectors.


Threat Defense Devices Currently Managed by Cloud-delivered Firewall Management Center

The following scenarios occur when you either move or migrate a device to the cloud-delivered Firewall Management Center:

  • If you delete a device from an on-premises management center or Secure Firewall Threat Defense device manager to onboard to the cloud-delivered Firewall Management Center, the change of managers wipes any policies configured through the on-premises management center.

  • If you migrate a device from an on-premises management center to the cloud-delivered Firewall Management Center, the device retains the majority of your previously configured policies.


Note


If you do not know if your device is already managed by an alternative manager, use the show managers command in the device's CLI.


Onboarding Methods

Cloud-delivered Firewall Management Center supports the following onboarding methods:

  • Registration Key - Onboard a device with a registration key. The initial device setup wizard is complete on the device.

  • Zero-Touch Provisioning - Onboard a new factory-shipped device with its serial number. Note that this method only supports Firepower 1000, Firepower 2100, or Secure Firewall 3100 devices.


    Note


    Version 7.0.3 does not support zero-touch provisioning.


  • Zero-Touch Provisioning using a device template - Onboard new factory-shipped devices using serial numbers and a device template. Note that this method only supports Firepower 1000, Firepower 2100, Secure Firewall 1200 or Secure Firewall 3100 devices.

Prerequisites to Onboard a Device to Cloud-delivered Firewall Management Center

Onboard Limitations and Requirements

Be aware of the following limitations when onboarding a device to the cloud-delivered Firewall Management Center:

  • Devices must be running version 7.0.3, or version 7.2 and later. We strongly recommend version 7.2 or later.

  • You can migrate an HA pair that is managed by an On-Premises Firewall Management Center by following the Migrate FTD to Cloud-Delivered Firewall Management Center process. Confirm both peers are in a healthy state prior to migrating.

  • Only devices that are configured for local management and are managed by a device manager can be onboarded with the serial number and zero-touch provisioning methods.

  • If the device is managed by an on-premises management center, you can either onboard the device to cloud-delivered Firewall Management Center or migrate the device. Migrating retains any existing policies and objects, whereas onboarding the device removes most policies and all objects. See Migrate FTD to Cloud-Delivered Firewall Management Center for more information.

  • If your device is currently managed by a device manager, unregister all your smart licenses before you onboard the device. Even if you switch device management, the Cisco Smart Software Manager will retain the smart licenses.

  • If you have previously onboarded a device that was managed by a device manager and deleted the device from Security Cloud Control with the intention of re-onboarding for cloud management, you must register the device manager to the Security Services Exchange cloud after deleting the device. See the "Access Security Services Exchange" chapter in the Firepower and Cisco SecureX Threat Response Integration Guide.


Tip


Onboarding a device to the cloud-delivered Firewall Management Center removes any policies and most objects configured through the previous manager. If your device is currently managed by an on-premises management center, it is possible to migrate the device and retain your policies and objects. See Migrate FTD to Cloud-Delivered Firewall Management Center for more information.


Network Requirements

Before you onboard a device, ensure the following ports have external and outbound access. Confirm the following ports on the device are allowed. If communication ports are blocked behind a firewall, onboarding the device may fail.


Note


You cannot configure these ports in the Security Cloud Control UI. You must enable these ports through the device's SSH.


Table 1. Device Port Requirements

Port

Protocol / Feature

Details

443/tcp

HTTPS

Send and receive data from the internet.

443

HTTPS

Communicate with the AMP cloud (public or private)

8305/tcp

Appliance communications

Securely communicate between appliances in a deployment.

Management and Data Interfaces

Make sure your device is correctly configured with either a management or data interface.

To configure a management or data interface on your device, see Complete the Initial Configuration of a Secure Firewall Threat Defense Device Using the CLI.

Onboard a Device with a CLI Registration Key

Use the procedure below to onboard a device for cloud-delivered Firewall Management Center with a CLI registration key.


Note


If your device is currently managed by an on-premises management center, onboarding the device will fail. You can either delete the device from the on-premises management center and onboard as a fresh, new device with no policies or objects, or you can migrate the device and retain the existing policies and objects. See Migrate FTD to Cloud-Delivered Firewall Managmenet Center for more information.


Important


You can create a Security Cloud Control-managed, standalone logical threat defense device using the Secure Firewall chassis manager or the FXOS CLI.


Before you begin

Before you onboard a device, be sure to complete the following tasks:

Procedure


Step 1

Log in to Security Cloud Control.

Step 2

In the left pane, click Security Devices.

Step 3

In the top-right corner, click Onboard ().

Step 4

Click the FTD tile.

Step 5

Under Management Mode, ensure you select FTD. By selecting FTD under Management Mode, you will not be able to manage the device using the previous management platform. All existing policy configurations except for interface configurations will be reset. You must re-configure policies after you onboard the device.

Step 6

Select Use CLI Registration Key as the onboarding method.

Step 7

Enter the device name in the Device Name field and click Next.

Step 8

In the Policy Assignment step, use the drop-down menu to select an access control policy to deploy once the device is onboarded. If you have no policies configured, select the Default Access Control Policy.

Step 9

Specify whether the device you are onboarding is a physical or virtual device. If you are onboarding a virtual device, you must select the device's performance tier from the drop-down menu.

Step 10

Select the subscription licenses you want to apply to the device. Click Next.

Step 11

Security Cloud Control generates a command with the registration key. Connect to the device you are onboarding using SSH. Log in as "admin" or a user with equivalent admin privileges and paste the entire registration key as is into the device's CLI.

Note: For Firepower 1000, Firepower 2100, ISA 3000, and threat defense virtual devices, open an SSH connection to the device and log in as admin. Copy the entire registration command and paste it into the device's CLI interface at the prompt. In the CLI, enter Y to complete the registration. If your device was previously managed by device manager, enter Yes to confirm the submission.

Step 12

Click Next in the Security Cloud Control onboarding wizard.

Step 13

(Optional) Add labels to your device to help sort and filter the Inventory page. Enter a label and select the blue plus button. Labels are applied to the device after it's onboarded to Security Cloud Control.


What to do next

Once the device is synchronized, select the device you just onboarded from the Inventory page and select any of the options listed under the Device Management pane located to the right. We strongly recommend the following actions:
  • If you did not already, create a custom access control policy to customize the security for your environment. See Access Control Overview in Managing Firewall Threat Defense with Cloud-Delivered Firewall Management Center in Cisco Security Cloud Control for more information.

  • Enable Cisco Security Analytics and Logging (SAL) to view events in the Security Cloud Control dashboard or register the device to an Secure Firewall Management Center for security analytics. See Cisco Security Analytics and Logging in Managing Firewall Threat Defense with Cloud-Delivered Firewall Management Center in Cisco Security Cloud Control for more information.

Onboard a Threat Defense Device to Cloud-delivered Firewall Management Center using Zero-Touch Provisioning

Only the Firepower 1000, Firepower 2100, and Secure Firewall 3100 devices can be onboarded with the zero-touch provisioning method.

Before you begin

Confirm that the following is completed before onboarding:

  • You have a Security Cloud Control tenant. If you do not, see Request a Security Cloud Control Tenant for more information.

  • Cloud-delivered Firewall Management Center is enabled for your tenant.

  • The device is freshly installed but has never been logged into by either the device CLI, a management center, or the device manager.

  • The device is running version 7.2 or later. Version 7.0.3 does not support zero-touch provisioning.

Procedure


Step 1

Log in to Security Cloud Control.

Step 2

In the left pane, click Security Devices.

Step 3

In the top-right corner, click Onboard ().

Step 4

Click the FTD tile.

Step 5

Under Management Mode, ensure you select FTD. By selecting FTD under Management Mode, you will not be able to manage the device using the previous management platform. All existing policy configurations except for interface configurations will be reset. You must re-configure policies after you onboard the device.

Step 6

Click the Use Serial Number tile.

Step 7

Select cloud-delivered Firewall Management Center from the drop-down list. Click Next.

Step 8

Enter the Device Serial Number and the Device Name. Select Next.

Step 9

Choose an option depending on whether the device is logged into and configured for a manager:

  • If your device is brand new and has never been configured for a manager, click Yes, this new device has never been logged into or configured for a manager.

  • If your device has been previously registered for a manager or is still registered to a manager, click No, this device has been logged into and configured for a manager.

Step 10

Click Next.

Step 11

In the Policy Assignment step, use the drop-down menu to select an access control policy to deploy once the device is onboarded. If you have no policies configured, select the Default Access Control Policy.

Step 12

Select the subscription licenses you want to apply to the device. Click Next.


What to do next

Once the device is synchronized, select the device you just onboarded from the Inventory page and select any of the options listed under the Device Management pane located to the right. We strongly recommend the following actions:
  • If you did not already, create a custom access control policy to customize the security for your environment. See Access Control Overview in Managing Firewall Threat Defense with Cloud-Delivered Firewall Management Center in Cisco Security Cloud Control for more information.

  • Enable Cisco Security Analytics and Logging (SAL) to view events in the Security Cloud Control dashboard or register the device to an Secure Firewall Management Center for security analytics. See Cisco Security Analytics and Logging in Managing Firewall Threat Defense with Cloud-Delivered Firewall Management Center in Cisco Security Cloud Control for more information.

Onboard a Threat Defense Device to On-Prem Firewall Management Center using Zero-Touch Provisioning

Only the Firepower 1000, Firepower 2100, and Secure Firewall 3100 devices can be onboarded with the zero-touch provisioning method.

Before you begin

Confirm the following is completed prior to onboarding:

  • You have a Security Cloud Control tenant. If you do not, see Request a Security Cloud Control Tenant for more information.

  • An on-prem FMC must be fully set up, configured, and already recognized as a management center within your Security Cloud Control tenant before onboarding any new devices.

  • The device is freshly installed but has never been logged into by either the device CLI, a management center, or the device manager.

  • The device is running version 7.2 or later. Version 7.0.3 does not support zero-touch provisioning.

Procedure


Step 1

Log in to Security Cloud Control.

Step 2

In the left pane, click Security Devices.

Step 3

In the top-right corner, click Onboard ().

Step 4

Click the FTD tile.

Step 5

Under Management Mode, ensure you select FTD. By selecting FTD under Management Mode, you will not be able to manage the device using the previous management platform. All existing policy configurations except for interface configurations will be reset. You must re-configure policies after you onboard the device.

Step 6

Click Use Serial Number.

Step 7

Select an available on-prem FMC from the drop-down list. Click Next.

Note

 
  • On-prem FMCs running version 7.4 or later and onboarded with Cisco Security Cloud are displayed in the drop-dwon.

  • Provide the Public IP address or FQDN value of the selected on-prem FMC unless

    • The FTD is publicly reachable

    • The FTD is running a version earlier than 7.4

    • The connection is being made through the data interface

Step 8

Enter the Device Serial Number and the Device Name. Click Next.

Step 9

Choose an option depending on whether the device is logged into and configured for a manager:

  • If your device is brand new and has never been configured for a manager, click Yes, this new device has never been logged into or configured for a manager.

  • If your device has been previously registered for a manager or is still registered to a manager, click No, this device has been logged into and configured for a manager.

Step 10

Click Next.

Step 11

In the Policy Assignment step, use the drop-down menu to select an access control policy to deploy once the device is onboarded. If you have no policies configured, select the Default Access Control Policy.

Step 12

Select the subscription licenses you want to apply to the device. Click Next.


What to do next

Once the device is synchronized, select the device you just onboarded from the Inventory page and select any of the options listed under the Device Management pane located to the right. We strongly recommend the following actions:

  • If you did not already, create a custom access control policy to customize the security for your environment.

    Fo more information, see Access Control Overview.

  • Enable Cisco Security Analytics and Logging (SAL) to view events in the Security Cloud Control dashboard or register the device to an Secure Firewall Management Center for security analytics.

    Fo more information, see Cisco Security Analytics and Logging.

Onboard Threat Defense Devices using Device Templates to Cloud-delivered Firewall Management Center using Zero-Touch Provisioning

Only the Firepower 1000, Firepower 2100, Secure Firewall 1200, and Secure Firewall 3100 devices can be onboarded with the zero-touch provisioning method.

Before you begin

Confirm that the following is completed before onboarding:

  • You have a Security Cloud Control tenant. If you do not, see Request a Security Cloud Control Tenant for more information.

  • Cloud-delivered Firewall Management Center is enabled for your tenant.

  • The device is freshly installed but has never been logged into by either the device CLI, a management center, or the device manager.

  • The device is running version 7.4 or later.

Procedure


Step 1

Log in to Security Cloud Control.

Step 2

In the left pane, click Security Devices.

Step 3

In the top-right corner, click Onboard ().

Step 4

Click the FTD tile.

Step 5

Click the Bulk Onboard using CSV File tile.

Step 6

In the Template Assignment field, select a template from the drop-down list. The access control policy associated with the template and the supported device models for the selected template are then displayed. Click Next.

Step 7

In the Upload CSV File field, Drag & drop your CSV template file or Click to select the CSV template file that you want to upload.

You can download a CSV Sample Template File to have a look at the required header details that have to be used in the template. The CSV template file must be less than 2 MB in size. The filename must satisfy the following criteria:

  • Can have a maximum of 64 characters.

  • Only alphanumeric characters and special characters such as dash (-), period (.), and underscore (_) are allowed.

  • Must not contain any spaces.

A properly formatted .csv file has the following fields:

  • Mandatory fields

    • Display Name - Name of the device. Type: string. Example: test1

    • Serial Number - Serial number of the device. Type: string, Example: JADX345670EG

  • Optional fields

    • Device Group - Name of the device group, Type: string, Example: testgroup

    • Admin Password - Password for admin access, Type: string, Example: E28@2OiUrhx

  • Variables - Use the following format: $<varName>. Sample variable: $LAN-Devices-IPv4Address - IPv4 address of the LAN device. Type: string. Example: 1.2.3.4.

  • Network object overrides - Use the following format:<objType>:<objName>. Sample network object override: Network:LAN-Devices-Network - IP address of the network of LAN devices. Type: string. Example: 1.2.3.4.

A sample CSV template file containing configuration for two devices is as given below.

DisplayName SerialNumber AdminPassword $WANLinkIP Host:gateway
Branch A FTD JADX345410AB C15c05n0rt# 10.20.30.1 10.2.3.1
Branch B FTD JADX345670CE Admin123! 10.20.30.5 10.2.3.1

Step 8

Click Next.

Step 9

A statement mentioning that the devices are being onboarded is displayed. You can check the onboarding status of the devices in the Security Devices window.


What to do next

Once the device is synchronized, select the device you just onboarded from the Inventory page and select any of the options listed under the Device Management pane located to the right. We strongly recommend the following actions:
  • If you did not already, create a custom access control policy to customize the security for your environment. See Access Control Overview in Managing Firewall Threat Defense with Cloud-Delivered Firewall Management Center in Cisco Security Cloud Control for more information.

  • Enable Cisco Security Analytics and Logging (SAL) to view events in the Security Cloud Control dashboard or register the device to an Secure Firewall Management Center for security analytics. See Cisco Security Analytics and Logging in Managing Firewall Threat Defense with Cloud-Delivered Firewall Management Center in Cisco Security Cloud Control for more information.

Deploy a Threat Defense Device with AWS

Use the following procedure to onboard and preliminarily provision the firewall of a threat defense device that is associated with an AWS VPC to be managed by cloud-delivered Firewall Management Center.

Before you begin

Confirm the following prerequisites are fulfilled prior to generating a virtual threat defense and deploying to an AWS environment:

  • You must have the cloud-delivered Firewall Management Center feature enabled and associated with your tenant.

Procedure


Step 1

Log in to Security Cloud Control.

Step 2

In the navigation pane, click Inventory and click the blue plus button.

Step 3

Select the FTD tile.

Step 4

Under Management Mode, be sure FTD is selected.

Step 5

Select Use AWS VPC as the onboarding method. If there is no AWS VPC already onboarded, you can click the provided link from this step and onboard the virtual environment.

Step 6

Select the availability zone from the drop-down menu. Select the zone where the cloud threat defense is located, and not where your local computer is located.

Step 7

Select the management interface subnet with either of the following options:

  • Use existing subnets - Expand the drop-down menus and select the appropriate subnets for the management interface, inside interface, and outside interface subnets.

  • Create new subnets - Add a set of subnet interfaces for the device to use once onboarded. Security Cloud Control automatically creates these subnets and applies them to the AWS VPC as part of the onboarding procedure.

Note that the diagnostic interface will use the same interface as the management interface.

Step 8

Click Select to assign the subnets. Click Next.

Step 9

Enter the device name in the Device Name field and click Next.

Step 10

In the Policy Assignment step, use the drop-down menu to select an access control policy to deploy once the device is onboarded. If you have no policies configured, select the Default Access Control Policy.

Step 11

Select the Subscription Licenses you want applied to the device. You must have at least the URL license selected for virtual threat defense devices.


What to do next

It may take a few minutes for the device to appear in Security Cloud Control's Inventory page as it cannot synchronize until Security Cloud Control has successfully deployed the cloud formation, initliaized the device connections, and established communication with both the virtual device and the AWS VPC environment.

If necessary, you can modfiy the virtual threat defense device performance tier selection after onboarding through the cloud-delivered Firewall Management Center UI.

Deploy a Threat Defense Device in Azure

This is a two-part process that involves onboarding an Azure account to Security Cloud Control as well as generating a virtual threat defense and simultaneously deploying it to your Azure instance.

Onboard an Azure VNet Environment

Use the following procedure to onboard an Azure VNet for cloud-delivered Firewall Management Center management:

Before you begin

You must have the following completed prior to this onboarding procedure:

  • Cloud-delivered Firewall Management Center is enabled for your tenant.

  • You must have at least one resource group available in your Azure account with an empty Azure VNet instance. If you do not have a resource group to host the virtual device, create one with the Azure portal. See Microsoft Azure's Manage Azure resource groups by using the Azure portal guide for more information.

  • Your resource group in the Azure portal must have a virtual network created for the virtual device. If you do not have one, create one in the Azure portal. See Microsoft Azure's Create a virtual network using the Azure portal quickstart guide for more information.

  • You must register Cisco Security Cloud Control to your Microsoft account to ensure successful communication between Azure and Security Cloud Control. See the "Quickstart: Register an application with the Microsoft identity platform" section of the Azure product documentation for more information.

  • You must assign a built-in role, or create a custom role, within the Azure environment and assign it a member or group that will access both Azure and Security Cloud Control. See the "Azure custom role" section or the "Azure custom roles" of the Azure product documentation for more information.

  • You must enable all of the following permissions in the Azure environment in order to successully communicate with and onboard to Security Cloud Control:
    "Microsoft.Network/virtualNetworks/write"
    "Microsoft.Network/virtualNetworks/join/action"
    "Microsoft.Network/virtualNetworks/subnets/read"
    "Microsoft.Network/virtualNetworks/subnets/write"
    "Microsoft.Network/virtualNetworks/subnets/prepareNetworkPolicies/action"
    "Microsoft.Network/networkSecurityGroups/read"
    "Microsoft.Network/networkSecurityGroups/write"
    "Microsoft.Network/networkSecurityGroups/join/action"
    "Microsoft.Network/networkSecurityGroups/securityRules/write"
    "Microsoft.Network/networkSecurityGroups/securityRules/read"
    "Microsoft.Network/networkSecurityGroups/securityRules/delete"
    "Microsoft.Storage/storageAccounts/write"
    "Microsoft.Storage/storageAccounts/read"
    "Microsoft.Resources/deployments/write"
    "Microsoft.Resources/deployments/read"
    "Microsoft.Network/publicIPAddresses/read"
    "Microsoft.Network/publicIPAddresses/write"
    "Microsoft.Network/routeTables/read"
    "Microsoft.Network/routeTables/write"
    "Microsoft.Network/networkInterfaces/read"
    "Microsoft.Network/networkInterfaces/write"
    "Microsoft.Compute/virtualMachines/write"
    "Microsoft.Resources/deployments/operationstatuses/read"
    "Microsoft.Resources/subscriptions/resourcegroups/deployments/operationstatuses/read"
    "Microsoft.Network/routeTables/join/action"
    "Microsoft.Network/virtualNetworks/subnets/join/action"
    "Microsoft.Network/publicIPAddresses/join/action"
    "Microsoft.Network/networkInterfaces/join/action"
    "Microsoft.Compute/virtualMachines/read"
    "Microsoft.Resources/subscriptions/resourceGroups/write"
    "Microsoft.Resources/subscriptions/resourceGroups/delete"

Procedure


Step 1

Review the prerequisites listed above. You must register Security Cloud Control to your Microsoft account, create a user role, and enable all the applicable permissions prior to onboarding a virtual environment.

Step 2

Log in to Security Cloud Control.

Step 3

In the navigation pane, click Inventory and click the blue plus button.

Step 4

Select the Azure VNet tile.

Step 5

Enter the following credentials to continue with the onboarding wizard, then click Next:

  • Azure Tenant ID (Directory ID) - A directory ID is a unique identifier for the tenant in the world of Microsoft cloud services. There is only one directory ID per tenant. To locate it, log into the Azure portal and navigate to Azure Services > Azure Active Directory and locate the Tenant ID listed on that page.

  • Client ID (Application ID) - An application ID is a unique identifier assigned toSecurity Cloud Control by Azure AD when the app was registered. To locate it, log into the Azure portal and navigate to Azure Services > Azure Active Directory > App Registrations and view the application ID in the list of apps. If there is no application ID for Security Cloud Control, click New Registrations to create one for this onboarding procedure.

  • Client Secret - You must manually request a client secret, although the Azure portal auto-generates a unique string to protect your tenant. To locate it, log into the Azure portal and navigate to Azure Services > Azure Active Directory > App Registrations, then expand the application for Security Cloud Control. In the panel on the left, click Certificates & secrets. If there is no secret, click New client secret to create one. Copy the Value entry for this onboarding procedure, not the Secret ID entry.

  • Subscription ID - A subscription is a tenant-based agreement to use Microsoft cloud services; in this case, Azure VNet. The subscription ID is the unique code associated between the tenant and this particular cloud service. To locate it, log into the Azure portal and navigate to Azure Services > Subscriptions. If there are no subscriptions available for Security Cloud Control, click Add to create one.

Step 6

In the Security Cloud Control onboarding wizard, use the drop-down menu to select the Azure VNet you want to onboard.

Step 7

Enter the Device Name and select Next. This device name is what the Azure VNet is displayed as in the Inventory page.

Step 8

(Optional) Add labels to your device to help sort and filter the Inventory page. Enter a label and select the blue plus button. Labels are applied to the device after it's onboarded to Security Cloud Control.


What to do next

Onboard a virtual device in Security Cloud Control with this instance of Azure VNet as the manager. See Deploy a Threat Defense Virtual in Azure for more information.

Deploy a Threat Defense Virtual in Azure

Onboard a threat defense virtual for Azure that is managed by cloud-delivered Firewall Management Center.

The Azure environment can only support one threat defense virtual. To onboard multiple devices, you must have a separate Azure instance for each of those devices.

Before you begin

Ensure that you have an active Azure subscription.

Procedure


Step 1

Log into Security Cloud Control.

Step 2

In the left pane, click Inventory and click the plus icon.

Step 3

Under Select a Device or Service Type, click the FTD tile.

Step 4

Under Management Mode, ensure that FTD is selected.

Warning


By selecting FTD under Management Mode, the device is reconfigured to use the cloud-delivered Firewall Management Center as the manager.

Step 5

Click Deploy an FTD to a cloud environment as the onboarding method.

Step 6

Choose Azure as your cloud provider from the drop-down list.

Step 7

(Optional) If you have not registered your Security Cloud Control account to an Azure subscription, you can do so now. Click Azure Cloud Shell to launch the Azure cloud shell and paste the script that is provided. If you have registered your account or if you have completed executing the script, click Next.

Step 8

Choose a Region to deploy the Azure subscription from the drop-down list.

Step 9

Enter the FTD Password that you wish to use for SSH console access.

Step 10

Enter a Device Name. This name is applied to the threat defense virtual in the Inventory page and Azure resource group.

Step 11

In the Policy Assignment step, use the drop-down menu to select an access control policy to deploy once the device is onboarded. If you have no policies configured, select the Default Access Control Policy.

Step 12

Select the licenses you want to apply to the device. You must select at least the essential license as the base license for this device. Click Next.

Step 13

Click Complete onboarding.

This completes the onboarding wizard. It may take up to 20 minutes for the device to fully onboard and synchronize. To monitor the creation process, expand the Workflows option of the Azure subscription that is hosting the device.


What to do next

Once the device is synchronized, select the device you just onboarded from the Inventory page and select any of the options listed under the Device Management pane located to the right. We strongly recommend the following actions:
  • If you did not already, create a custom access control policy to customize the security for your environment. See Access Control Overview in Managing Firewall Threat Defense with Cloud-Delivered Firewall Management Center in Cisco Security Cloud Control for more information.

  • Enable Cisco Security Analytics and Logging (SAL) to view events in the Security Cloud Control dashboard or register the device to an Secure Firewall Management Center for security analytics. See Cisco Security Analytics and Logging in Managing Firewall Threat Defense with Cloud-Delivered Firewall Management Center in Cisco Security Cloud Control for more information.

Deploy a Threat Defense Device to Google Cloud Platform

Deploy a threat defense device on your Google Cloud Platform (GCP) account to protect your Google Cloud workloads. The security policy for this device will be managed on your cloud-delivered Firewall Management Center.

You must first have a GCP account, a GCP project created, and several networks established for effective communication between cloud-delivered Firewall Management Center and GCP. Once you have established the GCP settings, onboard a threat defense device to be deployed to the GCP.

Use the following procedures to onboard and deploy a threat defense device to GCP.

Create VPC Networks for GCP

The threat defense virtual deployment requires four networks which you must create prior to deploying the threat defense virtual. The networks are as follows:

  • Management VPC for the management subnet.

  • Diagnostic VPC or the diagnostic subnet.

  • Inside VPC for the inside subnet.

  • Outside VPC for the outside subnet.

Additionally, you may have to set up the route tables and GCP firewall rules to allow traffic flow through the threat defense virtual. The route tables and firewall rules are separate from those that are configured on the threat defense virtual itself. Name the GCP route tables and firewall rules according to associated network and functionality

Procedure


Step 1

In the GCP console, choose VPC networks, then click Create VPC Network.

Step 2

In the Name field, enter the desired name.

Step 3

From the Subnet creation mode, click Custom.

Step 4

In the Name field under New subnet, enter the desired name.

Step 5

From the Region drop-down list, select the region appropriate for your deployment. All four networks must be in the same region.

Step 6

From the IP address range field, enter the first network's subnet in CIDR format, such as 10.10.0.0/24.

Step 7

Accept the defaults for all other settings, then click Create.

Step 8

Repeat steps 1-7 to create the remaining three VPC networks.


What to do next

You may have to create firewall rules to apply to your newly created VPC networks. Go to the GCP console and navigate to Networking > VPC network > Firewall and then click Create Firewall Rule. See GCP documentation for more information.

Once your GCP VPC networks have been finalized, continue on to deploy the threat defense virtual.

Deploy a Threat Defense Device on Google Cloud Platform

Before you begin

When you perform this procedure, Security Cloud Control creates the threat defense virtual as part of the onboarding wizard. You cannot use this procedure with physical threat defense device or a device that is already onboarded to Security Cloud Control.

The following prerequisites must be met prior to onboarding a threat defense that is currently associated with a Google Cloud Platform (GCP) environment:

  • You must have cloud-delivered Firewall Management Center enabled for your tenant.

  • You must have a GCP account and already have a project created. See GCP documentation for more information.

  • Management interfaces (2) — One used to connect the threat defense virtual to the management center, second used for diagnostics; cannot be used for through traffic.

    Traffic interfaces (2) — Used to connect the threat defense virtual to inside hosts and to the public network. See Create VPC Networks for GCP for more information.

  • You must enable all of the following permissions in the GCP environment in order to successully communicate with and onboard to Security Cloud Control:

    deploymentmanager.deployments.create
    deploymentmanager.deployments.get
    compute.networks.list

Procedure


Step 1

Log in to Security Cloud Control.

Step 2

In the navigation pane, click Inventory and click the blue plus button (+) to add a new device.

Step 3

Select the FTD tile.

Step 4

Under Management Mode, select FTD.

Step 5

Select Use GCP VPC as the onboarding method.

Step 6

IF you have not authenticated your GCP environment with Security Cloud Control before this point, copy the bash command that Security Cloud Control generates and run it on your bash environment or on the Google Cloud Shell to authenticate your GCP account and allow communication between the applications. IF you have already authenticated your GCP account prior, ignore the account integration steps and click Next.

Step 7

Use the drop-down menu to select the GCP project you want to associate with the device you are going to onboard. If there are no projects immeidately available, click + Link New Project. If you click + Link New Project, follow these steps:

  1. Enter the GCP project ID when prompted. Locate this value in the GCP UI. To locate the project ID, see GCP documentation.

  2. Upload Credentials File. Click Browse and navigate to where the the .JSON file generated from the script in Step 1 of the onboarding wizard is locally stored. Select it and click Save.

Step 8

Click Next.

Step 9

Use the drop-down menus to select the following paramters and click Next:

  • Inside VPC

  • Inside Sub Network

  • Outside VPC

  • Outside Sub Network

  • Management VPC

  • Management Sub Network

  • Diagnostic Network

  • Diagnostic Sub Network

Step 10

Enter a name for the threat defense device in the Device Name field and click Next.

Step 11

In the Policy Assignment step, use the drop-down menu to select an access control policy to deploy once the device is onboarded. If you have no policies configured in the cloud-delivered Firewall Management Center associated with your Security Cloud Control tenant, select the Default Access Control Policy.

Step 12

Select the Subscription Licenses you want applied to the device. You must have at least the URL license selected for virtual threat defense devices.

Step 13

Click Complete Onboarding.


What to do next

Navigate to the Inventory page to view the progress of the device registration there. Once the device is synchronized, we strongly recommend cross-launching to cloud-delivered Firewall Management Center and customize your access control policy and device status.

Onboard a Secure Firewall Threat Defense Cluster


Note


If you must delete a cluster, delete the cluster from the Security Cloud Control Inventory page. See Delete Devices from Cloud-delivered Firewall Management Center for more information.


The following table provides information about device models that support cluster onboarding and creation on the cloud-delivered Firewall Management Center:

Secure Firewall Threat Defense Platforms

Minimum Secure Firewall Threat Defense Version for Cluster Management

Support cluster creation from cloud-delivered Firewall Management Center?

VMware, KVM

7.2.1

Yes

AWS, GCP

7.2.1

No

Azure

7.3

No

Secure Firewall 3100

7.2.1

Yes

Firepower 4100

7.0.6

No

Secure Firewall 4200

7.4

Yes

Firepower 9300

7.0.6

No

Before you begin

Read through the following limitations:

  • Firepower 4100 and Firepower 9300 devices must be clustered through the device's chassis manager.

  • Secure Firewall 3100 devices, Secure Firewall 4200 devices, KVM, and VMware environments must be clustered through the Secure Firewall Management Center UI.

  • Azure, AWS, and GCP environment clusters must be created through their own environment and onboarded to Secure Firewall Management Center.

Procedure


Step 1

Log in to Security Cloud Control.

Step 2

In the left pane, click Security Devices.

Step 3

Click the FTD tile.

Step 4

Under Management Mode, ensure you select FTD. By selecting FTD under Management Mode, you will not be able to manage the device using the previous management platform. All existing policy configurations except for interface configurations will be reset. You must re-configure policies after you onboard the device.

Step 5

Select Use CLI Registration Key.

Step 6

Enter the device name in the Device Name field and click Next.

Step 7

In the Policy Assignment step, use the drop-down menu to select an access control policy to deploy once the device is onboarded. If you have no policies configured, select the Default Access Control Policy.

Step 8

Specify whether the device you are onboarding is a physical or virtual device. If you are onboarding a virtual device, you must select the device's performance tier from the drop-down menu.

Step 9

Select the subscription licenses you want to apply to the device. Click Next.

Step 10

Security Cloud Control generates a command with the registration key. Paste the entire registration key as is into the device's CLI.

Step 11

(Optional) Add labels to your device to help sort and filter the Inventory page. Enter a label and select the blue plus button. Labels are applied to the device after it's onboarded to Security Cloud Control.


What to do next

Once the device is synchronized, select the device you just onboarded from the Inventory page and select any of the options listed under the Device Management pane located to the right. We strongly recommend the following actions:
  • If you did not already, create a custom access control policy to customize the security for your environment. See Access Control Overview in Managing Firewall Threat Defense with Cloud-Delivered Firewall Management Center in Cisco Security Cloud Control for more information.

  • Enable Cisco Security Analytics and Logging (SAL) to view events in the Security Cloud Control dashboard or register the device to an Secure Firewall Management Center for security analytics. See Cisco Security Analytics and Logging in Managing Firewall Threat Defense with Cloud-Delivered Firewall Management Center in Cisco Security Cloud Control for more information.

Onboard a Chassis

You can add a Firepower 4100/9300 chassis to the cloud-delivered Firewall Management Center. The management center and the chassis share a separate management connection using the chassis MGMT interface. The management center offers chassis-level health alerts. For configuration, you still need to use the chassis manager or FXOS CLI.

Security Cloud Control does not record the processes on the Workflow page when you onboard a chassis or provision a multi-instance management centerthreat defense device from the cloud-delivered Firewall Management Center chassis manager page.


Note


For the Secure Firewall 3100/4200, you need to first convert to multi-instance mode. See Onboard the Multi-Instance Chassis.


Procedure


Step 1

Connect to the chassis FXOS CLI, either using the console port or SSH.

Step 2

In the Security Cloud Control navigation pane, click Inventory, then click the blue plus button (plus sign) to Onboard a device.

Step 3

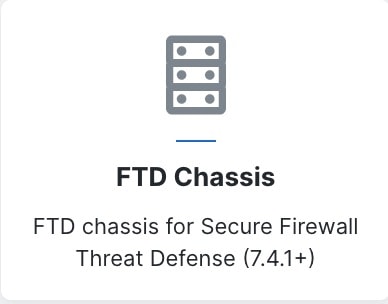
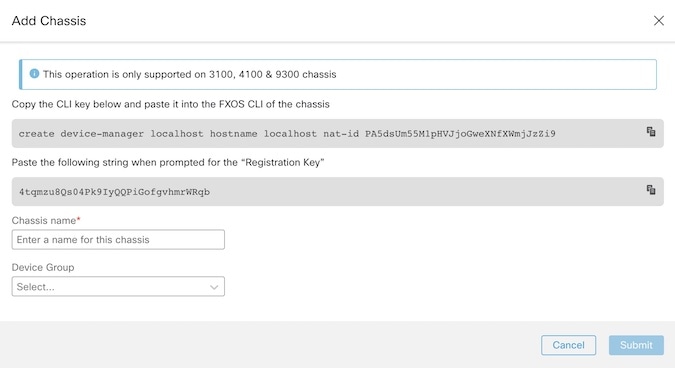
Click the FTD Chassis tile to open the Add Chassis dialog box.

Figure 1. FTD Chassis Tile
FTD Chassis Tile
Figure 2. Add Chassis
Add Chassis

Step 4

Click Copy (copy icon) to copy the top generated command, then paste it at the FXOS CLI of your chassis.

Step 5

When prompted for the Registration Key at the FXOS CLI, click Copy (copy icon) on the Add Chassis dialog box for the generated registration key and paste it at the FXOS CLI.

You can disconnect from the FXOS CLI at this point.

Step 6

In the cloud-delivered Firewall Management Center Chassis Name field, enter a name for the chassis as you want it to display in the management center.

Step 7

(Optional) Add the chassis to a Device Group.

Step 8

Click Submit.

The chassis is added to the Device > Device Management page.


Delete Devices from Cloud-delivered Firewall Management Center

Though devices may be registered to cloud-delivered Firewall Management Center, Security Cloud Control still manages device enrollment. You must delete the device from the Security Cloud Control dashboard to remove a device from cloud-delivered Firewall Management Center.


Note


Security Cloud Control does not synchronize the deletion of devices that are associated with an AWS VPC environment. You must delete a device direclty from the AWS VPC UI. See AWS documentation for more information.


Procedure


Step 1

Log into Security Cloud Control and click Inventory.

Step 2

Locate the device you want to delete by using the filters or search bar. Select it so the device row is highlighted. If your device is part of a high availability pair, locate and select the active device.

Step 3

In the Device Actions pane located to the right, click Remove.

Step 4

When prompted, select OK to confirm the removal of the selected device. Click Cancel to keep the device onboarded.


About Device Interfaces

Management Interfaces

When you set up your device, you specify the IP address that you want to connect to. Both management and event traffic go to this address at initial registration.


Note


In some situations, the device might establish the initial connection on a different management interface; subsequent connections should use the management interface with the specified IP address.


If the device has a separate event-only interface, the managed device sends subsequent event traffic is sent to the event-only interface if the network allows. In addition, some managed-device models include an additional management interface that you can configure for event-only traffic.


Note


Note that if you configure a data interface for management, you cannot use separate management and event interfaces.


If the event network goes down, then event traffic reverts to the regular management interfaces on the the managed device.

About Data Interfaces

You can use either the dedicated management interface or a regular data interface for communication with the device. Security Cloud Control access on a data interface is useful if you want to manage the FTD remotely from the outside interface, or you do not have a separate management network. Security Cloud Control supports high availability on the FTD managed remotely from the data interface.

FTD management access from a data interface has the following limitations:

  • You can only enable manager access on one physical, data interface. You cannot use a subinterface or EtherChannel.

  • Routed firewall mode only, using a routed interface.

  • PPPoE is not supported. If your ISP requires PPPoE, you will have to put a router with PPPoE support between the FTD and the WAN modem.

  • The interface must be in the global VRF only.

  • SSH is not enabled by default for data interfaces, so you will have to enable SSH later using Security Cloud Control. Because the management interface gateway will be changed to be the data interfaces, you also cannot SSH to the management interface from a remote network unless you add a static route for the management interface using the configure network static-routes command. For FTDv on Amazon Web Services, a console port is not available, so you should maintain your SSH access to the management interface: add a static route for Management before you continue with your configuration. Alternatively, be sure to finish all CLI configuration (including the configure manager add command) before you configure the data interface.

Network Routes on Device Management Interfaces

Management interfaces (including event-only interfaces) support only static routes to reach remote networks. When you set up your managed device, the setup process creates a default route to the gateway IP address that you specify. You cannot delete this route; you can only modify the gateway address.


Note


If you configure a data interface for management instead of using the dedicated Management interface, traffic is routed over the backplane to use the data routing table. The information in this section does not apply.


At least one static route is recommended per management interface to access remote networks. We recommend placing each interface on a separate network to avoid potential routing problems, including routing problems from other devices to the device. If you do not experience problems with interfaces on the same network, then be sure to configure static routes correctly. For example, both management0 and management1 are on the same network, but the FTD management and event interfaces are on different networks. The gateway is 192.168.45.1. If you want management1 to connect to the management's event-only interface at 10.6.6.1/24, you can create a static route for 10.6.6.0/24 through management1 with the same gateway of 192.168.45.1. Traffic to 10.6.6.0/24 will hit this route before it hits the default route, so management1 will be used as expected.

Log Into the Command Line Interface on the Device

You can log directly into the command line interface on threat defense devices. If this is your first time logging in, complete the initial setup process using the default admin user; see Complete the Initial Configuration of a Secure Firewall Threat Defense Device Using the CLI.


Note


If a user makes three consecutive failed attempts to log into the CLI via SSH, the system terminates the SSH connection.


Before you begin

Create additional user accounts that can log into the CLI using the configure user add command.

Procedure


Step 1

Connect to the threat defense CLI, either from the console port or using SSH.

You can SSH to the management interface of the threat defense device. You can also connect to the address on a data interface if you open the interface for SSH connections. SSH access to data interfaces is disabled by default. See SSH Access to allow SSH connections to specific data interfaces.

For physical devices, you can directly connect to the console port on the device. See the hardware guide for your device for more information about the console cable. Use the following serial settings:

  • 9600 baud

  • 8 data bits

  • No parity

  • 1 stop bit

The CLI on the console port is FXOS (with the exception of the ISA 3000, where it is the regular threat defense CLI). Use the threat defense CLI for basic configuration, monitoring, and normal system troubleshooting. See the FXOS documentation for information on FXOS commands.

Step 2

Log in with the admin username and password.

Example:


firepower login: admin
Password:
Last login: Thu May 16 14:01:03 UTC 2019 on ttyS0
Successful login attempts for user 'admin' : 1

firepower# 

Step 3

If you used the console port, access the threat defense CLI.

connect ftd

Note


This step does not apply to the ISA 3000.

Example:


firepower# connect ftd
>

Step 4

At the CLI prompt (>), use any of the commands allowed by your level of command line access.

To return to FXOS on the console port, enter exit .

Step 5

(Optional) If you used SSH, you can connect to FXOS.

connect fxos

To return to the threat defense CLI, enter exit .

Step 6

(Optional) Access the diagnostic CLI:

system support diagnostic-cli

Use this CLI for advanced troubleshooting. This CLI includes additional show and other commands.

This CLI has two sub-modes: user EXEC and privileged EXEC mode. More commands are available in privileged EXEC mode. To enter privileged EXEC mode, enter the enable command; press enter without entering a password when prompted.

Example:


> system support diagnostic-cli
firepower> enable
Password:
firepower#

To return to the regular CLI, type Ctrl-a, d.


Troubleshooting

Use the following scenarios to troubleshoot any onboarding issues.

Troubleshoot Cloud-delivered Firewall Management Center Connectivity with TCP

Use the following procedure to troubleshoot connectivity between the cloud-delivered Firewall Management Center and a threat defense device with TCP port 8305.

Procedure


Step 1

Log into Security Cloud Control.

Step 2

Navigate to Tools & Services in the left panel and select Firewall Management Center to open the Services page. Choose Cloud-Delivered FMC and locate the cloud-delivered Firewall Management Center's FQDN in the top righthand corner.

Step 3

Make sure the threat defense device's state in Security Cloud Control is currently Onboarding. Cloud-delivered Firewall Management Center will not respond if the device is not in an onboarding state. If onboarding has failed, click Retry Onboarding.

Step 4

Log into the threat defense device with SSH.

Step 5

Enter into Expert mode with the following command:

> expert
admin@devicename:~$

Step 6

Execute a TCP handshake:

admin@devicename:~$ nc -v xxxxxx.cdo.cisco.com 8305 
Connection to xxxxxx.cdo.cisco.com 8305 port [tcp/*] succeeded! 
^C (CTRL-C to exit netcat) 
admin@devicename:~$. 

What to do next

If there is still no response from the cloud-delivered Firewall Management Center, then there is a chance that outbound port TCP 8305 may be blocked upstream from your threat defense device and that network path will need to be assured before your threat defense will be able to connect to cloud-delivered Firewall Management Center.

Troubleshoot Threat Defense Device Connectivity

Test connectivity to the Internet from the management-plane of the threat defense device:

Procedure

  Command or Action Purpose

Step 1

Log into the threat defense device with SSH.

Step 2

Ping one or both of the following:

  • system 208.67.222.222

  • system cisco.com

What to do next

If either of these tests fail, there is likely an L1-L3 issue and you will need to check your management networking configuration (show network) and/or a DNS issue.

Troubleshoot Device Connectivity Loss After Cloud-delivered Firewall Management Center Update

A cloud-delivered Firewall Management Center is assigned a dynamic IP address when it is added to a Security Cloud Control tenant. When the management center is updated, the management center receives a new dynamic IP address.

If you have a firewall inspecting the outbound traffic from your threat defense device to the cloud-delivered Firewall Management Center, your firewall rules must allow the threat defense traffic to flow to the FQDN and port of the management center rather than its IP address, or the management center will not be able to manage your threat defense device.

For example, if your network traffic rule allowing management traffic from your threat defense device to the cloud-delivered Firewall Management Center looks like this:

allow all traffic <my-threat-defense-ip-src> to 200.165.200.225

where 200.165.200.225 is the management address of the cloud-delivered Firewall Management Center, change the one allow rule to these two allow rules as both ports 443 and 8305 need to be open:

allow all traffic <my-threat-defense-ip-src > to <my-cdfFMC-FQDN>:443

allow all traffic <my-threat-defense-ip-src > to <my-cdfFMC-FQDN>:8305

See “Network Requirements” in Prerequisites to Onboard a Device to Cloud-delivered Firewall Management Center for more port information.

Where do I find the domain name of my cloud-delivered Firewall Management Center?

Where do I find the domain name of my cloud-delivered Firewall Management Center?

  1. Log in to Security Cloud Control.

  2. In the left pane, click Administration > Firewall Management Center

  3. Select Cloud-Delivered FMC in the FMC table.

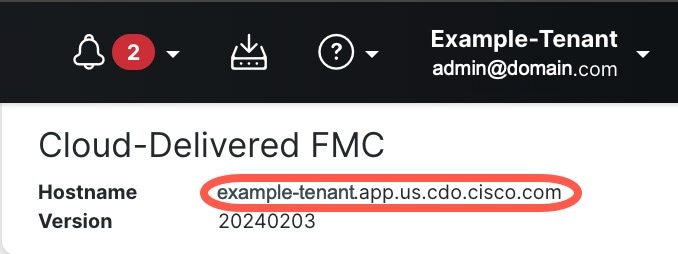
  4. In the top-right corner of the screen, you will see the Hostname of the management center. This is the FQDN.

    Figure 3. Cloud-delivered FMC FQDN

    Cloud-delivered FMC FQDN

Troubleshoot Onboarding a Device to the Cloud-delivered Firewall Management Center Using the CLI Registration Key

Error: Device Remains in Pending Setup State After Onboarding

When a device fails to register, the device's connectivity status is displayed as Pending Setup. In the panel located to the right, Security Cloud Control displays a Registration Failed message as well as a Retry Onboarding button to immediately allow you to reattempt onboarding the device.

If you fail to execute the configuration manager command in the device CLI within 3 mins after onboarding it to Security Cloud Control, the device's registration attempt expires and results in a registrationg failure. Use the following procedure to resolve the issue:

Procedure

Step 1

Log into Security Cloud Control and navigate to the Inventory page. Locate the device that failed to register.

Step 2

In the panel located to the right, locate the Registration Failed window. Beside the device's CLI registration key, click Copy. This actions copies the CLI key to a local clipboard.

Step 3

Open an SSH connection to the device and log in as admin.

Step 4

Paste the CLI registration key into the device's CLI interface. In the CLI, enter Y to complete the registration. If your device was previously managed by device manager, enter Yes to confirm the submission.


Troubleshoot Onboarding a Device to Cloud-delivered Firewall Management Center Using the Serial Number

Device is Offline or Unreachable

If the device is unreachable during the onboarding proess, or at any point post-onboarding, Security Cloud Control displays an Unreachable connectivity status. The device will not be able to fully onboard to Security Cloud Control until the device is able to connect. The following scenarios might be the cause:

  • The device is cabled incorrectly.

  • Your network may require a static IP address for the device.

  • Your network uses custom DNS, or there is external DNS blocking the network.

  • If your device is associated with the European region (https://defenseorchestrator.eu/), you may need to enable PPPoE authentication.For other domains, review the domain requirements.

  • The device may be blocked by a firewall, or is incorrectly blocking a port for connectivity. Review the device Network Requirements and confirm the correct outgoing ports are enabled.

Error: Serial Number Already Claimed

The Device was Purchased From an External Vendor

If the device was purchased from an external vendor and fails to onboard with a Serial Number Already Claimed error, it's possible the device is still associated to the vendor's tenant. Use the following steps to claim the device and its serial number:

  1. Delete the device from your Security Cloud Control tenant.

  2. Install the FXOS image on the device. For more information, see the "Reimage Procedures" chapter of the Cisco FXOS Troubleshooting Guide for the Firepower 1000/21000 and Secure Firewall 3100 Firepower Threat Defense guide.

  3. Connect a laptop to the device's console port.

  4. Connect to the FXOS CLI and log in as admin.

  5. In the FXOS CLI, connect to local-mgmt with the firepower # connect local-mgmt command.

  6. Execute the firepower(local-mgmt) # cloud deregister command to deregister the device from the cloud tenancy.

  7. Once the device is successfully unregistered, the CLI interface returns a success message. An example of the message:
    Example: firepower(local-mgmt) # cloud deregister Release Image Detected RESULT=success MESSAGE=SUCCESS 10, X-Flow-Id: 2b3c9e8b-76c3-4764-91e4-cfd9828e73f9

    Note


    If the device was never registered to another Security Cloud Control tenant, the message above states RESULT=success MESSAGE=DEVICE_NOT_FOUND.


  8. Onboard the device to your Security Cloud Control tenant with its serial number. See Onboard a Threat Defense Device to Cloud-delivered Firewall Management Center using Zero-Touch Provisioning for more information.

The Device is Claimed By a Security Cloud Control Tenant in Another Region

The device may have been previously managed by another Security Cloud Control instance in a different region and is still registered to that tenant.

If you do have access to the tenant the device is currently registered to, use the following procedure:

  1. Delete the device from the incorrect Security Cloud Control tenant.

  2. Log into the device's device manager UI.

  3. Navigate to System Settings > Cloud Services.

  4. Click Cloud Services and select Unregister Cloud Services from the drop-down list.

  5. Confirm the action and click Unregister. This action generates a warning to indicate that the device has been removed from Security Cloud Control. This is expected behavior.

  6. Log into Security Cloud Control tenant in the correct region and onboard the device. See Onboard a Threat Defense Device to Cloud-delivered Firewall Management Center using Zero-Touch Provisioning for more information.

  7. Navigate to System Settings > Cloud Services.

  8. Click Cloud Services and select Unregister Cloud Services from the drop-down list.

  9. Select the Auto-enroll with Tenancy from Security Cloud Control and click Register. The device maps to the new tenant that belongs to the new region and Security Cloud Control onboards the device.

If you do not have access to the tenant, use the procedure below:

  1. Connect to the FXOS CLI from the console port and log in as admin. For information on how to log into the FXOS CLI, see Accessing the FXOS CLI.

  2. In the FXOS CLI, connect to local-mgmt with the firepower # connect local-mgmt command.

  3. Execute the firepower(local-mgmt) # cloud deregister command to deregister the device from the cloud tenancy.

  4. Once the device is successfully unregistered, the CLI interface returns a success message. An example of the message:
    Example: firepower(local-mgmt) # cloud deregister Release Image Detected RESULT=success MESSAGE=SUCCESS 10, X-Flow-Id: 2b3c9e8b-76c3-4764-91e4-cfd9828e73f9

    Note


    If the device was never registered to another Security Cloud Control tenant, the message above states RESULT=success MESSAGE=DEVICE_NOT_FOUND.


  5. In your Security Cloud Control tenant in the correct domain, onboard the device. See Onboard a Threat Defense Device to Cloud-delivered Firewall Management Center using Zero-Touch Provisioning for more information.

  6. In the device's device manager UI, navigate to System Settings > Cloud Services.

  7. Select the Auto-enroll with Tenancy from Security Cloud Control and click Register. The device maps to the new tenant that belongs to the new region and Security Cloud Control onboards the device.

Error: Claim Error

If you enter the wrong serial number when onboarding a device, Security Cloud Control generates a Claim Error status.


Note


Confirm that the device is claimed in the correct region within Security Cloud Control.


Resolve this issue with the provedure below:

Procedure

Step 1

Log into Security Cloud Control and navigate to the Inventory page. Locate the device with the error.

Step 2

Select the device so it is highlighted and Remove the device from Security Cloud Control.

Step 3

Confirm the following:

  • The device is online and can reach the internet.

  • The device has not already been onboarded to your Security Cloud Control instance or claimed by a Security Cloud Control tenant in another region.

Step 4

Locate the device's serial number. You can use one of the following methods:

  • For the 1000, 2100 and 3100 series model, locate the serial number on the physical device.

  • Open an SSH connection to the device and issue the show serial-number command.

Step 5

In Security Cloud Control, onboard the device with the correct serial number. See Onboard a Threat Defense Device to Cloud-delivered Firewall Management Center using Zero-Touch Provisioning for more information.


Error: Failed to Claim

If you see an Error: Failed to Claim connectivity status or error message after attempting to onboard a device, the following might be the cause:

  • The Security Services Exchange platform may have temporary issues that result in no connectivity.

  • The Security Cloud Control server may be down.

Follow the procedure below to resolve this issue:

Procedure

Step 1

Log into Security Cloud Control and navigate to the Inventory page. Locate the device that failed to register.

Step 2

Select the device so it is highlighted and Remove the device from your Security Cloud Control tenant.

Step 3

Wait at least 10 minutes before attempting to onboard the device back to your Security Cloud Control tenant. See Onboard a Threat Defense Device to Cloud-delivered Firewall Management Center using Zero-Touch Provisioning for more information.


What to do next

If you are still unable to claim the device, review the device's workflow to see is there is an error message. If there is,Export the Workflow and open a support case to further troubleshoot the issue.

Error: Provisional Error

Device Password Has Not Been Changed

If you did not change the default password of the device when configuring the device for remote management and selected the No, this device has been logged into and configured for a manager option when onboarding the device to Security Cloud Control, the device will generate an UnProvisioned connectivity status in the Inventory page.

Use the following procedure to resolve this issue:

  1. Log into Security Cloud Control and navigate to the Inventory page.

  2. Locate and select the device with the UnProvisioned connectivity status so it is highlighted.

  3. In the pane located to the right, locate the Change Password window.

  4. Click Change Password and enter a new password for your device. This overwrites the default password.

It may take a few minutes for the device to onboard and fully synchronize to Security Cloud Control.

Device Password Has Already Been Changed

If you did change the default password of the device when configuring the device for remote management and selected the Is this a new device that has never been logged into or configured before? option when onboarding the device to Security Cloud Control, Security Cloud Control generates an UnProvisioned connectivity status in the Invenotry page.

Use the following procedure to resolve this issue:

  1. Log into Security Cloud Control and navigate to the Inventory page.

  2. Locate and select the device with the UnProvisioned connectivity status so it is highlighted.

  3. In the pane located to the right, locate the Confirm and Proceed window.

  4. Click Confirm and Proceed. This action ignores the password that was provided in the onboarding wizard and reinstates the default password for the device. Security Cloud Control then continues to onboard the device.

Other Provisional Error Scenarios

Regardless of the default password configuration of the device, it is still possible for a device to result in an UnProvisioned conectivity status during the onboarding process. If you confirm the password selection in the onboarding wizard is accurate for the state of the device, consider the following options to resolve the issue:

  • Select the device so it is highlighted. In the window located on the right pane of the screen, click Retry to force Security Cloud Control to re-onboard the device with existing provisional parameters.

  • Delete the device from the Inventory page and attempt to re-onboard the device.

  • In the device's device manager UI, navigate to System Settings > Cloud Services. Select the Auto-enroll with Tenancy from Security Cloud Control and click Register.

If you are still unable to claim the device, review the device's workflow to see is there is an error message. If there is,Export the Workflow and open a support case to further troubleshoot the issue.