Service Policies

You can use Threat Defense Service Policies to apply services to specific traffic classes. For example, you can use a service policy to create a timeout configuration that is specific to a particular TCP application, as opposed to one that applies to all TCP applications. A service policy consists of multiple actions or rules applied to an interface or applied globally.

About Threat Defense Service Policies

You can use Threat Defense Service Policies to apply services to specific traffic classes. With service policies, you are not limited to applying the same services to all connections that enter the device or a given interface.

A traffic class is a combination of the interface and an extended access control list (ACL). The ACL “allow” rules determine which connections are part of the class. Any “denied” traffic in the ACL simply does not have the service applied to it: these connections are not actually dropped. You can use IP addresses and TCP/UCP ports to identify matching connections as precisely as you require.

There are two types of traffic class:

  • Interface-based rules—If you specify a security zone or interface group in a service policy rule, the rule applies to the ACL “allowed” traffic that goes through any interface that is part of the interface objects.

    For a given feature, interface-based rules applied to the ingress interface always take precedence over global rules: if an ingress interface-based rule applies to a connection, any matching global rule is ignored. If no ingress interface or global rule applies, then an interface service rule on the egress interface is applied.

  • Global rules—These rules apply to all interfaces. If an interface-based rule does not apply to a connection, the global rules are checked and applied to any connections that the ACL “allows.” If none apply, then the connections proceed without any services applied.

A given connection can match only one traffic class, either interface-based or global, for a given feature. There should be at most one rule for a given interface object/traffic flow combination.

Service policy rules are applied after access control rules. These services are configured only for connections you are allowing.

How Service Policies Relate to FlexConfig and Other Features

Prior to version 6.3(0), you could configure connection-related service rules using the TCP_Embryonic_Conn_Limit and TCP_Embryonic_Conn_Timeout pre-defined FlexConfig objects. You should remove those objects and redo your rules using the Threat Defense Service Policy. If you created any custom FlexConfig objects to implement any of these connection-related features (that is, set connection commands), you should also remove those objects and implement the features through the service policy.

Because connection-related service policy features are treated as a separate feature group from other service-rule implemented features, you should not run into problems with overlapping traffic classes. However, please be mindful when configuring the following:

  • QoS Policy rules are implemented using the service policy CLI. These rules are applied before connection-based service policy rules. However, both QoS and connection settings can be applied to the same or overlapping traffic classes.

  • You can use FlexConfig policies to implement customized application inspections and NetFlow. Use the show running-config command to examine the CLI that already configures service rules, including the policy-map , class-map , and service-policy commands. Netflow and application inspection are compatible with QoS and connection settings, but you need to understand the existing configuration before implementing FlexConfig. Connection settings are applied before application inspections and Netflow.


Note


Traffic classes that are created from the Threat Defense Service Policy are named class_map_ACLname , where ACLname is the name of the extended ACL object used in the service policy rule.


What Are Connection Settings?

Connection settings comprise a variety of features related to managing traffic connections, such as a TCP flow through the threat defense. Some features are named components that you would configure to supply specific services.

Connection settings include the following:

  • Global timeouts for various protocols—All global timeouts have default values, so you need to change them only if you are experiencing premature connection loss. You configure global timeouts in the Firepower Threat Defense Platform policy. Select Devices > Platform Settings.

  • Connection timeouts per traffic class—You can override the global timeouts for specific types of traffic using service policies. All traffic class timeouts have default values, so you do not have to set them.

  • Connection limits and TCP Intercept—By default, there are no limits on how many connections can go through (or to) the threat defense. You can set limits on particular traffic classes using service policy rules to protect servers from denial of service (DoS) attacks. Particularly, you can set limits on embryonic connections (those that have not finished the TCP handshake), which protects against SYN flooding attacks. When embryonic limits are exceeded, the TCP Intercept component gets involved to proxy connections and ensure that attacks are throttled.

  • Dead Connection Detection (DCD)—If you have persistent connections that are valid but often idle, so that they get closed because they exceed idle timeout settings, you can enable Dead Connection Detection to identify idle but valid connections and keep them alive (by resetting their idle timers). Whenever idle times are exceeded, DCD probes both sides of the connection to see if both sides agree the connection is valid. The show service-policy command output includes counters to show the amount of activity from DCD. You can use the show conn detail command to get information about the initiator and responder and how often each has sent probes.

  • TCP sequence randomization—Each TCP connection has two initial sequence numbers (ISN): one generated by the client and one generated by the server. By default, the threat defense randomizes the ISN of the TCP SYN passing in both the inbound and outbound directions. Randomization prevents an attacker from predicting the next ISN for a new connection and potentially hijacking the new session. You can disable randomization per traffic class if desired.

  • TCP Normalization—The TCP Normalizer protects against abnormal packets. You can configure how some types of packet abnormalities are handled by traffic class. You can configure TCP Normalization using the FlexConfig policy.

  • TCP State Bypass—You can bypass TCP state checking if you use asymmetrical routing in your network.

Requirements and Prerequisites for Service Policies

Model Support

Threat Defense

Supported Domains

Any

User Roles

Admin

Access Admin

Network Admin

Guidelines and Limitations for Service Policies

  • Service policies apply to routed or switch interfaces only, in either routed or transparent mode. They do not apply to inline set or passive interfaces.

  • You can have at most 25 traffic classes for a given interface or the global policy. Specifically, this means that you cannot have more than 25 service policy rules for the global policy for a given security zone or interface group. However, for interfaces, because the same interface can appear in both a security zone and interface group, be aware that the actual limitation is based on the interfaces, and not the zone/group. Thus, you might be prevented from having 25 rules per zone/group based on the membership of your zones/groups.

  • You can have at most one rule for a given interface object/traffic flow combination.

  • When you make service policy changes to the configuration, all new connections use the new service policy. Existing connections continue to use the policy that was configured at the time of the connection establishment. If you want all connections to immediately use the new policy, you need to disconnect the current connections so they can reconnect using the new policy. From an SSH or Console CLI session, enter the clear conn or clear local-host commands.

Configure Threat Defense Service Policies

You can use Threat Defense Service Policies to apply services to specific traffic classes. For example, you can use a service policy to create a timeout configuration that is specific to a particular TCP application, as opposed to one that applies to all TCP applications. A service policy consists of multiple actions or rules applied to an interface or applied globally.

Procedure


Step 1

Choose Policies > Access Control, and click Edit (edit icon) for the access control policy whose Threat Defense Service Policy you want to edit.

Step 2

Click Advanced Settings from the More drop-down arrow at the end of the packet flow line.

Step 3

Click Edit (edit icon) in the Threat Defense Service Policy group.

A dialog box opens that shows the existing policy. The policy consists of an ordered list of rules, separated between global rules (which apply to all interfaces) and interface-based rules. The table shows the interface object and extended access control list name (which combined defines the traffic class for the rule), and the services applied.

Step 4

Do any of the following:

  • Click Add Rule to create a new rule. See Configure a Service Policy Rule.

  • Click Edit (edit icon) to edit an existing rule. See Configure a Service Policy Rule.

  • Click Delete (delete icon) to delete a rule.

  • Click a rule and drag it to a new location to move it. You cannot drag rules between the interface and global lists, instead you must edit the rule to change the interface/global setting. The first rule in the list that matches a connection is applied to the connection.

Step 5

Click OK when you are finished editing the policy.

Step 6

Click Save on Advanced window. The changes are not saved until you click save.


Configure a Service Policy Rule

Configure service policy rules to apply services to specific traffic classes.

Before you begin

Go to Objects > Object Management > Access List > Extended and create an the extended access list that defines the traffic to which the rule applies. The rule is applied to any connections that match Allow rules in the extended access list. Define the ACL rules precisely, so that your service policy rule applies to only the traffic that requires the service.

If you are creating an interface-based rule, you must also have configured the interfaces on the assigned devices and added them to security zones or interface groups.

Procedure


Step 1

If you are not already in the Threat Defense Service Policy dialog box, choose Policies > Access Control, edit the access control policy, select Advanced Settings from the More drop-down arrow at the end of the packet flow line, then edit the Threat Defense Service Policy.

Step 2

Do any of the following:

  • Click Add Rule to create a new rule.

  • Click Edit (edit icon) to edit an existing rule.

The service policy rule wizard opens to step you through the process of configuring the rule.

Step 3

In the Interface Object step, select the option that defines the interfaces that will use the policy.

  • Apply Globally—Select this option to create a global rule, which applies to all interfaces.

  • Select Interface Objects—Select this option to create an interface-based rule. Then, select the security zones or interface objects that contain the desired interfaces, and click > to move them to the Nextselected list. The service policy rule will be configured on each interface contained in the selected objects; it is not configured on the zone/group itself.

Click when the interface criteria is complete.

Step 4

In the Traffic Flow step, select the extended ACL object that defines the connections to which the rule applies, then click Next.

Step 5

In the Connection Setting step, configure the services to apply to this traffic class.

  • Enable TCP State Bypass (TCP connections only)—Implement TCP State Bypass. Connections subject to TCP State Bypass are not inspected by any inspection engines, and they bypass all TCP state checking and TCP normalization. For detailed information, see Bypass TCP State Checks for Asymetrical Routing (TCP State Bypass).

    Note


    Use TCP State Bypass for troubleshooting purposes or when asymmetric routing cannot be resolved. This feature disables multiple security features, which can cause a high number of connections if you do not implement it properly with a narrowly-defined traffic class.

  • Randomize TCP Sequence Number (TCP connections only)—Whether to enable or disable TCP sequence number randomization. Randomization is enabled by default. For more information, see Disable TCP Sequence Randomization.

  • Enable Decrement TTL (TCP connections only)—Decrement the time-to-live (TTL) on packets that match the class. If you decrement time to live, packets with a TTL of 1 will be dropped, but a connection will be opened for the session on the assumption that the connection might contain packets with a greater TTL. Note that some packets, such as OSPF hello packets, are sent with TTL = 1, so decrementing time to live can have unexpected consequences.

    Note


    If you want the threat defense device to appear on traceroutes, you must configure the decrement TTL option and also set the ICMP unreachable rate limit in the platform settings policy. See Make the Threat Defense Device Appear on Traceroutes.

  • Connections—Limits for the number of connections allowed for the entire class. You can configure these options:

    • Maximum TCP and UDP (TCP/UDP connections only)—The maximum number of simultaneous connections that are allowed, between 0 and 2000000, for the entire class. For TCP, this count applies to established connections only. The default is 0, which allows unlimited connections. Because the limit is applied to a class, one attacking host can consume all the connections and leave none for the rest of the hosts that are matched to the class. Set the per-client limit to ameliorate this problem.

    • Maximum Embryonic (TCP connections only)—The maximum number of simultaneous embryonic TCP connections (those that have not finished the TCP handshake) allowed, between 0 and 2000000. The default is 0, which allows unlimited connections. By setting a non-zero limit, you enable TCP Intercept, which protects inside systems from a DoS attack perpetrated by flooding an interface with TCP SYN packets. Also set the per-client options to protect against SYN flooding. For more information, see Protect Servers from a SYN Flood DoS Attack (TCP Intercept).

  • Connections Per Client—Limits for the number of connections allowed for a given client (source IP address). You can configure these options:

    • Maximum TCP and UDP (TCP/UDP connections only)—The maximum number of simultaneous connections allowed per client, between 0 and 2000000. For TCP, this includes established, half-open (embryonic), and half-closed connections. The default is 0, which allows unlimited connections. This option restricts the maximum number of simultaneous connections that are allowed for each host that is matched to the class.

    • Maximum Embryonic (TCP connections only)—The maximum number of simultaneous embryonic TCP connections allowed per client, between 0 and 2000000. The default is 0, which allows unlimited connections. For more information, see Protect Servers from a SYN Flood DoS Attack (TCP Intercept).

  • Connections Syn Cookie MSS—The server maximum segment size (MSS) for SYN-cookie generation for embryonic connections upon reaching the embryonic connections limit, from 48 to 65535 . The default is 1380. This setting is meaningful only if you configure Maximum Embryonic for connections or per-client, or both.

  • Connections Timeout—The timeout settings to apply to the traffic class. These timeouts override the global timeouts defined in the platform settings policy. You can configure the following:

    • Embryonic (TCP connections only)—The timeout period until a TCP embryonic (half-open) connection is closed, between 0:0:5 and 1193:00:00. The default is 0:0:30.

    • Half Closed (TCP connections only)—The idle timeout period until a half-closed connection is closed, between 0:0:30 and 1193:0:0. The default is 0:10:0. Half-closed connections are not affected by Dead Connection Detection (DCD). Also, the system does not send a reset when taking down half-closed connections.

    • Idle (TCP, UDP, ICMP, IP connections)—The idle timeout period after which an established connection of any protocol closes, between 0:0:1 and 1193:0:0. The default is 1:0:0, unless you select the TCP State Bypass option, where the default is 0:2:0.

    • Reset Connection Upon Timeout (TCP connections only)—Whether to send a TCP RST packet to both end systems after idle connections are removed.

  • Detect Dead Connections (TCP connections only)—Whether to enable Dead Connection Detection (DCD). Before expiring an idle connection, the system probes the end hosts to determine if the connection is valid. If both hosts respond, the connection is preserved, otherwise the connection is freed. When operating in transparent firewall mode, you must configure static routes for the endpoints. You cannot configure DCD on connections that are also offloaded, so do not configure DCD on connections you are fast-pathing in the prefilter policy. Use the show conn detail command in the threat defense CLI to track how many DCD probes have been sent by the initiator and responder.

    Configure the following options:

    • Detection Timeout—The time duration in hh:mm:ss format to wait after each unresponsive DCD probe before sending another probe, between 0:0:1 and 24:0:0. The default is 0:0:15.

      For systems that are operating in a cluster or high-availability configuration, we recommend that you do not set the interval to less than one minute (0:1:0). If the connection needs to be moved between systems, the changes required take longer than 30 seconds, and the connection might be deleted before the change is accomplished.

    • Detection Retries—The number of consecutive failed retries for DCD before declaring the connection dead, from 1 to 255. The default is 5.

Step 6

Click Finish to save your changes.

The rule is added to the bottom of the appropriate list, either Interfaces or Global. Global rules are matched in top-down order. Rules in the Interfaces list are matched in top down order for each interface object. Place rules for narrowly-defined traffic classes above broader rules, to ensure the right services get applied. You can move rules within each list by using drag and drop. You cannot move rules between lists.


Bypass TCP State Checks for Asymetrical Routing (TCP State Bypass)

If you have an asymetrical routing environment in your network, where the outbound and inbound flow for a given connection can go through two different threat defense devices, you need to implement TCP State Bypass on the affected traffic.

However, TCP State Bypass weakens the security of your network, so you should apply bypass on very specific, limited traffic classes.

The following topics explain the problem and solution in more detail.

The Asymetrical Routing Problem

By default, all traffic that goes through the threat defense is inspected using the Adaptive Security Algorithm and is either allowed through or dropped based on the security policy. The threat defense maximizes the firewall performance by checking the state of each packet (new connection or established connection) and assigning it to either the session management path (a new connection SYN packet), the fast path (an established connection), or the control plane path (advanced inspection).

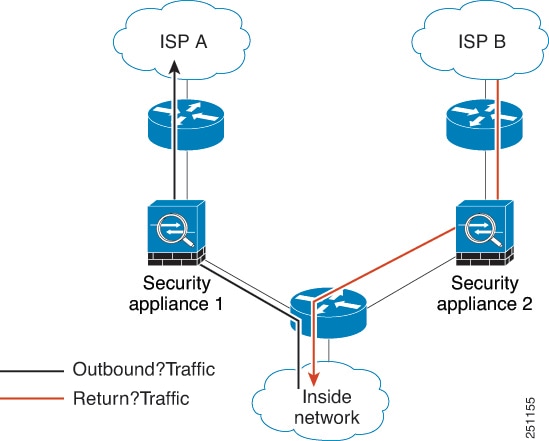
TCP packets that match existing connections in the fast path can pass through the threat defense without rechecking every aspect of the security policy. This feature maximizes performance. However, the method of establishing the session in the fast path using the SYN packet, and the checks that occur in the fast path (such as TCP sequence number), can stand in the way of asymmetrical routing solutions: both the outbound and inbound flow of a connection must pass through the same threat defense device.

For example, a new connection goes to Security Appliance 1. The SYN packet goes through the session management path, and an entry for the connection is added to the fast path table. If subsequent packets of this connection go through Security Appliance 1, then the packets match the entry in the fast path, and are passed through. But if subsequent packets go to Security Appliance 2, where there was not a SYN packet that went through the session management path, then there is no entry in the fast path for the connection, and the packets are dropped. The following figure shows an asymmetric routing example where the outbound traffic goes through a different threat defense than the inbound traffic:

Figure 1. Asymmetric Routing

If you have asymmetric routing configured on upstream routers, and traffic alternates between two threat defense devices, then you can configure TCP state bypass for specific traffic. TCP state bypass alters the way sessions are established in the fast path and disables the fast path checks. This feature treats TCP traffic much as it treats a UDP connection: when a non-SYN packet matching the specified networks enters the threat defense device, and there is not a fast path entry, then the packet goes through the session management path to establish the connection in the fast path. Once in the fast path, the traffic bypasses the fast path checks.

Guidelines and Limitations for TCP State Bypass

TCP State Bypass Unsupported Features

The following features are not supported when you use TCP state bypass:

  • Application inspection—Inspection requires both inbound and outbound traffic to go through the same threat defense, so inspection is not applied to TCP state bypass traffic.

  • Snort inspection—Inspection requires both inbound and outbound traffic to go through the same device. However, Snort inspection is not automatically bypassed for TCP state bypass traffic. You must also configure a prefilter fastpath rule for the same traffic class for which you configure TCP state bypass.

  • TCP Intercept, maximum embryonic connection limit, TCP sequence number randomization—The threat defense does not keep track of the state of the connection, so these features are not applied.

  • TCP normalization—The TCP normalizer is disabled.

  • Stateful failover.

TCP State Bypass NAT Guidelines

Because the translation session is established separately for each threat defense, be sure to configure static NAT on both devices for TCP state bypass traffic. If you use dynamic NAT, the address chosen for the session on Device 1 will differ from the address chosen for the session on Device 2.

Configure TCP State Bypass

To bypass TCP state checking in asymetrical routing environments, carefully define a traffic class that applies to the affected hosts or networks only, then enable TCP State Bypass on the traffic class using a service policy. You must also configure a corresponding prefilter fastpath policy for the same traffic to ensure the traffic also bypasses inspection.

Because bypass reduces the security of the network, limit its application as much as possible.

Procedure

Step 1

Create the extended ACL that defines the traffic class.

For example, to define a traffic class for TCP traffic from 10.1.1.1 to 10.2.2.2, do the following:

  1. Choose Objects > Object Management.

  2. Choose Access List > Extended from the table of contents.

  3. Click Add Extended Access List.

  4. Enter a Name for the object, for example, bypass.

  5. Click Add to add a rule.

  6. Keep Allow for the action.

  7. Enter 10.1.1.1 beneath the Source list and click Add, and 10.2.2.2 beneath the Destination list, and click Add.

  8. Click Port, select TCP (6) beneath the Selected Source Ports list, and click Add. Do not enter a port number, simply add TCP as the protocol, which will cover all ports.

  9. Click Add on the Extended Access List Entry dialog box to add the rule to the ACL.

  10. Click Save on the Extended Access List Object dialog box to save the ACL object.

Step 2

Configure the TCP state bypass service policy rule.

For example, to configure TCP state bypass for this traffic class globally, do the following:

  1. Choose Policies > Access Control, and edit the policy assigned to the devices that require this service.

  2. Click Advanced Settings from the More drop-down arrow at the end of the packet flow line, and click Edit (edit icon) for the Threat Defense Service Policy.

  3. Click Add Rule.

  4. Select Apply Globally > Next.

  5. Select the extended ACL object you created for this rule and click Next.

  6. Select Enable TCP State Bypass.

  7. (Optional.) Adjust the Idle timeout for bypassed connections. The default is 2 minutes.

  8. Click Finish to add the rule. If necessary, drag and drop the rule to the desired position in the service policy.

  9. Click OK to save the changes to the service policy.

  10. Click Save on Advanced to save the changes to the access control policy.

Step 3

Configure a prefilter fastpath rule for the traffic class.

You cannot use the ACL object in the prefilter rule, so you need to recreate the traffic class either directly in the prefilter rule, or by first creating network objects that define the class.

The following procedure assumes that you already have a prefilter policy attached to the access control policy. If you have not created a prefilter policy yet, go to Policies > Prefilter and first create the policy. You can then follow this procedure to attach it to the access control policy and create the rule.

Keeping with our example, this procedure creates a fastpath rule for TCP traffic from 10.1.1.1 to 10.2.2.2.

  1. Choose Policies > Access Control, and edit the policy that has the TCP bypass service policy rule.

  2. Click the link for the Prefilter Policy, which is to the left immediately under the policy description.

  3. In the Prefilter Policy dialog box, select the policy to assign to the device if the correct one is not already selected. Do not click OK yet.

    Because you cannot add rules to the default prefilter policy, you must choose a custom policy.

  4. In the Prefilter Policy dialog box, click the Edit (edit icon). This action opens a new browser window where you can edit the policy.

  5. Click Add Prefilter Rule and configure a rule with the following properties.

    • Name—Any name that you fined meaningful will do, such as TCPBypass.

    • Action—Select Fastpath.

    • Interface Objects—If you configured TCP state bypass as a global rule, leave the default, any, for both source and destination. If you created an interface-based rule, select the same interface objects you used for rule in the Source Interface Objects list, and keep any as the destination.

    • Networks—Add 10.1.1.1 to the Source Networks list, and 10.2.2.2 to the Destination Networks list. You can either use network objects or manually add the addresses.

    • Ports—Under Selected Source Ports, select TCP(6), do not enter a port, and click Add. This will apply the rule to all (and only) TCP traffic, regardless of TCP port number.

  6. Click Add to add the rule to the prefilter policy.

  7. Click Save to save your changes to the prefilter policy.

    You can now close the prefilter edit window and return to the access control policy edit window.

  8. In the access control policy edit window, the Prefilter Policy dialog box should still be open. Click OK to save your changes to the prefilter policy assignment.

  9. Click Save on the access control policy to save the changed prefilter policy assignment, if you changed it.

    You can now deploy the changes to the affected devices.


Disable TCP Sequence Randomization

Each TCP connection has two initial sequence numbers (ISN): one generated by the client and one generated by the server. The threat defense device randomizes the ISN of the TCP SYN passing in both the inbound and outbound directions.

Randomizing the ISN of the protected host prevents an attacker from predicting the next ISN for a new connection and potentially hijacking the new session.

You can disable TCP initial sequence number randomization if necessary, for example, because data is getting scrambled. Following are some situations where you might want to disable randomization.

  • If another in-line firewall is also randomizing the initial sequence numbers, there is no need for both firewalls to be performing this action, even though this action does not affect the traffic.

  • If you use eBGP multi-hop through the device, and the eBGP peers are using MD5. Randomization breaks the MD5 checksum.

  • If you use a WAAS device that requires the threat defense device not to randomize the sequence numbers of connections.

  • If you enable hardware bypass for the ISA 3000, and TCP connections are dropped when the ISA 3000 is no longer part of the data path.

Procedure


Step 1

Create the extended ACL that defines the traffic class.

For example, to define a traffic class for TCP traffic from any host to 10.2.2.2, do the following:

  1. Choose Objects > Object Management.

  2. Choose Access List > Extended from the table of contents.

  3. Click Add Extended Access List.

  4. Enter a Name for the object, for example, preserve-sq-no.

  5. Click Add to add a rule.

  6. Keep Allow for the action.

  7. Leave the Source list empty, enter 10.2.2.2 beneath the Destination list, and click Add.

  8. Click Port, select TCP (6) beneath the Selected Source Ports list, and click Add. Do not enter a port number, simply add TCP as the protocol, which will cover all ports.

  9. Click Add on the Extended Access List Entry dialog box to add the rule to the ACL.

  10. Click Save on the Extended Access List Object dialog box to save the ACL object.

Step 2

Configure the service policy rule that disables TCP sequence number randomization.

For example, to disable randomization for this traffic class globally, do the following:

  1. Choose Policies > Access Control, and edit the policy assigned to the devices that require this service.

  2. Click Advanced Settings from the More drop-down arrow at the end of the packet flow line, and click Edit (edit icon) for the Threat Defense Service Policy.

  3. Click Add Rule.

  4. Select Apply Globally > Next.

  5. Select the extended ACL object you created for this rule and click Next.

  6. Deselect Randomize TCP Sequence Number.

  7. (Optional.) Adjust the other connection options as needed.

  8. Click Finish to add the rule. If necessary, drag and drop the rule to the desired position in the service policy.

  9. Click OK to save the changes to the service policy.

  10. Click Save on Advanced to save the changes to the access control policy.

    You can now deploy the changes to the affected devices.


Examples for Service Policy Rules

The following topics provide examples of service policy rules.

Protect Servers from a SYN Flood DoS Attack (TCP Intercept)

A SYN-flooding denial of service (DoS) attack occurs when an attacker sends a series of SYN packets to a host. These packets usually originate from spoofed IP addresses. The constant flood of SYN packets keeps the server SYN queue full, which prevents it from servicing connection requests from legitimate users.

You can limit the number of embryonic connections to help prevent SYN flooding attacks. An embryonic connection is a connection request that has not finished the necessary handshake between source and destination.

When the embryonic connection threshold of a connection is crossed, the threat defense acts as a proxy for the server and generates a SYN-ACK response to the client SYN request using the SYN cookie method, so that the connection is not added to the SYN queue of the targeted host. The SYN cookie is the initial sequence number returned in the SYN-ACK that is constructed from MSS, time stamp, and a mathematical hash of other items to essentially create a secret. If the threat defense receives an ACK back from the client with the correct sequence number and within the valid time window, it can then authenticate that the client is real and allow the connection to the server. The component that performs the proxy is called TCP Intercept.

Setting connection limits can protect a server from a SYN flood attack. You can optionally enable TCP Intercept statistics and monitor the results of your policy. The following procedure explains the end-to-end process.

Before you begin

  • Ensure that you set the embryonic connection limit lower than the TCP SYN backlog queue on the server that you want to protect. Otherwise, valid clients can no longer access the server during a SYN attack. To determine reasonable values for embryonic limits, carefully analyze the capacity of the server, the network, and server usage.

  • Depending on the number of CPU cores on your Secure Firewall Threat Defense device model, the maximum concurrent and embryonic connections can exceed the configured numbers due to the way each core manages connections. In the worst case scenario, the device allows up to n-1 extra connections and embryonic connections, where n is the number of cores. For example, if your model has 4 cores, if you configure 6 concurrent connections and 4 embryonic connections, you could have an additional 3 of each type. To determine the number of cores for your model, enter the show cpu core command in the device CLI.

Procedure


Step 1

Create the extended ACL that defines the traffic class, which is the list of servers you want to protect.

For example, to define a traffic class to protect the web servers with the IP addresses 10.1.1.5 and 10.1.1.6:

  1. Choose Objects > Object Management.

  2. Choose Access List > Extended from the table of contents.

  3. Click Add Extended Access List.

  4. Enter a Name for the object, for example, protected-servers.

  5. Click Add to add a rule.

  6. Keep Allow for the action.

  7. Leave the Source list empty, enter 10.1.1.5 beneath the Destination list, and click Add.

  8. Also enter 10.1.1.6 beneath the Destination list and click Add.

  9. Click Port, select HTTP in the available ports list, and click Add to Destination. If your server also support HTTPS connections, also add that port.

  10. Click Add on the Extended Access List Entry dialog box to add the rule to the ACL.

  11. Click Save on the Extended Access List Object dialog box to save the ACL object.

Step 2

Configure the service policy rule that sets embryonic connection limits.

For example, to set the total concurrent embryonic limit to 1000 connections, and the per-client limit to 50 connections, do the following:

  1. Choose Policies > Access Control, and edit the policy assigned to the devices that require this service.

  2. Click Advanced Settings from the More drop-down arrow at the end of the packet flow line, and click Edit (edit icon) for the Threat Defense Service Policy.

  3. Click Add Rule.

  4. Select Apply Globally > Next.

  5. Select the extended ACL object you created for this rule and click Next.

  6. Enter 1000 for Connections > Maximum Embryonic.

  7. Enter 50 for Connections Per Client > Maximum Embryonic.

  8. (Optional.) Adjust the other connection options as needed.

  9. Click Finish to add the rule. If necessary, drag and drop the rule to the desired position in the service policy.

  10. Click OK to save the changes to the service policy.

  11. Click Save on Advanced to save the changes to the access control policy.

Step 3

(Optional.) Configure the rates for TCP Intercept statistics.

TCP Intercept uses the following options to determine the rate for collecting statistics. All options have default values, so if these rates suit your needs, you can skip this step.

  • Rate Interval—The size of the history monitoring window, between 1 and 1440 minutes. The default is 30 minutes. During this interval, the system samples the number of attacks 30 times.

  • Burst Rate—The threshold for syslog message generation, between 25 and 2147483647. The default is 400 per second. When the burst rate is exceeded, the device generates syslog message 733104.

  • Average Rate—The average rate threshold for syslog message generation, between 25 and 2147483647. The default is 200 per second. When the average rate is exceeded, the device generates syslog message 733105.

If you want to adjust these options, do the following:

  1. Choose Objects > Object Management.

  2. Choose FlexConfig > Text Object.

  3. Click Edit (edit icon) for the threat_defense_statistics system-defined object.

  4. Although you can directly change the values, the recommended approach is to open the Override section and click Add to create a device override.

  5. Select the devices to which you will assign the service policy (through the access control policy assignment) and click Add to move them to the selected list.

  6. Click Override.

  7. The object must have 3 entries, so click Count as needed until you get 3.

  8. Enter the values you need, in order from 1-3, as rate interval, burst rate, and average rate. Consult the object description to verify you enter the values in the right order.

  9. Click Add in the Object Override dialog box.

  10. Click Save in the Edit Text Object dialog box.

Step 4

Enable TCP Intercept statistics.

You must configure a FlexConfig policy to enable TCP Intercept statistics.

  1. Choose Devices > FlexConfig.

  2. If you already have a policy assigned to the devices, edit it. Otherwise, create a new policy and assign it to the affected devices.

  3. Select the Threat_Detection_Configure object in the Available FlexConfig list and click >>. The object is added to the Selected Append FlexConfigs list.

  4. Click Save.

  5. (Optional.) You can verify that you have the right settings by clicking Preview Config and selecting one of the devices.

    The system generates the CLI commands that will be written to the device during the next deployment. These commands will include those needed for the service policy as well as those needed for threat detection statistics. Scroll to the bottom of the preview to see the appended CLI. The TCP Intercept statistics command should look something like the following, if you use the default values (line break added for clarity):

    
    ###Flex-config Appended CLI ###
    
    threat-detection statistics tcp-intercept rate-interval 30 
           burst-rate 400 average-rate 200


Step 5

You can now deploy the changes to the affected devices.

Step 6

Monitor the TCP Intercept statistics from the device CLI using the following commands:

  • show threat-detection statistics top tcp-intercept [all | detail] —View the top 10 protected servers under attack. The all keyword shows the history data of all the traced servers. The detail keyword shows history sampling data. The system samples the number of attacks 30 times during the rate interval, so for the default 30 minute period, statistics are collected every 60 seconds.

    Note


    You can use the shun command to block attacking host IP addresses. To remove the block, use the no shun command.

  • clear threat-detection statistics tcp-intercept —Erases TCP Intercept statistics.

Example:


hostname(config)# show threat-detection statistics top tcp-intercept
Top 10 protected servers under attack (sorted by average rate)
Monitoring window size: 30 mins    Sampling interval: 30 secs
<Rank> <Server IP:Port> <Interface> <Ave Rate> <Cur Rate> <Total> <Source IP (Last Attack Time)>
----------------------------------------------------------------------------------
1    10.1.1.5:80 inside 1249 9503 2249245 <various> Last: 10.0.0.3 (0 secs ago)
2    10.1.1.6:80 inside 10 10 6080 10.0.0.200 (0 secs ago)


Make the Threat Defense Device Appear on Traceroutes

By default, the Threat Defense device does not appear on traceroutes as a hop. To make it appear, you need to decrement the time-to-live on packets that pass through the device, and increase the rate limit on ICMP unreachable messages. To accomplish this, you must configure a service policy rule and adjust the ICMP platform settings policy.


Note


If you decrement time to live, packets with a TTL of 1 will be dropped, but a connection will be opened for the session on the assumption that the connection might contain packets with a greater TTL. Note that some packets, such as OSPF hello packets, are sent with TTL = 1, so decrementing time to live can have unexpected consequences. Keep these considerations in mind when defining your traffic class.


Procedure


Step 1

Create the extended ACL that defines the traffic class for which to enable traceroute reporting.

For example, to define a traffic class for all addresses, but excluding OSPF traffic, do the following:

  1. Choose Objects > Object Management.

  2. Choose Access List > Extended from the table of contents.

  3. Click Add Extended Access List.

  4. Enter a Name for the object, for example, traceroute-enabled.

  5. Click Add to add a rule to exclude OSPF.

  6. Change the action to Block, click Port, select OSPFIGP (89) as the protocol beneath the Destination Ports list, and click Add to add the protocol to the selected list.

  7. Click Add on the Extended Access List Entry dialog box to add the OSPF rule to the ACL.

  8. Click Add to add a rule to include all other connections.

  9. Keep Allow for the action, and leave both the Source and Destination lists empty.

  10. Click Add on the Extended Access List Entry dialog box to add the rule to the ACL.

    Ensure that the OSPF deny rule is above the Allow Any rule. Drag and drop to move the rules if necessary.

  11. Click Save on the Extended Access List Object dialog box to save the ACL object.

Step 2

Configure the service policy rule that decrements the time-to-live value.

For example, to decrement time-to-live globally, do the following:

  1. Choose Policies > Access Control, and edit the policy assigned to the devices that require this service.

  2. Click Advanced Settings from the More drop-down arrow at the end of the packet flow line, and click Edit (edit icon) for the Threat Defense Service Policy.

  3. Click Add Rule.

  4. Select Apply Globally and click Next.

  5. Select the extended ACL object you created for this rule and click Next.

  6. Select Enable Decrement TTL.

  7. (Optional.) Adjust the other connection options as needed.

  8. Click Finish to add the rule. If necessary, drag and drop the rule to the desired position in the service policy.

  9. Click OK to save the changes to the service policy.

  10. Click Save on Advanced to save the changes to the access control policy.

    You can now deploy the changes to the affected devices.

Step 3

Increase the rate limit on ICMP unreachable messages.

  1. Choose Devices > Platform Settings.

  2. If you already have a policy assigned to the devices, edit it. Otherwise, create a new Threat Defense platform settings policy and assign it to the affected devices.

  3. Select ICMP from the table of contents.

  4. Increase the Rate Limit, for example, to 50. You might also want to increase the Burst Size, for example, to 10, to ensure enough reponses are generated within the rate limit.

    You can leave the ICMP rules table empty, it is not related to this task.

  5. Click Save.

Step 4

You can now deploy the changes to the affected devices.


Monitoring Service Policies

You can monitor service-policy related information using the device CLI. Following are some useful commands.

  • show conn [detail]

    Shows connection information. Detailed information uses flags to indicate special connection characteristics. For example, the “b” flag indicates traffic subject to TCP State Bypass.

    When you use the detail keyword, you can see information about Dead Connection Detection (DCD) probing, which shows how often the connection was probed by the initiator and responder. For example, the connection details for a DCD-enabled connection would look like the following:

    
    TCP dmz: 10.5.4.11/5555 inside: 10.5.4.10/40299,
        flags UO , idle 1s, uptime 32m10s, timeout 1m0s, bytes 11828, 
    cluster sent/rcvd bytes 0/0, owners (0,255)
      Traffic received at interface dmz
            Locally received: 0 (0 byte/s)
      Traffic received at interface inside
            Locally received: 11828 (6 byte/s)
      Initiator: 10.5.4.10, Responder: 10.5.4.11
      DCD probes sent: Initiator 5, Responder 5
    
  • show service-policy

    Shows service policy statistics, including Dead Connection Detection (DCD) statistics.

  • show threat-detection statistics top tcp-intercept [all | detail]

    View the top 10 protected servers under attack. The all keyword shows the history data of all the traced servers. The detail keyword shows history sampling data. The system samples the number of attacks 30 times during the rate interval, so for the default 30 minute period, statistics are collected every 60 seconds.