Introduction to Firewall Services

The Firewall policy folder (in either Device or Policy view) includes firewall-related policies that you can deploy to the Adaptive Security Appliance (ASA), PIX Firewall (PIX), Catalyst Firewall Services Module (FWSM), and security routers running Cisco IOS Software. These policies allow you to control network access through a device.

This chapter contains the following topics:

Overview of Firewall Services

The Firewall policy folder (in either Device or Policy view) includes firewall-related policies that you can deploy to the Adaptive Security Appliance (ASA), PIX Firewall (PIX), and Catalyst Firewall Services Module (FWSM).


Note


From version 4.21 onwards, Cisco Security Manager terminates whole support, including support for any bug fixes or enhancements, for all Aggregation Service Routers, Integrated Service Routers, Embedded Service Routers, and any device operating on Cisco IOS software

These policies are focused on controlling access through the device, rather than access to the device (that is, logging into the device so that you can change its configuration or use show commands). Following is a general overview of the available firewall policies with pointers to topics that provide more detailed information:

  • AAA rules—These are AAA firewall or authentication proxy rules that can require a user to authenticate (with a username and password) and optionally be authorized before the device allows the user to make network connections through it. You can also create accounting rules to collect billing, security, or resource allocation information. For more information, see Understanding AAA Rules.

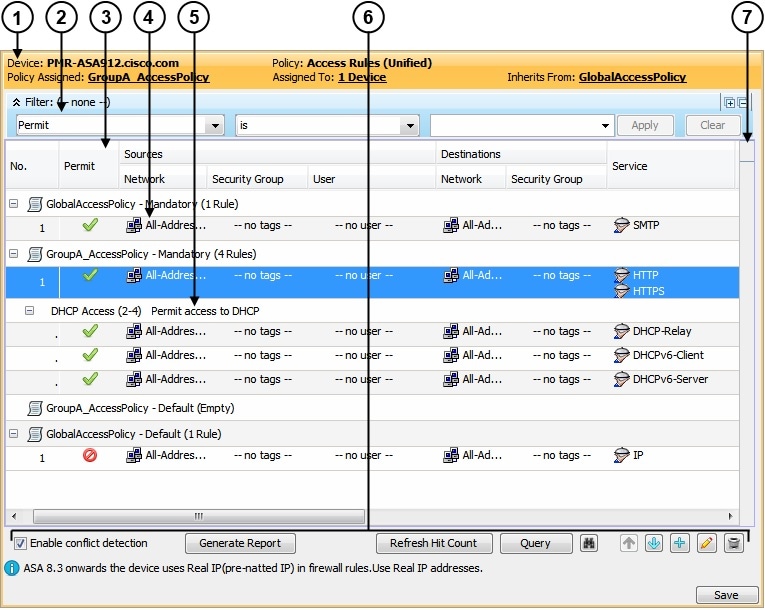
  • Access rules—These are traditional interface-based extended access control rules. They permit or deny a packet based on source address, destination address, source interface, and service, and you can apply them in both the in and out directions. For more information, see Understanding Access Rules.

  • Inspection rules—These are traditional Context-Based Access Control (CBAC) inspection rules that filter out bad TCP/UDP packets based on application-layer protocol session information and that enable return traffic for the selected services. For more information, see Understanding Inspection Rules.

  • Web filter rules—These are a type of inspection rule that filters web traffic based on the requested URL, allowing you to prevent connections to undesirable web sites. For more information, see Understanding Web Filter Rules.

  • Zone-based firewall rules—These rules replace access rules, inspection rules, and web filter rules on IOS devices if you want to configure your rules based on zones instead of interfaces. A zone is a defined group of interfaces that perform the same security role (such as Inside or Outside). By using zone rules, you can create more compact device configurations than you can by using the other types of rules. For more information, see Understanding the Zone-based Firewall Rules.

  • Botnet Traffic Filter Rules—These rules help you to spot botnet traffic when it is sent to known bad addresses. Botnets install malware on unsuspecting computers and use those computers as proxies to perform malicious actions. For more information, see Managing Firewall Botnet Traffic Filter Rules.

  • Transparent rules—These are Ethertype access control rules that apply to non-IP layer-2 traffic on transparent or bridged interfaces. For more information, see Configuring Transparent Firewall Rules.

Most firewall rules policies are configured in rules tables. These tables allow in-line editing for most cells, rule organization using sections, and the ability to change the order of rules. If you create shared rules policies, you can apply them to a number of devices, even to devices running different operating systems, and Security Manager automatically creates the appropriate device commands to configure the policies based on the characteristics of each individual device, filtering out settings that do not apply to a device. For more information on using rule tables, see Managing Your Rules Tables.

Another powerful feature used by most firewall rules policies is the idea of inheritance. When you create shared policies, one of your options is to have a device inherit the policy rather than be assigned the policy. This allows you to have a set of shared rules that apply to all devices, while having unique rules that apply to only those devices that require them. For more information about inheritance, see the following topics:

The following topics provide additional overview information about firewall services policies:

Understanding the Processing Order of Firewall Rules

When you configure firewall rules policies, you should keep in mind the logical order in which the rules are processed. For example, if you plan to drop all traffic of a certain type in an access rule, there is no reason to create rules in other firewall policies that apply to that type of traffic, because they will never be triggered. Conversely, if you want to apply certain types of inspection or web filtering on traffic, you must ensure that your access rules first allow that traffic to enter the device.

Following is the general logical processing order of firewall rules:

  • AAA rules—If you require authentication, with or without authorization, the user must successfully pass the test or the traffic is dropped.

  • Access rules (In direction)—The traffic must then get through your access rules. If you used AAA rules, you might have allowed temporary per-user access rules to be configured for the user’s session. These per-user rules are configured in your AAA server, not in Security Manager.

    On ASA 8.3+ devices, global access rules are then processed after any interface-specific access rules. For more information, see Understanding Global Access Rules.

  • Inspection rules (In direction), web filter rules (In direction), botnet rules, service policy rules (IPS, QoS, Connection)—All of these are applied to the traffic. For devices that do not allow you to configure the direction, all rules are considered to be in the In direction.

  • Zone-based firewall rules—If you configured zone-based rules for an IOS device, these rules replace inspection and web filter rules (botnet rules do not apply to IOS devices).

  • Routing protocols are then applied to the traffic. The traffic is dropped if it cannot be routed. (Routing policies are in the Platform folders for the various device types and are not considered firewall policies.)

  • ScanSafe Web Security policies, Inspection rules (Out direction), web filter rules (Out direction)—For IOS devices only, if you created ScanSafe policies, or inspection or web filter rules in the Out direction, they are now applied.

  • Access rules (Out direction)—Finally, the traffic must pass through any Out direction access rules.

Transparent rules do not fit into this picture. Because transparent rules apply to non-IP layer-2 traffic only, if a transparent rule applies to a packet, no other firewall rule applies to it; and conversely, if other rules apply, the transparent rule never applies.

Related Topics

Understanding How NAT Affects Firewall Rules

Devices that support firewall rules also allow you to configure network address translation (NAT). NAT substitutes the real address in a packet with a mapped address that is routable on the destination network.

If you configure NAT to occur on an interface, the firewall rules that are also configured on that interface should assess traffic based on the translated address rather than on the original (pre-NAT) address, with the exception of ASA 8.3+ devices.

Devices running ASA software release 8.3 and later use the original, or real, IP address when evaluating traffic with the exception of IPSec VPN traffic policies. Thus, when you configure firewall rules, ACL policy objects, or the IOS, QoS, and connection rules platform service policy, ensure that you use the original addresses.

For more information about NAT, see the following topics:

ACL Names Preserved by Security Manager

Security Manager tries to preserve user-defined access control list (ACL) names as they appear in device configurations. Security Manager can preserve the ACL names configured on a device in the following circumstances:

  • If the ACL name is specified in Security Manager.

For access rules policies, you can specify ACL names in Firewall > Settings > Access Control or Firewall > Settings > IPv6 Access Control. You can specify a given name for a single interface and direction, but the name is used for any other interfaces and directions that use the same ACL. Keep in mind that you cannot use the same name as an ACL policy object that you assign to other policies on the device, and you cannot use the same name for IPv4 and IPv6 ACLs.


Note


Prior to the release of Security Manager 4.4 and versions 9.0 and later of the ASA, separate pages, policies and policy objects were provided for configuring IPv4 and IPv6 firewall rules and policies. With Security Manager 4.4 and ASA 9.0+, these policies and policy objects were combined or unified. However, for the earlier ASA versions, a separate page for IPv6 access rules is still provided in Device view, while in Policy view, IPv4 and unified versions of the AAA-, access- and inspection-rule policy types are provided.
  • If a policy uses an ACL policy object, the name of the policy object is used for the ACL name. ACL policy objects created during discovery use the name of the ACL defined on the device whenever possible. Behavior depends on an administrative setting:

    • If you select Allow Device Override for Policy Objects in Tools > Security Manager Administration > Discovery, if a policy object with the same name exists in Security Manager, but it has different content, the name is reused and a device-level override is created.

    • If you do not select that option, a new policy object is created with the same name but with a number appended to it, for example, ACLobject_1. This is the default behavior.

  • If you select Reuse Existing Names for the Firewall Access List Names setting in Tools > Security Manager Administration > Deployment, names defined on the device are reused for firewall rules that generate ACLs.

  • If the ACL is unshared, even if you change the content of the ACL in Security Manager.

  • If the ACL is shared, but the policies that share the ACL are defined identically in Security Manager. If you change the content of the ACL, one ACL retains the name and the others are assigned generated names.


Note


On ASA devices and on PIX devices not running version 6.3(x), Security Manager does not reuse the ACL name if it is used by a NAT policy static rule and contains an object-group. The ACL is deployed with the contents of the object-group defined as the source. This is because the device requires that all ACEs in the ACL have the same source.

Tips

  • If you use an ACL policy object that uses a name also used by an ACL already defined on the device, and the existing ACL is for a command that Security Manager does not support, you will get a deployment error asking you to choose a different name. If this happens, rename the policy object.

  • ACLs named <number>_<number> are not valid on IOS devices. Security Manager strips off the suffix prior to deployment. This also means that you cannot assign an IOS device more than one ACL object with the same numbered prefix. However, named ACLs that have a numbered suffix are allowed, for example, ACLname_1.

  • Numbered ACLs must use the correct number ranges for IOS devices. Standard ACLs must be in the range 1-99 or 1300-1999. Extended ACLs must be in the range 100-199 or 2000-2699.

  • ACL names for IOS devices cannot begin with an underscore (_).

  • Policies that do not preserve user-defined names include SSL VPN policies, transparent firewall rules, and AAA rules (for IOS devices).

The following topics provide additional information about ACL naming:

ACL Naming Conventions

When the name for the ACL is generated by Security Manager, the name is derived from the type of rule or platform being defined and certain configuration settings that make it unique. All newly created ACLs are given a name based on the naming conventions shown in the following table.


Tip


During deployment, sometimes a suffix .n (where n is an integer) might get added to an ACL name if the existing ACL cannot be edited in place. For example, if an ACL named acl_mdc_outside_10 already exists on the device, a new ACL with the name acl_mdc_outside_10.1 is created if you do not remove the old ACL before you deploy the new ACL.
Table 1. ACL Naming Conventions

Policy Type

Naming Convention

Access ACLs

  • Inbound: CSM_FW_ACL_InterfaceName

  • Outbound: CSM_FW_ACL_OUT_InterfaceName

IPv6 Access ACLs

  • Inbound: CSM_IPV6_FW_ACL_InterfaceName

  • Outbound: CSM_IPV6_FW_ACL_OUT_InterfaceName

Note

 
Prior to the release of Security Manager 4.4 and versions 9.0 and later of the ASA, separate pages, policies and policy objects were provided for configuring IPv4 and IPv6 firewall rules and policies. With Security Manager 4.4 and ASA 9.0+, these policies and policy objects were combined or unified. However, for the earlier ASA versions, a separate page for IPv6 access rules is still provided in Device view, while in Policy view, IPv4 and unified versions of the AAA-, access- and inspection-rule policy types are provided.

Inspection Rules

  • For ASA 7.0+/PIX 7.0+: CSM_CMAP_ACL_n where n is an integer beginning with 1.

  • For IOS devices, a numbered ACL.

NAT0 ACLs

  • Inbound: CSM_nat0_InterfaceName_in

  • Outbound: CSM_nat0_InterfaceName

NAT ACLs

  • Inbound: CSM_nat_InterfaceName_poolID_in

  • Outbound: CSM_nat_InterfaceName_poolID

Note

 
For PIX 6.3(x) devices, the following is added to the ACL name: add _dns for dns, _nrseq for norandomseq, _emb## for embryonic limit and _tcp## and _udp## for tcp and udp max connection limits.

NAT Policy Static Translation Rules ACLs

  • For PIX 6.3(x) devices:

    • For IP: CSM_static_globalIP_LocalInterfaceName_globalInterfaceName

    • For other protocols: CSM_static_globalIP_LocalInterfaceName_globalInterfaceName_ protocol _globalPort

  • For devices running other OS versions, the localIP string is added:

    • For IP: CSM_static_localIP_globalIP_LocalInterfaceName_globalInterfaceName

    • For other protocols: CSM_static_localIP_globalIP_LocalInterfaceName_globalInterfaceName_ protocol _globalPort

AAA ACLs

For PIX/ASA/FWSM: CSM_AAA_{AUTHO | ATHEN | ACCT}_InterfaceName _ServerGroupName

Authentication Proxy for IOS devices:

  • On an interface without NAC: CSM_AUTH-PROXY_InterfaceName_traffic type_ACL, where InterfaceName is the interface in which the rule is applied and traffic type is HTTP, Telnet, or FTP.

  • AuthProxy and NAC on the same interface: CSM_ADMISSION_ID_ACL, where ID is an internal identifier of the interface role within Security Manager to which NAC is applied.

Web Filter Rules ACLs

For ASA 7.0+/PIX 7.0+: devices correspond to a filter command.

For IOS devices, a numbered ACL.

Resolving User Defined ACL Policy Naming Conflicts

Cisco Security Manager generates ACL names that begin with “CSM_”. You should not use the same naming pattern while defining a ACL in the device. If you declare ACL names with the “CSM_” prefix on device, during discovering the device configuration in Cisco Security Manager, those ACL names are replaced with Security Manager generated names and respective configuration delta would be applied to a device on the next deployment.

For example, Cisco Security Manager has CSM_FW_ACL_InterfaceName as the ACL naming pattern for inbound firewall interface. Here, if you use the CSM pattern for ACL name declaration in device like, CSM_xyz, Security Manager renames it as “CSM_FW_ACL_InterfaceName”.


Note


This rule is valid for firewall access list and delta would be generated and applied to a device even when the Reuse existing names setting is configured in Tools > Security Manager Administration > Deployment.

Resolving ACL Name Conflicts Between Policies

If an ACL is shared, but the policies that share the ACL are not defined identically in Security Manager, one policy uses the original name of the ACL and the other policies use a new name generated by Security Manager. The order of preference for determining which policy uses the original name is as follows:

  • Access list ACLs

  • AAA ACLs

  • Static ACLs

  • NAT0 ACLs

  • NAT ACLs

For example, if an access ACL and a NAT0 ACL try to reuse the same ACL, the access ACL uses the original name as configured on the device and the NAT0 ACL is renamed by Security Manager.

Managing Your Rules Tables

The following sections explain some of the basics of using rules tables, which appear in many of the firewall rules, NAT, and select other policies:

Using Rules Tables

Rules tables in Security Manager display sets of rules (for example, access rules) that make up a policy. These types of tables are used in only a select group of policies, but many of the firewall services rules policies use them. Rules tables are used when the order of the rules within the policy matter.

The below figure details the features in rules tables.

Figure 1. Rules Table Example

Following is an explanation of the numbered call-outs of the rules table features:

  • Device and policy identification banner (1)—The banner provides information about policy sharing and inheritance and includes the ability to perform some actions. For detailed information, see Using the Policy Banner.

  • Table filter (2)—You can filter the rules displayed to help you find rules in a large table. For more information, see Filtering Tables.

  • Table column headings (3)—You can sort by column and move, show, and hide columns. For more information, see Table Columns and Column Heading Features.

  • Rules, Workarea (4)—The body of the table shows the rules that are included in the policy.

  • User-defined sections (5)—You can group rules into sections for your convenience. For more information, see Using Sections to Organize Rules Tables.

  • Table buttons (6)—Use the buttons below the table to do the following:

If conflict detection is enabled, you can click the Generate Report button to create an HTML report of the conflicts that can be printed or exported to another tool.

When you first open the Access Rules page, the Generate Report button is replaced with a progress bar. After conflict analysis has completed, the Generate Report button becomes available along with the other conflict detection features.

  • Conflict Navigation Bar (7)—Use the Conflict navigation bar to navigate to conflicting rules in the rules table. For more information, see Using Automatic Conflict Detection.

Adding and Removing Rules

When you work with policies that use rules tables, like many of the firewall rules policies, you can add rules to the policy using several methods:

  • Add Row button (+ icon)—Clicking the Add Row button beneath the table is the standard method to add a new rule. Clicking this button opens the dialog box for adding rules that is specific to that type of policy. If you select a row or section heading, the new rule is added after the selected row. Otherwise, it is added at the end of the appropriate scope (typically, the local scope).

  • Right-click a row and select Add Row—This is equivalent to selecting a row and clicking the Add Row button.

  • Copy and paste—If you want to create a new rule that is similar to an existing rule, you can select the rule, right-click and select Copy, then select the row after which you want to place the rule, right-click and select Paste. This creates a duplicate rule, which you can select and edit (see Editing Rules).

  • Cut and paste—Cut and paste is similar to copy and paste, except you are deleting the existing rule when you select the Cut command. Instead of cut and paste, consider moving the rule (see Moving Rules and the Importance of Rule Order).

When you no longer need a rule, you can remove it by selecting the rule and clicking the Delete Row button (trash can icon).


Tip


Rather than deleting a rule, consider first disabling the rule. By disabling a rule, you remove it from the device (when you redeploy the configuration) without removing it from Security Manager. Then, if you discover that you really needed that rule after all, you can simply enable it and redeploy the configuration. If you delete the rule, you would have to recreate it (there is no undo function). Thus, you might want to develop a policy of deleting rules only after they have been disabled for a certain amount of time. For more information, see Enabling and Disabling Rules.

Related Topics

Editing Rules

To edit an existing rule in any of the rules policies that use rules tables, select the rule and click the Edit Row button, or right-click and select Edit Row. This allows you to edit all aspects of the selected rule.


Tip


You cannot edit any aspect of an inherited rule from a local device rule policy. Edit inherited rules in Policy view.

For most rule tables, you can also edit specific attributes, or table cells, instead of editing the entire rule, using commands in the right-click menu.

The ability to edit a cell is limited by whether it makes sense to edit the content. For example, Inspection Rules have many limitations based on how the rule is configured:

  • If you applied the rule to All Interfaces, you cannot edit source or destination addresses, the interface, or the direction of the rule.

  • If you selected Default Inspection Traffic for the traffic match criteria (without selecting the option to limit inspection between source and destination), or Custom Destination Ports, you cannot edit source or destination addresses.

  • If you selected Destination Address and Port (IOS), you cannot edit source addresses.

The following cell-level commands are available, although the ability to edit multiple rows is not supported in all policies that use rule tables:

  • Add <Attribute Type>—When you select multiple rows and right-click a Source, User, Destination, Services, or Interface cell, you can select the Add command to append entries to the data currently in the selected cells. The Add command’s full name includes the name of the attribute, for example, Add Source.

  • Edit <Attribute Type>—Most attributes allow you to edit the content. Editing replaces the content of the cell. You can edit a single cell, or select multiple rows and edit the contents of the same type of cell in all rows at once. The Edit command’s full name includes the name of the attribute, for example, Edit Interfaces.

  • Edit <Entry>—In some cases, when you edit Source, User, Destination, Services, or Interfaces, you can select an entry in the cell and edit just that entry. For example, if the Sources cell contains three network/host objects and an IP address, you can select any of them and edit the entry. The edit command includes the name of the entry, for example, Edit HostObject.

  • Remove <Entry>—In some cases, when you edit Source, User, Destination, Services, or Interfaces, you can select an entry in the cell and remove the entry. You cannot remove the last entry in the cell, because the rule would become invalid. The remove command includes the name of the entry, for example, Remove IP.

  • Create <Object Type> Object from Cell Contents—In the Sources, User, Destinations, and Services cells, you can select the Create command to create a policy object of the appropriate type. You can also select an entry in the cell and create a policy object from just the selected item. The create command includes the policy object type you can create, and the name of the item that is the source for the object, either cell contents for everything in the cell, or the name of an entry if you selected one. When creating network/host objects, you are always creating network/host group objects.

  • Show <Attribute Type> Contents; Show <Entry> Contents—The show commands let you view the actual data defined in the cell. The results depend on the view you are in:

    • Device View, Map View, or Import Rules—You are shown the actual IP addresses, fully-qualified domain names (FQDNs), services, or interfaces to which the rule will apply for the specific device. For example, if the rule uses network/host objects, you will see the specific IP addresses or FQDNs defined by the objects. If the rule uses interface objects, you will see the specific interfaces defined on the device that the object identifies, if any.

The IP addresses for network/host objects are sorted in ascending order on the IP address, and then descending order on the subnet mask.

Service objects are sorted on protocol, source port, and destination port.

Interface objects are listed in alphabetical order. If the interface is selected because it matches a pattern in an interface object, the pattern is listed first, and the matching interface is shown in parentheses. For example, “* (Ethernet1)” indicates that the Ethernet1 interface on the device is selected because it matches the * pattern (which matches all interfaces).

  • Policy View—You are shown the patterns defined in the policy objects and entries defined for the policy. Entries are sorted alphabetically, with numbers and special characters coming first.

Related Topics

Adding or Editing Address Cells in Rules Tables

Use the Add or Edit Sources or Destinations dialog boxes, or Address dialog boxes for NAT tables, to edit the source or destination entry in a rules table that includes sources or destinations. For detailed information on editing firewall rules cells, see Editing Rules.

You can enter any combination of the following address types to define the source or destination of the traffic. The type of policy determines whether an IPv4 or IPv6 address is required; you cannot mix address types. You can enter more than one value by separating the items with commas. For more information, see Specifying IP Addresses During Policy Definition.

  • Network/host object. Enter the name of the object or click Select to select it from a list. You can also create new objects from the selection list.


Note


The only way to specify a fully-qualified domain name (FQDN) is to use an FQDN network/host object or a group object that includes an FQDN object. You cannot directly type in an FQDN. Not all policy types allow FQDN; you are prevented from specifying an object that contains an FQDN object if the policy does not allow it.
  • Host IP address, for example, 10.10.10.100 (IPv4) or 2001:DB8::200C:417A (IPv6).

  • IPv4 network address, including subnet mask, in either the format 10.10.10.0/24 or 10.10.10.0/255.255.255.0.

  • IPv6 network address and prefix length in the format 2001:DB8::/32.

  • A range of IP addresses, for example, 10.10.10.100-10.10.10.200 (IPv4) or 2001:DB8::1-2001:DB8::100 (IPv6).

  • (IPv4 only.) An IP address pattern in the format 10.10.0.10/255.255.0.255, where the mask is a discontiguous bit mask (see Contiguous and Discontiguous Network Masks for IPv4 Addresses).

  • Interface roles object. Enter the name of the object or click Select to select it from a list (you must select Interface Role as the object type). When you use an interface role, the rule behaves as if you supplied the IPv4 or IPv6 address of the selected interface. This is useful for interfaces that get their address through DHCP, because you do not know what IP address will be assigned to the device. For more information, see Understanding Interface Role Objects.

If you select an interface role as a source, the dialog box displays tabs to differentiate between hosts or networks and interface roles.

Navigation Path

Do any of the following in a rules policy that includes sources, destinations, or other address cells:

  • Right-click an address cell in a rules table and select Edit Sources or Edit Destinations or a similar command. The data replaces the content of the selected cells.

  • Select an entry in an address cell and select Edit <Entry>. The data replaces the selected entry.

  • Select multiple rules, right-click a Sources or Destination cell, and select Add Sources or Add Destinations. The data is appended to the data already in the cell.

Adding or Editing User Cells in Rules Tables


Tip


The user cell applies to ASA 8.4(2+) only. Anything configured in the cell is ignored for other device types or OS versions.

Use the Add or Edit Users dialog boxes to edit the user entry in a rules table that includes user identity groups. For detailed information on editing firewall rules cells, see Editing Rules.

You can enter any combination of the following to identify traffic based on Active Directory (AD) user or user group names. If you configure identity user groups, they apply to source traffic only. For traffic to match the rule, both the source addresses and identity user groups must match. That is, the rule applies to traffic sent from users on the specific networks or hosts defined in the source field when directed at the destination. For more information, see Configuring Identity-Based Firewall Rules.

To make the rule apply to a user without regard for the source address, specify any in the source cell.

You can enter more than one value by separating the items with commas. Following are the supported formats:

  • Identity user group objects.

  • Individual users: NETBIOS_DOMAIN\user

  • User groups (note the double \): NETBIOS_DOMAIN\\user_group

Click Select to select objects, users, or user groups from a list or to create new objects. For more information, see Selecting Identity Users in Policies and Creating Identity User Group Objects.

Navigation Path

Do any of the following in a rules policy that includes user cells:

  • Right-click a user cell in a rules table and select Edit Users. The data replaces the content of the selected cells.

  • Select an entry in a user cell and select Edit <Entry>. The data replaces the selected entry.

  • Select multiple rules, right-click a user cell, and select Add Users. The data is appended to the data already in the cell.

Adding or Editing Services Cells in Rules Tables

Use the Edit Services dialog box to edit the services that define the type of traffic to act on. You can enter more than one value by separating the items with commas.

You can enter any combination of service objects and service types (which are typically a protocol and port combination). If you type in a service, you are prompted as you type with valid values. You can select a value from the list and press Enter or Tab. You can also click Select to select the service from a list, or to create a new service.

For complete information on how to specify services, see Understanding and Specifying Services and Service and Port List Objects.

For detailed information on editing firewall rules cells, see Editing Rules.

Navigation Path

Do any of the following in a rules policy that includes services:

  • Right-click a Services cell in a rules table and select Edit Services. The data replaces the content of the selected cells.

  • Select an entry in a Services cell and select Edit <Entry>. The data replaces the selected entry.

  • Select multiple rules, right-click a Services cell, and select Add Services. The data is appended to the data already in the cell.


Tip


For inspection rules, services appear in the Traffic Match column and only for rules where the traffic matches source, destination, and port.

Adding or Editing Interfaces or Zones Cells in Rules Tables

Use the Add or Edit Interfaces (or Zones) dialog box to edit the interfaces or zones for which the rule is defined. For detailed information on editing firewall rules cells, see Editing Rules.

  • When editing interfaces, you can enter any combination of specific interface names or interface roles. You can enter more than one value by separating the items with commas. Enter the names or click Select to select the interfaces and roles from a list, or to create new roles. An interface must already be defined to appear on the list.

When you deploy the policy to the device, interface roles are replaced by actual interface names, and only to interfaces that are actually configured on the device. To see which interfaces will actually be selected by a rule, right-click the Interfaces cell and select Show Interfaces.

  • When editing zones, you can select only one interface role, and you cannot select individual interfaces. The interface roles are used to create zones for zone based firewall rules. To see the interfaces that will belong to the zone, right-click the Zones cell and select Show Zone Contents.

For more information about interface roles and selecting interfaces, see the following topics:

Navigation Path

Do any of the following in a rules policy that includes interfaces or zones:

  • Right-click an Interfaces or Zones cell in a rules table and select Edit Interfaces, Edit Zones, or similar command. The data replaces the content of the selected cells.

  • Select an entry in an Interfaces cell and select Edit <Entry>. The data replaces the selected entry. You cannot edit an entry in a zone.

  • Select multiple rules, right-click an Interfaces cell, and select Add Interfaces. The data is appended to the data already in the cell. You cannot add entries to a zone.

Editing Category Cells in Rules Tables

Use the Edit Category dialog box to change the category assigned to a rule. Categories help you organize and identify rules and objects. See Using Category Objects. For detailed information on editing firewall rules cells, see Editing Rules.

Navigation Path

Right-click a Category cell in a rules policy that includes categories and select Edit Category.

Editing Description Cells in Rules Tables

Use the Edit Description dialog box to edit the description of the rule. The description helps you identify the purpose of a rule and can be up to 1024 characters. For detailed information on editing rules cells, see Editing Rules.

Navigation Path

Right-click a Description cell in a rules policy that includes descriptions and select Edit Description.

Showing the Contents of Cells in Rules Tables

Use the Show Contents dialog boxes to display the actual, translated data defined in a source, user, destination, services, interfaces, zones, or other cell in a rules table that includes addresses, identity user groups, interfaces, services, or policy objects that define those things. The title of the dialog box indicates which cell or entry you are examining. Use this information to determine to which addresses, services, or interfaces the rule will actually apply when deployed to the device. For detailed information about editing or viewing cell contents, see Editing Rules.

What you see in the dialog box depends on the view you are in:

  • Device View, Map View—You are shown the actual IP addresses, users, services, or interfaces to which the rule will apply for the specific device. For example, if the rule uses network/host objects, you will see the specific IP addresses or fully-qualified domain names (FQDN) defined by the objects. If the rule uses interface objects, you will see the specific interfaces defined on the device that the object identifies, if any.

    • The IP addresses for network/host objects are sorted in ascending order on the IP address, and then descending order on the subnet mask.

    • Service objects are sorted on protocol, source port, and destination port.

    • Interface objects are listed in alphabetical order. If the interface is selected because it matches a pattern in an interface object, the pattern is listed first, and the matching interface is shown in parentheses. For example, “* (Ethernet1)” indicates that the Ethernet1 interface on the device is selected because it matches the * pattern (which matches all interfaces).

  • Policy View—You are shown the patterns defined in the policy objects and entries defined for the policy. Entries are sorted alphabetically, with numbers and special characters coming first.

Filtering Contents

A List Filter field is provided above the results in the Show Contents dialog box. You can use the List Filter field to quickly locate any entries that contain a specified text string.

Figure 2. List Filter Field

1

Filter-parameters button.

2

Clear button.

To search for a specific text string in the Show Contents list:

  • Click in the List Filter field to place the text cursor, and then begin typing.

These are “live filter” fields. That is, as you type each character, entries that do not include your current text string are removed from the list or table.

To clear a List Filter field:

  • Click the clear button at the right side of the field.

This button appears when you begin typing in the field. (You also can highlight the characters and press the Delete or Backspace key on your keyboard.)

When you clear the List Filter field, all entries in the list are again displayed.

You can tune the filter results by selecting case sensitivity or insensitivity, by allowing wildcards or regular expressions, and by specifying where in a returned string your characters must be located.

To change the List Filter criteria:

  1. Click the filter-parameters button (magnifying glass) at the left side of the List Filter field to open the parameters menu.

  2. Choose an option.

The menu consists of three sections:

  • Case sensitive and Case insensitive – Choose one or the other. If you choose Case sensitive, found text must match not only the characters you enter, but also their as-typed case.

  • Use wildcards and Use regular expression – Choose one or the other. The following wildcards are recognized:

  • * (asterisk) – Match zero or more characters at that location in the string.

  • + (plus sign)– Match one or more characters at that location in the string.

  • ? (question mark) – Match one character at that location in the string.

  • Match from start, Match exactly, and Match anywhere – Choose one. Match from start means that the string you enter must be found at the beginning of an entry, although it can be part of a larger set of characters. Match exactly requires that the string you enter exactly match the entire column entry. Match anywhere means the string can be found anywhere within an entry, and it can be part of a larger set of characters.

  • Repeat Steps 1 and 2 to change another parameter.

Navigation Path

Do any of the following in a rules policy that includes sources, user, destinations, services, interfaces, zones, or other fields that specify networks, identity user groups, interfaces, or services. You can also show contents when using tools that work with rules, such as importing rules.

  • Right-click one of those cells and select Show <Attribute Type> Contents, where the attribute type is the name of the cell. The data includes all entries defined in the cell.

  • Right-click an entry in one of those cells and select Show <Entry> Contents, where the name of the selected entry is included in the command name. The data displayed is only for the selected entry.


Tip


For inspection rules, services appear in the Traffic Match column and only for rules where the traffic matches source, destination, and port.

Finding and Replacing Items in Rules Tables

In policies that use rules tables, you can search for items in some cells and selectively replace them. The cells that you can search depend on the policy. You can use wildcard characters to find items based on pattern matching, for example, so that you can replace several related networks with a new network/host policy object defined for them.

To use find and replace, click the Find and Replace (binoculars icon) button at the bottom of any policy that uses rules tables to open the Find and Replace Dialog Box. In the Firewall folder, this includes AAA rules, access rules, IPv6 access rules, inspection rules, zone based firewall rules, and web filter rules (for ASA/PIX/FWSM devices only). For ASA/PIX/FWSM devices, it also includes the NAT translation rules policy (but not for every combination of context and operational mode) and the IOS, QoS, and connection rules platform service policy.

When searching for items, you select the type of item, the columns you want to search, and enter the string that you want to find and optionally, the string you want to use to replace it. You can find and replace the following types of items:

  • Network—A network/host object name, or the IP address of a host or network.

  • User—An Active Directory (AD) username (NetBIOS_DOMAIN\user), user group name (NetBIOS_DOMAIN\\user_group), or identity user group object name.

  • Service—A service object name or protocol and port, for example TCP/80. The search is syntactic, not semantic, that is, if you are searching for TCP/80 and a rule uses HTTP, the search results will not find it.

  • Interface Role—An interface name or interface role object name.


Note


In access rules, you can search for global rules by using the Global interface name. However, there is no way to convert between global and interface-specific rules. Although you can find global rules using the Global interface name, if you try to replace an interface name with the name “Global,” you are actually creating an interface-specific access rule that uses a policy object named Global.
  • Text—A text string in a Description field.

The following are some examples of what you might do with find and replace:

  • If you create a new network/host object named network10.100 for all networks in the 10.100.0.0/16 range, you can search and replace all subordinate network specifications. For example, you can search for ^10.100* to find all addresses like 10.100.10.0/24. Select the Find Whole Words Only and Allow Wildcard options, and enter network10.100 as the replacement string. Because you selected Find Whole Words Only, the string that is replaced is the entire 10.100.10.0/24 string, not just the 10.100 portion.

  • If you want to find all rules that use IP addresses (instead of network/host objects), you can search for *.*.*.* to find all host or network IP addresses. You can then selectively edit the cell while the Find and Replace dialog box is open.

  • If you want to replace all interface role objects that include “side” in the name (such as inside and outside) with the interface role object named External, search for *side with the Find Whole Words Only and Allow Wildcard options selected, and enter External in the Replace field.

Related Topics

Find and Replace Dialog Box

Use the Find and Replace dialog box to locate and optionally replace items in rule table cells. The types of items you can search for differ based on the policy you are viewing.

Navigation Path

Click the Find and Replace (binoculars icon) button at the bottom of any policy that uses rules tables. In the Firewall folder, this includes AAA rules, access rules, IPv6 access rules, inspection rules, zone based firewall rules, and web filter rules (for ASA/PIX/FWSM devices only). For ASA/PIX/FWSM devices, it also includes the NAT translation rules policy (but not for every combination of context and operational mode) and the IOS, QoS, and connection rules platform service policy.

Related Topics
Field Reference
Table 2. Find and Replace Page

Element

Description

Type

The type of item you are trying to find. Select the type, then select which columns you want to search. If you select All Columns, the columns searched are those also listed with the All Columns item (the search does not consider every column in the table).

  • Network—A network/host object name, or the IP address of a host or network.

  • User—An Active Directory (AD) username (NetBIOS_DOMAIN\user), user group name (NetBIOS_DOMAIN\\user_group), or identity user group object name.

  • Service—A service object name or protocol and port, for example TCP/80. The search is syntactic, not semantic, that is, if you are searching for TCP/80 and a rule uses HTTP, the search results will not find it.

  • Interface Role—An interface name or interface role object name.

Note

 
In access rules, you can search for global rules by using the Global interface name. However, there is no way to convert between global and interface-specific rules. Although you can find global rules using the Global interface name, if you try to replace an interface name with the name “Global,” you are actually creating an interface-specific access rule that uses a policy object named Global.
  • Text—A text string in a Description field.

Find

The string you are trying to locate. If you are searching for a policy object, click Select to choose the object from a list.

Replace

(Optional) The string you want to use to replace the search string. What gets replaced is controlled by the search options. If you want to replace the search string with the name of a policy object, click Select to choose the object from a list.

You can replace search strings with multiple items. Separate the items with commas. For example, you can search for the TCP service and replace it with TCP, UDP.

You can remove items by not entering anything in the Replace field and clicking the Replace button.

This field is greyed out if the table does not allow editing.

Direction

The direction in which you want to search relative to the currently selected row or cell, either up or down. When the end of the table is reach, the search continues to the top of the table.

Match Case

For text searches, whether you want to match the capitalization you used in the Find field.

Find Whole Words Only

Whether the search should find and select only whole words, which are strings delimited by spaces or punctuation. For example, a whole word search for SanJose will find SanJose but not SanJose1.

If you use this option with the Allow Wildcard option, you can search for partial strings but if you replace the located string, you replace the whole word and not the partial string. For example, you can search for ^10.100* to find all addresses like 10.100.10.0/24, and replace with them with the network10.100 policy object. By selecting Whole Words, the network/host object replaces the entire address, not just the portion you searched for.

For text searches, this option and the Allow Wildcards option are mutually exclusive.

Allow Wildcards

Whether the search or replacement strings use wildcard characters. If you do not select this option, all characters are treated literally.

You can use the Java regular expression syntax to create your expression with the following exceptions:

  • Period (.)—The period is a literal period and it is implicitly escaped.

  • Question mark (?)—The question mark indicates a single character.

  • Asterisk (*)—The asterisk matches one or more characters. It does not match zero characters.

  • Plus sign (+)—The plus sign means the same as the asterisk; it matches one or more characters.

Find Next button

Click this button to find the next occurrence of the search string.

Replace button

Click this button to replace the found string with the replacement string.

Replace All button

Click this button to automatically find the search string and replace it throughout the table.

Moving Rules and the Importance of Rule Order

Rules policies that use rules tables are ordered lists. That is, the top to bottom order of the rules matters and has an effect on the policy.

When the device analyzes a packet against a rules policy, the device searches the rules in order from top to bottom. The first rule that matches the packet is the rule that is applied to the packet, and all subsequent rules are ignored. Thus, if you place a general rule pertaining to IP traffic before a more specific rule pertaining to HTML traffic for a given source or destination, the more specific rule might never be applied.

For access control rules, you can use the automatic conflict detection tool to help identify when rule order will prevent a rule from ever being applied to traffic (for more information, see Using Automatic Conflict Detection). For other rules policies, carefully inspect the table to spot problems with rule order.

When you find that you need to rearrange the order of a rule, select the rule that needs to be moved and click the Up Row (up arrow) or Down Row (down arrow) buttons as appropriate. If these buttons do not appear beneath the rules table, rule order does not matter and you cannot rearrange them.

If you use sections to organize your rules, you can move rules only within the section. When you move rules that are outside the sections, you can move them above or below the section. For more information about working with sections, see Using Sections to Organize Rules Tables.


Tip


Special rules apply to moving access rules when you mix interface-specific and global rules in a policy. For more information, see Understanding Global Access Rules.

Related Topics

Enabling and Disabling Rules

You can enable and disable individual rules in a policy that uses rules tables, such as most firewall services rules policies. Your change takes effect when you redeploy the configuration to the device.

If a rule is disabled, it appears in the table overlain with hash marks. When you deploy the configuration, disabled rules are removed from the device.

Disabled rules are kept in the rules policy in Security Manager as a convenience so that you can easily enable needed rules without recreating them. Thus, it is often wise to disable a rule that you believe you no longer need instead of immediately deleting it.

To change whether a rule is enabled or disabled, select the rule, right-click and select Enable or Disable, as appropriate.

Related Topics

Using Sections to Organize Rules Tables

You can organize policies that use rules tables into sections. There are two types of sections:

  • Scopes, which define inheritance relationships between a policy and an inherited policy. These sections are automatically created when you inherit policies. For more information, see Understanding Rule Inheritance.

  • User-defined sections, which are convenient groupings that help you organize rules so that you can evaluate and edit the policy more easily. These types of sections are most useful for policies that contain a large number of rules.

All rules within a section must be sequential; you cannot group rules randomly. If you want to identify non-contiguous rules as being related, you can assign the same category to the rules.

User-defined sections are set off visually from the other rules in the table by an indented section heading. The heading contains, left to right, a +/- icon for opening and closing the section, a band of color identifying the category you assigned the section (if any), the section name, the first and last rule number contained in the section (for example, 4-8), and the description, if any, you gave the section.


Note


You might need to resize the rule number column to see the numbering of rules in sections.

Whether you create user-defined sections is completely up to you. If you decide creating these types of sections is worthwhile, the following information explains how to create and use them:

  • To create a new section, right-click a row that you want to place the section and select Include in New Section. (You can also use Shift+click to select a block of rules.) You are prompted for a name, description, and category for the section (the name is the only required element).

  • To move existing rules into a section, select one or more contiguous rules, right-click and select Include in Section <name of section>. This command appears only if the selected rows are next to an existing section. If the rows you want to add to a section are not currently next to the section, you can do one of two things: move the rules until they are next to the section; cut the rules and paste them into the section.

  • You cannot move a section. Instead, you need to move the rules that are outside of the section around it. When you move a rule that is next to, but not within, a section, the rule jumps over the section.

  • You cannot move a rule outside of or through a section. A section defines the borders within which you can move rules. If you want to move rules out of a section and back into the Local scope section, select one or more contiguous rules, right-click and select Remove from Section <name of section>. The rules must be at the beginning or end of the section to use this command. If they are not, you can either move the rules until they are, or use cut and paste to move them out of the section.

  • To add a new rule to a section, select the rule after which you want to create the rule before clicking the Add Row button. To place it at the beginning of the section, select the section heading.

If you want to create a rule after, but outside of, a section, you can either create it as the last rule in the section and then remove it from the section, or create it just above the section and click the down arrow button.

  • You can change the name, description, or category of a section by right-clicking the section heading and selecting Edit Section.

  • When you delete a section, all rules contained in the section are retained and moved back into the Local scope section. No rules are deleted. To delete a section, right-click the section heading and select Delete Section.

  • If you use the Combine Rules tool, the resulting combined rules respect your sections. Rules that are in a section can be combined only with other rules in that section.

Related Topics

Add and Edit Rule Section Dialog Boxes

Use the Add and Edit Rule Section dialog boxes to add or edit a user-defined section heading in a rules table. For detailed information about how to use sections to organize a rules table, see Using Sections to Organize Rules Tables.

Navigation Path

Do one of the following:

  • Select one or more rules in a rules table, right-click and select Include in New Section.

  • Right-click a section heading and select Edit Section.

Field Reference
Table 3. Add and Edit Rule Section Dialog Boxes

Element

Description

Name

The name of the section.

Description

A description for the section, up to 1024 characters.

Category

The category assigned to the section. Categories help you organize and identify rules and objects. See Using Category Objects.

Combining Rules

Access rules and AAA rules policies can grow over time to include a large number of rules. The size of these policies can make it difficult to manage them. To alleviate this problem, you can use the rule combiner tool to reduce the number of rules in a policy without changing how the policy handles traffic.


Tip


Combining rules can dramatically compress the number of access rules required to implement a particular security policy. For example, a policy that required 3,300 access rules might only require 40 rules after hosts and services are efficiently grouped. However, you cannot use the rule combiner with IPv6 access rules or with rules that specify users or user groups, either directly or with identity user group objects. You can use the tool with rules that use FQDN network/host objects.

You might have several rules that allow a specific range of services to various trusted hosts (as sources) to various public servers (as destinations). If you have 10 rules applying to this situation, it is possible that those 10 rules can be combined into a single rule. You could then create new policy objects for the collection of services (for example, AllowedServices), hosts (for example, TrustedHosts), and servers (for example, PublicServers). To create the new objects during rule combination, you can right-click the newly-combined cells and select Create Network (or Service) Object from Cell Contents.

For example, you might have two rules for interface FastEthernet0:

  • Permit TCP for source 10.100.10.1 to destination 10.100.12.1

  • Permit TCP for source 10.100.10.1 to destination 10.100.13.1

These can be combined into a single rule: permit TCP for source 10.100.10.1 to destination 10.100.12.1, 10.100.13.1.

Multidimensional sorting is used to combine rules. For example, for access rules:

  1. Rules are sorted by their sources, so rules with the same source are placed together.

  2. Same-source rules are sorted by destination, so rules with the same source and destination are placed together.

  3. Same-source and same-destination rules are combined into a single rule, and the services are concatenated.

  4. Adjacent rules are checked to see if they have the same source and service. If so, they are combined into a single rule, and the destinations are concatenated.

  5. Adjacent rules are checked to see if they have the same destination and service. If so, they are combined into a single rule, and the sources are concatenated.

Sorting is repeated based on destination and service in place of source.


Tip


Rules from different sections are never combined. Any sections you create to organize rules limit the scope of the possible combinations. Also, interface-specific and global access rules are never combined. For more information about global rules, see Understanding Global Access Rules.

Related Topics

Procedure


Step 1

Select the policy whose rules you want to combine from the Firewall folder. You can combine rules for the following types of policy:

  • AAA rules

  • Access rules

Step 2

If you want the tool to limit possible combinations to a specific group of rules, select them. You can select rules using Shift+click and Ctrl+click, select all rules in a section by selecting the section heading, or all rules within a scope by selecting the scope heading (for example, Local). To not limit the tool, do not select anything in the table. Keep the following in mind:

  • In Device view, you can save combinations only for local rules. The tool will allow you to run it on shared and inherited rules, but you cannot save the results. If you do not select any rules, the default is to consider all local scope rules.

  • To combine rules in shared policies, you must run the tool in Policy view. If you do not select any rules, the default is to consider all mandatory rules.

You are warned if you try to run the tool when you cannot save the results.

Step 3

Right-click anywhere in the rules table and choose Combine Rules to open the Combine Rules Selection Summary Dialog Box. If you have selected specific rules for which to limit combining, make sure you right-click on one of the selected rules or the rules will be deselected.

Step 4

Select the columns you want the rule to consider combining. If you do not select certain columns, the combined rules must have the identical settings in those columns to be combined.

You can also elect to consider combining the rules you selected or all rules within the policy.

Tip

 
If a column type is not listed, then combined rules must have the identical content in those cells except for the Description cell. Rules that have different content for the cells are not combined.

Step 5

Click OK to generate the combination and display the results in the Rule Combiner Results Dialog Box.

Analyze the results and evaluate whether you want to save the combinations. You must save all or none, you cannot pick and choose which combinations to save.

For more information on evaluating the results, see Interpreting Rule Combiner Results. For an example, see Example Rule Combiner Results.

Step 6

Click OK to replace the original rules in the rules tables with the combined rules.


Combine Rules Selection Summary Dialog Box

Use the Combine Rules Selection Summary dialog box to define the parameters used for combining rules in firewall rules policies. When you click OK, the combination results are displayed in the Rule Combiner Results Dialog Box, where you can choose to save or discard the results as explained in Interpreting Rule Combiner Results.

Navigation Path

You can combine rules from the AAA Rules Page and the Access Rules Page. Click Tools located at the bottom of the tables and select Combine Rules.

Field Reference
Table 4. Combine Rules Selection Summary Dialog Box

Element

Description

Policy Selected

Shows the policy selected and the scope. Local indicates the local device rules. Otherwise, the field indicates the name of the shared policy and the scope selected within the policy, if any.

Rules to be combined

The rules you want the tool to consider combining:

  • All Rules—Consider combining all rules within the selected policy.

  • Selected Rules—Consider combining only those rules you selected in the policy before starting the tool.

For detailed information on selecting rules before running the tool, see Combining Rules.

Choose which columns to combine

The columns in the rules table that can be combined. Any columns that you do not select must have the identical content for two rules to be combined (even those not listed as combinable, except for the Description column). The columns you can combine are:

  • Source

  • User

  • Destination

  • Service

  • Interface

  • Security Sources

  • Security Destinations

  • For AAA rules, these additional columns:

    • Action

    • Auth Proxy

Interpreting Rule Combiner Results

Use the Rule Combiner Results dialog box to evaluate the results of a rule combination (see Combining Rules). The dialog box includes a summary of the results, and shows the new rules that will be created if you click OK.

Changed rule cells are outlined in red. Select a combined rule in the upper table to see the rules in the lower table that were combined to create the rule.

You can refine some elements of the results in this window:

  • You can right-click on the Source, Destination, and Service cells with multiple elements and select Create Network (or Service) Object from Cell Contents to create a new policy object that contains the contents of the combined cell. The new object replaces the contents of the cell.

You can also automatically create network object groups in the deployed configuration to replace the comma-separated values in a rule table cell. The network objects are created during deployment, and they do not affect the content of your rules policy. To enable this option, select Tools > Security Manager Administration > Deployment to open the Deployment Page and select Create Object Groups for Multiple Sources, Destinations, or Services in a Rule.

  • You can right-click on Description and select Edit Description to change the description. The descriptions of combined rules are a concatenation of the descriptions of the old rules separated by new lines.

For an example, seeExample Rule Combiner Results.

Tips
  • The combined results are not applied to the policy until you click OK. If you do not like the results of the combination, click Cancel and consider selecting smaller groups of rules to limit the scope of the Combine Rules tool.

If you click OK but then decide you do not want to accept the changes, you have two options. First, make sure you do not click Save on the policy page, select a different policy, and click No when prompted to save your changes to the policy. If you already clicked Save, you can still back out the changes by discarding your activity or configuration session (for example, File > Discard in non-Workflow mode), but this also discards any other changes you have made to other policies. Once you submit your changes or your activity is approved, you cannot undo your changes.

  • You are allowed to run the Combine Rules tool even if you are combining rules for a policy that you are not allowed to save. For example, you cannot save combined rules for a shared or inherited policy in Device view. You are warned before running the tool if you will not be allowed to save the results.

  • Rules from different sections are never combined. Any sections you create to organize rules limit the scope of the possible combinations. Also, interface-specific and global access rules are never combined. For more information about global rules, see Understanding Global Access Rules.

Navigation Path

You can combine rules from the AAA Rules Page and the Access Rules Page. Click Tools located at the bottom of the tables and select Combine Rules, fill in the Combine Rules Selection Summary Dialog Box and click OK.

Field Reference
Table 5. Combined Rules Results Summary

Element

Description

Result Summary

Provides a summary of the results of the combination and indicates the number of original rules, the number of rules remaining after the combination, and the number of changed and unchanged rules, if any combinations could be made.

Resulting Rules table

The rules that will replace the rules currently in the policy. If you click OK, these rules become part of your policy. The columns are the same as those in the associated policy (see AAA Rules Page or Access Rules Page), with the addition of the Rule State column.

The Rule State column shows the status of the rule:

  • Modified, Combined—The new rule is the result of combining one or more rules or modifying an existing rule. A red box around a cell indicates cells that have combined contents.

  • Unchanged—The rule remains unchanged, as it could not be combined with any other rule.

  • Not Selected—You did not select the rule for possible combination.

If there are a large number of rules, you can use the buttons beneath the table to scroll through the rules that have changes. Unchanged and unselected rules are skipped.

Original rules table (lower table)

The table in the lower half of the dialog box shows the original rules that were combined to create the rule you select in the upper table.

Detail Report button

Click this button to create an HTML report of the results. The report summarizes the results and also provides the details about the resulting rules and the rules that were combined to create the new rule.

For combined rules that have a lot of entries in cells, this report makes it easier to read the results. You can also print or save the report for later use.

Example Rule Combiner Results

When you run the Combine Rules tool as described in Combining Rules, the results of the combination are displayed in the Rule Combiner Results Dialog Box (see Interpreting Rule Combiner Results).

The below figure shows an example of a rule combination.

The new rules are shown in the upper table. Any new rules are indicated as modified or combined rules, and the changed cells are outlined in red. When you select a new rule in the upper table, the lower table shows the old rules that were combined to create the new rule. In this example, the two old rules had the same destination, service, and interface, and the two distinct sources were concatenated to form the new rule.

The top of the report summarizes the results. In this example, 5700 rules were reduced to 96 rules.

Figure 3. Example of Rule Combiner Results

1

Combined cell

3

Original rules

2

Newly combined rule

Related Topics

Converting IPv4 Rules to Unified Rules

Prior to the release of Security Manager 4.4 and versions 9.0 and later of the ASA, separate pages, policies and policy objects were provided for configuring IPv4 and IPv6 firewall rules and policies. With Security Manager 4.4 and ASA 9.0+, these policies and policy objects were combined or unified. However, for the earlier ASA versions, a separate page for IPv6 access rules is still provided in Device view, while in Policy view, IPv4 and unified versions of the AAA-, access- and inspection-rule policy types are provided.

A utility to convert separate IPv4 and IPv6 firewall rules to “unified” rules is provided with Security Manager 4.4 for use when you upgrade an ASA from an earlier version to 9.0 or later.

Navigation Path

To access the firewall-rule unification utility:

  • (Policy view) Select the firewall IPv4 rule type from the Policy Type selector and then right-click the desired policy in the Policies pane; choose Convert to <rule-type > Rules (Unified).

Related Topics

Procedure


Open the utility as described above; in the Convert Policy dialog box, provide a name for the new unified policy and click OK.

Following processing, the new unified rules policy is displayed. You can now assign this policy to ASA 9.0+ devices.


Generating Policy Query Reports

For most of the firewall rules policies, you can generate policy query reports that can help you evaluate your rules. With policy query reports, you can determine what rules already exist for a particular source, user, destination, interface, service, or zone before creating new rules to apply to those items.

To a limited degree, you can also determine if there are some blocking rules that prevent a rule from being used, or redundant rules that you can delete. If you are evaluating access rules, however, it is better to use the more powerful rule analysis tool to determine these problems.

When you create a policy query, you describe the traffic that interests you, much the same way you describe traffic when creating a rule. Creating a query is essentially the same as creating a rule, but you might want to describe the rule more broadly to capture a wider set of traffic so you can see a set of related rules rather than a single rule or a limited number of rules. The query you create depends on the information you are trying to discover.

The possible extent of a query depends on the view you are in:

  • Device or Map view—The query is limited to the selected device. However, you can query across all supported rule types. This allows you to compare different types of rules that apply to the same traffic.

  • Policy view—The query is limited to the selected policy. You see only rules that are defined in that policy, and you cannot query other types of policies. If you want to query a shared policy while examining other policies, select a device that is assigned to the shared policy, and query the policy from the device in Device view.

Related Topics

Procedure


Step 1

Select the policy that you want to query from the Firewall folder. You can query any of the following types of policy:

  • AAA Rules

  • Access Rules

  • Inspection Rules

  • Web Filter Rules (PIX/ASA/FWSM)

  • Zone Based Rules

Step 2

Click the Query button located below the table to open the Querying Device or Policy dialog box.

Step 3

Enter the parameters that define the rules you want to query. When setting up your query, you must select at least one rule type; enabled, disabled or both; permitted, denied, or both; and mandatory, default, or both. For detailed information about the query parameters, see Querying Device or Policy Dialog Box.

In Policy view, you cannot change the type of rule you are querying. In Device view, you can query any combination of rule types.

Step 4

Click OK to view the rules that match the criteria in the Policy Query Results dialog box. For information on reading the report, see Interpreting Policy Query Results.

For an example of a policy query report, see Example Policy Query Result.


Querying Device or Policy Dialog Box

Use the Querying Device or Querying Policy dialog box to set up the parameters for a query. The query results show the rules that match your parameters. The title of the dialog box indicates what you are querying:

  • In Device or Map view, you are querying rules defined for the selected device.

  • In Policy view, you are querying rules within the selected policy only.

You can query rules from these types of policies: AAA rules, access rules, inspection rules, web filter rules for ASA/PIX/FWSM, and zone based firewall rules.

When setting up your query, you must select at least one rule type; enabled, disabled or both; permitted, denied, or both; and mandatory, default, or both.


Note


For inspection rules, if you enter Global as the interface value, the match status results will be shown as a partial match even if the match is complete.

Results are displayed in the Policy Query Results dialog box (see Interpreting Policy Query Results).

Navigation Path

To generate Policy Query reports, do one of the following:

  • (Device view) Select a device, then select one of the supported firewall rules policies from the Firewall folder, and then click the Query button located below the table.

  • (Policy view) Select any of the supported firewall rules policies from the Firewall folder, then select a specific policy from the Shared Policy selector, and then click the Query button located below the table.

  • (Map view) Right-click a device and select a supported firewall rules policy from the Edit Firewall Policies menu. Click the Query button.

Related Topics
Field Reference
Table 6. Querying Device or Policy Dialog Box

Element

Description

Rule Types

The type of rules you want to query. When querying in Policy view, you cannot change the selection. When querying in Device view, you can select any of the following types of rules; the scope of the query is limited to the selected device:

  • AAA Rules

  • Access Rules

  • Inspection Rules

  • Web Filter Rules

  • Zone Based Rules

Enabled and/or Disabled Rules

Whether you want to query enabled or disabled rules, or both.

Mandatory and/or Default Rules

Whether you want to query rules that are in the mandatory or default sections, or both.

Match

Whether you want to query rules that permit or deny traffic, or both.

Sources

Destinations

The source or destination of the traffic. You can enter more than one value by separating the items with commas.

Note

 
If you leave a field blank, the query matches any address for that field.

You can enter any combination of the following address types to define the source or destination of the traffic. For more information, see Specifying IP Addresses During Policy Definition.

  • Network/host object. Enter the name of the object or click Select to select it from a list. You can also create new network/host objects from the selection list.

  • Host IP address, for example, 10.10.10.100.

  • Network address, including subnet mask, in either the format 10.10.10.0/24 or 10.10.10.0/255.255.255.0.

  • A range of IP addresses, for example, 10.10.10.100-10.10.10.200.

  • An IP address pattern in the format 10.10.0.10/255.255.0.255, where the mask is a discontiguous bit mask (see Contiguous and Discontiguous Network Masks for IPv4 Addresses).

Tip

 
You can create an object with a list of the IP addresses to facilitate future policy query requests.

User

(ASA 8.4(2+) only.) The Active Directory (AD) usernames, user groups, or identity user group objects for the rule, if any. You can enter more than one value by separating the items with commas.

Note

 
If you leave a field blank, the query matches only those rules that have nothing in the User field.

You can enter any combination of the following values.

  • Individual user names: NetBIOS_DOMAIN\username

  • User groups (note the double \): NetBIOS_DOMAIN\\user_group

  • Identity user group object names.

Click Select to select objects, users, or user groups from a list or to create new objects.

For more information, see:

Services

The services that define the type of traffic that is acted on. You can enter more than one value by separating the items with commas.

Note

 
If you leave the field blank, the query matches any service.

You can enter any combination of service objects and service types (which are typically a protocol and port combination). If you type in a service, you are prompted as you type with valid values. You can select a value from the list and press Enter or Tab.

For complete information on how to specify services, see Understanding and Specifying Services and Service and Port List Objects

Tip

 
You can create an object with a list of the services to facilitate future policy query requests.

Interfaces

The interfaces for which the rule is defined. You can enter any combination of interface or interface role names, separated by commas. Enter the name or click Select to select the interface or interface role.

Note

 
If you leave the field blank, the query matches any interface or interface role.

Query for Global Rules

Whether the query should also consider global rules when querying access rules or inspection rules.

From Zone

To Zone

For zone based firewall rules, the zones defined for the rule. Enter the zone names (which are interface roles), or click Select to select them from a list.

Actions

For zone based firewall rules, the actions defined for the rule.

Check if Matching Rules Are Shadowed by Rules Above

Whether to have the policy query results include rule conflict detection information. Selecting this option might have an impact on performance and cost results.

Interpreting Policy Query Results

Use the Policy Query Results dialog box to view the results of a policy query that you defined on the Query Device or Policy dialog box. The results report opens after you define your query parameters on the Querying Device or Policy Dialog Box and click OK. For the procedure, see Generating Policy Query Reports. To see an example report, see Example Policy Query Result.


Tip


In the query results table, you can double-click a row, or right-click and select Go to Rule, to select the rule in the rules policy page, where you can edit the rule. If the appropriate rules policy is not already selected in the policy selector, you might have to do this twice to actually select the rule.

To read the report, consider the following report sections:

  • Query Parameters—The top portion of the report specifies the parameters you entered for the query. If you want to change them, click Edit Query to open the Querying Device or Policy Dialog Box, where you can make your changes and regenerate the report.

  • Results Table—This table lists all rules that match your query. If you queried more than one type of rule, select the rule type you want to examine in the Display field. The columns in the table are the same as those for that type of rule, except for the following:

    • Match Status—Indicates how the rule matches your query:

Complete Match—The rule matches all query parameters.

Partial Match—All of the search criteria overlap or are a superset of the matched rule. For example, if you have a rule defined with a source address of 10.100.20.0/24, a destination address of 10.200.100.0/24 and a service of IP, and your query is to search for a source of 10.100.20.0/24, the match status is shown as a partial match because the query results represent only a portion of the rule’s definition.

No Effect—Rules are blocked by other matching rules, or a conflict exists that has no effect. For example, you might have two matching rules, A and B. If rule A’s source address, destination address, and services are equivalent to, or contain, those of rule B, rule B is blocked by rule A. Thus, rule B will have no effect on traffic.

In another example, you might have a global mandatory rule that permits a service, but a rule at the device (local) level denies the service. Because rules are recognized on a first-match basis, after discovering a match at the mandatory global scope, no other rules are checked. The local rule has no effect; the service is permitted, not denied. You should edit your policies to ensure you get the desired results.

  • Scope—Identifies whether a rule is shared or local, mandatory or default.

  • Details Table—The details table shows the detailed query match information for the rule selected in the results table. The folders on the left represent the attributes for which you can see detailed information. Select a folder to view the details.

The details show the query value, which is the parameter you defined, and the item in the rule that matches the parameter. The matching relationship is one of the following:

  • Identical—The parameter is identical to the value in the rule.

  • Contains—The parameter is a superset that contains the value in the rule. For example, the query parameter might have been a network/host object, and the rule used an IP address that was part of the object definition.

  • Is contained by—The parameter is a subset nested within the value of the rule.

  • Overlaps—The query parameter shows results that overlap between more than one policy object used in the rule. For example, the service query parameter was tcp/70-90 and the results show a service defined as tcp/80-100.

Related Topics

Example Policy Query Result

The below figure shows an example of a policy query report on access rules. The criteria does not limit source, destination, service, and interface parameters, but limits the query to enabled rules. Both shared and local rules are included.

The Query Parameters section shows the query criteria for the report. In this example, the first row in the results table is selected, and the detailed information for that rule is shown in the details table in the bottom half of the window. In this example, the source folder is selected in the details table, and the result shows that the rule value, any, is an identical match to the query parameter *, which is equivalent to any source address.

For detailed information on reading the report, see Interpreting Policy Query Results.

Figure 4. Policy Query Results
Related Topics

Optimizing Network Object Groups When Deploying Firewall Rules

When you deploy firewall rules policies to an ASA, PIX, FWSM, or IOS 12.4(20)T+ device, you can configure Security Manager to evaluate and optimize the network/host policy objects that you use in the rules when it creates the associated network object groups on the device. Optimization merges adjacent networks and removes redundant network entries. This reduces the runtime access list data structures and the size of the configuration, which can be beneficial to some FWSM and PIX devices that are memory-constrained.

For example, consider a network/host object named test that contains the following entries and that is used in an access rule:


192.168.1.0/24
192.168.1.23
10.1.1.0
10.1.1.1
10.1.1.2/31

If you enable optimization, when you deploy the policy, the resulting object group configuration is generated. Note that the description indicates the group was optimized:


object-group network test
 description (Optimized by CS-Manager)
 network-object 10.1.1.0 255.255.255.252
 network-object 192.168.1.0 255.255.255.0

If you do not enable optimization, the group configuration would be as follows:


object-group network test
 network-object 192.168.1.0 255.255.255.0
 network-object 192.168.1.23 255.255.255.255
 network-object 10.1.1.0 255.255.255.255
 network-object 10.1.1.1 255.255.255.255
 network-object 10.1.1.2 255.255.255.254

This optimization does not change the definition of the network/host object, nor does it create a new network/host policy object. If you rediscover policies on the device, the existing unchanged policy object is used.


Note


If a network/host object contains another network/host object, the objects are not combined. Instead, each network/host object is optimized separately. Also, Security Manager cannot optimize network/host objects that use discontiguous subnet masks.

To configure optimization, select the Optimize Network Object-Groups During Deployment option on the Deployment Page (select Tools > Security Manager Administration and select Deployment from the table of contents). The default is to not optimize network object groups during deployment.


Note


if you have upgraded to CSM 4.19 without configuring CSM 4.17 SP1 and CSM 4.18, the deployment of a firewall that has an object-group service fails for the following objects:

  • service-object gre

  • service-object 41

  • service-object ah

You must execute the following SQL queries on the DB side of the CSM server to avoid the deployment failure.

$SIG{INT} = 'IGNORE';
use CRM;
use DBI;
use lib "$ENV{NMSROOT}/lib/perl/install";
use InstallUtility;
require "$ENV{NMSROOT}/cgi-bin/dbadmin/pdbadmin/dbAdminCommon.pl";
my $DROP_CONNECTION_FLAG = false;

checkDMisRunning();
&resolveGreSubTypeEntries();

sub checkDMisRunning
{
	my $d = '\\';
    my ($rc, $dmIsRunning, $line, @lines);
    $rc = open IN, "$ENV{NMSROOT}${d}bin${d}pdshow 2>&1 |";
    if (!$rc)
    {
        print "ERROR: *** Could not execute pdshow ***\n";
        print "ERROR: *** probable cause: daemon manger is corrupted ***";
        exit(-1); 
    }

    @lines = <IN>;

    $dmIsRunning = 1;
    for $line (@lines)
    {
	
        if ($line =~ m/ERROR:\s+connect\s+to\s+dmgtd.*on\s+port\s+.+failed:/)
        {
			$dmIsRunning = 0;
            last;
        }
	}
    close IN;

    if ($dmIsRunning)
    {
        print "Daemon manager is  running ..\n";
     }
	else
	{
	    print "Daemon manager is not running ..\n";
		print "Deamon manager should be running to execute this file\n";
		exit(-1);
		}
}


sub resolveGreSubTypeEntries
{

		$dsn="vms"; 
		$node_dbh = &dbinternal::connect("dsn=$dsn");
	
		if ($node_dbh)
		{
			print "\n*******************************************\n";
			print "\nScript Execution Starts \n" ;
			print "\n*******************************************\n";
			my $select_query = "select count(*) from BB_MAIN where OBJECTID =1106 and name='gre' and subtype!='SO'";
			my $select_query_prep = $node_dbh->prepare($select_query) || die "Error preparing query" . $node_dbh->errstr;
			$select_query_prep->execute || die "Error executing query" . $select_query_prep->errstr;
			my @node_results;
		    $impactedcount = 0;
			while (@node_results = $select_query_prep->fetchrow_array()) 
			{
			      my $size = @node_results;
				  for (my $j=0; $j < $size; $j++) 
				    {
					$impactedcount = $node_results[$j];
		   		    }
		    }
			if($impactedcount > 0){
			    my $updateQuery = "update BB_MAIN set subtype='SO' where OBJECTID=1106";
			    my $prep = $node_dbh->prepare($updateQuery) || die "Error preparing query" . $node_dbh->errstr;
			    $prep->execute || die "Error executing query" . $prep->errstr;
			}
			print "\n*******************************************\n";
			print "\nScript Execution Completed! \n" ;
			print "\n*******************************************\n";
	    }

  return 0;	
    
}

Copy the script into ~CSCOpx/bin directory and execute the following command:

C:\PROGRA~2\CSCOpx\bin\perl C:\PROGRA~2\CSCOpx\bin\resolveDBEntriesCSCvj54910.pl#!/usr/bin/perl

Expanding Object Groups During Discovery

When you discover policies from a device that uses object groups, you can elect to have those object groups expanded into the items they contain rather than create policy objects from the group.

For example, if an object group named CSM_INLINE_55 contains the hosts 10.100.10.15, 10.100.10.18, and 10.100.10.25, importing an access control list by expanding the objects will create a rule that includes all three addresses in the source (or destination, as appropriate) cell rather than a network/host policy object named CSM_INLINE_55.

To configure expansion, you must have a naming scheme for your object groups that allows you to identify the prefix of groups that you want to expand. The default is to expand any object group that starts with the prefix CSM_INLINE. Configure these prefixes in the Auto-Expand Object Groups with These Prefixes field on the Discovery Page by selecting Tools > Security Manager Administration and selecting Discovery from the table of contents.