Managing Zone-based Firewall Rules

The Zone-based Firewall feature (also known as Zone-based Policy Firewall) allows unidirectional application of IOS firewall policies between groups of interfaces known as “zones.” That is, interfaces are assigned to zones, and firewall rules are applied to specific types of traffic moving in one direction between the zones. Beginning with 4.16, Cisco Security Manager allows sub-interfaces to be assigned to zones. Zone-based firewalls enforce a secure inter-zone policy by default, meaning traffic cannot pass between security zones until an explicit policy allowing that traffic is defined.

The “zone” itself is an abstraction—multiple interfaces with the same or similar security requirements that can be logically grouped together. For example, router interfaces Ethernet 0/0 and Ethernet 0/1 might be connected to the local LAN. When viewed from a firewall perspective, these two interfaces are similar in that they represent the internal network, and they can be grouped into a single zone for the purposes of firewall configuration. Then you can specify firewall policies between that and other zones. These inter-zone policies offer considerable flexibility and granularity, so different inspection policies can be applied to multiple host groups connected to the same router interface.


Note


The zone-based firewall feature is supported on IOS devices running 12.4(6)T or later, and ASR devices running 12.2(33) or later.

A Simple Example

A security zone should be configured for each region of similar security within the network, so that all interfaces assigned to the same zone are protected with a similar level of security. For example, consider an access router with three interfaces:

  • One interface is connected to the public Internet

  • One interface is connected to a private LAN that must not be accessible from the public Internet

  • One interface is connected to an Internet-service “demilitarized zone” (DMZ), where a Web server,

Domain Name System (DNS) server, and e-mail server must have access to the public Internet. Each interface in this network would be assigned to its own zone, as shown in the following figure.

Figure 1. Basic Security Zone Topology

This example configuration typically would have three main policies (sets of rules) defining:

  • Private zone connectivity to the Internet

  • Private zone connectivity to DMZ hosts

  • Internet zone connectivity to DMZ hosts

Zone-based firewalls impose a prohibitive default security posture. In other words, for example, unless the DMZ hosts are specifically allowed access to other networks, those networks are protected against any undesired connections from the DMZ hosts. Similarly, unless access is specifically provided for Internet hosts to access the Private zone directly, the Private zone hosts are safe from unwanted access by Internet hosts.

In this simple example, each zone has only one member interface. If an additional interface is added to the Private zone, for example, the hosts connected to that new interface can immediately pass traffic to all hosts connected to the existing interface in the zone. Additionally, traffic to hosts in other zones is immediately controlled by existing Private zone policies.

In a more realistic example, you might allow varied access from the public Internet to specific hosts in the DMZ, and varied application-use policies for hosts in the protected LAN.

This chapter contains the following topics:

Understanding the Zone-based Firewall Rules

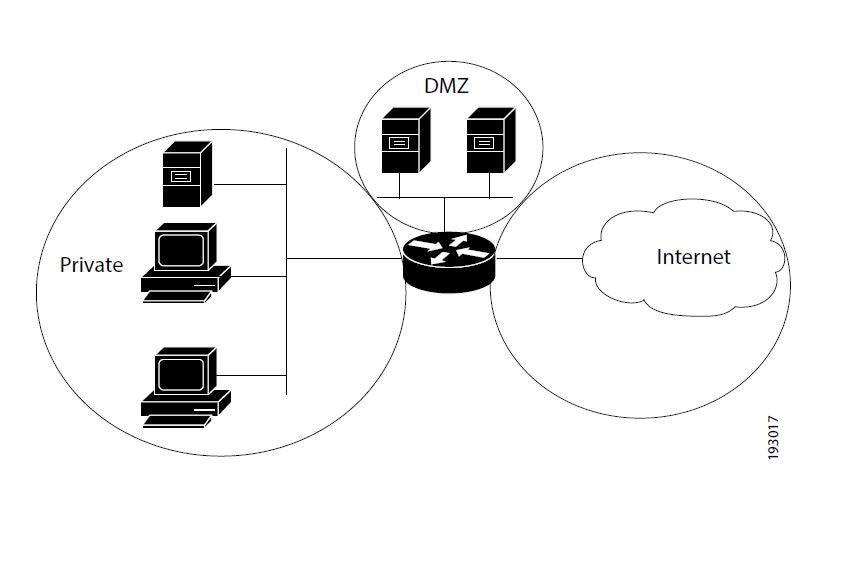
Zones establish the security borders of your network. A zone defines a boundary where traffic is subjected to inspection or filtering as it crosses to another region of your network. The default zone-based firewall policy between zones is “deny all.” Thus, if no zone-based firewall rules are explicitly configured, all traffic moving between all zones is blocked.

Zone-based firewall rules apply specific actions—Drop, Pass, Inspect, and Content Filter—to various types of unidirectional traffic between pairs of zones. The direction of the traffic is determined by specifying a source and destination zone as part of each rule.

Logging

Zone-based firewall rules offer syslog, alert, and audit-trail logging options. Most messages are logged to the router console unless a syslog server is configured. See Logging on Cisco IOS Routers for information about configuring syslog logging.

Important Points

Please note the following points regarding zones and zone-based firewall rules:

  • Zone-based firewall rules are supported only on IOS devices running 12.4(6)T or later, and ASR devices running 12.2(33) or later.

  • If a zone-based firewall rule and an IOS Inspection rule use the same interface, an error results.

The zone-based firewall model and the earlier interface-based inspection rules model are not mutually exclusive on the router, but they cannot be combined on any given interface. That is, an interface cannot be configured as a member of a security zone if it is configured with Inspection rules. Further, configuring a router to use both models at the same time is not recommended.

  • An interface can be assigned to only one security zone, but zones can include multiple interfaces. If an interface is assigned to more than one zone, an error results.

  • All traffic to and from a given interface is implicitly blocked when the interface is assigned to a zone (except traffic to and from other interfaces in the same zone, and traffic to any interface on the router). Thus, to permit traffic to and from a zone-member interface, one or more rules allowing or inspecting traffic must be configured between that zone and any other zone.

  • Traffic is implicitly allowed to flow between interfaces that are members of the same zone. However, you can define rules that require inspection of traffic between same-zone members.

  • The “Self” zone is a default zone that defines the router itself as a separate security zone, which you can specify as either the source or destination zone. The Self zone is the only exception to the default “deny all” policy. All traffic to any router interface is allowed until explicitly denied.

A zone-based firewall rule that includes the Self zone applies to local traffic—that is, traffic directed to the router, or to traffic generated by the router; it does not apply to traffic through the router. See The Self Zone for more information.

  • The Inspect action is not allowed in rules that apply to the Self zone.

  • The Pass action permits traffic in one direction only. You must explicitly define rules for return traffic. However, with the Inspect action, return traffic is automatically allowed for established connections.

  • Traffic cannot flow between a zone-member interface and any interface that is not a zone member.

  • Interfaces that have not been assigned to a zone can still function as classical router ports and might still have other types of firewall rules configured on them.

However, if an interface is not part of your zone-based firewall policy, it might still be necessary to add that interface to a zone and configure a “pass all” policy (sort of a “dummy policy”) between that zone and any other zone to which inter-zone traffic flow is desired.

  • Access-control list (ACL) rules applied on interfaces that are also zone members are processed before the zone rules are applied. Therefore, to continue using both rule types, it may be necessary to relax the interface ACLs to ensure certain traffic flows are processed by the zone-based rules.

  • All interfaces in a zone must belong to the same Virtual Routing and Forwarding (VRF) instance. Zone-based rules can be configured between zones whose member interfaces are in separate VRFs. However, if traffic cannot flow between these VRFs, these rules will never be executed. See Zones and VRF-aware Firewalls for more information.

  • Zones are defined using Interface Role objects. If you change the definition of an interface role that you are using for a zone, you are changing the zone, which can affect existing traffic flows. In addition, if you use wildcards in the interface role to specify an interface name pattern, be aware that interfaces may automatically be added to the zone when you create new interfaces on the router.

  • If zone-based firewall rules contain conflicting zone information, the first rule defined in the table takes precedence. Rules that do not reference valid zones are not deployed and an activity validation warning is shown.

  • Empty zones result in activity validation errors for certain devices; refer to the following restriction lists.

  • Source and destination zones cannot be the same for certain devices; refer to the following restriction lists.


    Note


    From version 4.21 onwards, Cisco Security Manager terminates whole support, including support for any bug fixes or enhancements, for all Aggregation Service Routers, Integrated Service Routers, Embedded Service Routers, and any device operating on Cisco IOS software.

Related Topics

The Self Zone

The router itself is defined as a separate security zone, with the fixed name Self, and since IOS firewalls support examination of traffic (TCP, UDP and H.323 only) that terminates or originates on the router (together known as “local” traffic), incoming and outgoing router traffic can be subject to rules in the same way as routed inter-zone traffic.

When an interface is assigned to a zone, the hosts connected to that interface are included in that zone. By default, traffic is allowed to flow between interfaces that are members of the same zone, while a default “deny-all” policy is applied to traffic moving between zones.

However, traffic flowing directly between other zones and the router’s IP interfaces (the Self zone) is implicitly allowed. This ensures that connectivity to the router’s management interfaces is maintained when a zone firewall configuration is applied to the router.

This also means that traffic flowing to and from the IP addresses of the router’s interfaces is not initially controlled by zone policies. If you wish to control traffic moving between the router interfaces and other zones, you must apply rules that block or allow this local traffic.

When configuring the rules for the Self zone, consider the following:

  • All IP addresses configured on the router belong to the Self zone, regardless of interface zone membership.

  • Traffic to and from the Self zone is unrestricted until you configure explicit rules to the contrary.

That is, when you configure a zone-based firewall rule that includes the Self zone, traffic between the Self zone and the other zone is immediately restricted in both directions. For example, if you define a rule affecting traffic from the “Private” zone to the Self zone, the router cannot originate any traffic to the Private zone until you define one or more rules for Self to Private.

Traffic between the router itself and other zones that are not included in the Self-zone rules remains unaffected.

  • The Inspect action is not allowed in rules that apply to the Self zone.

When configuring restrictions on inbound Self-zone traffic, consider the necessary outbound traffic (including the routing and network management protocols). For example, if you restrict inbound traffic from a zone to the router itself, the routing protocols could stop working on all interfaces belonging to that zone.

Related Topics

Using VPNs with Zone-based Firewall Policies

Recent enhancements to the IP Security (IPsec) VPN implementation simplify firewall policy configuration for VPN connectivity. IPSec Virtual Tunnel Interface (VTI) and GRE+IPSec allow the confinement of VPN site-to-site and client connections to a specific security zone by placing the tunnel interfaces in that security zone. Connections can be isolated in a VPN DMZ if connectivity must be limited by a specific policy. Or, if VPN connectivity is implicitly trusted, VPN connections can be placed in the same security zone as the trusted inside network.

To configure the router to use zone-based firewall rules with dynamic VPNs (those which dynamically create Tunnel/Loopback/Virtual interfaces):

  • Define a zone specifically for the VPN interfaces.

  • Enter this zone in the VPN Zone field on the VPN tab of the Zone Based Firewall Page.

  • Create zone-based firewall rules to allow the VPN traffic, as appropriate.

If non-VTI IPsec is employed, you must exercise caution when you configure a zone-based firewall policy for VPN. The zone policy must specifically allow access to protected hosts by remote VPN hosts or clients if they are in a different zone than the ingress interface for encrypted VPN traffic. This access policy must be configured by including an access control list (ACL) enumerating the source IP addresses of the VPN clients, and the destination IP addresses of all protected hosts the VPN clients are allowed to reach. If the access policy is not properly configured, the policy could expose vulnerable hosts to hostile traffic.

Refer to this white paper on cisco.com “Using VPN with Zone-Based Policy Firewall” for further discussion of these topics.

Related Topics

Zones and VRF-aware Firewalls

Cisco IOS firewalls are VRF-aware (Virtual Routing and Forwarding), providing management of IP address overlap across different VRFs, separate thresholds and timeouts for VRFs, and so forth. For application of zone-based firewall rules, all interfaces in a zone must belong to the same VRF.

When multiple VRFs are configured on a router and one interface provides common services to all the VRFs (for example, Internet service), you should place that interface in a separate zone. You can then define policies between the common zone and other zones. (There can be one or more zones per VRF.)

You can configure rules between two zones that contain different VRFs, as shown in the following illustration.

Figure 2. Zones and VRF

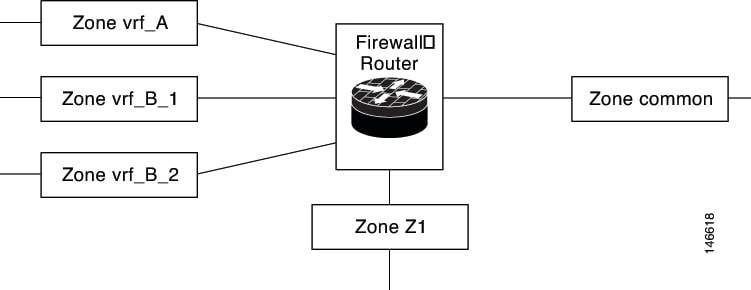
In this illustration:

  • The interface providing common services is a member of the zone “common.”

  • All of VRF A is in a single zone, “vrf_A.”

  • VRF B, which has multiple interfaces, is partitioned into two zones “vrf_B_1” and “vrf_B_2.”

  • Zone Z1 does not have VRF interfaces.

Based on this configuration:

  • You can specify policies between each of these zones and the common zone. Additionally, you can specify polices between each of the zones vrf_A, vrf_B_n and Z1 if VRF route export is configured and the traffic patterns make sense.

  • You can configure a policy between zones vrf_A and vrf_B_1, but be sure that traffic can flow between them.

  • You do not need to specify the global thresholds and timers on a per-VRF basis. Instead, parameters are supplied to the Inspect action through a parameter map.

Related Topics

Understanding the Relationship Between Permit/Deny and Action in Zone-based Firewall Rules

When you create a zone-based firewall rule, you must specify two execution-related settings: Permit/Deny and an Action (Drop, Pass, Inspect, or Content Filter). To obtain the results you want, you must clearly understand the relationship between these two parameters:

  • Permit/Deny—The Permit/Deny setting appears to correspond to Permit/Deny in an access control list (ACL) entry. However, in zone-based firewall rules, unlike in standard access rules, these keywords do not permit or deny traffic. Instead, they specify whether you want to apply an Action to the traffic flow defined by the Source, Destination, and Services fields, and they affect processing of related class maps.

    • Permit – Applies the specified Action to traffic that matches the Source, Destination, and Services fields. (If protocols are listed in the Protocols table, the Action is further limited to those protocols.)

Tip: Essentially all of your zone-based rules should be Permit rules. This is the easiest configuration to understand—it means you are identifying the traffic to which you want the chosen Action applied.

    • Deny – Exempts the traffic defined by the Source, Destination, and Services fields. (If protocols are listed in the Protocols table, the exemption is further limited to those protocols.) In other words, treat the traffic as not matching the rule. Instead, evaluate subsequent class maps (which are not the same as zone rules) for the zone pair and look for a subsequent map that matches the traffic. If no subsequent map matches the traffic, apply the default rule to the traffic (see Changing the Default Drop Behavior).

It is important to understand that there is not a one-to-one relationship between zone rules and class maps. Therefore, you cannot determine just by looking at the rules table how the rules will be converted to class maps. You must preview the configuration to see which subsequent rules might be applied to traffic that matches your Deny rule. (To preview the configuration, save your changes and select Tools > Preview Configuration. For more information, see Previewing Configurations).

In general, you might use a Deny rule to exempt a specific IP address within a subnet from a Permit rule you want to apply to the subnet in general; for example, exempting 10.100.10.1 from a rule applying to 10.100.10.0/24. However, it is much easier to create a Permit rule for the specific IP address and apply a desired Action, and ensure that the rule is listed above the general rule in the zone-based rules table.

If you decide to use Deny rules, be sure to also read Troubleshooting Zone-based Rules and Configurations.

  • Action—The Action parameters define what happens to traffic that matches a Permit rule. These parameters are ignored for Deny rules, except to determine to which class map the rule is added.

When you create a Permit rule, traffic that matches the Source, Destination, Services, and Protocol fields is processed according to the Action you choose: drop the traffic (and optionally log it), pass the traffic (and optionally log it), inspect the traffic, or apply content filtering (for Web traffic only).

When you inspect traffic for some protocols, or perform content filtering, you have the option of specifying a policy map to use for deep inspection. The deep inspection policy map also specifies actions based on the deeper characteristics of the traffic. This additional inspection applies to packets that meet the requirements of the class map to which the assigned policy map refers. Packets that do not match the deep inspection class map are allowed. Thus, deep inspection might reset TCP connections if the policy map specifies that action.

The following table illustrates the relationship between Permit/Deny and the chosen Action in a zone-based firewall rule. The table uses the TCP service as an example, but the general explanation applies to the IP service as well. The result applies only to the From and To zones specified in the rule.

Table 1. Relationship Between Permit/Deny and Action in Zone-based Rules

Permit / Deny

Service

Rule Action

Protocol

Result

Permit

TCP

Pass

(None)

Pass all TCP traffic.

Deny

TCP

Pass

(None)

Skip the rule and evaluate the next class map. Either a subsequent class map with a Permit rule is applied, or the class default rule is applied.

The Pass action is ignored.

Permit

TCP

Drop

(None)

Drop all TCP traffic.

Deny

TCP

Drop

(None)

Skip the rule and evaluate the next class map. Either a subsequent class map with a Permit rule is applied, or the class default rule is applied.

The Drop action is ignored.

Permit

TCP

Pass

DNS

Only DNS traffic passes. Other TCP traffic is handled by subsequent rules.

Permit

TCP

Drop

DNS

DNS traffic is dropped. Other TCP traffic is handled by subsequent rules.

Deny

TCP

Pass

DNS

Skip the rule for DNS traffic and evaluate the next class map. Either a subsequent class map with a Permit rule is applied, or the class default rule is applied.

The Pass action is ignored.

Deny

TCP

Drop

DNS

Skip the rule for DNS traffic and evaluate the next class map. Either a subsequent class map with a Permit rule is applied, or the class default rule is applied.

The Drop action is ignored.

Permit

TCP

Inspect

HTTP

Allow and inspect HTTP traffic. If you specify a policy map for deep inspection, the action from the policy map is applied to any packets that match deep inspection parameters (for example, reset the connection for protocol violations).

Deny

TCP

Inspect

HTTP

Skip the rule for HTTP traffic and evaluate the next class map. Either a subsequent class map with a Permit rule is applied, or the class default rule is applied.

The Inspect action is ignored.

Tip

 
If subsequent rules, or the class default, pass the traffic without inspection, you need to create a Permit/Pass rule in the other direction (or an access rule) to allow return traffic for the HTTP connection. If your intention is to prohibit HTTP connections, create a Permit/Drop rule instead of a Deny/Inspect rule.

Permit

TCP

Content Filter

HTTP

Allow and inspect HTTP traffic, and apply URL filtering maps to selectively permit or deny Web connections based on the Web sites requested.

If you specify a policy map for deep inspection, the action from the policy map is applied to any packets that match deep inspection parameters (for example, reset the connection for protocol violations).

Thus, traffic can be dropped either because the Web site is added to the block list, or because the HTTP packets violate your deep inspection rules.

Deny

TCP

Content Filter

HTTP

Skip the rule for HTTP traffic and evaluate the next class map. Either a subsequent class map with a Permit rule is applied, or the class default rule is applied.

The Content Filter action is ignored.

Tip

 
This type of rule can exempt the specified source/destination from content filtering if no subsequent class maps drop the traffic or apply content filtering. However, if you want to allow HTTP connections for this traffic, you must create a Permit/Inspect rule for the traffic.

Understanding the Relationship Between Services and Protocols in Zone-based Firewall Rules

When you create a zone-based firewall rule, there are two seemingly similar parameters which help identify the characteristics of the target traffic: Services and Protocols. The entries in these fields can provide very similar information, but it is used differently when constructing zone-based firewall policies in the device configuration. This section describes the recommended uses of these fields.

  • Services – The Services field is used to define traffic protocol(s) in an access control list (ACL) entry. Along with the Sources and Destinations specified, this ACL entry is used by a class map to define the traffic to which you want to apply a policy. However, unlike in standard access rules, the Services information is not the primary means of identifying the traffic protocol. It is required only because ACLs must have a service designation for each entry.

In general, you can leave the default entry (IP) in the Services field for all of your zone-based firewall rules, using the Protocol table to identify specific protocols that you want to Drop, Pass, or Inspect.

If you do elect to specify a Service other than IP, ensure that your selection does not conflict with any protocols listed in the Protocol table. For example, do not specify UDP in the Services field, and then list a TCP-based protocol in the table. In general, for a given rule, if you specify a specific service in the Services field, do not enter any protocols in the Protocol table.

  • Protocol – The Protocol table, in the Action area of the Add and Edit Zone Based Rule dialog boxes, is used to select one or more protocols, add custom port application mappings (if you specify non-default ports), and apply deep inspection policy maps. You can specify very specific protocols, such as DNS, general protocols such as TCP and UDP, and even custom protocols that identify ports you use for special applications.

As a general rule, leave Services set to IP and use the Protocol table to identify the protocols (which are also services) for all of your zone-based rules for the Drop, Pass, and Inspect actions. (The Content Filter action automatically uses the HTTP protocol, which you can configure but not change.) Following this approach will create a configuration that is as “clean” and easy to interpret (and troubleshoot) as possible.

For more detailed information on how these fields are used when generating device configurations, see Troubleshooting Zone-based Rules and Configurations.

General Recommendations for Zone-based Firewall Rules

Zone-based firewall rules allow a wide variety of configurations. You can quickly generate a set of rules that will be very complex and difficult to analyze, because you can use the zone-based rules in place of the standard access rules, inspection rules, and Web filter rules.

When defining zone-based rules, strive to keep them as simple and straightforward as possible. Consider the following recommendations for helping to maintain simplicity in your zone-based firewall policy:

  • Only use Permit rules. The chosen Action determines what happens to matched traffic, and Deny rules are difficult to analyze. For more information, see Understanding the Relationship Between Permit/Deny and Action in Zone-based Firewall Rules.

  • The Drop and Pass rules are equivalent to standard interface access rules, but are applied to the specified zone pair. You can use either the Services field or the Protocol table to identify the type of traffic, but we recommend using the Protocol table exclusively. To drop traffic, specify Permit with the Action Drop.

  • You do not need to first pass traffic before inspecting it. For example, if you want to allow HTTP traffic between zones, you need only a single Permit/Inspect rule; you do not need to first create a Permit/Pass rule. If you do use Pass rules, note that you must also create a Pass rule in the return direction if you want to allow returning traffic. In practice, you generally can avoid creating Pass rules, using only Inspect rules.

  • You can use Permit/Pass and Permit/Drop rules to perform the same functions as standard access rules. Thus, you can eliminate your access rules policy and use only zone-based firewall rules.

However, because there are several tools available for analyzing interface access rules, and Security Manager allows you to use the same interface roles in zone-base rules and access rules, you might find it more convenient to create your Pass/Drop policies (which are Permit/Deny in standard access rules) in the access rules table instead of the zone rules table. Use the zone rules table primarily for zone-based Inspection and Content Filter rules.

  • Use sections to organize the rules for each zone pair. Sections make it easy for you to see all of the rules for a pair, which can be critical if your rules have sequential dependencies. For more information on working with sections, see Using Sections to Organize Rules Tables.

Developing and Applying Zone-based Firewall Rules

The following is a general overview of how to develop and apply zone-based firewall rules to your network.

  • Consider your network, and its sub-networks, in terms of security zones—think about the security requirements of the various zones. As a general guideline, group router interfaces that are similar when viewed from a security perspective.

  • Determine the types of traffic to be examined as it travels from one zone to another, decide how each type is to be examined and handled.

  • Define zone-based firewall rules that implement these decisions. This process may include some or all of the following procedures, which you can perform prior to defining the rules themselves, or which you can perform as necessary during rule definition:

    • Define the zones by creating named Interface Role objects, assigning the appropriate interfaces and interface patterns to them.

    • Define/edit Port Application Mapping (PAM) settings for specific Layer 4 protocols and ports, and optionally specific networks and hosts.

    • Configure Deep Packet Inspection (DPI) policies for Layer 7 protocols—HTTP, IMAP, instant messaging (IM), and peer-to-peer (P2P).

    • Configure Protocol Info parameter maps; these define DNS servers that interact with the IM applications.

    • Configure Inspect parameter maps that define connection, timeout, and other settings for the Inspect action.

    • Define WebFilter parameter or policy maps for URL-based content filtering.

The following topics provide additional information about these procedures:

Adding Zone-Based Firewall Rules

This procedure explains how to configure a zone-based firewall rule in Security Manager.

Related Topics

Procedure


Step 1

Access the Zone-based Firewall Rules Page as follows:

  • (Device view) Select an IOS router and then select Firewall > Zone Based Firewall Rules from the Policy selector.

  • (Policy view) Select Firewall > Zone Based Firewall Rules from the Policy Type selector. Select an existing policy or create a new one.

Step 2

Click the Add Row button below the rules table, or right-click anywhere inside the table, and choose Add Row to open the Add Zone Based Firewall Rule dialog box.

Refer to Adding and Editing Zone-based Firewall Rules for a complete description of this dialog box.

Step 3

Define the base Traffic flow for this rule.

Note

 
Together, the Permit/Deny, Sources, Destinations, and Services options can be thought of as defining a simple access rule that can be enhanced by the application of in-depth Action-related policies, and restricted to a specific direction between a specific pair of zones.
  1. Choose whether to Permit or Deny further processing of traffic that matches this rule. See Understanding the Relationship Between Permit/Deny and Action in Zone-based Firewall Rules for more information.

  2. Optionally, provide Source and Destination hosts/networks or Security Groups (IOS 15.2(2)T+ and IOS-XE 3.5.x(15.2(1)S)+ only).

    By default, the traffic definition encompasses packets from “any” source, to “any” destination. You can use these fields to refine this base traffic definition by providing one or more source and destination hosts/networks. (See Understanding Networks/Hosts Objects and Understanding Networks/Hosts Objects for more information.)

  3. Specify one or more Services (protocols) that indicate the type of traffic; for example, IP, TCP, etc.

    You can provide more than one Service; however, IP generally stands alone. (See Understanding and Specifying Services and Service and Port List Objects.)

  4. Provide the From Zone; that is, the only zone from which matched traffic can originate.

  5. Provide the To Zone; that is, the only zone to which matched traffic can flow.

    Refer to Understanding Interface Role Objects for more information about zone/interface objects.

    Note

     
    Together, the From Zone and the To Zone constitute what is sometimes referred to as a “zone-pair.”
  6. Click the Advanced button to add a time range, or to apply a packet-fragment or an established-connection restriction to this zone-based firewall rule.

    See Zone-based Firewall Rule: Advanced Options Dialog Box for more information about these options.

Step 4

Specify the actions to be applied to traffic matching this definition by choosing a base Action, and supplying additional parameters as necessary.

  1. Choose a base Action:

    • Drop – Matching traffic is silently dropped; no notification of the drop is sent to the originating host.

    • Drop and Log – Matching traffic is dropped and a syslog message generated; no notification of the drop is sent to the originating host.

    • Pass – Traffic is forwarded. This action is unidirectional; Pass allows traffic in only the specified direction.

    • Pass and Log – Traffic is forwarded and a syslog message generated.

    Note

     
    The Pass actions do not track the state of connections or sessions within the traffic. Pass only allows the traffic in one direction. A corresponding rule must be defined to allow return traffic. The Pass actions are useful for protocols such as IPSec ESP, IPSec AH, ISAKMP, and other inherently secure protocols with predictable behavior. However, most application traffic is better handled in the zone-based firewall rules with the Inspect action.
    • Inspect – This option offers state-based traffic control—the device maintains connection or session information for TCP and UDP traffic, meaning return traffic in reply to connection requests is permitted.

    Choose this option to apply packet inspection based on your selected Layer 4 (TCP, UDP) and Layer 7 (HTTP, IMAP, instant messaging, and peer-to-peer) protocols. You also can edit the Port Application Mapping (PAM) settings for the selected protocols, and you can set up deep packet inspection (DPI) and provide additional protocol-related information for the Layer 7 protocols.

    • Content Filter – Lets you configure HTTP content inspection (URL filtering) based on a WebFilter parameter map, or a WebFilter policy map. This action is generally equivalent to a Web Filter rule; however, zone-based firewall rules support additional advanced options, such as HTTP deep packet inspection (DPI).

    The router intercepts HTTP requests, performs protocol-related inspection, and optionally contacts a third-party server to determine whether the requests should be allowed or blocked. You can provide a WebFilter parameter map, which defines filtering based on local URL lists, as well as information from an external SmartFilter (previously N2H2) or Websense server. Alternately, you can provide a WebFilter policy map that accesses Local, N2H2, Websense, or Trend Micro filtering data.

  2. For any Action except Content Filter, you can select and edit the specific traffic Protocol(s) to be considered:

    Click Select next to the Protocol table to open the Protocol Selector Dialog Box . Select one or more protocols and click >> to move them to the Selected Protocol list. You can edit the Port Application Mapping (PAM) settings for the selected protocols; see Configure Protocol Dialog Box for more information.

    The Instant Messaging and Stun-ice protocols also allow selection of Protocol Info parameter maps. Further, when Inspect is the chosen Action, some protocols allow selection of deep-inspection policy maps.

    See Configuring Inspection Maps for Zone-based Firewall Policies, and Configuring Protocol Info Parameter Maps for more information.

    Note

     
    It is not necessary to specify protocols for the Drop, Drop and Log, Pass, and Pass and Log actions. You can leave the Protocol table empty and pass or drop traffic based on the Sources, Destinations, and Services parameters.
  3. When the chosen Action is Content Filter, configure the URL filtering:

    1. Click Configure next to the Protocol field to customize the HTTP PAM settings, and to apply an HTTP deep-inspection policy map. See the Configure Protocol Dialog Box for more information

    2. Select either WebFilter Parameter Map, or WebFilter Policy Map, and enter or Select the name of the appropriate WebFilter map. See Configuring Content Filtering Maps for Zone-based Firewall Policies for more information.

  4. When the chosen Action is Inspect or Content Filter, you can enter or Select the name of an Inspect Parameter map to apply a customized set of connection, timeout, and other settings. See Configuring Inspect Parameter Maps for more information.

Step 5

(Optional) Enter a description to help you identify the rule.

Step 6

(Optional) Under Category, select a category to help you identify this rule in the rules table. See Using Category Objects.

Step 7

Click OK to close the Add Zone Based Firewall Rule dialog box and return to the Zone Based Firewall Rules table.

The new rule is listed in the table.


Configuring Inspection Maps for Zone-based Firewall Policies

When you configure zone-based firewall policies for a router, you can define rules to inspect traffic by choosing Inspect as the Action for the rule. You can then select the specific protocols to inspect.

For some protocols, you can select policy maps to perform deep inspection on packets that match your criteria. You can configure these maps from the policy object selector dialog box while defining the rule, or at any time in the Policy Object Manager window (select Manage > Policy Objects). In addition to policy maps, there are some parameter maps you can configure for inspection.

  • For protocols that allow deep inspection, you can select a related policy map, which in turn incorporates class maps that define match conditions for the targeted traffic. To create these policy maps in the Policy Object Manager, select one of the available map types (which are listed in the following table) from the Maps > Policy Maps > Inspect folder, and review the detailed usage information in Configuring Policy Maps for Zone-Based Firewall Policies.

For information on creating class maps for use in your deep-inspection policy maps, see the references to the match criterion dialog boxes in the following table, as well as the topic Configuring Class Maps for Zone-Based Firewall Policies. These class map are found in the Maps > Class Maps > Inspect folder in the Policy Object Manager.

  • When Inspect (or Content Filter) is the chosen Action, you can also apply an Inspect Parameters map in the Adding and Editing Zone-based Firewall Rules. Zone-based firewall inspection includes several general settings, all of which have default values that are appropriate for most networks. If you want to adjust any of these settings, you must create an Inspect Parameters map. In the Policy Object Manager, select Maps > Parameter Maps > Inspect > Inspect Parameters and review the detailed usage information in Configuring Inspect Parameter Maps.

Table 2. Policy Objects for Zone-based Firewall Inspection Rules

Protocol

Minimum IOS Software Version

Policy Map

Class Map

Parameter Map

Description and Match Criteria Reference

Instant Messaging: AOL, ICQ, MSN Messenger, Windows Messenger, Yahoo Messenger

12.4(9)T

IM (Zone based IOS)

AOL

ICQ

MSN Messenger

Windows Messenger

Yahoo Messenger

Protocol Info

Inspect traffic based on the type of service (text-chat or any other). See Zone-based Firewall IM Application Class Maps: Add or Edit Match Condition Dialog Boxes.

You must also select a Protocol Info parameter map to define the DNS servers used by the traffic you are inspecting. See Configuring Protocol Info Parameter Maps.

Peer-to-peer (P2P): eDonkey, FastTrack, Gnutella, Kazaa2

12.4(9)T

P2P

eDonkey

FastTrack

Gnutella

Kazaa2

None

Inspect traffic based on file name. See Zone-based Firewall P2P Application Class Maps: Add or Edit Match Condition Dialog Boxes.

H.323

12.4(6)T

H.323 (IOS)

H.323 (IOS)

None

Inspect traffic based on the H.323 message type. See H.323 (IOS) Class Maps Add or Edit Match Criterion Dialog Boxes.

HTTP

12.4(6)T

HTTP (Zone based IOS)

HTTP (IOS)

None

Inspect traffic based on a wide variety of criteria including the content of the header or body, port misuse, and whether the traffic includes a Java applet. See HTTP (IOS) Class Add or Edit Match Criterion Dialog Boxes.

IMAP (Internet Message Access Protocol)

POP3 (Post Office Protocol 3)

12.4(6)T

IMAP

POP3

IMAP

POP3

None

Inspect traffic based on invalid commands or clear-text logins. See IMAP and POP3 Class Maps Add or Edit Match Criterion Dialog Boxes.

SIP (Session Initiation Protocol)

12.4(6)T

SIP (IOS)

SIP (IOS)

None

Inspect traffic based on a wide variety of criteria. See SIP (IOS) Class Add or Edit Match Criterion Dialog Boxes.

SMTP (Simple Mail Transfer Protocol)

12.4(6)T

SMTP

SMTP

None

Inspect traffic based on data length. See SMTP Class Maps Add or Edit Match Criterion Dialog Boxes.

Stun-ice

12.4(9)T

None

None

Protocol Info

You must select a Protocol Info parameter map to define the DNS servers used by the traffic you are inspecting. See Configuring Protocol Info Parameter Maps.

Sun RPC (Remote Procedure Call)

12.4(6)T

Sun RPC

Sun RPC

None

Inspect traffic based on the RPC protocol number. See Sun RPC Class Maps Add or Edit Match Criterion Dialog Boxes.

SCTP (Stream Control Transmission Protocol)

12.4(6)T

SCTP

None

None

Inspect traffic based on PPID match criterion. See SCTP Policy Maps Add or Edit Match Condition and Action Dialog Boxes.

Diameter protocol

12.4(6)T

Diameter

Diameter

None

Inspect traffic based on application ID, command codes, and AVP. See Diameter Class and Policy Maps Add or Edit Match Condition (and Action) Dialog Boxes.

LISP (Locator and ID Separation Protocol)

12.4(6)T

LISP

None

None

Inspect traffic based on application ID, command codes, and AVP.

Related Topics

Configuring Class Maps for Zone-Based Firewall Policies

Use the Add and Edit Class Map dialog boxes to define class maps to be used in policy maps of the same type. The name of the dialog box indicates the type of map you are creating.

A class map defines application traffic based on criteria specific to the application. You then select the class map in the corresponding policy map and configure the action to take for the selected traffic. Thus, each class map must contain traffic that you want to handle in the same way (for example, to allow it or to drop it).

When configuring zone-based firewall rules for devices running Cisco IOS Software, you can create class maps for the following purposes:

Navigation Path

Select Manage > Policy Objects, then select any zone-based class map object in the folders in the Maps > Class Maps folder in the table of contents. Right-click inside the work area, then select New Object, or right-click a row, then select Edit Object.

Related Topics

Field Reference

Table 3. Add or Edit Class Maps Dialog Boxes for Zone-Based Firewall Policies

Element

Description

Name

The name of the policy object. A maximum of 40 characters is allowed.

Description

A description of the policy object. A maximum of 200 characters is allowed.

Match table

Match Type

(Except for Trend Content Filter class maps.)

The Match table lists the criteria included in the class map. Each row indicates whether the inspection is looking for traffic that matches or does not match each criterion and the criterion and value that is inspected.

The name of the table indicates whether every one of the criteria must be met for the traffic to match the class (Match All), or whether matching any of the listed criteria is sufficient (Match Any). For the HTTP (IOS) and SMTP classes, you can choose whether to match all or any. When using a Match All table, if you add more than one criteria, ensure that you are not defining a set of characteristics that no traffic can match.

Tip

 
Match All works for devices running Cisco IOS Software version 12.4(20)T or later only.
  • To add a criterion, click the Add button and fill in the Match Criterion dialog box. For more information, see the topics referenced above.

  • To edit a criterion, select it and click the Edit button.

  • To delete a criterion, select it and click the Delete button.

Trend Content Filter Match Criteria

The match criteria for Trend Content Filter class maps differs from that of all other class maps. Instead of adding items to a table, you simply select the items you want from a list. Select the Enable checkbox for any of the Trend-Micro classifications on the following tabs. Traffic matches the class if it matches any of your selections.

  • Productivity Categories—Matches the traffic to the category to which the URL belongs. For example, you can target traffic associated with gambling or pornography.

  • Security Ratings—Matches the traffic to the security rating assigned to it by Trend-Micro. For example, you can target adware, which is traffic associated with advertising.

See the Trend-Micro documentation for specific information on these categories or security classifications.

Category

The category assigned to the object. Categories help you organize and identify rules and objects. See Using Category Objects.

Allow Value Override per Device

Overrides

Edit button

Whether to allow the object definition to be changed at the device level. For more information, see Allowing a Policy Object to Be Overridden and Understanding Policy Object Overrides for Individual Devices.

If you allow device overrides, you can click the Edit button to create, edit, and view the overrides. The Overrides field indicates the number of devices that have overrides for this object.

Zone-based Firewall IM Application Class Maps: Add or Edit Match Condition Dialog Boxes

Use the Add or Edit Match Criterion dialog boxes for the various instant messenger (IM) application classes used with zone-based firewall policies to define a match criterion and value for the class map.

You can define a match for the following types of traffic:

  • Any—Any type of traffic from the application except text chat traffic.

  • Text-chat—Text chat traffic.

Navigation Path

From the Add or Edit Class Maps dialog boxes for AOL, ICQ, MSN Messenger, Windows Messenger, or Yahoo Messenger classes, right-click inside the table and select Add Row or right-click a row and select Edit Row. See Configuring Class Maps for Zone-Based Firewall Policies.

Related Topics

Zone-based Firewall P2P Application Class Maps: Add or Edit Match Condition Dialog Boxes

Use the Add or Edit Match Criterion dialog boxes for the various peer-to-peer (P2P) application classes used with zone-based firewall policies to define a match criterion and value for the class map.

Navigation Path

From the Add or Edit Class Maps dialog boxes for eDonkey, FastTrack, Gnutella, or Kazaa2 classes, right-click inside the table and select Add Row, or right-click a row and select Edit Row. See Configuring Class Maps for Zone-Based Firewall Policies.

Related Topics
Field Reference
Table 4. Zone-based Firewall P2P Application Class Maps Add or Edit Match Condition Dialog Boxes

Element

Description

Criterion

Choose which criterion to match:

  • File Transfer – Matches file-transfer traffic.

  • Search Filename – Matches the names of files for which the user is searching. You can use this criterion to block users from searching for particular files using eDonkey.

  • Text Chat – Matches eDonkey text chat traffic.

Type

Specifies that the map includes traffic that matches the criterion.

File Name

The name of the file associated with the traffic. You can use regular expressions to specify a name pattern. For information on the metacharacters you can use to build regular expressions, see Metacharacters Used to Build Regular Expressions.

Tip

 
eDonkey does not require a file name.

H.323 (IOS) Class Maps Add or Edit Match Criterion Dialog Boxes


Note


From version 4.17, though Cisco Security Manager continues to support IOS features/functionality, it does not support any enhancements.

Use the Add or Edit Match Criterion dialog boxes for the H.323 (IOS) class used with zone-based firewall policies to define a match criterion and value for the class map. You can match traffic based on the H.323 protocol message type. Select the message that you want to match.

Navigation Path

From the Add or Edit Class Maps dialog boxes for the H.323 (IOS) class, right-click inside the table and select Add Row or right-click a row and select Edit Row. See Configuring Class Maps for Zone-Based Firewall Policies.

Related Topics

HTTP (IOS) Class Add or Edit Match Criterion Dialog Boxes


Note


From version 4.17, though Cisco Security Manager continues to support IOS features/functionality, it does not support any enhancements.

Use the Add or Edit Match Criterion dialog boxes for the HTTP (IOS) class used with zone-based firewall policies to define a match criterion and value for the class map.

The fields on this dialog box change based on the criterion you select. You can use the following criteria:

  • Request/Response Body Length, Request Body Length, Response Body Length—Specifies that the body length of the request, response, or both, is less than or greater than the specified number. This allows you to set a minimum or maximum message length.

  • Request/Response Body, Request Body, Response Body—Applies a regular expression to match the body of the request, response, or both.

  • Request/Response Header, Request Header, Response Header—You can match a regular expression against the header, test for repeated fields, check the content type, or check the total length or number of records in the header.

  • Request/Response Protocol Violation—Matches non-compliant HTTP traffic.

  • Request Argument, Request URI—Matches the length or content (with a regular expression) of the argument (parameters) or uniform resource identifier (URI) in a request message.

  • Request Port Misuse—Matches the misuse of ports by certain types of applications.

  • Response Body Java Applet—Matches Java applets in an HTTP connection.

  • Response Header Status Line—Applies a regular expression to match the content of the status line in the header.

Navigation Path

From the Add or Edit Class Maps dialog boxes for the HTTP (IOS) class, right-click inside the table and select Add Row or right-click a row and select Edit Row. See Configuring Class Maps for Zone-Based Firewall Policies.

Related Topics
Field Reference
Table 5. HTTP (IOS) Class Add or Edit Match Criterion Dialog Boxes

Element

Description

Criterion

Specifies which criterion of HTTP traffic to match. The criteria are described above.

Type

Specifies that the map includes traffic that matches the criterion.

Variable Fields

The following fields vary based on what you select in the Criterion field. This list is a super-set of the fields you might see.

Less Than Length

The minimum length in bytes of the evaluated field. The criterion matches if the length is less than the specified number.

Greater Than Length

The maximum length in bytes of the evaluated field. The criterion matches if the length is greater than the specified number.

Header Option

The type of header record. If you do not select a record type, the count or expression is applied to all records in the header. If you select a record type, those selections are applied only to the records of the selected type. If you select content type or transfer encoding, you can make additional selections related to those types.

Request Method

The request method you want to match.

Value (Content Type)

If you select content-type in the Header Option field, you can select these types:

  • Mismatch—Verifies the content-type of the response message against the accept field value of the request message.

  • Unknown—The content type is not known. Select Unknown when you want to evaluate the item against all known MIME types.

  • Violation—The content-type definition and the content type of the actual body do not match.

Encoding Type

If you select transfer encoding in the Header Option field, you can select these types:

  • All—All of the transfer encoding types.

  • Chunked—The message body is transferred as a series of chunks; each chunk contains its own size indicator.

  • Compress—The message body is transferred using UNIX file compression.

  • Deflate—The message body is transferred using zlib format (RFC 1950) and deflate compression (RFC 1951).

  • GZIP—The message body is transferred using GNU zip (RFC 1952).

  • Identity—No transfer encoding is performed.

Greater Than Count

The maximum number of records allowed in the header. If you select a specific header option, the count applies to those types of records. If you do not select a specific header option, the count applies to the total number of records in the header without regard to type.

Regular Expression

The regular expression object that defines the regular expression you want to use for pattern matching. Enter the name of the object. You can click Select to choose the object from a list of existing ones or to create a new regular expression object.

Port Misuse

The type of request port misuse you want to match. Your options are:

  • Any—Any of the listed types of misuse.

  • IM—Instant messaging protocol applications subject to inspection.

  • P2P—Peer-to-peer protocol applications subject to inspection.

  • Tunneling—Tunneling applications subject to inspection: HTTPPort/HTTPHost.

IMAP and POP3 Class Maps Add or Edit Match Criterion Dialog Boxes

Use the Add or Edit Match Criterion dialog boxes for the Internet Message Access Protocol (IMAP) and Post Office Protocol 3 (POP3) classes used with zone-based firewall policies to define a match criterion and value for the class map.

You can select the following criteria to identify matching traffic:

  • Invalid Command—Matches commands that are not valid on a POP3 server or IMAP connection.

  • Login Clear Text—Matches non-secure logins, where the password is being provided in clear text.

Navigation Path

From the Add or Edit Class Maps dialog boxes for the IMAP or POP3 classes, right-click inside the table and select Add Row or right-click a row and select Edit Row. See Configuring Class Maps for Zone-Based Firewall Policies.

Related Topics

SIP (IOS) Class Add or Edit Match Criterion Dialog Boxes


Note


From version 4.17, though Cisco Security Manager continues to support IOS features/functionality, it does not support any enhancements.

Use the Add or Edit Match Criterion dialog boxes for the SIP (IOS) class used with zone-based firewall policies to define a match criterion and value for the class map.

The fields on this dialog box change based on the criterion you select.

Navigation Path

From the Add or Edit Class Maps dialog boxes for the SIP (IOS) class, right-click inside the table and select Add Row or right-click a row and select Edit Row. See Configuring Class Maps for Zone-Based Firewall Policies.

Related Topics
Field Reference
Table 6. SIP (IOS) Class Add or Edit Match Criterion Dialog Boxes

Element

Description

Criterion

Specifies which criterion of traffic to match. You can select from the following:

  • Protocol Violation—Matches traffic that violates the protocol.

  • Request/Response Header Options—Matches a regular expression against the selected request or response header field.

  • Request Options—Matches the request method or matches a regular expression against the selected request header field.

  • Response Options—Matches a regular expression against the selected response header field or status message.

Type

Specifies that the map includes traffic that matches the criterion.

Variable Fields

The following fields vary based on what you select in the Criterion field. This list is a super-set of the fields you might see.

Header

The type of header in the request or response message. The regular expression is matched against the content of headers of the selected type.

Method

The request method you want to inspect:

  • ack—Acknowledges that the previous message is valid and accepted.

  • bye—Signifies the intention to terminate a call.

  • cancel—Terminates any pending request.

  • info—Communicates mid-session signaling information along the signaling path for the call.

  • invite—Sets up a call.

  • message—Sends an instant message.

  • notify—Informs subscribers of state changes.

  • options—Queries the capabilities of another user agent or a proxy server.

  • prack—Provides reliable transfer of provisional response messages.

  • refer—Indicates that the recipient should contact a third party using the contact information provided in the request.

  • register—Includes a contact address to which SIP requests for the address-of-record should be forwarded.

  • subscribe—Requests notification of an event or set of events at a later time.

  • update—Permits a client to update parameters of a session but has no impact on the state of a dialog.

Status

The regular expression is matched against the status line in the response.

Regular Expression

The regular expression object that defines the regular expression you want to use for pattern matching. Enter the name of the object. You can click Select to choose the object from a list of existing ones or to create a new regular expression object.

SMTP Class Maps Add or Edit Match Criterion Dialog Boxes

Use the Add or Edit Match Criterion dialog boxes for the SMTP classes used with zone-based firewall policies to define a match criterion and value for the class map.


Tip


Only the Data Length criterion is available for routers running Cisco IOS Software lower than 12.4(20)T.

The fields on this dialog box change based on the criterion you select. You can use the following criteria:

  • Data Length—Specifies that the data length of the traffic is greater than the specified number. You can match the data length of the traffic to determine if the data transferred in an SMTP connection exceeds the specified length in bytes. By default, inspection keeps data length below 20.

  • Body Regular Expression—Applies a regular expression to match the content types and content encoding types for text and HTML in the body of an e-mail message. Only text or HTML that uses 7-bit or 8-bit encoding is checked. The regular expression cannot be scanned in messages that use another encoding type (such as base64 or zip files).

  • Command Line Length—Specifies that the length of the ESMTP command line not be greater than the specified number. Use this to thwart Denial of Service (DoS) attacks.

  • Command Verb—Limits inspection to the selected SMTP or ESMTP command. If you configure inspection for SMTP, all commands are inspected unless you limit them.

  • Header Length—Specifies that the length of the SMTP header is greater than the specified number. Use this to thwart DoS attacks by limiting the possible size of the header.

  • Header Regular Expression—Applies a regular expression to match the content of the header of an e-mail message. For example, you can use this to test for particular patterns in the subject, from, or to fields.

  • Mime Content-Type Regular Expression—Applies a regular expression to match the Multipurpose Internet Message Exchange (MIME) content type of an e-mail attachment. Use this to prevent the transmission of undesired types of attachments.

  • Mime Encoding—Specifies the MIME encoding type for e-mail attachments that you want to inspect. You can use this to identify unknown or non-standard encodings to restrict their transmission.

  • Recipient Address—Applies a regular expression to match the recipient of an e-mail message in the SMTP RCPT command. Use this to search for a non-existent recipient, which might help you identify the source of spam.

  • Recipient Count—Specifies that the number of recipients for an e-mail message cannot be greater than the specified number. Use this to prevent spammers from sending e-mails to a large number of users.

  • Recipient Invalid Count—Specifies that the number of invalid recipients for an e-mail message cannot be greater than the specified number. Use this prevent spammers from sending e-mails to a large number common names, where they are fishing for real addresses. SMTP typically replies with a “no such address” message when an address is invalid; by putting a limit on the number of invalid addresses, you can prevent these replies to spammers.

  • Reply EHLO—Specifies the service extension parameter in an EHLO server reply. Use this to prevent a client from using a particular service extension.

  • Sender Address—Applies a regular expression to match the sender of an e-mail message. Use this to block specific senders, such as known spammers, from sending e-mail messages through the device.

Navigation Path

From the Add or Edit Class Maps dialog boxes for SMTP classes, right-click inside the table and select Add Row or right-click a row and select Edit Row. See Configuring Class Maps for Zone-Based Firewall Policies.

Related Topics
Field Reference
Table 7. SMTP Class Add or Edit Match Criterion Dialog Boxes

Element

Description

Criterion

Specifies which criterion of SMTP traffic to match. The criteria are described above.

Type

Specifies that the map includes traffic that matches the criterion.

Variable Fields

The following fields vary based on what you select in the Criterion field. This list is a super-set of the fields you might see.

Greater Than Length

The maximum length in bytes of the evaluated field. The criterion matches if the length is greater than the specified number.

Greater Than Count

The maximum number of recipients or invalid recipients allowed in the e-mail message. The criterion matches if the number is greater than the specified number.

Verb Option

User Defined Format

(For the Command Verb criterion.)

The SMTP or ESMTP command that you want to inspect. If you select User Defined, you must enter the text string that corresponds to a word in the body of the e-mail message. The word cannot include spaces or special characters; only alphanumeric characters.

Service Extension Parameter

User Defined Format

(For the Reply EHLO criterion.

The service extension parameter of an EHLO server reply that you want to inspect. Select one of the well-known parameters, or select User Defined to specify a private extension in the User Defined Format field.

Encoding Format

User Defined Format

The MIME encoding format for which you want to test. Encoding types are:

  • 7-bit—ASCII encoding.

  • 8-bit—Used for the exchange of e-mail messages containing octets outside the 7-bit ASCII range.

  • base64—Encodes binary data by treating it numerically and translating it into a base 64 representation.

  • quoted-printable-Encoding that uses printable characters to transmit 8-bit data over a 7-bit data path.

  • binary—Encodes using only 0 and 1.

  • unknown—Encoding type is not known.

  • x-uuencode-Nonstandard encoding.

  • user defined—An encoding type you define. If you select User Defined, you must enter the text string that defines the encoding type you are looking for.

Regular Expression

The regular expression object that defines the regular expression you want to use for pattern matching. Enter the name of the object. You can click Select to choose the object from a list of existing ones or to create a new regular expression object.

Sun RPC Class Maps Add or Edit Match Criterion Dialog Boxes

Use the Add or Edit Match Criterion dialog boxes for the Sun Remote Procedure Call (RPC) classes used with zone-based firewall policies to define a match criterion and value for the class map. You can enter the RPC protocol number that you want to match. See the Sun RPC documentation for information about protocol numbers.

Navigation Path

From the Add or Edit Class Maps dialog boxes for Sun RPC classes, right-click inside the table and select Add Row or right-click a row and select Edit Row. See Configuring Class Maps for Zone-Based Firewall Policies.

Related Topics

Local Web Filter Class Add or Edit Match Criterion Dialog Boxes

Use the Add or Edit Match Criterion dialog boxes for the Local web filter class to define a match criterion and value for the class map.

Navigation Path

From the Add or Edit Class Maps dialog boxes for the Local web filter class, right-click inside the table and select Add Row or right-click a row and select Edit Row. See Configuring Class Maps for Zone-Based Firewall Policies.

Related Topics
Field Reference
Table 8. Local Web Filter Class Add or Edit Match Criterion Dialog Boxes

Element

Description

Criterion

Specifies which criterion of traffic to match. You can select from the following:

  • Server Domain—Matches traffic based on the name of the server. The URLF Glob parameter map you select should specify server domain names such as *.cisco.com or www.cisco.com.

  • URL Keyword—Matches traffic based on keywords in the URLs. A key word is any complete string that occurs between / characters in a URL. For example, in the URL segment www.cisco.com/en/US, en and US are examples of keywords.

Type

Specifies that the map includes traffic that matches the criterion.

URLF Glob Parameter Map

The URLF Glob parameter map object that defines the URL patterns that you want to match. Ensure that the object you select has the appropriate content for the type of matching you selected.

Enter the name of the object. You can click Select to choose the object from a list of existing ones or to create a new object.

N2H2 and Websense Class Add or Edit Match Criterion Dialog Boxes

Use the Add or Edit Match Criterion dialog boxes for the N2H2 (SmartFilter) and Websense web filter classes to define a match criterion and value for the class map. The only match criterion available is to match any response from the SmartFilter or Websense server.

Navigation Path

From the Add or Edit Class Maps dialog boxes for the N2H2 or Websense web filter class, right-click inside the table and select Add Row or right-click a row and select Edit Row. See Configuring Class Maps for Zone-Based Firewall Policies.

Related Topics

Configuring Inspect Parameter Maps

Use the Add and Edit Inspect Parameter Map dialog boxes to define a parameter map for inspection for zone-based firewall policies on routers. If you configure the action of a zone-based firewall policy rule as Inspect or Content Filter, you can select an inspect parameter map to define connection, timeout, and other settings for the inspection action. If you do not select an inspect parameter map for a zone-based firewall rule, the system uses default values for these settings.

Navigation Path

Select Manage > Policy Objects, then select Maps > Parameter Maps > Inspect > Inspect Parameters in the table of contents. Right-click inside the work area and select New Object, or right-click a row and select Edit Object.

Related Topics

Field Reference

Table 9. Add or Edit Inspect Parameter Map Dialog Boxes

Element

Description

Name

The name of the policy object. A maximum of 40 characters is allowed.

Description

A description of the policy object. A maximum of 200 characters is allowed.

DNS Timeout

The length of time, in seconds, for which a DNS lookup session is managed while there is no activity.

ICMP Timeout

The length of time, in seconds, for which an inactive ICMP (Internet Control Message Protocol) session is maintained.

Max Incomplete Low

Max Incomplete High

The number of existing half-open sessions that will cause the software to start (at the high threshold) and stop (at the low threshold) deleting half-open sessions.

Ensure that you enter a lower number in the Low field than you enter in the High field, for example, 400 and 500. The default is unlimited half-open sessions.

One Minute Low

One Minute High

The number of new unestablished sessions that causes the system to start and stop deleting half-open sessions. Ensure that you enter a lower number in the Low field than you enter in the High field. The default is unlimited.

Max Sessions

The maximum number of inspection sessions on a zone pair, for example, 200. The default is unlimited.

TCP FINWAIT Timeout

How long to maintain TCP session state information after the firewall detects a FIN-exchange, in seconds. The FIN-exchange occurs when the TCP session is ready to close.

TCP SYNWAIT Timeout

How long to wait for a TCP session to reach the established state before dropping the session, in seconds.

TCP Idle Timeout

How long to maintain a TCP session while there is no activity in the session, in seconds.

TCP Max Incomplete Hosts

TCP Max Incomplete Block Time

The threshold and blocking time (in minutes) for TCP host-specific denial-of-service (DoS) detection and prevention.

The maximum incomplete hosts is the number of half-open TCP sessions with the same host destination address that can simultaneously exist before the software starts deleting half-open sessions to that host. An unusually high number of half-open sessions with the same destination host address could indicate that a DoS attack is being launched against the host.

When the threshold is exceeded, half-open sessions are dropped based on the maximum incomplete block time:

  • If the block time is 0, the software deletes the oldest existing half-open session for the host for every new connection request to the host. This ensures that the number of half-open sessions to a given host never exceeds the threshold.

  • If the block time is greater than 0, the software deletes all existing half-open sessions for the host and then blocks all new connection requests to the host. The software continues to block all new connection requests until the block time expires.

The software sends syslog messages whenever the specified threshold is exceeded and when blocking of connection initiations to a host starts or ends.

UDP Idle Timeout

How long to maintain a UDP session while there is no activity in the session, in seconds.

When the software detects a valid UDP packet, the software establishes state information for a new UDP session. Because UDP is a connectionless service, there are no actual sessions, so the software approximates sessions by examining the information in the packet and determining if the packet is similar to other UDP packets (for example, it has similar source or destination addresses) and if the packet was detected soon after another similar UDP packet.

If the software detects no UDP packets for the UDP session for the period of time defined by the UDP idle timeout, the software will not continue to manage state information for the session.

Enable Alert

Whether to generate stateful packet inspection alert messages on the console.

Enable Audit Trail

Whether audit trail messages are logged to the syslog server or router.

Category

The category assigned to the object. Categories help you organize and identify rules and objects. See Using Category Objects.

Allow Value Override per Device

Overrides

Edit button

Whether to allow the object definition to be changed at the device level. For more information, see Allowing a Policy Object to Be Overridden and Understanding Policy Object Overrides for Individual Devices.

If you allow device overrides, you can click the Edit button to create, edit, and view the overrides. The Overrides field indicates the number of devices that have overrides for this object.

Configuring Protocol Info Parameter Maps

Use the Add and Edit Protocol Info Parameter Map dialog boxes to define a parameter map for the inspection of Instant Messaging (IM) applications or the Stun-ice protocol for zone-based firewall policies on routers. If you configure the action of a zone-based firewall policy rule as Inspect, you must select a protocol info parameter map when you configure any of these applications: AOL, ICQ, MSN Messenger, Windows Messenger, Yahoo Messenger, Stun-ice. The protocol info parameter map defines the DNS servers that interact with these applications, which helps the instant messenger application engine to recognize the instant messenger traffic and to enforce the configured policy for that instant messenger application.

Navigation Path

Select Manage > Policy Objects, then select Maps > Parameter Maps > Inspect > Protocol Info Parameters in the table of contents. Right-click inside the work area and select New Object, or right-click a row and select Edit Object.

Related Topics

Field Reference

Table 10. Add or Edit Protocol Info Parameter Map Dialog Boxes

Element

Description

Name

The name of the policy object. A maximum of 40 characters is allowed.

Description

A description of the policy object. A maximum of 200 characters is allowed.

DNS Server Table

The DNS servers for which traffic will be permitted (and inspected) or denied.

Category

The category assigned to the object. Categories help you organize and identify rules and objects. See Using Category Objects.

Allow Value Override per Device

Overrides

Edit button

Whether to allow the object definition to be changed at the device level. For more information, see Allowing a Policy Object to Be Overridden and Understanding Policy Object Overrides for Individual Devices.

If you allow device overrides, you can click the Edit button to create, edit, and view the overrides. The Overrides field indicates the number of devices that have overrides for this object.

Add or Edit DNS Server for Protocol Info Parameters Dialog Box

Use the Add or Edit DNS Server dialog box to identify DNS servers for which traffic will be permitted (and inspected) or denied. These servers are defined in a Protocol Info parameter map for use with the inspection of protocols that require them in a zone-based firewall policy.

You can identify a server using any of these types:

  • Server Name—The name of the DNS server. You can use an asterisk (*) as a wildcard character to match one or more characters. For example, if you want to identify all DNS servers on the cisco.com domain, you can specify *.cisco.com.

  • IP Address—The IP address of a single DNS server.

  • IP Address Range—A range of IP addresses identifying any DNS server within the start and end addresses.

Navigation Path

From the Add or Edit Protocol Info Parameter Map dialog boxes, click the Add button beneath the server table, or select a server and click the Edit button. See Configuring Protocol Info Parameter Maps.

Configuring Policy Maps for Zone-Based Firewall Policies

Use the Add and Edit Policy Map dialog boxes for zone-based firewall policies to define the match criterion and values for an inspection map used in a zone-based firewall policy for a Cisco IOS router. You can create policy inspection maps for H.323 (IOS), HTTP (Zone based IOS), IM (Zone based IOS), IMAP, P2P, POP3, SIP (IOS), SMTP, and Sun RPC inspection, and the name of the dialog box indicates the type of map you are creating.

When defining the inspection map, you select class maps of the same type and define the action to take for matching traffic. You can configure the required class maps before creating the policy maps or while you are creating them.

Navigation Path

Select Manage > Policy Objects, then any of the following items in the Maps > Policy Maps > Inspect folder in the table of contents: H.323 (IOS), HTTP (Zone based IOS), IM (Zone based IOS), IMAP, P2P, POP3, SIP (IOS), SMTP, and Sun RPC. Right-click inside the work area and select New Object, or right-click a row and select Edit Object.

Related Topics

Field Reference

Table 11. Add or Edit Policy Maps Dialog Boxes for Zone-Based Firewall Policies

Element

Description

Name

The name of the policy object. A maximum of 40 characters is allowed.

Description

A description of the policy object. A maximum of 200 characters is allowed.

Match All table

The Match All table lists class maps included in the policy map, and the action to take for traffic that matches the class. For traffic to match this class, all criteria defined in the selected class maps must be met.

Category

The category assigned to the object. Categories help you organize and identify rules and objects. See Using Category Objects.

Allow Value Override per Device

Overrides

Edit button

Whether to allow the object definition to be changed at the device level. For more information, see Allowing a Policy Object to Be Overridden and Understanding Policy Object Overrides for Individual Devices.

If you allow device overrides, you can click the Edit button to create, edit, and view the overrides. The Overrides field indicates the number of devices that have overrides for this object.

Add or Edit Match Condition and Action Dialog Boxes for Zone-Based Firewall and Web Filter Policies

Use the Add or Edit Match Condition and Action dialog boxes for zone-based firewall and web filter policies to select the class maps for inspection and to define the action to take for traffic that matches the class. This dialog box is used for the following types of policy maps: H.323 (IOS), HTTP (Zone based IOS), IM (Zone based IOS), IMAP, P2P, POP3, SIP (IOS), SMTP, Sun RPC, Web Filter.

The fields on this dialog box differ slightly depending on the type of policy map you are defining.

Navigation Path

From the Add or Edit Policy Maps dialog boxes for Zone-Based Firewall Policies, right-click inside the match table and select Add Row or right-click a row and select Edit Row. See Configuring Policy Maps for Zone-Based Firewall Policies.

Related Topics
Field Reference
Table 12. Add or Edit Match Condition and Action Dialog Boxes for Zone-Based Firewall Policies

Element

Description

Match Type

Indicates that you are selecting a class map. You must define class maps when creating policy maps for zone-based firewall policies.

Class Map

P2P, IM, and Web Filter class map types.

The name of the class map for the type of policy map you are creating. Click Select to select the map from a list or to create a new class map object.

For P2P, IM, and Web Filter policy maps, you must also select the type of policy map you are creating. For example, in a P2P map you must select between eDonkey, FastTrack, Gnutella, and Kazaa2. In an IM (Zone Based IOS) map, you must select between AOL, MSN Messenger, Yahoo Messenger, Windows Messenger, and ICQ. In a Web Filter map, you must select between Local, N2H2, WebSense, and Trend.

Action

The action you want the device to take for traffic that matches the selected class.

Configuring Content Filtering Maps for Zone-based Firewall Policies

When you configure zone-based firewall policies for a router, you can define rules to filter Web content by choosing Content Filter as the Action for the rule.

To filter Web content, you must configure certain map objects, which you can do from the policy object selector dialog box while defining the rule, or at any time in the Policy Object Manager window (select Manage > Policy Objects).

The type of maps required depends on the technique you are using to filter content, and on the Cisco IOS software version you are using. You can filter content based on URL lists defined locally on the device, or you can use external filtering servers such as SmartFilter (N2H2), Websense, or Trend Micro.


Tip


If you use an external server, you must have set up and configured the server appropriately based on the documentation for the type of server you select. If you use Trend Micro servers, you must specify the server details, and register the product and download certificates, on the Content Filtering tab of the Zone Based Firewall page (select Firewall > Settings > Zone Based Firewall). See Zone-based Firewall Rules Page.

The following are requirements for the map objects used with zone-based content filtering:

  • For devices running releases below 12.4(20)T, you must create a URL Filter parameter map. In the Policy Object Manager, select Maps > Parameter Maps > Web Filter > URL Filter, and review the detailed usage information in Configuring URL Filter Parameter Maps.

    • To perform local filtering on the router using lists of allowed (part of allow list) and denied (part of block list) hosts, create the lists on the Local Filtering tab. Any Web access request is first compared to these lists before the request is sent on to an external filtering server (if you have configured one). These lists contain either complete domain names (such as www.cisco.com), or partial names (such as cisco.com), but they do not include paths or page names, and you cannot use wildcards.

    • To use a SmartFilter (N2H2) or Websense server, configure the type of server you are using and its address information on the External Filter tab. You can also configure other settings that control communication with the server. You cannot configure a Trend Micro server using the URL Filter parameter map.

  • For devices running release 12.4(20)T and later, the preferred approach is to use a Web Filter policy map. Although Web Filter policy maps are more complex, they provide added flexibility, and they let you access Trend Micro filtering servers. In the Policy Object Manager, select Maps > Policy Maps > Web Filter > Web Filter, and review the detailed usage information in Configuring Web Filter Maps.

A Web Filter policy map incorporates other types of maps. To create the policy map, you will need one or more of these other types of maps:

    • Parameter maps – On the Parameters tab of the Add and Edit Web Filter Map dialog boxes, you can select parameter maps for the various types of Web filtering if you do not want to use the default settings. If you are using SmartFilter (N2H2) or Websense, you need to select a parameter map because the map identifies those servers. For Local and Trend Micro filtering, parameter maps configure some general settings, the most interesting of which is whether to display a message or Web page when a URL is blocked. In the Policy Object Manager, you can find parameter maps for Local, N2H2, Trend, and Websense in the Maps > Parameter Maps > Web Filter folder. For detailed usage information, see Configuring Local Web Filter Parameter Maps, Configuring N2H2 or WebSense Parameter Maps, or Configuring Trend Parameter Maps.


Note


You configure Trend Micro server information on the Content Filtering tab of the Zone Based Firewall page (select Firewall > Settings > Zone Based Firewall). See Zone-based Firewall Rules Page.
    • Class maps for match conditions – These class maps define the type of traffic you want to target and specify the action to be taken. You select a type of filtering (Local, SmartFilter/N2H2, Websense, or Trend Micro), specify the class map that identifies the targeted traffic, and choose an action (such as Allow, Reset, etc.) to be taken for that traffic. In the Policy Object Manager, you can find class maps for Local, N2H2, Trend, and Websense in the Maps > Class Maps > Web Filter folder.

These class-map configurations depend on the type of filtering:

Local Filtering – The Local WebFilter class map is a list of one or more URLF Glob parameter maps that specify either domain names or URL keywords that you want to target. A URL keyword is any text string delineated by forward-slash (/) characters in a URL. These class maps help you define allowed (part of allow list) and denied (part of block list) URL lists for a WebFilter policy—create separate maps for each list. For detailed usage information, see Configuring Class Maps for Zone-Based Firewall Policies, Local Web Filter Class Add or Edit Match Criterion Dialog Boxes, and Configuring URLF Glob Parameter Maps.

SmartFilter (N2H2) or Websense Filtering—The class maps for N2H2 and Websense define any server response as the matching criterion. For detailed usage information, see Configuring Class Maps for Zone-Based Firewall Policies.

Trend Micro Filtering – The Trend class map lets you select various Productivity Categories and Security Ratings, as defined by Trend Micro, that you want to target. For detailed usage information, see Configuring Class Maps for Zone-Based Firewall Policies.

Besides the maps used to define content filtering, you can also configure the following maps for content filter rules:

Related Topics

Configuring Local Web Filter Parameter Maps

Use the Add and Edit Local Parameter Map dialog boxes to define a parameter map for local web filtering for zone-based firewall policies on routers. If you configure the action of a zone-based firewall policy rule as Content Filter, you can select a Web Filter policy map that incorporates a Local web filter parameter map (when you select Local for the parameter type on the Parameter tab). For more information about Web Filter policy maps, see Configuring Web Filter Maps.

Navigation Path

Select Manage > Policy Objects, then select Maps > Parameter Maps > Web Filter > Local in the table of contents. Right-click inside the work area and select New Object, or right-click a row and select Edit Object.

Related Topics

Field Reference

Table 13. Add or Edit Local Web Filter Parameter Map Dialog Boxes

Element

Description

Name

The name of the policy object. A maximum of 40 characters is allowed.

Description

A description of the policy object. A maximum of 200 characters is allowed.

Enable Alert

Whether to generate stateful packet inspection alert messages on the console.

Enable Allow Mode

Whether to allow or block URL requests when the URL filtering process does not have connectivity to a URL filtering database. When allow-mode is on, all unmatched URL requests are allowed; when off, all unmatched URL requests are blocked.

Block Page

The web page you want to present to the user if the user attempts to access a page that you block. You can select from the following:

  • None—The user is not presented with any information.

  • Message—The user is presented with the text message you enter in the edit box.

  • Redirect URL—The user is redirected to the URL you enter in the edit box.

Category

The category assigned to the object. Categories help you organize and identify rules and objects. See Using Category Objects.

Allow Value Override per Device

Overrides

Edit button

Whether to allow the object definition to be changed at the device level. For more information, see Allowing a Policy Object to Be Overridden and Understanding Policy Object Overrides for Individual Devices.

If you allow device overrides, you can click the Edit button to create, edit, and view the overrides. The Overrides field indicates the number of devices that have overrides for this object.

Configuring N2H2 or WebSense Parameter Maps

Use the Add and Edit N2H2 or Websense Parameter Map dialog boxes to define a parameter map for Smartfilter (N2H2) or Websense web filtering for zone-based firewall policies on routers. If you configure the action of a zone-based firewall policy rule as Content Filter, you can select a Web Filter policy map that incorporates an N2H2 or Websense web filter parameter map (when you select N2H2 or Websense for the parameter type on the Parameter tab). For more information about Web Filter policy maps, see Configuring Web Filter Maps.

Navigation Path

Select Manage > Policy Objects, then select N2H2 or WebSense from the Maps > Parameter Maps > Web Filter folder in the table of contents. Right-click inside the work area and select New Object, or right-click a row and select Edit Object.

Related Topics

Field Reference

Table 14. Add or Edit N2H2 or WebSense Parameter Map Dialog Boxes

Element

Description

Name

The name of the policy object. A maximum of 40 characters is allowed.

Description

A description of the policy object. A maximum of 200 characters is allowed.

URL Filtering Server Table

The list of URL filtering servers and their attributes.

  • To add servers, click the Add button and fill in the Add External Filter dialog box (see Add or Edit External Filter Dialog Box).

  • To edit a server, select it and click the Edit button.

  • To delete a server, select it and click the Delete button.

Enable Alert

Whether to generate stateful packet inspection alert messages on the console.

Enable Allow Mode

Whether to allow or block URL requests when the URL filtering process does not have connectivity to a URL filtering database. When allow-mode is on, all unmatched URL requests are allowed; when off, all unmatched URL requests are blocked.

Block Page

The web page you want to present to the user if the user attempts to access a page that you block. You can select from the following:

  • None—The user is not presented with any information.

  • Message—The user is presented with the text message you enter in the edit box.

  • Redirect URL—The user is redirected to the URL you enter in the edit box.

Source Interface

The interface whose IP address should be used as the source IP address when a TCP connection is established between the system and the URL filtering server.

Maximum Cache Entries

The maximum number of entries to store in the categorization cache. The default is 5000.

Cache Life Time

How long, in hours, an entry remains in the cache table. The default is 24.

Maximum Requests

The maximum number of pending requests. The range is from 1 to 2147483647. The default is 1000.

Maximum Responses

The maximum number of HTTP responses that can be buffered. The range is from 0 and 20000. The default is 200.

Truncate Hostname

Truncate Script Parameters

Whether to truncate the URLs:

  • If you do not select an option, URLs are not truncated.

  • If you select Hostname, URLs are truncated at the end of the domain name.

  • If you select Script Parameters, URLs are truncated at the left-most question mark in the URL.

Tip

 
Although you can select both options, it is illogical to do so.

Enable Server Log

Whether to send information about HTTP requests to the URL filtering server’s log server. The information includes the URL, the hostname, the source IP address, and the destination IP address.

Category

The category assigned to the object. Categories help you organize and identify rules and objects. See Using Category ObjectsF.

Allow Value Override per Device

Overrides

Edit button

Whether to allow the object definition to be changed at the device level. For more information, see Allowing a Policy Object to Be Overridden and Understanding Policy Object Overrides for Individual Devices.

If you allow device overrides, you can click the Edit button to create, edit, and view the overrides. The Overrides field indicates the number of devices that have overrides for this object.

Add or Edit External Filter Dialog Box

Use the Add or Edit External Filter dialog box to add a URL filtering server to an N2H2, Websense, or URL Filter parameter map policy object.

Navigation Path

Click the Add button beneath the server table, or select a server and click the Edit button, from any of the following dialog boxes:

Field Reference
Table 15. Add or Edit External Filter Dialog Box

Element

Description

Server

The fully-qualified domain name or IP address of the URL filtering server.

Port

The port that is listening for requests.

Retransmission Count

The number of times the router retransmits the lookup request when a response is not received from the server. The range is from 1 to 10.

Timeout

The number of seconds that the router waits for a response from the server. The range is from 1 to 300.

Outside

Whether the server is outside the network.

Configuring Trend Parameter Maps

Use the Add and Edit Trend Parameter Map dialog boxes to define a parameter map for Trend Micro web filtering for zone-based firewall policies on routers. If you configure the action of a zone-based firewall policy rule as Content Filter, you can select a Web Filter policy map that incorporates a Trend web filter parameter map (when you select Trend for the parameter type on the Parameter tab). For more information about Web Filter policy maps, see Configuring Web Filter Maps.

Navigation Path

Select Manage > Policy Objects, then select Maps > Parameter Maps > Web Filter > Trend in the table of contents. Right-click inside the work area and select New Object, or right-click a row and select Edit Object.

Related Topics

Field Reference

Table 16. Add or Edit Trend Parameter Map Dialog Boxes

Element

Description

Name

The name of the policy object. A maximum of 40 characters is allowed.

Description

A description of the policy object. A maximum of 200 characters is allowed.

Enable Allow Mode

Whether to allow or block URL requests when the URL filtering process does not have connectivity to a URL filtering database. When allow-mode is on, all unmatched URL requests are allowed; when off, all unmatched URL requests are blocked.

Block Page

The web page you want to present to the user if the user attempts to access a page that you block. You can select from the following:

  • None—The user is not presented with any information.

  • Message—The user is presented with the text message you enter in the edit box.

  • Redirect URL—The user is redirected to the URL you enter in the edit box.

Maximum Requests

The maximum number of pending requests. The range is from 1 to 2147483647. The default is 1000.

Maximum Responses

The maximum number of HTTP responses that can be buffered. The range is from 0 and 20000. The default is 200.

Truncate Hostname

Whether to truncate URLs at the end of the domain name.

Category

The category assigned to the object. Categories help you organize and identify rules and objects. See Using Category Objects.

Allow Value Override per Device

Overrides

Edit button

Whether to allow the object definition to be changed at the device level. For more information, see Allowing a Policy Object to Be Overridden and Understanding Policy Object Overrides for Individual Devices.

If you allow device overrides, you can click the Edit button to create, edit, and view the overrides. The Overrides field indicates the number of devices that have overrides for this object.

Configuring URL Filter Parameter Maps

Use the Add and Edit URL Filter Parameter Map dialog boxes to define the parameters and match criterion and values for an inspection map used in a zone-based firewall policy for a router.

If you configure the action of a zone-based firewall policy rule as Content Filter, you can select a URL Filter parameter map to define web filtering parameters and match criteria. However, if the router is running Cisco IOS Software release 12.4(20)T or later, the recommended approach is to configure a Web Filter policy map along with parameter and class maps for the appropriate server type (local, N2H2, Trend, or Websense). For more information, see Configuring Web Filter Maps.

Navigation Path

Select Manage > Policy Objects, then select Maps > Parameter Maps > Web Filter > URL Filter in the table of contents. Right-click inside the work area and select New Object, or right-click a row and select Edit Object.

Related Topics

Field Reference

Table 17. Add or Edit URL Filter Parameter Map Dialog Boxes

Element

Description

Name

The name of the policy object. A maximum of 40 characters is allowed.

Description

A description of the policy object. A maximum of 200 characters is allowed.

Local Filtering Tab

The fields on this tab define the properties for local URL filtering.

Permitlisted and Blocklisted Domains tables

These tables define the domain names for which the software will not contact the external URL filtering server. Domain names on the allowed list are always allowed. Domain names on the blocked list are always blocked. Use these lists to identify entire domains that you want to allow without restriction (such as your company’s web site) or block completely (such as pornography sites).

Domain names can be complete (including the host name, such as www.cisco.com), or partial (such as cisco.com). For partial names, all web site hosts on that domain are either permitted or denied. You can also enter host IP addresses.

Enable Alert

Whether to generate stateful packet inspection alert messages on the console.

Enable Audit Trail

Whether to log URL information to the syslog server or router.

Enable Allow Mode

Whether to allow or block URL requests when the URL filtering process does not have connectivity to a URL filtering database. When allow-mode is on, all unmatched URL requests are allowed; when off, all unmatched URL requests are blocked.

External Filtering Tab

The fields on this tab define the properties for an external URL filtering server.

Server Type

Server Table

The type of external URL filtering server you are configuring, either SmartFilter (N2H2) or Websense.

  • To add servers, click the Add button and fill in the Add External Filter dialog box (see Add or Edit External Filter Dialog Box).

  • To edit a server, select it and click the Edit button.

  • To delete a server, select it and click the Delete button.

Source Interface

The interface whose IP address should be used as the source IP address when a TCP connection is established between the system and the URL filtering server.

Maximum Cache Entries

The maximum number of entries to store in the categorization cache. The default is 5000.

Maximum Requests

The maximum number of pending requests. The range is from 1 to 2147483647. The default is 1000.

Maximum Responses

The maximum number of HTTP responses that can be buffered. The range is from 0 and 20000. The default is 200.

Truncate Hostname

Truncate Script Parameters

Whether to truncate the URLs:

  • If you do not select an option, URLs are not truncated.

  • If you select Hostname, URLs are truncated at the end of the domain name.

  • If you select Script Parameters, URLs are truncated at the left-most question mark in the URL.

Do not select any truncate options for devices running software releases lower than 12.4(15)T or you will receive a validation error.

Tip

 
Although you can select both options, it is illogical to do so.

Enable Server Log

Whether to send information about HTTP requests to the URL filtering server’s log server. The information includes the URL, the hostname, the source IP address, and the destination IP address.

Additional Fields

Category

The category assigned to the object. Categories help you organize and identify rules and objects. See Using Category Objects.

Allow Value Override per Device

Overrides

Edit button

Whether to allow the object definition to be changed at the device level. For more information, see Allowing a Policy Object to Be Overridden and Understanding Policy Object Overrides for Individual Devices.

If you allow device overrides, you can click the Edit button to create, edit, and view the overrides. The Overrides field indicates the number of devices that have overrides for this object.

Add or Edit URL Domain Name Dialog Box for URL Filter Parameters

Use the Add URL Domain Name dialog box to add web site domain names to the allow lists (allowed) or block lists (not allowed).

Domain names can be complete (including the host name, such as www.cisco.com), or partial (such as cisco.com). For partial names, all web site hosts on that domain are either permitted or denied. You can also enter host IP addresses.

Navigation Path

From the Add or Edit URL Filter Parameter Map dialog boxes, click the Add button beneath the allow list or block list tables, or select a name and click the Edit button. See Configuring URL Filter Parameter Maps.

Configuring URLF Glob Parameter Maps

Use the Add and Edit URLF Glob Parameter Map dialog boxes to define a parameter map for the inspection of URLs in a Local web filter class map.

A single URLF Glob should contain only segments of URLs that you want to block or allow. Your goal is to create class maps of allowed or block listed URLs. You can then define Local web filter policy maps to allow or block the identified URLs.

A single URLF Glob must also be limited to one of these types of URL segments:

  • Strings that appear in the server name of a URL, which includes the name of the server and the domain name of the network. For example, www.cisco.com.

  • Strings that appear in URL keywords, which are the strings that appear between / characters in a URL, or which are the file names. For example, in the URL segment www.cisco.com/en/US/, both en and US are keywords. The file name in a URL, such as index.html, is also considered a keyword.

You cannot use the characters /, {, }, and ? in a URLF glob.

To match a server name or URL keyword, the string in the URL must match exactly the string included in the URLF glob unless you use wildcard metacharacters to specify a variable string pattern. You can use the following metacharacters for pattern matching for either server names or URL keywords:

  • * (Asterisk). Matches any sequence of zero or more characters. For example, *.edu matches all servers in the education domain, and you could use hack* to block www.example.com/hacksite/123.html.

  • [abc] (Character class). Matches any character in the brackets. The character matching is case sensitive. For example, [abc] matches a, b, or c, but not A, B, or C. Thus, you could use www.[ey]xample.com to block both www.example.com and www.yxample.com.

  • [a-c] (Character range class). Matches any character in the range. The character matching is case sensitive. [a-z] matches any lowercase letter. You can mix characters and ranges; for example, [abcq-z] matches a, b, c, q, r, s, t, u, v, w, x, y, z, and so does [a-cq-z].The dash (-) character is literal only if it is the last or the first character within the brackets, [abc-] or [-abc].

  • [0-9] (Numerical range class). Matches any number in the brackets. For example [0-9] matches 0, 1, 2, 3, 4, 5, 6, 7, 8, or 9. Thus, you can use www.example[0-9][0-9].com to block www.example01.com, www.example33.com, and www.example99.com (and so forth).

Navigation Path

Select Manage > Policy Objects, then select Maps > Parameter Maps > Web Filter > URLF Glob Parameters in the table of contents. Right-click inside the work area and select New Object, or right-click a row and select Edit Object.

Related Topics

Field Reference

Table 18. Add or Edit URLF Glob Parameter Map Dialog Boxes

Element

Description

Name

The name of the policy object. A maximum of 40 characters is allowed.

Description

A description of the policy object. A maximum of 200 characters is allowed.

Value

The server domains or keywords for the URLs you are targeting. Enter only one type of glob: either all server domains, or all URL keywords, but not a mixture of both.

If you include more than one entry, separate the entries with new lines. For example, the following entries identify all government or education web servers:


*.gov
*.edu

Category

The category assigned to the object. Categories help you organize and identify rules and objects. See Using Category Objects.

Allow Value Override per Device

Overrides

Edit button

Whether to allow the object definition to be changed at the device level. For more information, see Allowing a Policy Object to Be Overridden and Understanding Policy Object Overrides for Individual Devices.

If you allow device overrides, you can click the Edit button to create, edit, and view the overrides. The Overrides field indicates the number of devices that have overrides for this object.

Configuring Web Filter Maps

Use the Add and Edit Web Filter Map dialog boxes to define the parameters and match criterion and values for an inspection map used in a zone-based firewall policy for a router.

If you configure the action of a zone-based firewall policy rule as Content Filter, you can select a Web Filter policy map to define web filtering parameters and match criteria. You can select Web Filter policy maps only for routers running Cisco IOS Software release 12.4(20)T and later. If you are configuring zone-based firewalls for routers running Cisco IOS Software release 12.4(6)T up to 12.4(20)T, you must configure a URL Filter parameter map instead of a Web Filter policy map. For more information, see Configuring URL Filter Parameter Maps.

You can configure a mix of local and server-based web filtering. To do this, you should select a parameter map appropriate for the type of server you are using, and for the match criteria, an appropriate mix of local and server class maps. Do not mix class and parameter maps for different types of servers.

Navigation Path

Select Manage > Policy Objects, then select Maps > Policy Maps > Web Filter > Web Filter from the Object Type selector. Right-click inside the table and select New Object or right-click a row and select Edit Object.

Related Topics

Field Reference

Table 19. Add and Edit FTP Map Dialog Boxes

Element

Description

Name

The name of the policy object. A maximum of 40 characters is allowed.

Description

A description of the policy object. A maximum of 200 characters is allowed.

Parameters tab

Parameter Type

Parameter Map

The type of parameter map to include in the Web Filter policy map. Select None if you do not want to select a parameter map.

If you select a specific parameter type, enter the name of the parameter map in the Parameter Map field. Click Select to select the map from a list or to create a new parameter map object.

Match Condition and Action Tab

The Match All table lists class maps included in the policy map, and the action to take for traffic that matches the class. For traffic to match this class, all criteria defined in the selected class maps must be met.

Category

The category assigned to the object. Categories help you organize and identify rules and objects. See Using Category Objects.

Allow Value Override per Device

Overrides

Edit button

Whether to allow the object definition to be changed at the device level. For more information, see Allowing a Policy Object to Be Overridden and Understanding Policy Object Overrides for Individual Devices.

If you allow device overrides, you can click the Edit button to create, edit, and view the overrides. The Overrides field indicates the number of devices that have overrides for this object.

Changing the Default Drop Behavior

By default, all traffic between zones is dropped unless explicitly allowed. However, you can change this default behavior, as described in this section.

Security Manager converts the parameters—including class, parameter, and policy maps—that you supply for zone-based firewall rules into a series of IOS commands that the router will recognize. These are the so-called "CLI" (command line interface) configuration commands, which you can preview in separate window by choosing Tools > Preview Configuration. See Previewing Configurations for more information. In addition, the section, Troubleshooting Zone-based Rules and Configurations, discusses an example of zone-based firewall CLI commands.

For the purposes of this discussion, the most interesting of these commands is policy-map, which is used to apply your zone policy for each pair of zones. That is, for any given zone-pair, all rules defining traffic (classes) and actions are applied within one policy-map. Further, Security Manager appends the current class-default class to the end of each policy-map’s class list to capture any packets not processed by a zone rule.

The default class-default is drop—appending this class to each policy-map is how the implicit dropping of traffic between zones is accomplished. However, as mentioned, you can change this default behavior for any zone-pair. For example, you might elect to pass all unmatched traffic, or you might change the default to drop and log so you can determine what traffic is not being matched by your existing rules.


Note


The only options for the default behavior are Drop, Drop and Log, Pass, and Pass and Log.

If you want the default policy to continue to drop packets, you do not have to do anything in Security Manager. This rule is generated automatically. If you do want to change the default behavior for a zone-pair, you must provide a Permit any any IP rule (that is, Match: Permit; Sources: any; Destinations: any; Services: IP in the Adding and Editing Zone-based Firewall Rules), with Drop and Log, Pass, or Pass and Log as the chosen Action. You must also ensure that this rule appears last in the list of rules for a zone pair. Security Manager interprets this as the intended class-default rule.

If your zone-based rules table includes a large number of rules, it might be difficult to ensure that this rule comes after all other rules for a zone pair. Here are a couple of techniques you can use to alleviate this:

  • Use sections to organize the table, with one section per zone-pair. This will make it easier for you to order the rules for a zone-pair, as well as ensuring that the class-default rule comes last. For more information on working with sections, see Using Sections to Organize Rules Tables.

  • Create a shared zone-based rules policy that includes the class-default rule in the Default scope, and inherit this rule in the device’s local zone-based rule policy. For more information on inheritance and creating shared policies, see Inheriting or Uninheriting Rules and Creating a New Shared Policy.

Configuring Settings for Zone-based Firewall Rules

Use the Zone Based Firewall settings page to: identify unreferenced zones; specify a zone for VPN interfaces; enable or disable WAAS support; maintain Trend Micro server and certificate information; and specify global Log settings.


Note


From version 4.21 onwards, Cisco Security Manager terminates whole support, including support for any bug fixes or enhancements, for all Aggregation Service Routers, Integrated Service Routers, Embedded Service Routers, and any device operating on Cisco IOS software.

Related Topics

Procedure


Step 1

Access the Zone Based Firewall Page as follows:

  • (Device view) Select an IOS device and then select Firewall > Settings > Zone Based Firewall from the Policy selector.

  • (Policy view) Select Firewall > Settings > Zone Based Firewall from the Policy Type selector. Select an existing policy or create a new one.

Step 2

(Optional) On the Zones tab: add, edit and delete unreferenced zones.

The Zones tab lists all unreferenced zones defined on the device; that is, zones without any associated interfaces, rules or policies. Unreferenced zones are usually found and listed during device discovery, but you also can create named, “empty” zones here.

Step 3

(Optional) On the VPN tab, supply the name of the zone specifically set up for VPN traffic.

This zone ensures that dynamic VPN traffic can be processed by the zone-based firewall rules on this router. See Using VPNs with Zone-based Firewall Policies for more information.

Step 4

(Optional) On the WAAS tab, select Enable WAAS to enable Wide Area Application Services interoperability.

If this option is not enabled, packets being optimized by a WAAS device may be dropped because WAAS increases the TCP packet sequence number during the TCP handshake. This behavior may be viewed as a possible attack by the IOS device.

Step 5

(Optional) On the Content Filter Settings tab, provide server settings for Trend Micro-based content filtering.

To use Trend Micro-based content filtering, you must configure contact information for the Trend Micro server on this tab of the Zone Based Firewall page. This tab also provides links to Trend Micro registration and certificate download. You must have an active subscription with Trend Micro to utilize this form of content filtering, and you must download and install a valid subscription certificate on this IOS device.

For more information, see Zone Based Firewall Page - Content Filter Tab.

Step 6

(Optional) On the Global Parameters (ASR) tab, you can configure global, logging-related settings specific to ASR devices:

  • Log Dropped Packets – Select this option to log all packets dropped by the device; syslog logging must be enabled to view the information.

  • Log Flow export timeout rate – NetFlow logs are created after a flow either expires or is timed out, and it is important to put a time limit on how long a flow can be active before expiring. This value is maximum number of minutes a flow can remain active before it is expired. The value can be any integer from 1 to 3600; the default is 30.

  • Log Flow export destination IP – The IP address or host name of the NetFlow collector to which flow data is to be sent.

  • Log Flow export destination port – The UDP port monitored by the NetFlow collector for flow data.


Zone Based Firewall Page

Use the Zone Based Firewall page to configure and identify unreferenced zones, specify a VPN zone, enable or disable WAAS support, maintain Trend Micro server and certificate information, and specify global Log settings on supported ASR devices.

The following tabs are described in the table on this page:

  • Zones

  • VPN

  • WAAS

  • Global Parameters (ASR)

The Content Filtering tab is detailed in Zone Based Firewall Page - Content Filter Tab.

Navigation Path

To access the Zone Based Firewall page, do one of the following:

  • (Device view) Select a device, then select Firewall > Settings > Zone Based Firewall from the Policy selector.

  • (Policy view) Select Firewall > Settings > Zone Based Firewall from the Policy Type selector. Create a new policy or select an existing one.

  • (Map view) Right-click a device and choose Edit Firewall Settings > Zone Based Firewall.

Related Topics

Field Reference

Table 20. Zone Based Firewall Page

Element

Description

Zones tab

This tab displays the Zones table, which lists unreferenced zones; that is zones without any associated interfaces, rules or policies. Unreferenced zones are usually found and listed during device discovery, but you also can create named, “empty” zones here.

The Zones table lists the following information for each unreferenced zone:

  • Zone – The name of the Zone/Interface Role.

  • Content – Any interfaces assigned to the zone.

  • Description – Any user-provided comments about the zone.

To add a zone to this table, click the Add Row button and provide a Zone name in the Zone dialog box.

VPN tab

This tab presents the VPN Zone field; a zone entry in this field ensures that dynamic VPN traffic can be processed by the zone-based firewall rules on this router. See Using VPNs with Zone-based Firewall Policies for more information about this zone.

Enter or Select the zone through which VPN traffic will pass.

WAAS tab

This tab presents the Enable WAAS check box. Select this option to enable Wide Area Application Services interoperability.

If this option is not enabled, packets being optimized by a WAAS device may be dropped because WAAS increases the TCP packet sequence number during the TCP handshake. This behavior may be viewed as a possible attack by the IOS device.

Content Filtering tab

This tab displays server settings and certificate links for Trend Micro-based content filtering. For more information, see Zone Based Firewall Page - Content Filter Tab.

Global Parameters (ASR) tab

This tab displays global, logging-related settings specific to ASR devices. Configure these settings as follows:

  • Log Dropped Packets – Select this option to log all packets dropped by the device; syslog logging must be enabled to view the information.

  • Log Flow export timeout rate – NetFlow logs are created after a flow either expires or is timed out, and it is important to put a time limit on how long a flow can be active before expiring. This value is maximum number of minutes a flow can remain active before it is expired. The value can be any integer from 1 to 3600; the default is 30.

  • Log Flow export destination IP – The IP address or host name of the NetFlow collector to which flow data is to be sent.

  • Log Flow export destination port – The UDP port monitored by the NetFlow collector for flow data.

Zone Based Firewall Page - Content Filter Tab

To use Trend Micro-based content filtering, you must configure contact information for the Trend Micro server on this tab of the Zone Based Firewall page. This tab also provides links to Trend Micro registration and certificate download. You must have an active subscription with Trend Micro to utilize this form of content filtering, and you must download and install a valid subscription certificate on this IOS device.

Navigation Path

To access the Zone Based Firewall page, do one of the following:

  • (Device view) Select a device, then select Firewall > Settings > Zone Based Firewall from the Device selector.

  • (Policy view) Select Firewall > Settings > Zone Based Firewall from the Policy selector.

  • (Map view) Right-click a device and choose Edit Firewall Settings > Zone Based Firewall.

Related Topics
Field Reference
Table 21. Zone Based Firewall Page - Content Filter Tab

Element

Description

Trend Micro Server Settings

Cache-entry-lifetime (hrs)

How long, in hours, a look-up request to the Trend Micro server remains in the router’s local URL cache table. The allowed range is 0 to 120; the default value is 24.

Cache-size (KBytes)

The maximum amount of memory to be used by the router’s local URL cache. The allowed range is 0 to 120,000 KB; the default value is 250.

Server

The fully-qualified domain name or IP address of the Trend Micro URL filtering server.

HTTP Port

The port the Trend Micro server is listening to for HTTP requests. The default is 80.

HTTPS Port

The port the Trend Micro server is listening to for HTTPS requests. The default is 443.

Retransmission Count

The number of times the router retransmits a look-up request when a response is not received from the server. The range is 1 to 10.

Retransmission Timeout

The number of seconds that the router waits for a response from the server. The range is 1 to 300.

Alert

Whether stateful packet inspection messages are copied to the syslog.

Trend Micro Server Certificate Download Links

Link to download certificates

Opens the page for installing Trusted Authority Certificates on Cisco IOS Routers for Trend URL Filtering Support.

Link for product registration

Opens the page for Product License Registration. You must enter the Product Authorization Key and register the router.

Zone Dialog Box

Use the Add and Edit Zone dialog boxes to add and edit unreferenced zones—zones without any associated interfaces, rules or policies.

Navigation Path

To access the Add and Edit Zone dialog boxes, do one of the following:

  • (Device view) Select a device, then select Firewall > Settings > Zone Based Firewall from the Device selector. Right-click inside the Zones table, then select Add Row, or right-click a line item, then select Edit Row.

  • (Policy view) Select Firewall > Settings > Zone Based Firewall from the Policy selector. Right-click inside the table, then select Add Row, or right-click a line item, then select Edit Row.

  • (Map view) Right-click a device and select Edit Firewall Policies > Settings > Zone Based Firewall Rules.

Enter a zone name in the Zone field, or click Select to choose one from the Interfaces Selector dialog box.

Related Topics

Troubleshooting Zone-based Rules and Configurations

Zone-based firewall rules are powerful, but also complex. Using zone rules, you can replace access rules, inspection rules, and Web filter rules with a single type of firewall rule. Because zone-based firewall rules can perform so many possible actions, the configuration generated from them uses many different types of configuration commands, including structures for access control lists (ACLs), class maps, and policy maps. There is no one-to-one correspondence between a zone-based firewall rule and a line in the configuration (unlike access rules, for example).

To illustrate this complexity, this topic describes the relationship between zone-based firewall rules and the configuration generated from them. You do not need to know any of the information in this topic to create and deploy zone-based firewall rules. However, if you are familiar with the CLI (command line interface), or if you find that your rules are generating undesired results, this information can help you understand and troubleshoot zone-based firewall rules.

Consider the set of rules shown in the following illustration. These rules form a policy for a single zone pair, affecting traffic moving from the Inside zone to the Outside zone. This is traffic from your internal network going to the Internet. The rules define the following actions:

  • Drop all traffic from the 10.100.10.0/24 and 10.100.11.0/24 networks.

  • Drop all FTP and FTPS traffic from the 10.100.12.0/24 network.

  • Drop all peer-to-peer traffic from any network.

  • Inspect (and allow) all FTP/FTPS traffic (except for that from 10.100.12.0/24, which is already dropped).

  • Inspect all HTTP traffic using an additional deep-inspection policy map.

  • And finally, perform generic inspection of all remaining TCP/UDP traffic.

Figure 3. Example of Zone-based Rules for a Zone Pair

When you deploy these rules, Security Manager generates the following configuration. The bold letters are added for reference in the explanation that follows the configuration.

A.


class-map type inspect http match-any HTTPcmap
 match req-resp protocol-violation
 match request port-misuse any
!

B.


policy-map type inspect http HTTPpmap
 class type inspect http HTTPcmap
  reset
  log
!

C.


class-map type inspect CSM_ZBF_CLASS_MAP_1
 match access-group name CSM_ZBF_CMAP_ACL_1
!

D.


class-map type inspect match-any CSM_ZBF_CMAP_PLMAP_1
 match protocol ftp
 match protocol ftps
!

E.


class-map type inspect CSM_ZBF_CLASS_MAP_2
 match access-group name CSM_ZBF_CMAP_ACL_2
 match class-map CSM_ZBF_CMAP_PLMAP_1
!

F.


class-map type inspect match-any CSM_ZBF_CLASS_MAP_3
 match protocol bittorrent
 match protocol edonkey
 match protocol fasttrack
 match protocol icq
 match protocol kazaa2
!

G.


class-map type inspect CSM_ZBF_CLASS_MAP_4
 match protocol http
!

H.


class-map type inspect match-any CSM_ZBF_CLASS_MAP_5
 match protocol tcp
 match protocol udp
!

I.


policy-map type inspect CSM_ZBF_POLICY_MAP_1
 class type inspect CSM_ZBF_CLASS_MAP_1
  drop
 class type inspect CSM_ZBF_CLASS_MAP_2
  drop
 class type inspect CSM_ZBF_CLASS_MAP_3
  drop 
class type inspect CSM_ZBF_CMAP_PLMAP_1
  inspect
 class type inspect CSM_ZBF_CLASS_MAP_4
  inspect
  service-policy http HTTPpmap
 class type inspect CSM_ZBF_CLASS_MAP_5
  inspect
 class class-default
  drop
!

J.


zone security Inside
zone security Outside
zone-pair security CSM_Inside-Outside_1 source Inside destination Outside
 service-policy type inspect CSM_ZBF_POLICY_MAP_1
!
interface GigabitEthernet0/1
 ip address dhcp
 zone-member security Inside
!
interface GigabitEthernet0/2
 ip address dhcp
 zone-member security Outside
!

K.


ip access-list extended CSM_ZBF_CMAP_ACL_1
 permit ip 10.100.10.0 0.0.0.255 any
 permit ip 10.100.11.0 0.0.0.255 any
!

L.


ip access-list extended CSM_ZBF_CMAP_ACL_2
 permit ip 10.100.12.0 0.0.0.255 any
!

The following list explains how the rules in Security Manager are converted to device-configuration commands, to aid your understanding of the relationship between the two. The list numbering corresponds to the rule numbers from the rules table in Security Manager (see the previous illustration):

  1. This rule drops all traffic from the 10.100.10.0/24 network. The Permit, Source, Destination, and Service fields are used to create the first access control entry (ACE) in the ACL named CSM_ZBF_CMAP_ACL_1 defined in (K). This ACL is referenced from the class map CSM_ZBF_CLASS_MAP_1 defined in (C), which then defines the first drop rule in the policy map CSM_ZBF_POLICY_MAP_1, defined in (I).

The policy map (I) is used to define the zone service policy in (J). Because this policy map is how all of the rules are assigned to the zone pair, (J) is not mentioned again.

  1. This rule drops all traffic from the 10.100.11.0/24 network. This rule is combined with rule 1 by adding an ACE to the ACL defined in (K). The rest of the configuration is identical to rule 1. Thus, rules 1 and 2 essentially become a single rule in the device configuration.

  2. This rule drops all FTP/FTPS traffic from the 10.100.10.12/24 network. The Permit, Source, Destination, and Service fields are used to create the ACL named CSM_ZBF_CMAP_ACL_2 defined in (L). The Protocol table generates the class map CSM_ZBF_CMAP_PLMAP_1 defined in (D), which specifies the FTP and FTPS protocols. The ACL and FTP/FTPS class map are then used in a new class map, CSM_ZBF_CLASS_MAP_2 defined in (E), which completes the characterization of the traffic based on the combination of source and protocol. Finally, (E) is referenced in the policy map (I) as the second rule.

  3. This rule drops peer-to-peer traffic from any source that uses any of these protocols: Bittorrent, eDonkey, FastTrack, ICQ, or Kazaa2. This rule prevents any of your internal servers from being used as a file-sharing source for these services. Because the rule applies to all sources and destinations for the default IP service, no ACL is required. Instead, the configuration starts with the class map CSM_ZBF_CLASS_MAP_3 defined in (F). This class map is referenced by the third drop rule in the policy map (I).

  4. This rule inspects FTP/FTPS traffic from any source to any destination, which means these services are allowed. Note that rule 3, because it comes above rule 5, already drops FTP/FTPS traffic from the 10.100.12.0/24 network, so the combination of these rules means that FTP/FTPS traffic is inspected for all sources except 10.100.12.0/24. Because the Protocol table specifies the same protocols as it does for rule 3, no new class map is needed. Instead, the policy map (I) simply refers to the class map (D) as the fourth class type, but this time with the Inspect action.

  5. This rule inspects HTTP traffic and applies a deep-inspection policy map named HTTPpmap. The HTTPpmap policy map (B) defines the action to take when traffic matches the criteria defined in the class map HTTPcmap (A). These maps specify that any HTTP connection that violates the HTTP protocol, or that misuses ports, should be reset (dropped) and a syslog entry generated. (Protocol violation and port misuse can characterize Denial of Service attacks.) The combination of (A) and (B) define the deep-inspection rules for this policy.

An additional class map, CSM_ZBF_CLASS_MAP_4, is needed to specify the HTTP protocol (G). Then, the fifth class type rule in the policy map (I) refers to class map (G) for inspection, and the service-policy command refers to the policy map (B) for deep inspection.

  1. This rule provides generic inspection on TCP/UDP traffic, allowing and inspecting the remaining TCP/UDP traffic from the internal network to the Internet and back. The class map CSM_ZBF_CLASS_MAP_5 defined in (H) is generated from the Protocols table. This class map then becomes the next-to-last rule in the policy map (I).

  2. Finally, there is an automatic rule, which appears as the final class-default rule in the policy map (I). This rule drops any traffic that does not match one of the class maps referenced in the policy map (I). For example, ICMP traffic from the internal network to the Internet will not be allowed. For information on configuring a different class-default rule, see Changing the Default Drop Behavior.

Zone-based Firewall Rules Page

Zone-based firewall rules provide unidirectional application of firewall policies between groups of interfaces known as “zones.” That is, interfaces are assigned to zones, and specific inspection policies are applied to traffic moving between zones in one direction or the other.

A zone defines a boundary where traffic is subjected to specific restrictions as it crosses into another region of your network. The default zone-based firewall policy between zones is deny all. Thus, if no policy is explicitly configured, all traffic between zones is blocked.


Note


From version 4.21 onwards, Cisco Security Manager terminates whole support, including support for any bug fixes or enhancements, for all Aggregation Service Routers, Integrated Service Routers, Embedded Service Routers, and any device operating on Cisco IOS software.

The Zone Based Firewall Rules page displays a list of currently configured zone-based firewall rules, and lets you add, edit and delete rules.


Tip


Disabled rules are shown with hash marks covering the table row. When you deploy the configuration, disabled rules are removed from the device. For more information, see Enabling and Disabling Rules.

Navigation Path

To access the Zone Based Firewall Rules page, do one of the following:

  • (Device view) Select a device, then select Firewall > Zone Based Firewall Rules from the Policy selector.

  • (Policy view) Select Firewall > Zone Based Firewall Rules from the Policy Type selector. Create a new policy or select an existing one.

  • (Map view) Right-click a device and select Edit Firewall Policies > Zone Based Firewall Rules.

Related Topics

Field Reference

Table 22. Zone Based Firewall Rules Page

Element

Description

No.

This number indicates the rule’s position in the ordering of the list. You can use the Up Row and Down Row buttons to change the position of the selected rule.

Permit

Indicates whether the rule permits or denies traffic.

  • Permit – Shown as a green check mark.

  • Deny – Shown as a red circle with a slash.

Sources

The sources of traffic for this rule; can be networks or security groups. Multiple entries are displayed on separate lines within the table cell.

  • Network – The network, host, or IP address objects and definitions that are defined as the sources for this rule. The “All-Address” objects do not restrict the rule to specific hosts or networks.

See Understanding Networks/Hosts Objects and Specifying IP Addresses During Policy Definition for additional information about these definitions.

Note

 
From version 4.21 onwards, Cisco Security Manager terminates whole support, including support for any bug fixes or enhancements, for all Aggregation Service Routers, Integrated Service Routers, Embedded Service Routers, and any device operating on Cisco IOS software.

Each specification is combined with any others to limit traffic matches to only those flows that include all definitions. For example, specified user traffic originating from within a specified source address range.

Destinations

The destinations of traffic for this rule; can be networks or security groups. Multiple entries are displayed on separate lines within the table cell.

  • Network – The network, host, or IP address objects and definitions that are defined as the destinations for this rule. The “All-Address” objects do not restrict the rule to specific hosts or networks.

See Understanding Networks/Hosts Objects and Specifying IP Addresses During Policy Definition for additional information about these definitions.

Note

 
From version 4.21 onwards, Cisco Security Manager terminates whole support, including support for any bug fixes or enhancements, for all Aggregation Service Routers, Integrated Service Routers, Embedded Service Routers, and any device operating on Cisco IOS software.

Each specification is combined with any others to limit traffic matches to only those flows that include all definitions. For example, specified user traffic originating from within a specified source address range.

Service

The services that define the types of traffic matched by this rule. Services are defined by objects that specify protocol and port information. See Understanding and Specifying Services and Service and Port List Objects for more information.

From Zone

This rule applies only to traffic originating from this zone.

To Zone

This rule applies only to traffic destined for this zone.

Inspected Protocol

The protocol(s) on which the rule performs the chosen Action.

Action

Identifies how matched protocols are processed:

  • Drop – Matched traffic is silently dropped. The default action for all traffic.

  • Drop and Log – Matched traffic is logged and dropped.

  • Pass – The router forwards matched traffic from the source zone to the destination zone.

  • Pass and Log – Traffic is logged and forwarded.

  • Inspect – State-based traffic control; Inspect can provide application inspection and control for certain protocols, based on Port to Application Mapping (PAM).

  • Content Filter – HTTP content inspection based on a WebFilter parameter map, or a WebFilter policy map.

Note

 
The Log options generate system-log messages; you must ensure that syslog logging is configured to capture these messages.

Options

The Inspect Parameter map assigned to this rule; available only with Inspect and Content Filter actions.

Category

The category assigned to the rule. Categories help you organize and identify rules and objects. See Using Category Objects.

Description

The description of this rule, if provided. A maximum of 1024 characters is allowed.

Last Ticket(s)

Shows the ticket(s) associated with last modification to the rule. You can click the ticket ID in the Last Ticket(s) column to view details of the ticket and to navigate to the ticket. If linkage to an external ticket management system has been configured, you can also navigate to that system from the ticket details (see Ticket Management Page).

Query button

To run policy queries, which can help you evaluate your rules and identify ineffective rules that you can delete. See Generating Policy Query Reports.

Find and Replace button (binoculars icon)

Searches for values in rules tables, such as IP addresses and policy object names, to facilitate locating and making changes to rules in tables. See Finding and Replacing Items in Rules Tables.

Up button

Moves the selected rule up one row in the table.

Down button

Moves the selected rule down one row in the table.

Add button

Opens the Add Zone-based Firewall Rule dialog box, where you can create a new rule.

Edit button

Used to edit the selected rule in the table; opens the Edit Zone-based Firewall Rule dialog box.

Delete button

Deletes the selected rule from the table.

Adding and Editing Zone-based Firewall Rules

Use the Add and Edit Zone based Firewall Rule dialog boxes to add and edit zone-based firewall rules on Cisco IOS and ASR devices.

Navigation Path

From the Zone-based Firewall Rules Page, click the Add Row button, or select a row and click the Edit Row button.

Related Topics

Field Reference

Table 23. Add and Edit Zone based Firewall Rule Dialog Boxes

Element

Description

Enable Rule

When selected, the rule is enabled on the device after the configuration is generated and deployed. Deselect this option to disable the rule without deleting it.

Traffic

Define the traffic flow to which this rule is applied.

Match

Choose whether to Permit or Deny matched traffic. See Understanding the Relationship Between Permit/Deny and Action in Zone-based Firewall Rules for additional information about this option.

Sources

Provide traffic sources for this rule; can be networks or security groups. You can enter values, enter object names, or select objects for one or more of the following types of sources:

Note

 
Enter more than one value in any of these fields by separating the items with commas.

Note

 
From version 4.21 onwards, Cisco Security Manager terminates whole support, including support for any bug fixes or enhancements, for all Aggregation Service Routers, Integrated Service Routers, Embedded Service Routers, and any device operating on Cisco IOS software.

Each specification is combined with any others to limit traffic matches to only those flows that include all definitions. For example, specified user traffic originating from within a specified source address range.

Destinations

Provide traffic destinations for this rule; can be networks or security groups. You can enter values, enter object names, or select objects for one or more of the following types of sources:

Note

 
Enter more than one value in any of these fields by separating the items with commas.

Note

 
From version 4.21 onwards, Cisco Security Manager terminates whole support, including support for any bug fixes or enhancements, for all Aggregation Service Routers, Integrated Service Routers, Embedded Service Routers, and any device operating on Cisco IOS software.

Each specification is combined with any others to limit traffic matches to only those flows that include all definitions. For example, specified user traffic originating from within a specified source address range.

Services

Specify the services that define the type of traffic to matched by this rule. You can enter any combination of service objects and service types (which are typically a protocol and port combination), separated by commas. See Understanding the Relationship Between Services and Protocols in Zone-based Firewall Rules for additional information about this option.

If you type in a service, you are prompted as you type with valid values. You also can click Select to select services from a list. For complete information on how to specify services, see Understanding and Specifying Services and Service and Port List Objects.

From Zone

To Zone

Basic zone-based firewall rules are unidirectional; that is, they define a traffic flow that moves in only one direction between two zones.

Enter or select the zone from which traffic flows can originate for this rule, and enter or select the zone to which traffic can flow.

Advanced button

Opens the Advanced Options dialog box where you can select time-range options. See Zone-based Firewall Rule: Advanced Options Dialog Box.

Action

The action applied to traffic that matches this rule. Choose the desired Action:

Action: Drop, Drop and Log, Pass, Pass and Log

  • Drop – Silently drops all packets for the specified Services. The default action for all traffic.

  • Drop and Log – Matched traffic is logged and dropped.

  • Pass – The router forwards matched packets from the From Zone to the To Zone. Return traffic is not recognized, so you have to specify additional rules for return traffic. This option is useful only for protocols such as IPsec-encrypted traffic.

  • Pass and Log – Traffic is logged and forwarded.

For any of these Actions, you can select one or more protocols to be matched by clicking the Select button next to the Protocol table to open the Protocol Selector Dialog Box. However, this is not necessary; you can leave the Protocol table empty and pass or drop traffic based on the Sources, Destinations, and Services parameters; in effect, these are standard access rules.

The Protocol Selector dialog box also provides access to the Configure Protocol Dialog Box, where you can edit the Port Application Mapping (PAM) parameters for the selected protocol.

Note

 
The Log options generate system-log messages; you must ensure that syslog logging is configured to capture these messages.

Action: Inspect

Inspect provides state-based traffic control—the device maintains connection or session information for TCP and UDP traffic, meaning return traffic in reply to connection requests is permitted.

Choose this option to apply packet inspection based on your selected Layer 4 (TCP, UDP) and Layer 7 (HTTP, IMAP, instant messaging, and peer-to-peer) protocols. You also can edit PAM settings for the selected protocols, and you can set up deep packet inspection (DPI) and provide additional protocol-related information for the Layer 7 protocols. See Configuring Inspection Maps for Zone-based Firewall Policies for more information.

  1. You can select one or more protocols for inspection by clicking the Select button next to the Protocol table to open the Protocol Selector Dialog Box.

  2. The Protocol Selector dialog box also provides access to the Configure Protocol Dialog Box, where you can create custom protocols, and edit the PAM and DPI parameters for the selected protocol.

  3. Inspect Parameters – You can apply a customized set of connection, timeout, and other settings by entering the name of an Inspect Parameter map in this field, or you can click Select to select one from a list. You also can create new Inspect Parameter maps from the selection-list dialog box; see Configuring Inspect Parameter Maps for more information.

If you do not specify an Inspect Parameters map, the default settings are used.

Action: Content Filter

Content Filter provides URL filtering based on a supplied parameter or policy map. The router intercepts HTTP requests, performs protocol-related inspection, and optionally contacts a third-party server to determine whether the requests should be allowed or blocked. You can provide a WebFilter parameter map, which defines filtering based on local URL lists, as well as information from an external SmartFilter (previously N2H2) or Websense server. Alternately, you can provide a WebFilter policy map that accesses Local, N2H2, Websense, or Trend Micro filtering data.

  1. When Content Filter is the chosen Action, HTTP is the specified Protocol. You can click Configure to open the Configure Protocol Dialog Box, where you can edit the HTTP PAM settings, and apply an HTTP DPI map.

  2. Select WebFilter Parameter Map, or WebFilter Policy Map, and supply the name of an appropriate map. You can click the appropriate Select button to select the map from a list; you also can create new maps from the selection-list dialog box. See Configuring Content Filtering Maps for Zone-based Firewall Policies for information about configuring these maps.

  3. Inspect Parameters – You can apply a customized set of connection, timeout, and other settings by entering the name of an Inspect Parameter map in this field, or you can click Select to select one from a list. You also can create new Inspect Parameter maps from the selection-list dialog box; see Configuring Inspect Parameter Maps for more information.

If you do not specify an Inspect Parameters map, the default settings are used.

Description

(Optional) You can enter a description of up to 1024 characters to help you identify the rule when viewing the rules table.

Category

(Optional) You can assign a category to the rule, to help you organize and identify rules and objects. See Using Category Objects.

Zone-based Firewall Rule: Advanced Options Dialog Box

Use the Zone-Based Firewall Rule Advanced Options dialog box to apply specific time-range information to a zone-based firewall rule.

Navigation Path

In the Traffic section of the Add or Edit Zone based Firewall Rule dialog box, click the Advanced button.

Related Topics
Field Reference
Table 24. Advanced Options Dialog Box

Element

Description

Time Range

This feature lets you define time periods during which this zone-based firewall rule is active. If you do not specify a time range, the rule is immediately and always active.

Enter the name of a time-range object, or click Select to choose one from a list in the Time Ranges Selector dialog box. You can create and edit time-range objects from this dialog box. For more information, see Configuring Time Range Objects.

Options

This feature lets you apply an initial-packet-fragment or an established-connection restriction to this zone-based firewall rule. Choose one of the following options:

  • None—No packet-fragment or established-connection restrictions are applied.

  • Fragment – If chosen, the rule is applied to non-initial packet fragments; the fragment is either permitted or denied accordingly. The white paper, “Access Control Lists and IP Fragments", provides additional information that is also relevant to zone-based firewall rules.

  • Established – For the TCP protocol only; requires an established connection. A match occurs if the TCP datagram has the ACK or RST control bits set. The non-matching case is that of the initial TCP datagram to form a connection.

Protocol Selector Dialog Box

Use the Protocol Selector dialog box to specify one or more communication protocols as part of the definition of traffic for a zone-based firewall rule.

The Protocol Selector dialog box also provides access to the Configure Protocol dialog box, which you can use to create custom protocols and edit Port Application Mapping (PAM) parameters for existing protocols. The Configure Protocol dialog box is also where you select Deep Inspection policy maps, and Protocol Info parameter maps, for certain protocols. See Configure Protocol Dialog Box for more information.

Navigation Path

The Protocol Selector dialog box can be accessed from the Add and Edit Zone based Firewall Rule dialog boxes (described in Adding and Editing Zone-based Firewall Rules). In either dialog box, choose any Action except Content Filter and then click the Select button next to the Protocol table.

You can also open the Protocol Selector dialog box by right-clicking the Inspected Protocol column for any entry in the Zone Based Firewall Rules table, and then choosing Edit Protocols.

Related Topics

Table 25. Protocol Selector Dialog Box

Element

Description

Available Protocols

A list of protocols that can be selected for a zone-based firewall rule.

Tip

 
You can create a custom protocol by clicking the Create button below the Selected Protocols column, opening the Configure Protocol Dialog Box.

Selected Protocols

The list of protocols you have selected for this zone-based firewall rule.

Tip

 
You can edit Port Application Mapping (PAM) settings for the protocol highlighted in the Selected Protocols column: click the Edit button below the Selected Protocols column to open the Configure Protocol Dialog Box.

>> button

Moves the highlighted protocols from the Available Protocols column to the Selected Protocols column. You can select multiple protocols using the standard Shift-click and Ctrl+click functions.

<< button

Moves the highlighted protocols from the Selected Protocols column back to the Available Protocols column. You can select multiple protocols using the standard Shift-click and Ctrl+click functions.

Configure Protocol Dialog Box

Packet inspection can be configured in zone-based firewall rules by the selection of specific protocol objects, which define Port Application Mapping (PAM) parameters (Layer 4 protocols and ports, and optionally specific networks and hosts). A Layer 7 (HTTP, IMAP, Instant Messaging, and peer-to-peer) protocol can also include a deep-packet inspection policy specific to that protocol. Refer to Adding and Editing Zone-based Firewall Rules for information about selecting protocols during zone-based firewall rule definition.

The Configure Protocol dialog box is used to edit existing protocol definitions, and to create custom definitions, for use with zone-based firewall rules. For example, if a protocol does not use its default ports for some or all networks, you can configure different port mappings.

Navigation Path

The Configure Protocol dialog box is accessed from the Protocol Selector Dialog Box, as follows:

  • Click the Create (+) button below the Selected Protocols list to create a new protocol.

  • Select a protocol in the Selected Protocols list, and click the Edit (pencil) button to edit that protocol.

Related Topics
Table 26. Configure Protocol Dialog Box

Element

Description

Protocol Name

The name of the selected protocol. If you are creating a custom protocol, you can enter a name of up to 19 characters. Custom protocol names must begin with user-.

Enable Signature

This option is available only when editing the peer-to-peer (eDonkey, FastTrack, Gnutella, Kazaa2) protocols.

Enabling this option means Network-based Application Recognition (NBAR) heuristics will be applied to the traffic to detect “telltales” that signify specific P2P application activity. These telltales includes port-hopping and other changes in application behavior to avoid traffic detection.

Note

 
This level of traffic inspection comes at the price of increased CPU utilization and reduced network throughput capability.

Deep Inspection

This option is available only when editing the H.323, HTTP, IM (AOL, ICQ, MSN Messenger, Windows Messenger, and Yahoo Messenger), IMAP, P2P (eDonkey, FastTrack, Gnutella, Kazaa2), POP3, SIP, SMTP, Sun RPC protocols, and Inspect is the chosen Action for the zone-based firewall rule.

Enter or Select the name of the Inspect policy map to be used with the selected protocol. See Configuring Inspection Maps for Zone-based Firewall Policies for more information about these policy maps.

Protocol Info

This option is available only when editing the Instant Messaging (AOL, ICQ, MSN Messenger, Windows Messenger, and Yahoo Messenger) and Stun-ice protocols.

Enter or Select the name of the Protocol Info parameter map to be used with the selected protocol. These parameter maps define the DNS servers that interact with these applications, which helps the Instant Messaging (IM) application engine recognize the IM traffic and enforce the configured policy for that IM application.

See Configuring Protocol Info Parameter Maps for more information about these parameter maps.

Port Application Mapping

These options let you customize the Port Application Mapping (PAM) parameters for the selected protocol.

Protocol

Select the transport protocol(s) for this mapping:

  • TCP/UDP

  • TCP

  • UDP

Ports

Enter any combination of a single port number, multiple port numbers, or a range of ports (for example, 60000-60005). Separate multiple entries with commas. Do not specify a range that overlaps already mapped ports.

Networks

If this protocol/port mapping is only for specific networks or hosts, enter the names or IP addresses of the networks or hosts, or the names of the network/host objects. You can click Select to open the Networks/Hosts Selector. Separate multiple entries with commas.