Managing Activities

Whether you are using Workflow or non-Workflow mode, all policy configuration is done within an activity, which is also called a configuration session in non-Workflow mode. In Workflow mode, you must explicitly create and manage activities, whereas in non-Workflow mode much of the activity creation and management is done automatically for you. However, in non-Workflow mode, you are in fact working within an activity whenever you modify policies, and so you should understand the basic activity concepts.

In non-Workflow mode with Ticket Management enabled, an activity is created automatically and transparently whenever you open a ticket. You must actively open and manage tickets in this mode.

The following topics provide information about activities:

Understanding Activities

An activity is a temporary context within which you define policies and assign them to devices. You do not need to create an activity to import, create, or delete devices (unless you perform policy discovery as part of the action), or to perform various system management tasks.

The requirements for creating or opening activities differ depending on your Workflow mode:

  • Non-Workflow mode with Ticket Management—An activity is created automatically and transparently whenever you open a ticket. If you do not explicitly open a ticket, you are prompted to create a new ticket or open an existing one whenever you perform an action that requires an activity. You must actively open and manage tickets in this mode.

  • Non-Workflow mode without Ticket Management—An activity is created automatically and transparently for you whenever you define, modify, or assign policies to devices. The same activity is used until you submit your changes to the database, and is automatically closed and reopened as needed. You cannot actively open or manage activities in non-Workflow mode. These types of activities are also called configuration sessions.

  • Workflow mode—If you do not explicitly open an activity, you are prompted to create a new activity or open an existing one whenever you perform an action that requires an activity. You must actively open and manage activities in Workflow mode.


Note


Workflow mode works in the same manner whether Ticket Management is enabled or not. Enabling Ticket Management in Workflow mode simply enables the Ticket field for use with Activities. Entering a ticket ID is not required, but if one is used, the Ticket field can be configured to link to an external change management system. For more information, see Ticket Management.

When you create an activity, or one is created for you, you open a virtual copy of the Security Manager policy database. You define and assign policies within this copy. Changes that you made within this copy are only available within the copy. Other users in different activities cannot see these changes. After the activity is submitted and, in Workflow mode, approved, the changes within this copy are committed to the database so that all other users can view the changes. Then, you can create a deployment job to generate the relevant CLI commands and deploy them to the devices.

How you submit your activity changes differs depending on Workflow mode:

  • Non-Workflow mode with Ticket Management (default)—Select Tickets > Submit Ticket to submit your changes to the policy database.

  • Non-Workflow mode without Ticket Management—Select File > Submit to submit your changes to the policy database.

  • Workflow mode—Select Activities > Submit Activity if you are working with an activity approver, or Activities > Approve Activity if you do not have a separate activity approver.

The following topics describe why activities are important and how they operate in Workflow mode:

Benefits of Activities

You use activities to control changes made to policies and policy assignments. Although how activities are implemented depends on the workflow settings you choose, all activities provide the following benefits:

  • Audit trail—Activities track changes that are made in Security Manager. You can use this information to determine what changes were made and who made the changes as described in Viewing Activity/Ticket Status and History. For both Workflow and non-Workflow mode, there is also an audit report that provides visibility into activities and other actions, as described in Working with Audit Reports.

  • Safety mechanism—Activities provide a means for experimenting with changes. Because you are making the changes to a private database view, if you do not want to implement the changes, you can easily discard the activity or configuration session. For more information, see Discarding an Activity/Ticket.

  • Task isolation—The policies that are modified within an activity (or configuration session) are locked from being modified within other activities. This prevents conflicting changes that could make a policy unstable. For more information, see Activities and Locking.

In addition, the changes you make within an activity are visible only within the activity. Other users see only the last approved committed configurations, unless they view your activity before you close it (in Workflow mode).

Activity Approval

When you enable Workflow mode, you can choose to operate with or without an activity approver.

If your organization requires a different person with higher permissions to approve activities, you can enable workflow with an approver. When using Workflow mode with an approver, the activity must be approved by a person with the appropriate permissions so the policies can be committed to the database. This approval process at the policy definition level helps to ensure that no inappropriate configurations reach the network devices.

If you choose to operate without an approver, the person defining the policies has the permissions to approve them.

For information about enabling or disabling activity approval and changing the default activity approver, see Workflow Page.

Activities and Locking

To prevent multiple users from making conflicting changes, Security Manager obtains activity-level locks when a user performs certain actions within an activity or configuration session in Workflow or non-Workflow mode. This prevents two or more people from making changes to the same feature policy, policy assignment, or object at the same time.

Security Manager also uses locking to ensure that operations related to the committed configuration always run exclusive of one another. These operations can be divided into two categories:

Operations that change the committed configuration:

  • Activity approval, which includes configuration session submission in non-Workflow mode.

  • Device deletion.

  • Editing device properties.

Operations that read the committed configuration:

  • Configuration preview.

  • Deployment (in non-Workflow mode).

  • Creation of deployment job (in Workflow mode).

  • Activity or configuration session validation.

If you are performing an operation that changes the committed configuration, no one can perform any of the operations in either list until this operation is complete. An error message is displayed to the user who tries, indicating the action and activity (or user, in non-Workflow mode) that has the lock. For example, if you are approving an activity (which occurs automatically when an activity is submitted in non-Workflow mode), no one else can delete a device or validate a different activity until the approval is complete. This type of locking is particularly important in multi-user settings as it prevents multiple users from simultaneously making changes to the committed configuration.

If you are performing an operation that reads the committed configuration, no one can perform an operation that changes the committed configuration. For example, if you are validating an activity, another user cannot approve an activity. However, other users can perform another operation that reads the configuration. For example, if you are validating an activity, another user can create a deployment job. Similarly, if you are previewing the configuration before deployment, another user is permitted to do the same. This is because these two operations are limited to reading the committed configuration; they do not make any changes to it.


Tip


Activity locking is broader in scope than policy locking, which is described in Understanding Policy Locking. Policy locking prevents two users from changing the same policy on the same device simultaneously.

Related Topics

Activities and Multiple Users

Only one user can define or change policies within an individual activity at one time. However, when Workflow mode is enabled or when Ticket Management is enabled in non-Workflow mode, multiple users can work in the activity in sequence. That is, if an activity or ticket is closed (but not yet approved or submitted for approval), another user can open it and make changes to it if they have the necessary privileges. Multiple users can work in parallel in different activities.

Understanding Activity/Ticket States

Activities in Workflow mode and tickets in non-Workflow mode (when Ticket Management is enabled) can have the states described in the following table. The main states are shown in bold.

Table 1. Activity/Ticket States

State

Description

Edit

The activity/ticket was created, but the activity is not currently being edited. The activity/ticket can be opened or discarded while it is in the Edit state.

Edit Open

The activity/ticket is open for editing. Changes, such as defining and assigning policies, can be made in the activity/ticket. The policies, policy assignments (devices being assigned policies), and objects being configured or modified in the activity/ticket are locked. That is, they cannot be configured or modified within the context of another activity/ticket. An activity can be closed, discarded, submitted, or approved while it is in the Edit Open state. A ticket can be closed, discarded, or submitted while it is in the Edit Open state.

The configuration changes can be seen only in the context of the activity/ticket.

Submitted

Submitted Open

The activity was submitted for review and approval or the ticket was submitted. (In Workflow mode, this state is available only if you have activity approval required. For more information, see Workflow Page.) No further changes can be made within the activity/ticket. The policies, devices (through policy assignment), or objects affected by the policy changes remain locked to other activities/tickets.

When an activity is submitted, an e-mail is sent to the approver. The approver can open the activity (in read-only mode, moving to the Submitted Open state) to review the changes within the activity, then approve or reject it. An approved activity moves to the approved state. A rejected activity returns to the Edit state.

Approved (Workflow mode only)

The activity was approved, and the corresponding configuration elements are now committed policy configurations. The devices affected by the policy changes are no longer locked to other activities. The activity can be deployed while it is in the Approved state.

Approve Failed(Workflow mode only)

The activity is placed in the Approve Failed state if errors occur during approval (for example, due to a power failure). If this happens, try to approve the activity again or reboot the server.

Discarded

Changes made to the activity/ticket since it was created were discarded and further changes to the activity/ticket are not allowed. Devices associated with the activity/ticket are unlocked and can now be used in a new activity/ticket. The activity/ticket remains in the table showing a Discarded state until it is purged from the system.

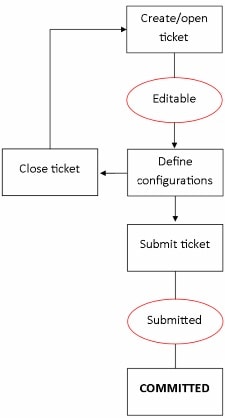
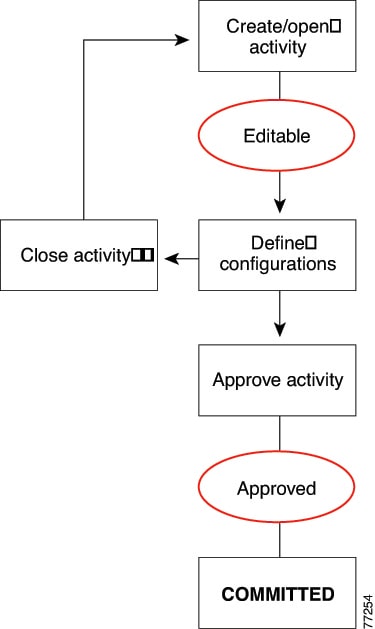
Ticket Workflow shows the stages in the ticket workflow. Activity Workflow without an Approver shows the stages in the activity workflow without an approver. Activity Workflow with an Approver shows the stages in the activity workflow with an approver.

Figure 1. Ticket Workflow
Figure 2. Activity Workflow without an Approver
Figure 3. Activity Workflow with an Approver

Working with Activities/Tickets

The following topics provide information to help you use activities and configuration sessions:

Accessing Activity Functions in Workflow Mode

In Workflow mode, you can access activity management functions in the following ways:

  • Select Manage > Activities. The Activity Manager window contains a list of existing activities and their states. From this window, you can create new activities, and open, close, submit, approve, reject, or discard existing activities. For more information, see Activity/Ticket Manager Window.

  • Click a button in the Activities portion of the main toolbar or select the equivalent command in the Activities menu. Whether a button or command is active depends on your user permissions, the state of the activity, and whether you are using workflow with or without an approver. The following table explains the buttons and commands and the conditions under which you can them.


Note


If an activity is open, the activity name is displayed above the Global Search field in the upper right corner of the Configuration Manager interface. You can click the activity name to open the Activity Manager window.
Table 2. Activities Tool Bar Buttons and Commands When Workflow Mode Is Enabled

Button

Activities Menu Command

Description

New Activity

Creates an activity.

Open Activity

Opens an activity. You can open an activity when it is in the Edit or the Submitted state.

To open a submitted activity, you must have user privileges to approve or reject changes made in that activity. For more information, see the Installation Guide for Cisco Security Manager .

Close Activity

Saves all changes made while the activity was open and closes it.

You can close an activity when it is in the Edit Open or the Submit Open state.

View Changes

Evaluates all changes made in the activity and produces an Activity Change Report in PDF format in a separate window. For more information, see Viewing Change Reports.

Validate Activity

Validates the integrity of changed policies within the current activity. By validating an activity, you can check for configuration errors that you might have introduced by your policy changes.

Submit Activity

In Workflow mode with an activity approver, submits the activity for approval. You can submit an activity when it is in the Edit or the Edit Open state.

Approve Activity

Approves the changes proposed in an activity.

You can approve an activity when it is in the Submitted state when using an activity approver, or the Edit or Edit Open state when not using an approver. You must have user privileges to accept the changes proposed in an activity. For more information, see the Installation Guide for Cisco Security Manager.

Reject Activity

In Workflow mode with an activity approver, rejects the changes proposed in an activity.

You can reject an activity when it is in the Submitted or Submitted Open state. You must have user privileges to deny changes proposed in an activity. For more information, see the Installation Guide for Cisco Security Manager .

Discard Activity

Discards the selected activity. The activity is discarded and later purged from the system after it exceeds the age for keeping activities as set under Tools > Security Manager Administration > Workflow. The activity state is shown as discarded until the activity is actually purged from the system.

Accessing Ticket Functions in Non-Workflow Mode

In non-Workflow mode with Ticket Management enabled, you can access ticket management functions in the following ways:

  • Select Manage > Tickets. The Ticket Manager window contains a list of existing tickets and their states. From this window, you can create new tickets, and open, close, submit, or discard existing tickets. For more information, see Activity/Ticket Manager Window.

  • Click a button in the Tickets portion of the main toolbar or select the equivalent command in the Tickets menu. Whether a button or command is active depends on your user permissions and the state of the ticket. The following table explains the buttons and commands and the conditions under which you can them.


Note


If a ticket is open, the ticket ID is displayed above the Global Search field in the upper right corner of the Configuration Manager interface. You can click the ticket ID to open the Ticket Manager window.
Table 3. Tickets Tool Bar Buttons and Commands When Ticket Management Is Enabled in Non-Workflow Mode

Button

Activities Menu Command

Description

New Ticket

Creates a ticket.

Open Ticket

Opens a ticket. You can open a ticket when it is in the Edit state.

Close Ticket

Saves all changes made while the ticket was open and closes it.

You can close a ticket when it is in the Edit Open state.

View Changes

Evaluates all changes made in the ticket and produces a Ticket Change Report in PDF format in a separate window. For more information, see Viewing Change Reports.

Validate Ticket

Validates the integrity of changed policies within the current ticket. By validating a ticket, you can check for configuration errors that you might have introduced by your policy changes.

Submit Ticket

Submits the ticket. Submitting the ticket saves the proposed changes to the database. Devices associated with the ticket are unlocked, meaning they can be included in policy definitions and changes in other tickets. You can submit a ticket when it is in the Edit or the Edit Open state.

Discard Ticket

Discards the selected ticket. The ticket is discarded and later purged from the system after it exceeds the age for keeping tickets as set under Tools > Security Manager Administration > Ticket Management. The ticket state is shown as discarded until the ticket is actually purged from the system. For more information, see Ticket Management Page.

Activity/Ticket Manager Window

Activity management and ticket management are very similar processes. The primary difference between activities and tickets is that tickets do not use an approval process. For a comparison of the various modes of operation, see Comparing Workflow Modes.

  • Activity Manager—Use the Activity Manager window to create and manage activities and to view activity status and history. The upper pane lists the activities that have been created. Select an activity to view its details and history in the lower pane.

  • Ticket Manager—Use the Ticket Manager window to create and manage tickets and to view ticket status and history. The upper pane lists the tickets that have been created. Select a ticket to view its details and history in the lower pane.


Note


The Activity Manager window is available only if you are operating in Workflow mode. The Ticket Manager window is available only if you are operating in non-Workflow mode with Ticket Management enabled. In non-Workflow mode without Ticket Management enabled, Security Manager automatically and transparently manages activities. For information on selecting a mode, see Changing Workflow Modes.

Navigation Path

  • In non-Workflow mode with Ticket Management enabled, click the Ticket Manager button on the Main toolbar, or select Manage > Tickets.

  • In Workflow mode, click the Activity Manager button on the Main toolbar, or select Manage > Activities.

Field Reference

Table 4. Activity/Ticket Manager Window

Element

Description

*

Activities with unapproved changes (Edit, Edit Open, or Submitted state) or tickets with unsubmitted changes (Edit or Edit Open state) are flagged for easy identification.

Activity

Ticket

The name of the activity or ID of the ticket. If Ticket Management is enabled in Workflow mode, both columns are displayed.

If Ticket Management is enabled, you can click the ticket ID to view details of the ticket. If linkage to an external ticket management system has been configured, you can also navigate to that system from the ticket details (see Ticket Management Page).

Last Modified

The date and time of the most recent change to the activity/ticket.

State

The state of the activity/ticket. For a list of states, see Understanding Activity/Ticket States.

User

The username of the person who last changed the state of the activity/ticket.

Last Action

The most recent action performed on the activity/ticket.

Create button

Click this button to create a new activity or ticket so that you can create or change policies or assign policies to devices. For more information, see Creating an Activity/Ticket.

Open button

Click this button to open the selected activity/ticket so that changes, such as defining and assigning policies, are captured within the activity/ticket. You can open an activity when it is in the Edit or the Submitted state. Submitted activities are opened read-only. You can open a ticket when it is in the Edit state. For more information, see Opening an Activity/Ticket.

Close button

Click this button to close the selected activity/ticket if you or others want to continue configuring policies at a later time. For more information, see Closing an Activity/Ticket.

Validate button

Click this button to validate changes that you have made to the selected activity/ticket from the time you created it to the current time. Validating an activity/ticket checks policy integrity and deployability, and displays detailed error information if errors are detected. For more information, see Validating an Activity/Ticket.

Submit button

In Workflow mode with an activity approver, click this button to submit the selected activity. Submitting the activity sends notification that the activity is ready for review to the specified approver. You can submit an activity when it is in the Edit or the Edit Open state.

In non-Workflow mode with Ticket Management enabled, click this button to submit the selected ticket. Submitting the ticket saves the proposed changes to the database. Devices associated with the ticket are unlocked, meaning they can be included in policy definitions and changes in other tickets. You can submit a ticket when it is in the Edit or the Edit Open state.

You are prompted for a comment. For more information, see Submitting an Activity for Approval (Workflow Mode with Activity Approver).

Approve button

(Activity Manager only)

Click this button to approve the selected activity, which saves the proposed changes to the database. Devices associated with the activity are unlocked, meaning they can be included in policy definitions and changes in other activities. You must have appropriate user permissions to approve the activity.

In Workflow mode without an approver, you can approve your own activities when they are in the Edit state. In workflow mode with an approver, you must submit your activity, and the approver can approve an activity only when it is in the Submitted state.

You are prompted for an approval comment. For more information, see Approving or Rejecting an Activity (Workflow Mode).

Reject button

(Activity Manager only)

In Workflow mode with an activity approver, click this button to reject the changes proposed in the selected activity or activities. You must have appropriate user permissions to reject an activity. If the activity is rejected, the submitter can continue to make changes to the activity. Devices associated with the activity are not unlocked, meaning that they cannot be included in policy definitions or changes in another activity. You can reject an activity only when it is in the Submitted or the Submitted Open state.

You are prompted for a rejection comment. For more information, see Approving or Rejecting an Activity (Workflow Mode).

Discard button

Click this button to discard the selected activity/ticket. Devices associated with the activity/ticket are unlocked, meaning they can be used by other activities/tickets. Multiple activities/tickets can be discarded at the same time.

You are prompted for a comment. For more information, see Discarding an Activity/Ticket.

Discarded activities are removed from the system according to the settings defined in the Security Manager settings for Workflow. The activity state is shown as discarded until the activity is purged from the system. For more information, see Workflow Page.

Discarded tickets are removed from the system according to the settings defined in the Security Manager settings for Ticket Management. The ticket state is shown as discarded until the ticket is purged from the system. For more information, see Ticket Management Page.

View Changes

Click this button to generate a report in PDF format for the selected activity/ticket. If the activity/ticket is closed, this button is grayed out. For more information, see Viewing Change Reports.

Refresh button

Click this button to refresh the information presented in the window.

Details tab

Displays detailed information for the selected activity/ticket. Besides the information repeated from the table, the details include this information:

  • Activity ID—The identification number assigned by Security Manager when you created the activity.

  • Ticket ID—The identification number entered when the ticket was created. You can click the Edit Ticket button next to the ticket ID to edit the ticket ID.

  • Created—The date and time the activity/ticket was created.

  • Last Modified—The date and time changes were last made to the activity/ticket.

  • Description—The description that was entered when the activity/ticket was created.

  • Comments History—Shows a history of the comments that were entered for this activity/ticket. The user that entered the comment is shown as well as the date and time the comment was entered. You can add and edit comments using the buttons below the Comments History table.

History tab

Displays a log of the changes that have been made to the selected activity/ticket. The information includes the state changes, the user who made the change, the date and time of the change (based on the Security Manager server time), and any comments the user entered to document the change.

Creating an Activity/Ticket

In Workflow mode, before you create or change policies or assign policies to devices, you must create an activity. In non-Workflow mode, if you have Ticket Management enabled, before you create or change policies or assign policies to devices, you must create a ticket.


Tip


In non-Workflow mode with Ticket Management disabled, activities are created automatically when needed.

Related Topics

Procedure


Step 1

Do one of the following:

For activities:

  • Click the Create Activity button in the activity toolbar.

  • Select Activities > New Activity.

  • Click Create in the Activity Manager window.

For tickets:

  • Click the Create Ticket button in the tickets toolbar.

  • Select Tickets > New Ticket.

  • Click Create in the Ticket Manager window.

The Create Activity/Ticket dialog box appears.

Step 2

In the Create Activity/Ticket dialog box, enter a name for the activity or keep the system-generated name. The default name contains the username, date, and time the activity/ticket was created. You can also enter a comment to describe the activity/ticket.

Ticket Management supports linking between a Ticket ID and an external ticket management system. For more information, see Ticket Management Page.

Tip

 
You can use a comma to separate multiple ticket IDs.

Step 3

Click OK.

The activity/ticket is listed in the Activity/Ticket Manager window. For more information, see Activity/Ticket Manager Window.


Responding to the Activity/Ticket Required Dialog Box

When in Workflow mode, you must create or open an activity before you create or modify policies. When in non-Workflow mode, if Ticket Management is enabled, you must create or open a ticket before you create or modify policies. If you attempt to perform an action that requires an activity or a ticket, and you have not created or opened one yet, you are prompted to do so with the Activity/Ticket Required dialog box.

You can choose from the following options:

  • Create a new activity/ticket—Create a completely new activity/ticket, specifying an activity name or ticket ID and optionally a description of the purpose of the activity/ticket. The default activity/ticket name contains the username, date, and time the activity/ticket was created.

  • Open an existing activity/ticket—To open the activity/ticket you select from the Activity/Ticket list. This option is displayed only if there are activities/tickets available in the Edit state.

Related Topics

Opening an Activity/Ticket

In Workflow mode, you can open an existing activity if no one else has it opened. You might open an existing activity in the Edit state to make further policy changes, or you might open an existing activity in the Submitted state to review proposed policy changes before approving or rejecting it (if you have the appropriate permissions and you are working in Workflow mode with an approver).

You can make changes to activities in the Edit state, but you can only view activities in the Submitted state.

In non-Workflow mode, if you have Ticket Management enabled, you can open an existing ticket to make further policy changes if no one else has it opened.

To open an activity/ticket, do one of the following:

  • For activities:

    • Click the Open button in the activity toolbar or select Activities > Open Activity. The Openable Activities dialog box lists all activities that can be opened, including the name of the activity, its state, and the username of the person who created the activity. Select the activity you want to open and click OK.

    • Select Manage > Activities. From the Activity Manager window, select the activity you want to open and click Open.

  • For tickets:

    • Click the Open button in the tickets toolbar or select Tickets > Open Ticket. The Openable Tickets dialog box lists all tickets that can be opened, including the ticket ID, its state, and the username of the person who created the ticket. Select the ticket you want to open and click OK.

    • Select Manage > Tickets. From the Ticket Manager window, select the ticket you want to open and click Open.


Tip


In non-Workflow mode with Ticket Management disabled, your previous configuration session is opened whenever needed until you submit it. A new activity is then created the next time you perform an action that requires an activity.

Note


In Workflow mode and in non-Workflow mode with Ticket Management enabled, you are prompted to open or create an activity/ticket when you launch Security Manager.

Related Topics

Closing an Activity/Ticket

You can close an activity without approving it (or submitting it for approval) or close a ticket without submitting it if you or others want to continue configuring policies at a later time.

A person with administrator privileges can close an activity/ticket opened by another user.

To close an open activity/ticket, do one of the following:

  • For activities:

    • Click the Close button in the activity toolbar.

    • Select Activities > Close Activity.

    • Select Manage > Activities. From the Activity Manager window, click Close.

  • For tickets:

    • Click the Close button in the tickets toolbar.

    • Select Tickets > Close Ticket.

    • Select Manage > Tickets. From the Ticket Manager window, click Close.


Tip


In non-Workflow mode with Ticket Management disabled, your configuration session is closed whenever you log out. The same session is reopened the next time you log in.

Related Topics

Viewing Change Reports

There are many places in the interface where you can open change reports. Typically, the button or command to generate the report is View Changes. These change reports provide detailed information about the policy and policy object changes, and the devices that were acted on, that have been made in an activity/ticket, whether you are operating in Workflow or non-Workflow mode.

The change report is in Adobe Acrobat (PDF) format. You can use all of the Acrobat features, including the bookmarks tab, to view the report.

If you discover a device or rediscover policies on a device, then subsequent policy changes in the same activity/ticket performed on that device are not listed in the activity change report. This is also true on a device that you clone from another device.

Following are some of the ways you can view change reports:

  • Non-Workflow mode with Ticket Management:

    • Select Tickets > View Changes, or click the View Changes button in the toolbar, to view the changes made during the currently open ticket.

    • Highlight a ticket in the Ticket Manager window and click View Changes to view the changes made in that ticket

  • Non-Workflow mode without Ticket Management:

    • Select File > View Changes to view the changes made during the current configuration session.

    • Select Manage > Change Reports to view the changes made during previous sessions (which are closed when you submit or discard your changes). Select a configuration session from the Change Report window and click View Changes. (See Selecting a Change Report in Non-Workflow Mode with Ticket Management Disabled.)

  • Workflow mode:

    • Select Activities > View Changes, or click the View Changes button in the toolbar, to view the changes made during the currently open activity.

    • Highlight an activity in the Activity Manager window and click View Changes to view the changes made in that activity.

  • In all modes, you can view changes from various dialog boxes when creating deployment jobs.


Note


You must disable any popup-blocker applications you have running to ensure the activity report will open.

The following illustration shows a sample activity report.

Figure 4. Activity Change Report

The change report includes these elements:

  • Activity name/Ticket ID—The name of the activity (or the user and session start date and time if it is unnamed) or the Ticket ID.

  • Created by—The username of the person who created the activity/ticket, with the date and time.

  • Current state—The current state of the activity.

  • Report created on—The date and time the report was created.

  • Devices section—A summary of the devices that were acted on in the activity/ticket (that is, they were added, modified, or deleted). Changes to local policies are displayed here.

Changes in this section and the other sections of the report are color-coded to help you identify changes:

  • Green—Indicates a newly inserted item.

  • Red—Indicates a deleted item or the old value of a changed item.

  • Blue—Indicates the new value of a changed item.

  • Shared Policies section—Changes to all shared policies are displayed here.

  • Policy Bundles—Changes to all policy bundles are displayed here.

  • Policy Objects—Changes to all policy objects are displayed here.

  • VPN—Changes to VPN topologies and policies are displayed here, including newly discovered VPNs and deleted VPN topologies.

Selecting a Change Report in Non-Workflow Mode with Ticket Management Disabled

In non-Workflow mode with Ticket Management disabled, you can view change reports for closed configuration sessions by selecting Manage > Change Reports and then selecting the session in the Change Report dialog box.

In non-Workflow mode with Ticket Management disabled, a configuration session is considered complete when you either submit or discard your changes. The Change Report dialog box lists all closed sessions, showing the date and time the session was closed, the action that closed it (submitted or discarded), and the user name associated with the session. These sessions are equivalent to activities in Workflow mode. Select a session and click View Changes to view the report. For information on reading the report, see Viewing Change Reports.


Tip


To view the report for the current configuration session, close this dialog box and select File > View Changes.

Validating an Activity/Ticket

In Workflow mode, Security Manager validates activities when you submit them for approval, or you can validate an activity at any time while you are creating and changing policies in an activity. After an activity is submitted, the validation report remains static.

In non-Workflow mode, Security Manager validates policies when you submit them to the database, when you try to deploy them, or when you validate them. The validation process reports on policy changes that were made up until the changes are submitted or deployed.

The validation process checks the following areas. If there are errors, you can display a detailed summary of the validation results.

  • Policy integrity—There are no unresolvable references (for example, missing objects, unresolved interface roles, overrides of mandatory settings, and so on).

  • Policy deployability—The platform, operating system, and configured features are supported by the target devices so that policies can be correctly translated into CLI commands.

If a policy contains options that require specific device types or operation system versions, you will see validation warnings for non-supported devices, but Security Manager will not generate the associated commands for unsupported devices. This allows you to create policies that apply to a wide range of devices without having to create policies that are too device-specific.

  • FlexConfig integrity—There are no corrupted FlexConfig objects. If corrupted objects are found, a warning with a list of the corrupted FlexConfig objects results.

  • FlexConfig syntax—If syntax errors are found, a warning with a list of affected FlexConfigs and their syntax errors results.

  • FlexConfig object references—All object references are resolvable. If FlexConfig objects reference non-existent objects, a warning with a list of the missing objects results.

Related Topics

Procedure


Step 1

Do one of the following:

  • In Workflow mode:

    • Open an activity, and then click the Validate button on the activity toolbar or select Activities > Validate Activity.

    • Select Manage > Activities. From the Activity Manager window, select an activity, and then click Validate.

  • In non-Workflow mode with Ticket Management enabled:

    • Open a ticket, and then click the Validate Saved Changes button on the tickets toolbar or select Tickets > Validate Ticket.

    • Select Manage > Tickets. From the Ticket Manager window, select a ticket, and then click Validate.

  • In non-Workflow mode with Ticket Management disabled, select File > Validate, or try to preview or deploy policies.

Security Manager performs the validation and opens an informational message dialog box that summarizes the validation results. If there are no errors, validation passes. If there are errors or warnings, click Details to open the Validation dialog box, where you can view detailed information about the errors.

Step 2

Evaluate the errors to determine how to fix them.

The Validation dialog box organizes the errors and warnings in two ways, which are displayed on separate tabs:

  • Errors tab—The Errors tab organizes validation problems based on the type of error. Each error indicates the number of devices that are affected and the severity of the error.

Select an error in the upper pane, and a list of devices (with the type of device) that have the error appears in the lower left pane. The lower right pane describes the error, its cause, and what you might do to fix it.

  • Devices tab—The Devices tab organizes validation problems based on the device. Each device indicates the number and types of errors and warnings for the device, and the device type. The device status indicates the worst problem in the device configuration (error or warning).

Select a device in the upper pane, and a list of the errors for that device appears in the lower left pane. Select an error and the lower right pane describes the error, its cause, and what you might do to fix it.

You must correct errors before submitting the activity. Security Manager does not allow an activity to be submitted with validation errors.

Note

 
A validation warning (as opposed to an error) will not prevent activity approval or deployment.

Submitting an Activity for Approval (Workflow Mode with Activity Approver)

In Workflow mode with an activity approver, you must submit activities for approval. When you submit the activity, the integrity and deployability of the activity is validated. For details about the validation process and report, see Validating an Activity/Ticket.

The activity is also closed so that it can be opened by the user who has the permissions to approve it. When the activity is approved, its configurations are committed to the Security Manager database, and they can be deployed to the devices.

When you submit an activity, Security Manager sends an e-mail to the relevant approvers to notify them that an activity requires approval.

If you are working in Workflow mode without an activity approver, you do not need to submit activities (in fact, you cannot submit them). You can approve the activity yourself. For more information about changing activity approval settings, and configuring the e-mail addresses for notifications, see Workflow Page.

Related Topics

Procedure


Step 1

Do one of the following:

  • Open an activity and click the Submit Activity button on the activity toolbar or select Activities > Submit Activity.

  • Select Manage > Activities. From the Activity Manager window, select an activity, then click Submit.

The Submit Activity dialog box opens.

Step 2

In the Submit Activity dialog box, fill in the following fields:

  • Approver—Enter the e-mail address of the person who should approve the activity if the default address is not the right one. This person receives notification of your submission.

The default e-mail address is set in Tools > Security Manager Administration > Workflow.

  • Comment—Enter comments that will help the approver evaluate the activity.

  • Submitter—Enter the e-mail address of the person submitting the approval request if the default address is not the right one. The field initially contains the e-mail address associated with the username you used to log into Security Manager. Notifications of activity state changes are sent to this address.

If desired, you can click the View Changes button to view a report in PDF format of the changes made in the activity. For more information, see Viewing Change Reports.

Step 3

Click OK. The activity status changes to Submitted in the Activity Manager window and notifications are sent.

Note

 
Security Manager warns you if the e-mail cannot be sent and you must contact the approver directly.

Approving or Rejecting an Activity (Workflow Mode)

Before the changes in an activity are committed to the database, you must approve the activity. If you have activity approval permissions, you can open an activity, review the policies and policy assignments, and then either approve or reject the activity.

If you are operating in Workflow mode without an approver, you can approve your own activities. When working without an approver, you cannot reject an activity, but you can discard it if you do not want to save your changes. In non-Workflow mode, you use the Submit and Discard commands on the file menu to submit (and automatically approve) or discard the configuration session.

In Workflow mode with an activity approver, the activity must be submitted before you can open it and approve it. In this mode, you can also reject the activity.

If you approve an activity, policies and policy assignments are committed to the database and are ready to be deployed to devices or files. Devices associated with the activity are unlocked, meaning they can be included in policy definitions and changes in other activities.

If you reject the activity, it is returned to the Edit state and the submitter can reopen the activity to make the necessary changes and resubmit it for approval. Devices associated with the activity are not unlocked, meaning that they cannot be included in policy definitions or changes in another activity.


Note


After an activity is approved, changes cannot be undone. You must create a new activity and manually change policies and policy assignments to the desired state.

Related Topics

Procedure


Step 1

Perform the appropriate step below:

  • To approve an activity, do one of the following:

    • Open an activity and click the Approve Activity button on the activity toolbar or select Activities > Approve Activity from the menu.

    • Select Manage > Activities. In the Activity Manager window, select an activity and click Approve.

  • To reject an activity or multiple activities, do one of the following:

    • Open an activity and click the Reject Activity button on the activity toolbar or select Activities > Reject Activity from the menu.

    • Select Manage > Activities. In the Activity Manager window, select an activity or multiple activities and click Reject.

The Approve Activity, Reject Activity, or Reject Multiple Activities dialog box appears.

Step 2

In the Comment field, enter a brief explanation of why you are approving or rejecting the activity or activities. If you are rejecting, you might want to include suggested revisions.

Step 3

Click OK (for a single activity) or Reject (for multiple activities). The activity status changes to Approved or Edit (if rejected) in the Activity Manager window. For a description of the elements in the window, see Activity/Ticket Manager Window.


Discarding an Activity/Ticket

You can discard an activity/ticket (configuration session in non-Workflow mode) if it is no longer required. When you discard an activity/ticket, you delete all the policies and policy assignments that were defined within the activity. Those policies and policy assignments are not in the database; therefore, they cannot be deployed.

Discarded activities are removed from the system according to the settings defined in the Security Manager settings for Workflow and devices associated with the activity are unlocked, meaning they can be used by other activities. For more information, see Workflow Page.

Discarded tickets are removed from the system according to the settings defined in the Security Manager settings for Ticket Management and devices associated with the ticket are unlocked, meaning they can be used by other tickets. The ticket state is shown as discarded until the ticket is purged from the system. For more information, see Ticket Management Page.


Note


When a ticket is discarded, Image Management jobs assigned to that ticket will not be discarded automatically. If required, you must search for pending Image Manager jobs with that ticket ID in Image Manager and delete those jobs.

To discard an activity/ticket:

Workflow Mode—Do one of the following:

  • To discard a single activity, do one of the following:

    • Open an activity, then click the Discard button on the activity toolbar or select Activities > Discard Activity.

    • Select Manage > Activities. From the Activity Manager window, select an activity, then click Discard. Only an activity in the Edit or Edit Open state can be discarded.

Using either method, you are prompted with the Discard Activity dialog box, which allows you to enter an optional comment to explain why you are discarding the activity. Enter a comment and click OK to discard it.

  • To discard multiple activities, select Manage > Activities. From the Activity Manager window, select the activities you wish to discard, then click Discard. Only activities in the Edit or Edit Open state can be discarded.

You are prompted with the Discard Multiple Activities dialog box, which allows you to enter an optional comment to explain why you are discarding the activities. If you selected activities belonging to other users, you can choose to discard those activities or not using the Discard selected activities of other users as well check box. Enter a comment, select or deselect the Discard selected activities of other users as well check box as desired, and then click OK to discard the selected activities.

Non-Workflow Mode with Ticket Management Enabled—Do one of the following:

  • To discard a single ticket, do one of the following:

    • Open a ticket, then click the Discard button on the tickets toolbar or select Tickets > Discard Ticket.

    • Select Manage > Tickets. From the Ticket Manager window, select a ticket, then click Discard. Only a ticket in the Edit or Edit Open state can be discarded.

Using either method, you are prompted with the Discard Ticket dialog box, which allows you to enter an optional comment to explain why you are discarding the ticket. Enter a comment and click OK to discard it.

  • To discard multiple activities, select Manage > Tickets. From the Ticket Manager window, select the tickets you want to discard, then click Discard. Only tickets in the Edit or Edit Open state can be discarded.

You are prompted with the Discard Multiple Tickets dialog box, which allows you to enter an optional comment to explain why you are discarding the tickets. If you selected tickets belonging to other users, you can choose to discard those tickets or not using the Discard selected tickets of other users as well check box. Enter a comment, select or deselect the Discard selected tickets of other users as well check box as desired, and then click OK to discard the selected tickets.

Non-Workflow Mode with Ticket Management Disabled—Select File > Discard to discard the changes in the current configuration session.

Related Topics

Viewing Activity/Ticket Status and History

In Workflow mode, you can view the status and history of changes for activities in the Activity Manager window. In non-Workflow mode with Ticket Management enabled, you can view the status and history of changes for tickets in the Ticket Manager window.

To open the window for activities, click the Activity Manager button in the toolbar or select Manage > Activities.

To open the window for tickets, click the Ticket Manager button in the toolbar or select Manage > Tickets.

The upper pane lists all available activities/tickets, including the current state of the activity/ticket. Select an activity/ticket to see additional information in the tabs in the lower pane:

  • Details tab—Shows the date and time the activity/ticket was created, and its description.

  • History tab—Shows the transaction history for the activity/ticket. Each time the state is changed, a record of the change is kept, including the user who made the change and any comments about the change.

Related Topics