About access control policies
Access control is a hierarchical policy that allows you to specify, inspect, and log network traffic. You can use the characteristics of each connection to allow, trust, block, or monitor the connection.
Each managed device can be assigned to one access control policy. The data that the policy’s assigned (also known as targeted) devices collect about your network traffic can be used to filter and control that traffic based on:
-
simple, easily determined transport and network layer characteristics: source and destination, port, protocol, and so on
-
the latest contextual information on the traffic, including characteristics such as reputation, risk, business relevance, application used, or URL visited
-
realm, user, user group, or ISE attribute
-
custom Security Group Tag (SGT)
-
characteristics of encrypted traffic; you can also decrypt this traffic for further analysis
-
whether unencrypted or decrypted traffic contains a prohibited file, detected malware, or intrusion attempt
-
time and day (on supported devices)
Each type of traffic inspection and control occurs where it makes the most sense for maximum flexibility and performance. For example, reputation-based blocking uses simple source and destination data, so it can block prohibited traffic early in the process. In contrast, detecting and blocking intrusions and exploits is a last-line of defense.
Access control policy components
Following are the main elements of an access control policy.
- Name and description
-
Each access control policy must have a unique name. A description is optional.
- Inheritance settings
-
Policy inheritance allows you to create a hierarchy of access control policies. A parent (or base) policy defines and enforces default settings for its descendants.
A policy's inheritance settings allow you to select its base policy. You can also lock settings in the current policy to force any descendants to inherit them. Descendant policies can override unlocked settings.
- Policy assignment
-
Each access control policy identifies the devices that use it. Each device can be targeted by only one access control policy.
- Rules
-
Access control rules provide a granular method of handling network traffic. Rules in an access control policy are numbered, starting at 1, including rules inherited from ancestor policies. The system matches traffic to access control rules in top-down order by ascending rule number.
Usually, the system handles network traffic according to the first access control rule where all the rule’s conditions match the traffic. Conditions can be simple or complex, and their use often depends on certain licenses.
- Default action
-
The default action determines how the system handles and logs traffic that is not handled by any other access control configuration. The default action can block or trust all traffic without further inspection, or inspect traffic for intrusions and discovery data.
Although an access control policy can inherit its default action from an ancestor policy, you cannot enforce this inheritance.
- Security Intelligence
-
Security Intelligence is a first line of defense against malicious internet content. This feature allows you to block connections based on the latest IP address, URL, and domain name reputation intelligence. To ensure continual access to vital resources, you can override block list entries with custom do not block list entries.
- HTTP responses
-
When the system blocks a user’s website request, you can either display a generic system-provided response page, or a custom page. You can also display a page that warns users, but also allows them to continue to the originally requested site.
- Logging
-
Settings for access control policy logging allow you to configure default syslog destinations for the current access control policy. The settings are applicable to the access control policy and all the included decryption, prefilter, and intrusion policies unless the syslog destination settings are explicitly overridden with custom settings in included rules and policies.
- Advanced access control options
-
Advanced access control policy settings typically require little or no modification. Often, the default settings are appropriate. Advanced settings you can modify include traffic preprocessing, decryption, identity, and various performance options.
Access control policy default action
A newly created access control policy directs its assigned devices to handle all traffic using its default action.
In a simple access control policy, the default action specifies how a device handles all traffic. In a more complex policy, the default action handles traffic that:
-
is not fast pathed by the prefilter policy
-
is not on a Security Intelligence block list
-
is not blocked by the decryption policy (encrypted traffic only)
-
matches none of the rules in the policy (except monitor rules, which match and log—but do not handle or inspect—traffic)
The access control policy default action can block or trust traffic without further inspection, or inspect traffic for intrusions and discovery data.
 Note |
You cannot perform file or malware inspection on traffic handled by the default action. Logging for connections handled by the default action is initially disabled, though you can enable it. |
If you are using policy inheritance, the default action for the lowest-level descendant determines final traffic handling. Although an access control policy can inherit its default action from its base policy, you cannot enforce this inheritance.
The following table describes the types of inspection you can perform on traffic handled by each default action.
|
Default Action |
Effect on Traffic |
Inspection Type and Policy |
|---|---|---|
|
Access Control: Block All Traffic |
Block without further inspection. |
None. |
|
Access Control: Trust All Traffic |
Trust (allow to its final destination without further inspection). |
None. |
|
Intrusion Prevention |
Allow, as long as it is passed by the intrusion policy you specify. |
Intrusion, using the specified intrusion policy and associated variable set. Discovery, using the network discovery policy. |
|
Network Discovery Only |
Allow. |
Discovery only, using the network discovery policy. |
|
Inherit from base policy |
Defined in base policy. |
Defined in base policy. |
The following diagram illustrates the table.
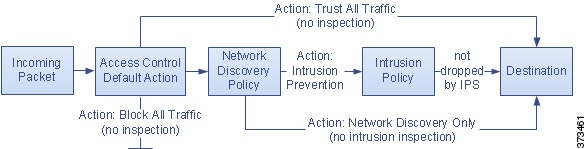
The following diagrams illustrate the Block All Traffic and Trust All Traffic default actions.

The following diagrams illustrate the Intrusion Prevention and Network Discovery Only default actions.

 Tip |
The purpose of Network Discovery Only is to improve performance in a discovery-only deployment. Different configurations can disable discovery if you are only interested in intrusion detection and prevention. |
Access control policy inheritance
You can nest access control policies, where each policy inherits the rules and settings from an ancestor (or base) policy. You can enforce this inheritance, or allow lower-level policies to override their ancestors.
Access control uses a hierarchical policy-based implementation. Just as you create a domain hierarchy, you can create a corresponding hierarchy of access control policies. A descendant, or child, access control policy inherits rules and settings from its direct parent, or base, policy. That base policy may have its own parent policy from which it inherits rules and settings, and so on.
An access control policy’s rules are nested between its parent policy’s Mandatory and Default rule sections. This implementation enforces Mandatory rules from ancestor policies, but allows the current policy to write rules that preempt Default rules from ancestor policies.
You can lock the following settings to enforce them in all descendant policies. Descendant policies can override unlocked settings.
-
Security Intelligence—Connections that are allowed or blocked based on the latest reputation intelligence for IP addresses, URLs, and domain names.
-
HTTP Response pages—Displaying a custom or system-provided response page when you block a user's website request.
-
Advanced settings—Specifying associated subpolicies, network analysis settings, performance settings, and other general options.
When using policy inheritance, the default action for the lowest-level descendant determines final traffic handling. Although an access control policy can inherit its default action from an ancestor policy, you cannot enforce this inheritance.
Policy inheritance and multitenancy
Access control's hierarchical policy-based implementation complements multitenancy.
In a typical multidomain deployment, access control policy hierarchy corresponds to domain structure, and you apply the lowest-level access control policy to managed devices. This implementation allows selective access control enforcement at a higher domain level, while lower-level domain administrators can tailor deployment-specific settings. (You must use roles, not policy inheritance and enforcement alone, to restrict administrators in descendant domains.)
For example, as a Global domain administrator for your organization, you can create an access control policy at the Global level. You can then require that all your devices, which are divided into subdomain by function, use that Global-level policy as a base policy.
When subdomain administrators log into the Secure Firewall Management Center to configure access control, they can deploy the Global-level policy as-is. Or, they can create and deploy a descendant access control policy within the boundaries of the Global-level policy.
Note |
Although the most useful implementation of access control inheritance and enforcement complements multitenancy, you can create a hierarchy of access control policies within a single domain. You can also assign and deploy access control policies at any level. |
Rule and other policy warnings
Policy and rule editors use icons to mark configurations that could adversely affect traffic analysis and flow. Depending on the issue, the system may warn you when you deploy or prevent you from deploying entirely.
Tip |
Hover your pointer over an icon to read the warning, error, or informational text. |
|
Icon |
Description |
Example |
|---|---|---|
|
Errors ( |
If a rule or configuration has an error, you cannot deploy until you correct the issue, even if you disable any affected rules. |
A rule that performs category and reputation-based URL filtering is valid until you assign a device that does not have a URL Filtering license. At that point, an error icon appears next to the rule, and you cannot deploy until you edit or delete the rule, unassign the device, or enable the license. |
|
Warning ( |
You can deploy a policy that displays rule or other warnings. However, misconfigurations marked with warnings have no effect. If you disable a rule with a warning, the warning icon disappears. It reappears if you enable the rule without correcting the underlying issue. |
Preempted rules or rules that cannot match traffic due to misconfiguration have no effect. This includes conditions using empty object groups, application filters that match no applications, excluded LDAP users, invalid ports, and so on. However, if a warning icon marks a licensing error or model mismatch, you cannot deploy until you correct the issue. |
|
Information ( |
Information icons convey helpful information about configurations that may affect the flow of traffic. These issues do not prevent you from deploying. |
The system might skip matching the first few packets of a connection against some rules, until the system identifies the application or web traffic in that connection. This allows connections to be established so that applications and HTTP requests can be identified. |
|
Rule Conflict ( |
When you enable rule conflict analysis, this icon appears in the rule table for rules that have conflicts. |
Conflicts include redundant rules, redundant objects, and shadowed rules. Redundant and shadowed rules do not match traffic because previous rules would already match the criteria. Redundant objects make your rules unnecessarily complex. |
 )
)
 )
) )
)


 Feedback