User Control with Captive Portal

The Captive Portal Identity Source

Captive portal is one of the authoritative identity sources supported by the system. Captive portal is an active authentication method where users authenticate onto the network using a managed device. (RA-VPN is another type of active authentication.). Active authentication differs from passive authentication in that the user is presented with a login page by the managed device, whereas passive authentication queries the authentication realm (for example, Microsoft AD) to authenticate the user.

You typically use captive portal to require authentication to access the internet or to access restricted internal resources; you can optionally configure guest access to resources. After the system authenticates captive portal users, it handles their user traffic according to access control rules. Captive portal performs authentication on HTTP and HTTPS traffic only.


Note


HTTPS traffic must be decrypted before captive portal can perform authentication.


Captive portal also records failed authentication attempts. A failed attempt does not add a new user to the list of users in the database. The user activity type for failed authentication activity reported by captive portal is Failed Auth User.

The authentication data gained from captive portal can be used for user awareness and user control.

About Hostname Redirect

(Snort 3 only.) An active authentication identity rule redirects to the captive portal port using its configured interface. Because the redirect is typically done to an IP address, the user gets an untrusted certificate error and because this behavior is similar to a man-in-the-middle attack, users might be reluctant to accept the untrusted certificate.

To avoid this problem, you can configure the captive portal to use the managed device's fully-qualified domain name (FQDN). With a properly configured certificate, users will not get an untrusted certificate error, and the authentication will be more seamless and appear to be more secure.

License Requirements for Captive Portal

Threat Defense License

Any

Classic License

Control

Requirements and Prerequisites for Captive Portal

Supported Domains

Any

User Roles

  • Admin

  • Access Admin

  • Network Admin

Captive Portal Guidelines and Limitations

When you configure and deploy captive portal in an identity policy, users from specified realms authenticate using threat defense to access your network.


Note


When a remote access VPN user has already actively authenticated through a managed device acting as a secure gateway, captive portal active authentication will not occur, even if configured in an identity policy.


Captive portal and policies

You configure captive portal in your identity policy and invoke active authentication in your identity rules. Identity policies are associated with access control policies and access control policies define access to resources in the network. For example, you might exclude users in the US-West/Finance group to access Engineering servers or you can prohibit users from accessing nonsecure applications on the network.

You configure some captive portal identity policy settings on the identity policy's Active Authentication tab page and configure the rest in the identity rule associated with the access control policy.

An active authentication rule has either an Active Authentication rule action, or a Passive Authentication rule action with Use active authentication if passive or VPN identity cannot be established selected. In each case the system transparently enables or disables TLS/SSL decryption, which restarts the Snort process.


Caution


Adding the first or removing the last active authentication rule when TLS/SSL decryption is disabled (that is, when the access control policy does not include a decryption policy) restarts the Snort process when you deploy configuration changes, temporarily interrupting traffic inspection. Whether traffic drops during this interruption or passes without further inspection depends on how the target device handles traffic. See Snort Restart Traffic Behavior for more information.


When the captive portal authenticates users that match an identity rule, any user in a Microsoft Active Directory or LDAP group that has not been downloaded is identified as Unknown. To avoid users being identified as Unknown, configure the realm or realm sequence to download users in all groups you expect to authenticate with captive portal. Unknown users are handled according to the associated access control policy; if the access control policy is configured to block Unknown users, these users are blocked.

To make sure the system downloads all users in a realm or realm sequence, make sure the groups are in the Available Groups list in the realm's configuration.

For more information about synchronizing users and groups, see Synchronize Users and Groups.

Routed interface required

Captive portal active authentication can be performed only by a device with a routed interface configured. If you are configuring an identity rule for captive portal and your captive portal device contains inline and routed interfaces, you must configure interface rule conditions in the access control policy to target only the routed interfaces on the device.

If the identity policy associated with your access control policy contains one or more captive portal identity rules and you deploy the policy on the management center that manages one or more devices with routed interfaces configured, the policy deployment succeeds and the routed interfaces perform active authentication.

Required certificate and certificate authorities

Before you can use the captive portal for user control and awareness, you must have all of the following:

  • To authenticate with Microsoft AD, export the server's root certificate and import it into the Secure Firewall Management Center as a trusted CA certificate.

  • An internal certificate object for authenticating with the managed device to which the identity policy is deployed.

  • An internal certificate authority for the required decryption rule.

Captive portal requirements and limitations

Note the following requirements and limitations:

  • Captive portal does not support HTTP/3 QUIC connections.

  • The system supports up to 20 captive portal logins per second.

  • There is a maximum five minute limit between failed login attempts for a failed login attempt to be counted toward the count of maximum login attempts. The five minute limit is not configurable.

    (Maximum login attempts are displayed in connection events: Analysis > Connections > Events.)

    If more than five minutes elapse between failed logins, the user is redirected to captive portal for authentication and will not be designated a failed login user or a guest user, and will not be reported to the management center.

  • Captive portal does not negotiate TLS v1.0 connections.

    Only TLS v1.1, v1.2, and TLS 1.3 connections are supported.

  • The only way to be sure a user logs out is for the user to close and reopen the browser. Unless that happens, in some cases, the user can log out of captive portal and be able to access the network without authenticating again using the same browser.

  • If a realm is created for a parent domain and the managed device detects a login to a child of that parent domain, the user's subsequent logout is not detected by the managed device.

  • Your access control rule must allow traffic destined for the IP address and port of the device you plan to use for captive portal.

  • To perform captive portal active authentication on HTTPS traffic, you must use a decryption policy to decrypt the traffic from the users you want to authenticate. You cannot decrypt the traffic in the connection between a captive portal user's web browser and the captive portal daemon on the managed device; this connection is used to authenticate the captive portal user.

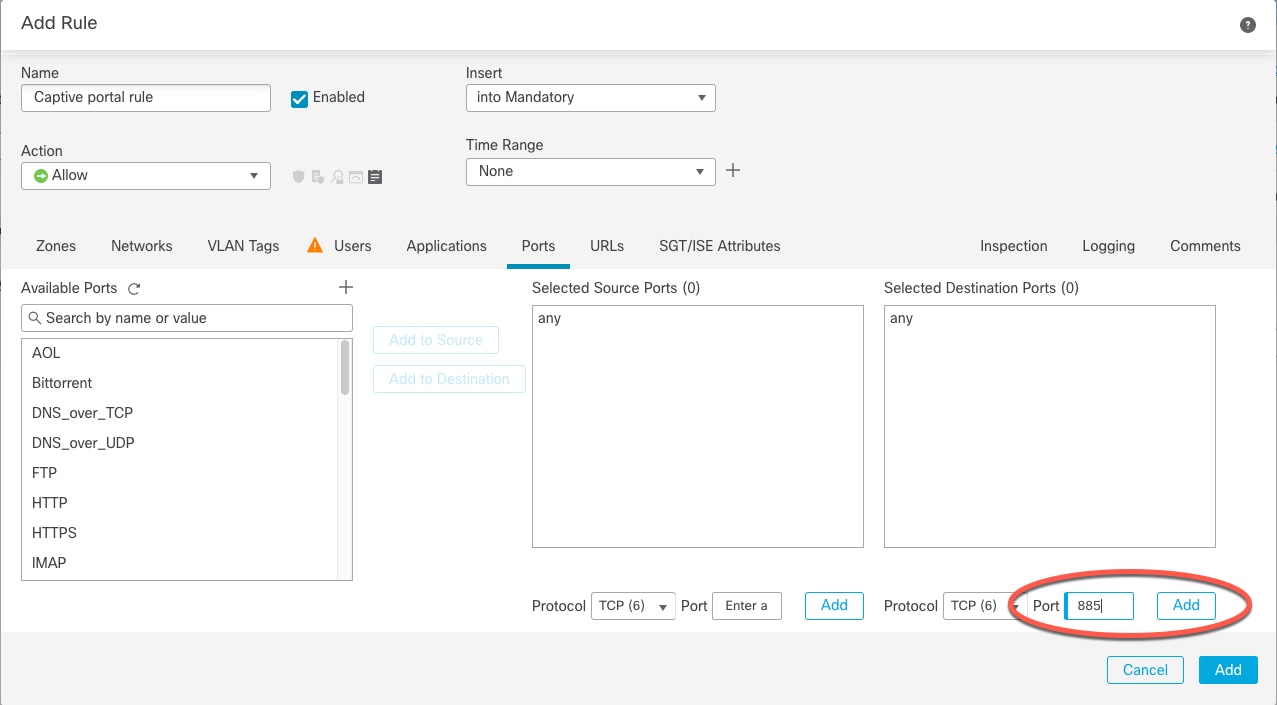
  • To limit the amount of non-HTTP or HTTPS traffic that is allowed through the managed device, you should enter typical HTTP and HTTPS ports in the identity policy's Ports tab page.

    The managed device changes a previously unseen user from Pending to Unknown when it determines that the incoming request does not use the HTTP or HTTPS protocol. As soon as the managed device changes a user from Pending to another state, access control, Quality of Service, and decryption policies can be applied to that traffic. If your other policies don't permit non-HTTP or HTTPS traffic, configuring ports on the captive portal identity policy can prevent undesired traffic from being allowed through the managed device.

Kerberos prerequisites

If you're using Kerberos authentication, the managed device's host name must be less than 15 characters (it's a NetBIOS limitation set by Windows); otherwise, captive portal authentication fails. You set the managed device host name when you set up the device. For more information, see an article like this one on the Microsoft documentation site: Naming conventions in Active Directory for computers, domains, sites, and OUs.

DNS must return a response of 64KB or less to the hostname; otherwise, the AD connection test fails. This limit applies in both directions and is discussed in RFC 6891 section-6.2.5.

How to Configure the Captive Portal for User Control

Before you begin

To use the captive portal for active authentication, you must set up an LDAP realm; or a Microsoft AD realm or realm sequence; access control policy; an identity policy; a decryption policy; and associate the identity and decryption policies with the same access control policy. Finally, you must deploy the policies to managed devices. This topic provides a high-level summary of those tasks.


Note


Microsoft Azure Active Directory is not supported for captive portal.


Perform the following tasks first:

  • Confirm that your management center manages one or more devices with a routed interface configured.

  • To use encrypted authentication with the captive portal, either create a PKI object for the authenticating managed device or have your certificate data and key available on the machine from which you're accessing the management center. To create a PKI object, see PKI.

Procedure


Step 1

Create and enable an LDAP realm; or a Microsoft AD realm and optionally realm sequence as discussed in the following topics:

To make sure the system downloads all users in a realm or realm sequence, make sure the groups are in the Available Groups list in the realm's configuration.

For more information, see Synchronize Users and Groups.

Step 2

Get required certificates and certificate authories.

You must have all of the following:
  • To authenticate with Microsoft AD, export the server's root certificate and import it into the Secure Firewall Management Center as a trusted CA certificate.

  • An internal certificate object for authenticating with the managed device to which the identity policy is deployed.

  • An internal certificate authority for the required decryption rule.

Step 3

Create a network object with an associated trusted certificate authority.

See Configure the Captive Portal Part 1: Create a Network Object.

Step 4

Create identity policy with an active authentication rule.

The identity policy enables selected users in your realm access resources after authenticating with the captive portal.

For more information, see Configure the Captive Portal Part 2: Create an Identity Policy and Active Authentication Rule.

Step 5

Configure an access control rule for the captive portal that allows traffic on the captive portal port (by default, TCP 885).

You can choose any available TCP port for the captive portal to use. Whatever your choice, you must create a rule that allows traffic on that port.

For more information, see Configure the Captive Portal Part 3: Create a TCP Port Access Control Rule.

Step 6

Add another access control rule to allow users in the selected realm or realm sequence to access resources using the captive portal.

For more information, see Configure the Captive Portal Part 4: Create a User Access Control Rule.

Step 7

Configure a decryption policy with a Decrypt - Resign rule for the Unknown user so captive portal users can access web pages using the HTTPS protocol.

The captive portal can authenticate users only if the HTTPS traffic is decrypted before the traffic is sent to the captive portal. The captive portal itself is seen by the system as the Unknown user.

Captive Portal Example: Create a Decryption Policy with an Outbound Rule

Step 8

Associate the identity and decryption policies with the access control policy from step 3.

This final step enables the system to authenticate users with the captive portal.

For more information, see Configure Captive Portal Part 6: Associate Identity and Decryption Policies with the Access Control Policy.


What to do next

See Configure the Captive Portal Part 1: Create a Network Object.

Configure the Captive Portal Part 1: Create a Network Object

This task discusses how to start configuring the captive portal as an identity source.

Before you begin

(Snort 3 only.) Create a fully-qualified host name (FQDN) using your DNS server and upload the Threat Defense's internal certificate to the management center. You can consult a resource such as this one if you've never done it before. Specify the IP address of a routed interface on one of the devices managed by your management center.

For more information about the network object, see Redirect to Host Name Network Rule Conditions.

Procedure


Step 1

If you haven't already done so, log in to your management center.

Step 2

Click Objects > Object Management.

Step 3

Expand PKI.

Step 4

Click Internal Certs.

Step 5

Click Add Internal Cert.

Step 6

In the Name field, enter a name to identify the internal cert (for example, MyCaptivePortal).

Step 7

In the Certificate Data field, either paste the certificate or use the Browse button to locate it.

The certificate Common Name must exactly match the FDQN with which you want captive portal users to authenticate.

Step 8

In the Key field, either paste the certificate's private key or use the Browse button to locate it.

Step 9

If the certificate is encrypted, select the Encrypted check box and enter the password in the adjacent field.

Step 10

Click Save.

Step 11

Click Network.

Step 12

Click Add Network > Add Object.

Step 13

In the Name field, enter a name to identify the object (for example, MyCaptivePortalNetwork).

Step 14

Click FDQN and, in the field, enter the name of the captive portal's FDQN.

Step 15

Click an option for Lookup.

The following figure shows an example.

Users can access your captive portal configuration with a fully qualified host name. Enter the host name in the dialog box.

Step 16

Click Save.


What to do next

Configure the Captive Portal Part 2: Create an Identity Policy and Active Authentication Rule

Configure the Captive Portal Part 2: Create an Identity Policy and Active Authentication Rule

Before you begin

This multi-part procedure shows how to set up the captive portal using the default TCP port 885 and using a management center server certificate for both the captive portal and for TLS/SSL decryption. Each part of this example explains one task required to enable the captive portal to perform active authentication.

If you follow all the steps in this procedure, you can configure captive portal to work for users in your domains. You can optionally perform additional tasks, which are discussed in each part of the procedure.

For an overview of the entire procedure, see How to Configure the Captive Portal for User Control.

Procedure


Step 1

Log in to the management center if you have not already done so.

Step 2

Click Policies > Access Control > Identity and create or edit an identity policy.

Step 3

(Optional.) Click Add Category to add a category for the captive portal identity rules and enter a Name for the category.

Step 4

Click the Active Authentication tab.

Step 5

Choose the appropriate Server Certificate from the list or click Add (add icon) to add a certificate.

Note


Captive portal does not support the use of Digital Signature Algorithm (DSA) or Elliptic Curve Digital Signature Algorithm (ECDSA) certificates.

Step 6

From the Redirect to Host Name field, click the network object you previously created or click Add (add icon).

Step 7

Enter 885 in the Port field and specify the Maximum login attempts.

Step 8

Uncheck Share active authentication across firewalls to enable the management center to require users to reauthenticate every time they access your network using a different managed device than the last time.

For more information about this option, see Captive Portal Fields.

Step 9

(Optional.) Choose an Active Authentication Response Page as described in Captive Portal Fields.

Step 10

(If you upgraded to version 7.4.1 from an earlier version only and you authenticate users with a realm sequence.) Click Edit (edit icon) and see Update a Custom Authentication Form.

Step 11

Click Save.

Step 12

Click Rules.

Step 13

Click Add Rule to add a new captive portal identity policy rule, or click Edit (edit icon) to edit an existing rule.

Step 14

Enter a Name for the rule.

Step 15

From the Action list, choose Active Authentication.

Step 16

Click Realm & Settings.

Step 17

From the Realms list, choose a realm or realm sequence to use for user authentication.

Step 18

(Optional.) Check Identify as Guest if authentication cannot identify user. For more information, see Captive Portal Fields.

Step 19

Choose an Authentication Protocol from the list.

You cannot authenticate users with a realm sequence if you choose NTLM, Kerberos, or HTTP Negotiate authentication protocols. Choose HTTP Basic or HTTP Response Page instead.

Step 20

(Optional.) To exempt specific application traffic from captive portal, see Exclude Applications from Captive Portal.

Step 21

Add conditions to the rule (port, network, and so on) as discussed in Identity Rule Conditions.

Step 22

Click Add.

Step 23

At the top of the page, click Save.


What to do next

Continue with Configure the Captive Portal Part 3: Create a TCP Port Access Control Rule.

Update a Custom Authentication Form

After you upgrade to version 7.4.1 (or later) from an earlier release, you must add the following line to a custom authentication form for users to see a list of domains when they authenticate with captive portal. (This task is always required if you use the HTTP Response Page authentication type; if users authenticate with a realm using another authentication type, this task is optional.)

On the Active Authentication tab page of your identity rule, click Edit (edit icon) and enter the following in the part of the form that requires the user to log in:

<select name="realm" id="realm"></select>

Configure the Captive Portal Part 3: Create a TCP Port Access Control Rule

This part of the procedure shows how to create an access control rule that allows the captive portal to communicate with clients using TCP port 885, which is the captive portal's default port. You can choose another port if you wish, but the port must match the one you chose in Configure the Captive Portal Part 2: Create an Identity Policy and Active Authentication Rule.

Before you begin

For an overview of the entire captive portal configuration, see How to Configure the Captive Portal for User Control.

Procedure


Step 1

Log in to the management center if you have not already done so.

Step 2

If you haven't done so already, create a certificate for the captive portal as discussed in PKI.

Step 3

Click Policies > Access Control > Access Control and create or edit an access control policy.

Step 4

Click Add Rule.

Step 5

Enter a Name for the rule.

Step 6

Choose Allow from the Action list.

Step 7

Click Ports.

Step 8

From the Protocol list under the Selected Destination Ports field, choose TCP.

Step 9

In the Port field, enter 885 .

Step 10

Click Add next to the Port field.

The following figure shows an example.

Set up an access control rule to allow TCP port 885 (or whatever port you configured for the captive portal).

Step 11

Click Add at the bottom of the page.


What to do next

Continue with Configure the Captive Portal Part 4: Create a User Access Control Rule.

Configure the Captive Portal Part 4: Create a User Access Control Rule

This part of the procedure discusses how to add an access control rule that enables users in a realm to authenticate using captive portal.

Before you begin

For an overview of the entire captive portal configuration, see How to Configure the Captive Portal for User Control.

Procedure


Step 1

In the rule editor, click Add Rule.

Step 2

Enter a Name for the rule.

Step 3

Choose Allow from the Action list.

Step 4

Click Users.

Step 5

In the Available Realms list, click the realms to allow.

Step 6

If no realms display, click Refresh (refresh icon).

Step 7

In the Available Users list, choose the users to add to the rule and click Add to Rule.

Step 8

(Optional.) Add conditions to the access control policy as discussed in Identity Rule Conditions.

Step 9

Click Add.

Step 10

On the access control rule page, click Save.

Step 11

In the policy editor, set the rule position. Click and drag or use the right-click menu to cut and paste. Rules are numbered starting at 1. The system matches traffic to rules in top-down order by ascending rule number. The first rule that traffic matches is the rule that handles that traffic. Proper rule order reduces the resources required to process network traffic and prevents rule preemption.


What to do next

Captive Portal Example: Create a Decryption Policy with an Outbound Rule

Captive Portal Example: Create a Decryption Policy with an Outbound Rule

This part of the procedure discusses how to create a decryption policy to decrypt and resign traffic before the traffic reaches the captive portal. The captive portal can authenticate traffic only after it has been decrypted.

Before you begin

You must have an internal certificate authority (CA) for your outbound server; in other words, the managed device that decrypts the traffic for captive portal users to authenticate. This certificate must be different from the internal certificate you use to authenticate the captive portal with the managed device.

Procedure


Step 1

Log in to the management center if you haven't already done so.

Step 2

Click Policies > Access Control > Decryption.

Step 3

Click New Policy.

Step 4

Give the policy a unique Name and, optionally, a Description.

Step 5

Click the Outbound Connections tab.

Create a decryption policy with an outbound rule (also referred to as a Decrypt-Resign rule)

Step 6

Upload or choose certificates for the rules.

The system creates one rule per combination of CA and networks/ports.

Step 7

(Optional.) Choose networks and ports.

For more information:

Step 8

Click Save.

Step 9

Click Edit (edit icon) next to the decryption policy you just created.

Step 10

Click Edit (edit icon) next to the decryption rule for captive portal.

Step 11

Click Users.

Step 12

Above the Available Realms list, click Refresh (refresh icon).

Step 13

In the Available Realms list, click Special Identities.

Step 14

In the Available Users list, click Unknown.

Step 15

Click Add to Rule.

The following figure shows an example. Set up a decryption rule to search your realms for the Special Identity user Unknown

Step 16

(Optional.) Set other options as discussed in Decryption Rule Conditions.

Step 17

Click Add.


What to do next

Configure Captive Portal Part 6: Associate Identity and Decryption Policies with the Access Control Policy

Configure Captive Portal Part 6: Associate Identity and Decryption Policies with the Access Control Policy

This part of the procedure discusses how to associate the identity policy and TLS/SSL Decrypt - Resign rule with the access control policy you created earlier. After this, users can authenticate using the captive portal.

Before you begin

For an overview of the entire captive portal configuration, see How to Configure the Captive Portal for User Control.

Procedure


Step 1

Click Policies > Access Control > Access Control and edit the access control policy you created as discussed in Configure the Captive Portal Part 3: Create a TCP Port Access Control Rule. If View (View button) appears instead, the configuration belongs to an ancestor domain, or you do not have permission to modify the configuration.

Step 2

Either create a new access control policy or edit an existing policy.

Step 3

At the top of the page, click the word Identity.

Step 4

From the list, choose the name of your identity policy and, at the top of the page, click Save.

Step 5

Repeat the preceding steps to associate your captive portal decryption policy with the access control policy.

Step 6

If you haven't done so already, target the policy at managed devices as discussed in Setting Target Devices for an Access Control Policy.


What to do next

Captive Portal Fields

Use the following fields to configure captive portal on the Active Authentication tab page of your identity policy. See also Identity Rule Fields and Exclude Applications from Captive Portal.

Server Certificate

An internal certificate presented by the captive portal daemon.


Note


Captive portal does not support the use of Digital Signature Algorithm (DSA) or Elliptic Curve Digital Signature Algorithm (ECDSA) certificates.


Port

The port number to use for the captive portal connection. You must set up your access control rule with a TCP port to use for the captive portal, then associate the identity policy with that access control policy. For more information, see Configure the Captive Portal Part 3: Create a TCP Port Access Control Rule.

Maximum login attempts

The maximum allowed number of failed login attempts before the system denies a user's login request.

Share active authentication sessions across firewalls

Determines whether or not users are required to authenticate when their authentication session is sent to a different managed device than one they previously connected to. If your organization requires users to authenticate every time they change locations or sites, you should disable this option.

  • (Default, which continues previous behavior.) Check the box to allow users to authenticate with any managed device associated with the active authentication identity rule.

  • Uncheck the box to require the user to authenticate with a different managed device, even if they have already authenticated with another managed device to which the active authentication rule is deployed. Use this option if your organization requires authentication per location or site and a managed device is deployed per site.

Managed devices are either clustered or are in a high availability pair act as if they are the same device; in particular,

  • Managed devices in the same cluster or high availability pair: Saves the user session to maintain consistency across the pair. On failover, the secondary has the current user session data.

  • Managed devices in a different cluster or high availability pair: User session data is not shared with and therefore not stored on these devices.

Active Authentication Response Page

The system-provided or custom HTTP response page you want to display to captive portal users. After you select an Active Authentication Response Page in your identity policy active authentication settings, you also must configure one or more identity rules with HTTP Response Page as the Authentication Protocol.

The system-provided HTTP response page includes Username and Password fields, a list of realms if you chose to authenticate with a realm sequence, as well as a Login as guest button to allow users to access the network as guests. To display a single login method, configure a custom HTTP response page.

An example of what users see when logging in with a response page is shown in Create a Sample Identity Policy with an Active Authentication Rule.

Choose the following options:

  • To use a generic response, click System-provided. You can click View (View button) to view the HTML code for this page.

  • To create a custom response, click Custom. A window with system-provided code is displayed that you can replace or modify. When you are done, save your changes. You can edit a custom page by clicking Edit (edit icon).

Exclude Applications from Captive Portal

You can select applications (identified by their HTTP User-Agent strings) and exempt them from captive portal active authentication. This allows traffic from the selected applications to pass through the identity policy without authenticating.


Note


Only applications with the User-Agent Exclusion Tag are displayed in this list.


Procedure


Step 1

If you haven't done so already, log in to the management center.

Step 2

Click Policies > Access Control > Identity .

Step 3

Edit the identity policy that contains the captive portal rule.

Step 4

On Realm & Settings tab page, expand HTTP User Agent Exclusions.

  • In the first column, select the check box next to each item to filter applications, then one or more applications, and click Add to Rule.

    Check boxes are ANDed together.

  • To narrow the filters that are displayed, type a search string in the Search by name field; this is especially useful for categories and tags. To clear the search, click Clear (clear icon).

  • To refresh the filters list and clear any selected filters, click Reload (reload icon).

Note


The list displays 100 applications at a time.

Step 5

Choose the applications that you want to add to the filter from the Available Applications list:

  • To narrow the individual applications that appear, enter a search string in the Search by name field. To clear the search, click Clear (clear icon).

  • Use paging at the bottom of the list to browse the list of individual available applications.

  • To refresh the applications list and clear any selected applications, click Reload (reload icon).

Step 6

Add the selected applications to exclude from external authentication. You can click and drag, or you can click Add to Rule. The result is the combination of the application filters you selected.


What to do next

Troubleshoot the Captive Portal Identity Source

For other related troubleshooting information, see Troubleshoot Realms and User Downloads and Troubleshoot User Control.

If you experience issues with captive portal, check the following:

  • The time on your captive portal managed device must be synchronized with the time on the management center.

  • If you have DNS resolution configured and you create an identity rule to perform Kerberos (or HTTP Negotiate, if you want Kerberos as an option) captive portal, you must configure your DNS server to resolve the fully qualified domain name (FQDN) of the captive portal device. The FQDN must match the hostname you provided when configuring DNS.

    For more information, see About Hostname Redirect.

  • If you're using Kerberos authentication, the managed device's host name must be less than 15 characters (it's a NetBIOS limitation set by Windows); otherwise, captive portal authentication fails. You set the managed device host name when you set up the device. For more information, see an article like this one on the Microsoft documentation site: Naming conventions in Active Directory for computers, domains, sites, and OUs.

  • DNS must return a response of 64KB or less to the hostname; otherwise, the AD connection test fails. This limit applies in both directions and is discussed in RFC 6891 section-6.2.5.

  • If the captive portal is configured correctly but the redirect to an IP address or fully-qualified domain name (FQDN) fails, disable endpoint security software. This type of software can interfere with the redirection.

  • If you select Kerberos (or HTTP Negotiate, if you want Kerberos as an option) as the Authentication Type in an identity rule, the Realm you select must be configured with an AD Join Username and AD Join Password to perform Kerberos captive portal active authentication.

  • If you select HTTP Basic as the Authentication Type in an identity rule, users on your network might not notice their sessions time out. Most web browsers cache the credentials from HTTP Basic logins and use the credentials to seamlessly begin a new session after an old session times out.

  • If the connection between your management center and a managed device fails, no captive portal logins reported by the device can be identified during the downtime, unless the users were previously seen and downloaded to the management center. The unidentified users are logged as Unknown users on the management center. After the downtime, the Unknown users are reidentified and processed according to the rules in your identity policy.

  • If the device you want to use for captive portal contains both inline and routed interfaces, you must configure a zone condition in your captive portal identity rules to target only the routed interfaces on the captive portal device.

  • The host name of the managed device must be less than 15 characters for Kerberos authentication to succeed.

  • The only way to be sure a user logs out is to close and reopen the browser. Unless that happens, in some cases, the user can log out of captive portal and be able to access the network without authenticating again using the same browser.

  • Active FTP sessions are displayed as the Unknown user in events. This is normal because, in active FTP, the server (not the client) initiates the connection and the FTP server should not have an associated user name. For more information about active FTP, see RFC 959.

  • When the captive portal authenticates users that match an identity rule, any user in a Microsoft Active Directory or LDAP group that has not been downloaded is identified as Unknown. To avoid users being identified as Unknown, configure the realm or realm sequence to download users in all groups you expect to authenticate with captive portal. Unknown users are handled according to the associated access control policy; if the access control policy is configured to block Unknown users, these users are blocked.

    To make sure the system downloads all users in a realm or realm sequence, make sure the groups are in the Available Groups list in the realm's configuration.

    For more information, see Synchronize Users and Groups.

History for Captive Portal

Feature

Minimum Management CenterManagement Center

Minimum Threat Defense

Details

Authentication using a realm or realm sequence.

7.4.1

7.4.1

You can configure active authentication for either an LDAP realm; or a Microsoft Active Directory realm or a realm sequence. In addition, you can configure a passive authentication rule to fall back to active authentication using either a realm or a realm sequence. You can optionally share sessions between managed devices that share the same identity policy in access control rules.

In addition, you have the option to require users to authenticate again when they access the system using a different managed device than they accessed previously.

Microsoft Azure Active Directory cannot be used with captive portal.

New/modified screens:

  • Policies > Identity > (edit policy) > Active Authentication > Share active authentication sessions across firewalls

  • Identity policy > (edit) > Add Rule > Passive Authentication > Realms & Settings > Use active authentication if passive or VPN identity cannot be established

  • Identity policy > (edit) > Add Rule > Active Authentication > Realms & Settings > Use active authentication if passive or VPN identity cannot be established

Share active authentication sessions across firewalls.

7.4.1

7.4.1

Determines whether or not users are required to authenticate when their authentication session is sent to a different managed device than one they previously connected to. If your organization requires users to authenticate every time they change locations or sites, you should disable this option.

  • (Default.) Enable to allow users to authenticate with any managed device associated with the active authentication identity rule.

  • Disable to require the user to authenticate with a different managed device, even if they have already authenticated with another managed device to which the active authentication rule is deployed.

New/modified screens: Policies > Identity > (edit policy) > Active Authentication > Share active authentication sessions across firewalls

Hostname redirect.

7.1.0

7.1.0 with Snort 3

You can use a network object that contains the fully-qualified host name (FQDN) of the interface that captive portal can use for active authentication requests.

Guest login.

6.1.0

6.1.0

Users can log in as guest using captive portal.

Captive portal.

6.0.0

6.0.0

Feature introduced. You can use the captive portal to require users to enter their credentials when prompted in a browser window. The mapping also allows policies to be based on a user or group of users.