IPv4 GRE トンネル保護経由の IPv6

IPv4 GRE トンネル保護経由の IPv6 機能は、IPv6 ユニキャスト トラフィックと IPv6 マルチキャスト トラフィックの両方が保護された Generic Routing Encapsulation(GRE)を通過できるようにします。

IPv4 GRE トンネル保護経由の IPv6 の前提条件

  • この機能を有効にするには、IPv4 GRE トンネル上で IPsec トンネル保護を設定する必要があります。

  • IPv6 マルチキャストを有効にするには、IPv6 マルチキャスト ルーティングを設定する必要があります。

IPv4 GRE トンネル保護経由の IPv6 の制約事項

IPv4 GRE トンネル保護経由の IPv6 機能は、IPv4 ポイントツーポイント GRE トンネル保護経由の IPv6 をサポートしますが、IPv4 mGRE トンネル保護経由の IPv6 はサポートしません。

IPv4 GRE トンネル保護経由の IPv6 に関する情報

IPsec を使用した GRE トンネル

Generic Routing Encapsulation(GRE)トンネルは、ときどき、IPSec と組み合わせて使用されます。これは、IPSec が IPv6 マルチキャスト パケットをサポートしていないためです。これにより、ダイナミック ルーティング プロトコルが IPSec VPN ネットワーク経由で正しく機能しません。GRE トンネルは IPv6 マルチキャストをサポートしているため、ダイナミック ルーティング プロトコルを GRE トンネル経由で実行できます。ダイナミック ルーティング プロトコルが GRE トンネル経由で設定されている場合は、IPSec を使用して GRE IPv6 マルチキャスト パケットを暗号化できます。

IPSec は、クリプト マップまたはトンネル保護を使用して GRE パケットを暗号化できます。いずれの方法でも、GRE カプセル化の設定後に、IPSec 暗号化を実行するように指定されます。クリプト マップを使用している場合は、暗号化が GRE トンネル パケット用のアウトバウンド物理インターフェイスに適用されます。トンネル保護を使用している場合は、暗号化が GRE トンネル インターフェイス上で設定されます。

次の図に、物理インターフェイス上でクリプト マップを使用して、GRE トンネル インターフェイス経由でルータに入る暗号化されたパケットを示します。パケットは、復号化およびカプセル化解除されてから、クリア テキストとして IP 宛先に送られます。

Figure 1. クリプト マップを使用した IPv4 GRE トンネル暗号化経由の IPv6 の設定

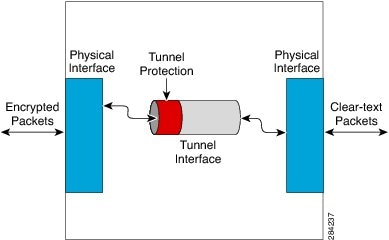
次の図に、GRE トンネル インターフェイス上で tunnel protection コマンドを使用した暗号化を示します。暗号化されたパケットは、トンネル インターフェイス経由でルータに入り、復号化およびカプセル化解除されてから、クリア テキストとして宛先に送られます。

Figure 2. トンネル保護を使用した IPv4 GRE トンネル暗号化経由の IPv6 の設定

クリプト マップ方式を使用した場合とトンネル保護方式を使用した場合の重要な違いを以下に示します。

  • IPSec クリプト マップは、物理インターフェイスに関連付けられ、パケットが物理インターフェイスを通して転送されるときにチェックされます。この時点で、パケットはすでに GRE トンネル内でカプセル化されています。

  • トンネル保護は、暗号化機能を GRE トンネルに関連付け、パケットが GRE カプセル化されてから物理インターフェイスに転送されるまでの間にチェックされます。

IPv4 GRE トンネル保護経由の IPv6 の設定方法

クリプト マップを使用した IPv4 GRE 暗号化経由の IPv6 の設定

SUMMARY STEPS

  1. enable
  2. configure terminal
  3. ipv6 multicast-routing
  4. ipv6 unicast-routing
  5. interface type number
  6. ipv6 address {ipv6-address/prefix-length | prefix-name sub-bits/prefix-length}
  7. tunnel mode {aurp | cayman | dvmrp | eon | gre | gre multipoint | gre ip | gre ipv6 | ipip [decapsulate-any] | ipsec ipv4 | iptalk | ipv6 | ipsec ipv6 | mpls | nos | rbscp}
  8. tunnel source {ip-address | ipv6-address | interface-typeinterface-number}
  9. tunnel destination {hostname | ip-address | ipv6-address}
  10. exit
  11. crypto isakmp policy priority
  12. authentication {rsa-sig | rsa-encr | pre-share}
  13. hash {sha | md5}
  14. group {1 | 2 | 5}
  15. encryption {des | 3des | aes 192 | aes 256}
  16. exit
  17. crypto isakmp key enc-type-digit keystring {address peer-address [mask] | ipv6 {ipv6-address/ipv6-prefix} | hostname hostname} [no-xauth]
  18. crypto ipsec transform-set transform-set-name transform1 [transform2] [transform3] [transform4]
  19. access-list access-list-number [dynamic dynamic-name [timeout minutes]] {deny | permit} protocol source source-wildcard destination destination-wildcard [precedence precedence] [tos tos] [time-range time-range-name] [fragments] [log [word] | log-input [word]]
  20. crypto map [ipv6] map-name seq-num [ipsec-isakmp [dynamic dynamic-map-name | discover | profile profile-name]]
  21. set peer {hostname [dynamic] [default] | ip-address [default]}
  22. set transform-set transform-set-name [transform-set-name2...transform-set-name6]
  23. match address [access-list-id | name]
  24. exit
  25. interface type number
  26. crypto map map-name [redundancy standby-group-name [stateful]]
  27. end

DETAILED STEPS

  Command or Action Purpose

Step 1

enable

Example:

Router> enable

特権 EXEC モードを有効にします。

  • パスワードを入力します(要求された場合)。

Step 2

configure terminal

Example:

Router# configure terminal

グローバル コンフィギュレーション モードを開始します。

Step 3

ipv6 multicast-routing

Example:

Router(config)# ipv6 multicast-routing

ルータのすべての IPv6 対応インターフェイス上で Protocol Independent Multicast(PIM)とマルチキャスト リスナー検出(MLD)を使用したマルチキャスト ルーティングを有効にして、マルチキャスト転送を有効にします。

  • このコマンドは、IPv6 マルチキャストを使用している場合にのみ有効にします。IPv6 ユニキャストを使用している場合は、このコマンドを有効にしないようにする必要があります。

Step 4

ipv6 unicast-routing

Example:

Router(config)# ipv6 unicast-routing

IPv6 ユニキャスト データグラムの転送を有効にします。

Step 5

interface type number

Example:

Router(config)# interface tunnel 10

トンネル インターフェイスおよび番号を指定し、インターフェイス コンフィギュレーション モードを開始します。

Step 6

ipv6 address {ipv6-address/prefix-length | prefix-name sub-bits/prefix-length}

Example:

Router(config-if)# ipv6 address 0:0:0:7272::72/64

IPv6 の一般的なプレフィックスに基づいて IPv6 アドレスを設定し、インターフェイスにおける IPv6 処理をイネーブルにします。

Step 7

tunnel mode {aurp | cayman | dvmrp | eon | gre | gre multipoint | gre ip | gre ipv6 | ipip [decapsulate-any] | ipsec ipv4 | iptalk | ipv6 | ipsec ipv6 | mpls | nos | rbscp}

Example:

Router(config-if)# tunnel mode gre ip

トンネル インターフェイスのカプセル化モードを設定します。

Step 8

tunnel source {ip-address | ipv6-address | interface-typeinterface-number}

Example:

Router(config-if)# tunnel source ethernet0

トンネル インターフェイスの送信元アドレスを設定します。

Step 9

tunnel destination {hostname | ip-address | ipv6-address}

Example:

Router(config-if)# tunnel destination 172.16.0.12

トンネル インターフェイスの宛先を指定します。

Step 10

exit

Example:

Router(config-if)# exit

インターフェイス コンフィギュレーション モードを終了し、グローバル コンフィギュレーション モードに戻ります。

Step 11

crypto isakmp policy priority

Example:

Router(config)# crypto isakmp policy 15

インターネット キー エクスチェンジ(IKE)ポリシーを定義して、ISAKMP ポリシー コンフィギュレーション モードを開始します。

  • ポリシー番号 1 は、最もプライオリティが高いポリシーを示します。priority 引数値が低いほど、優先順位が高くなります。

Step 12

authentication {rsa-sig | rsa-encr | pre-share}

Example:

Router(config-isakmp-policy)# authentication pre-share

IKE ポリシー内の認証方式を指定します。

  • rsa-sig キーワードと rsa-encr キーワードは IPv6 でサポートされません。

Step 13

hash {sha | md5}

Example:

Router(config-isakmp-policy)# hash md5

IKE ポリシー内のハッシュ アルゴリズムを指定します。

Step 14

group {1 | 2 | 5}

Example:

Router(config-isakmp-policy)# group 2

IKE ポリシー内部での D-H グループの識別番号を指定します。

Step 15

encryption {des | 3des | aes 192 | aes 256}

Example:

Router(config-isakmp-policy)# encryption 3des

IKE ポリシー内の暗号化アルゴリズムを指定します。

Step 16

exit

Example:

Router(config-isakmp-policy)# exit

ISAKMP ポリシー コンフィギュレーション モードを終了して、グローバル コンフィギュレーション モードを開始します。

Step 17

crypto isakmp key enc-type-digit keystring {address peer-address [mask] | ipv6 {ipv6-address/ipv6-prefix} | hostname hostname} [no-xauth]

Example:

Router(config)# crypto isakmp key cisco-10 address 172.16.0.12 255.240.0.0

事前共有認証キーを設定します。

Step 18

crypto ipsec transform-set transform-set-name transform1 [transform2] [transform3] [transform4]

Example:

Router(config)# crypto ipsec transform-set myset0 ah-sha-hmac esp-3des

トランスフォーム セットを定義します。

Step 19

access-list access-list-number [dynamic dynamic-name [timeout minutes]] {deny | permit} protocol source source-wildcard destination destination-wildcard [precedence precedence] [tos tos] [time-range time-range-name] [fragments] [log [word] | log-input [word]]

Example:

Router(config)# access-list 110 permit gre host 192.168.0.16 host 172.16.0.12

拡張 IP アクセス リストを定義します。

Step 20

crypto map [ipv6] map-name seq-num [ipsec-isakmp [dynamic dynamic-map-name | discover | profile profile-name]]

Example:

Router(config)# crypto map mymap 10 ipsec-isakmp

新しいクリプト マップ エントリまたはプロファイルを作成し、クリプト マップ コンフィギュレーション モードを開始します。

Step 21

set peer {hostname [dynamic] [default] | ip-address [default]}

Example:

Router(config-crypto-map)# set peer 10.0.0.1

クリプト マップ エントリ内の IP Security(IPsec)ピアを指定します。

Step 22

set transform-set transform-set-name [transform-set-name2...transform-set-name6]

Example:

Router(config-crypto-map)# set transform-set myset0

クリプト マップ エントリで使用可能なトランスフォーム セットを指定します。

Step 23

match address [access-list-id | name]

Example:

Router(config-crypto-map)# match address 102

クリプト マップ エントリの拡張アクセス リストを指定します。

Step 24

exit

Example:

Router(config-crypto-map)# exit

クリプト マップ コンフィギュレーション モードを終了し、グローバル コンフィギュレーション モードに戻ります。

Step 25

interface type number

Example:

Router(config)# interface ethernet 1

インターフェイスと番号を指定し、インターフェイス コンフィギュレーション モードを開始します。

Step 26

crypto map map-name [redundancy standby-group-name [stateful]]

Example:

Router(config-if)# crypto map mymap

定義済みのクリプト マップ セットをアウトバウンド インターフェイスに適用します。

Step 27

end

Example:

Router(config-if)# end

インターフェイス コンフィギュレーション モードを終了し、特権 EXEC モードに戻ります。

トンネル保護を使用した IPv4 GRE 暗号化経由の IPv6 の設定

SUMMARY STEPS

  1. enable
  2. configure terminal
  3. ipv6 multicast-routing
  4. ipv6 unicast-routing
  5. crypto isakmp policy priority
  6. authentication {rsa-sig | rsa-encr | pre-share}
  7. hash {sha | md5}
  8. group {1 | 2 | 5}
  9. encryption{des |3des |aes |aes 192 |aes 256}
  10. exit
  11. crypto isakmp key enc-type-digit keystring {address peer-address [mask] | ipv6 {ipv6-address/ipv6-prefix} | hostname hostname} [no-xauth]
  12. crypto ipsec transform-set transform-set-name transform1 [transform2 ] [transform3 ] [transform4 ]
  13. crypto ipsec profile profile-name
  14. set transform-set transform-set-name [transform-set-name2...transform-set-name6]
  15. exit
  16. interface type number
  17. ipv6 address {ipv6-address / prefix-length | prefix-name sub-bits /prefix-length }
  18. tunnel mode {aurp | cayman | dvmrp | eon | gre | gre multipoint | gre ip | gre ipv6 | ipip[decapsulate-any] | ipsec ipv4 | iptalk | ipv6 | ipsec ipv6 | mpls | nos | rbscp}
  19. tunnel source {ip-address | ipv6-address | interface-type interface-number }
  20. tunnel destination {hostname | ip-address | ipv6-address}
  21. tunnel protection ipsec profile name [shared]
  22. end

DETAILED STEPS

  Command or Action Purpose

Step 1

enable

Example:

Router> enable

特権 EXEC モードを有効にします。

  • パスワードを入力します(要求された場合)。

Step 2

configure terminal

Example:

Router# configure terminal

グローバル コンフィギュレーション モードを開始します。

Step 3

ipv6 multicast-routing

Example:

Router(config)# ipv6 multicast-routing

ルータのすべての IPv6 対応インターフェイス上で Protocol Independent Multicast(PIM)とマルチキャスト リスナー検出(MLD)を使用したマルチキャスト ルーティングを有効にして、マルチキャスト転送を有効にします。

  • このコマンドは、IPv6 マルチキャストを使用している場合にのみ有効にします。IPv6 ユニキャストを使用している場合は、このコマンドを有効にする必要はありません。

Step 4

ipv6 unicast-routing

Example:

Router(config)# ipv6 unicast-routing

IPv6 ユニキャスト データグラムの転送を有効にします。

Step 5

crypto isakmp policy priority

Example:

Router(config)# crypto isakmp policy 15

IKE ポリシーを定義し、ISAKMP ポリシー コンフィギュレーション モードを開始します。

ポリシー番号 1 は、最もプライオリティが高いポリシーを示します。priority 引数値が低いほど、優先順位が高くなります。

Step 6

authentication {rsa-sig | rsa-encr | pre-share}

Example:

Router(config-isakmp-policy)# authentication pre-share

インターネット キー エクスチェンジ(IKE)ポリシー内の認証方式を指定します。

  • rsa-sig キーワードと rsa-encr キーワードは IPv6 でサポートされません。

Step 7

hash {sha | md5}

Example:

Router(config-isakmp-policy)# hash md5

IKE ポリシー内のハッシュ アルゴリズムを指定します。

Step 8

group {1 | 2 | 5}

Example:

Router(config-isakmp-policy)# group 2

IKE ポリシー内部での D-H グループの識別番号を指定します。

Step 9

encryption{des |3des |aes |aes 192 |aes 256}

Example:

Router(config-isakmp-policy)# encryption 3des

IKE ポリシー内の暗号化アルゴリズムを指定します。

Step 10

exit

Example:

Router(config-isakmp-policy)# exit

ISAKMP ポリシー コンフィギュレーション モードを終了します。続いて、グローバル コンフィギュレーション モードに戻ります。

Step 11

crypto isakmp key enc-type-digit keystring {address peer-address [mask] | ipv6 {ipv6-address/ipv6-prefix} | hostname hostname} [no-xauth]

Example:

Router(config)# crypto isakmp key cisco-10 address 172.16.0.12 255.240.0.0

事前共有認証キーを設定します。

Step 12

crypto ipsec transform-set transform-set-name transform1 [transform2 ] [transform3 ] [transform4 ]

Example:

Router(config)# crypto ipsec transform-set myset0 ah-sha-hmac esp-3des

トランスフォーム セットを定義し、ルータを暗号化トランスフォーム コンフィギュレーション モードにします。

Step 13

crypto ipsec profile profile-name

Example:

Router(config)# crypto ipsec profile ipsecprof

2 つの IPsec ルータ間の IPsec 暗号化に使用される IPsec パラメータを定義して、IPsec プロファイル コンフィギュレーション モードを開始します。

Step 14

set transform-set transform-set-name [transform-set-name2...transform-set-name6]

Example:

Router(ipsec-profile)# set transform-set myset0

クリプト マップ エントリで使用可能なトランスフォーム セットを指定します。

Step 15

exit

Example:

Router(ipsec-profile)# exit

IPsec プロファイル コンフィギュレーション モードを終了し、グローバル コンフィギュレーション モードに戻ります。

Step 16

interface type number

Example:

Router(config)# interface tunnel 1

トンネル インターフェイスおよび番号を指定し、インターフェイス コンフィギュレーション モードを開始します。

Step 17

ipv6 address {ipv6-address / prefix-length | prefix-name sub-bits /prefix-length }

Example:

Router(config-if)# ipv6 address 3ffe:b00:c18:1::3/127

インターフェイスに割り当てられている IPv6 ネットワークを指定し、インターフェイスで IPv6 処理をイネーブルにします。

Step 18

tunnel mode {aurp | cayman | dvmrp | eon | gre | gre multipoint | gre ip | gre ipv6 | ipip[decapsulate-any] | ipsec ipv4 | iptalk | ipv6 | ipsec ipv6 | mpls | nos | rbscp}

Example:

Router(config-if)# tunnel mode gre ip

GRE IPv6 トンネルを指定します。

Step 19

tunnel source {ip-address | ipv6-address | interface-type interface-number }

Example:

Router(config-if)# tunnel source 10.0.0.1

トンネル インターフェイスの送信元アドレスまたは送信元インターフェイス タイプと番号を指定します。

Step 20

tunnel destination {hostname | ip-address | ipv6-address}

Example:

Router(config-if)# tunnel destination 172.16.0.12

トンネル インターフェイスの宛先アドレスまたはホスト名を指定します。

Step 21

tunnel protection ipsec profile name [shared]

Example:

Router(config-if)# tunnel protection ipsec profile ipsecprof

トンネル インターフェイスを IPsec プロファイルに関連付けます。

  • name 引数には、IPsec プロファイルの名前を指定します。この値は、crypto IPsec profile name コマンドで指定した name と一致する必要があります。

  • shared キーワードを指定すると、同じトンネル送信元 IP を設定した複数のトンネル インターフェイス間で IPsec セッションを共有できるようになります。

Note


IPsec プロファイルのトンネル保護を変更する場合は、まずトンネルインターフェイスをシャットダウンする必要があります。変更が成功したら、トンネル設定を手動でオンにする必要があります。

Step 22

end

Example:

Router(config-if)# end

インターフェイス コンフィギュレーション モードを終了し、特権 EXEC モードに戻ります。

IPv4 GRE トンネル保護経由の IPv6 の設定例

クリプト マップを使用した IPv4 GRE 暗号化経由の IPv6 の設定例

Router> enable
Router# configure terminal
Router(config)# ipv6 multicast-routing
Router(config)# ipv6 unicast-routing
Router(config)# interface tunnel 10
Router(config-if)# ipv6 address my-prefix 0:0:0:7272::72/64
Router(config-if)# tunnel mode gre ip
Router(config-if)# tunnel source ethernet0
Router(config-if)# tunnel destination 172.16.0.12
Router(config-if)# exit
Router(config)# crypto isakmp policy 15
Router(config-isakmp-policy)# authentication pre-share
Router(config-isakmp-policy)# hash md5
Router(config-isakmp-policy)# group 2
Router(config-isakmp-policy)# encryption 3des
Router(config-isakmp-policy)# exit
Router(config)# crypto isakmp key cisco-10 address 172.16.0.12 255.240.0.0
Router(config)# crypto ipsec transform-set myset0 ah-sha-hmac esp-3des
Router(config)# access-list 110 permit gre host 192.168.0.16 host 172.16.0.12
Router(config)# crypto map mymap 10 ipsec-isakmp
Router(config-crypto-map)# set peer 10.0.0.1
Router(config-crypto-map)# set transform-set myset0
Router(config-crypto-map)# match address 102
Router(config-crypto-map)# exit
Router(config)# interface ethernet1
Router(config-if)# crypto map mymap
Router(config-if)# end

トンネル保護を使用した IPv4 GRE 暗号化経由の IPv6 の設定例

次に、IPv4 GRE トンネル上で IPsec トンネル保護を設定する例を示します。IPv6 マルチキャストルーティングは、ipv6 multicast-routing コマンドを使用して有効にします。
Router> enable
Router# configure terminal
Router(config)# ipv6 multicast-routing
Router(config)# ipv6 unicast-routing
Router(config)# crypto isakmp policy 15
Router(config-isakmp-policy)# authentication pre-share
Router(config-isakmp-policy)# hash md5
Router(config-isakmp-policy)# group 2
Router(config-isakmp-policy)# encryption 3des
Router(config-isakmp-policy)# exit
Router(config)# crypto isakmp key cisco-10 address 172.16.0.12 255.240.0.0
Router(config)# crypto ipsec transform-set myset0 ah-sha-hmac esp-3des
Router(config)# crypto ipsec profile ipsecprof
Router(ipsec-profile)# set transform-set myset0
Router(ipsec-profile)# exit
Router(config)# interface tunnel 1
Router(config-if)# ipv6 address 3ffe:b00:c18:1::3/127
Router(config-if)# tunnel mode gre ip
Router(config-if)# tunnel source 10.0.0.1
Router(config-if)# tunnel destination 172.16.0.12
Router(config-if)# tunnel protection ipsec profile ipsecprof
Router(config-if)# end

その他の参考資料

関連資料

関連項目

マニュアル タイトル

IPv6 マルチキャスト ルーティング

『IPv6 Implementation Guide』

Cisco IOS コマンド

『Cisco IOS Master Commands List, All Releases』

セキュリティ コマンド:コマンド構文の詳細、コマンド モード、コマンド履歴、デフォルト設定、使用上の注意事項、および例

シスコのテクニカル サポート

説明

リンク

右の URL にアクセスして、シスコのテクニカル サポートを最大限に活用してください。これらのリソースは、ソフトウェアをインストールして設定したり、シスコの製品やテクノロジーに関する技術的問題を解決したりするために使用してください。この Web サイト上のツールにアクセスする際は、Cisco.com のログイン ID およびパスワードが必要です。

http://www.cisco.com/cisco/web/support/index.html

IPv4 GRE トンネル保護経由の IPv6 に関する機能情報

次の表に、このモジュールで説明した機能に関するリリース情報を示します。この表は、ソフトウェア リリース トレインで各機能のサポートが導入されたときのソフトウェアリリースだけを示しています。その機能は、特に断りがない限り、それ以降の一連のソフトウェアリリースでもサポートされます。

プラットフォームのサポートおよびシスコ ソフトウェアイメージのサポートに関する情報を検索するには、Cisco Feature Navigator を使用します。Cisco Feature Navigator にアクセスするには、www.cisco.com/go/cfn に移動します。Cisco.com のアカウントは必要ありません。